Google Cloud’s 9-week conference is underway. Already lots of fun announcements and useful sessions in this free event. I wrote a post about what I was looking forward to watching during weeks one and two, and I’m now thinking about the upcoming weeks three and four. The theme for week three is “infrastructure” and week four’s topic is “security.”
For week three (starting July 28), I’m looking forward to watching (besides the keynote):
Like every other tech vendor, Google’s grand conference plans for 2020 changed. Instead of an in-person mega-event for cloud aficionados, we’re doing a (free!) nine week digital event called Google Cloud Next OnAir. Each week, starting July 14th, you get on-demand breakout sessions about a given theme. And there are ongoing demo sessions, learning opportunities, and 1:1s with Google Experts. Every couple weeks, I’ll highlight a few talks I’m looking forward to.
Before sharing my week one and week two picks, a few words on why you should care about this event. More than any other company, Google defines what’s “next” for customers and competitors alike. Don’t believe me? I researched a few of the tech inflection points of the last dozen years and Google’s fingerprints are all over them! If I’m wrong with any of this, don’t hesitate to correct me in the comments.
In 2008, Google launched Google App Engine (GAE), the first mainstream platform-as-a-service offering that introduced a compute model that obfuscated infrastructure. GAE (and Heroku) sparked an explosion of other products like Azure Web Apps, Cloud Foundry, AWS Elastic Beanstalk and others. I’m also fairly certain that the ideas behind PaaS led to the serverless+FaaS movement as well.
Google created Go and released the new language in 2009. It remains popular with developers, but has really taken off with platform builders. A wide range of open-source projects use Go, including Docker, Kubernetes, Terraform, Prometheus, Hugo, InfluxDB, Jaeger, CockroachDB, NATS, Cloud Foundry, etcd, and many more. It seems to be the language of distributed systems and the cloud.
Today, we think of data processing and AI/ML when we think of cloud computing, but that wasn’t always the case. Google had the first cloud-based data warehouse (BigQuery, in 2010) and AI/ML as a service by a cloud provider (Translate API, in 2011). And don’t forget Spanner, the distributed SQL database unveiled by Google in 2012 that inspired a host of other database vendors. We take for granted that every major public cloud now offers data warehouses, AI/ML services, and planet-scale databases. Seems like Google set the pace.
Keep going? Ok. The components emerging as the heart of the modern platform? Looks like container orchestration, service mesh, and serverless runtime. The CNCF 2019 survey shows that Kubernetes, Istio, and Knative play leading roles. All of those projects started at Google, and the industry picked up on each one. While, we were first to offer a managed Kubernetes service (GKE in 2015), now you find everyone offering one. Istio and Knative are also popping up all over. And our successful effort to embed all those technologies into a software-driven managed platform (Anthos, in 2019) may turn out to be the preferred model vs. a hyperconverged stack of software plus infrastructure.
Obviously, additional vendors and contributors have moved our industry forward over the past dozen years: Docker with approachable containerization, Amazon with AWS Lambda, social coding with GitHub, infrastructure-as-code from companies like HashiCorp, microservice and chaos engineering ideas from the likes of Netflix, and plenty of others. But I contend that no single vendor has contributed more value for the entire industry than Google. That’s why Next OnAir matters, as we’ll keep sharing tech that makes everything better.
Ok, enough blather. The theme of week one is “industry insights.” There’s also the analyst summit and partner summit, both with great content for those audiences. The general sessions I definitely want to watch:
Opening Keynote. Let’s see Google Cloud CEO Thomas Kurian do his thing.
Planning for Retail’s New Priorities. Every industry has felt impact from the pandemic, especially retail. I’m interested in learning more about what we’re doing there to help.
Next OnAir has a tremendous list of speakers, including customers and Google engineers sharing their insight. It’s free to sign up, you can watch at your leisure, and maybe, get a glimpse of what’s next.
Earlier this year, I took a look at how Microsoft Azure supports Java/Spring developers. With my change in circumstances, I figured it was a good time to dig deep into Google Cloud’s offerings for Java developers. What I found was a very impressive array of tools, services, and integrations. More than I thought I’d find, honestly. Let’s take a tour.
Local developer environment
What stuff goes on your machine to make it easier to build Java apps that end up on Google Cloud?
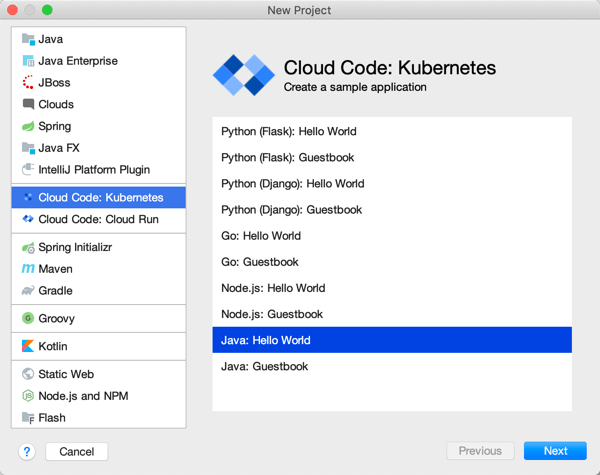
Cloud Code extension for IntelliJ
Cloud Code is a good place to start. Among other things, it delivers extensions to IntelliJ and Visual Studio Code. For IntelliJ IDEA users, you get starter templates for new projects, snippets for authoring relevant YAML files, tool windows for various Google Cloud services, app deployment commands, and more. Given that 72% of Java developers use IntelliJ IDEA, this extension helps many folks.
Cloud Code in VS Code
The Visual Studio Code extension is pretty great too. It’s got project starters and other command palette integrations, Activity Bar entries to manage Google Cloud services, deployment tools, and more. 4% of Java devs use Visual Studio Code, so, we’re looking out for you too. If you use Eclipse, take a look at the Cloud Tools for Eclipse.
The other major thing you want locally is the Cloud SDK. Within this little gem you get client libraries for your favorite language, CLIs, and emulators. This means that as Java developers, we get a Java client library, command line tools for all-up Google Cloud (gcloud), Big Query (bq) and Storage (gsutil), and then local emulators for cloud services like Pub/Sub, Spanner, Firestore, and more. Powerful stuff.
App development
Our machine is set up. Now we need to do real work. As you’d expect, you can use all, some, or none of these things to build your Java apps. It’s an open model.
Java devs have lots of APIs to work with in the Google Cloud Java client libraries, whether talking to databases or consuming world-class AI/ML services. If you’re using Spring Boot—and the JetBrains survey reveals that the majority of you are—then you’ll be happy to discover Spring Cloud GCP. This set of packages makes it super straightforward to interact with terrific managed services in Google Cloud. Use Spring Data with cloud databases (including Cloud Spanner and Cloud Firestore), Spring Cloud Stream with Cloud Pub/Sub, Spring Caching with Cloud Memorystore, Spring Security with Cloud IAP, Micrometer with Cloud Monitoring, and Spring Cloud Sleuth with Cloud Trace. And you get the auto-configuration, dependency injection, and extensibility points that make Spring Boot fun to use. Google offers Spring Boot starters, samples, and more to get you going quickly. And it works great with Kotlin apps too.
Emulators available via gcloud
As you’re building Java apps, you might directly use the many managed services in Google Cloud Platform, or, work with the emulators mentioned above. It might make sense to work with local emulators for things like Cloud Pub/Sub or Cloud Spanner. Conversely, you may decide to spin up “real” instance of cloud services to build apps using Managed Service for Microsoft Active Directory, Secret Manager, or Cloud Data Fusion. I’m glad Java developers have so many options.
Where are you going to store your Java source code? One choice is Cloud Source Repositories. This service offers highly available, private Git repos—use it directly or mirror source code code from GitHub or Bitbucket—with a nice source browser and first-party integration with many Google Cloud compute runtimes.
Building and packaging code
After you’ve written some Java code, you probably want to build the project, package it up, and prepare it for deployment.
Artifact Registry
Store your Java packages in Artifact Registry. Create private, secure artifact storage that supports Maven and Gradle, as well as Docker and npm. It’s the eventual replacement of Container Registry, which itself is a nice Docker registry (and more).
Looking to build container images for your Java app? You can write your own Dockerfiles. Or, skip docker build|push by using our open source Jib as a Maven or Gradle plugin that builds Docker images. Jib separates the Java app into multiple layers, making rebuilds fast. A new project is Google Cloud Buildpacks which uses the CNCF spec to package and containerize Java 8|11 apps.
Odds are, your build and containerization stages don’t happen in isolation; they happen as part of a build pipeline. Cloud Build is the highly-rated managed CI/CD service that uses declarative pipeline definitions. You can run builds locally with the open source local builder, or in the cloud service. Pull source from Cloud Source Repositories, GitHub and other spots. Use Buildpacks or Jib in the pipeline. Publish to artifact registries and push code to compute environments.
Application runtimes
As you’d expect, Google Cloud Platform offers a variety of compute environments to run your Java apps. Choose among:
Bare Metal. Choose a physical machine to host your Java app. Choose from machine sizes with as few as 16 CPU cores, and as many as 112.
Google Kubernetes Engine. The first, and still the best, managed Kubernetes service. Get fully managed clusters that are auto scaled, auto patched, and auto repaired. Run stateless or stateful Java apps.
App Engine. One of the original PaaS offerings, App Engine lets you just deploy your Java code without worrying about any infrastructure management.
Cloud Functions. Run Java code in this function-as-a-service environment.
Cloud Run. Based on the open source Knative project, Cloud Run is a managed platform for scale-to-zero containers. You can run any web app that fits into a container, including Java apps.
Google Cloud VMware Engine. If you’re hosting apps in vSphere today and want to lift-and-shift your app over, you can use a fully managed VMware environment in GCP.
Running in production
Regardless of the compute host you choose, you want management tools that make your Java apps better, and help you solve problems quickly.
You might stick an Apigee API gateway in front of your Java app to secure or monetize it. If you’re running Java apps in multiple clouds, you might choose Google Cloud Anthos for consistency purposes. Java apps running on GKE in Anthos automatically get observability, transport security, traffic management, and SLO definition with Anthos Service Mesh.
You probably have lots of existing Java apps. Some are fairly new, others were written a decade ago. Google Cloud offers tooling to migrate many types of existing VM-based apps to container or cloud VM environments. There’s good reasons to do it, and Java apps see real benefits.
Migrate for Anthos takes an existing Linux or Windows VM and creates artifacts (Dockerfiles, Kubernetes YAML, etc) to run that workload in GKE. Migrate for Compute Engine moves your Java-hosting VMs into Google Compute Engine.
All-in-all, there’s a lot to like here if you’re a Java developer. You can mix-and-match these Google Cloud services and tools to build, deploy, run, and manage Java apps.
I rarely enjoy the last mile of work. Sure, there’s pleasure in seeing something reach its conclusion, but when I’m close, I just want to be done! For instance, when I create a Pluralsight course—my new one, Cloud Foundry: The Big Picture just came out—I enjoy the building part, and dread the record+edit portion. Same with writing software. I like coding an app to solve a problem. Then, I want a fast deployment so that I can see how the app works, and wrap up. Ideally, each app I write doesn’t require a unique set of machinery or know-how. Thus, I wanted to see if I could create a *single* Google Cloud Build deployment pipeline that shipped any custom app to the serverless Google Cloud Run environment.
Cloud Build is Google Cloud’s continuous integration and delivery service. It reminds me of Concourse in that it’s declarative, container-based, and lightweight. It’s straightforward to build containers or non-container artifacts, and deploy to VMs, Kubernetes, and more. The fact that it’s a hosted service with a great free tier is a bonus. To run my app, I don’t want to deal with configuring any infrastructure, so I chose Google Cloud Run as my runtime. It just takes a container image and offers a fully-managed, scale-to-zero host. Before getting fancy with buildpacks, I wanted to learn how to use Build and Run to package up and deploy a Spring Boot application.
First, I generated a new Spring Boot app from start.spring.io. It’s going to be a basic REST API, so all I needed was the Web dependency.
I’m not splitting the atom with this Java code. It simply returns a greeting when you hit the root endpoint.
@RestController
@SpringBootApplication
public class HelloAppApplication {

	public static void main(String[] args) {
		SpringApplication.run(HelloAppApplication.class, args);
	}

	@GetMapping("/")
	public String SayHello() {
		return "Hi, Google Cloud Run!";
	}
}
Now, I wanted to create a pipeline that packaged up the Boot app into a JAR file, built a Docker image, and deployed that image to Cloud Run. Before crafting the pipeline file, I needed a Dockerfile. This file offers instructions on how to assemble the image. Here’s my basic one:
FROM openjdk:11-jdk
ARG JAR_FILE=target/hello-app-0.0.1-SNAPSHOT.jar
COPY ${JAR_FILE} app.jar
ENTRYPOINT ["java", "-Djava.security.edg=file:/dev/./urandom","-jar","/app.jar"]
On to the pipeline. A build configuration isn’t hard to understand. It consists of a series of sequential or parallel steps that produce an outcome. Each step runs in its own container image (specified in the name attribute), and if needed, there’s a simple way to transfer state between steps. My cloudbuild.yaml file for this Spring Boot app looked like this:
steps:
# build the Java app and package it into a jar
- name: maven:3-jdk-11
  entrypoint: mvn
  args: ["package", "-Dmaven.test.skip=true"]
# use the Dockerfile to create a container image
- name: gcr.io/cloud-builders/docker
  args: ["build", "-t", "gcr.io/$PROJECT_ID/hello-app", "--build-arg=JAR_FILE=target/hello-app-0.0.1-SNAPSHOT.jar", "."]
# push the container image to the Registry
- name: gcr.io/cloud-builders/docker
  args: ["push", "gcr.io/$PROJECT_ID/hello-app"]
#deploy to Google Cloud Run
- name: 'gcr.io/cloud-builders/gcloud'
  args: ['run', 'deploy', 'seroter-hello-app', '--image', 'gcr.io/$PROJECT_ID/hello-app', '--region', 'us-west1', '--platform', 'managed']
images: ["gcr.io/$PROJECT_ID/hello-app"]
You’ll notice four steps. The first uses the Maven image to package my application. The result of that is a JAR file. The second step uses a Docker image that’s capable of generating an image using the Dockerfile I created earlier. The third step pushes that image to the Container Registry. The final step deploys the container image to Google Cloud Run with an app name of seroter-hello-app. The final “images” property puts the image name in my Build results.
As you can imagine, I can configure triggers for this pipeline (based on code changes, etc), or execute it manually. I’ll do the latter, as I haven’t stored this code in a repository anywhere yet. Using the terrific gcloud CLI tool, I issued a single command to kick off the build.
gcloud builds submit --config cloudbuild.yaml .
After a minute or so, I have a container image in the Container Registry, an available endpoint in Cloud Run, and a full audit log in Cloud Build.
Container Registry:
Cloud Run (with indicator that app was deployed via Cloud Build:
Cloud Build:
I didn’t expose the app publicly, so to call it, I needed to authenticate myself. I used the “gcloud auth print-identity-token” command to get a Bearer token, and plugged that into the Authorization header in Postman. As you’d expect, it worked. And when traffic dies down, the app scales to zero and costs me nothing.
So this was great. I did all this without having to install build infrastructure, or set up an application host. But I wanted to go a step further. Could I eliminate the Dockerization portion? I have zero trust in myself to build a good image. This is where buildpacks come in. They generate well-crafted, secure container images from source code. Google created a handful of these using the CNCF spec, and we can use them here.
My new cloudbuild.yaml file looks like this. See that I’ve removed the steps to package the Java app, and build and push the Docker image, and replaced them with a single “pack” step.
steps:
# use Buildpacks to create a container image
- name: 'gcr.io/k8s-skaffold/pack'
  entrypoint: 'pack'
  args: ['build', '--builder=gcr.io/buildpacks/builder', '--publish', 'gcr.io/$PROJECT_ID/hello-app-bp:$COMMIT_SHA']
#deploy to Google Cloud Run
- name: 'gcr.io/cloud-builders/gcloud'
  args: ['run', 'deploy', 'seroter-hello-app-bp', '--image', 'gcr.io/$PROJECT_ID/hello-app-bp:latest', '--region', 'us-west1', '--platform', 'managed']
With the same gcloud command (gcloud builds submit --config cloudbuild.yaml .) I kicked off a new build. This time, the streaming logs showed me that the buildpack built the JAR file, pulled in a known-good base container image, and containerized the app. The result: a new image in the Registry (21% smaller in size, by the way), and a fresh service in Cloud Run.
I started out this blog post saying that I wanted a single cloudbuild.yaml file for *any* app. With Buildpacks, that seemed possible. The final step? Tokenizing the build configuration. Cloud Build supports “substitutions” which lets you offer run-time values for variables in the configuration. I changed my build configuration above to strip out the hard-coded names for the image, region, and app name.
steps:
# use Buildpacks to create a container image
- name: 'gcr.io/k8s-skaffold/pack'
  entrypoint: 'pack'
  args: ['build', '--builder=gcr.io/buildpacks/builder', '--publish', 'gcr.io/$PROJECT_ID/$_IMAGE_NAME:$COMMIT_SHA']
#deploy to Google Cloud Run
- name: 'gcr.io/cloud-builders/gcloud'
  args: ['run', 'deploy', '$_RUN_APPNAME', '--image', 'gcr.io/$PROJECT_ID/$_IMAGE_NAME:latest', '--region', '$_REGION', '--platform', 'managed']
Before trying this with a new app, I tried this once more with my Spring Boot app. For good measure, I changed the source code so that I could confirm that I was getting a fresh build. My gcloud command now passed in values for the variables:
After a minute, the deployment succeeded, and when I called the endpoint, I saw the updated API result.
For the grand finale, I want to take this exact file, and put it alongside a newly built ASP.NET Core app. I did a simple “dotnet new webapi” and dropped the cloudbuild.yaml file into the project folder.
After tweaking the Program.cs file to read the application port from the platform-provided environment variable, I ran the following command:
A few moments later, I had a container image built, and my ASP.NET Core app listening to requests in Cloud Run.
Calling that endpoint (with authentication) gave me the API results I expected.
Super cool. So to recap, that six line build configuration above works for your Java, .NET Core, Python, Node, and Go apps. It’ll create a secure container image that works anywhere. And if you use Cloud Build and Cloud Run, you can do all of this with no mess. I might actually start enjoying the last mile of app development with this setup.
This week I’m once again speaking at INTEGRATE, a terrific Microsoft-oriented conference focused on app integration. This may be the last year I’m invited, so before I did my talk, I wanted to ensure I was up-to-speed on Google Cloud’s integration-related services. One that I was aware of, but not super familiar with, was Google Cloud Pub/Sub. My first impression was that this was a standard messaging service like Amazon SQS or Azure Service Bus. Indeed, it is a messaging service, but it does more.
Here are three unique aspects to Pub/Sub that might give you a better way to solve integration problems.
#1 – Global control plane with multi-region topics
When creating a Pub/Sub topic—an object that accepts a feed of messages—you’re only asked one major question: what’s the ID?
In the other major cloud messaging services, you select a geographic region along with the topic name. While you can, of course, interact with those messaging instances from any other region via the API, you’ll pay the latency cost. Not so with Pub/Sub. From the documentation (bolding mine):
Cloud Pub/Sub offers global data access in that publisher and subscriber clients are not aware of the location of the servers to which they connect or how those services route the data.
…
Pub/Sub’s load balancing mechanisms direct publisher traffic to the nearest GCP data center where data storage is allowed, as defined in the ResourceLocation Restriction section of the IAM & admin console. This means that publishers in multiple regions may publish messages to a single topic with low latency. Any individual message is stored in a single region. However, a topic may have messages stored in many regions. When a subscriber client requests messages published to this topic, it connects to the nearest server which aggregates data from all messages published to the topic for delivery to the client.
That’s a fascinating architecture, and it means you get terrific publisher performance from anywhere.
#2 – Supports both pull and push subscriptions for a topic
Messaging queues typically store data until it’s retrieved by the subscriber. That’s ideal for transferring messages, or work, between systems. Let’s see an example with Pub/Sub.
I first used the Google Cloud Console to create a pull-based subscription for the topic. You can see a variety of other settings (with sensible defaults) around acknowledgement deadlines, message retention, and more.
I then created a pair of .NET Core applications. One pushes messages to the topic, another pulls messages from the corresponding subscription. Google created NuGet packages for each of the major Cloud services—which is better than one mega-package that talks to all services—that you can see listed here on GitHub. Here’s the Pub/Sub package that added to both projects.
using Google.Cloud.PubSub.V1;
using Google.Protobuf;

...

 public string PublishMessages()
 {
   PublisherServiceApiClient publisher = PublisherServiceApiClient.Create();

   //create messages
   PubsubMessage message1 = new PubsubMessage {Data = ByteString.CopyFromUtf8("Julie")};
   PubsubMessage message2 = new PubsubMessage {Data = ByteString.CopyFromUtf8("Hazel")};
   PubsubMessage message3 = new PubsubMessage {Data = ByteString.CopyFromUtf8("Frank")};

   //load into a collection
   IEnumerable<PubsubMessage> messages = new PubsubMessage[] {
      message1,
      message2,
      message3
    };

   //publish messages
   PublishResponse response = publisher.Publish("projects/seroter-anthos/topics/seroter-topic", messages);

   return "success";
 }
After I ran the publisher app, I switched to the web-based Console and saw that the subscription had three un-acknowledged messages. So, it worked.
The subscribing app? Equally straightforward. Here, I asked for up to ten messages associated with the subscription, and once I processed then, I sent “acknowledgements” back to Pub/Sub. This removes the messages from the queue so that I don’t see them again.
using Google.Cloud.PubSub.V1;
using Google.Protobuf;

...

  public IEnumerable<String> ReadMessages()
  {
     List<string> names = new List<string>();

     SubscriberServiceApiClient subscriber = SubscriberServiceApiClient.Create();
     SubscriptionName subscriptionName = new SubscriptionName("seroter-anthos", "sub1");

     PullResponse response = subscriber.Pull(subscriptionName, true, 10);
     foreach(ReceivedMessage msg in response.ReceivedMessages) {
         names.Add(msg.Message.Data.ToStringUtf8());
     }

     if(response.ReceivedMessages.Count > 0) {
         //ack the message so we don't receive it again
         subscriber.Acknowledge(subscriptionName, response.ReceivedMessages.Select(m => m.AckId));
     }

     return names;
 }
When I start up the subscriber app, it reads the three available messages in the queue. If I pull from the queue again, I get no results (as expected).
As an aside, the Google Cloud Console is really outstanding for interacting with managed services. I built .NET Core apps to test out Pub/Sub, but I could have done everything within the Console itself. I can publish messages:
And then retrieve those message, with an option to acknowledge them as well:
Great stuff.
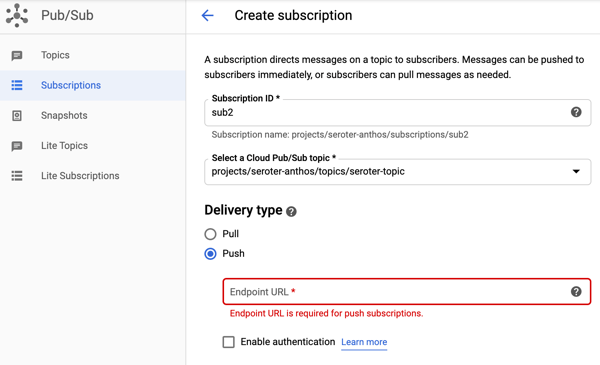
But back to the point of this section, I can use Pub/Sub to create pull subscriptions and push subscriptions. We’ve been conditioned by cloud vendors to expect distinct services for each variation in functionality. One example is with messaging services, where you see unique services for queuing, event streaming, notifications, and more. Here with Pub/Sub, I’m getting a notification service and queuing service together. A “push” subscription doesn’t wait for the subscriber to request work; it pushes the message to the designated (optionally, authenticated) endpoint. You might provide the URL of an application webhook, an API, a function, or whatever should respond immediately to your message.
I like this capability, and it simplifies your architecture.
#3 – Supports message replay within an existing subscription and for new subscriptions
One of the things I’ve found most attractive about event processing engines is the durability and replay-ability functionality. Unlike a traditional message queue, an event processor is based on a durable log where you can rewind and pull data from any point. That’s cool. Your event streaming engine isn’t a database or system of record, but a useful snapshot in time of an event stream. What if you could get the queuing semantics you want, with that durability you like from event streaming? Pub/Sub does that.
This again harkens back to point #2, where Pub/Sub absorbs functionality from other specialized services. Let me show you what I found.
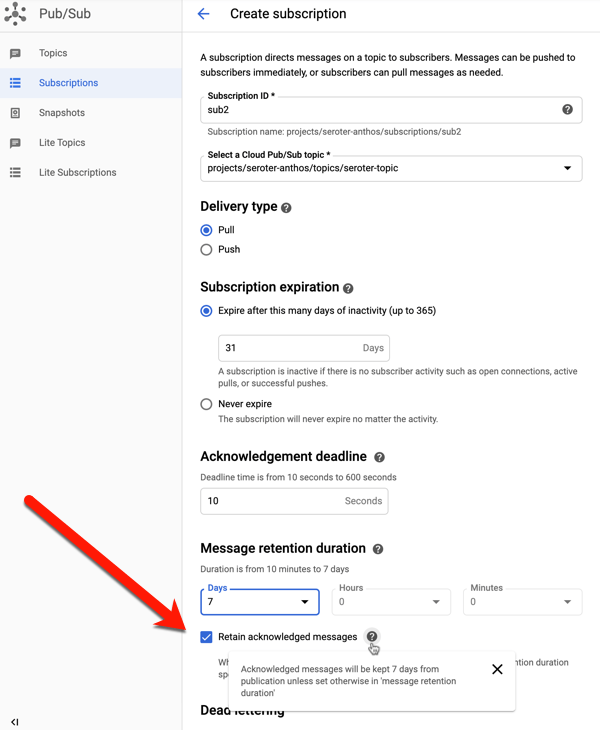
When creating a subscription (or editing an existing one), you have the option to retain acknowledged messages. This keeps these messages around for whatever the duration is for the subscription (up to seven days).
To try this out, I sent in four messages to the topic, with bodies of “test1”, “test2”, “test3”, and “test4.” I then viewed, and acknowledged, all of them.
If I do another “pull” there are no more messages. This is standard queuing behavior. An empty queue is a happy queue. But what if something went wrong downstream? You’d typically have to go back upstream and resubmit the message. Because I saved acknowledged messages, I can use the “seek” functionality to replay!
Hey now. That’s pretty wicked. When I pull from the subscription again, any message after the date/time specified shows up again.
And I get unlimited bites at this apple. I can choose to replay again, and again, and again. You can imagine all sorts of scenarios where this sort of protection can come in handy.
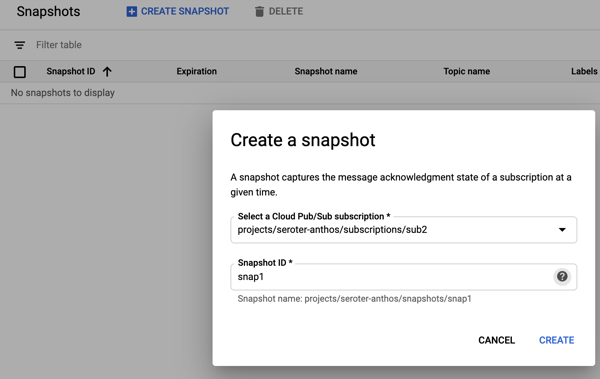
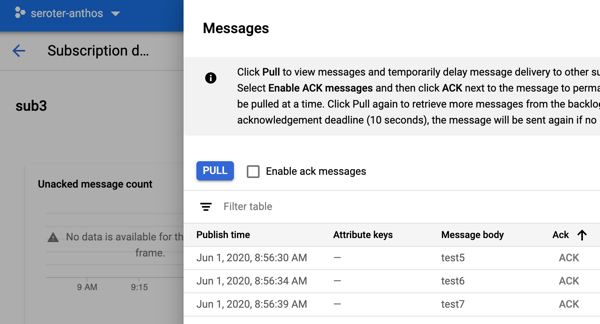
Ok, but what about new subscribers? What about a system that comes online and wants a batch of messages that went through the system yesterday? This is where snapshots are powerful. They store the state of any unacknowledged messages in the subscription, and any new messages published after the snapshot was taken. To demonstrate this, I sent in three more messages, with bodies of “test 5”, “test6” and “test7.” Then I took a snapshot on the subscription.
I read all the new messages from the subscription, and acknowledged them. Within this Pub/Sub subscription, I chose to “replay”, load the snapshot, and saw these messages again. That could be useful if I took a snapshot pre-deploy of code changes, something went wrong, and I wanted to process everything from that snapshot. But what if I want access to this past data from another subscription?
I created a new subscription called “sub3.” This might represent a new system that just came online, or even a tap that wants to analyze the last four days of data. Initially, this subscription has no associated messages. That makes sense; it only sees messages that arrived after the subscription was created. From this additional subscription, I chose to “replay” and selected the existing snapshot.
After that, I went to my subscription to view messages, and I saw the three messages from the other subscription’s snapshot.
Wow, that’s powerful. New subscribers don’t always have to start from scratch thanks to this feature.
It might be worth it for you to take an extended look at Google Cloud Pub/Sub. It’s got many of the features you expect from a scaled cloud service, with a few extra features that may delight you.
Most apps use databases. This is not a shocking piece of information. If your app is destined to run in a public cloud, how do you work with cloud-only databases when doing local development? It seems you have two choices:
Provision and use an instance of the cloud database. If you’re going to depend on a cloud database, you can certainly use it directly during local development. Sure, there might be a little extra latency, and you’re paying per hour for that instance. But this is the most direct way to do it.
Install and use a local version of that database. Maybe your app uses a cloud DB based on installable software like Microsoft SQL Server, MongoDB, or PostgreSQL. In that case, you can run a local copy (in a container, or natively), code against it, and swap connection strings as you deploy to production. There’s some risk, as it’s not the EXACT same environment. But doable.
A variation of choice #2 is when you select a cloud database that doesn’t have an installable equivalent. Think of the cloud-native, managed databases like Amazon DynamoDB, Google Cloud Spanner, and Azure Cosmos DB. What do you do then? Must you choose option #1 and work directly in the cloud? Fortunately, each of those cloud databases now has a local emulator. This isn’t a full-blown instance of that database, but a solid mock that’s suitable for development. In this post, I’ll take a quick look at the above mentioned emulators, and what you should know about them.
#1 Amazon DynamoDB
Amazon’s DynamoDB is a high-performing NoSQL (key-value and document) database. It’s a full-featured managed service that transparently scales to meet demand, supports ACID transactions, and offers multiple replication options.
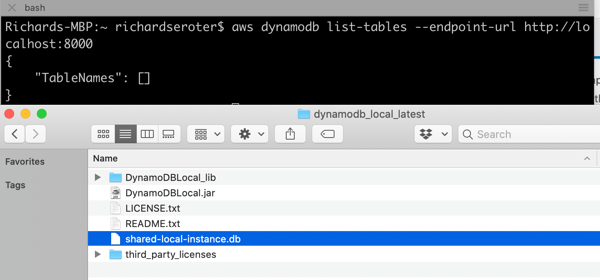
DynamoDB Local is an emulator you can run anywhere. AWS offers a few ways to run it, including a direct download—it requires Java to run—or a Docker image. I chose the downloadable option and unpacked the zip file on my machine.
Before you can use it, you need credentials set up locally. Note that ANY credentials will do (they don’t have to be valid) for it to work. If you have the AWS CLI, you can simply do an aws configure command to generate a credentials file based on your AWS account.
The JAR file hosting the emulator has a few flags you can choose at startup:
You can see that you have a choice of running this entirely in-memory, or use the default behavior which saves your database to disk. The in-memory option is nice for quick testing, or running smoke tests in an automated pipeline. I started up DynamoDB Local with the following command, which gave me a shared database file that every local app will connect to:
This gave me a reachable instance on port 8000. Upon first starting it up, there’s no database file on disk. As soon as I issued a database query (in another console, as the emulator blocks after it starts up), I saw the database file.
Let’s try using it from code. I created a new Node Express app, and added an npm reference to the AWS SDK for JavaScript. In this app, I want to create a table in DynamoDB, add a record, and then query that record. Here’s the complete code:
const express = require('express')
const app = express()
const port = 3000

var AWS = require("aws-sdk");

//region doesn't matter for the emulator
AWS.config.update({
  region: "us-west-2",
  endpoint: "http://localhost:8000"
});

//dynamodb variables
var dynamodb = new AWS.DynamoDB();
var docClient = new AWS.DynamoDB.DocumentClient();

//table configuration
var params = {
    TableName : "Animals",
    KeySchema: [
        { AttributeName: "animal_id", KeyType: "HASH"},  //Partition key
        { AttributeName: "species", KeyType: "RANGE" }  //Sort key
    ],
    AttributeDefinitions: [
        { AttributeName: "animal_id", AttributeType: "S" },
        { AttributeName: "species", AttributeType: "S" }
    ],
    ProvisionedThroughput: {
        ReadCapacityUnits: 10,
        WriteCapacityUnits: 10
    }
};


// default endpoint
app.get('/', function(req, res, next) {
    res.send('hello world!');
});

// create a table in DynamoDB
app.get('/createtable', function(req, res) {
    dynamodb.createTable(params, function(err, data) {
        if (err) {
            console.error("Unable to create table. Error JSON:", JSON.stringify(err, null, 2));
            res.send('failed to create table')
        } else {
            console.log("Created table. Table description JSON:", JSON.stringify(data, null, 2));
            res.send('success creating table')
        }
    });
});

//create a variable holding a new data item
var animal = {
    TableName: "Animals",
    Item: {
        animal_id: "B100",
        species: "E. lutris",
        name: "sea otter",
        legs: 4
    }
}

// add a record to DynamoDB table
app.get('/addrecord', function(req, res) {
    docClient.put(animal, function(err, data) {
        if (err) {
            console.error("Unable to add animal. Error JSON:", JSON.stringify(err, null, 2));
            res.send('failed to add animal')
        } else {
            console.log("Added animal. Item description JSON:", JSON.stringify(data, null, 2));
            res.send('success added animal')
        }
    });
});

// define what I'm looking for when querying the table
var readParams = {
    TableName: "Animals",
    Key: {
        "animal_id": "B100",
        "species": "E. lutris"
    }
};

// retrieve a record from DynamoDB table
app.get('/getrecord', function(req, res) {
    docClient.get(readParams, function(err, data) {
        if (err) {
            console.error("Unable to read animal. Error JSON:", JSON.stringify(err, null, 2));
            res.send('failed to read animal')
        } else {
            console.log("Read animal. Item description JSON:", JSON.stringify(data, null, 2));
            res.send(JSON.stringify(data, null, 2))
        }
    });
});

//start up app
app.listen(port);
It’s not great, but it works. Yes, I’m using a GET To create a record. This is a free site, so you’ll take this code AND LIKE IT.
After starting up the app, I can create a table, create a record, and find it.
Because data is persisted, I can stop the emulator, start it up later, and everything is still there. That’s handy.
As you can imagine, this emulator isn’t an EXACT clone of a global managed service. It doesn’t do anything with replication or regions. The “provisioned throughput” settings which dictate read/write performance are ignored. Table scans are done sequentially and parallel scans aren’t supported, so that’s another performance-related thing you can’t test locally. Also, read operations are all eventually consistent, but things will be so fast, it’ll seem strongly consistent. There are a few other considerations, but basically, use this to build apps, not to do performance tests or game-day chaos exercises.
#2 Google Cloud Spanner
Cloud Spanner is a relational database that Google says is “built for the cloud.” You get the relational database traits including schema-on-write, strong consistency, and ANSI SQL syntax, with some NoSQL database traits like horizontal scale and great resilience.
Just recently, Google Cloud released a beta emulator. The Cloud Spanner Emulator stores data in memory and works with their Java, Go, and C++ libraries. To run the emulator, you need Docker on your machine. From there, you can either use the gcloud CLI to run it, a pre-built Docker image, Linux binaries, and more. I’m going to use the gcloud CLI that comes with the Google Cloud SDK.
I ran a quick update of my existing SDK, and it was cool to see it pull in the new functionality. Kicking off emulation from the CLI is a developer-friendly idea.
Starting up the emulator is simple: gcloud beta emulators spanner start. The first time it runs, the CLI pulls down the Docker image, and then starts it up. Notice that it opens up all the necessary ports.
I want to make sure my app doesn’t accidentally spin up something in the public cloud, so I create a separate gcloud configuration that points at my emulator and uses the project ID of “seroter-local.”
gcloud config configurations create emulator
gcloud config set auth/disable_credentials true
gcloud config set project seroter-local
gcloud config set api_endpoint_overrides/spanner http://localhost:9020/
Next, I create a database instance. Using the CLI, I issue a command creating an instance named “spring-demo” and using the local emulator configuration.
Instead of building an app from scratch, I’m using one of the Spring examples created by the Google Cloud team. Their go-to demo for Spanner uses their library that already recognizes the emulator, if you provide a particular environment variable. This demo uses Spring Data to work with Spanner, and serves up web endpoints for interacting with the database.
In the application package, the only file I had to change was the application.properties. Here, I specified project ID, instance ID, and database to create.
In the terminal window where I’m going to run the app, I set two environment variables. First, I set SPANNER_EMULATOR_HOST=localhost:9010. As I mentioned earlier, the Spanner library for Java looks for this value and knows to connect locally. Secondly, I set a pointer to my GCP service account credentials JSON file: GOOGLE_APPLICATION_CREDENTIALS=~/Downloads/gcp-key.json. You’re not supposed to need creds for local testing, but my app wouldn’t start without it.
Finally, I compile and start up the app. There are a couple ways this app lets you interact with Spanner, and I chose the “repository” one:
After a second or two, I see that the app compiled, and data got loaded into the database.
Pinging the endpoint in the browser gives a RESTful response.
Like with the AWS emulator, the Google Cloud Spanner emulator doesn’t do everything that its managed counterpart does. It uses unencrypted traffic, identity management APIs aren’t supported, concurrent read/write transactions get aborted, there’s no data persistence, quotas aren’t enforced, and monitoring isn’t enabled. There are also limitations during the beta phase, related to the breadth of supported queries and partition operations. Check the GitHub README for a full list.
#3 Microsoft Azure Cosmos DB
Now let’s look at Azure’s Cosmos DB. This is billed as a “planet scale” NoSQL database with easy scaling, multi-master replication, sophisticated transaction support, and support for multiple APIs. It can “talk” Cassandra, MongoDB, SQL, Gremlin, or Etcd thanks to wire-compatible APIs.
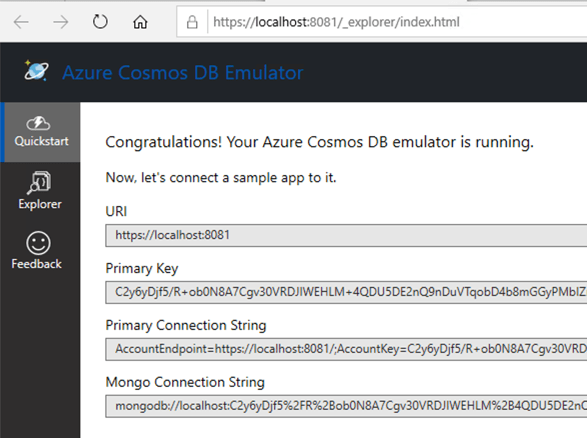
Microsoft offers the Azure Cosmos Emulator for local development. Somewhat inexplicably, it’s available only as a Windows download or Windows container. That surprised me, given the recent friendliness to Mac and Linux. Regardless, I spun up a Windows 10 environment in Azure, and chose the downloadable option.
Once it’s installed, I see a graphical experience that closely resembles the one in the Azure Portal.
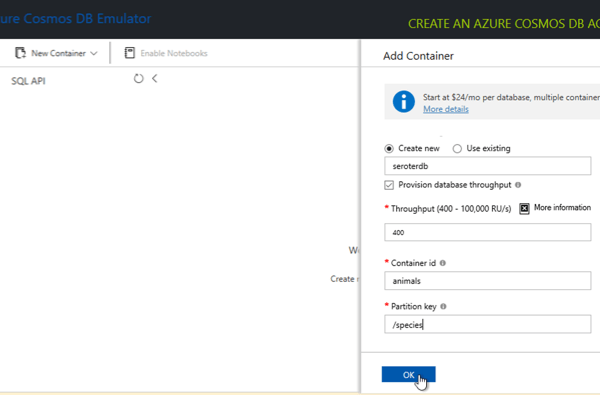
From here, I use this graphical UI and build out a new database, container—not an OS container, but the name of a collection—and specify a partition key.
For fun, I added an initial database record to get things going.
Nice. Now I have a database ready to use from code. I’m going to use the same Node.js app I built for the AWS demo above, but this time, reference the Azure SDK (npm install @azure/cosmos) to talk to the database. I also created a config.json file that stores, well, config values. Note that there is a single fixed account and well-known key for all users. These aren’t secret.
Finally, the app code itself. It’s pretty similar to what I wrote earlier for DynamoDB. I have an endpoint to add a record, and another one to retrieve records.
When I start the app, I call the endpoint to create a record, see it show up in Cosmos DB, and issue another request to get the records that match the target “species.” Sure enough, everything works great.
What’s different about the emulator, compared to the “real” Cosmos DB? The emulator UI only supports the SQL API, not the others. You can’t use the adjustable consistency levels—like strong, session, or eventual—for queries. There are limits on how many containers you can create, and there’s no concept of replication here. Check out the remaining differences on the Azure site.
All three emulators are easy to set up and straightforward to use. None of them are suitable for performance testing or simulating production resilience scenarios. That’s ok, because the “real” thing is just a few clicks (or CLI calls) away. Use these emulators to iterate on your app locally, and maybe to simulate behaviors in your integration pipelines, and then spin up actual instances for in-depth testing before going live.
It’s been nine years since I first tried out Cloud Foundry, and it remains my favorite app platform. It runs all kinds of apps, has a nice dev UX for deploying and managing software, and doesn’t force me to muck with infrastructure. The VMware team keeps shipping releases (another today) of the most popular packaging of Cloud Foundry, Tanzu Application Service (TAS). One knock against Cloud Foundry has been its weight—in typically runs on dozens of VMs. Others have commented on its use of open-source, but not widely-used, components like BOSH, the Diego scheduler, and more. I think there are good justifications for its size and choice of plumbing components, but I’m not here to debate that. Rather, I want to look at what’s next. The new Tanzu Application Service (TAS) for Kubernetes (now in beta) eliminates those prior concerns with Cloud Foundry, and just maybe, leapfrogs other platforms by delivering the dev UX you like, with the underlying components—things like Kubernetes, Cluster API, Istio, Envoy, fluentd, and kpack—you want. Let me show you.
TAS runs on any Kubernetes cluster: on-premises or in the cloud, VM-based or a managed service, VMware-provided or delivered by others. It’s based on the OSS Cloud Foundry for Kubernetes project, and available for beta download with a free (no strings attached) Tanzu Network account. You can follow along with me in this post, and in just a few minutes, have a fully working app platform that accepts containers or source code and wires it all up for you.
Step 1 – Download and Start Stuff (5 minutes)
Let’s get started. Some of these initial steps will go away post-beta as the install process gets polished up. But we’re brave explorers, and like trying things in their gritty, early stages, right?
First, we need a Kubernetes. That’s the first big change for Cloud Foundry and TAS. Instead of pointing it at any empty IaaS and using BOSH to create VMs, Cloud Foundry now supports bring-your-own-Kubernetes. I’m going to use Minikube for this example. You can use KinD, or any other number of options.
Install kubectl (to interact with the Kubernetes cluster), and then install Minikube. Ensure you have a recent version of Minikube, as we’re using the Docker driver for better performance. With Minikube installed, execute the following command to build out our single-node cluster. TAS for Kubernetes is happiest running on a generously-sized cluster.
After a minute or two, you’ll have a hungry Kubernetes cluster running, just waiting for workloads.
We also need a few command line tools to get TAS installed. These tools, all open source, do things like YAML templating, image building, and deploying things like Cloud Foundry as an “app” to Kubernetes. Install the lightweight kapp, klbd, and ytt tools using these simple instructions.
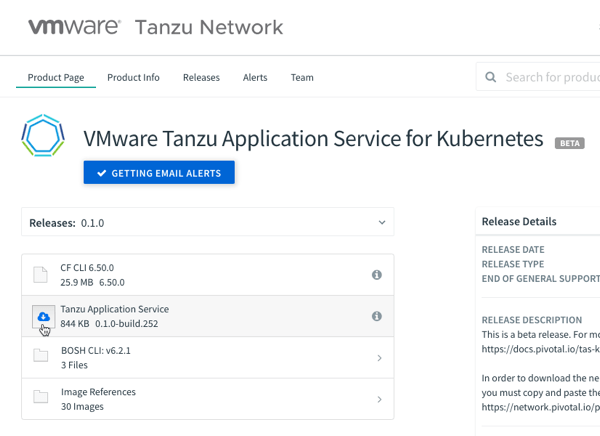
You also need the Cloud Foundry command line tool. This is for interacting with the environment, deploying apps, etc. This same CLI works against a VM-based Cloud Foundry, or Kubernetes-based one. You can download the latest version via your favorite package manager or directly.
Finally, you’ll want to install the BOSH CLI. Wait a second, you say, didn’t you say BOSH wasn’t part of this? Am I just a filthy liar? First off, no name calling, you bastards. Secondly, no, you don’t need to use BOSH, but the CLI itself helps generate some configuration values we’ll use in a moment. You can download the BOSH CLI via your favorite package manager, or grab it from the Tanzu Network. Install via the instructions here.
I downloaded the archive to my desktop, unpacked it, and renamed the folder “tanzu-application-service.” Create a sibling folder named “configuration-values.”
Now we’re going to create the configuration file. Run the following command in your console, which should be pointed at the tanzu-application-service directory. The first quoted value is the domain. For my local instance, this value is vcap.me. When running this in a “real” environment, this value is the DNS name associated with your cluster and ingress point. The output of this command is a new file in the configuration-values folder.
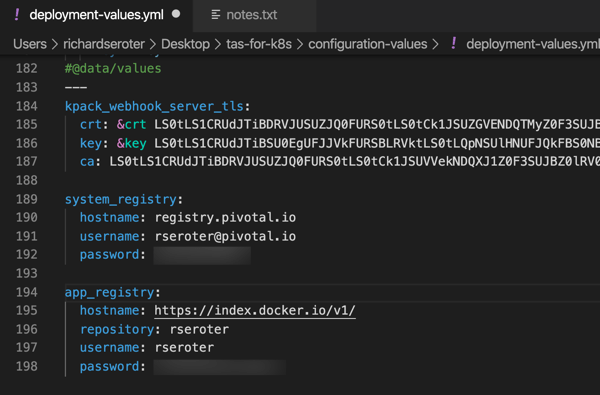
After a couple of seconds, we have an impressive-looking YAML file with passwords, certificates, and all sorts of delightful things.
We’re nearly done. Our TAS environment won’t just run containers; it will also use kpack and Cloud Native Buildpacks to generate secure container images from source code. That means we need a registry for stashing generated images. You can use most any one you want. I’m going to use Docker Hub. Thus, the final configuration values we need are appended to the above file. First, we need the credentials to the Tanzu Network for retrieving platform images, and secondly, credentials for container registry.
With our credentials in hand, add them to the very bottom of the file. Indentation matters, this is YAML after all, so ensure you’ve got it lined up right.
The last thing? There’s a file that instructs the installation to create a cluster IP ingress point versus a Kubernetes load balancer resource. For Minikube (and in public cloud Kubernetes-as-a-Service environments) I want the load balancer. So, within the tanzu-application-service folder, move the replace-loadbalancer-with-clusterip.yaml file from the custom-overlays folder to the config-optional folder.
Finally, to be safe, I created a copy of this remove-resource-requirements.yml file and put it in the custom-overlays folder. It relaxes some of the resource expectations for the cluster. You may not need it, but I saw CPU exhaustion issues pop up when I didn’t use it.
All finished. Let’s deploy this rascal.
Step 3 – Deploy Stuff (10 minutes)
Deploying TAS to Kubernetes takes 5-9 minutes. With your console pointed at the tanzu-application-service directory, run this command:
./bin/install-tas.sh ../configuration-values
There’s a live read-out of progress, and you can also keep checking the Kubernetes environment to see the pods inflate. Tools like k9s make it easy to keep an eye on what’s happening. Notice the Istio components, and some familiar Cloud Foundry pieces. Observe that the entire Cloud Foundry control plane is containerized here—no VMs anywhere to be seen.
While this is still installing, let’s open up the Minikube tunnel to expose the LoadBalancer service our ingress gateway needs. Do this in a separate console window, as its a blocking call. Note that the installation can’t complete until you do it!
minikube tunnel
After a few minutes, we’re ready to deploy workloads.
Step 4 – Test Stuff (3 minutes)
We now have a full-featured Tanzu Application Service up and running. Neat. Let’s try a few things. First, we need to point the Cloud Foundry CLI at our environment.
cf api --skip-ssl-validation https://api.vcap.me
Great. Next, we log in, using generated cf_admin_password from the deployment-values.yaml file.
cf auth admin <password>
After that, we’ll enable containers in the environment.
cf enable-feature-flag diego_docker
Finally, we set up a tenant. Cloud Foundry natively supports isolation between tenants. Here, I set up an organization, and within that organization, a “space.” Finally, I tell the Cloud Foundry CLI that we’re working with apps in that particular org and space.
Let’s do something easy, first. Push a previously-containerized app. Here’s one from my Docker Hub, but it can be anything you want.
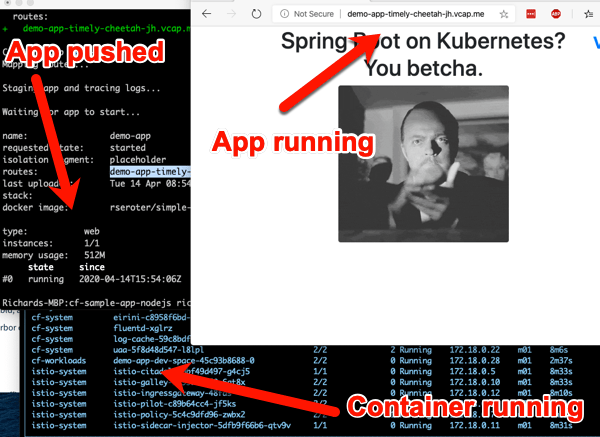
cf push demo-app -o rseroter/simple-k8s-app-kpack
After you enter that command, 15 seconds later you have a hosted, routable app. The URL is presented in the Cloud Foundry CLI.
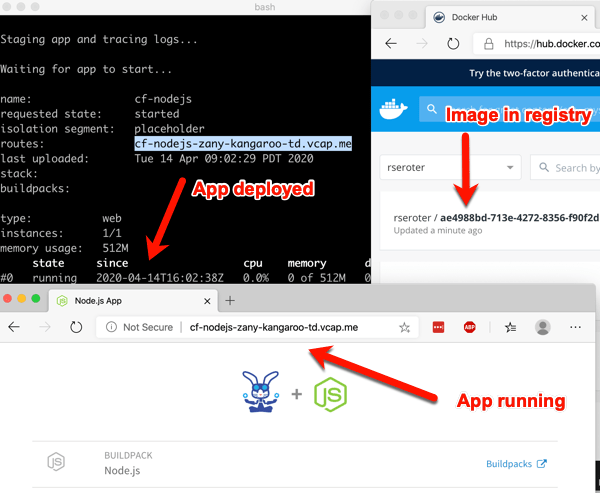
How about something more interesting? TAS for Kubernetes supports a variety of buildpacks. These buildpacks detect the language of your app, and then assemble a container image for you. Right now, the platform builds Java, .NET Core, Go, and Node.js apps. To make life simple, clone this sample Node app to your machine. Navigate your console to that folder, and simple enter cf push.
After a minute or so, you end up with a container image in whatever registry you specified (for me, Docker Hub), and a running app.
This beta release of TAS for Kubernetes also supports commands around log streaming (e.g. cf logs cf-nodejs), connecting to backing services like databases, and more. And yes, even the simple, yet powerful, cf scale command works to expand and contract pod instances.
It’s simple to uninstall the entire TAS environment from your Kubernetes cluster with a single command:
kapp delete -a cf
Thanks for trying this out with me! If you only read along, and want to try it yourself later, read the docs, download the bits, and let me know how it goes.
Are all serverless compute platforms—typically labeled Function-as-a-Service—the same? Sort of. They all offer scale-to-zero compute triggered by events and billed based on consumed resources. But I haven’t appreciated the nuances of these offerings, until now. Last week, Laurence Hecht did great work analyzing the latest CNCF survey data. It revealed which serverless (compute) offerings have the most usage. To be clear, this is about compute, not databases, API gateways, workflow services, queueing, or any other managed services.
Serverless usage rose from 37% in 2018 to 46% in 2019. Waiting for the 2020 study, but IMHO don't significant breadth of growth (adoption %). Instead, growth will be in terms of depth — # of workloads, # of app components. https://t.co/gjgF30YqNppic.twitter.com/Izcmcdkb7L
To me, the software in that list falls into one of three categories: connective compute, platform expanding, and full stack apps. Depending on what you want to accomplish, one may be better than the others. Let’s look at those three categories, see which platforms fall into each one, and see an example in action.
Category 1: Connective Compute
Trigger / Destination
Signature
Packaging
Deployment
Database, storage, message queue, API Gateway, CDN, Monitoring service
Handlers with specific parameters
ZIP archive, containers
Web portal, CLI, CI/CD pipelines
The best functions are small functions that fill the gaps between managed services. This category is filled with products like AWS Lambda, Microsoft Azure Functions, Google Cloud Functions, Alibaba Cloud Functions, and more. These functions are triggered when something happens in another managed service—think of database table changes, messages reaching a queue, specific log messages hitting the monitoring system, and files uploaded to storage. With this category of serveless compute, you stitch together managed services into apps, writing as little code as possible. Little-to-none of your existing codebase transfers over, as this caters to greenfield solutions based on a cloud-first approach.
AWS Lambda is the grandaddy of them all, so let’s take a look at it.
In my example, I want to read messages from a queue. Specifically, have an AWS Lambda function read from Amazon SQS. Sounds simple enough!
You can write AWS Lambda functions in many ways. You can also deploy them in many ways. There are many frameworks that try to simplify the latter, as you would rarely deploy a single function as your “app.” Rather, a function is part of a broader collection of resources that make up your system. Those resources might be described via the AWS Serverless Application Model (SAM), where you can lay out all the functions, databases, APIs and more that should get deployed together. And you could use the AWS Serverless Application Repository to browse and deploy SAM templates created by you, or others. However you define it, you’ll deploy your function-based system via the AWS CLI, AWS console, AWS-provided CI/CD tooling, or 3rd party tools like CircleCI.
For this simple demo, I’m going to build a C#-based function and deploy it via the AWS console.
First up, I went to the AWS console and defined a new queue in SQS. I chose the “standard queue” type.
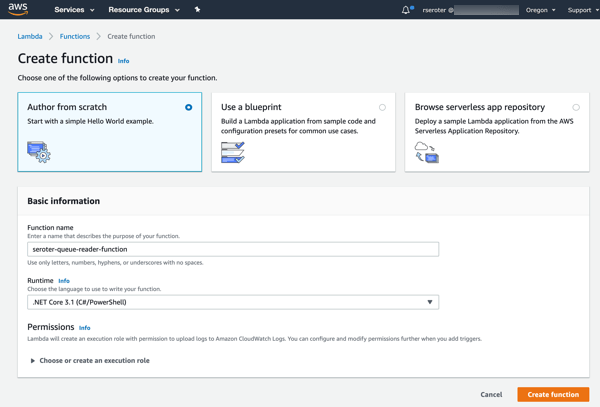
Next up, creating a new AWS Lambda function. I gave it a name, chose .NET Core 3.1 as my runtime, and created a role with basic permissions.
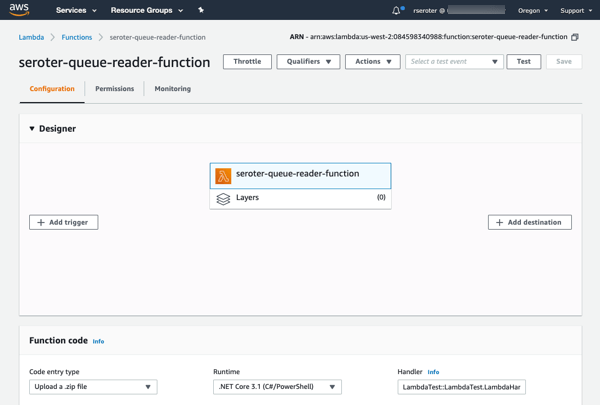
After clicking “create function”, I get a overview screen that shows the “design” of my function and provides many configuration settings.
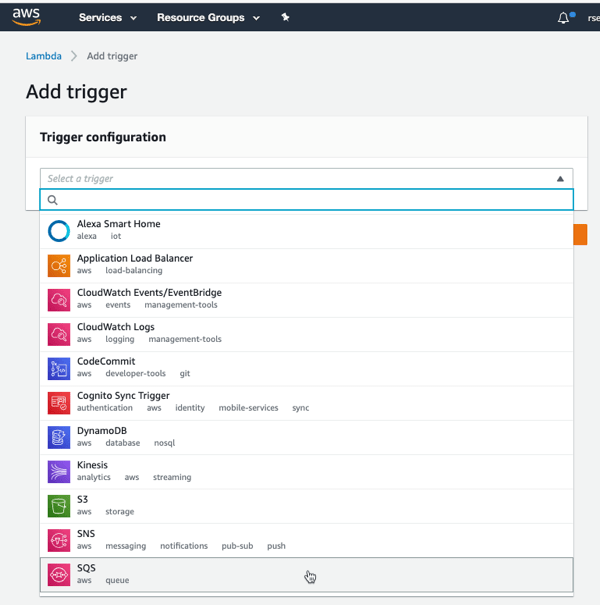
I clicked “add trigger” to specify what event kicks off my function. I’ve got lots of options to choose from, which is the hallmark of a “connective compute” function platform. I chose SQS, selected my previously-created queue from the dropdown list, and clicked “Add.”
Now all I have to do is the write the code that handles the queue message. I chose VS Code as my tool. At first, I tried using the AWS Toolkit for Visual Studio Code to generate a SAM-based project, but the only template was an API-based “hello world” one that forced me to retrofit a bunch of stuff after code generation. So, I decided to skip SAM for now, and code the AWS Lambda function directly, by itself.
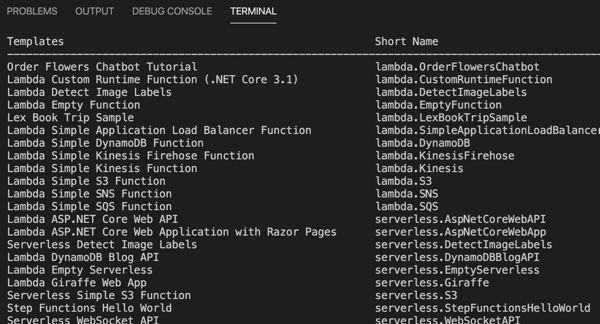
The .NET team at AWS has done below-the-radar great work for years now, and their Lambda tooling is no exception. They offer a handful of handy templates you can use with the .NET CLI. One basic command installs them for you: dotnet new -i Amazon.Lambda.Templates
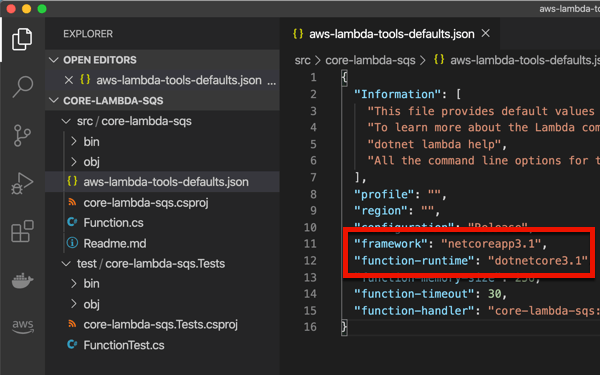
I chose to create a new project by entering dotnet new lambda.sqs. This produced a pair of projects, one with the function source code, and one that has unit tests. The primary project also has a aws-lambda-tools-default.json file that includes command line options for deploying your function. I’m not sure if I need it given I’m deploying via CLI, but I updated references to .NET Core 3.1 anyway. Note that the “function-handler” value *is* important, as we’ll need that shortly. This tells Lambda which operation (in which class) to invoke.
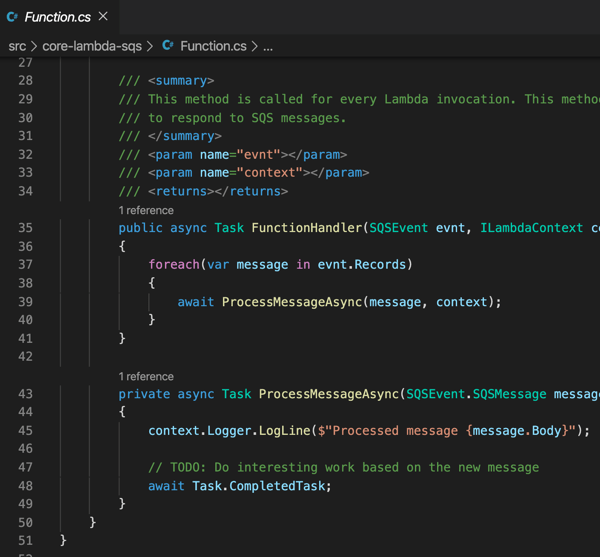
I kept the generated function code, which simply prints out the contents of the message pulled from Amazon SQS.
I successfully built the project, and then had to “publish” it to get the right assets for packaging. This publish command ensures that configuration files get bundled up as well:
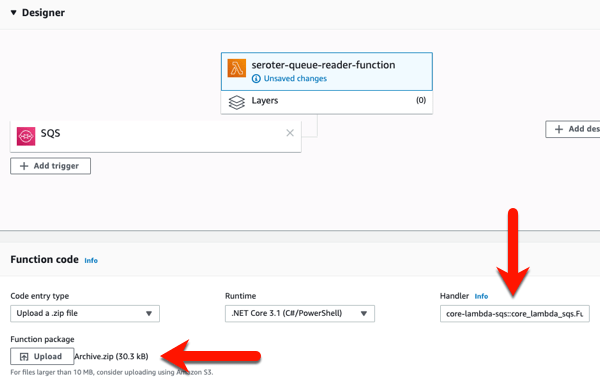
Now, all I have to do is zip up the resulting files in the “publish” directory. With those DLLs and *.json files zipped up, I return to the AWS console to upload my code. In most cases, you’re going to stash the archive file in Amazon S3 (either manually, or as the result of a CI process). Here, I uploaded my ZIP file directly, AND, set the function handler value equal to the “function-handler” value from my configuration file.
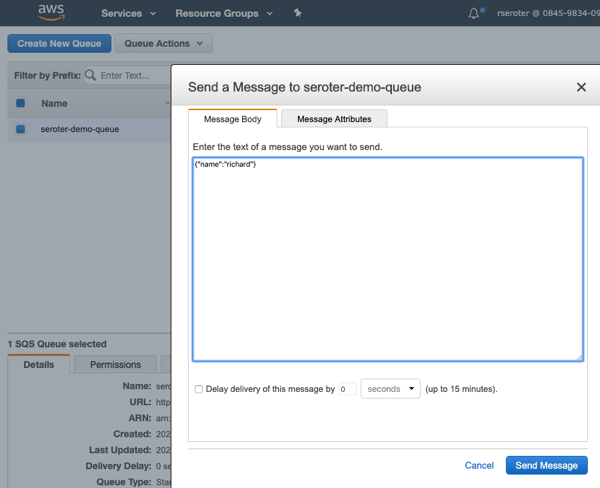
After I click “save”, I get a notice that my function was updated. I went back to Amazon SQS, and sent a few messages to the queue, using the “send a message” option.
After a moment, I saw entries in the “monitoring” view of the AWS Lambda console, and drilled into the CloudWatch logs and saw that my function wrote out the SQS payloads.
I’m impressed at how far the AWS Lambda experience has come since I first tried it out. You’ll find similarly solid experiences from Microsoft, Google and others as you use their FaaS platforms as glue code to connect managed services.
Category 2: Platform Expanding
Trigger / Destination
Signature
Packaging
Deployment
HTTP
Handlers with specific parameters
code packages
Web portal, CLI
There’s a category of FaaS that, to me, isn’t about connecting services together, as much as it’s about expanding or enriching the capabilities of a host platform. From the list above, I’d put offerings like Cloudflare Workers, Twilio Functions, and Zeit Serverless Functions into that bucket.
Most, if not all, of these start with an HTTP request and only support specific programming languages. For Twilio, you can use their integrated FaaS to serve up tokens, call outbound APIs after receiving an SMS, or even change voice calls. Zeit is an impressive host for static sites, and their functions platform supports backend operations like authentication, form submissions, and more. And Cloudflare Workers is about adding cool functionality whenever someone sends a request to a Cloudfare-managed domain. Let’s actually mess around with Cloudflare Workers.
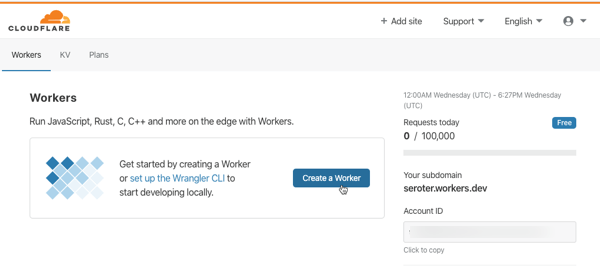
I go to my (free) Cloudflare account to get started. You can create these running-at-the-edge functions entirely in the browser, or via the Wrangler CLI. Notice here that Workers support JavaScript, Rust, C, and C++.
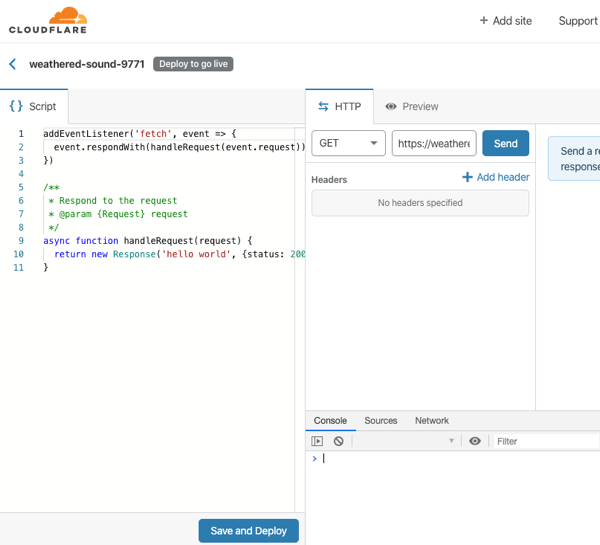
After I click “create a Worker”, I’m immediately dropped into a web console where I can author, deploy, and test my function. And, I get some sample code that represents a fully-working Worker. All workers start by responding to a “fetch” event.
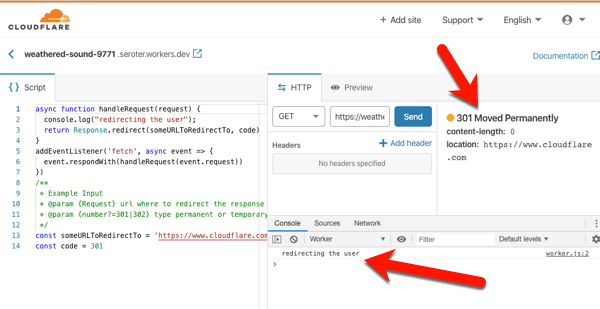
I don’t think you’d use this to create generic APIs or standalone apps. No, you’d use this to make the Cloudflare experience better. They handily have a whole catalog of templates to inspire you, or do your work for you. Most of these show examples of legit Cloudflare use cases: inspect and purge sensitive data from responses, deny requests missing an authorization header, do A/B testing based on cookies, and more. I copied the code from the “redirect” template which redirects requests to a different URL. I changed a couple things, clicked “save and deploy” and called my function.
On the left is my code. In the middle is the testing console, where I submitted a GET request, and got back a “301 Moved Permanently” HTTP response. I also see a log entry from my code. If you call my function in your browser, you’ll get redirected to cloudflare.com.
That was super simple. The serverless compute products in this category have a constrained set of functionality, but I think that’s on purpose. They’re meant to expand the set of problems you can solve with their platform, versus creating standalone apps or services.
Category 3: Full Stack Apps
Trigger / Destination
Signature
Packaging
Deployment
HTTP, queue, time
None
Containers
Web portal, CLI, CI/CD pipelines
This category—which I can’t quite figure out the right label for—is about serverless computing for complete web apps. These aren’t functions, per-se, but run on a serverless stack that scales to zero and is billed based on usage. The unit of deployment is a container, which means you are providing more than code to the platform—you are also supplying a web server. This can make serverless purists squeamish since a key value prop of FaaS is the outsourcing of the server to the platform, and only focusing on your code. I get that. The downside of that pure FaaS model is that it’s an unforgiving host for any existing apps.
What fits in this category? The only obvious one to me is Google Cloud Run, but AWS Fargate kinda fits here too. Google Cloud Run is based on the popular open source Knative project, and runs as a managed service in Google Cloud. Let’s try it out.
First, install the Google Cloud SDK to get the gcloud command line tool. Once the CLI gets installed, you do a gcloud init in order to link up your Google Cloud credentials, and set some base properties.
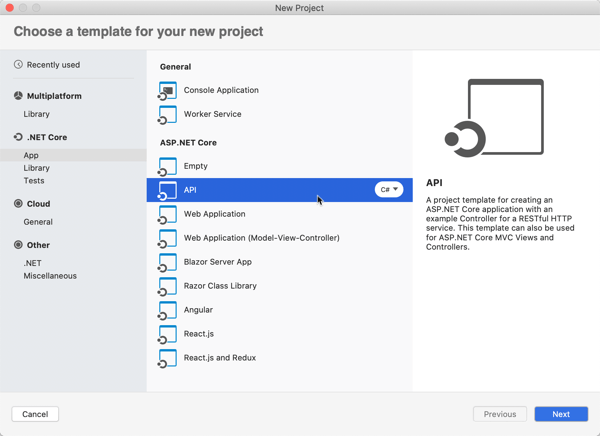
Now, to build the app. What’s interesting here, is this is just an app. There’s no special format or method signature. The app just has to accept HTTP requests. You can write the app in any language, use any base image, and end up with a container of any size. The app should still follow some basic cloud-native patterns around fast startup and attached storage. This means—and Google promotes this—that you can migrate existing apps fairly easily. For my example, I’ll use Visual Studio for Mac to build a new ASP.NET Web API project with a couple RESTful endpoints.
The default project generates a weather-related controller, so let’s stick with that. To show that Google Cloud Run handles more than one endpoint, I’m adding a second method. This one returns a forecast for Seattle, which has been wet and cold for months.
namespace seroter_api_gcr.Controllers
{
    [ApiController]
    [Route("[controller]")]
    public class WeatherForecastController : ControllerBase
    {
        private static readonly string[] Summaries = new[]
        {
            "Freezing", "Bracing", "Chilly", "Cool", "Mild", "Warm", "Balmy", "Hot", "Sweltering", "Scorching"
        };

        private readonly ILogger<WeatherForecastController> _logger;

        public WeatherForecastController(ILogger<WeatherForecastController> logger)
        {
            _logger = logger;
        }

        [HttpGet]
        public IEnumerable<WeatherForecast> Get()
        {
            var rng = new Random();
            return Enumerable.Range(1, 5).Select(index => new WeatherForecast
            {
                Date = DateTime.Now.AddDays(index),
                TemperatureC = rng.Next(-20, 55),
                Summary = Summaries[rng.Next(Summaries.Length)]
            })
            .ToArray();
        }

        [HttpGet("seattle")]
        public WeatherForecast GetSeattleWeather()
        {
            return new WeatherForecast { Date = DateTime.Now, Summary = "Chilly", TemperatureC = 6 };
        }
    }
}
If I were doing this the right way, I’d also change my Program.cs file and read the port from a provided environment variable, as Google suggests. I’m NOT going to do that, and instead will act like I’m just shoveling an existing, unchanged API into the service.
The app is complete and works fine when running locally. To work with Google Cloud Run, my app must be containerized. You can do this a variety of ways, including the most reasonable, which involves Google Cloud Build and continuous delivery. I don’t roll like that. WE’RE DOING IT BY HAND.
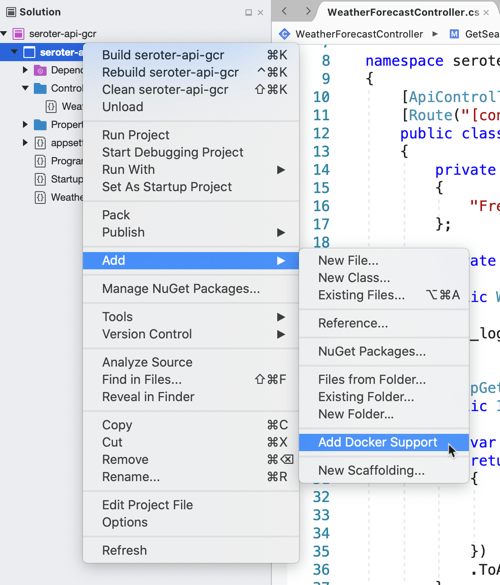
I will cheat and have Visual Studio give me a valid Dockerfile. Right-click the project, and add Docker support. This creates a Docker Compose project, and throws a Dockerfile into my original project.
Let’s make one small tweak. In the Dockerfile, I’m exposing port 5000 from my container, and setting an environment variable to tell my app to listen on that port.
I opened my CLI, and navigated to the folder directly above this project. From there, I executed a Docker build command that pointed to the generated Dockerfile, and tagged the image for Google Container Registry (where Google Cloud Run looks for images).
That finished, and I had a container image in my local registry. I need to get it up to Google Container Registry, so I ran a Docker push command.
docker push gcr.io/seroter/seroter-api-gcr
After a moment, I see that container in the Google Container Registry.
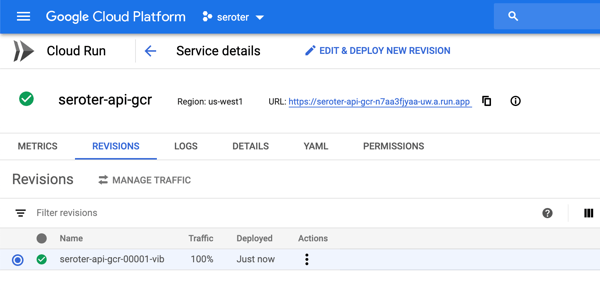
Neat. All that’s left is to spin up Google Cloud Run. From the Google Cloud portal, I choose to create a new Google Cloud Run service. I choose a region and name for my service.
Next up, I chose the container image to use, and set the container port to 5000. There are lots of other settings here too. I can create a connection to managed services like Cloud SQL, choose max requests per container, set the request timeout, specify the max number of container instances, and more.
After creating the service, I only need to wait a few seconds before my app is reachable.
As expected, I can ping both API endpoints and get back a result. After a short duration, the service spins compute down to zero.
Wrap up
The landscape of serverless computing is broader than you may think. Depending on what you’re trying to do, it’s possible to make a sub-optimal choice. If you’re working with many different managed services and writing code to connect them, use the first category. If you’re enriching existing platforms with bits of compute functionality, use the second category. And if you’re migrating or modernizing existing apps, or have workloads that demand more platform flexibility, choose the third. Comments? Violent disagreement? Tell me below.
Function-as-a-service gets all the glory in the serverless world, but the eventing backplane is the unheralded star of modern architectures, serverless or otherwise. Don’t get me wrong, scale-to-zero compute is cool. But is your company really transforming because you’re using fewer VMs? I’d be surprised. No, it seems that big benefits comes from a reimagined architecture, often powered by (managed) software that emit and consume events. If you have this in place, creative developers can quickly build out systems by tapping into event streams. If you have a large organization, and business systems that many IT projects tap into, this sort of event-driven architecture can truly speed up delivery.
But I doubt that most existing software at your company is powered by triggers and events. How can you start being more event-driven with all the systems you have in place now? In this post, I’ll look at three techniques I’ve used or seen.
First up, what do you need at your disposal? What’s the critical tech if you want to event-enable your existing SaaS or on-premises software? How about:
Event bus/backbone. You need an intermediary to route events among systems. It might be on-premises or in the public cloud, in-memory or persistent, open source or commercial. The important thing is having a way to fan-out the information instead of only offering point-to-point linkages.
Connector library. How are you getting events to and from software systems? You may use HTTP APIs or some other protocol. What you want is a way to uniformly talk to most source/destination systems without having to learn the nuances of each system. A series of pre-built connectors play a big part.
Schema registry. Optional, but important. What do the events looks like? Can I discover the available events and how to tap into them?
Event-capable targets. Your downstream systems need to be able to absorb events. They might need a translation layer or buffer to do so.
MOST importantly, you need developers/architects that understand asynchronous programming, stateful stream processing, and distributed systems. Buying the technology doesn’t matter if you don’t know how to best use it.
Let’s look at how you might use these technologies and skills to event-ify your systems. In the comments, tell me what I’m missing!
Option #1: Light up natively event-driven capabilities in the software
Some software is already event-ready and waiting for you to turn it on! Congrats if you use a wide variety of SaaS systems like Salesforce (via outbound messaging), Oracle Cloud products (e.g. Commerce Cloud), GSuite (via push notifications), Office 365 (via graph API) and many more. Heck, even some cloud-based databases like Azure Cosmos DB offer a change feed you can snack on. It’s just a matter of using these things.
On-premises software can work here as well. A decade ago, I worked at Amgen and we created an architecture where SAP events were broadcasted through a broker, versus countless individual systems trying to query SAP directly. SAP natively supported eventing then, and plenty of systems do now.
For either case—SaaS systems or on-premises software—you have to decide where the events go. You can absolutely publish events to single-system web endpoints. But realistically, you want these events to go into an event backplane so that everyone (who’s allowed) can party on the event stream.
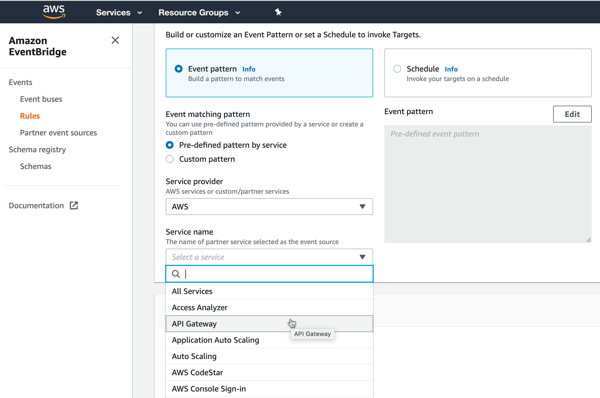
AWS has a nice offering that helps here. Amazon EventBridge came out last year with a lot of fanfare. It’s a fully managed (serverless!) service for ingesting and routing events. EventBridge takes in events from dozens of AWS services, and (as of this writing) twenty-five partners. It has a nice schema registry as well, so you can quickly understand the events you have access to. The list of integrated SaaS offerings is a little light, but getting better.
Given their long history in the app integration space, Microsoft also has a good cloud story here. Their eventing subsystem, called Azure Event Grid, ingests events from Azure (or custom) sources, and offers sophisticated routing rules. Today, its built-in event sources are all Azure services. If you’re looking to receive events from a SaaS system, you bolt on Azure Logic Apps. This service has a deep array of connectors that talk to virtually every system you can think of. Many of these connectors—including SharePoint, Salesforce, Workday, Microsoft Dynamics 365, and Smartsheet—support push-based triggers from the SaaS source. It’s fairly easy to create a Logic App that receives a trigger, and publishes to Azure Event Grid.
And you can always use “traditional” service brokers like Microsoft’s BizTalk Server which offer connectors, and pub/sub routing on any infrastructure, on-premises or off.
Option #2: Turn request-driven APIs into event streams
What if your software doesn’t have triggers or webhooks built in? That doesn’t mean you’re out of luck.
Virtually all modern packaged (on-premises or SaaS) software offers APIs. Even many custom-built apps do. These APIs are mostly request-response based (versus push-based async, or request-stream) but we can work with this.
One pattern? Have a scheduler call those request-response APIs and turn the results into broadcasted events. Is it wasteful? Yes, polling typically is. But, the wasted polling cycles are worth it if you want to create a more dynamic architecture.
Microsoft Azure users have good options. Specifically, you can quickly set up an Azure Logic App that talks to most everything, and then drops the results to Azure EventGrid for broadcast to all interested parties. Logic Apps also supports debatching, so you can parse the polled results and create an outbound stream of individual events. Below, every minute I’m listing records from ServiceNow that I publish to EventGrid.
Note that Amazon EventBridge also supports scheduled invocation of targets. Those targets include batch job queues, code pipelines, ECS tasks, Lambda functions, and more.
Option #3: Hack the subsystems to generate events
You’ll have cases where you don’t have APIs at all. Just give up? NEVER.
A last resort is poking into the underlying subsystems. That means generating events from file shares, FTP locations, queues, and databases. Now, be careful here. You need to REALLY know your software before doing this. If you create a change feed for the database that comes with your packaged software, you could end up with data integrity issues. So, I’d probably never do this unless it was a custom-built (or well-understood) system.
How do public cloud platforms help? Amazon EventBridge primarily integrates with AWS services today. That means if your custom or packaged app runs in AWS, you can trigger events off the foundational pieces. You might trigger events off EC2 state changes, new objects added to S3 blob storage, deleted users in the identity management system, and more. Most of these are about the service lifecycle, versus about the data going through the service, but still useful.
In Azure, the EventGrid service ingests events from lots of foundational Azure services. You can listen on many of the same types of things that Amazon EventBridge does. That includes blob storage, although nothing yet on virtual machines.
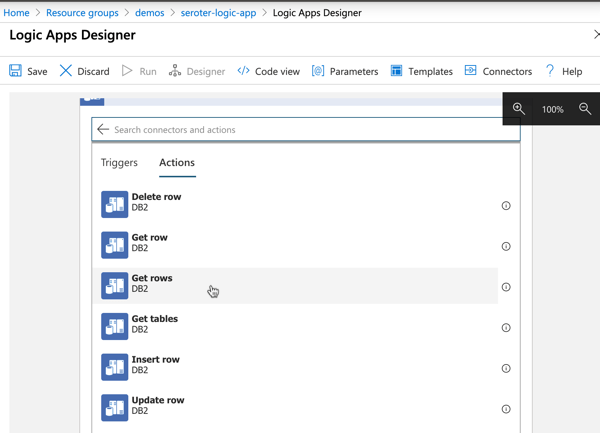
Your best bet in Azure may be once again to use Logic Apps and turn subsystem queries into an outbound event stream. In this example, I’m monitoring IBM DB2 database changes, and publishing events.
I could do the same with triggers on FTP locations …
… and file shares.
In all those cases, it’s fairly straightforward to publish the queried items to Azure EventGrid for fan-out processing to trigger-based recipient systems
Ideally, you have option #1 at your disposal. If not, you can selectively choose #2 or #3 to get more events flowing in your architecture. Are there other patterns and techniques you use to generate events out of existing systems?
My favorite definition of “serverless computing” still comes from Rachel Stephens at RedMonk: managed services that scale to zero. There’s a lot packed into that statement. It elevates consumption-based pricing, and a bias towards managed services, not raw infrastructure. That said, do today’s mainstream serverless technologies represent a durable stack for the next decade? I’m not sure. It feels like there’s still plenty of tradeoffs and complexity. I especially feel this way after spending time with Dark.
If you build apps by writing code, you’re doing a lot of setup and wiring. Before writing code, you figure out tech choices, spin up dependent services (databases, etc), get your CI/CD pipeline figured out, and decide out how to stitch it all together. Whether you’re building on-premises or off, it’s generally the same. Look at a typical serverless stack from AWS. it’s made up of AWS Lambda or Fargate, Amazon S3, Amazon DynamoDB, Amazon Cognito, Amazon API Gateway, Amazon SQS or Kinesis, Amazon CloudWatch, AWS X-Ray and more. All managed services, but still a lot to figure out and pre-provision. To be fair, frameworks like AWS Amplify or Google’s Firebase pull things together better than pure DIY. Regardless, it might be serverless, but it’s not setup-less or maintain-less.
Dark seems different. It’s a complete system—language, editor, runtime, and infrastructure. You spend roughly 100% of your time building the app. It’s a deploy-less model where your code changes are instantly deployed behind the scenes. It’s setup-less as you don’t create databases, message brokers, API gateways, or compute hosts. Everything is interconnected. Some of this sounds reminiscent of low-code platforms like Salesforce, Microsoft PowerApps, or OutSystems. But Dark still targets professional programmers, I think, so it’s a different paradigm.
In this post, I’ll build a simple app with Dark. As we go along, I’ll explain some of the interesting aspects of the platform. This app serves up a couple REST endpoints, stores data in database, and uses a background worker to “process” incoming orders.
Step 0: Understand Dark Language and Components
With Dark, you’re coding in their language. They describe it as “statically-typed functional/imperative hybrid, based loosely on ML. It is a high-level language, with immutable values, garbage collection, and support for generics/polymorphic types.” It offers the standard types (e.g. Strings, Integers, Booleans, Lists, Dictionaries), and doesn’t really support custom objects.
The Dark team also describes their language as “expression-oriented.” You basically build up expressions. You use (immutable) variables, conditional statements, and pipelining to accomplish your objectives. We’ll see a few examples of this below.
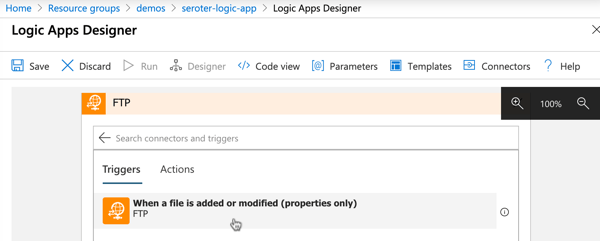
There are five (kinda, six) components that make up a Dark app. These “handlers” sit on your “canvas” and hold all your code. These components are:
HTTP endpoints. These are for creating application entry points via the major HTTP verbs.
Cron jobs. These are tasks that run on whatever schedule you set.
Background Workers. They receive events, run asynchronously, and support automatic retries.
Persistent Datastores. This is a key-value store.
REPL. These are developer tools you create to run commands outside of your core components.
All of these components are first-class in the Dark language itself. I can write Dark code that inherently knows what to do with all the above things.
The other component that’s available is a “Function” which is just that. It’s an extracted command that you can call from your other components.
Ok, we know the basics. Let’s get to work.
Step 1: Create a Datastore
I need to store state. Almost every system does. Whether your compute nodes store it locally, or you pull it from an attached backing store, you have to factor in provisioning, connecting to, and maintaining it. Not with Dark.
First, let’s look at the canvas. Here, I add and position the components that make up my app. Each user (or app) gets its own canvas.
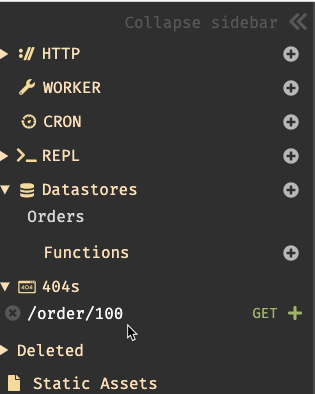
I need a database. To create it, I just click the “plus” next to the Datastores item in the left sidebar, or click on the canvas and choose New DB.
I named mine “Orders” and proceeded to define a handful of fields and corresponding data types. That’s it. I didn’t pick an instance size, throughput units, partition IDs, or replication factors.
I can also test out my database by adding a REPL to my canvas, and writing some quick code to inject a record in the database. A button in the REPL lights up and when I click it, it runs whatever code is there. I can then see the record in the database, and add a second REPL to purge the database.
Step 2: Code the REST endpoints
Let’s add some data to this database, via a REST API.
I could click the “plus” button next to the HTTP component in the sidebar, or click the canvas. A better way of doing this is via the Trace-Based Development model in Dark. Specifically, I can issue a request to a non-existent endpoint, Dark will capture that, and I can build up a handler based on it. Reminds me a bit of consumer-driven contract testing where you’re building based on what the client needs.
So, I go to Postman and submit an HTTP POST request to a URL that references my canvas, but the path doesn’t exist (yet). I’m also sending in the shape of the JSON payload that I want my app to handle.
Back in Dark, I see a new entry under “404s.”
When I click the “plus” sign next to it, I get a new HTTP handler on my canvas. Not only that, the handler is pre-configured to handle POST requests to the URL I specified, and, shows me the raw trace of the 404 request.
What’s kinda crazy is that I can choose this trace (or others) and replay them through the component. This is a powerful way to first create the stub, and then run that request through the component after writing the handler code.
So let’s write the code. All I want to do is create a record in the database with the data from the HTTP request. If the fields map 1:1, you can just dump it right in there. I chose to more explicitly map it, and set some DB values that didn’t exist in the JSON payload.
As I start typing my code in, I’m really just filling in the expressions, and choosing from the type-ahead values. Also notice that each expression resolves immediately and shows you the result of that expression on the left side.
My code itself is fairly simple. I use the built-in operators to set a new database record, and return a simple JSON acknowledgement to the caller.
That’s it. Dark recognized that this handler is now using the Orders database, and shows a ghostly connection visualization. When I click the “replay” button on my HTTP handler, it runs my code against the selected trace, and sure enough, a record shows up in the database.
I want a second API endpoint to retrieve a specific order from the system. So, I go back to Postman, and issue another HTTP request to the URL that I want the system to give me.
As expected, I have another trace to leverage when inflating my HTTP handler.
For this handler, I changed the handler’s URL to tokenize the request (and get the “orderid” as a variable), and added some simple code to retrieve a record from the database using that order ID.
That’s all. I now have two REST endpoints that work together to create and retrieve data from a persistent datastore. At no point was I creating containers, deployment pipelines, or switching to logging dashboards. It’s all in one place, as one experience.
Step 3: Build a Worker
The final step is to build a worker. This component receives an event and does some work. In my case, I want it to receive new orders, and change the order status to “processing.”
Once again, I can trigger creation of a worker by “calling” it before it exists. Back in my HTTP post handler, I’m adding the reserved emit command. This is how you send events to a background worker. In this case, I specify the payload, and the name of the yet-to-be-created worker. Then I replay that specific command against the latest trace, and see a new 404 for the worker request.
In my Dark code, I overwrite the existing record with a new one, and set the OrderStatus value. By replaying the trace, I can see the inbound payload (left) and resulting database update (bottom).
At this point, my app is done. I can POST new orders, and almost immediately see the changed “status” because the workers run so fast.
Dark won’t be a fit for many apps and architectures. That said, if my app has me debating between integrating a dozen individual serverless services from a cloud provider, or Dark, I’m choosing Dark.