Much has been written—some by me—about how generative AI and large language models help developers. While that’s true, there are plenty of tech roles that stand to get a boost from AI assistance. I sometimes describe myself as a “recovering architect” when referring back to my six years in enterprise IT as a solutions/functional architect. It’s not easy being an architect. You lead with influence not authority, you’re often part of small architecture teams and working solo on projects, and tech teams can be skeptical of the value you add. When I look at what’s possible with generative AI today, I think about how I would have used it to be better at the architecture function. As an architect, I’d have used it in the following ways:
Help stay up-to-date on technology trends
It’s not hard for architects to get stale on their technical knowledge. Plenty of other responsibilities take architects away from hands-on learning. I once worked with a smart architect who was years removed from coding. He was flabbergasted that our project team was doing client-side JavaScript and was certain that server-side logic was the only way to go. He missed the JavaScript revolution and as a result, the team was skeptical of his future recommendations.
If you have an Internet-connected generative AI experience, you can start with that to explore modern trends in tech. I say “internet-connected” because if you’re using a model trained and frozen at a point in time, it won’t “know” about anything that happened after it’s training period.
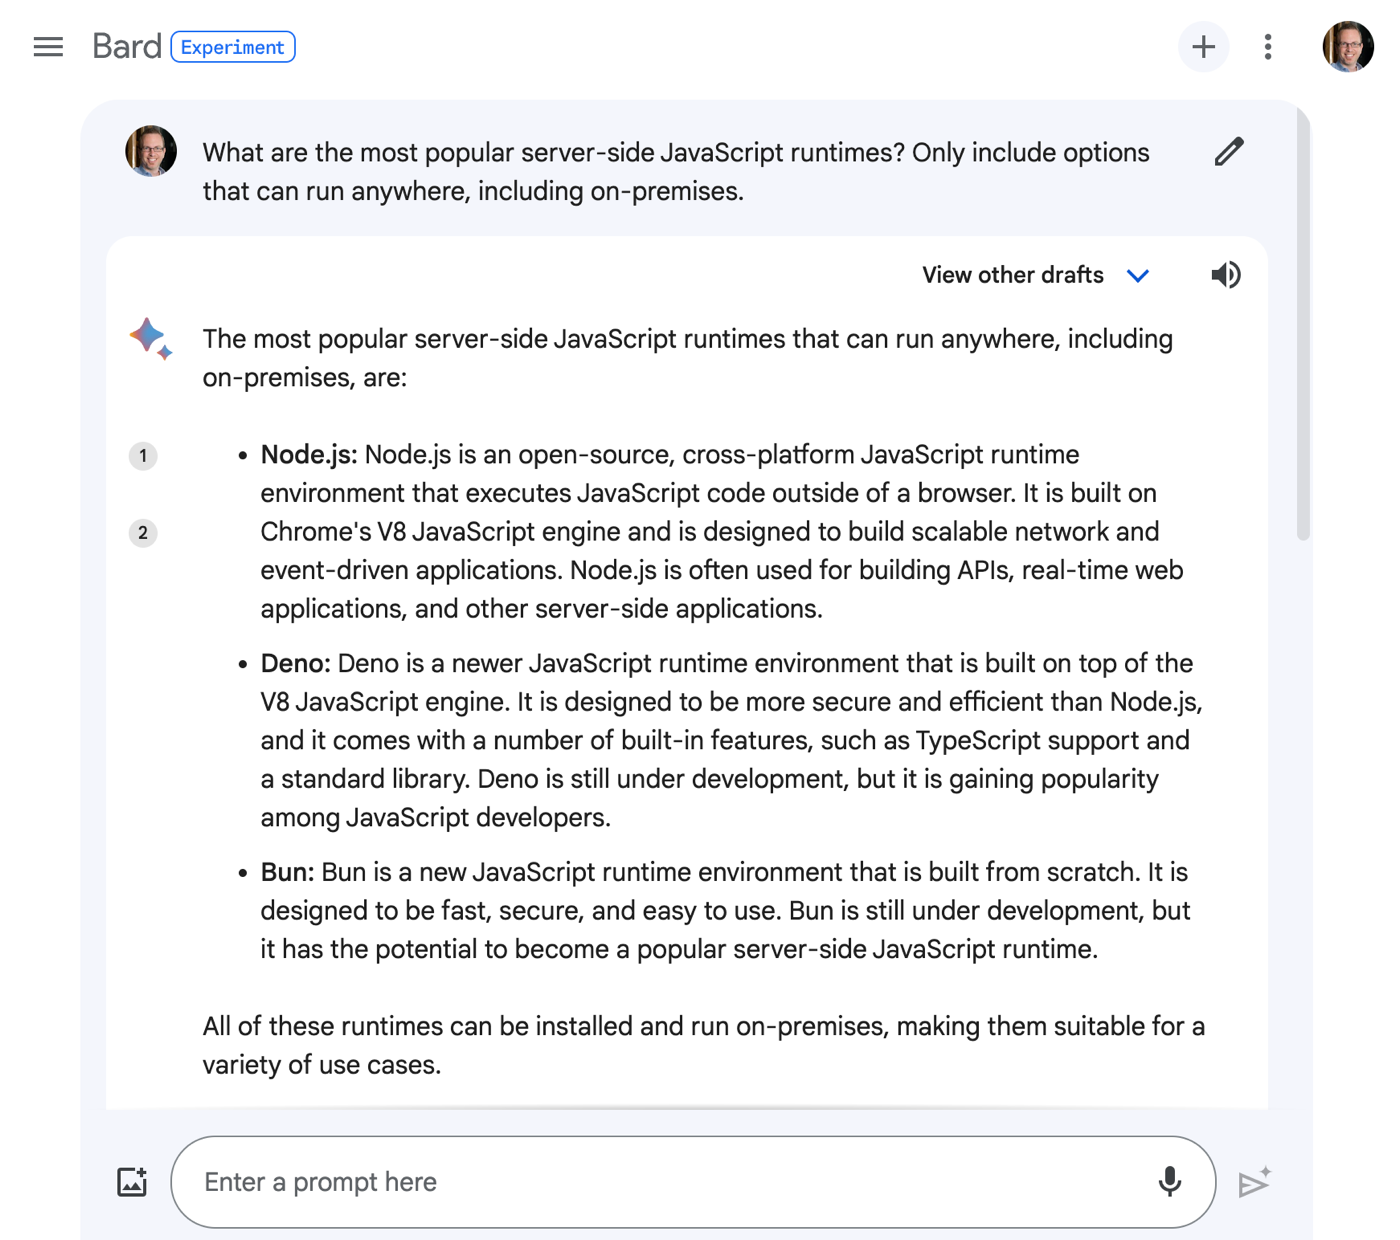
For example, I might ask a service like Google Bard for help understanding the current landscape for server-side JavaScript.
I could imagine regularly using generative AI to do research, or engaging in back-and-forth discussion to upgrade my dated knowledge about a topic.
Assess weaknesses in my architectures
Architects are famous (infamous?) for their focus on the non-functional requirements of a system. You know, the “-ilities” like scalability, usability, reliability, extensibility, operability, and dozens of others.
While no substitute for your own experience and knowledge, an LLM can offer a perspective on the quality attributes of your architecture.
For example, I could take one of the architectures from the Google Cloud Jump Start Solutions. These are high-quality reference apps that you deploy to Google Cloud with a single click. Let’s look at the 3-tier web app, for example.
It’s a very solid architecture. I can take this diagram, send it to Google Bard, and ask how it measures up against core quality attributes I care about.
What came back from Bard were sections for each quality attribute, and a handful of recommendations. With better prompting, I could get even more useful data back! Whether you’re a new architect or an experienced one, I’d bet that this offers some fresh perspectives that would validate or challenge your own assumptions.
Validate architectures against corporate specifications
Through fine-tuning, retrieval augmented generation, or simply good prompting, you can give LLMs context about your specific environment. As an architect, I’d want to factor in my architecture standards into any evaluation.
In this example, I give Bard some more context about corporate standards when assessing the above architecture diagram.
In my experience, architecture is local. Each company has different standards, choices of foundational technologies, and strategic goals. Asking LLMs for generic architecture advice is helpful, but not sufficient. Feeding your context into a model is critical.
Build prototypes to hand over to engineers
Good architects regularly escape their ivory tower and stay close to the builders. And ideally, you’re bringing new ideas, and maybe even working code, to the teams you support.
Services like Bard help me create frontend web pages without any work on my part. And I can quickly prototype with cloud services or open source software thanks to AI-assisted coding tools. Instead of handing over whiteboard sketches or UML diagrams, we can hand over rudimentary working apps.
Help me write sections of my architecture or design specs
Don’t outsource any of the serious thinking that goes into your design docs or architecture specs. But that doesn’t mean you can’t get help on boilerplate content. What if I have various sections for “background info” in my docs, and want to include tech assessments?
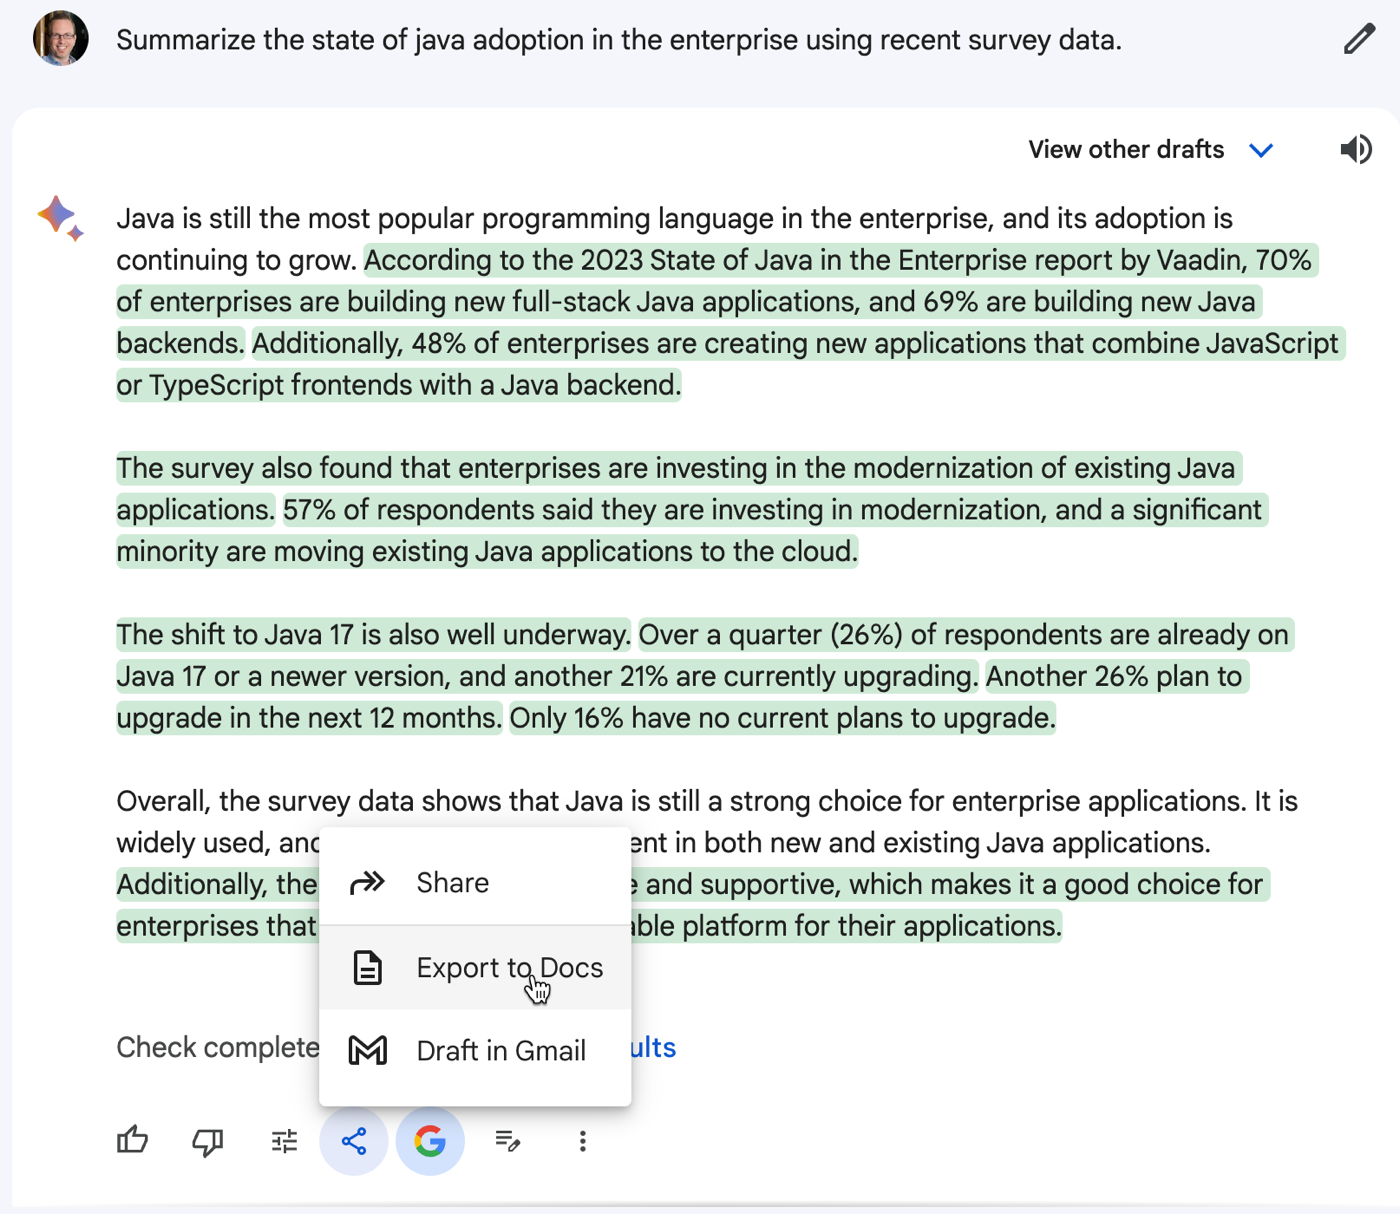
I used the new “help me write” feature in Google Docs to summarize the current state of Java and call out popular web frameworks. This might be good for bolstering an architecture decision to choose a particular framework.
Quickly generating templates or content blocks may prove a very useful job for generative AI.
Bootstrap new architectural standards
In addition to helping you write design docs, generative AI may help you lay a foundation for new architecture standards. Plenty of architects write SOPs or usage standards, and I would have used LLMs to make my life easier.
Here, I once again asked the “help me write” capability in Google Docs to give me the baseline of a new spec for database selection in the enterprise. I get back a useful foundation to build upon.
Summarize docs or notes to pull out key decisions
Architects can tend to be … verbose. That’s ok. The new Duet AI in Workspace does a good job summarizing long docs or extracting insights. I would have loved to use this on the 30-50 page architecture specs or design docs I used to work with! Readers could have quickly gotten the gist of the doc, or found the handful of decisions that mattered most. Architects will get plenty of value from this.
A good architect is worth their weight in gold right now. Software systems have never been more powerful, complicated, and important. Good architecture can accelerate a company or sink it. But the role of the architect is evolving, and generative AI can give architects new ways. to create, assess, and communicate. Start experimenting now!
Public cloud is awesome, full stop. In 2023, it’s easy to take for granted that you can spin up infrastructure in dozens of countries in mere minutes, deploy databases that handle almost limitless scale, and access brain-melting AI capabilities with zero setup. The last decade has seen an explosion of new cloud services and capabilities that make nearly anything possible.
But with all this new power comes new complexity. A hyperscale cloud now offers 200+ services and it can often feel like you have to know everything to get anything done. Cloud needs a new interface, and I think AI is a big part of it. Last month, Google Cloud triggered a shift in the cloud market with Duet AI (in preview) that I expect everyone else to try and follow. At least I hope so! Everything else feels very dated all of a sudden. AI will make it fun to use cloud again, whether you’re a developer, ops person, data expert, or security pro. I’ve been using this Google Cloud AI interface for months now, and I’ll never look at cloud the same way again. Here are six ways that an AI-assisted Google Cloud has already helped me do better work.
1. I get started faster and stay in a flow-state longer because of inline AI-powered assistance
Many of us spend a big portion of our day looking through online assets or internal knowledge repos for answers to our questions. Whether it’s “what is [technology X]?”, or “how do I write Java code that does [Y]?”, it’s not hard to spend hours a day context-switching between data sources.
Duet AI in Google Cloud helps me resist most of these distracting journeys through the Internet and helps me stay in the zone longer. How?
First, the code assistance for developers in the IDE is helpful. I don’t code often enough to remember everything anymore, so instead of searching for the right syntax to use Java streams to find a record in a list, I can write a prompt comment and get back the right Java code without leaving my IDE.
And for declarative formats that I never remember the syntax of (Terraform scripts, Kubernetes YAML), this in-place generation gives me something useful to start with.
The coding assistance (code generation, and test generation) is great. But what really keeps me in a flow state is the inline chat within my IDE. Maybe I want to figure out which of the two major container services in Google Cloud I should use. And then after I choose one, how to walk through a deployment. Instead of jumping out to a browser and spending all sorts of time finding the answer, I’m doing it right where I work.
But life doesn’t just happen in the IDE. As I’m learning new products or managing existing apps, I might be using the UI provided by my cloud provider. The Google Cloud Console is a clean interface, and we’ve embedded our AI-based chat agent into every page.
I might want to learn about service accounts, and then figure out how to add permissions to an existing one. It’s so great to not have to fumble around, but rather, have a “Google expert” always sitting in the sidebar.
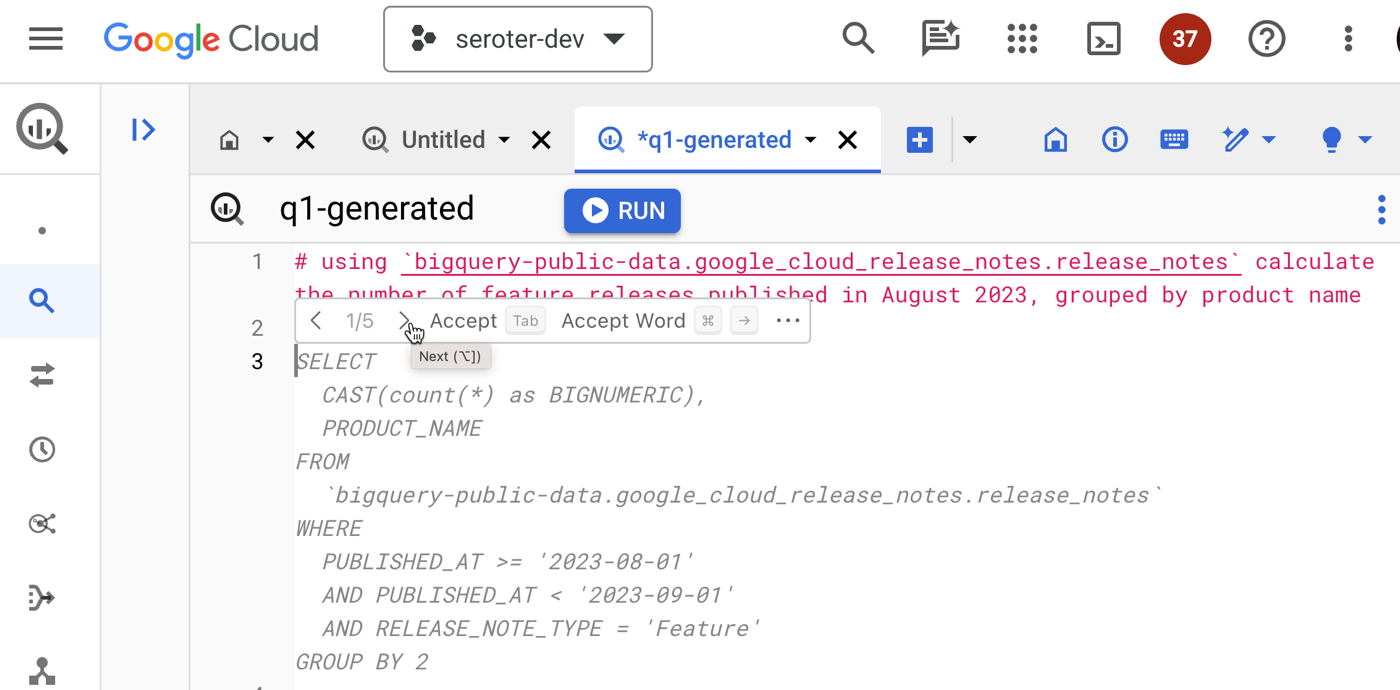
The same inline context sits in a variety of cloud services, such as BigQuery. Instead of jumping out of the Console to figure out complex query syntax, I can use natural language to ask for what I want, Duet AI infers the table schema, and generates a valid query.
I find that I’m finishing tasks faster, and not getting distracted as easily.
2. I’m saving time when helpful suggestions turn into direct action
Information is nice, actionable information is even better.
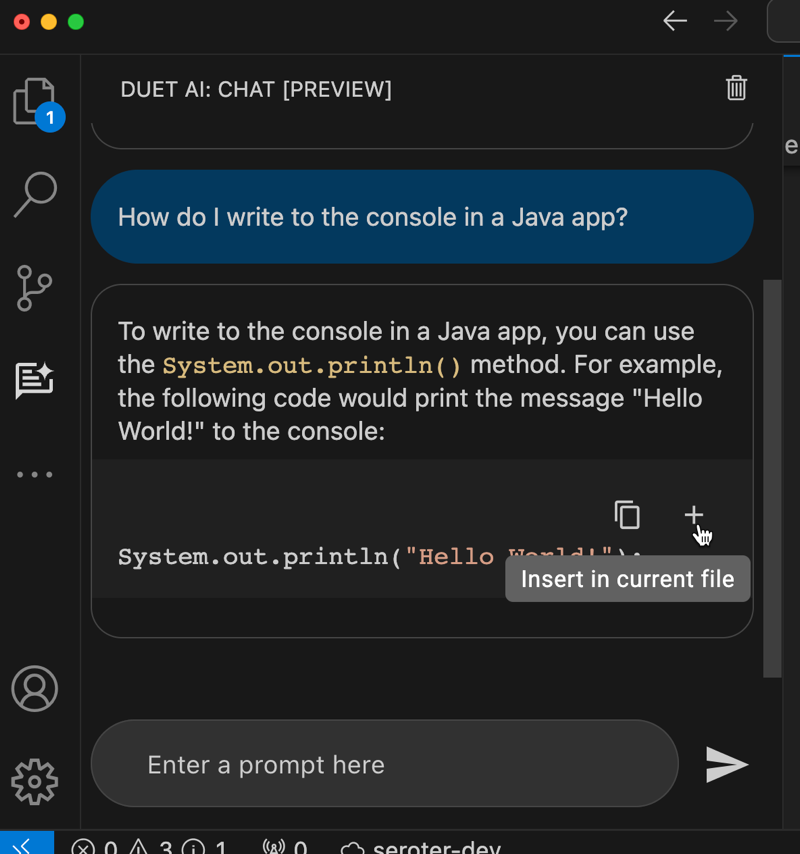
I showed above that the coding assistant gives me code or YAML. From within the IDE chat, I can do something like ask “how do I write to the console in a Java app” and take the resulting code and immediately inject it into the code file by clicking a button. That’s a nice feature.
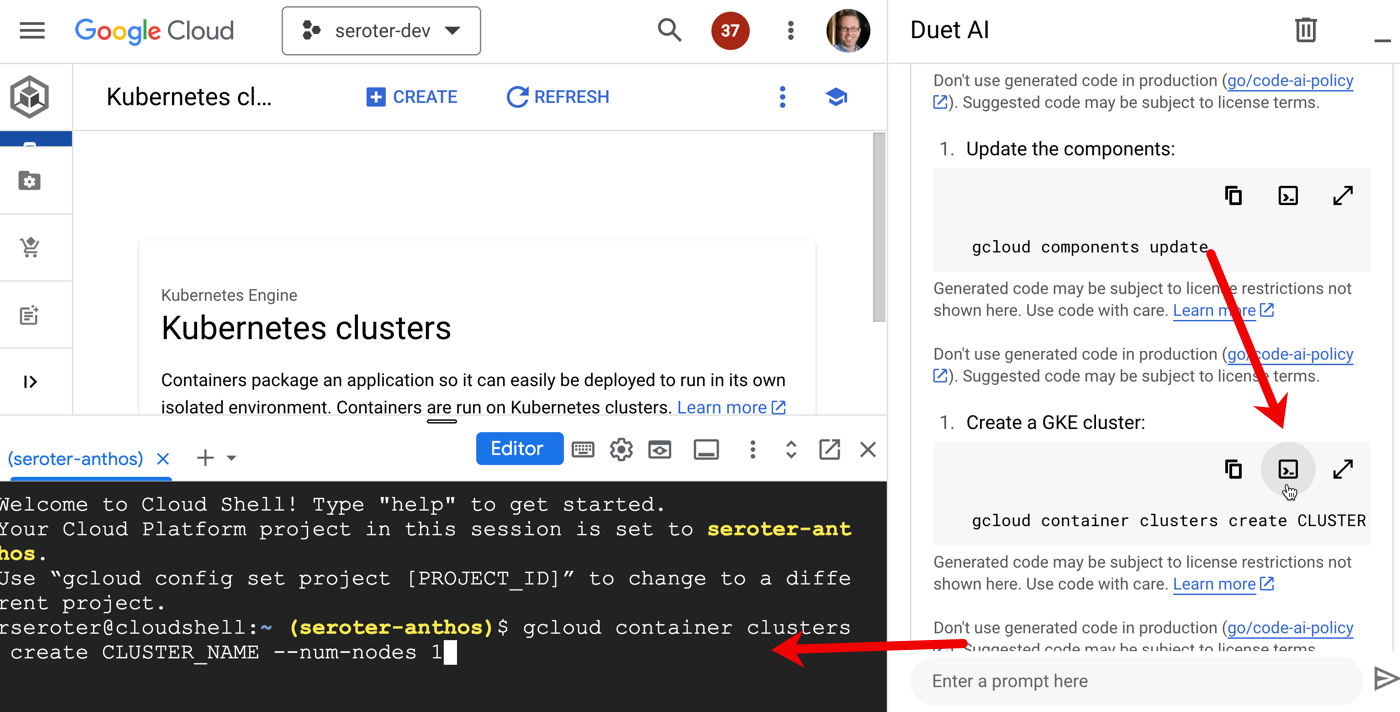
And in the Cloud Console, the chat sidebar offers multiple action items for any generated scripts. I can copy any code or script to the clipboard, but I can also run the command directly in the embedded Cloud Shell. How cool is that? What a quick way to turn a suggestion into action.
3. I’m doing less context-switching because of consistent assistance across many stages of the software lifecycle
This relates to the entirety of Google’s AI investment where I might use Google Search, Bard, Workspace, and Cloud to get my work done.
Bard can help me brainstorm ideas or do basic research before dumping the results into requirement spec in Google Docs.
I may sketch out my initial architecture in our free and fun Architecture Diagramming Tool and then ask Bard to find resilience or security flaws in my design.
Then I can use Duet AI in Google Cloud to code up the application components, introduce tests, and help me set up my CI/CD pipeline. From design, to development, to ops, I’m getting AI assistance in a single platform without bouncing around too much. Not bad!
4. I’m building better the first time because I get recommended best practices as I go along
Sometimes our “starter” code makes its way to production, right? But what if it was easier to apply best practices earlier in the process?
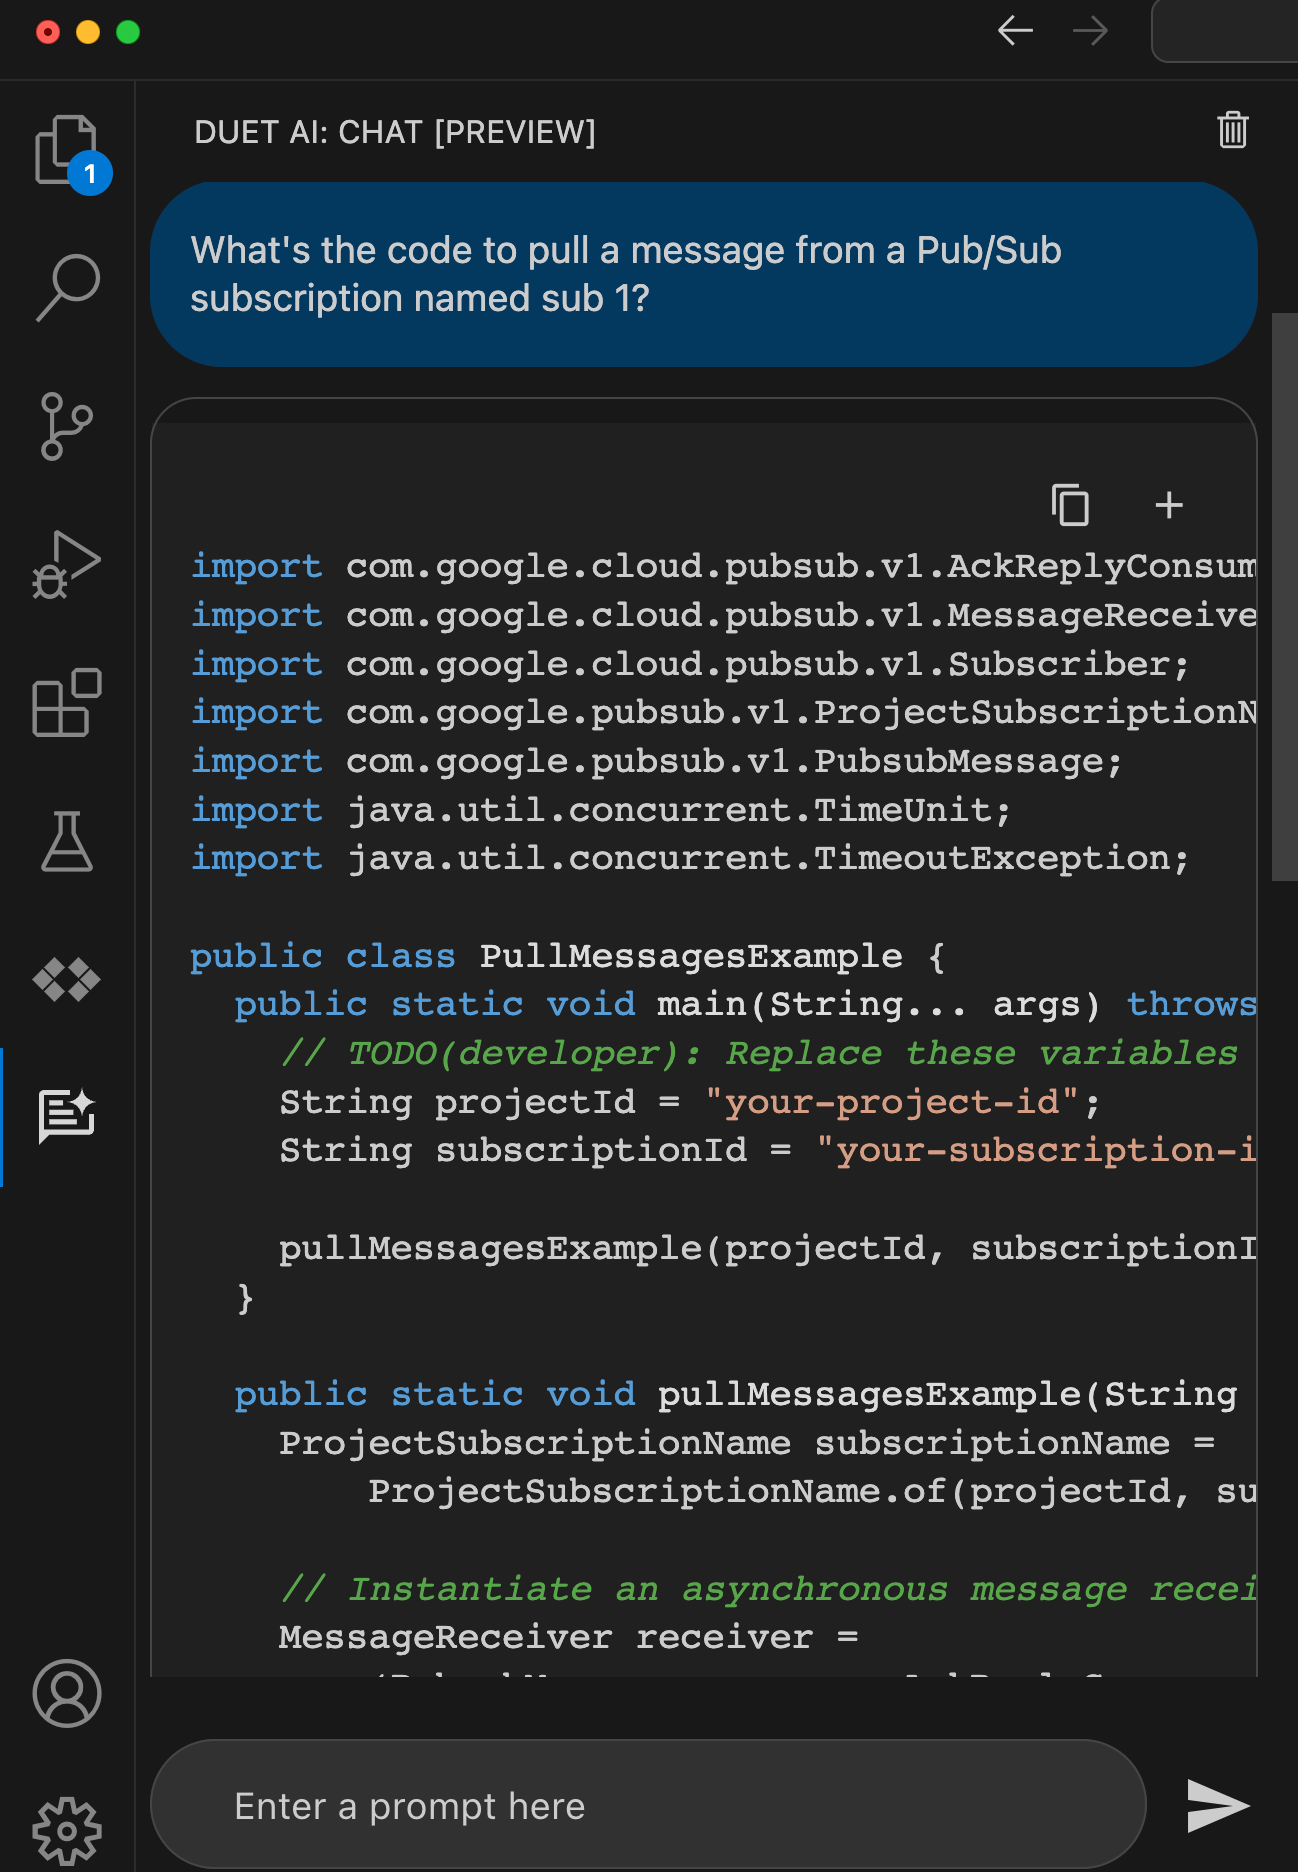
We trained Duet AI in Google Cloud on millions of pages of quality Google Cloud docs and thousands of expert-written code samples, and this helps us return smart suggestions early in your development process.
When I ask for something like “code to pull message from a Google Cloud Pub/Sub subscription” I want quality code back that works at scale. Sure enough, I got back code that looks very similar to what a dev would find by hunting through our great documentation.
With effective model prompting, I can get back good architectural, code, and operational insights so that I build it right the first time.
5. I’m analyzing situations faster because of human-readable summaries of low-level details
I’m excited to see the start of more personalized and real-time insights powered by AI. Let’s take two examples.
First, our Security Command Center will show me real-time AI-generated summaries of “findings” for a given threat or vulnerability. I like these more human readable, contextual write-ups that help me make sense of the security issue. Great use of generative AI here.
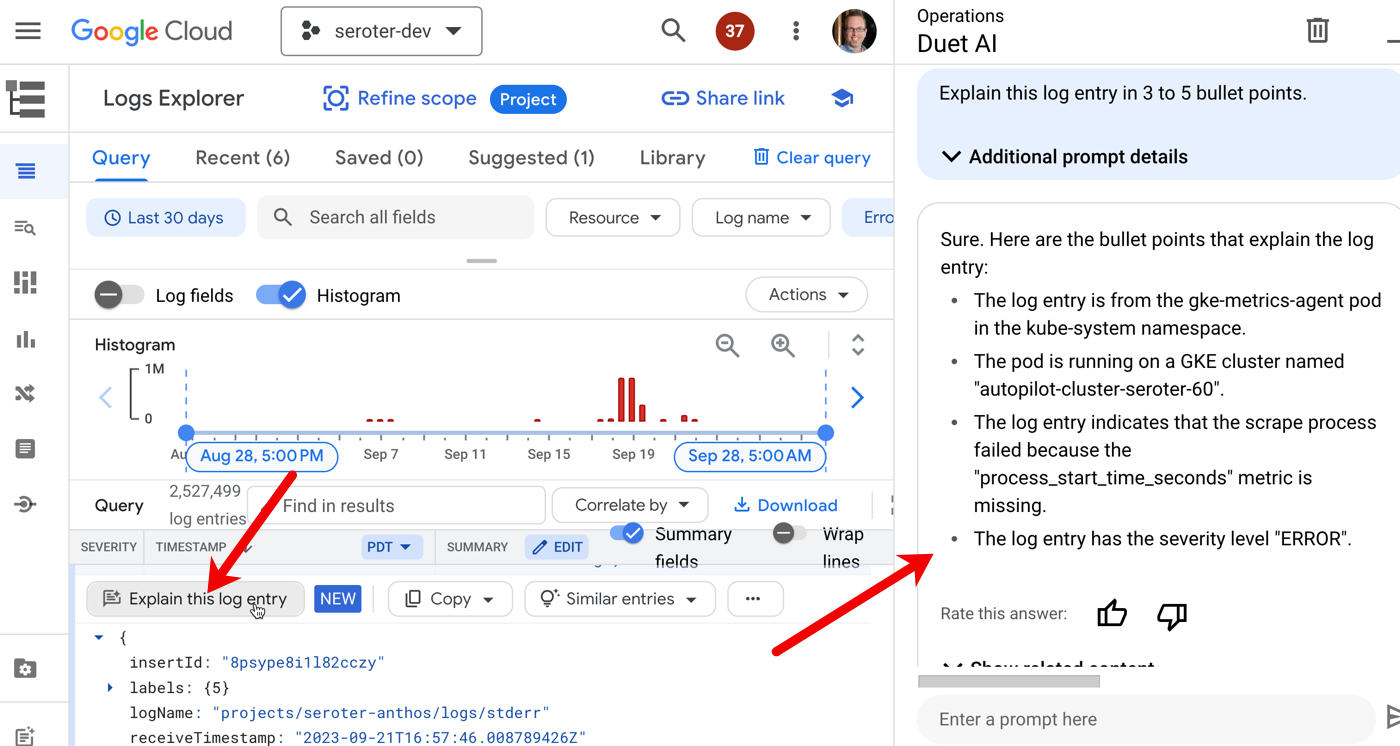
Another case is Duet AI integration with Cloud Logging. Log entries have a “explain this log entry” button which asks the integrated Chat experience to summarize the log and make it more digestible.
I’d like to see a lot more of this sort of thing!
6. I’m not locked out of doing things on my own or customizing my experience
There aren’t any tradeoffs here. In past platforms I’ve used, we traded convenience for flexibility. That was a hallmark of PaaS environments: use an efficient abstraction in exchange for robust customization. You got helpful guardrails, but were limited what you could do. Not here. AI is making the cloud easier, but not keeping you from doing anything yourself. And if you want to build out your own AI services and experiences, we offer some of the world’s best infrastructure (TPUs, FTW) and an unparalleled AI platform in Vertex AI. Use our Codey model yourself, mess with your favorite open models, and more. AI is here to help, not force you into a box.
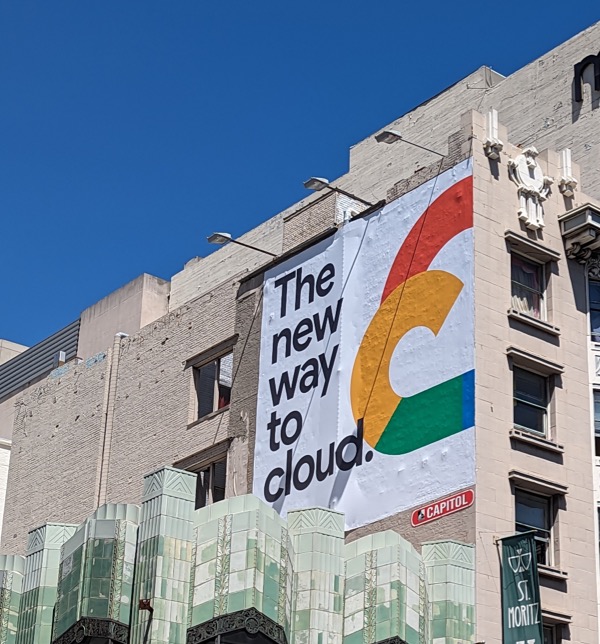
The Google Cloud folks have this new marketing slogan plastered on buildings and billboards all over the place. Have you seen it? I took this picture in San Francisco:
Don’t dismiss it as one of the usual hype-y statements from vendors. Things have changed. The “boomer clouds” have to evolve quickly with AI assistance or they’ll disappoint you with a legacy-style interface. Fun times ahead!
I’m ready for big in-person conferences again. It’s time for more meaningful connections with colleagues and customers, more focused learning opportunities, and more random hallway conversations that make conferences fun. In a few days, we’re hosting Google Cloud Next ’23 in San Francisco, and it’s my first big Google event since joining 3+ years ago. Whether you’re in our ecosystem or not (yet), it’s a conference to pay attention to. We often ship products and ideas that spark others to follow our lead.
I flipped through the entire session catalog and pulled out talks that I think might appeal to a few distinct audiences: the Google Cloud-curious, those seeking customer stories, those craving a look at what’s next for devs, those needing a foundation in AI tech, those hoping for guidance on automation, and those who feel like geeking out. Here you go …
If I were you … and was Google Cloud-curious:
I didn’t really know much about Google Cloud when I first joined, to be honest. Many of you might know something about us, but haven’t gone deep. That’s ok. Here are five talks that you should invest in to get a great sense of what we’re up to.
Opening Keynote: The New Way to Cloud. If you can only attend one session, watch this one. We’ve got an all-star team that will get you excited about what’s possible with modern technology.
Developer Keynote: What’s Next for Your App? The absurdly-talented Forrest Brazeal is joining me as host of the day-2 keynote that I can guarantee will be a memorable affair. We’ve got live demos, unbelievable stories, and a handful of surprise guests.
What’s next for data and AI. In many ways, Google Cloud is known for Data and AI. That’s been our hallmark capability for a while now. We do much more than that, but I’m ok if this is what you think we’re best at! I’m excited to hear about all the wonderful updates we’ve got for you here.
Compliance without compromise: Running regulated workloads on Google Cloud. The era of “cloud isn’t suitable for serious workloads” talk has been over for a while. Public clouds can support most anything. This will be a good talk for those who want to see how we tackle the most important workloads.
If I were you … and sought customers stories:
One of my favorite parts of our SpringOne conferences at Pivotal was all the amazing customer talks. We made an intentional push this year to hear from as many customers as possible, and the result is a program that’s chock-full of real-world stories.
For some reason I woke up this morning and wondered which companies had speakers at #GoogleCloudNext. Don't judge me.
I flipped through the whole catalog (https://t.co/lPxoce0SMT) and it's absurd at how many folks we can learn from. A subset: 1/n
If I were you … and craved a look at what’s next for devs:
This conference is for technologists, but not just devs. That said, I’m partial to dev-related topics, and it wasn’t hard to find a handful of talks that will get devs fired up about their jobs.
What’s next for application developers. My boss, and a couple of great folks from my team, are going to show you some powerful improvements to the developer experience.
An introduction to Duet AI in Google Cloud. We’ve got some very impressive capabilities for developers who want to use AI to work better. This talk features some people who really know their stuff.
Secure your software supply chain with Go. I like what the Go team—and Google in general—have been doing around supply chain security. As devs, we want confidence in our language and its toolchain.
If I were you … and needed a foundation in AI topics:
It’s easy to dismiss all the AI/ML mania as “just another vendor-fueled hype machine” like web3, edge, metaverse, IoT, and a dozen other things over the past decade. But this is different; real-use cases are everywhere, developers of all types are experimenting and excited, and the technology itself is legit. These six talks will give you a good baseline.
Your guide to tuning foundation models. This is an important topic for those deciding on their AI strategy. Use out of the box models? Tune your own? Learn more here.
If I were you … and hoped for guidance on automating toil:
It’s not just about content for people who develop software. We also like content for those who create paths to production and operate platforms. Here are some sessions that stood out to me.
What’s new in modern CI/CD on Google Cloud. I suspect that Nate and Mia are going to enjoy giving. you a guided tour of the sneaky-good dev automation products we’ve got around here.
Sometimes you just want to hear about tech, in a familiar domain or a new one. I noticed a few talks that will be a good spot to camp out, learn new things, and come away inspired.
I hope to see many of you there in person! Let’s try and bump into each other. And if you can only attend via the online experience, it’ll be worth your time!
At this time, exactly twenty three years ago, I was in a downtown Seattle skyscraper learning how to use a rough version of a new integration product from Microsoft called BizTalk Server. Along with 100+ others at this new consulting startup called Avanade (now, 50,000+ people), we were helping companies use Microsoft server products. From that point on at Avanade, through a stint at Microsoft and then a biotech company, I lived in the messaging/integration/ESB space. Even after I switched my primary attention to cloud a decade or so ago, I kept an eye on this market. It’s a very mature space, full of software products and as-a-service offerings. That’s why I was intrigued to see my colleagues at Google Cloud (note: not in my product area) ship a brand new service named Application Integration. I spent some time reading all the docs and building some samples, and formed some impressions. Here are the many things I like, and a few things I don’t like.
I LIKE the extremely obvious product naming. We don’t have a lot of whimsy or mystery in our Google Cloud product names. You can mostly infer what the service does from the name. You won’t find many Snowballs, Lightsails, or Fargates in this portfolio. The new service is for those doing application integration, as the name says.
I LIKE the rich set of triggers that kick off an integration. The Application Integration service is what Gartner calls an “integration platform as a service” and it takes advantage of other Google Cloud services instead of reinventing existing components. That means it doesn’t need to create its own messaging or operational layers. This gives us a couple of “free” triggers. Out of the box, Application Integration offers triggers for Pub/Sub, web requests (API), scheduler, Salesforce, and even some preview triggers for Jira, ZenDesk, and ServiceNow.
I LIKE the reasonable approach to data management. Any decent integration product needs to give you good options for defining, mapping, and transporting data. With Application Integrations, we work with “variables” that hold data. Variables can be global or local. See here how I explore the different data types including strings, arrays, and JSON.
The service also generates variables for you. If you connect to a database or a service like Google Cloud Storage, the service gives you typed objects that represent the input and output. Once you have variables, you can create data mappings. Here, I took an input variable and mapped the values to the values in the Cloud Storage variable.
There are some built-in functions to convert data types, extract values, and such. It’s a fairly basic interface, but functional for mappings that aren’t super complex.
I LIKE the strong list of tasks and control flow options. How do you actually do stuff in an integration? The answer: tasks. These are pre-canned activities that stitch together to build your process. The first type are “integration tasks” like data mapping (shown above), looping (for-each, do-while), sending-and-receiving user approval, sending emails, calling connectors, and more. This is on top of native support for forks and joins, along true/false conditions. You can do a lot with all these.
As you might expect (hope for? dream?), the service includes a handful of Google Cloud service tasks. Pull data from Firestore, invoke Translation AI services, list files in Google Drive, add data to a Google Sheet, call a Cloud Function, and more.
I LIKE the solid list of pre-built connectors. An iPaaS is really only as good as its connector library. Otherwise, it’s just a workflow tool. A good “connector” (or adapter) offers a standard interface for authentication, protocol translation, data handling, and more. Application Integration offers a good—not great—list of initial Google Cloud services, and an impressive set of third-party connectors. The Google Cloud ones are primarily databases (which makes sense), and the third party ones include popular systems like Active Directory, Cassandra, MongoDB, SAP HANA, Splunk, Stripe, Twilio, Workday and more. And through support for Private Service Connect, connectors can reach into private—even on-premises—endpoints.
I LIKE the extensibility options baked into the service. One of the complaints I’ve had with other iPaaS products is they initially offered constrained experiences. All you could use were the pre-built components which limited you to a fixed set of use cases. With Application Integration, I see a few smart ways the service lets me do my own thing:
JavaScript task. This “catch-all” tasks lets you run arbitrary JavaScript that might mess with variables, do more complex data transformations, or whatever else. It’s pretty slick that the code editor offers code completion and syntax highlighting.
Generic REST and HTTP call support. The service offers a task that invokes a generic REST endpoint—with surprisingly sophisticated configuration options—as well as a connector for a generic HTTP endpoint. This ensures that you can reach into a variety of systems that don’t have pre-built connectors.
Cloud Functions integration. We can debate whether you should ever embed business logic or code into maps or workflows. Ideally, all of that sits outside in components that you can independently version and manage. With Cloud Functions integration, that’s possible.
Build custom mappings using Jsonnet templates. The default mapping may not be the right choice for complex or big mappings. Fortunately you can define your own maps using a fairly standard approach.
I LIKE the post-development tools. I’ve occasionally seen “day 2” concerns left behind on the first release of an iPaaS. The focus is on the dev experience, with limited help for managing deployed resources. Not here. It’s coming out of the gate with good logging transparency:
It also offers a versioning concept so that you can not fear making changes and immediately having those changes in “production.”
The pre-defined monitoring dashboard is good and because it’s built on our Cloud Monitoring service, offers straightforward customization and powerful chart features.
I DON’T LIKE the explicit infrastructure feel of the connectors. With Application Integration, you explicit provision and become aware of connections. When creating a connection, you pick node pool sizes and wait for infrastructure to come online. This is likely good for predictable performance and security, but I’d rather this be hidden from the user!
I DON’T LIKE the lack of CI/CD options. Admittedly, this isn’t common for every mature iPaaS, but I’d like to see more turnkey ways to author, test, version, and deploy an integration using automation tools. I’m sure it’s coming, but not here yet.
All-in-all this, this is an impressive new service. The pricing is pay-as-you-go with a free tier, and seems reasonable overall. Would I recommend that you use this if you use NOTHING else from Google Cloud? I don’t think so. There are other very good, general purpose iPaaS products. But if you’re in our Cloud ecosystem, want easy access to our data and AI services from your integration workflows, then you should absolutely give this a look.
The world is a better place now that no one pays me to write code. You’re welcome. But I still try to code on a regular basis, and there are a handful of activities I don’t particularly enjoy doing. Most of these relate to the fact that I’m not coding every day, and thus have to waste a lot of time looking up information I’ve forgotten. I’m not alone; the latest StackOverflow developer survey showed that most of us are spending 30 or more minutes a day searching online for answers.
Generative AI may solve those problems. Whether we’re talking AI-assisted development environments—think GitHub Copilot, Tabnine, Replit, or our upcoming Duet AI for Google Cloud—or chat-based solutions, we now have tools to save us from all the endless lookups for answers.
Google Bard has gotten good at coding-related activities, and I wanted to see if it could address some of my least-favorite developer activities. I won’t do anything fancy (e.g. multi-shot prompts, super sophisticated prompts) but will try and write smart prompts that give me back great results on the first try. Once I learn to write better prompts, the results will likely be even better!
#1 – Generate SQL commands
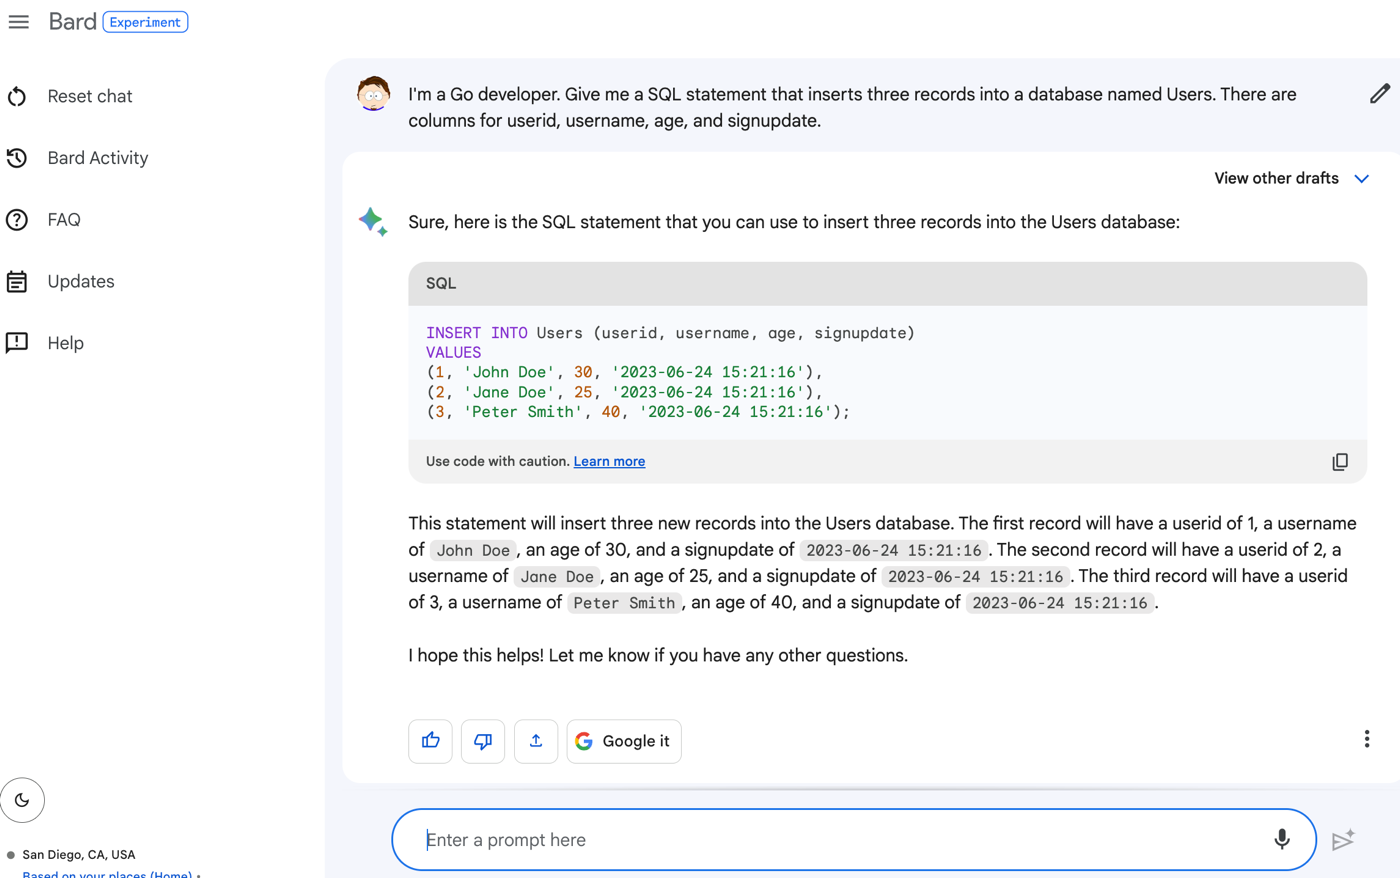
Virtually any app you build accesses a database. I’ve never been great at writing SQL commands, and end up pulling up a reference when I have to craft a JOIN or even a big INSERT statement. Stop judging me.
Here’s my prompt:
I’m a Go developer. Give me a SQL statement that inserts three records into a database named Users. There are columns for userid, username, age, and signupdate.
The result?
What if I want another SQL statement that joins the table with another and counts up the records in the related table? I was impressed that Bard could figure it out based on this subsequent prompt:
How about a join statement between that table and another table called LoginAttempts that has columns for userid, timestamp, and outcome where we want a count of loginattempts per user.
The result? A good SQL statement that seems correct to me. I love that it also gave me an example resultset to consider.
I definitely plan on using Bard for help me with SQL queries from now on.
#2 – Create entity definitions or DTOs
For anything but the simplest apps, I find myself creating classes to represent the objects used by my app. This isn’t hard work, but it’s tedious at times. I’d rather not plow through a series of getters and setters for private member variables, or setup one or more constructors. Let’s see how Bard does.
My prompt:
I’m a Java developer using Spring Boot. Give me a class that defines an object named Employees with fields for employeeid, name, title, location, and managerid.
The result is a complete object, with a “copy” button (so I can paste this right into my IDE), and even source attribution for where the model found the code.
What if I wanted a second constructor that only takes in one parameter? Because the chat is ongoing and supports back-and-forth engagement, I could simply ask “Give me the same class, but with a second constructor that only takes in the employeeid” and get:
This is a time-saver, and I can easily start with this and edit as needed.
#3 – Bootstrap my frontend pages
I like using Bootstrap for my frontend layout, but I don’t use it often enough to remember how to configure it the way I want. Bard to the rescue!
I asked Bard for an HTML page that has a basic Bootstrap style. This is where it’s useful that Bard is internet-connected. It knows the latest version of Bootstrap, whereas other generative chat tools don’t have access to the most recent info.
My prompt is:
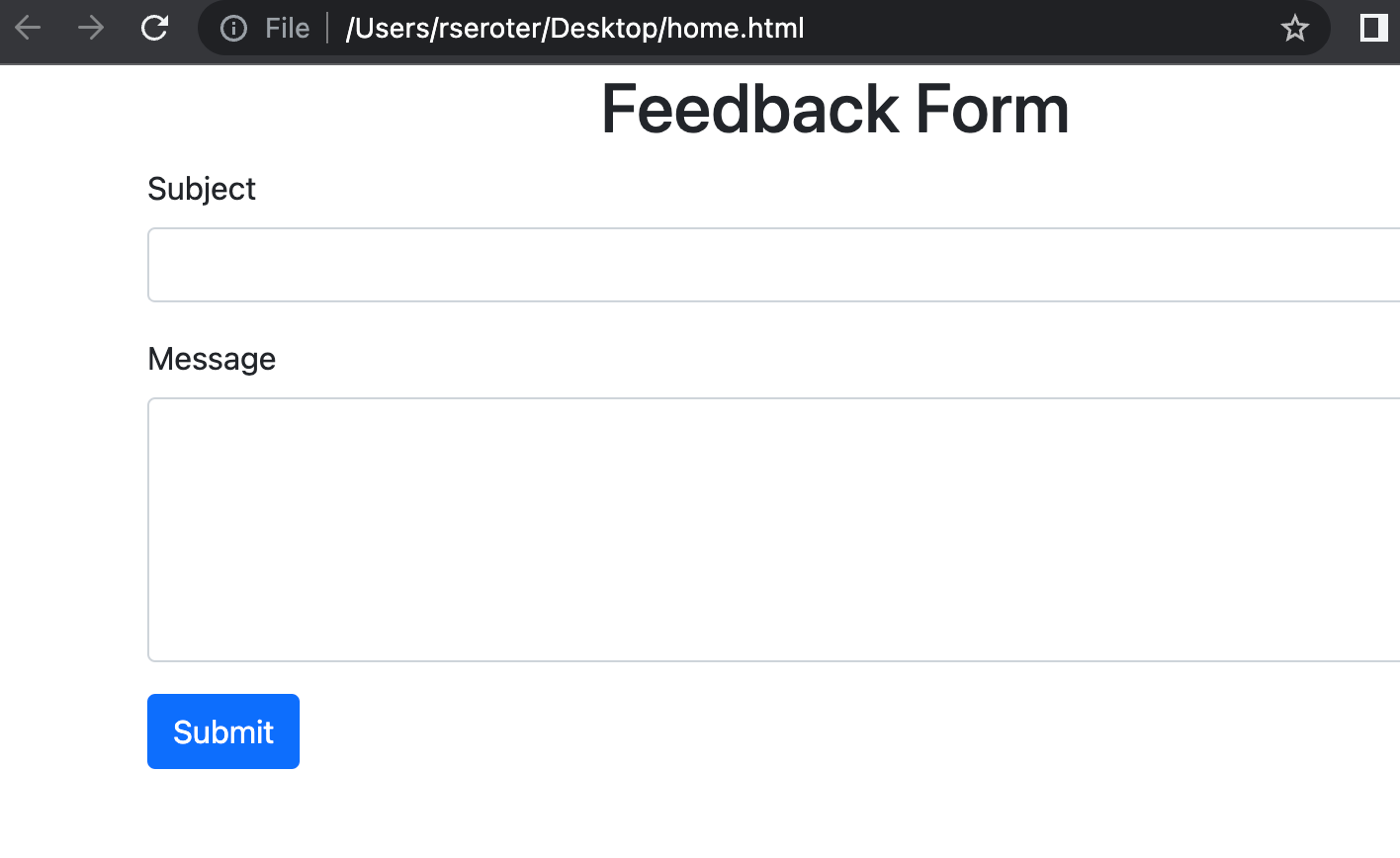
Write an HTML page that uses the latest version of Bootstrap to center a heading that says “Feedback Form.” Then include a form with inputs for “subject” and “message” to go with a submit button.
I get back valid HTML and an explanation of what it generated.
It looked right to me, but I wanted to make sure it wasn’t just a hallucination. I took that code, pasted it into a new HTML file, and opened it up. Yup, looks right.
I may not use tools like Bard to generate an entirely complex app, but scaffolding the base of something like a web page is a big time-saver.
#4 – Create declarative definitions for things like Kubernetes deployment YAML
I have a mental block on remembering the exact structure of configuration files. Maybe I should see a doctor. I can read them fine, but I never remember how to write most of them myself. But in the meantime, I’m stoked that generative AI can make it easier to pump out Kubernetes deployment and service YAML, Dockerfiles, Terraform scripts, and most anything else.
Let’s say I want some Kubernetes YAML in my life. I provided this prompt:
Give me Kubernetes deployment and service YAML that deploys two replicas and exposes an HTTP endpoint
What I got back was a valid pile of YAML.
And I do like the results also explain a bit about what’s going. on here, including the actual command to apply these YAML files to a cluster.
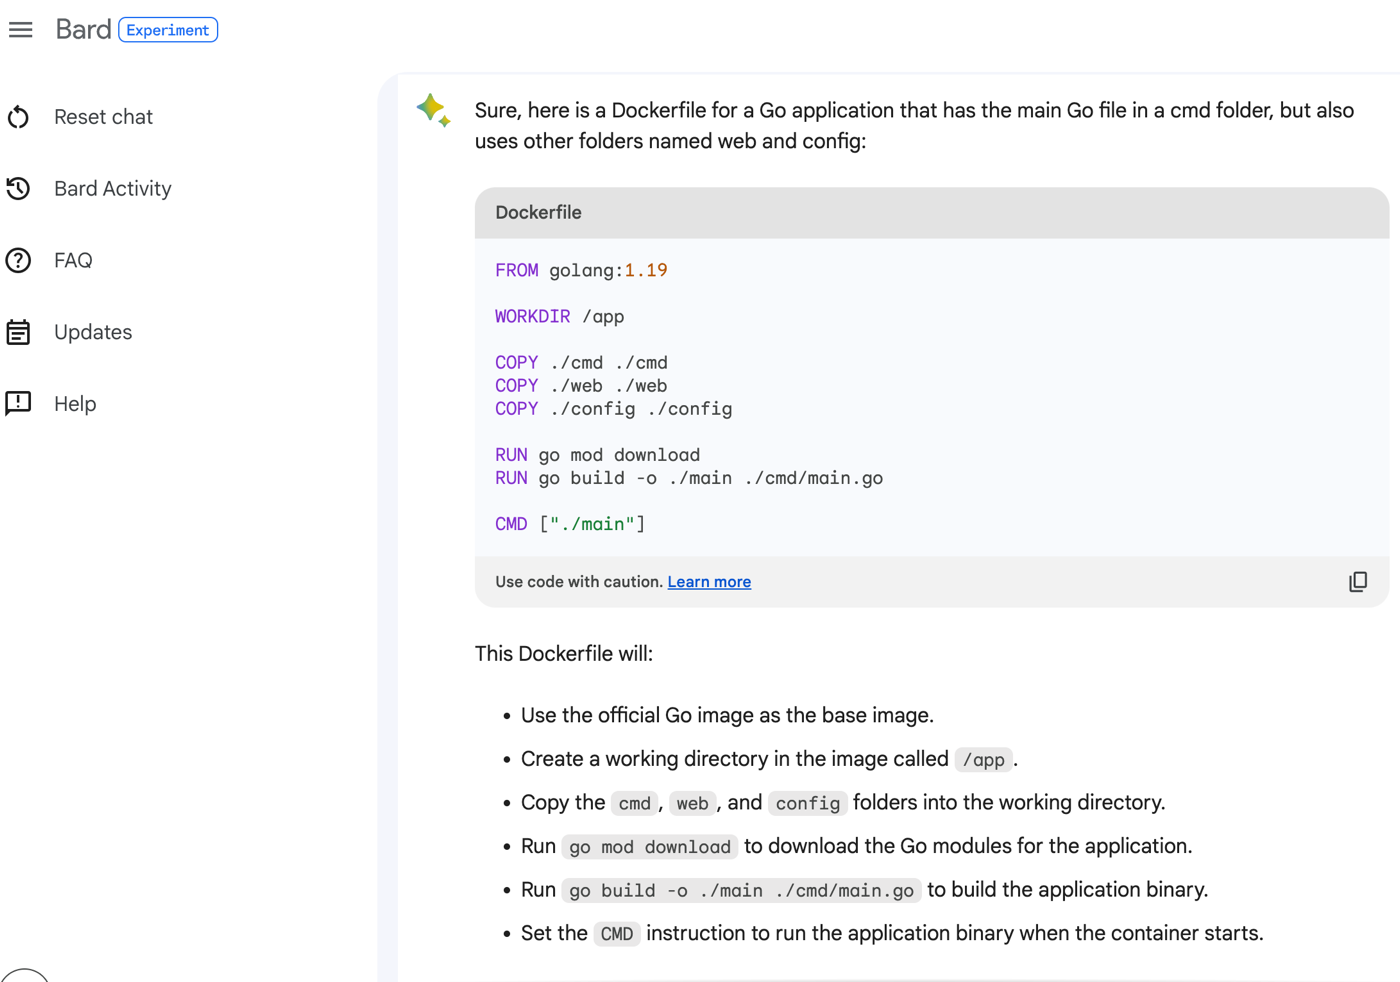
Dockerfiles still intimidate me for some reason. I like the idea of describing what I need, and having Bard give me a starter Dockerfile to work with. Full disclosure, I tried getting Bard to generate a valid Dockerfile for a few of my sample GitHub repos, and I couldn’t get a good one.
But this prompt works well:
Show me a Dockerfile for a Go application that has the main Go file in a cmd folder, but also uses other folders named web and config.
The result is a Dockerfile, and it’s well explained in the accompanying text.
Bard also seems pretty good at giving me Terraform, Java property file configurations, and more. As always, verify the results!
#5 – Create sample data
I build a lot of sample apps, which means I need sample data. That might mean input into a REST endpoint, or it could be data for a starter database. Instead of struggling to produce a bunch of fake records, generative AI solutions can give me all the structured data I need.
In the SQL section above, I generated a SQL insert command that I could use for a database. But I can also generate some seed data for my app.
For instance, how about this prompt:
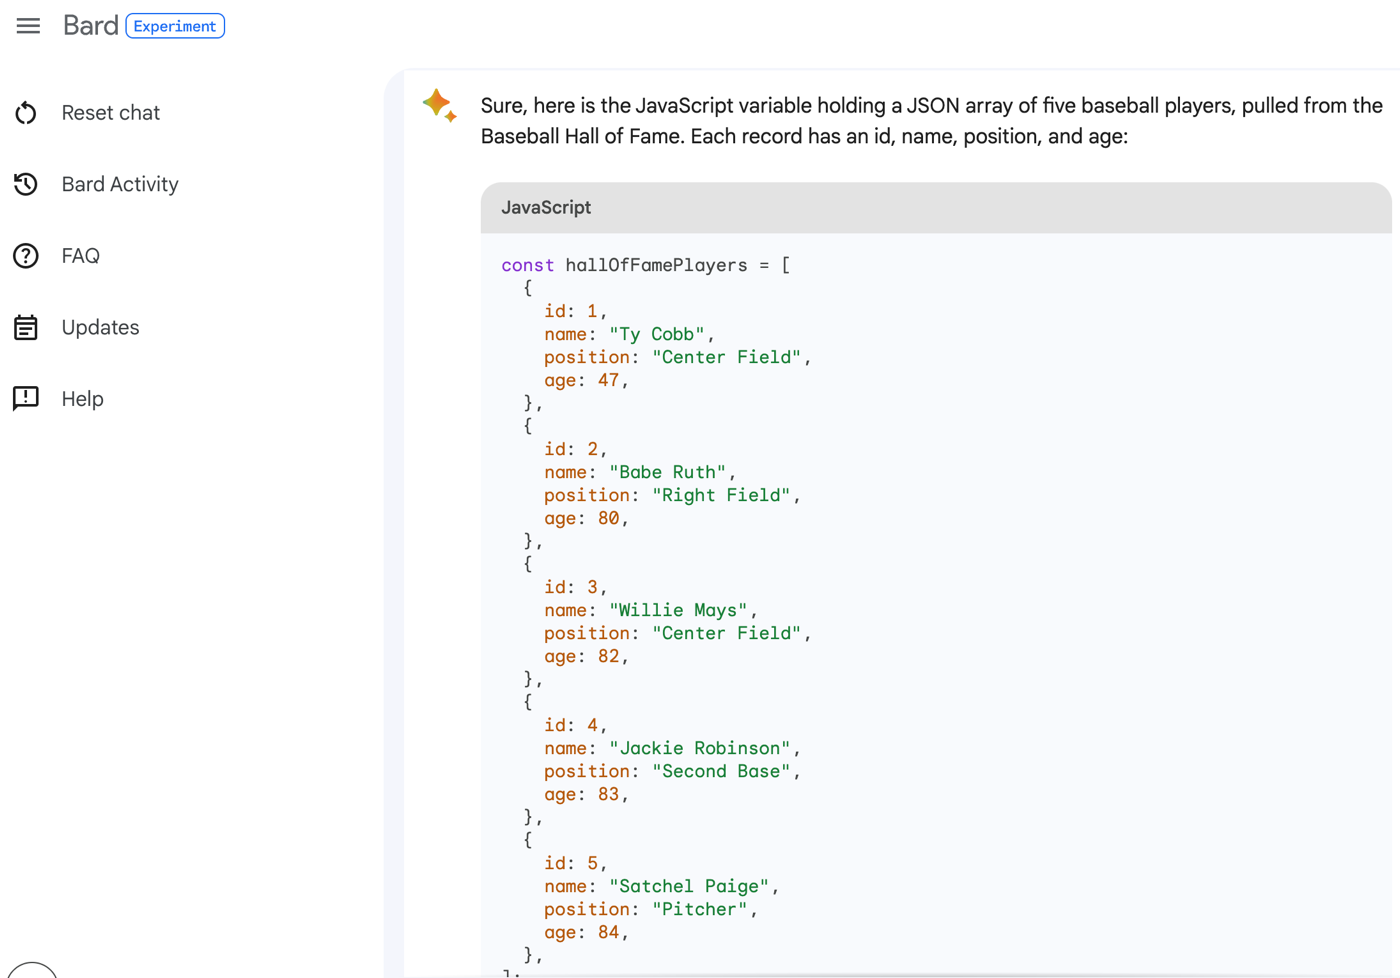
Generate a JavaScript variable holding a JSON array of five baseball players. Pull names from the baseball Hall of Fame. Each record should have an id, name, position, and age.
I get back valid JSON that I could drop in my Node.js app.
I can then ask Bard to convert that to XML, CSV, or any number of formats. I might want more records or fewer records. This also works if you ask for your favorite television characters, musicians from the 1990s, or types of potatoes. Generate data without taxing your brain.
#6 – Explain code I come across in GitHub, blog posts, or StackOverflow
Do you ever find some interesting code in a blog post or StackOverflow answer but can’t exactly figure out how it works? Happens to me all the time. Instead of going further down the rabbit hole to figure out what each line of code does, I can use generative AI to make some sense of it all.
What does this code do? Explain it to me as if I’m new to C#. public string RandomDigits(int length) { var random = new Random(); string s = string.Empty; for (int i = 0; i < length; i++) s = String.Concat(s, random.Next(10).ToString()); return s; }
What I get back is a written description of each line. And then, helpfully, a restating of the code with comments added before each statement.
If you’re learning a new language, consider using generative AI to explain code snippets to you. I acknowledge that I’ve had mixed luck pointing Bard at a code file or repo and getting a perfect explanation. I sometimes get hallucinations (e.g. refer to files to methods that don’t exist), but I expect this functionality to get better quickly.
#7 – Convert code from one language (or version) to another
Do you ever come across code that shows a useful pattern, but isn’t in the language you’re coding in? Maybe I found that code above to generate a random number, but want the equivalent in Go. Not a big problem any more. A prompt following the above prompt:
Convert this C# code to Go code instead
I get back Go code, and a description of what’s different.
Consider the case where you find code for calling a particular HTTP endpoint, but it’s in Java and your app is written in Go. My colleague Guillaume just wrote up a great post about calling our new Google PaLM LLM API via a Java app. I can ask for all the code in the post to be converted to Go.
That’s pretty cool. I wasn’t sure that was going to work.
With all of these examples, it’s still important to verify the results. Generative AI doesn’t absolve you of responsibility as a developer; but it can give you a tremendous head start and save you from wasting tons of time navigating from source to source for answers.
Any other development activities that you’d like generative AI to assist you with?
Moving isn’t fun. At least not for me. Even if you can move from one place to another, there are plenty of things that add friction. In the public cloud, you might want to switch from your first cloud to your next one, but it just feels like a lot of work. And while we cloud vendors like to talk about flashy serverless/container compute options, let’s be honest, most companies have their important workloads running in virtual machines. So how do you move those VMs from one place to another without a ton of effort? I’m going to look at four of the options, including one we just shipped at Google Cloud.
Option #1 – Move the workload, not the VM
In this case, you take what was on the original VM, and install it onto a fresh instance in the next cloud. The VM doesn’t move, the workload does. Maybe you do move the software manually, or re-point your build system to a VM instance in the new cloud.
Why do this? It’s a clean start and might give you the opportunity to do that OS upgrade (or swap) you’ve been putting off. Or you could use this time to split up the websites on a stuff server into multiple servers. This is also the one option that’s mostly guaranteed to work regardless of where you’re coming from, and where you’re going to.
The downside? It’s the most work of any of these options. You’ve got to install software, move state around, reconfigure things. Even if you do automated deployments, there’s likely new work here to bake golden images or deploy to a new cloud.
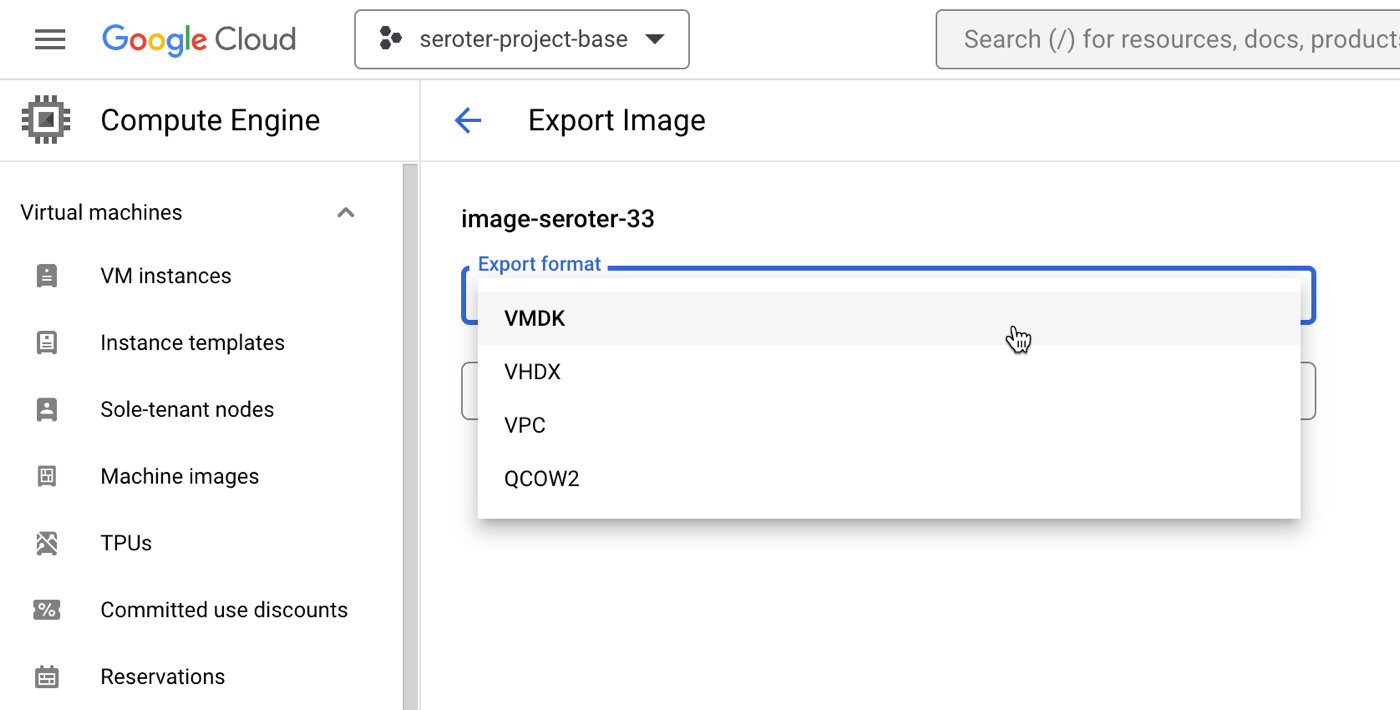
Option #2 – Export the VM images from one cloud and import into the next one
All the major clouds (and software vendors) support exporting and importing a VM image. These images come in all sorts of formats (e.g. VMDK, VHDX).
Why do this? It gives you a portable artifact that you can bring to another cloud and deploy. It’s a standard approach, and gives you a manageable asset to catalog, secure, backup, and use wherever you want. AWS offers guidance, so does Azure, as does Google Cloud. This usually carries no explicit cost, but brings with it costs for storage of the assets.
The downsides? This too is manual, although can be automated with APIs. It also moves the entire VM image without an opportunity to shrink or modernize any aspect of it. Additionally, it usually requires extra configuration of storage buckets and permissions to store the temporary artifacts.
Option #3 – Convert the VM to a container and move that artifact to the new cloud
Another way to move a VM to another cloud is to extract the VM-based application to a container image. The workload moves, but in a different format. All the major public clouds have something here. Azure Migrate helps with this, AWS provides an App2Container CLI tool, and Google Cloud offers Migrate to Containers as a CLI and UI-based experience.
So, what do you do with those existing .NET Framework apps on Windows? Most advice is "upgrade to #dotnet Core." But I hear that many folks want to freeze on .NET 4.8 for now.
Why do this? This offers a means of “shrinking” the workload by reducing it to its own components, without bringing along the OS with it. This can bring higher workload density in the target cloud (if you throw a bunch of app containers onto consolidated hardware) and reduce cost. Also, this gives you flexibility on where you run the workload next. For instance, the container image you generate from the Google Cloud tool can run on a Kubernetes cluster or serverless Cloud Run environment.
Downsides? This doesn’t work for all workload types. Don’t shove SharePoint into a container, for example. And not all tools work with all the various clouds, so you might have to move the VM manually and then run the containerization tool. Also, doing this may give the impression you’re modernizing the app, but in reality, you’re only modernizing the underlying platform. That is valuable, but doesn’t remove the need for other modernization activities.
Option #4 – Use a managed service that moves the VM and turns down the old instance
Can migration be easier? Can you move VMs around with fewer steps and moving parts? There are definitely solutions for this from a variety of vendors. Among cloud providers, what Google Cloud has is unique. We just added a new experience, and figured we could walk through it together.
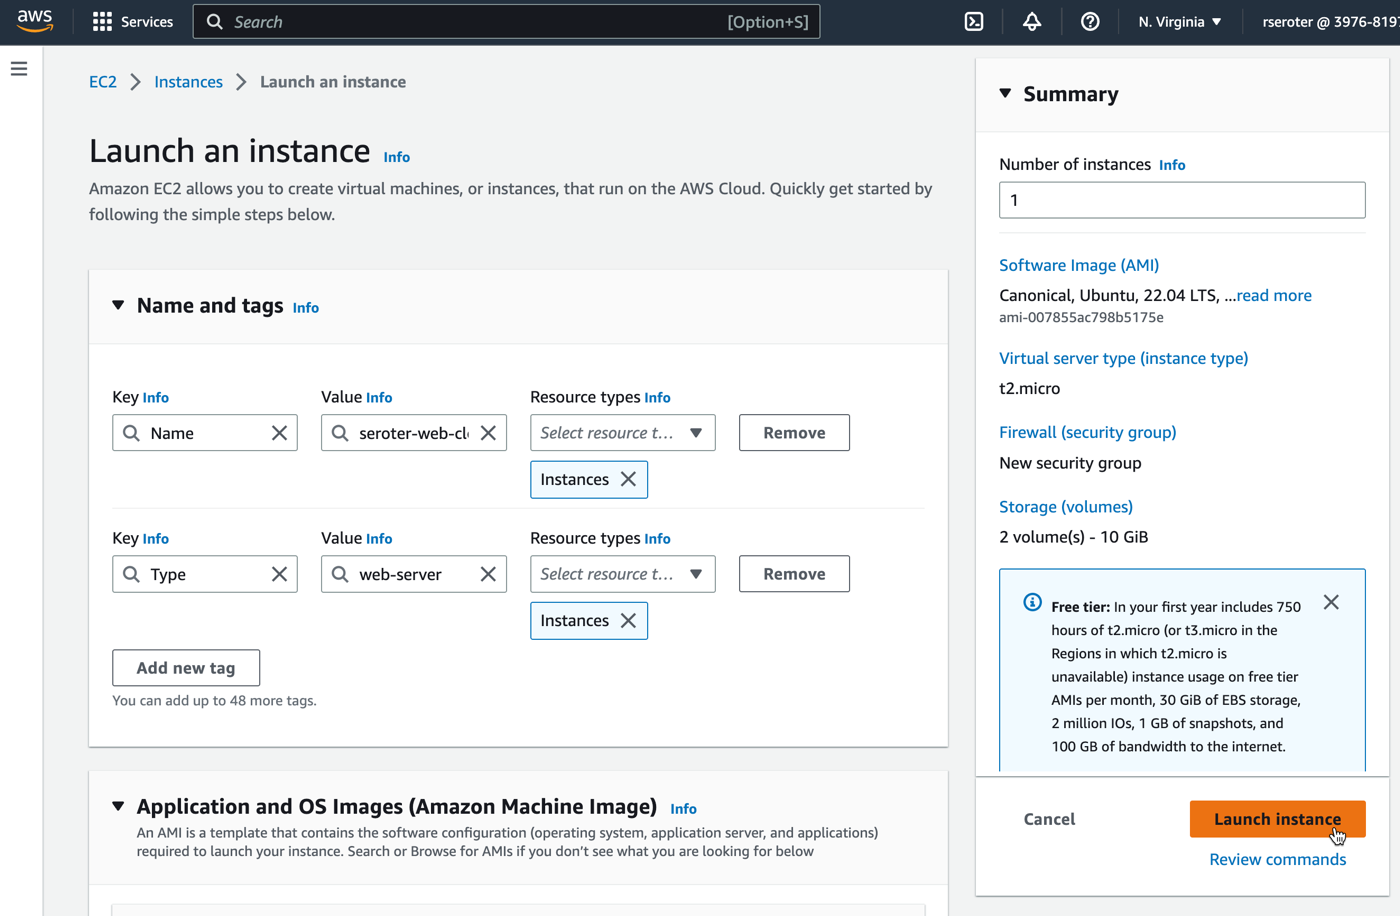
First, I built an Amazon EC2 instance and installed a web server onto it. I added a custom tag with the key “type” and value “web-server” so that I could easily find this VM later. I also added two total volumes in order to see if they successfully move alongside the VM itself.
After a few moments, I had my EC2 instance up and running.
Let’s fast forward for a period of time, and maybe it’s time to evolve and pick my next cloud. I chose Google Cloud, WHICH MUST SHOCK YOU. This workload needs a happier home.
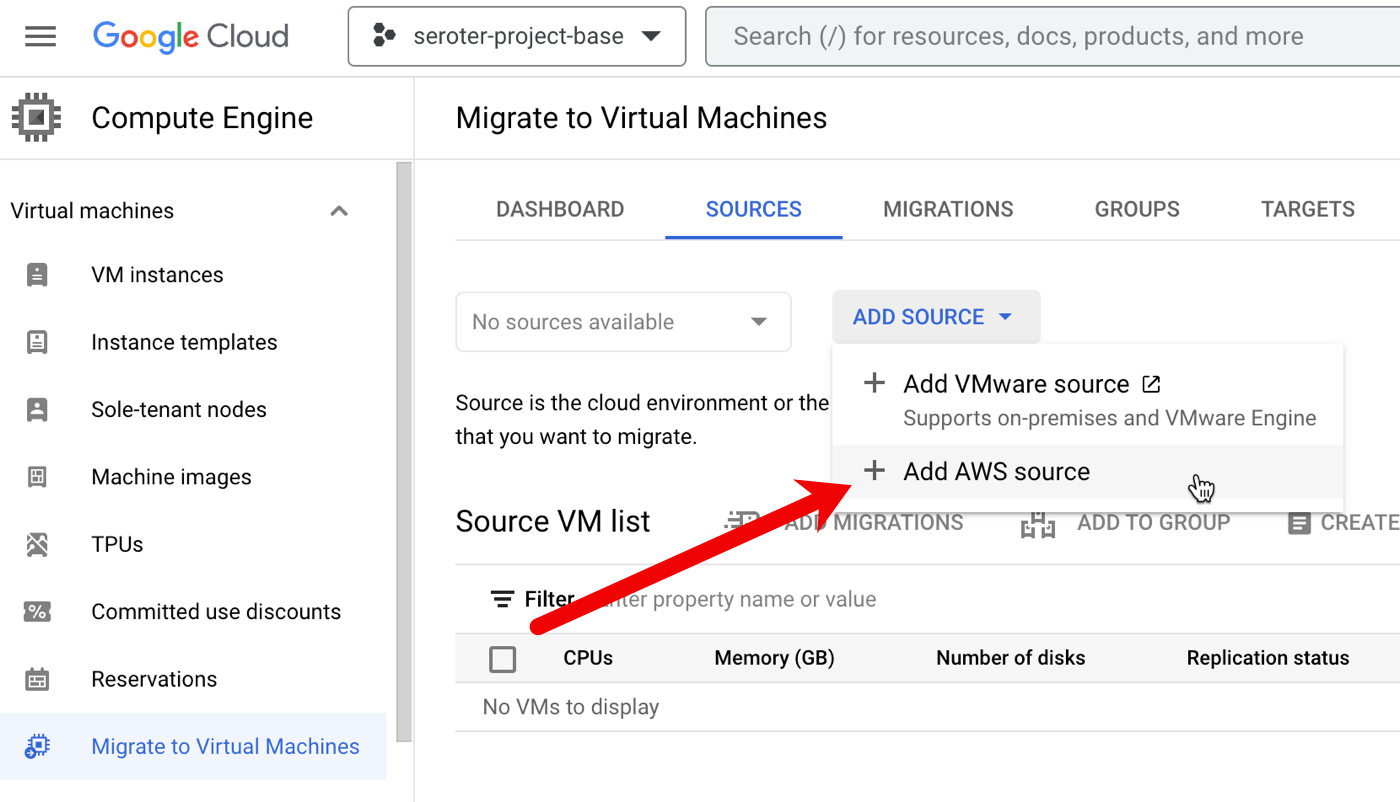
The new Migrate to Virtual Machines experience in the Google Cloud console is pretty sweet. From here, I can add migration sources, target projects, create groups of VMs for migration, and monitor the progress.
First, I needed to create a source. We recently added AWS as a built-in option. We’ve supported VMware-based migrations for a while now.
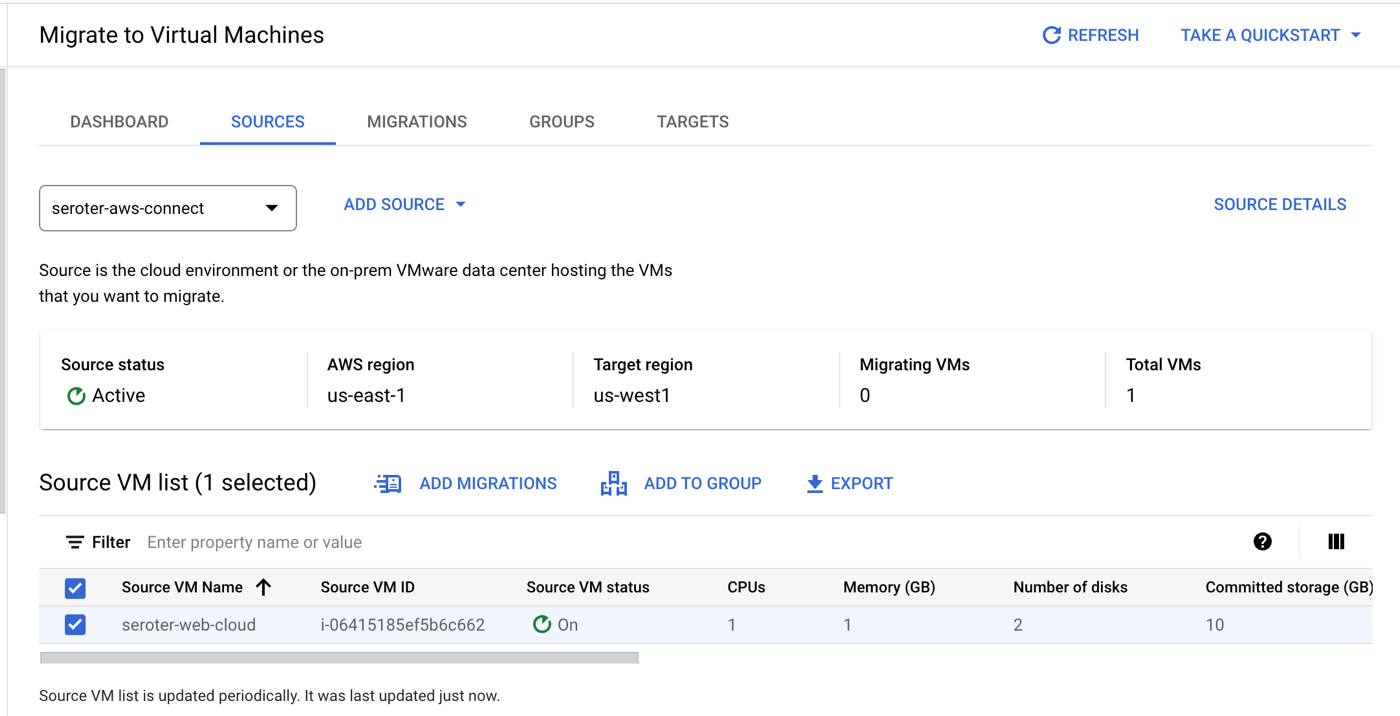
I created the “AWS source” by giving it a name, choosing the source AWS region, the target Google Cloud region, and providing credentials to access my account. Also note that I added an (optional) tag to search for when retrieving instances, and an (optional) tag for the migrated VMs.
My connection was in a “pending” state for a couple of minutes, and after that, showed me a list of VMs that met the criteria (AWS region, tag). Pretty cool.
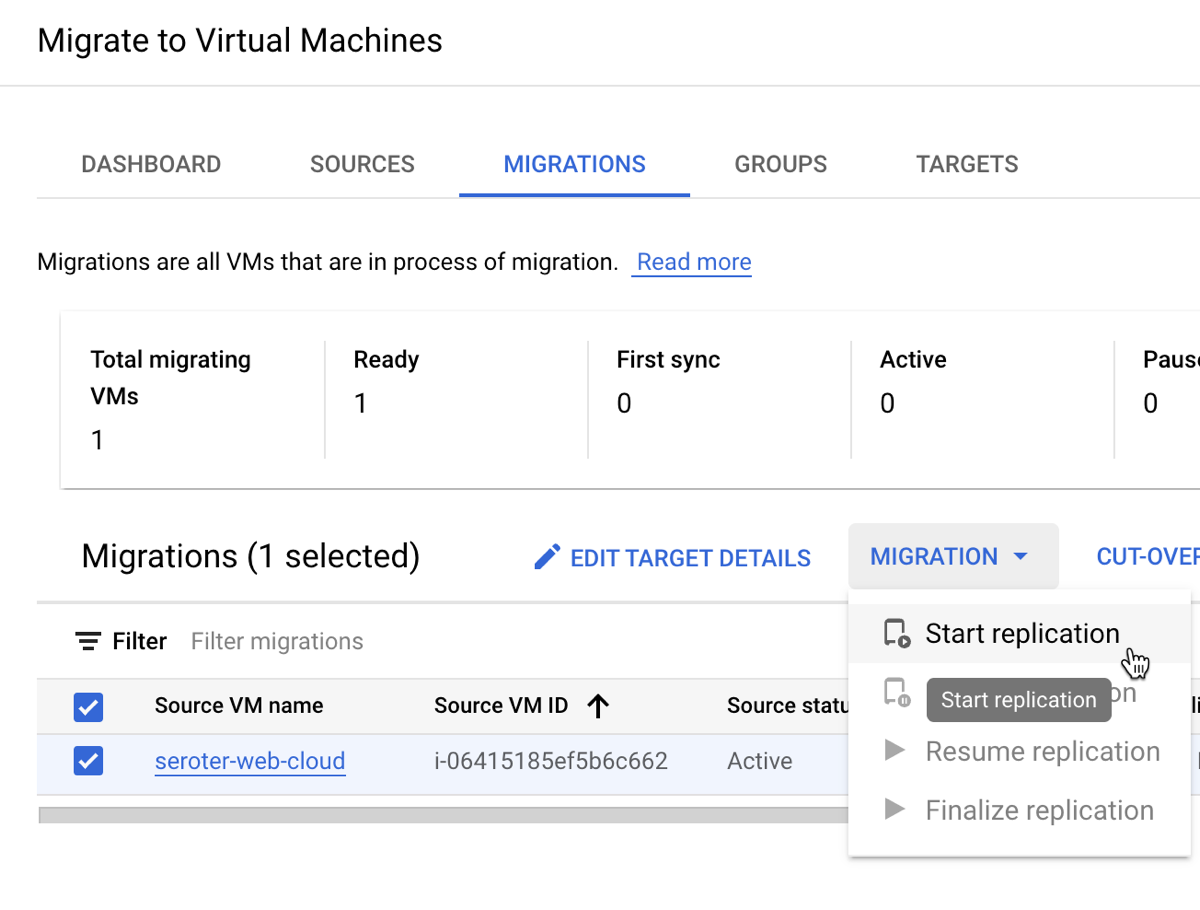
From here, I chose that VM and picked the option to “add migration.” This added this particular VM into a migration set. Now I could set the “target” details of the VM in Google Cloud Compute Engine that this AWS image loads into. That means the desired machine name, machine type, network, subnet, and such.
I started the migration. Note that I did not have to stop the VM on AWS for this migration to commence.
When it’s done replicating, I don’t yet have a running VM. My last major step is choosing to do a test-clone phase where I test my app before making it “live”, or, jump right to cut-over. In cut-over, the services takes a final data replica, stops the original VM, and makes a Compute Engine instance using the replicated data.
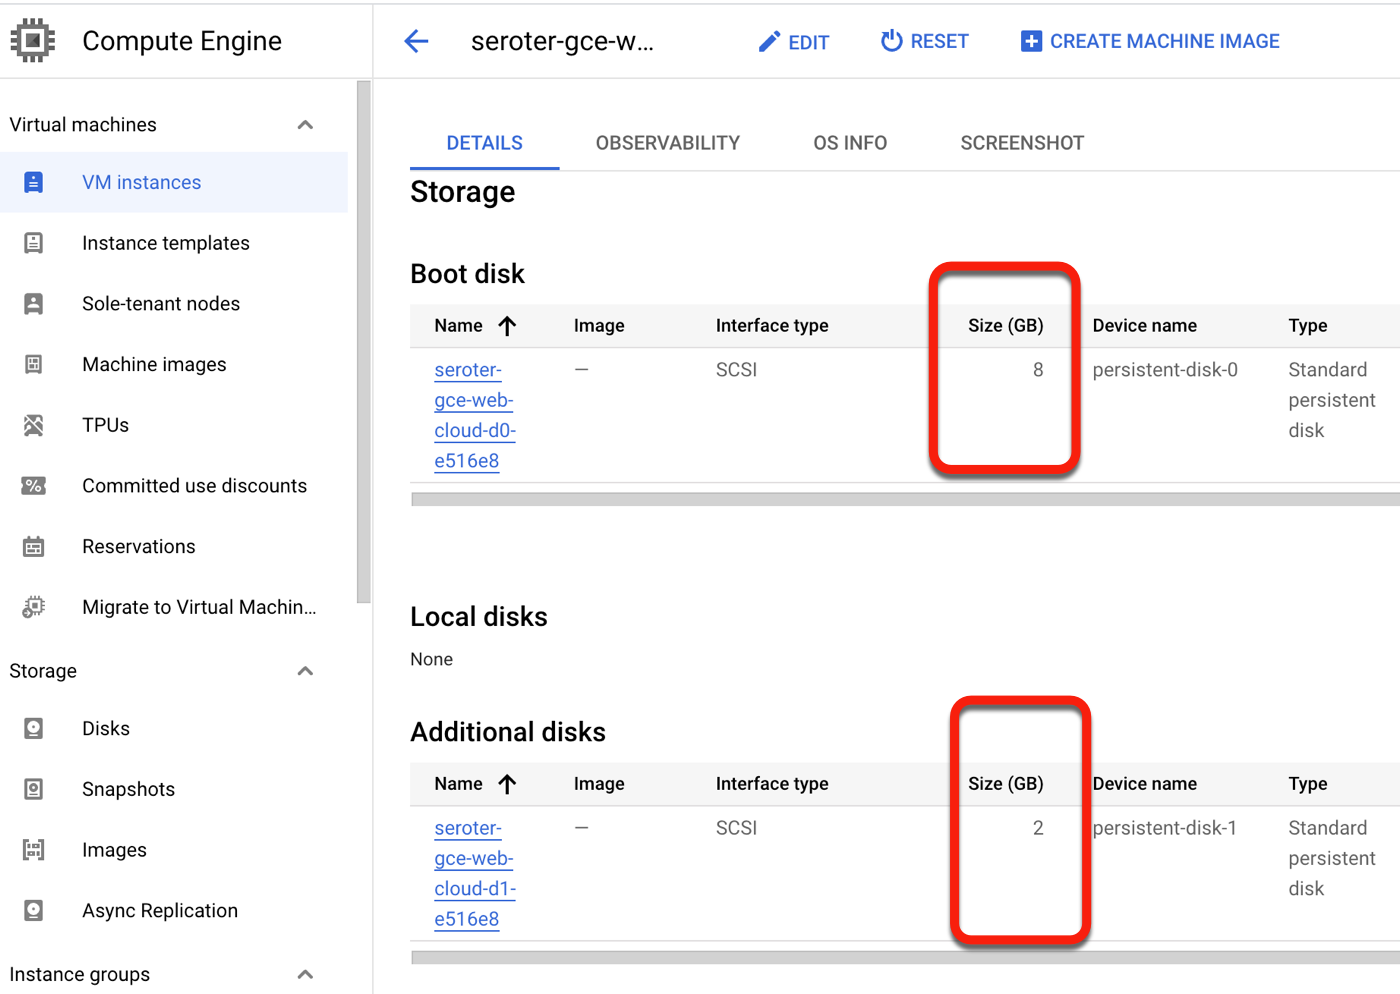
After a few more minutes, I saw a running Google Cloud Compute Engine VM, and a stopped EC2 instance.
I “finalized” the migration to clean up all the temporary data replicas and the like. After not being sure if this migration experience grabbed the secondary disks from my EC2 instance, I confirmed that yes, we brought them all over. Very nice!
Why do this? The Migrate to Virtual Machines experience offers a clean way to move one or multiple VMs from AWS, vSphere, or Azure (preview) to Google Cloud. There’s very little that you have to do yourself. And I like that it handles the shut down of the initial VM, and offers ways to pause and resume the migration.
The downsides? It’s specific to Google Cloud as a target. You’re not using this to move workloads out of Google Cloud. It’s also not yet available in every single Google Cloud region, but will be soon.
What did I miss? How do you prefer to move your VMs or VM-based workloads around?
Is a serverless architecture realistic for every system? Of course not. But it’s never been easier to build robust solutions out of a bunch of fully-managed cloud services. For instance, what if I want to take uploaded files, inspect them, and route events to app instances hosted in different regions around the world? Such a solution might require a lot of machinery to set up and manage—file store, file listeners, messaging engines, workflow system, hosting infrastructure, and CI/CD products. Yikes. How about we do that with serverless technology such as:
The heart of this system is the app that processes “loan” events. The events produced by Eventarc are in the industry-standard CloudEvents format. Do I want to parse and process those events in code manually? No, no I do not. Two things will help here. First, our excellent engineers have built client libraries for every major language that you can use to process CloudEvents for various Google Cloud services (e.g. Storage, Firestore, Pub/Sub). My colleague Mete took it a step further by creating VS Code templates for serverless event-handlers in Java, .NET, Python, and Node. We’ll use those.
To add these templates to your Visual Studio Code environment, you start with Cloud Code, our Google Cloud extension to popular IDEs. Once Cloud Code is installed, I can click the “Cloud Code” menu and then choose the “New Application” option.
Then I chose the “Custom Application” option and “Import Sample from Repo” and added a link to Mete’s repo.
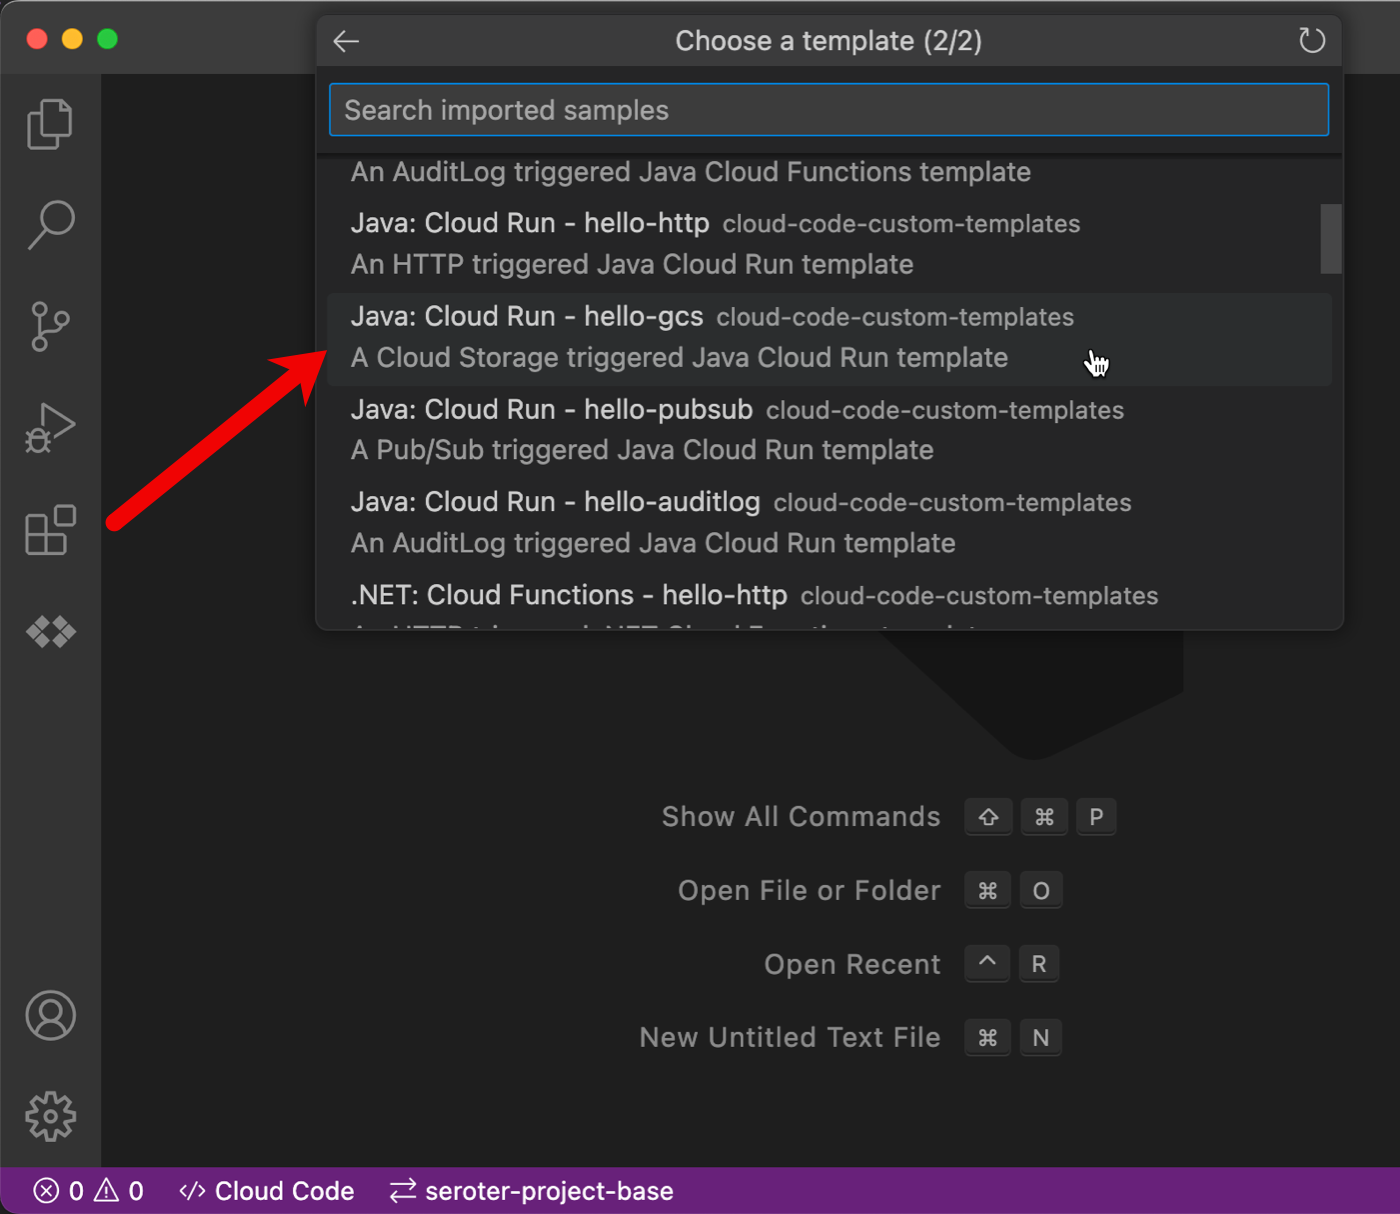
Now I have the option to pick a “Cloud Storage event” code template for Cloud Functions (traditional function as a service) or Cloud Run (container-based serverless). I picked the Java template for Cloud Run.
The resulting project is a complete Java application. It references the client library mentioned above, which you can see as google-cloudevent-types in the pom.xml file. The code is fairly straightforward and the core operation accepts the inbound CloudEvent and creates a typed StorageObjectData object.
This generated project has directions and scripts to test locally, if you’re so inclined. I went ahead and deployed an instance of this app to Cloud Run using this simple command:
gcloud run deploy --source .
That gave me a running instance, and, a container image I could use in our next step.
Step 2: Create parallel deployment of Java app to multiple Cloud Run locations
In our fictitious scenario, we want an instance of this Java app in three different regions. Let’s imagine that the internal employees in each geography need to work with a local application.
I’d like to take advantage of a new feature of Cloud Deploy, parallel deployments. This makes it possible to deploy the same workload to a set of GKE clusters or Cloud Run environments. Powerful! To be sure, the MOST applicable way to use parallel deployments is a “high availability” scenario where you’d deploy identical instances across locations and put a global load balancer in front of it. Here, I’m using this feature as a way to put copies of an app closer to specific users.
First, I need to create “service” definitions for each Cloud Run environment in my deployment pipeline. I’m being reckless, so let’s just have “dev” and “prod.”
My “dev” service definition looks like this. The “image” name can be anything, as I’ll replace this placeholder in realtime when I deploy the pipeline.
The “production” YAML service is identical except for a different service name.
Next, I need a Skaffold file that identifies the environments for my pipeline, and points to the respective YAML files that represent each environment.
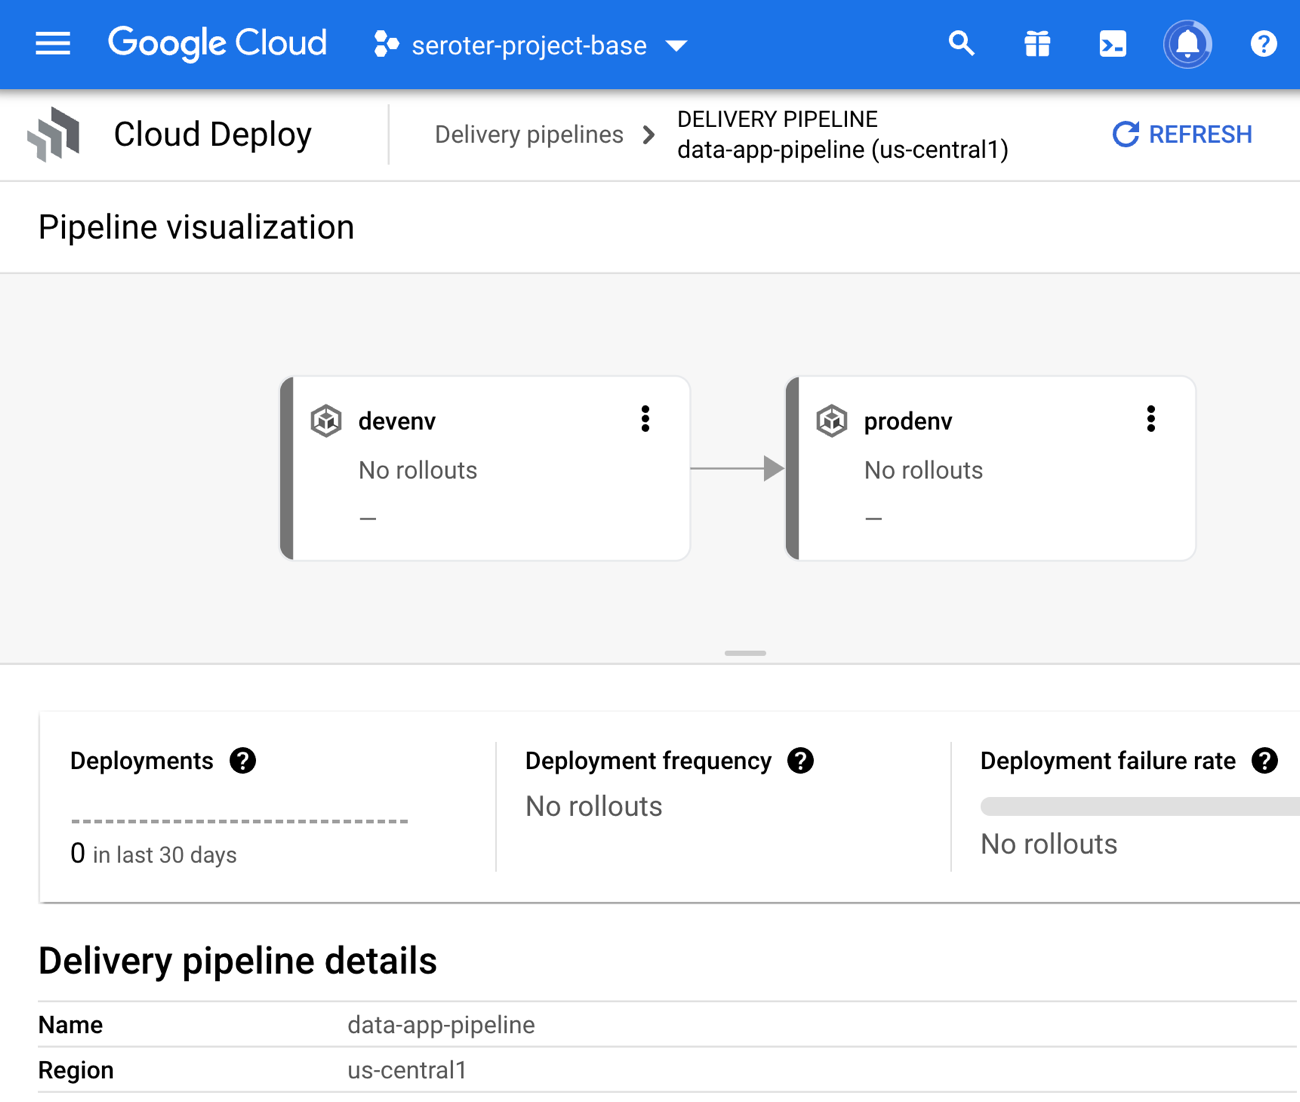
The final artifact I need is a DeliveryPipeline definition. It calls out two stages (dev and prod), and for production that points to a multiTarget that refers to three Cloud Run targets.
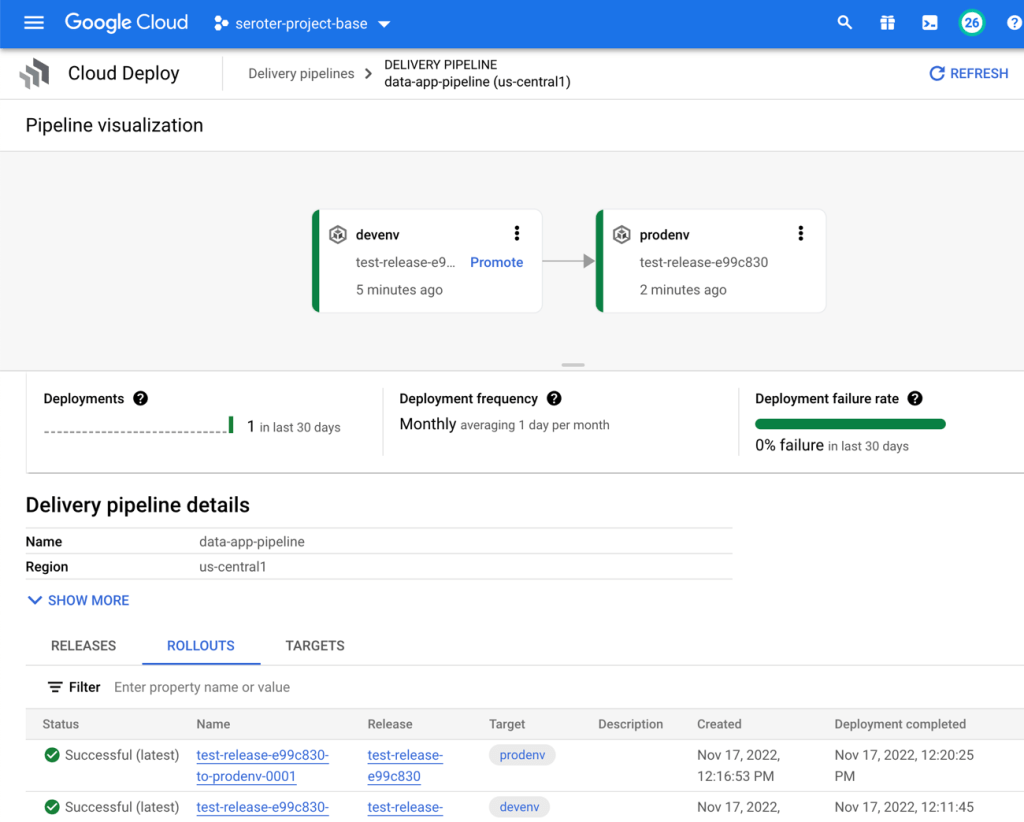
In the Google Cloud Console, I can see my deployed pipeline with two stages and multiple destinations for production.
Now it’s time to create a release for this deployment and see everything provisioned.
The command to create a release might be included in your CI build process (whether that’s Cloud Build, GitHub Actions, or something else), or you can run the command manually. I’ll do that for this example. I named the release, gave it the name of above pipeline, and swapped the placeholder image name in my service YAML files with a reference to the container image generated by the previously-deployed Cloud Run instance.
After a few moments, I see a deployment to “dev” rolling out.
When that completed, I “promoted” the release to production and saw a simultaneous deployment to three different cloud regions.
Sweet. Once this is done, I check and see four total Cloud Run instances (one for dev, three for prod) created. I like the simplicity here for shipping the same app instance to any cloud region. For GKE clusters, this also works with Anthos environments, meaning you could deploy to edge, on-prem or other clouds as part of a parallel deploy.
We’re done with this step. I have an event-receiving app deployed around North America.
Step 3: Set up Cloud Storage bucket
This part is simple. I use the Cloud Console to create a new object storage bucket named seroter-loan-applications. We’ll assume that an application drops files into this bucket.
Step 4: Write Cloud Workflow that routes events to correct Cloud Run instance
There are MANY ways one could choose to architect this solution. Maybe you upload files to specific bucket and route directly to the target Cloud Run instance using a trigger. Or you route all bucket uploads to a Cloud Function and decide there where you’ll send it next. Plus dozens of other options. I’m going to use a Cloud Workflow that receives an event, and figures out where to send it next.
A Cloud Workflow is described with a declarative definition written in YAML or JSON. It’s got a standard library of functions, supports control flow, and has adapters to lots of different cloud services. This Workflow needs to parse an incoming CloudEvent and route to one of our three (secured) Cloud Run endpoints. I do a very simple switch statement that looks at the file name of the uploaded file, and routes it accordingly. This is a terrible idea in real life, but go with me here.
This YAML results in a workflow that looks like this:
Step 5: Configure Eventarc trigger to kick off a Cloud Workflow
Our last step is to wire up the “file upload” event to this workflow. For that, we use Eventarc. Eventarc handles the machinery for listening to events and routing them. See here that I chose Cloud Storage as my event source (there are dozens and dozens), and then the event I want to listen to. Next I selected my source bucket, and chose a destination. This could be Cloud Run, Cloud Functions, GKE, or Workflows. I chose Workflows and then my specific Workflow that should kick off.
All good. Now I have everything wired up and can see this serverless solution in action.
Step 6: Test and enjoy
Testing this solution is straightforward. I dropped three “loan application” files into the bucket, each named with a different target region.
Sure enough, three Workflows kick off and complete successfully. Clicking into one of them shows the Workflow’s input and output.
Looking at the Cloud Run logs, I see that each instance received an event corresponding to its location.
Wrap Up
No part of this solution required me to stand up hardware, worry about operating systems, or configure networking. Except for storage costs for my bucket objects, there’s no cost to this solution when it’s not running. That’s amazing. As you look to build more event-driven systems, consider stitching together some fully managed services that let you focus on what matters most.
I’ve been putting together a learning list to help me go deep on machine learning in 2023. After doing a few tutorials reading some docs, and watching a few videos, I jumped onto Pluralsight to see what they had. Given that I’ve been teaching at Pluralsight for more than a decade, I feel silly not checking there first! I bookmarked a few good-looking machine learning courses to watch later, but what really caught my eye was that Google Cloud folks were busy adding and updating tons of courses in the catalog over the past couple of months. Here are a handful of high-quality, educational courses that jumped out at me.
Data and AI/ML
Innovating with Data and Google Cloud. Ninety-minute course that talks about the value of data, types of cloud data services, and what machine learning is about.
Google Cloud Big Data and Machine Learning Fundamentals. This course is two-and-a-half hours long, and has many hands-on labs for streaming data processing, working with BigQuery ML, using pre-built and custom ML models, and working with Vertex AI.
Applying Machine Learning to your Data with Google Cloud. Spend ninety minutes on this excellent overview into machine learning, pre-trained ML APIs, using BigQuery with datasets and ML models, and more. Lots of hands-on exercises here.
Achieving Advanced Insights with BigQuery. This course is a bit under two hours, and you get to use some advanced SQL, learn about schema design, understand how to optimize BigQuery for performance, and go hands on with BigQuery and Vertex AI.
Managing Machine Learning Projects with Google Cloud. This four-and-a-half hour course covers ML practices, building and evaluating ML models, identifying real-world use cases, and managing ML projects. It’s got some hands-on lab exercises as well.
Building Batch Data Pipelines on Google Cloud. Important topics covered in this two-hour-and-twenty minute course. Watch this to learn about EL/ELT/ETL and cloud services like Dataproc, BigQuery, Dataflow, Data Fusion, and more.
Essential Google Cloud Infrastructure: Core Services. This course is about three-and-a-half hours and covers topics like IAM, storage, databases, and operations. Looks like a very solid overview of the base infrastructure.
Reliable Google Cloud Infrastructure: Design and Process. This is a four+ hour course that helps you architect and design a system that runs on Google Cloud. It’s not about building out the specific components, but rather, about going from requirements to architecture. it covers topics like microservices, automation, reliability, security, maintenance, and more.
Google Cloud Fundamentals for AWS Professionals. Its not about where you come from, but where you’re going. If you started with AWS, you’ll like this three hour course that maps your AWS experience to the equivalent (and better!) experience in Google Cloud. IT covers IAM, VMs, storage, containers, deployment tools, Ops, and more.
Managing Security in Google Cloud. This two+ hour course digs into the foundational aspects of security in Google Cloud—think shared responsibilities model, threat mitigation—along with IAM, and VPCs. Some deep stuff here that will be best for architects, security analysts, and engineers.
Security Best Practices in Google Cloud. Coming in at a shade under two hours, this course has lots of hands-on options to learn about service accounts, confidential VMs, encryption, identity-aware proxy, secret manager, and even GKE security techniques.
Deployments, Day-2, and SRE
Developing a Google SRE Culture. This is a two hour course for leaders. It talks about DevOps and SRE, SLOs, dealing with regulated workloads, and apply SRE to your own organization.
Logging, Monitoring and Observability in Google Cloud. An almost five hour course on operations? BRING IT. Watch this one to learn about alerting policies, dashboards, uptime checks, custom metrics, analyzing logs, network security monitoring, managing incidents, and much more. Very comprehensive.
Develop and Deploy Windows Applications on Google Cloud. This stood out to me because you probably don’t think of Google Cloud as the best home for Windows workloads. You might be surprised. Learn more about how to run Windows apps on Google compute.
I don’t know what your learning journey looks like in 2023, but if you want to go deep on Google Cloud, it might be worth a subscription to Pluralsight for access to this broad catalog.
The idea of “backup and restore” in a complex distributed system is bit weird. Is it really even possible? Can you snapshot all the components of an entire system at a single point in time, inclusive of all the side effects in downstream systems? I dunno. But you need to at least have a good recovery story for each of your major stateful components! While Kubernetes started out as a terrific orchestrator for stateless containers, it’s also matured as a runtime for stateful workloads. Lots of folks are now using Kubernetes to run databases, event processors, ML models. and even “legacy” apps that maintain local state. Until now, public cloud users have only had DIY or 3rd party options when it comes to backing up their Kubernetes clusters, but not any more. Google Cloud just shipped a new built-in Backup for Google Kubernetes Engine (GKE) feature, and I wanted to try it out.
What Backup for GKE does
Basically, it captures the resources—at the cluster or namespace level—and persistent volumes within a given cluster at a specific point in time. It does not back up cluster configurations themselves (e.g. node pool size, machine types, enabled cluster features). For that, you’d like likely have an infrastructure-as-code approach for stamping out clusters (using something like Terraform), and use Backup for GKE to restore the state of your running app. This diagram from the official docs shows the architecture:
A Kubernetes cluster backup comes from a “backup plan” that defines the scope of a given backup. With these, you choose a cluster to back up, which namespaces you want backed up, and a schedule (if any). To restore a backup into an existing cluster, you execute a pre-defined “restore plan.” All of this is part of a fully managed Google Cloud service, so you’re not stuck operating any of the backup machinery.
Setting up Backup for GKE on a new cluster
Backup for GKE works with existing clusters (see Appendix A below), but I wanted to try it out on a fresh cluster first.
I started with a GKE standard cluster. First, I made sure to choose a Kubernetes version that supported the Backup feature. Right now, that’s Kubernetes 1.24 or higher.
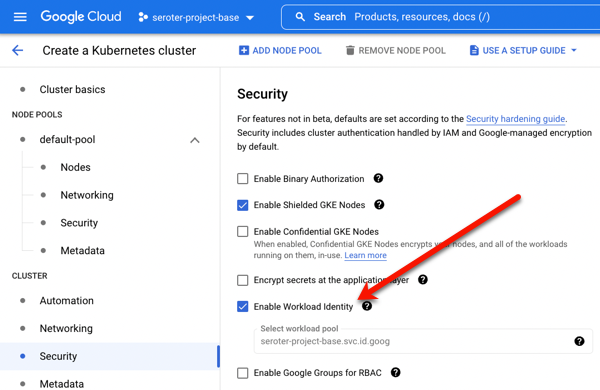
I also turned on two features at the cluster-level. The first was Workload Identity. This security feature enforces more granular, workload-specific permissions to access other Google Cloud services.
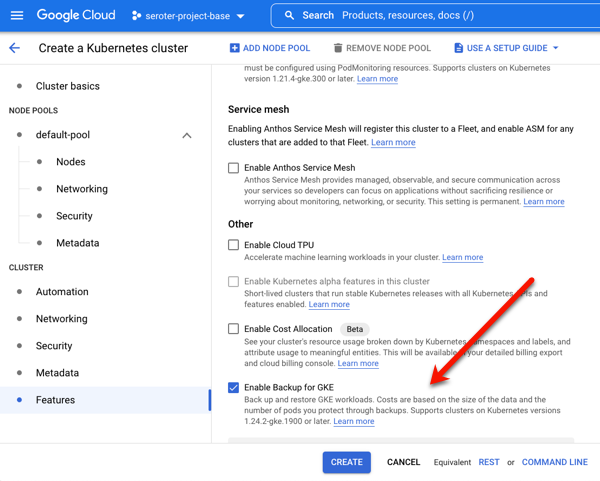
The second and final feature to enable is Backup for GKE. This injects the agent into the cluster and connects it to the control plane.
Deploying a stateful app to Kubernetes
Once my cluster was up and running, I wanted to deploy a simple web application to it. What’s the app? I created a poorly-written Go app that has a web form to collect support tickets. After you submit a ticket, I route it to Google Cloud Pub/Sub, write an entry into a directory, and then take the result of the cloud request and jam the identifier into a file on another directory. What does this app prove? Two things. First, it should flex Workload Identity by successfully publishing to Pub/Sub. And second, I wanted to observe how stateful backups worked, so I’m writing files to two directories, one that can be backed by a persistent volume, and one backed by a local (node) volume.
I built and containerized the app automatically by using a Cloud Buildpack within a Cloud Build manifest, and invoking a single command:
gcloud builds submit --config cloudbuild.yaml
I then logged into my just-created GKE cluster and created a new namespace to hold my application and specific permissions.
kubectl create ns demos
To light up Workload Identity, you create a local service account in a namespace and map it to an existing Google Cloud IAM account that has the permissions the application should have. I created a Kubernetes service account:
Sweet. Finally, there’s the Kubernetes deployment YAML that points to my app container, service account, and the two volumes used by my app. At the top is my definition of the persistent volume, and then the deployment itself.
I applied the above manifest (and a services definition) to my GKE cluster with the following command:
kubectl apply -f k8s/. -n demos
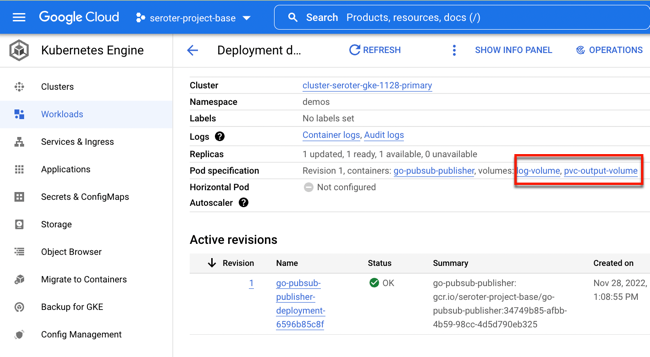
A moment afterwards, I saw a deployment and service. The deployment showed two associated volumes, including the auto-created persistent disk based on my declarative request.
Let’s triple check that. I got the name of the pod and got a shell into the running container. See below that both directories show up, and my app isn’t aware of which one is from a persistent volume and which is not.
I pulled up the web page for the app, and entered a few new “support tickets” into the system. The Pub/Sub UI lets me pull messages from a topic subscription, and we see my submitted tickets there.
The next thing to check is the container’s volumes. Sure enough, I saw the contents of each message written to the local directory (/logs) and the message IDs written to the persistent directory (/acks).
Running a backup and restore
Let’s back that thing up.
Backup plans are tied to a cluster. You can see here that my primary cluster (with our deployed app) and new secondary cluster (empty) have zero plans.
I clicked the “create a backup plan” button at the top of this page, and got asked for some initial plan details.
That all seemed straightforward. Then it got real. My next options included the ability to back up ALL the namespaces of the cluster, specific ones, or “protected” (more customized) configs. I just chose our “demos” namespace for backup. Also note that I could choose to back up persistent volume data and control encryption.
Next, I was asked to choose the frequency of backups. This is defined in the form of a CRON expression. I could back up every few minutes, once a month, or every year. If I leave this “schedule” empty, this becomes an on-demand backup plan.
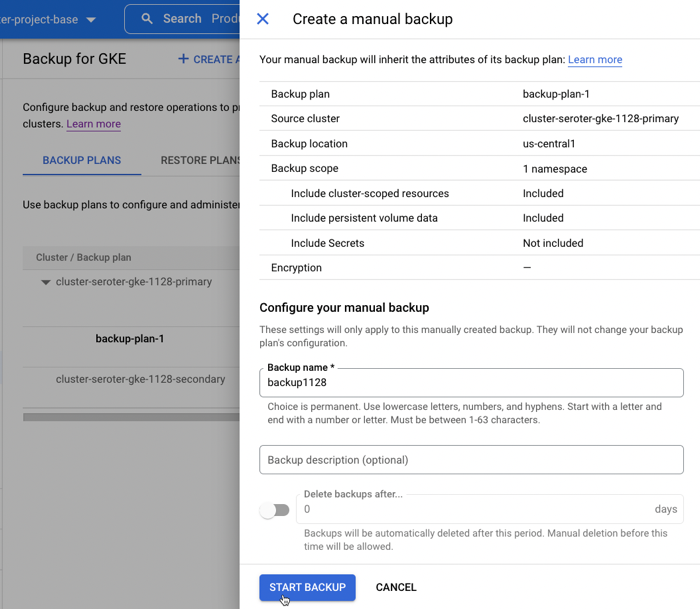
After reviewing all my settings, I saved the backup plan. Then I manually kicked off a backup by providing the name and retention period for the backup.
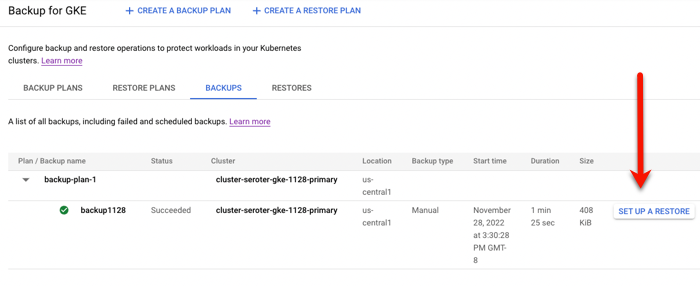
To do anything with this backup, I need a “restore plan.” I clicked the button to create a new restore plan, and was asked to connect it to a backup plan, and a target cluster.
Next, I had the choice of restoring some, or all, namespaces. In real life, you might back up everything, and then selectively restore. I like that you’re asked about conflict handling, which determines what happens if the target cluster already has the specified namespace in there. There are also a handful of flexible options for restoring volume data, ranging from creating new volumes, to re-using existing, to not restoring anything.
After that, I was asked about cluster-scoped resources. It pre-loaded a few API groups and Object kinds to restore, and offered me the option to overwrite any existing resources.
Finally, I got asked for any substitution rules to swap backed up values for different ones. With that, I finished my restore plan and had everything I needed to test my backup.
I set up a restore, which basically just involved choosing a restore plan (which is connected to a backup, and target cluster). In just a few moments, I saw a “succeeded” message and it looked like it worked.
When I checked out the GKE “workloads” view, I saw both the original and “restored” deployment running.
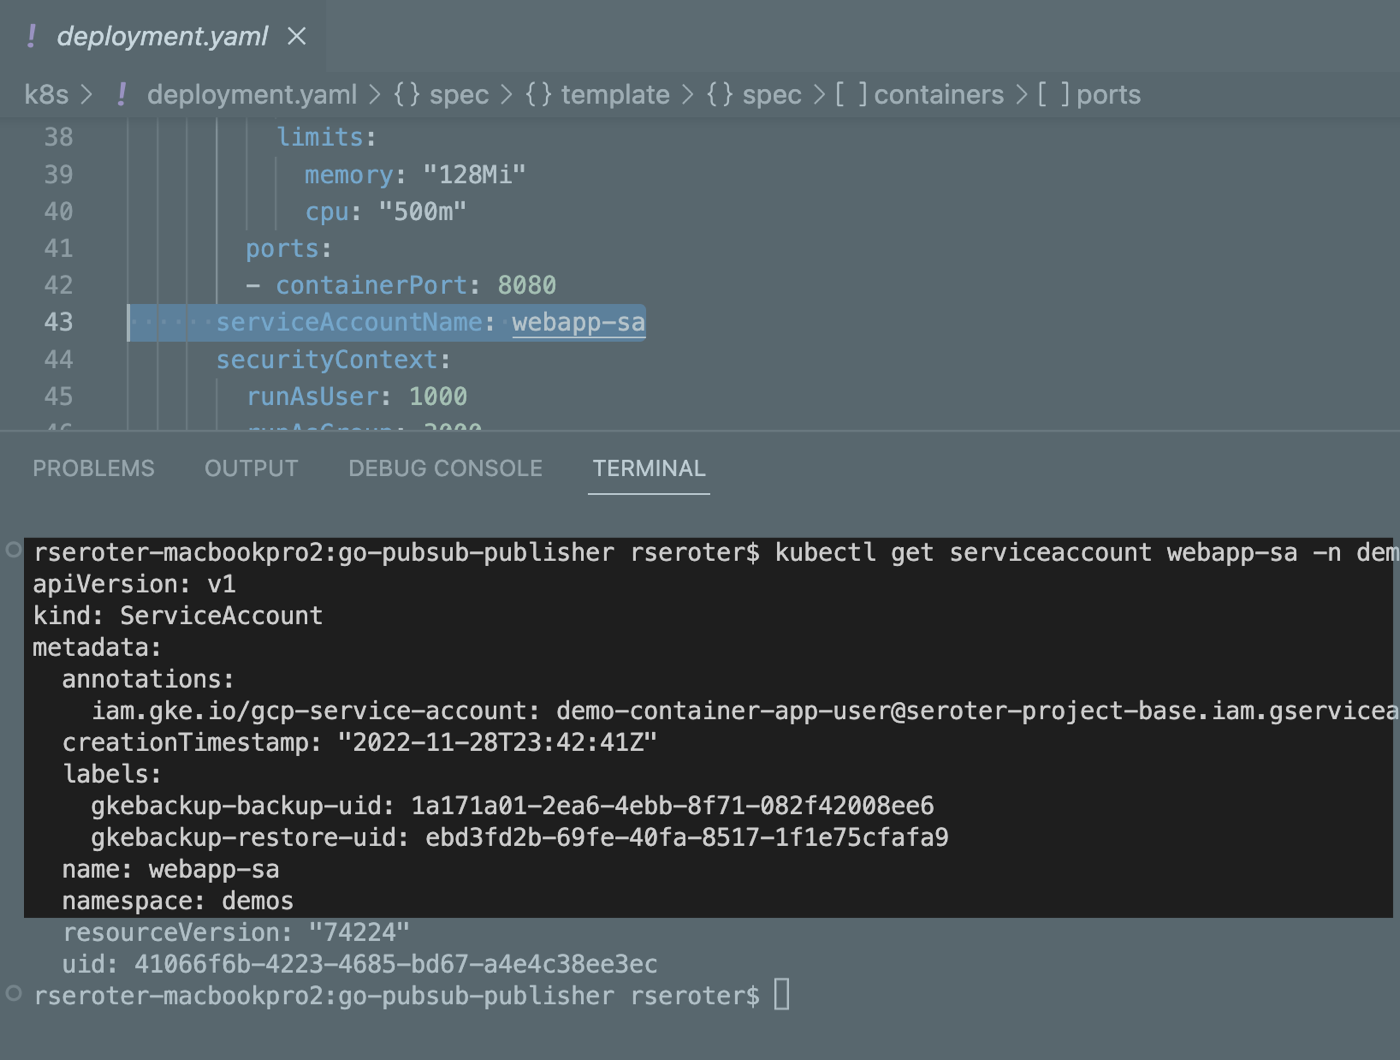
I logged into the “secondary” GKE cluster and saw my custom namespace and workload. I also checked, and saw that my custom service account (and Workload Identity-ready annotation) came over in the restore action.
Next, I grabbed a shell into the container to check my stateful data. What did I find? The “local” volume from the original container (“logs”) was empty. Which makes sense. That wasn’t backed by a persistent disk. The “acks” directory, on the other hand, was backed up, and shows up intact as part of the restore.
To test out my “restored” app instance, I submitted a new ticket, saw it show up in Pub/Sub (it just worked, as Workload Identity was in place), and also saw the new log file, and updated “ids.txt” file.
Pretty cool! With Backup for GKE, you don’t deal with the installation, patching, or management of your backup infrastructure, and get a fairly sophisticated mechanism for resilience in your distributed system.
Appendix A: Setting up Backup for GKE on an an existing cluster
Backup for GKE doesn’t only work with new clusters. You can add it to most existing GKE clusters. And these clusters can act as either sources or targets!
First, let’s talk about GKE Autopilot clusters. These are basically hyper-automated GKE standard clusters that incorporate all of Google’s security and scalability best practices. An Autopilot cluster doesn’t yet expose “Backup for GKE” feature at creation time, but you apply if after the fact. You also need to ensure you’re on Kubernetes 1.24 or higher. Workload Identity is enabled by default, so there’s nothing you need to do there.
But let’s talk about an existing GKE standard cluster. If you provision one from scratch, the default security option is to use a service account for the node pool identity. What this means is that any workloads in the cluster will have the same permissions as that account.
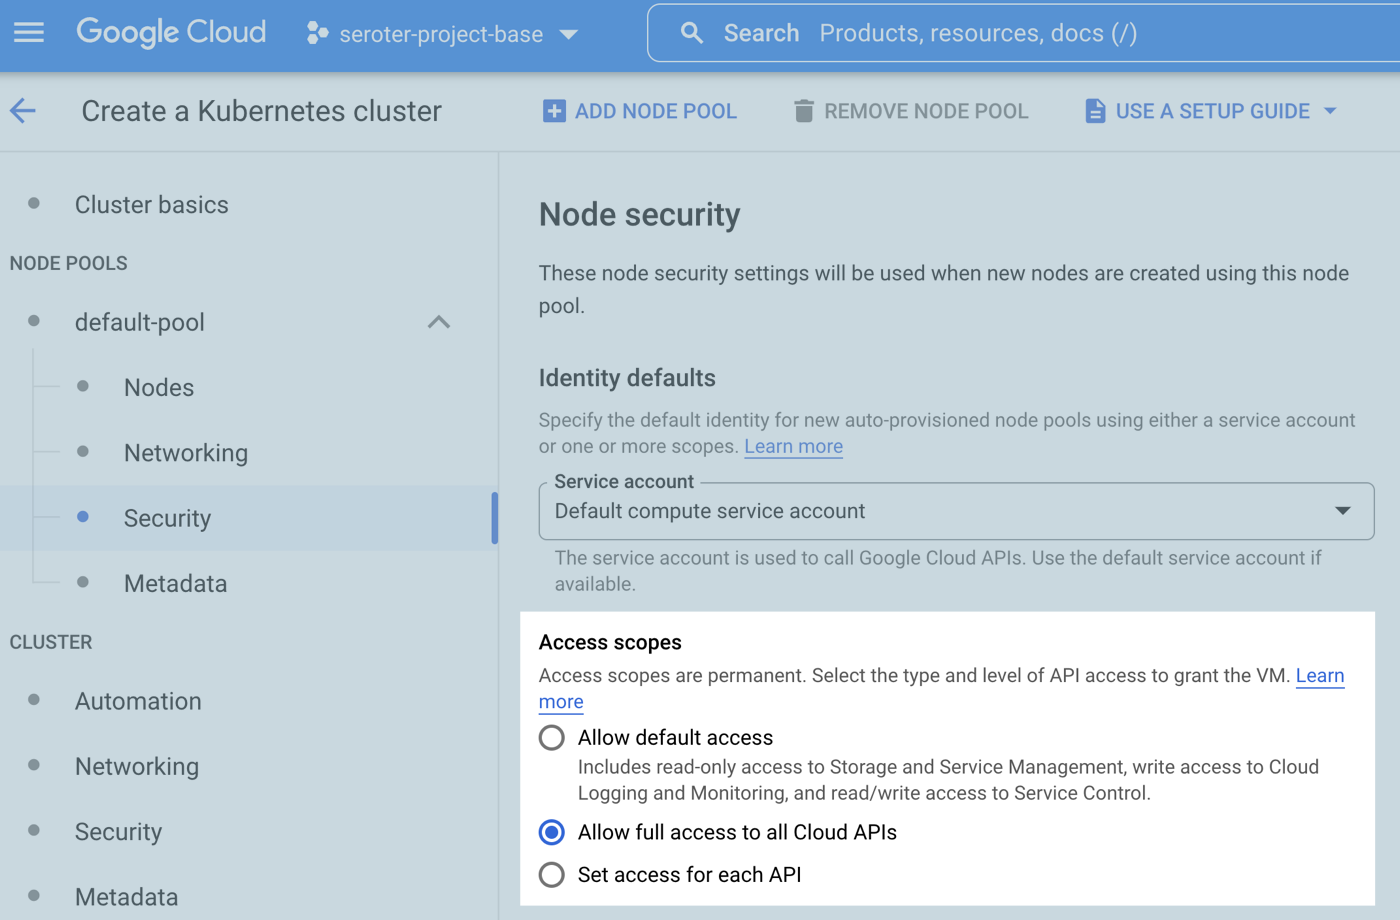
If I provision a cluster (cluster #1) like so, the app from above does not work. Why? The “default compute service account” doesn’t have permission to write to a Pub/Sub topic. A second security option is to use a specific service account with the minimum set of permissions needed for the node’s workloads. If I provision cluster #2 and choose a service account with rights to publish to Pub/Sub, my app does work.
The third security option relates to the access scopes for the cluster. This is a legacy method for authorization. The default setting is “allow default access” which offers a limited set of OAuth-based permissions. If I build a GKE cluster (cluster #3) with a default service account and “allow full access to all cloud APIs” then my app above does work because it has wide-ranging access to all the cloud APIs.
For a GKE standard cluster configured in either of the three ways above, I cannot install Backup for GKE. Why? I have to first enable Workload Identity. Once I edited the three clusters’ settings to enable Workload Identity, my app behaved the same way (not work, work, work)! That surprised me. I expected it to stop using the cluster credentials and require a Workload Identity assignment. What went wrong? For an existing cluster, turning on Workload Identity alone doesn’t trigger the necessary changes for existing node pools. Any new node pools would have everything enabled, but you have to explicitly turn on the GKE Metadata Server for any existing node pools.
This GKE Metadata Server is automatically turned on for any new node pools when you enable Workload Identity, and if you choose to install Workload Identity on a new cluster, it’s also automatically enabled for the first node pool. I didn’t totally understand all this until I tried out a few scenarios!
Once you’re running a supported version of Kubernetes and have Workload Identity enabled on a cluster, you can enroll it in Backup for GKE.
Want to constantly deploy updates to your web app through the use of automation? Not everyone does it, but it’s a mostly solved problem with mature patterns and tools that make it possible. Automated deployments of databases, app services, and data warehouses? Also possible, but not something I personally see done as often. Let’s change that!
Last month, I was tweeting about Liquibase, and their CTO and co-founder pointed out to me that Google Cloud contributed a BigQuery extension. Given that Liquibase is a well-known tool for automating database changes, I figured it was time to dig in and see how it worked, especially for a fully managed data warehouse like BigQuery. Specifically, I wanted to prove out four things:
Use the Liquibase CLI locally to add columns to a BigQuery table. This is an easy way to get started!
Use the Liquibase Docker image to add columns to a BigQuery table. See how to deploy changes through a Docker container, which makes later automation easier.
Use the Liquibase Docker image within Cloud Build to automate deployment of a BigQuery table change. Bring in continuous integration (and general automation service) Google Cloud Build to invoke the Liquibase container to push BigQuery changes.
Use Cloud Build and Cloud Deploy to automate the build and deployment of the app to GKE along with a BigQuery table change. This feels like the ideal state, where Cloud Build does app packaging, and then hands off to Cloud Deploy to push BigQuery changes (using the Docker image) and the web app through dev/test/prod.
I learned a lot of new things by performing this exercise! I’ll share all my code and lessons learned about Docker, Kubernetes, init containers, and Liquibase throughout this post.
Scenario #1 – Use Liquibase CLI
The concepts behind Liquibase are fairly straightforward: define a connection string to your data source, and create a configuration file that represents the desired change to your database. A Liquibase-driven change isn’t oriented adding data itself to a database (although, it can), but for making structural changes like adding tables, creating views, and adding foreign key constraints. Liquibase also does things like change tracking, change locks, and assistance with rollbacks.
I downloaded the CLI installer for my Mac, which added the bits to a local directory. And then I checked to see if I could access the liquibase CLI from the console.
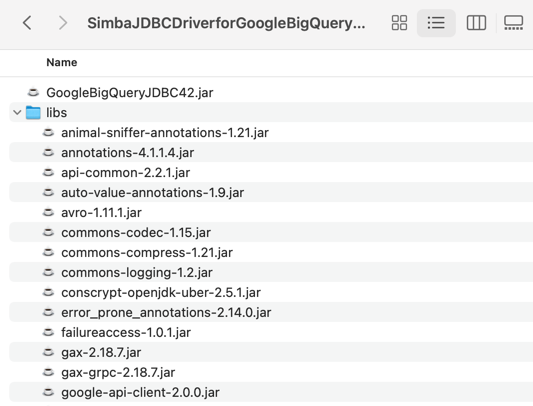
Next, I downloaded the BigQuery JDBC driver which is what Liquibase uses to connect to my BigQuery. The downloaded package includes the JDBC driver along with a “lib” folder containing a bunch of dependencies.
I added *all* of those files—the GoogleBigQueryJDBC42.jar file and everything in the “lib” folder—to the “lib” folder included in the liquibase install directory.
Next, I grabbed the latest BigQuery extension for Liquibase and installed that single JAR file into the same “lib” folder in the local liquibase directory. That’s it for getting the CLI properly loaded.
What about BigQuery itself? Anything to do there? Not really. When experimenting, I got “dataset not found” from Liquibase when using a specific region like “us-west1” so I created a dataset the wider “US” region and everything worked fine.
I added a simple table to this dataset and started it off with two columns.
Now I was ready to trigger some BigQuery changes! I had a local folder (doesn’t need to be where the CLI was installed) with two files: liquibase.properties, and changelog.yaml. The properties file (details here) includes the database connection string, among other key attributes. I turned on verbose logging, which was very helpful in finding obscure issues with my setup! Also, I want to use environmental credentials (saved locally, or available within a cloud instance by default) versus entering creds in the file, so the OAuthType is set to “3”.
#point to where the file is containing the changelog to execute
changelogFile: changelog.yaml
#identify which driver to use for connectivity
driver: com.simba.googlebigquery.jdbc.Driver
#set the connection string for bigquery
url: jdbc:bigquery://https://googleapis.com/bigquery/v2:443;ProjectId=seroter-project-base;DefaultDataset=employee_dataset;OAuthType=3;
#log all the things
logLevel: 0
#if not using the "hub" features
liquibase.hub.mode=off
Next I created the actual change log. There are lots of things you can do here, and change files can be authored in JSON, XML, SQL, or YAML. I chose YAML, because I know how to have a good time. The BigQuery driver supports most of the Liquibase commands, and I chose the one to add a new column to my table.
Once you get all the setup in place, the actual Liquibase stuff is fairly simple! To execute this change, I jumped into the CLI, navigated to the folder holding the properties file and change log, and issued a single command.
liquibase --changeLogFile=changelog.yaml update
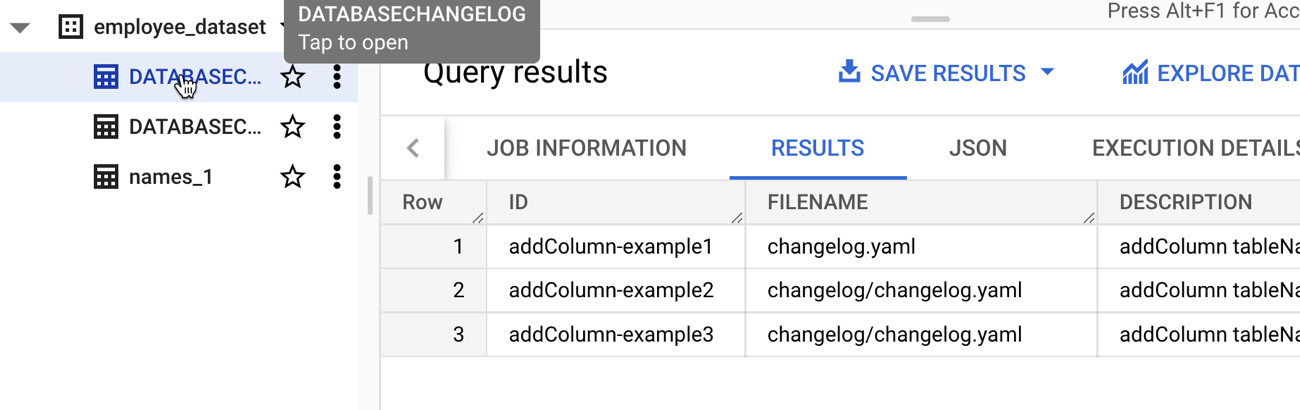
Assuming you have all the authentication and authorization settings correct and files defined and formatted in the right way, the command should complete successfully. In BigQuery, I saw that my table had a new column.
Note that this command is idempotent. I can execute it again and again with no errors or side effects. After I executed the command, I saw two new tables added to my dataset. If I had set the “liquibaseSchemaName” property in the properties file, I could have put these tables into a different dataset of my choosing. What are they for? The DATABASECHANGELOGLOCK table is used to create a “lock” on the database change so that only one process at a time can make updates. The DATABASECHANGELOG table stores details of what was done, when. Be aware that each changeset itself is unique, so if I tried to run a new change (add a different column) with the same changeset id (above, set to “addColumn-example1”), I’d get an error.
That’s it for the CLI example. Not too bad!
Scenario #2 – Use Liquibase Docker image
The CLI is cool, but maybe you want an even more portable way to trigger a database change? Liquibase offers a Docker image that has the CLI and necessary bits loaded up for you.
To test this out, I fired up an instance of the Google Cloud Shell—this is an dev environment that you can access within our Console or standalone. From here, I created a local directory (lq) and added folders for “changelog” and “lib.” I uploaded all the BigQuery JDBC JAR files, as well as the Liquibase BigQuery driver JAR file.
I also uploaded the liquibase.properties file and changelog.yaml file to the “changelog” folder in my Cloud Shell. I opened the changelog.yaml file in the editor, and updated the changeset identifier and set a new column name.
All that’s left is to start the Docker container. Note that you might find it easier to create a new Docker image based on the base Liquibase image with all the extra JAR files embedded within it instead of schlepping the JARs all over the place. In my case here, I wanted to keep it all separate. To ensure that the Liquibase Docker container “sees” all my config files and JAR files, I needed to mount volumes when I started the container. The first volume mount maps from my local “changelog” directory to the “/liquibase/changelog” directory in the container. The second maps from the local “lib” directory to the right spot in the container. And by mounting all those JARs into the container’s “lib” directory—while also setting the “–include-system-classpath” flag to ensure it loads everything it finds there—the container has everything it needs. Here’s the whole Docker command:
After 30 seconds or so, I saw the new column added to my BigQuery table.
To be honest, this doesn’t feel like it’s that much simpler than just using the CLI, but, by learning how to use the container mechanism, I could now embed this database change process into a container-native cloud build tool.
Scenario #3 – Automate using Cloud Build
Those first two scenarios are helpful for learning how to do declarative changes to your database. Now it’s time to do something more automated and sustainable. In this scenario, I tried using Google Cloud Build to automate the deployment of my database changes.
Cloud Build runs each “step” of the build process in a container. These steps can do all sorts of things, ranging from compiling your code, running tests, pushing to artifact storage, or deploy a workload. Since it can honestly run any container, we could also use the Liquibase container image as a “step” of the build. Let’s see how it works.
My first challenge related to getting all those JDBC and driver JAR files into Cloud Build! How could the Docker container “see” them? To start, I put all the JAR files and config files (updated with a new column named “title”) into Google Cloud Storage buckets. This gave me easy, anywhere access to the files.
Then, I decided to take advantage of Cloud Build’s built-in volume for sharing data between the independent build steps. This way, I could retrieve the files, store them, and then the Liquibase container could see them on the shared volume. In real life, you’d probably grab the config files from a Git repo, and the JAR files from a bucket. We’ll do that in the next scenario! Be aware that there’s also a project out there for mounting Cloud Storage buckets as volumes, but I didn’t feel like trying to do that. Here’s my complete Cloud Build manifest:
The first “step” uses a container that’s pre-loaded with the Cloud Storage CLI. I executed the “copy” command and put all the JAR files into the built-in “workspace” volume. The second step does something similar by grabbing all the “config” files and dropping them into another folder within the “workspace” volume.
Then the “big” step executed a virtually identical Docker “run” command as in scenario #2. I pointed to the “workspace” directories for the mounted volumes. Note the “–network” flag which is a magic command for using default credentials.
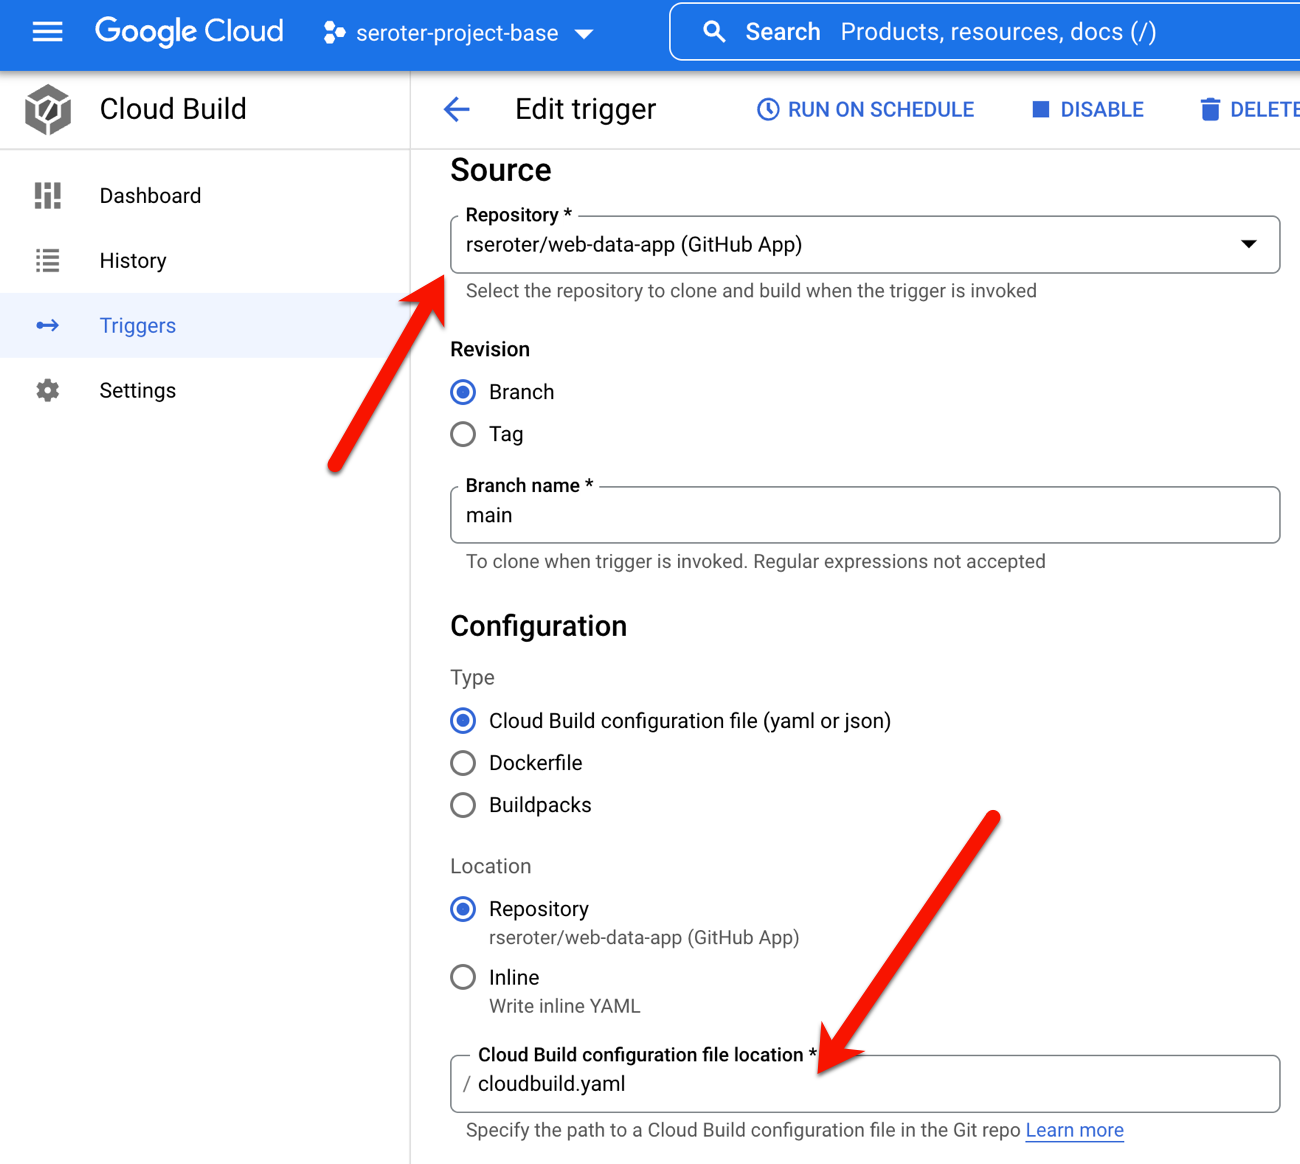
I jumped into the Google Cloud Console and created a new Cloud Build trigger. Since I’m not (yet) using a git repo for configs, but I have to pick SOMETHING when building a trigger, I chose a random repo of mine. I chose an “inline” Cloud Build definition and pasted in the YAML above.
That’s it. I saved the trigger, ensured the “Cloud Build” account had appropriate permissions to update BigQuery, and “ran” the Cloud Build job.
I saw the new column in my BigQuery table as a result and if I looked at the “change table” managed by Liquibase, I saw each of the three change we did so far.
Scenario #4 – Automate using Cloud Build and Cloud Deploy
So far so good. But it doesn’t feel “done” yet. What I really want is to take a web application that writes to BigQuery, and deploy that, along with BigQuery changes, in one automated process. And I want to use the “right” tools, so I should use Cloud Build to package the app, and Google Cloud Deploy to push the app to GKE.
I first built a new web app using Node.js. This very simple app asks you to enter the name of an employee, and it adds that employee to a BigQuery table. I’m seeking seed funding for this app now if you want to invest. The heart of this app’s functionality is in its router:
router.post('/', async function(req, res, next) {
    console.log('called post - creating row for ' + req.body.inputname)

    const row = [
        {empid: uuidv4(), fullname: req.body.inputname}
      ];

    // Insert data into a table
    await bigquery
    .dataset('employee_dataset')
    .table('names_1')
    .insert(row);
    console.log(`Inserted 1 rows`);


    res.render('index', { title: 'Employee Entry Form' });
  });
Before defining our Cloud Build process that packages the app, I wanted to create all the Cloud Deploy artifacts. These artifacts consist of a set of Kubernetes deployment files, a Skaffold configuration, and finally, a pipeline definition. The Kubernetes deployments get associated to a profile (dev/prod) in the Skaffold file, and the pipeline definition identifies the target GKE clusters.
Let’s look at the Kubernetes deployment file for the “dev” environment. To execute the Liquibase container before deploying my Node.js application, I decided to use Kubernetes init containers. These run (and finish) before the actual container you care about. But I had the same challenge as with Cloud Build. How do I pass the config files and JAR files to the Liquibase container? Fortunately, Kubernetes offers up Volumes as well. Basically, the below deployment file does the following things:
Create an empty volume called “workspace.”
Runs an init container that executes a script to create the “changelog” and “lib” folders in the workspace volume. For whatever reason, the Cloud Storage CLI wouldn’t do it automatically for me, so I added this distinct step.
Runs an init container that git clones the latest config files from my GitHub project (no longer using Cloud Storage) and stashes them in the “changelog” directory in the workspace volume.
Runs a third init container to retrieve the JAR files from Cloud Storage and stuff them into the “lib” directory in the workspace volume.
Runs a final init container that mounts each directory to the right place in the container (using subpath references), and runs the “liquibase update” command.
Runs the application container holding our web app.
The only difference between the “dev” and “prod” deployments is that I named the running containers something different. Each deployment also has a corresponding “service.yaml” file that exposes the container with a public endpoint.
Ok, so we have configs. That’s the hard part, and took me the longest to figure out! The rest is straightforward.
I defined a skaffold.yaml file which Cloud Deploy uses to render right assets for each environment.
Skaffold is a cool tool for local development, but I won’t go into it here. The only other asset we need for Cloud Deploy is the actual pipeline definition! Here, I’m pointing to my two Google Kubernetes Engine clusters (with platform-wide access scopes) that represent dev and prod environments.
In the Cloud Console, I saw a visual representation of my jazzy new pipeline.
The last step is to create the Cloud Build definition which builds my Node.js app, stashes it into Google Cloud Artifact Registry, and then triggers a Cloud Deploy “release.” You can see that I point to the Skaffold file, which in turns knows where the latest Kubernetes deployment/service YAML files are at. Note that I use a substitution value here with –images where the “web-data-app” value in each Kubernetes deployment file gets swapped out with the newly generated image identifier.
To make all this magic work, I went into Google Cloud Build to set up my new trigger. It points at my GitHub repo and refers to the cloudbuild.yaml file there.
I ran my trigger manually (I could also set it to run on every check-in) to build my app and initiate a release in Cloud Deploy. The first part ran quickly and successfully.
The result? It worked! My “dev” GKE cluster got a new workload and service endpoint, and my BigQuery table got a new column.
When I went back into Cloud Deploy, I “promoted” this release to production and it ran the production-aligned files and popped a workload into the other GKE cluster. And it didn’t make any BigQuery changes, because we already did on the previous run. In reality, you would probably have different BigQuery tables or datasets for each environment!
Wrap up
Did you make it this far? You’re amazing. It might be time to shift from just shipping the easy stuff through automation to shipping ALL the stuff via automation. Software like Liquibase definition gets you further along in the journey, and it’s good to see Google Cloud make it easier.