Want to constantly deploy updates to your web app through the use of automation? Not everyone does it, but it’s a mostly solved problem with mature patterns and tools that make it possible. Automated deployments of databases, app services, and data warehouses? Also possible, but not something I personally see done as often. Let’s change that!
Last month, I was tweeting about Liquibase, and their CTO and co-founder pointed out to me that Google Cloud contributed a BigQuery extension. Given that Liquibase is a well-known tool for automating database changes, I figured it was time to dig in and see how it worked, especially for a fully managed data warehouse like BigQuery. Specifically, I wanted to prove out four things:
- Use the Liquibase CLI locally to add columns to a BigQuery table. This is an easy way to get started!
- Use the Liquibase Docker image to add columns to a BigQuery table. See how to deploy changes through a Docker container, which makes later automation easier.
- Use the Liquibase Docker image within Cloud Build to automate deployment of a BigQuery table change. Bring in continuous integration (and general automation service) Google Cloud Build to invoke the Liquibase container to push BigQuery changes.
- Use Cloud Build and Cloud Deploy to automate the build and deployment of the app to GKE along with a BigQuery table change. This feels like the ideal state, where Cloud Build does app packaging, and then hands off to Cloud Deploy to push BigQuery changes (using the Docker image) and the web app through dev/test/prod.
I learned a lot of new things by performing this exercise! I’ll share all my code and lessons learned about Docker, Kubernetes, init containers, and Liquibase throughout this post.
Scenario #1 – Use Liquibase CLI
The concepts behind Liquibase are fairly straightforward: define a connection string to your data source, and create a configuration file that represents the desired change to your database. A Liquibase-driven change isn’t oriented adding data itself to a database (although, it can), but for making structural changes like adding tables, creating views, and adding foreign key constraints. Liquibase also does things like change tracking, change locks, and assistance with rollbacks.
While it directly integrates with Java platforms like Spring Boot, you can also use it standalone via a CLI or Docker image.

I downloaded the CLI installer for my Mac, which added the bits to a local directory. And then I checked to see if I could access the liquibase CLI from the console.

Next, I downloaded the BigQuery JDBC driver which is what Liquibase uses to connect to my BigQuery. The downloaded package includes the JDBC driver along with a “lib” folder containing a bunch of dependencies.
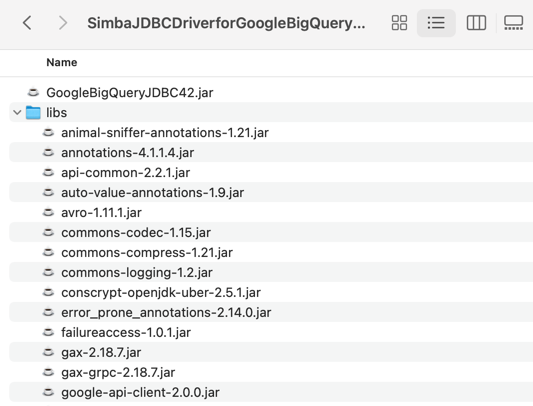
I added *all* of those files—the GoogleBigQueryJDBC42.jar file and everything in the “lib” folder—to the “lib” folder included in the liquibase install directory.

Next, I grabbed the latest BigQuery extension for Liquibase and installed that single JAR file into the same “lib” folder in the local liquibase directory. That’s it for getting the CLI properly loaded.
What about BigQuery itself? Anything to do there? Not really. When experimenting, I got “dataset not found” from Liquibase when using a specific region like “us-west1” so I created a dataset the wider “US” region and everything worked fine.

I added a simple table to this dataset and started it off with two columns.

Now I was ready to trigger some BigQuery changes! I had a local folder (doesn’t need to be where the CLI was installed) with two files: liquibase.properties, and changelog.yaml. The properties file (details here) includes the database connection string, among other key attributes. I turned on verbose logging, which was very helpful in finding obscure issues with my setup! Also, I want to use environmental credentials (saved locally, or available within a cloud instance by default) versus entering creds in the file, so the OAuthType is set to “3”.
#point to where the file is containing the changelog to execute
changelogFile: changelog.yaml
#identify which driver to use for connectivity
driver: com.simba.googlebigquery.jdbc.Driver
#set the connection string for bigquery
url: jdbc:bigquery://https://googleapis.com/bigquery/v2:443;ProjectId=seroter-project-base;DefaultDataset=employee_dataset;OAuthType=3;
#log all the things
logLevel: 0
#if not using the "hub" features
liquibase.hub.mode=off
Next I created the actual change log. There are lots of things you can do here, and change files can be authored in JSON, XML, SQL, or YAML. I chose YAML, because I know how to have a good time. The BigQuery driver supports most of the Liquibase commands, and I chose the one to add a new column to my table.
databaseChangeLog:
  - changeSet:
      id: addColumn-example1
      author: rseroter
      changes:
        - addColumn:
            tableName: names_1
            columns:
            - column:
                name: location
                type: STRING
Once you get all the setup in place, the actual Liquibase stuff is fairly simple! To execute this change, I jumped into the CLI, navigated to the folder holding the properties file and change log, and issued a single command.
liquibase --changeLogFile=changelog.yaml update
Assuming you have all the authentication and authorization settings correct and files defined and formatted in the right way, the command should complete successfully. In BigQuery, I saw that my table had a new column.

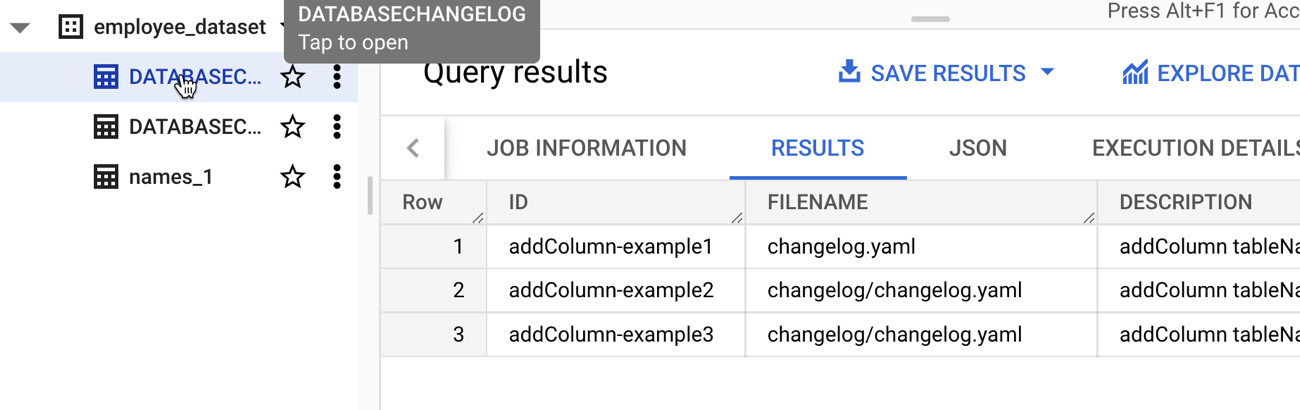
Note that this command is idempotent. I can execute it again and again with no errors or side effects. After I executed the command, I saw two new tables added to my dataset. If I had set the “liquibaseSchemaName” property in the properties file, I could have put these tables into a different dataset of my choosing. What are they for? The DATABASECHANGELOGLOCK table is used to create a “lock” on the database change so that only one process at a time can make updates. The DATABASECHANGELOG table stores details of what was done, when. Be aware that each changeset itself is unique, so if I tried to run a new change (add a different column) with the same changeset id (above, set to “addColumn-example1”), I’d get an error.

That’s it for the CLI example. Not too bad!
Scenario #2 – Use Liquibase Docker image
The CLI is cool, but maybe you want an even more portable way to trigger a database change? Liquibase offers a Docker image that has the CLI and necessary bits loaded up for you.
To test this out, I fired up an instance of the Google Cloud Shell—this is an dev environment that you can access within our Console or standalone. From here, I created a local directory (lq) and added folders for “changelog” and “lib.” I uploaded all the BigQuery JDBC JAR files, as well as the Liquibase BigQuery driver JAR file.

I also uploaded the liquibase.properties file and changelog.yaml file to the “changelog” folder in my Cloud Shell. I opened the changelog.yaml file in the editor, and updated the changeset identifier and set a new column name.

All that’s left is to start the Docker container. Note that you might find it easier to create a new Docker image based on the base Liquibase image with all the extra JAR files embedded within it instead of schlepping the JARs all over the place. In my case here, I wanted to keep it all separate. To ensure that the Liquibase Docker container “sees” all my config files and JAR files, I needed to mount volumes when I started the container. The first volume mount maps from my local “changelog” directory to the “/liquibase/changelog” directory in the container. The second maps from the local “lib” directory to the right spot in the container. And by mounting all those JARs into the container’s “lib” directory—while also setting the “–include-system-classpath” flag to ensure it loads everything it finds there—the container has everything it needs. Here’s the whole Docker command:
docker run --rm -v /home/richard/lq/changelog:/liquibase/changelog -v /home/richard/lq/lib:/liquibase/lib liquibase/liquibase --include-system-classpath=true --changeLogFile=changelog/changelog.yaml --defaultsFile=/liquibase/changelog/liquibase.properties update
After 30 seconds or so, I saw the new column added to my BigQuery table.

To be honest, this doesn’t feel like it’s that much simpler than just using the CLI, but, by learning how to use the container mechanism, I could now embed this database change process into a container-native cloud build tool.
Scenario #3 – Automate using Cloud Build
Those first two scenarios are helpful for learning how to do declarative changes to your database. Now it’s time to do something more automated and sustainable. In this scenario, I tried using Google Cloud Build to automate the deployment of my database changes.
Cloud Build runs each “step” of the build process in a container. These steps can do all sorts of things, ranging from compiling your code, running tests, pushing to artifact storage, or deploy a workload. Since it can honestly run any container, we could also use the Liquibase container image as a “step” of the build. Let’s see how it works.
My first challenge related to getting all those JDBC and driver JAR files into Cloud Build! How could the Docker container “see” them? To start, I put all the JAR files and config files (updated with a new column named “title”) into Google Cloud Storage buckets. This gave me easy, anywhere access to the files.

Then, I decided to take advantage of Cloud Build’s built-in volume for sharing data between the independent build steps. This way, I could retrieve the files, store them, and then the Liquibase container could see them on the shared volume. In real life, you’d probably grab the config files from a Git repo, and the JAR files from a bucket. We’ll do that in the next scenario! Be aware that there’s also a project out there for mounting Cloud Storage buckets as volumes, but I didn’t feel like trying to do that. Here’s my complete Cloud Build manifest:
steps:
- id: "Get Liquibase Jar files"
  name: 'gcr.io/cloud-builders/gsutil'
  dir: 'lib'
  args: ['cp', 'gs://liquibase-jars/*.jar', '/workspace/lib']
- id: "Get Liquibase config files"
  name: 'gcr.io/cloud-builders/gsutil'
  dir: 'changelog'
  args: ['cp', 'gs://liquibase-configs/*.*', '/workspace/changelog']
- id: "Update BQ"
  name: 'gcr.io/cloud-builders/docker'
  args: [ "run", "--network=cloudbuild", "--rm", "--volume", "/workspace/changelog:/liquibase/changelog", "--volume", "/workspace/lib:/liquibase/lib", "liquibase/liquibase", "--include-system-classpath=true", "--changeLogFile=changelog/changelog.yaml", "--defaultsFile=/liquibase/changelog/liquibase.properties", "update" ]
The first “step” uses a container that’s pre-loaded with the Cloud Storage CLI. I executed the “copy” command and put all the JAR files into the built-in “workspace” volume. The second step does something similar by grabbing all the “config” files and dropping them into another folder within the “workspace” volume.
Then the “big” step executed a virtually identical Docker “run” command as in scenario #2. I pointed to the “workspace” directories for the mounted volumes. Note the “–network” flag which is a magic command for using default credentials.
I jumped into the Google Cloud Console and created a new Cloud Build trigger. Since I’m not (yet) using a git repo for configs, but I have to pick SOMETHING when building a trigger, I chose a random repo of mine. I chose an “inline” Cloud Build definition and pasted in the YAML above.

That’s it. I saved the trigger, ensured the “Cloud Build” account had appropriate permissions to update BigQuery, and “ran” the Cloud Build job.

I saw the new column in my BigQuery table as a result and if I looked at the “change table” managed by Liquibase, I saw each of the three change we did so far.
Scenario #4 – Automate using Cloud Build and Cloud Deploy
So far so good. But it doesn’t feel “done” yet. What I really want is to take a web application that writes to BigQuery, and deploy that, along with BigQuery changes, in one automated process. And I want to use the “right” tools, so I should use Cloud Build to package the app, and Google Cloud Deploy to push the app to GKE.
I first built a new web app using Node.js. This very simple app asks you to enter the name of an employee, and it adds that employee to a BigQuery table. I’m seeking seed funding for this app now if you want to invest. The heart of this app’s functionality is in its router:
router.post('/', async function(req, res, next) {
    console.log('called post - creating row for ' + req.body.inputname)

    const row = [
        {empid: uuidv4(), fullname: req.body.inputname}
      ];

    // Insert data into a table
    await bigquery
    .dataset('employee_dataset')
    .table('names_1')
    .insert(row);
    console.log(`Inserted 1 rows`);


    res.render('index', { title: 'Employee Entry Form' });
  });
Before defining our Cloud Build process that packages the app, I wanted to create all the Cloud Deploy artifacts. These artifacts consist of a set of Kubernetes deployment files, a Skaffold configuration, and finally, a pipeline definition. The Kubernetes deployments get associated to a profile (dev/prod) in the Skaffold file, and the pipeline definition identifies the target GKE clusters.
Let’s look at the Kubernetes deployment file for the “dev” environment. To execute the Liquibase container before deploying my Node.js application, I decided to use Kubernetes init containers. These run (and finish) before the actual container you care about. But I had the same challenge as with Cloud Build. How do I pass the config files and JAR files to the Liquibase container? Fortunately, Kubernetes offers up Volumes as well. Basically, the below deployment file does the following things:
- Create an empty volume called “workspace.”
- Runs an init container that executes a script to create the “changelog” and “lib” folders in the workspace volume. For whatever reason, the Cloud Storage CLI wouldn’t do it automatically for me, so I added this distinct step.
- Runs an init container that git clones the latest config files from my GitHub project (no longer using Cloud Storage) and stashes them in the “changelog” directory in the workspace volume.
- Runs a third init container to retrieve the JAR files from Cloud Storage and stuff them into the “lib” directory in the workspace volume.
- Runs a final init container that mounts each directory to the right place in the container (using subpath references), and runs the “liquibase update” command.
- Runs the application container holding our web app.
apiVersion: apps/v1
kind: Deployment
metadata:
  name: db-ci-deployment-dev
spec:
  replicas: 1
  selector:
    matchLabels:
      app: web-data-app-dev
  template:
    metadata:
      labels:
        app: web-data-app-dev
    spec:
      volumes:
      - name: workspace
        emptyDir: {}
      initContainers:
        - name: create-folders
          image: alpine
          command:
          - /bin/sh
          - -c
          - |
            cd liquibase
            mkdir changelog
            mkdir lib
            ls
            echo "folders created"
          volumeMounts:
          - name: workspace
            mountPath: /liquibase
            readOnly: false
        - name: preload-changelog
          image: bitnami/git
          command:
          - /bin/sh
          - -c
          - |
            git clone https://github.com/rseroter/web-data-app.git
            cp web-data-app/db_config/* liquibase/changelog
            cd liquibase/changelog
            ls
          volumeMounts:
          - name: workspace
            mountPath: /liquibase
            readOnly: false
        - name: preload-jars
          image: gcr.io/google.com/cloudsdktool/cloud-sdk
          command: ["gsutil"]
          args: ['cp', 'gs://liquibase-jars/*', '/liquibase/lib/']
          volumeMounts:
          - name: workspace
            mountPath: /liquibase
            readOnly: false
        - name: run-lq
          image: liquibase/liquibase
          command: ["liquibase"]
          args: ['update', '--include-system-classpath=true', '--changeLogFile=/changelog/changelog.yaml', '--defaultsFile=/liquibase/changelog/liquibase.properties']
          volumeMounts:
          - name: workspace
            mountPath: /liquibase/changelog
            subPath: changelog
            readOnly: false
          - name: workspace
            mountPath: /liquibase/lib
            subPath: lib
            readOnly: false
      containers:
      - name: web-data-app-dev
        image: web-data-app
        env:
        - name: PORT
          value: "3000"
        ports:
          - containerPort: 3000
        volumeMounts:
        - name: workspace
          mountPath: /liquibase
The only difference between the “dev” and “prod” deployments is that I named the running containers something different. Each deployment also has a corresponding “service.yaml” file that exposes the container with a public endpoint.
Ok, so we have configs. That’s the hard part, and took me the longest to figure out! The rest is straightforward.
I defined a skaffold.yaml file which Cloud Deploy uses to render right assets for each environment.
apiVersion: skaffold/v2beta16
kind: Config
metadata:
 name: web-data-app-config
profiles:
 - name: prod
   deploy:
     kubectl:
       manifests:
         - deployment-prod.yaml
         - service-prod.yaml
 - name: dev
   deploy:
     kubectl:
       manifests:
         - deployment-dev.yaml
         - service-dev.yaml
Skaffold is a cool tool for local development, but I won’t go into it here. The only other asset we need for Cloud Deploy is the actual pipeline definition! Here, I’m pointing to my two Google Kubernetes Engine clusters (with platform-wide access scopes) that represent dev and prod environments.
apiVersion: deploy.cloud.google.com/v1
kind: DeliveryPipeline
metadata:
 name: data-app-pipeline
description: application pipeline for app and BQ changes
serialPipeline:
 stages:
 - targetId: devenv
   profiles:
   - dev
 - targetId: prodenv
   profiles:
   - prod
---

apiVersion: deploy.cloud.google.com/v1
kind: Target
metadata:
 name: devenv
description: development GKE cluster
gke:
 cluster: projects/seroter-project-base/locations/us-central1-c/clusters/cluster-seroter-gke-1110

---

apiVersion: deploy.cloud.google.com/v1
kind: Target
metadata:
 name: prodenv
description: production GKE cluster
gke:
 cluster: projects/seroter-project-base/locations/us-central1-c/clusters/cluster-seroter-gke-1117
I then ran the single command to deploy that pipeline (which doesn’t yet care about the Skaffold and Kubernetes files):
gcloud deploy apply --file=clouddeploy.yaml --region=us-central1 --project=seroter-project-base
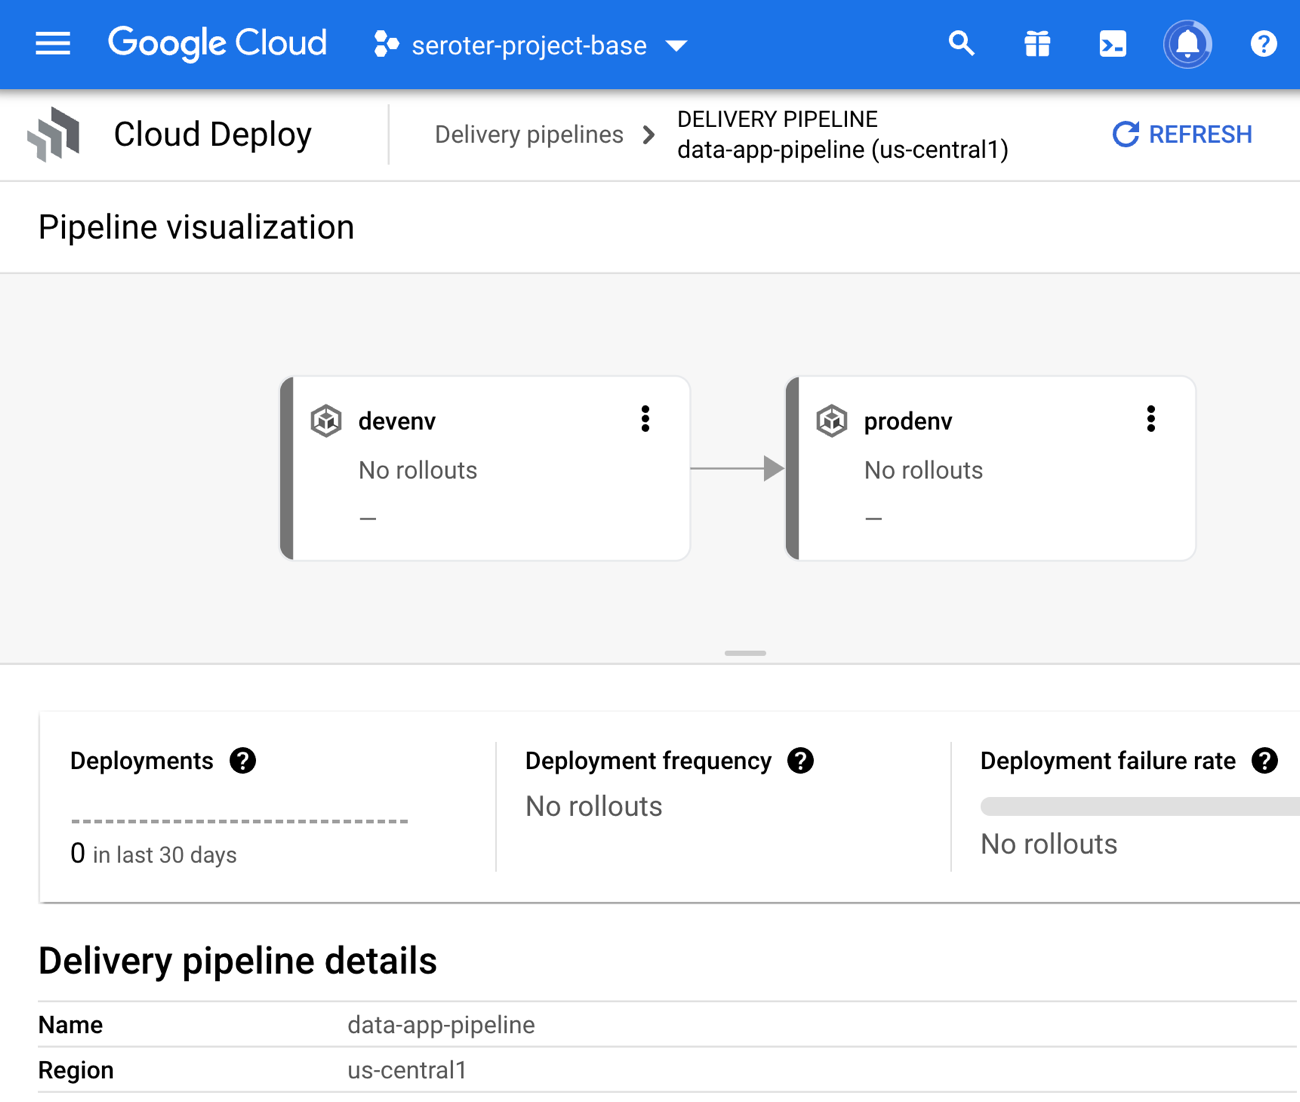
In the Cloud Console, I saw a visual representation of my jazzy new pipeline.
The last step is to create the Cloud Build definition which builds my Node.js app, stashes it into Google Cloud Artifact Registry, and then triggers a Cloud Deploy “release.” You can see that I point to the Skaffold file, which in turns knows where the latest Kubernetes deployment/service YAML files are at. Note that I use a substitution value here with –images where the “web-data-app” value in each Kubernetes deployment file gets swapped out with the newly generated image identifier.
steps:
  - name: 'gcr.io/k8s-skaffold/pack'
    id: Build Node app
    entrypoint: 'pack'
    args: ['build', '--builder=gcr.io/buildpacks/builder', '--publish', 'gcr.io/$PROJECT_ID/web-data-app:$COMMIT_SHA']
  - name: gcr.io/google.com/cloudsdktool/cloud-sdk
    id: Create Cloud Deploy release
    args:
        [
          "deploy", "releases", "create", "test-release-$SHORT_SHA",
          "--delivery-pipeline", "data-app-pipeline",
          "--region", "us-central1",
          "--images", "web-data-app=gcr.io/$PROJECT_ID/web-data-app:$COMMIT_SHA",
          "--skaffold-file", "deploy_config/skaffold.yaml"
        ]
    entrypoint: gcloud
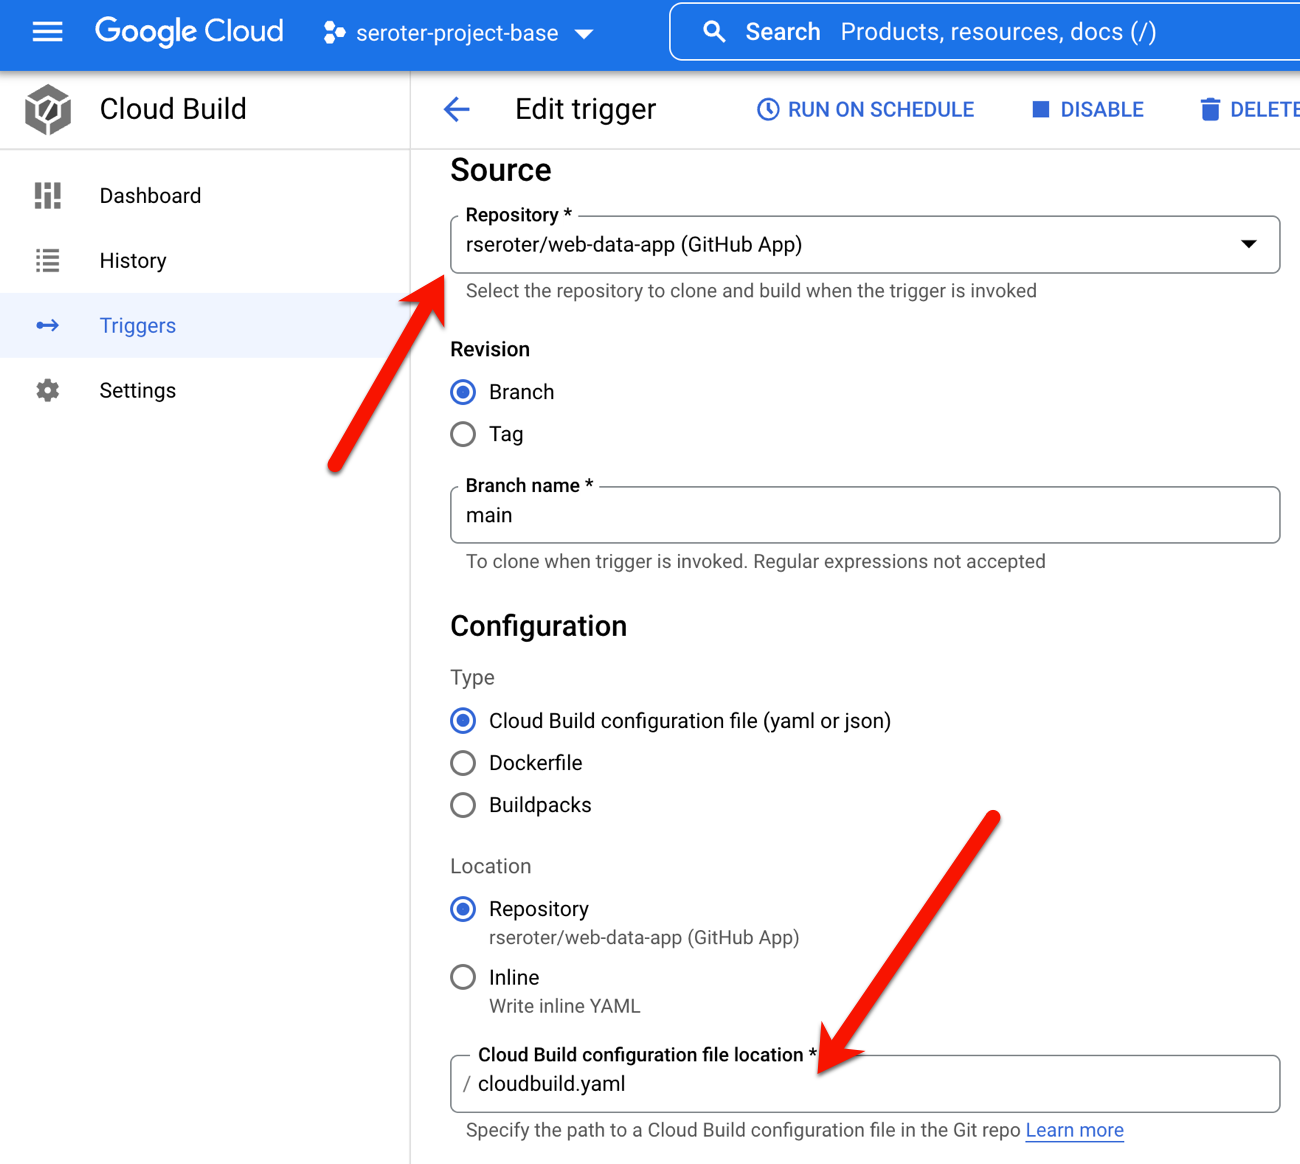
To make all this magic work, I went into Google Cloud Build to set up my new trigger. It points at my GitHub repo and refers to the cloudbuild.yaml file there.
I ran my trigger manually (I could also set it to run on every check-in) to build my app and initiate a release in Cloud Deploy. The first part ran quickly and successfully.

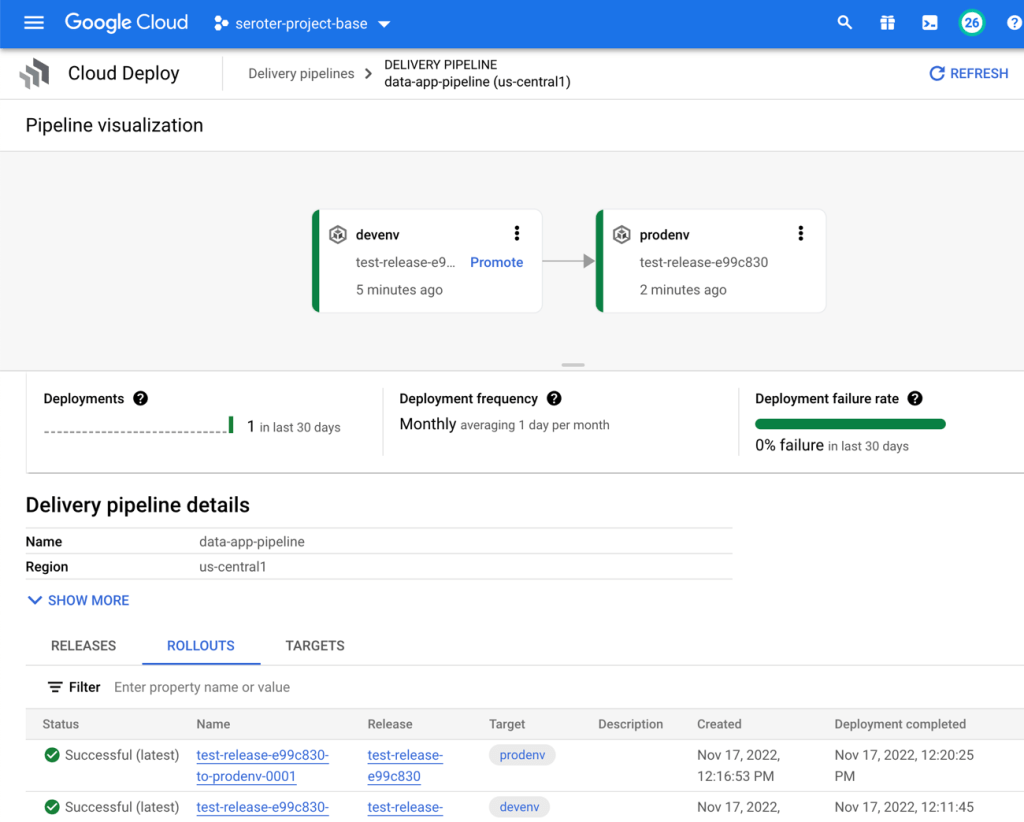
The result? It worked! My “dev” GKE cluster got a new workload and service endpoint, and my BigQuery table got a new column.

When I went back into Cloud Deploy, I “promoted” this release to production and it ran the production-aligned files and popped a workload into the other GKE cluster. And it didn’t make any BigQuery changes, because we already did on the previous run. In reality, you would probably have different BigQuery tables or datasets for each environment!

Wrap up
Did you make it this far? You’re amazing. It might be time to shift from just shipping the easy stuff through automation to shipping ALL the stuff via automation. Software like Liquibase definition gets you further along in the journey, and it’s good to see Google Cloud make it easier.

Leave a comment