
Is a serverless architecture realistic for every system? Of course not. But it’s never been easier to build robust solutions out of a bunch of fully-managed cloud services. For instance, what if I want to take uploaded files, inspect them, and route events to app instances hosted in different regions around the world? Such a solution might require a lot of machinery to set up and manage—file store, file listeners, messaging engines, workflow system, hosting infrastructure, and CI/CD products. Yikes. How about we do that with serverless technology such as:
- Google Cloud Run to host app instances in different regions.
- Google Cloud Workflows which figures out which Cloud Run instance should process each event.
- Google Cloud Eventarc to listen to and route “file upload” events to a listener in Cloud Workflows.
- Google Cloud Storage to hold uploaded files.
- Google Cloud Deploy to do parallel deployments of Cloud Run apps to different locations. New feature alert: parallel deployments are brand new.
The final architecture (designed with the free and fun Architecture Diagramming Tool) looks like this:

Let’s build this together, piece by piece.
Step 1: Build Java app that processes CloudEvents
The heart of this system is the app that processes “loan” events. The events produced by Eventarc are in the industry-standard CloudEvents format. Do I want to parse and process those events in code manually? No, no I do not. Two things will help here. First, our excellent engineers have built client libraries for every major language that you can use to process CloudEvents for various Google Cloud services (e.g. Storage, Firestore, Pub/Sub). My colleague Mete took it a step further by creating VS Code templates for serverless event-handlers in Java, .NET, Python, and Node. We’ll use those.
To add these templates to your Visual Studio Code environment, you start with Cloud Code, our Google Cloud extension to popular IDEs. Once Cloud Code is installed, I can click the “Cloud Code” menu and then choose the “New Application” option.

Then I chose the “Custom Application” option and “Import Sample from Repo” and added a link to Mete’s repo.
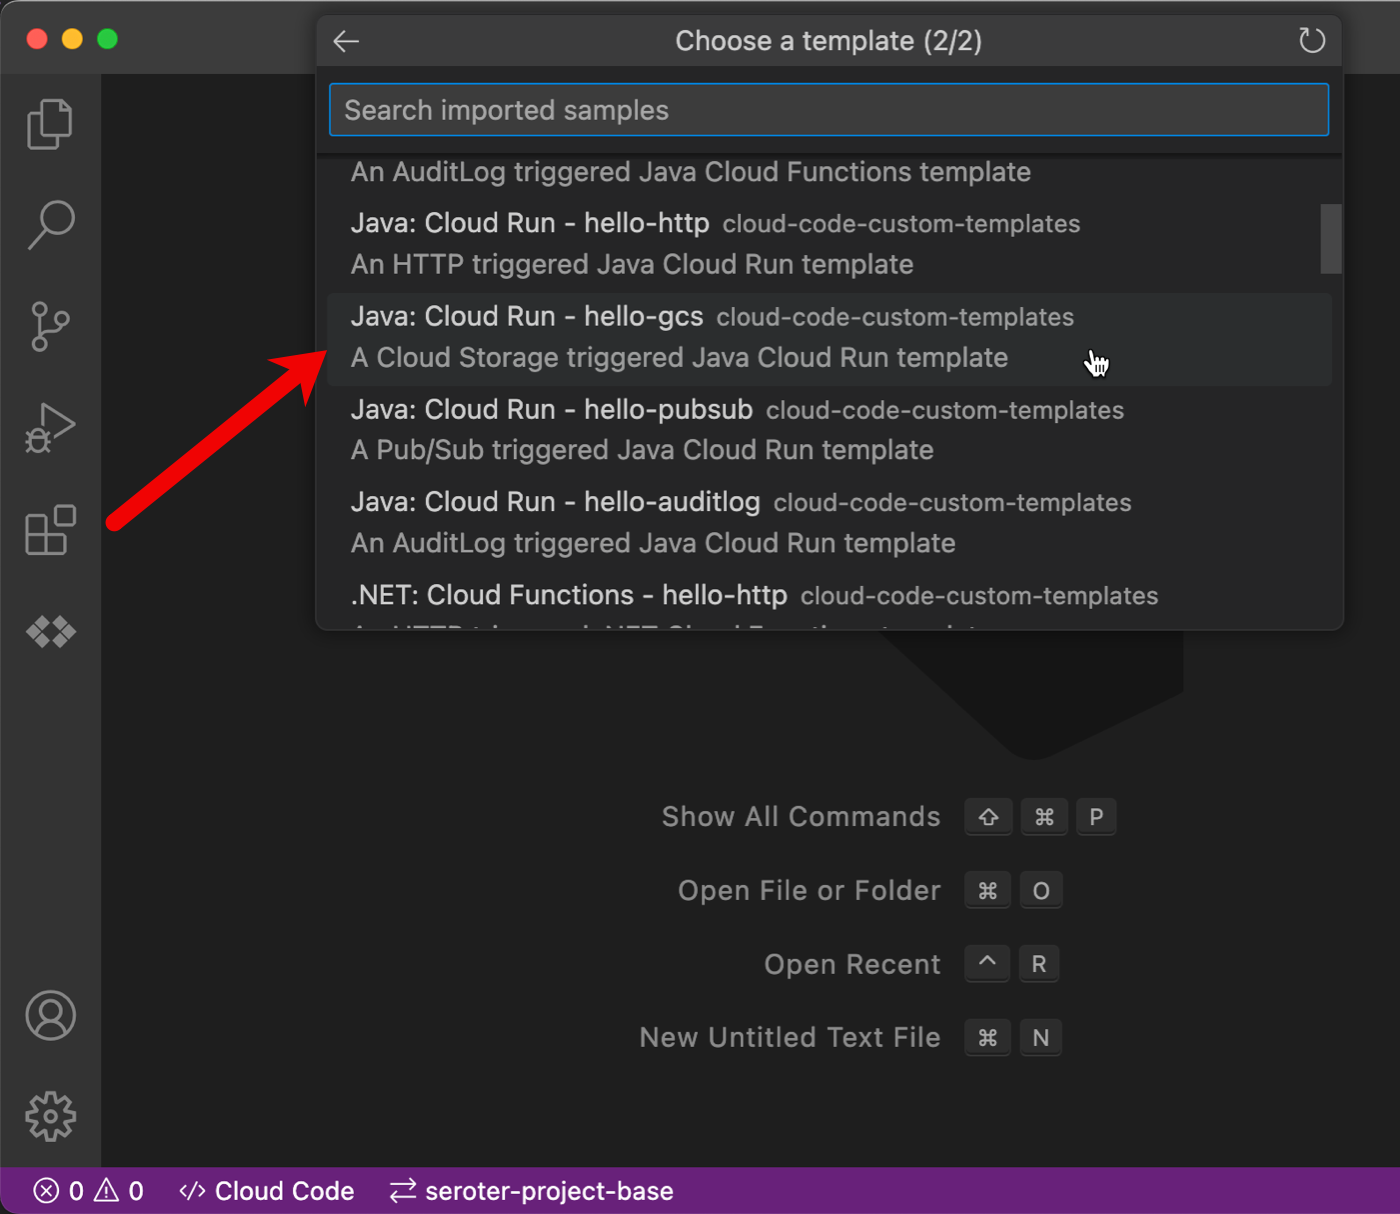
Now I have the option to pick a “Cloud Storage event” code template for Cloud Functions (traditional function as a service) or Cloud Run (container-based serverless). I picked the Java template for Cloud Run.
The resulting project is a complete Java application. It references the client library mentioned above, which you can see as google-cloudevent-types in the pom.xml file. The code is fairly straightforward and the core operation accepts the inbound CloudEvent and creates a typed StorageObjectData object.
@PostMapping("/")
ResponseEntity<Void> handleCloudEvent(@RequestBody CloudEvent cloudEvent) throws InvalidProtocolBufferException {

      // CloudEvent information
      logger.info("Id: " + cloudEvent.getId());
      logger.info("Source: " + cloudEvent.getSource());
      logger.info("Type: " + cloudEvent.getType());

      String json = new String(cloudEvent.getData().toBytes());
      StorageObjectData.Builder builder = StorageObjectData.newBuilder();
      JsonFormat.parser().merge(json, builder);
      StorageObjectData data = builder.build();

      // Storage object data
      logger.info("Name: " + data.getName());
      logger.info("Bucket: " + data.getBucket());
      logger.info("Size: " + data.getSize());
      logger.info("Content type: " + data.getContentType());

      return ResponseEntity.ok().build();
 }
This generated project has directions and scripts to test locally, if you’re so inclined. I went ahead and deployed an instance of this app to Cloud Run using this simple command:
gcloud run deploy --source .
That gave me a running instance, and, a container image I could use in our next step.
Step 2: Create parallel deployment of Java app to multiple Cloud Run locations
In our fictitious scenario, we want an instance of this Java app in three different regions. Let’s imagine that the internal employees in each geography need to work with a local application.
I’d like to take advantage of a new feature of Cloud Deploy, parallel deployments. This makes it possible to deploy the same workload to a set of GKE clusters or Cloud Run environments. Powerful! To be sure, the MOST applicable way to use parallel deployments is a “high availability” scenario where you’d deploy identical instances across locations and put a global load balancer in front of it. Here, I’m using this feature as a way to put copies of an app closer to specific users.
First, I need to create “service” definitions for each Cloud Run environment in my deployment pipeline. I’m being reckless, so let’s just have “dev” and “prod.”
My “dev” service definition looks like this. The “image” name can be anything, as I’ll replace this placeholder in realtime when I deploy the pipeline.
apiVersion: serving.knative.dev/v1
kind: Service
metadata:
  name: event-app-dev
spec:
  template:
    spec:
      containers:
      - image: java-eventlistener
The “production” YAML service is identical except for a different service name.
Next, I need a Skaffold file that identifies the environments for my pipeline, and points to the respective YAML files that represent each environment.
apiVersion: skaffold/v4beta1
kind: Config
metadata:
  name: deploy-run-webapp
profiles:
- name: dev
  manifests:
    rawYaml:
    - run-dev.yaml
- name: prod
  manifests:
    rawYaml:
    - run-prod.yaml
deploy:
  cloudrun: {}
The final artifact I need is a DeliveryPipeline definition. It calls out two stages (dev and prod), and for production that points to a multiTarget that refers to three Cloud Run targets.
apiVersion: deploy.cloud.google.com/v1
kind: DeliveryPipeline
metadata:
 name: my-parallel-event-app
description: event application pipeline
serialPipeline:
 stages:
 - targetId: app-dev
   profiles: [dev]
 - targetId: app-prod-multi
   profiles: [prod]
---

apiVersion: deploy.cloud.google.com/v1
kind: Target
metadata:
 name: app-dev
description: Cloud Run development service
run:
 location: projects/seroter-project-base/locations/us-central1

---

apiVersion: deploy.cloud.google.com/v1
kind: Target
metadata:
 name: app-prod-multi
description: production
multiTarget:
 targetIds: [prod-east, prod-west, prod-northeast2]
---

apiVersion: deploy.cloud.google.com/v1
kind: Target
metadata:
 name: prod-east
description: production us-east1
run:
 location: projects/seroter-project-base/locations/us-east1
---

apiVersion: deploy.cloud.google.com/v1
kind: Target
metadata:
 name: prod-west
description: production us-west1
run:
 location: projects/seroter-project-base/locations/us-west1

---

apiVersion: deploy.cloud.google.com/v1
kind: Target
metadata:
 name: prod-northeast2
description: production northamerica-northeast2
run:
 location: projects/seroter-project-base/locations/northamerica-northeast2
All set. It takes a single command to create the deployment pipeline.
gcloud deploy apply --file=clouddeploy.yaml --region=us-central1 --project=seroter-project-base
In the Google Cloud Console, I can see my deployed pipeline with two stages and multiple destinations for production.

Now it’s time to create a release for this deployment and see everything provisioned.
The command to create a release might be included in your CI build process (whether that’s Cloud Build, GitHub Actions, or something else), or you can run the command manually. I’ll do that for this example. I named the release, gave it the name of above pipeline, and swapped the placeholder image name in my service YAML files with a reference to the container image generated by the previously-deployed Cloud Run instance.
gcloud deploy releases create test-release-001 \
--project=seroter-project-base \
--region=us-central1 \
--delivery-pipeline=my-parallel-event-app \
--images=java-eventlistener=us-south1-docker.pkg.dev/seroter-project-base/cloud-run-source-deploy/java-cloud-run-storage-event
After a few moments, I see a deployment to “dev” rolling out.

When that completed, I “promoted” the release to production and saw a simultaneous deployment to three different cloud regions.

Sweet. Once this is done, I check and see four total Cloud Run instances (one for dev, three for prod) created. I like the simplicity here for shipping the same app instance to any cloud region. For GKE clusters, this also works with Anthos environments, meaning you could deploy to edge, on-prem or other clouds as part of a parallel deploy.

We’re done with this step. I have an event-receiving app deployed around North America.
Step 3: Set up Cloud Storage bucket
This part is simple. I use the Cloud Console to create a new object storage bucket named seroter-loan-applications. We’ll assume that an application drops files into this bucket.

Step 4: Write Cloud Workflow that routes events to correct Cloud Run instance
There are MANY ways one could choose to architect this solution. Maybe you upload files to specific bucket and route directly to the target Cloud Run instance using a trigger. Or you route all bucket uploads to a Cloud Function and decide there where you’ll send it next. Plus dozens of other options. I’m going to use a Cloud Workflow that receives an event, and figures out where to send it next.
A Cloud Workflow is described with a declarative definition written in YAML or JSON. It’s got a standard library of functions, supports control flow, and has adapters to lots of different cloud services. This Workflow needs to parse an incoming CloudEvent and route to one of our three (secured) Cloud Run endpoints. I do a very simple switch statement that looks at the file name of the uploaded file, and routes it accordingly. This is a terrible idea in real life, but go with me here.
main:
    params: [eventmsg]
    steps:
        - get-filename:
            assign:
                - filename: ${eventmsg.data.name}
        - choose_endpoint:
            switch:
                - condition: ${text.match_regex(filename, "northeast")}
                  next: forward_request_northeast
                - condition: ${text.match_regex(filename, "uswest")}
                  next: forward_request_uswest
                - condition: ${text.match_regex(filename, "useast")}
                  next: forward_request_useast
        - forward_request_northeast:
            call: http.post
            args:
                url: https://event-app-prod-ofanvtevaa-pd.a.run.app
                auth:
                    type: OIDC
                headers:
                    Content-Type: "application/json"
                    ce-id: ${eventmsg.id} #"123451234512345"
                    ce-specversion: ${eventmsg.specversion} #"1.0"
                    ce-time: ${eventmsg.time} #"2020-01-02T12:34:56.789Z"
                    ce-type: ${eventmsg.type} #"google.cloud.storage.object.v1.finalized"
                    ce-source: ${eventmsg.source} #"//storage.googleapis.com/projects/_/buckets/MY-BUCKET-NAME"
                    ce-subject: ${eventmsg.subject} #"objects/MY_FILE.txt"
                body:
                    ${eventmsg.data}
            result: the_message
            next: returnval
        - forward_request_uswest:
            call: http.post
            args:
                url: https://event-app-prod-ofanvtevaa-uw.a.run.app
                auth:
                    type: OIDC
                headers:
                    Content-Type: "application/json"
                    ce-id: ${eventmsg.id} #"123451234512345"
                    ce-specversion: ${eventmsg.specversion} #"1.0"
                    ce-time: ${eventmsg.time} #"2020-01-02T12:34:56.789Z"
                    ce-type: ${eventmsg.type} #"google.cloud.storage.object.v1.finalized"
                    ce-source: ${eventmsg.source} #"//storage.googleapis.com/projects/_/buckets/MY-BUCKET-NAME"
                    ce-subject: ${eventmsg.subject} #"objects/MY_FILE.txt"
                body:
                    ${eventmsg.data}
            result: the_message
            next: returnval
        - forward_request_useast:
            call: http.post
            args:
                url: https://event-app-prod-ofanvtevaa-ue.a.run.app
                auth:
                    type: OIDC
                headers:
                    Content-Type: "application/json"
                    ce-id: ${eventmsg.id} #"123451234512345"
                    ce-specversion: ${eventmsg.specversion} #"1.0"
                    ce-time: ${eventmsg.time} #"2020-01-02T12:34:56.789Z"
                    ce-type: ${eventmsg.type} #"google.cloud.storage.object.v1.finalized"
                    ce-source: ${eventmsg.source} #"//storage.googleapis.com/projects/_/buckets/MY-BUCKET-NAME"
                    ce-subject: ${eventmsg.subject} #"objects/MY_FILE.txt"
                body:
                    ${eventmsg.data}
            result: the_message
            next: returnval
        - returnval:
            return: ${the_message}
This YAML results in a workflow that looks like this:

Step 5: Configure Eventarc trigger to kick off a Cloud Workflow
Our last step is to wire up the “file upload” event to this workflow. For that, we use Eventarc. Eventarc handles the machinery for listening to events and routing them. See here that I chose Cloud Storage as my event source (there are dozens and dozens), and then the event I want to listen to. Next I selected my source bucket, and chose a destination. This could be Cloud Run, Cloud Functions, GKE, or Workflows. I chose Workflows and then my specific Workflow that should kick off.

All good. Now I have everything wired up and can see this serverless solution in action.
Step 6: Test and enjoy
Testing this solution is straightforward. I dropped three “loan application” files into the bucket, each named with a different target region.

Sure enough, three Workflows kick off and complete successfully. Clicking into one of them shows the Workflow’s input and output.

Looking at the Cloud Run logs, I see that each instance received an event corresponding to its location.

Wrap Up
No part of this solution required me to stand up hardware, worry about operating systems, or configure networking. Except for storage costs for my bucket objects, there’s no cost to this solution when it’s not running. That’s amazing. As you look to build more event-driven systems, consider stitching together some fully managed services that let you focus on what matters most.

Leave a comment