
The idea of “backup and restore” in a complex distributed system is bit weird. Is it really even possible? Can you snapshot all the components of an entire system at a single point in time, inclusive of all the side effects in downstream systems? I dunno. But you need to at least have a good recovery story for each of your major stateful components! While Kubernetes started out as a terrific orchestrator for stateless containers, it’s also matured as a runtime for stateful workloads. Lots of folks are now using Kubernetes to run databases, event processors, ML models. and even “legacy” apps that maintain local state. Until now, public cloud users have only had DIY or 3rd party options when it comes to backing up their Kubernetes clusters, but not any more. Google Cloud just shipped a new built-in Backup for Google Kubernetes Engine (GKE) feature, and I wanted to try it out.
What Backup for GKE does
Basically, it captures the resources—at the cluster or namespace level—and persistent volumes within a given cluster at a specific point in time. It does not back up cluster configurations themselves (e.g. node pool size, machine types, enabled cluster features). For that, you’d like likely have an infrastructure-as-code approach for stamping out clusters (using something like Terraform), and use Backup for GKE to restore the state of your running app. This diagram from the official docs shows the architecture:

A Kubernetes cluster backup comes from a “backup plan” that defines the scope of a given backup. With these, you choose a cluster to back up, which namespaces you want backed up, and a schedule (if any). To restore a backup into an existing cluster, you execute a pre-defined “restore plan.” All of this is part of a fully managed Google Cloud service, so you’re not stuck operating any of the backup machinery.
Setting up Backup for GKE on a new cluster
Backup for GKE works with existing clusters (see Appendix A below), but I wanted to try it out on a fresh cluster first.
I started with a GKE standard cluster. First, I made sure to choose a Kubernetes version that supported the Backup feature. Right now, that’s Kubernetes 1.24 or higher.

I also turned on two features at the cluster-level. The first was Workload Identity. This security feature enforces more granular, workload-specific permissions to access other Google Cloud services.
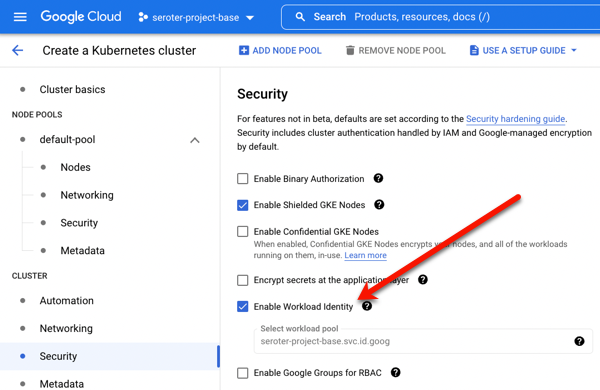
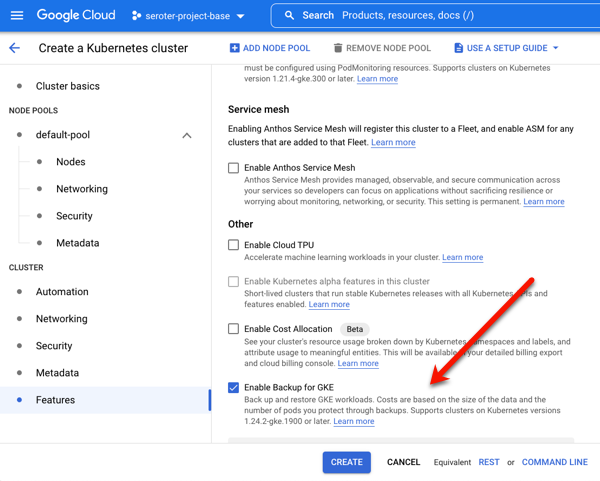
The second and final feature to enable is Backup for GKE. This injects the agent into the cluster and connects it to the control plane.
Deploying a stateful app to Kubernetes
Once my cluster was up and running, I wanted to deploy a simple web application to it. What’s the app? I created a poorly-written Go app that has a web form to collect support tickets. After you submit a ticket, I route it to Google Cloud Pub/Sub, write an entry into a directory, and then take the result of the cloud request and jam the identifier into a file on another directory. What does this app prove? Two things. First, it should flex Workload Identity by successfully publishing to Pub/Sub. And second, I wanted to observe how stateful backups worked, so I’m writing files to two directories, one that can be backed by a persistent volume, and one backed by a local (node) volume.
I built and containerized the app automatically by using a Cloud Buildpack within a Cloud Build manifest, and invoking a single command:
gcloud builds submit --config cloudbuild.yaml
I then logged into my just-created GKE cluster and created a new namespace to hold my application and specific permissions.
kubectl create ns demos
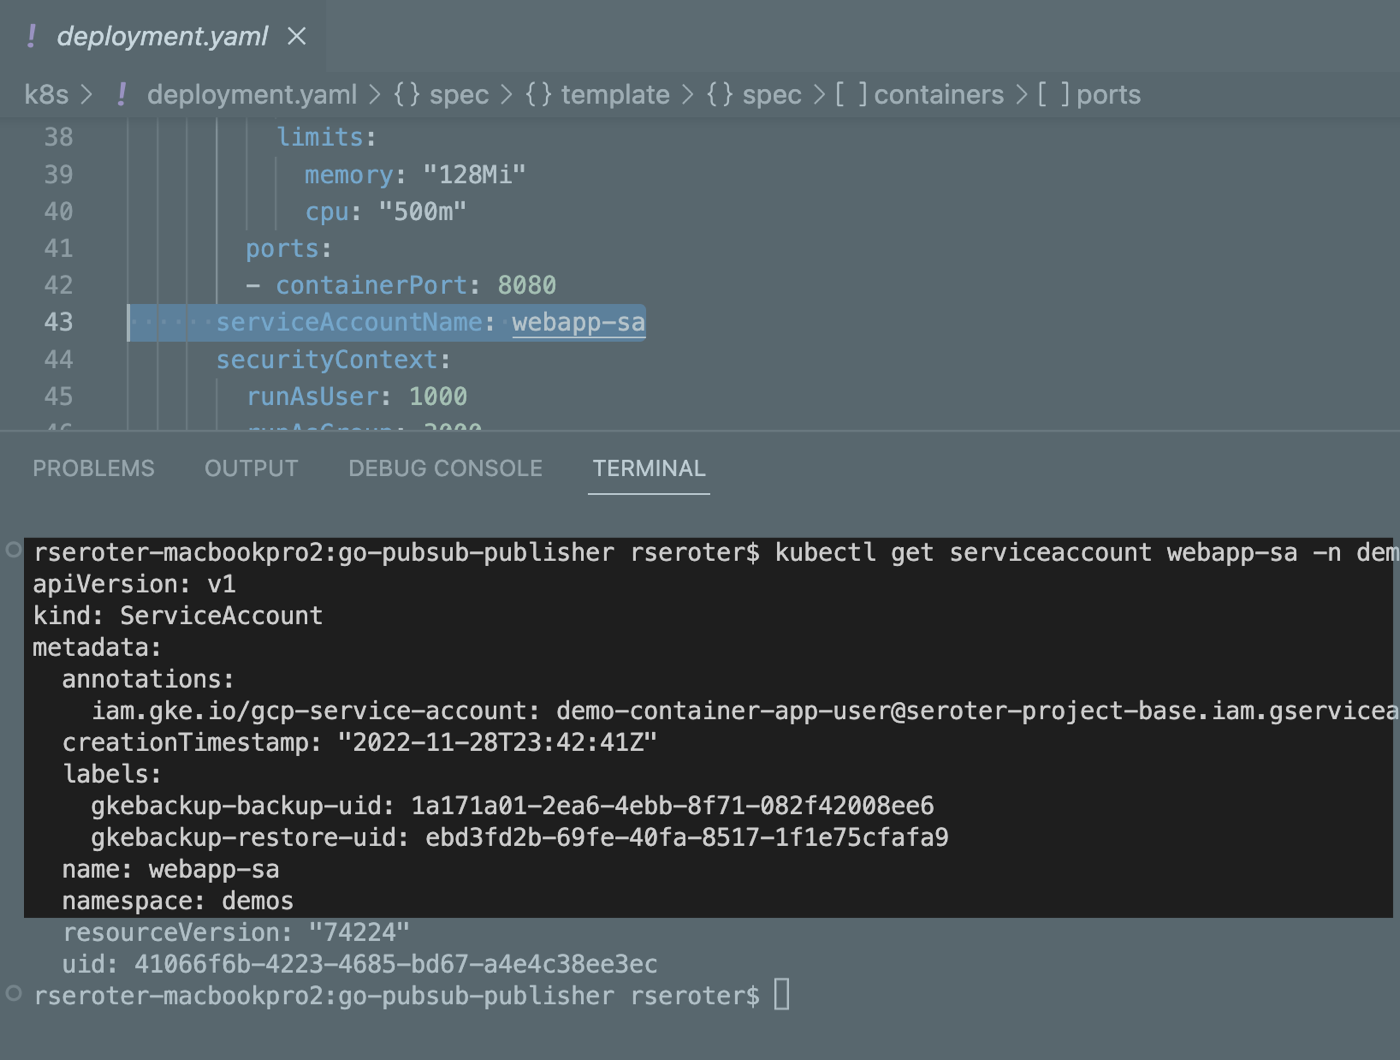
To light up Workload Identity, you create a local service account in a namespace and map it to an existing Google Cloud IAM account that has the permissions the application should have. I created a Kubernetes service account:
kubectl create serviceaccount webapp-sa --namespace demos
And then I annotated the service account with the mapping to an IAM account (demo-container-app-user) which triggers the impersonation at runtime:
kubectl annotate serviceaccount webapp-sa --namespace demos iam.gke.io/gcp-service-account=demo-container-app-user@seroter-project-base.iam.gserviceaccount.com
Sweet. Finally, there’s the Kubernetes deployment YAML that points to my app container, service account, and the two volumes used by my app. At the top is my definition of the persistent volume, and then the deployment itself.
apiVersion: v1
kind: PersistentVolumeClaim
metadata:
  name: pvc-output
spec:
  accessModes:
    - ReadWriteOnce
  resources:
    requests:
      storage: 5Gi
  storageClassName: standard-rwo
---
apiVersion: apps/v1
kind: Deployment
metadata:
  name: go-pubsub-publisher-deployment
spec:
  selector:
    matchLabels:
      app: go-pubsub-publisher
  template:
    metadata:
      labels:
        app: go-pubsub-publisher
    spec:
      containers:
      - name: go-pubsub-publisher
        image: gcr.io/seroter-project-base/go-pubsub-publisher:34749b85-afbb-4b59-98cc-4d5d790eb325
        volumeMounts:
          - mountPath: /logs
            name: log-volume
          - mountPath: /acks
            name: pvc-output-volume
        resources:
          requests:
            memory: "64Mi"
            cpu: "300m"
          limits:
            memory: "128Mi"
            cpu: "500m"
        ports:
        - containerPort: 8080
      serviceAccountName: webapp-sa
      securityContext:
        runAsUser: 1000
        runAsGroup: 3000
        fsGroup: 2000
      volumes:
        - name: log-volume
          emptyDir: {}
        - name: pvc-output-volume
          persistentVolumeClaim:
            claimName: pvc-output
I applied the above manifest (and a services definition) to my GKE cluster with the following command:
kubectl apply -f k8s/. -n demos
A moment afterwards, I saw a deployment and service. The deployment showed two associated volumes, including the auto-created persistent disk based on my declarative request.
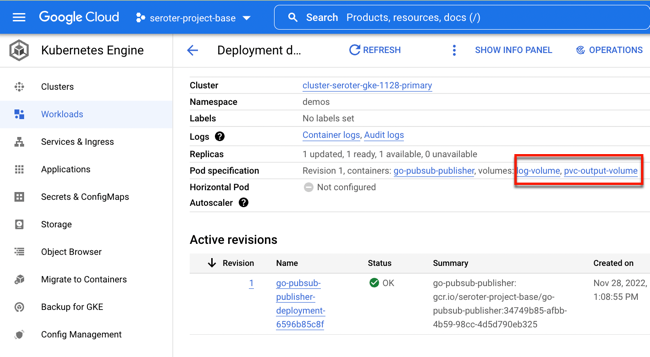
Let’s triple check that. I got the name of the pod and got a shell into the running container. See below that both directories show up, and my app isn’t aware of which one is from a persistent volume and which is not.

I pulled up the web page for the app, and entered a few new “support tickets” into the system. The Pub/Sub UI lets me pull messages from a topic subscription, and we see my submitted tickets there.

The next thing to check is the container’s volumes. Sure enough, I saw the contents of each message written to the local directory (/logs) and the message IDs written to the persistent directory (/acks).

Running a backup and restore
Let’s back that thing up.
Backup plans are tied to a cluster. You can see here that my primary cluster (with our deployed app) and new secondary cluster (empty) have zero plans.

I clicked the “create a backup plan” button at the top of this page, and got asked for some initial plan details.

That all seemed straightforward. Then it got real. My next options included the ability to back up ALL the namespaces of the cluster, specific ones, or “protected” (more customized) configs. I just chose our “demos” namespace for backup. Also note that I could choose to back up persistent volume data and control encryption.

Next, I was asked to choose the frequency of backups. This is defined in the form of a CRON expression. I could back up every few minutes, once a month, or every year. If I leave this “schedule” empty, this becomes an on-demand backup plan.

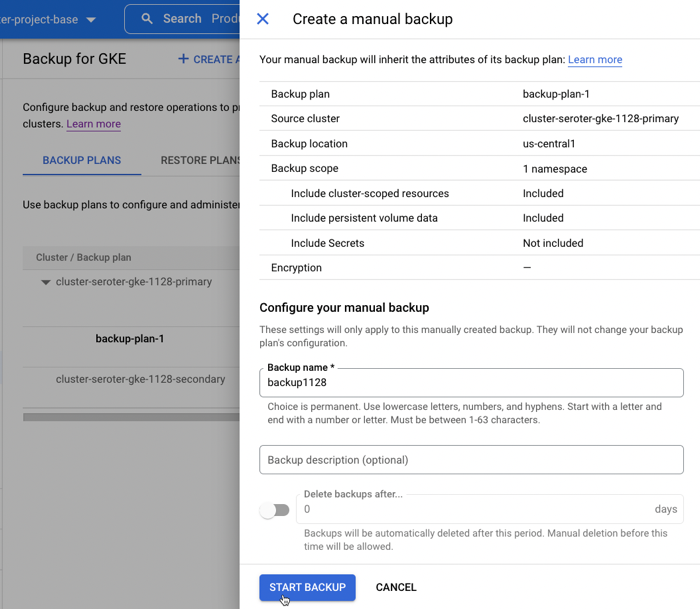
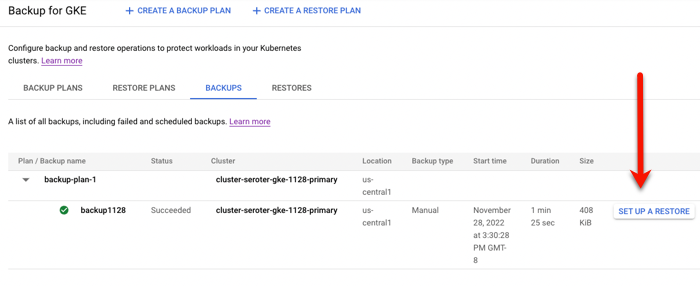
After reviewing all my settings, I saved the backup plan. Then I manually kicked off a backup by providing the name and retention period for the backup.
To do anything with this backup, I need a “restore plan.” I clicked the button to create a new restore plan, and was asked to connect it to a backup plan, and a target cluster.

Next, I had the choice of restoring some, or all, namespaces. In real life, you might back up everything, and then selectively restore. I like that you’re asked about conflict handling, which determines what happens if the target cluster already has the specified namespace in there. There are also a handful of flexible options for restoring volume data, ranging from creating new volumes, to re-using existing, to not restoring anything.

After that, I was asked about cluster-scoped resources. It pre-loaded a few API groups and Object kinds to restore, and offered me the option to overwrite any existing resources.

Finally, I got asked for any substitution rules to swap backed up values for different ones. With that, I finished my restore plan and had everything I needed to test my backup.
I set up a restore, which basically just involved choosing a restore plan (which is connected to a backup, and target cluster). In just a few moments, I saw a “succeeded” message and it looked like it worked.

When I checked out the GKE “workloads” view, I saw both the original and “restored” deployment running.

I logged into the “secondary” GKE cluster and saw my custom namespace and workload. I also checked, and saw that my custom service account (and Workload Identity-ready annotation) came over in the restore action.
Next, I grabbed a shell into the container to check my stateful data. What did I find? The “local” volume from the original container (“logs”) was empty. Which makes sense. That wasn’t backed by a persistent disk. The “acks” directory, on the other hand, was backed up, and shows up intact as part of the restore.

To test out my “restored” app instance, I submitted a new ticket, saw it show up in Pub/Sub (it just worked, as Workload Identity was in place), and also saw the new log file, and updated “ids.txt” file.

Pretty cool! With Backup for GKE, you don’t deal with the installation, patching, or management of your backup infrastructure, and get a fairly sophisticated mechanism for resilience in your distributed system.
To learn more about this, check out the useful documentation, and these two videos: Introduction to Backup for GKE, and How to enable GKE Backup.
Appendix A: Setting up Backup for GKE on an an existing cluster
Backup for GKE doesn’t only work with new clusters. You can add it to most existing GKE clusters. And these clusters can act as either sources or targets!
First, let’s talk about GKE Autopilot clusters. These are basically hyper-automated GKE standard clusters that incorporate all of Google’s security and scalability best practices. An Autopilot cluster doesn’t yet expose “Backup for GKE” feature at creation time, but you apply if after the fact. You also need to ensure you’re on Kubernetes 1.24 or higher. Workload Identity is enabled by default, so there’s nothing you need to do there.

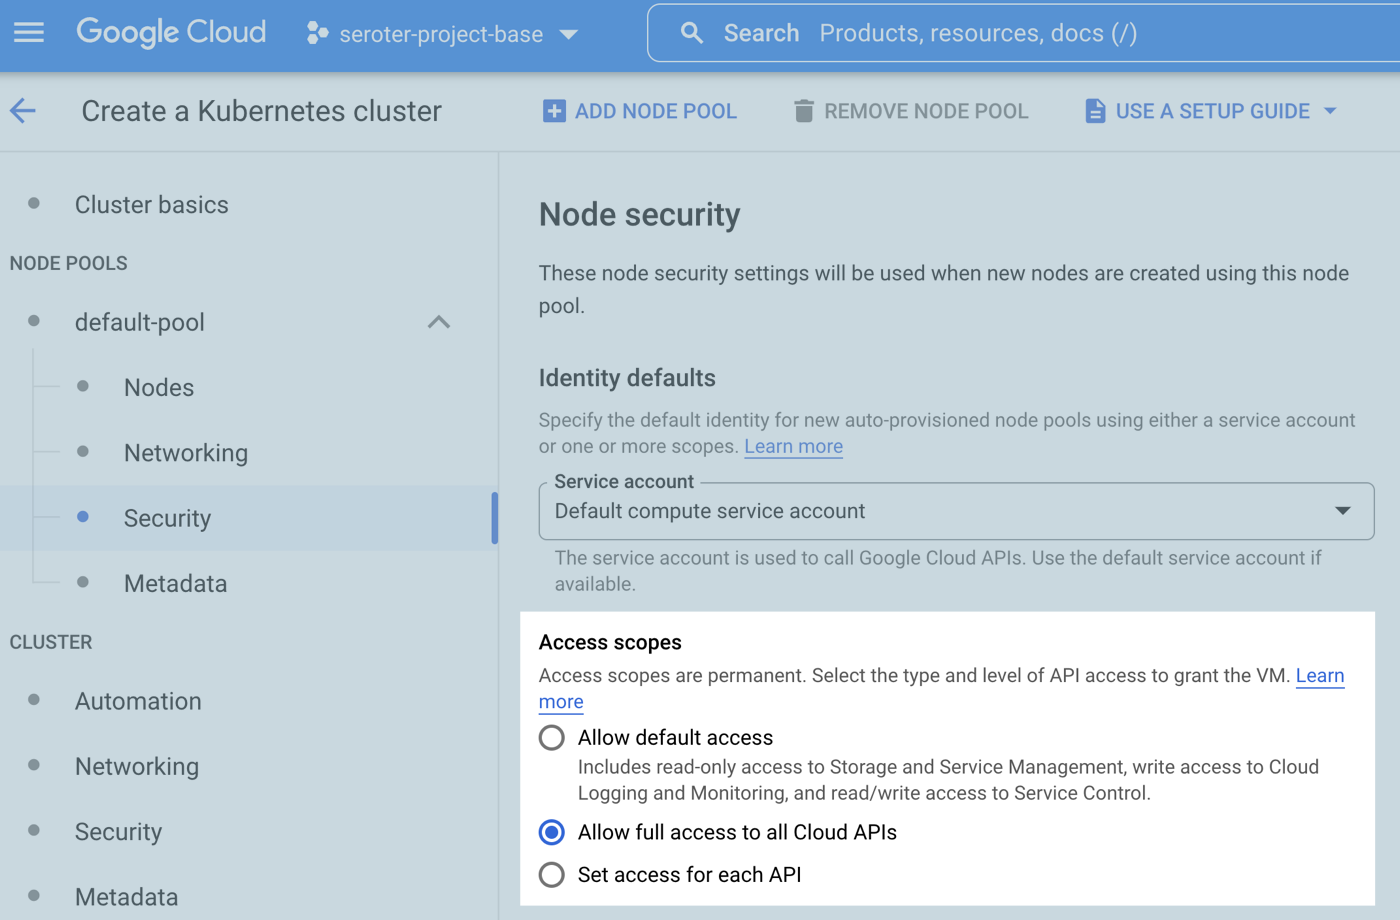
But let’s talk about an existing GKE standard cluster. If you provision one from scratch, the default security option is to use a service account for the node pool identity. What this means is that any workloads in the cluster will have the same permissions as that account.

If I provision a cluster (cluster #1) like so, the app from above does not work. Why? The “default compute service account” doesn’t have permission to write to a Pub/Sub topic. A second security option is to use a specific service account with the minimum set of permissions needed for the node’s workloads. If I provision cluster #2 and choose a service account with rights to publish to Pub/Sub, my app does work.
The third security option relates to the access scopes for the cluster. This is a legacy method for authorization. The default setting is “allow default access” which offers a limited set of OAuth-based permissions. If I build a GKE cluster (cluster #3) with a default service account and “allow full access to all cloud APIs” then my app above does work because it has wide-ranging access to all the cloud APIs.
For a GKE standard cluster configured in either of the three ways above, I cannot install Backup for GKE. Why? I have to first enable Workload Identity. Once I edited the three clusters’ settings to enable Workload Identity, my app behaved the same way (not work, work, work)! That surprised me. I expected it to stop using the cluster credentials and require a Workload Identity assignment. What went wrong? For an existing cluster, turning on Workload Identity alone doesn’t trigger the necessary changes for existing node pools. Any new node pools would have everything enabled, but you have to explicitly turn on the GKE Metadata Server for any existing node pools.

This GKE Metadata Server is automatically turned on for any new node pools when you enable Workload Identity, and if you choose to install Workload Identity on a new cluster, it’s also automatically enabled for the first node pool. I didn’t totally understand all this until I tried out a few scenarios!
Once you’re running a supported version of Kubernetes and have Workload Identity enabled on a cluster, you can enroll it in Backup for GKE.


Leave a comment