Most apps use databases. This is not a shocking piece of information. If your app is destined to run in a public cloud, how do you work with cloud-only databases when doing local development? It seems you have two choices:
- Provision and use an instance of the cloud database. If you’re going to depend on a cloud database, you can certainly use it directly during local development. Sure, there might be a little extra latency, and you’re paying per hour for that instance. But this is the most direct way to do it.
- Install and use a local version of that database. Maybe your app uses a cloud DB based on installable software like Microsoft SQL Server, MongoDB, or PostgreSQL. In that case, you can run a local copy (in a container, or natively), code against it, and swap connection strings as you deploy to production. There’s some risk, as it’s not the EXACT same environment. But doable.
A variation of choice #2 is when you select a cloud database that doesn’t have an installable equivalent. Think of the cloud-native, managed databases like Amazon DynamoDB, Google Cloud Spanner, and Azure Cosmos DB. What do you do then? Must you choose option #1 and work directly in the cloud? Fortunately, each of those cloud databases now has a local emulator. This isn’t a full-blown instance of that database, but a solid mock that’s suitable for development. In this post, I’ll take a quick look at the above mentioned emulators, and what you should know about them.
#1 Amazon DynamoDB
Amazon’s DynamoDB is a high-performing NoSQL (key-value and document) database. It’s a full-featured managed service that transparently scales to meet demand, supports ACID transactions, and offers multiple replication options.
DynamoDB Local is an emulator you can run anywhere. AWS offers a few ways to run it, including a direct download—it requires Java to run—or a Docker image. I chose the downloadable option and unpacked the zip file on my machine.
Before you can use it, you need credentials set up locally. Note that ANY credentials will do (they don’t have to be valid) for it to work. If you have the AWS CLI, you can simply do an aws configure command to generate a credentials file based on your AWS account.
The JAR file hosting the emulator has a few flags you can choose at startup:

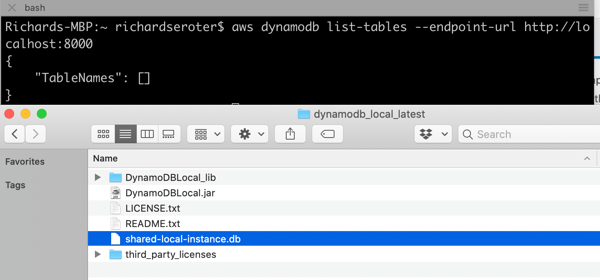
You can see that you have a choice of running this entirely in-memory, or use the default behavior which saves your database to disk. The in-memory option is nice for quick testing, or running smoke tests in an automated pipeline. I started up DynamoDB Local with the following command, which gave me a shared database file that every local app will connect to:
java -Djava.library.path=./DynamoDBLocal_lib -jar DynamoDBLocal.jar -sharedDb
This gave me a reachable instance on port 8000. Upon first starting it up, there’s no database file on disk. As soon as I issued a database query (in another console, as the emulator blocks after it starts up), I saw the database file.
Let’s try using it from code. I created a new Node Express app, and added an npm reference to the AWS SDK for JavaScript. In this app, I want to create a table in DynamoDB, add a record, and then query that record. Here’s the complete code:
const express = require('express')
const app = express()
const port = 3000

var AWS = require("aws-sdk");

//region doesn't matter for the emulator
AWS.config.update({
  region: "us-west-2",
  endpoint: "http://localhost:8000"
});

//dynamodb variables
var dynamodb = new AWS.DynamoDB();
var docClient = new AWS.DynamoDB.DocumentClient();

//table configuration
var params = {
    TableName : "Animals",
    KeySchema: [
        { AttributeName: "animal_id", KeyType: "HASH"},  //Partition key
        { AttributeName: "species", KeyType: "RANGE" }  //Sort key
    ],
    AttributeDefinitions: [
        { AttributeName: "animal_id", AttributeType: "S" },
        { AttributeName: "species", AttributeType: "S" }
    ],
    ProvisionedThroughput: {
        ReadCapacityUnits: 10,
        WriteCapacityUnits: 10
    }
};


// default endpoint
app.get('/', function(req, res, next) {
    res.send('hello world!');
});

// create a table in DynamoDB
app.get('/createtable', function(req, res) {
    dynamodb.createTable(params, function(err, data) {
        if (err) {
            console.error("Unable to create table. Error JSON:", JSON.stringify(err, null, 2));
            res.send('failed to create table')
        } else {
            console.log("Created table. Table description JSON:", JSON.stringify(data, null, 2));
            res.send('success creating table')
        }
    });
});

//create a variable holding a new data item
var animal = {
    TableName: "Animals",
    Item: {
        animal_id: "B100",
        species: "E. lutris",
        name: "sea otter",
        legs: 4
    }
}

// add a record to DynamoDB table
app.get('/addrecord', function(req, res) {
    docClient.put(animal, function(err, data) {
        if (err) {
            console.error("Unable to add animal. Error JSON:", JSON.stringify(err, null, 2));
            res.send('failed to add animal')
        } else {
            console.log("Added animal. Item description JSON:", JSON.stringify(data, null, 2));
            res.send('success added animal')
        }
    });
});

// define what I'm looking for when querying the table
var readParams = {
    TableName: "Animals",
    Key: {
        "animal_id": "B100",
        "species": "E. lutris"
    }
};

// retrieve a record from DynamoDB table
app.get('/getrecord', function(req, res) {
    docClient.get(readParams, function(err, data) {
        if (err) {
            console.error("Unable to read animal. Error JSON:", JSON.stringify(err, null, 2));
            res.send('failed to read animal')
        } else {
            console.log("Read animal. Item description JSON:", JSON.stringify(data, null, 2));
            res.send(JSON.stringify(data, null, 2))
        }
    });
});

//start up app
app.listen(port);
It’s not great, but it works. Yes, I’m using a GET To create a record. This is a free site, so you’ll take this code AND LIKE IT.
After starting up the app, I can create a table, create a record, and find it.

Because data is persisted, I can stop the emulator, start it up later, and everything is still there. That’s handy.
As you can imagine, this emulator isn’t an EXACT clone of a global managed service. It doesn’t do anything with replication or regions. The “provisioned throughput” settings which dictate read/write performance are ignored. Table scans are done sequentially and parallel scans aren’t supported, so that’s another performance-related thing you can’t test locally. Also, read operations are all eventually consistent, but things will be so fast, it’ll seem strongly consistent. There are a few other considerations, but basically, use this to build apps, not to do performance tests or game-day chaos exercises.
#2 Google Cloud Spanner
Cloud Spanner is a relational database that Google says is “built for the cloud.” You get the relational database traits including schema-on-write, strong consistency, and ANSI SQL syntax, with some NoSQL database traits like horizontal scale and great resilience.
Just recently, Google Cloud released a beta emulator. The Cloud Spanner Emulator stores data in memory and works with their Java, Go, and C++ libraries. To run the emulator, you need Docker on your machine. From there, you can either use the gcloud CLI to run it, a pre-built Docker image, Linux binaries, and more. I’m going to use the gcloud CLI that comes with the Google Cloud SDK.
I ran a quick update of my existing SDK, and it was cool to see it pull in the new functionality. Kicking off emulation from the CLI is a developer-friendly idea.

Starting up the emulator is simple: gcloud beta emulators spanner start. The first time it runs, the CLI pulls down the Docker image, and then starts it up. Notice that it opens up all the necessary ports.

I want to make sure my app doesn’t accidentally spin up something in the public cloud, so I create a separate gcloud configuration that points at my emulator and uses the project ID of “seroter-local.”
gcloud config configurations create emulator
gcloud config set auth/disable_credentials true
gcloud config set project seroter-local
gcloud config set api_endpoint_overrides/spanner http://localhost:9020/
Next, I create a database instance. Using the CLI, I issue a command creating an instance named “spring-demo” and using the local emulator configuration.
gcloud spanner instances create spring-demo --config=emulator-config --description="Seroter Instance" --nodes=1
Instead of building an app from scratch, I’m using one of the Spring examples created by the Google Cloud team. Their go-to demo for Spanner uses their library that already recognizes the emulator, if you provide a particular environment variable. This demo uses Spring Data to work with Spanner, and serves up web endpoints for interacting with the database.
In the application package, the only file I had to change was the application.properties. Here, I specified project ID, instance ID, and database to create.
spring.cloud.gcp.spanner.project-id=seroter-local
spring.cloud.gcp.spanner.instance-id=spring-demo
spring.cloud.gcp.spanner.database=trades
In the terminal window where I’m going to run the app, I set two environment variables. First, I set SPANNER_EMULATOR_HOST=localhost:9010. As I mentioned earlier, the Spanner library for Java looks for this value and knows to connect locally. Secondly, I set a pointer to my GCP service account credentials JSON file: GOOGLE_APPLICATION_CREDENTIALS=~/Downloads/gcp-key.json. You’re not supposed to need creds for local testing, but my app wouldn’t start without it.
Finally, I compile and start up the app. There are a couple ways this app lets you interact with Spanner, and I chose the “repository” one:
mvn spring-boot:run -Dspring-boot.run.arguments=--spanner_repository
After a second or two, I see that the app compiled, and data got loaded into the database.

Pinging the endpoint in the browser gives a RESTful response.

Like with the AWS emulator, the Google Cloud Spanner emulator doesn’t do everything that its managed counterpart does. It uses unencrypted traffic, identity management APIs aren’t supported, concurrent read/write transactions get aborted, there’s no data persistence, quotas aren’t enforced, and monitoring isn’t enabled. There are also limitations during the beta phase, related to the breadth of supported queries and partition operations. Check the GitHub README for a full list.
#3 Microsoft Azure Cosmos DB
Now let’s look at Azure’s Cosmos DB. This is billed as a “planet scale” NoSQL database with easy scaling, multi-master replication, sophisticated transaction support, and support for multiple APIs. It can “talk” Cassandra, MongoDB, SQL, Gremlin, or Etcd thanks to wire-compatible APIs.
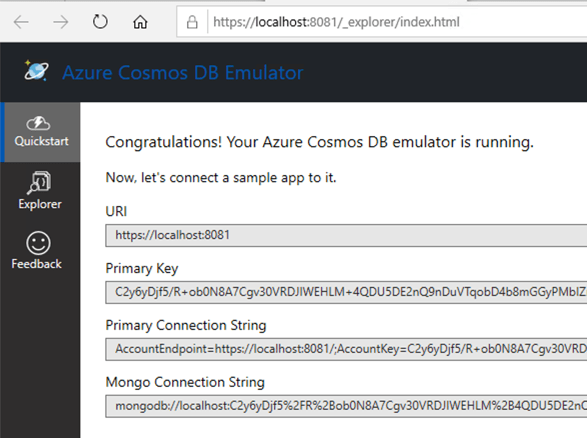
Microsoft offers the Azure Cosmos Emulator for local development. Somewhat inexplicably, it’s available only as a Windows download or Windows container. That surprised me, given the recent friendliness to Mac and Linux. Regardless, I spun up a Windows 10 environment in Azure, and chose the downloadable option.

Once it’s installed, I see a graphical experience that closely resembles the one in the Azure Portal.
From here, I use this graphical UI and build out a new database, container—not an OS container, but the name of a collection—and specify a partition key.
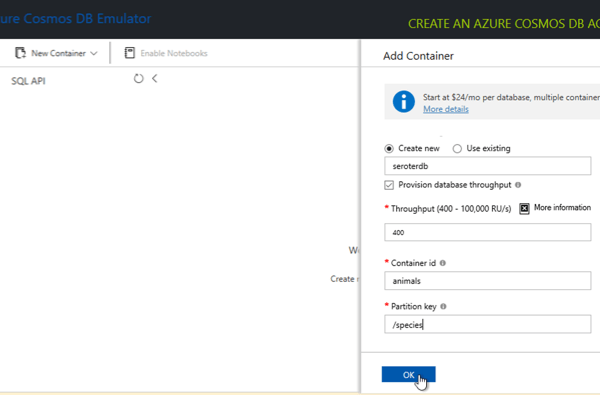
For fun, I added an initial database record to get things going.

Nice. Now I have a database ready to use from code. I’m going to use the same Node.js app I built for the AWS demo above, but this time, reference the Azure SDK (npm install @azure/cosmos) to talk to the database. I also created a config.json file that stores, well, config values. Note that there is a single fixed account and well-known key for all users. These aren’t secret.
const config = {
endpoint: "https://localhost:8081",
key: "C2y6yDjf5/R+ob0N8A7Cgv30VRDJIWEHLM+4QDU5DE2nQ9nDuVTqobD4b8mGGyPMbIZnqyMsEcaGQy67XIw/Jw==",
databaseId: "seroterdb",
containerId: "animals",
partitionKey: { kind: "Hash", paths: ["/species"] }
};
module.exports = config;
Finally, the app code itself. It’s pretty similar to what I wrote earlier for DynamoDB. I have an endpoint to add a record, and another one to retrieve records.
const express = require('express')
const app = express()
const port = 3000

const CosmosClient = require("@azure/cosmos").CosmosClient;
const config = require("./config");

//disable TLS verification
process.env.NODE_TLS_REJECT_UNAUTHORIZED = "0";

const { endpoint, key, databaseId, containerId } = config;
const client = new CosmosClient({ endpoint, key });
const database = client.database(databaseId);
const container = database.container(containerId);

app.get('/', function(req, res) {
    res.send('Hello World!')
})

//create a variable holding a new data item
var animal = {
    animal_id: "B100",
    species: "E. lutris",
    name: "sea otter",
    legs: 4
}

// add a record to DynamoDB table
app.get('/addrecord', async function(req, res) {
    const { resource: createdItem } = await container.items.create(animal);

    res.send('successfully added animal - ' + createdItem.id);
});

app.get('/getrecords', async function(req, res) {

    //query criteria
    querySpec = {
        query: "SELECT * from c WHERE c.species='E. lutris'"
      };

    animals = await container.items.query(querySpec).fetchAll();

    res.send(JSON.stringify(animals));
});

app.listen(port, function() {
    console.log('Example app listening at http://localhost:' + port)
});
When I start the app, I call the endpoint to create a record, see it show up in Cosmos DB, and issue another request to get the records that match the target “species.” Sure enough, everything works great.

What’s different about the emulator, compared to the “real” Cosmos DB? The emulator UI only supports the SQL API, not the others. You can’t use the adjustable consistency levels—like strong, session, or eventual—for queries. There are limits on how many containers you can create, and there’s no concept of replication here. Check out the remaining differences on the Azure site.
All three emulators are easy to set up and straightforward to use. None of them are suitable for performance testing or simulating production resilience scenarios. That’s ok, because the “real” thing is just a few clicks (or CLI calls) away. Use these emulators to iterate on your app locally, and maybe to simulate behaviors in your integration pipelines, and then spin up actual instances for in-depth testing before going live.