Are you tired on online events yet? No? You might be the only one. There are a few events popping up in person, but looks like we’re all stuck with “amazing digital experiences” for the next while. But at least the organizers are learning about what works and improving the events! Last year’s Google Cloud Next lasted for nine weeks, which was about eight weeks too long. Sorry about that. This year, our flagship cloud conference is a brisk three days, from October 12-14. And it’s free, which is cool.
Cloud Next matters because a lot of what Google Cloud shares becomes widely adopted by others later on. Might as well get it here first!
I flipped through the agenda to find the talks that interested me the most. Obviously my keynote/demo thing will be the most glorious session, but let’s put that aside. As I browsed the catalog, I identified a handful of themes. Here are fifteen talks I’m excited about, spread across my three made-up themes: familiar but better, migration ready, and optimized for scale.
Familiar but better
This is the story of Google Cloud. Things that resemble cloud services or products you’ve used before, but more full-featured, easier to use, and more reliable. Talks that stood out:
What’s new and what’s next with Google Cloud databases. People often choose Google Cloud upfront because of our great AI/ML and data story. Check out this session to see how our databases feel familiar, but offer more than you might expect.
What’s new in serverless? It’s great that some clouds got us all started with serverless computing, but come to this talk to hear what everyone will be doing next.
Enterprise-ready modern applications with Go. No, I’m not trolling you Java and .NET fans. Live your life. But if you want a modern language that’s popular for building meaningful systems, Go is pretty great. This’ll be a fun session.
Migration ready
It’s fun to build and modernize, but many folks are looking for a clean path to migrate to the cloud faster, while working with what they already have. There are a few talks about this:
Many are past the first cloud wave of using stuff in small pockets. Now it’s about running things effectively at scale from a cost, security, manageability perspective. Talks I like:
There’s lots of other terrific talks covering security, analytics, infrastructure, and more, so do check out the whole catalog. I hope to see you at Cloud Next, and drop into my presentation to heckle me or provide moral support.
When it comes to building and managing cloud resources—VMs, clusters, user roles, databases—most people seem to use a combination of tools. The recent JetBrains developer ecosystem survey highlighted that Terraform is popular for infrastructure provisioning, and Ansible is popular for keeping infrastructure in a desired state. Both are great tools, full stop. Recently, I’ve seen folks look at the Kubernetes API as a single option for both activities. Kubernetes is purpose-built to take a declared state of a resource, implement that state, and continuously reconcile to ensure the resource stay in that state. While we apply this Kubernetes Resource Model to containers today, it’s conceptually valid for most anything.
18 months ago, Google Cloud shipped a Config Connector that offered custom resource definitions (CRDs) for Google Cloud services, and controllers to provision and manage those services. Install this into a Kubernetes cluster, send resource definitions to that cluster, and watch your services hydrate. Stand up and manage 60-ish Google Cloud services as if they were Kubernetes resources. It’s super cool and useful. But maybe you don’t want 3rd party CRDs and controllers running in a shared cluster, and don’t want to manage a dedicated cluster just to host them. Reasonable. So we created a new managed service: Config Controller. In this post, I’ll look at manually configuring a GKE cluster, and then show you how to use the new Config Controller to provision and configure services via automation.And, if you’re a serverless fan or someone who doesn’t care at ALL about Kubernetes, you’ll see that you can still use this declarative model to build and manage cloud services you depend on.
But first off, let’s look at configuring clusters and extending the Kubernetes API to provision services. To start with, it’s easy to stand up a GKE cluster in Google Cloud. It can be one-click or fifty, depending on what you want. You can use the CLI, API, Google Cloud Console, Terraform modules, and more.
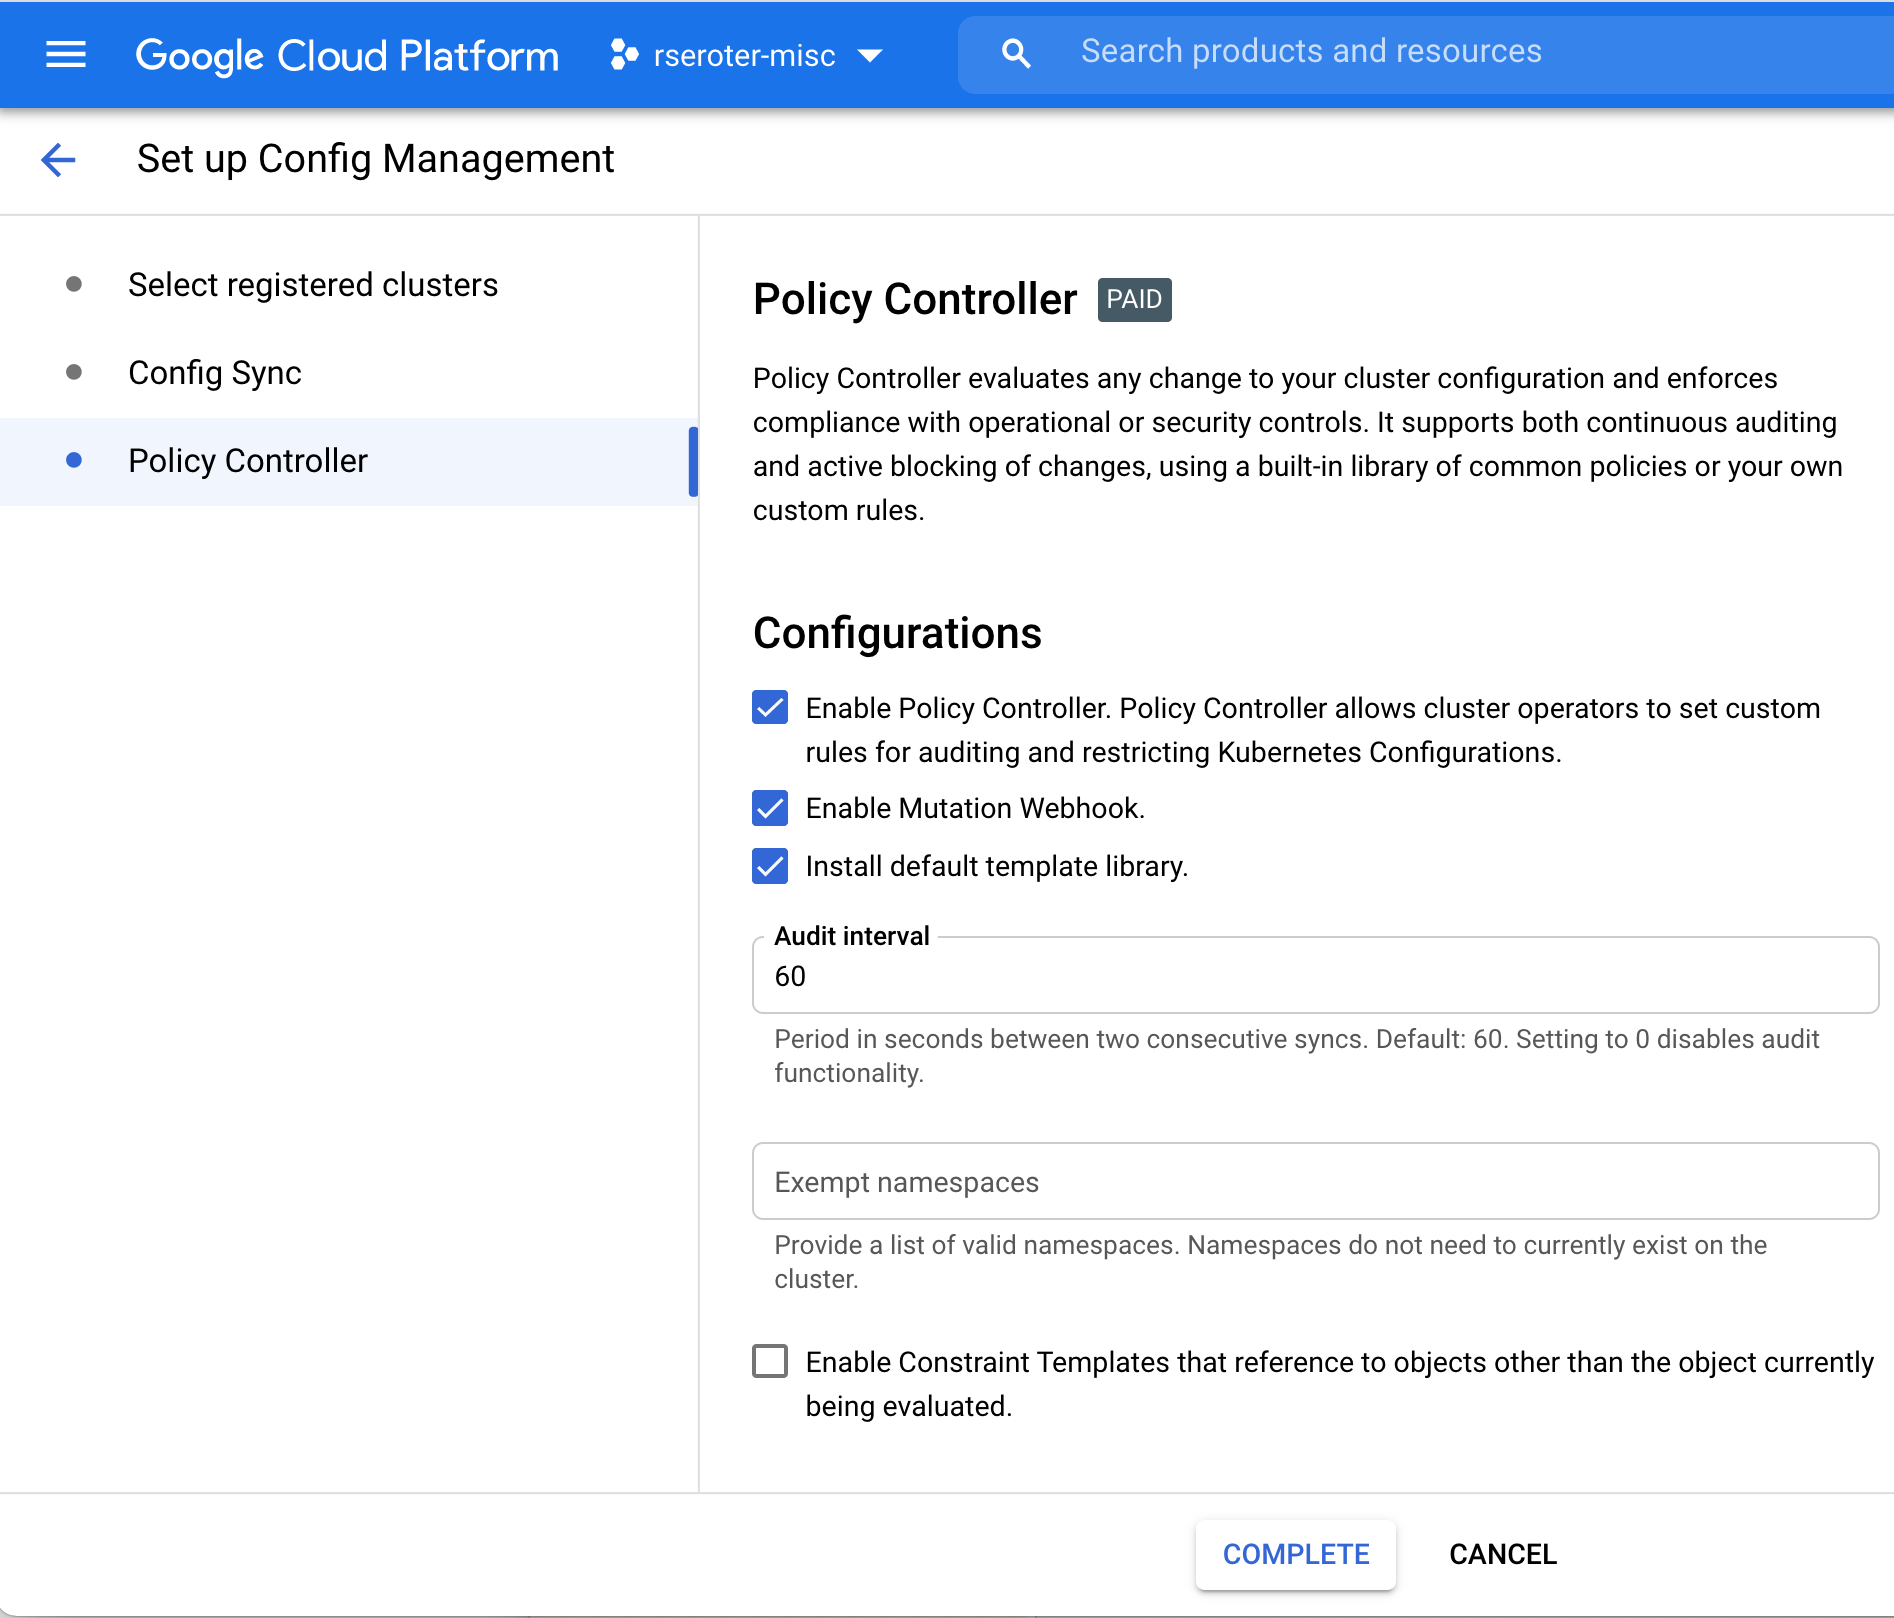
Building and managing one of something isn’t THAT hard. Dealing with fleets of things is harder. That’s why Google Anthos exists. It’s got a subsystem called Anthos Config Management (ACM). In addition to embedding the above-mentioned Config Connector, this system includes an ability to synchronize configurations across clusters (Config Sync), and apply policies to clusters based on Open Policy Agent Gatekeeper (Policy Controller). All these declarative configs and policies are stored in a git repo. We recently made it possible to use ACM as a standalone service for GKE clusters. So you might build up a cluster that looks like this:
What this looks like in real life is that there’s a “Config Management” tab on the GKE view in the Console. When you choose that, you register a cluster with a fleet. A fleet shares a configuration source, so all the registered clusters are identically configured.
Once I registered my GKE cluster, I chose a GitHub repo that held my default configurations and policies.
Finally, I configured Policy Controller on this GKE cluster. This comes with a few dozen Google-provided constraint templates you can use to apply cluster constraints. Or bring your own. My repo above includes a constraint that limits how much CPU and memory a pod can have in a specific namespace.
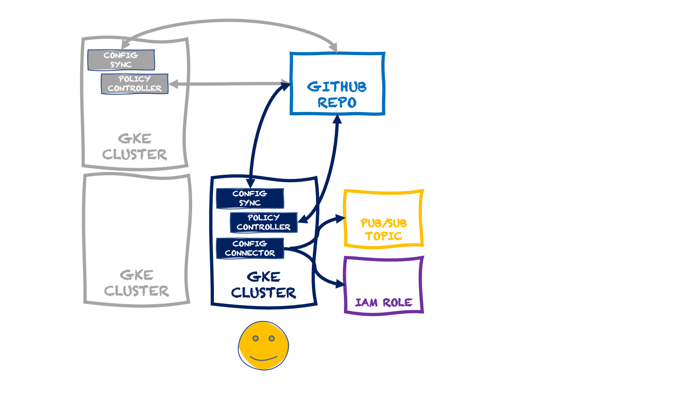
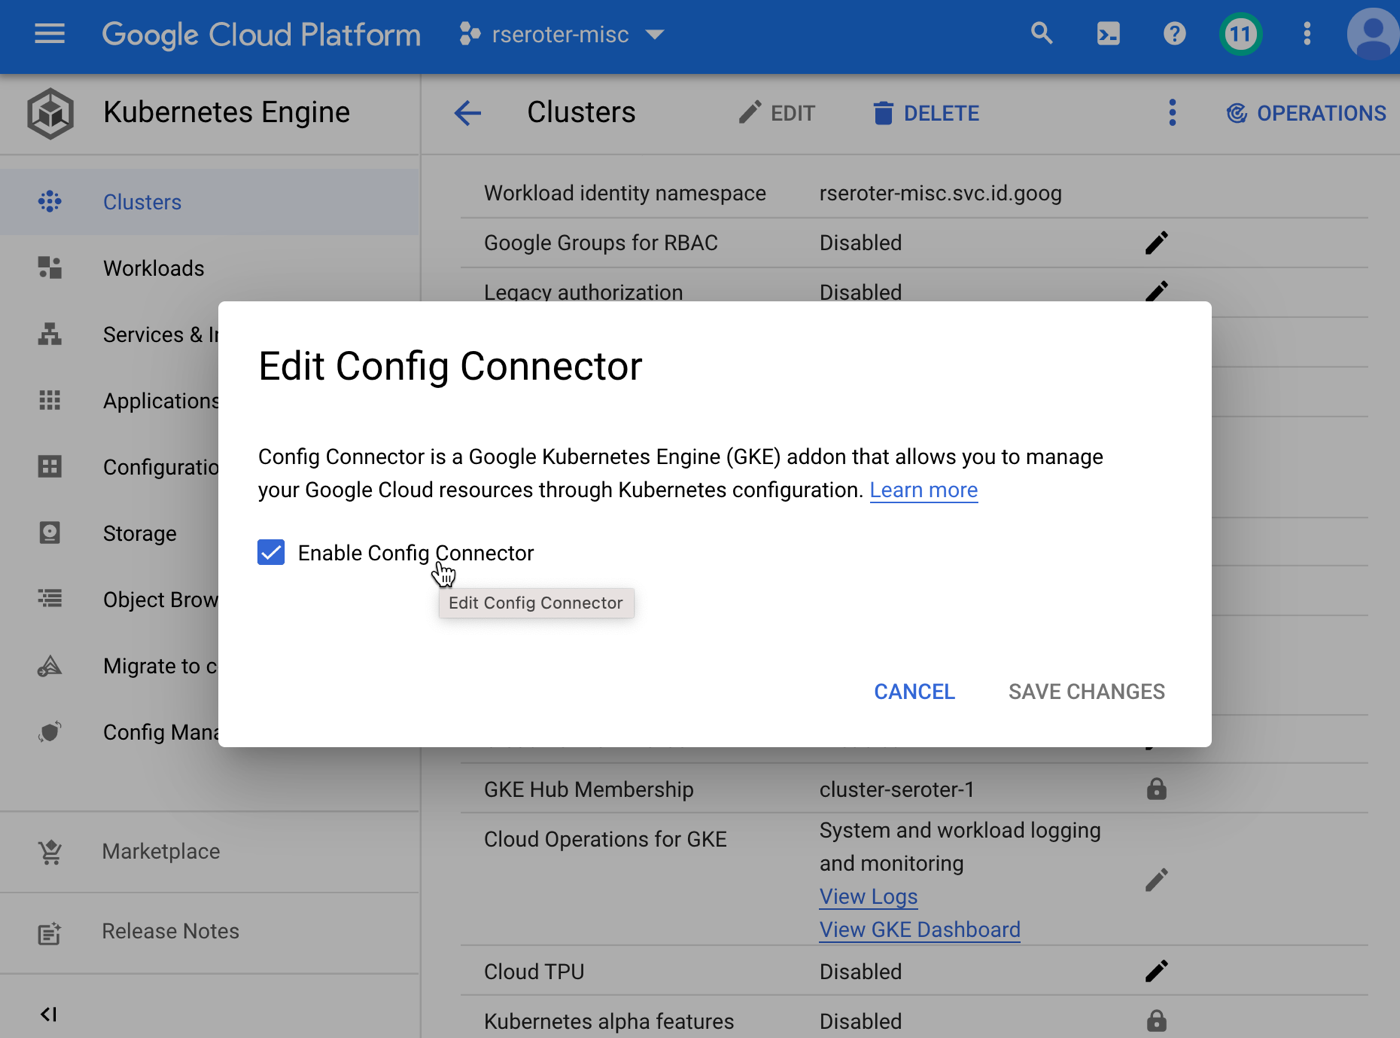
At this point, I have a single cluster with policy guardrails and applied configurations. I also have the option of adding the Config Connector to a cluster directly. In that scenario, a cluster might look like this:
In that diagram, the GKE cluster not only has the GKE Config Management capabilities turned on (Config Sync and Policy Controller), but we’ve also added the Config Connector. You can add that feature during cluster provisioning, or after the fact, as I show below.
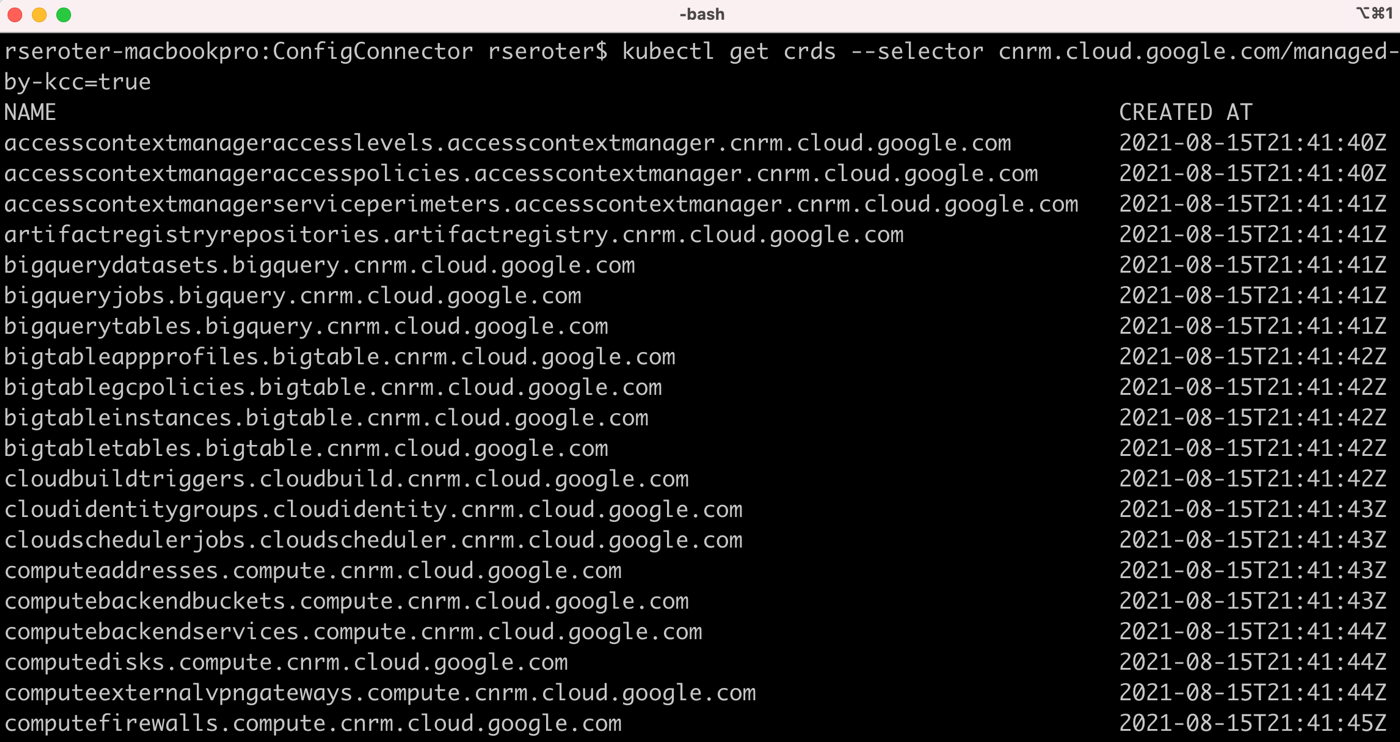
kubectl get crds --selector cnrm.cloud.google.com/managed-by-kcc=true
Now, I can create instances of all sorts of Google Cloud managed services—BigQuery jobs, VMs, networks, Dataflow jobs, IAM policies, Memorystore Redis instances, Spanner databases, and more. Whether your app uses containers or functions, this capability is super useful. To create the resource I want, I write a bit of YAML. I could export an existing cloud service instance to get its representative YAML, write it from scratch, or generate it from the Cloud Code tooling. I did the latter, and produced this YAML for a managed Redis instance via Memorystore:
When I query Kubernetes for “redisinstances” it knows what that means, and when I look to see if I really have one, I see it show up in the Google Cloud Console.
You could stop here. We have a fully-loaded cluster that synchronizes configurations and policies, and can create/manage Google Cloud services. But the last thing is different from the first two. Configs and policies create a secure and consistent cluster. The Config Connector is a feature that uses the Kubernetes control plane for other purposes. In reality, what you want is something like this:
Here, we have a dedicated KRM server thanks to the managed Config Controller. With this, I can spin up and manage cloud services, including GKE clusters themselves, without running a dedicated cluster or stashing extra bits inside an existing cluster. It takes just a single command to spin up this service (which creates a managed GKE instance):
Super cool. But wait, there’s more. This declarative model shouldn’t FORCE you to know about Kubernetes. What if I want to GitOps-ify my services so that anyone could create cloud services by checking a configuration into a git repo versus kubectl apply commands? This is what makes this interesting to any developer, whether they use Kubernetes or not. Let’s try it.
I have a GitHub repo with a flattened structure. The Config Sync component within the Config Controller service will read from this repo, and and work with the Config Connector to instantiate and manage any service instances I declare. To set this up, all I do is activate Config Sync and tell it about my repo. This is the file that I send to the Config Controller to do that:
# config-management.yaml

apiVersion: configmanagement.gke.io/v1
kind: ConfigManagement
metadata:
  name: config-management
spec:
  #you can find your server name in the GKE console
  clusterName: krmapihost-seroter-cc-instance
  #not using an ACM structure, but just a flat one
  sourceFormat: unstructured
  git:
    policyDir: /
    syncBranch: main
    #no service account needed since there's no read permissions required
    secretType: none
    syncRepo: https://github.com/rseroter/anthos-seroter-config-repo-cc
Note: this demo would have been easier if I had used Google Cloud’s Source Repositories instead of GitHub. But I figured most people would use GitHub, so I should too. The Config Controller is a private GKE cluster, which is safe and secure, but also doesn’t have outbound access. It can reach our Source Repos, but I had to add an outbound VPC firewall rule for 443, and then provision a NAT gateway so that the traffic could flow.
With all this in place, as soon as I check in a configuration, the Config Controller reads it and acts upon it. Devs just need to know YAML and git. They don’t have to know ANY Kubernetes to provision managed cloud services!
Here’s the definition for a custom IAM role.
apiVersion: iam.cnrm.cloud.google.com/v1beta1
kind: IAMCustomRole
metadata:
  name: iamcustomstoragerole
  namespace: config-control
spec:
  title: Storage Custom Role
  description: This role only contains two permissions - read and update
  permissions:
    - storage.buckets.list
    - storage.buckets.get
  stage: GA
When I add that to my repo, I almost immediately see a new role show up in my account. And if I mess with that role directly by removing or adding permissions, I see Config Controller detect that configuration drift and return the IAM role back to the desired state.
This concept gets even more powerful when you look at the blueprints we’re creating. Stamp out projects, landing zones, and GKE clusters with best practices applied. Imagine using the Config Controller to provision all your GKE clusters and prevent drift. If someone went into your cluster and removed Config Sync or turned off Workload Identity, you’d be confident knowing that Config Controller would reset those properties in short order. Useful!
In this brave new world, you can can keep Kubernetes clusters in sync and secured by storing configurations and policies in a git repo. And you can leverage that same git repo to store declarative definitions of cloud services, and ask the KRM-powered Config Controller to instantiate and manage those services. To me, this makes managing an at-scale cloud environment look much more straightforward.
When does your app enforce its data structure? If you’re using a relational database, you comply with a pre-defined data structure when you write data to its tables. The schema—made up of field names, data types, and foreign key constraints, for example—is enforced up front. Your app won’t successfully write data if it violates the schema. Many of us have been working with schema-on-write relational databases for a long time, and they make sense when you have relatively static data structures.
If you’d prefer to be more flexible with what data you store, and want data consumers to be responsible for enforcing structure, you’ll prefer a NoSQL database. Whether you’ve got a document-style database like Firestore or MongoDB, or key-value stores like Redis, you’re mostly leaving it up the client to retrieve the data and deserialize it into a structure it expects. These clients apply a schema when they read the data.
Both of these approaches are fine. It’s all about what you need for a given scenario. While this has been a choice for database folks for a while, today’s message queue services often apply a schema-on-read approach. Publish whatever, and subscribers retrieve the data and deserialize it into the object they expects. To be sure, there are some queues with concepts of message structure—ActiveMQ has something, and traditional ESB products like TIBCO EMS and BizTalk Server offer schemas—but modern cloud-based queue services are typically data-structure-neutral.
Amazon SQS is one of the oldest cloud services. It doesn’t look at any of the messages that pass through, and there’s no concept of a message schema. Same goes for Azure Service Bus, another robust queuing service that asks the consumer to apply a schema when a message is read. To be clear, there’s nothing is wrong with that. It’s a good pattern. Heck, it’s one that Google Cloud applies too with Pub/Sub. However, we’ve recently added schema support, and I figured we should take a look at this unique feature.
I wrote about Pub/Sub last year. It’s a fairly distinct cloud service. You can do traditional message queuing, of course. But it also supports things like message replay—which feels Kafka-esque—and push notifications. Instead of using 3+ cloud messaging services, maybe just use one?
The schema functionality in Pub/Sub is fairly straightforward. A schema defines a message structure, you apply it to one or many new Topics, and only messages that comply with that schema may be published to those Topics. You can continue using Topics without schemas and accept any input, while attaching schemas to Topics that require upfront validation.
Creating schemas
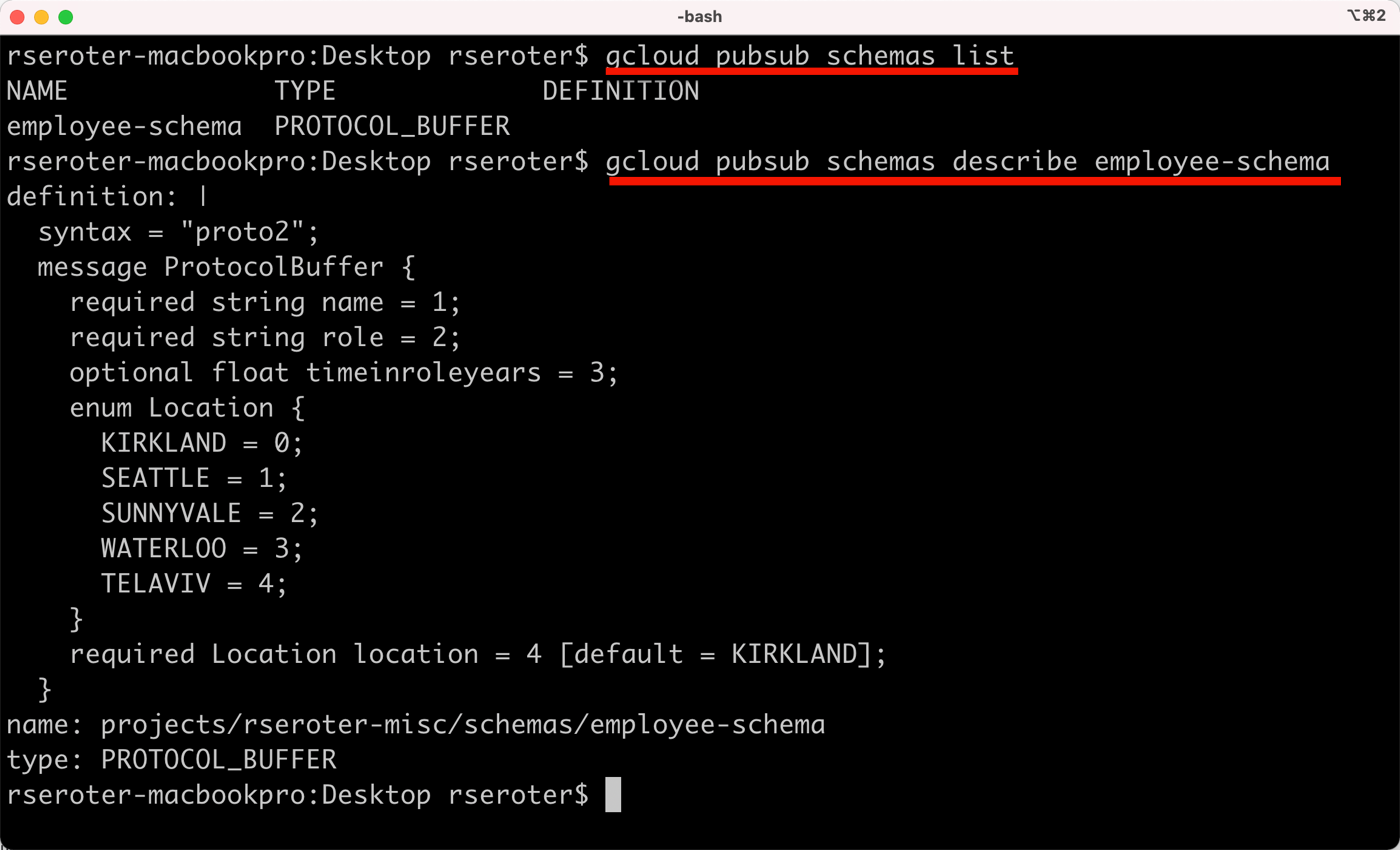
Schemas work with schemas encoded as JSON or in a binary format. And the schema itself is structured using either Apache Avro or the protocol buffer language. Both support basic primitive types, and complex structures (e.g. nested types, arrays, enumerations).
With Google Cloud Pub/Sub, you can create schemas independently and then attach to Topics, or you can create them at the same time as creating a Topic. Let’s do the former.
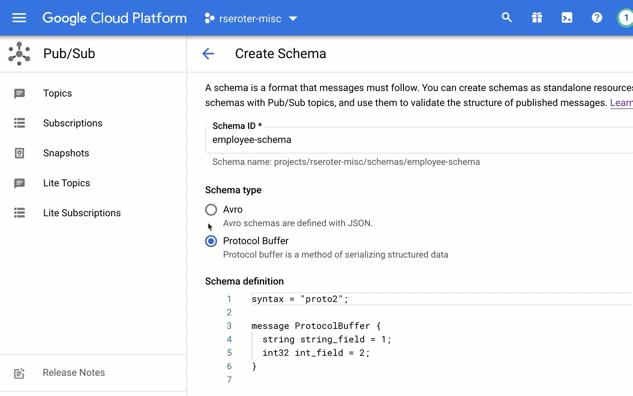
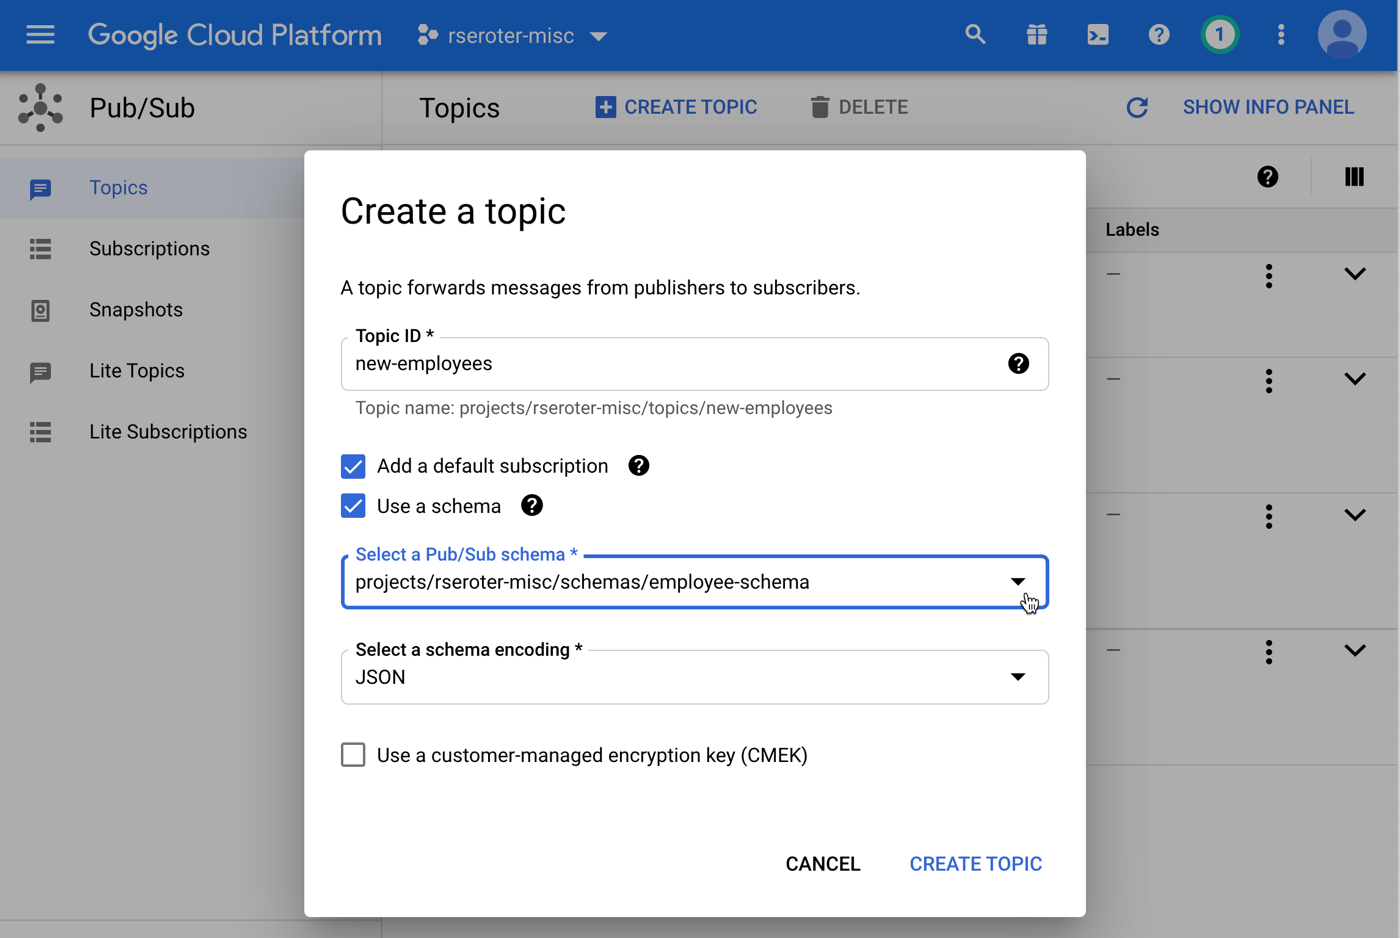
You can create schemas programmatically, as you’d expect, but let’s use the Google Cloud Console to do it here. I’M A VISUAL LEARNER.
On the schemas view of the Console, I see options to view, create, and delete schemas.
I chose to create a brand new schema. In this view, I’m asked to give the schema a name, and then choose if I’m using Avro or Protocol Buffers to define the structure.
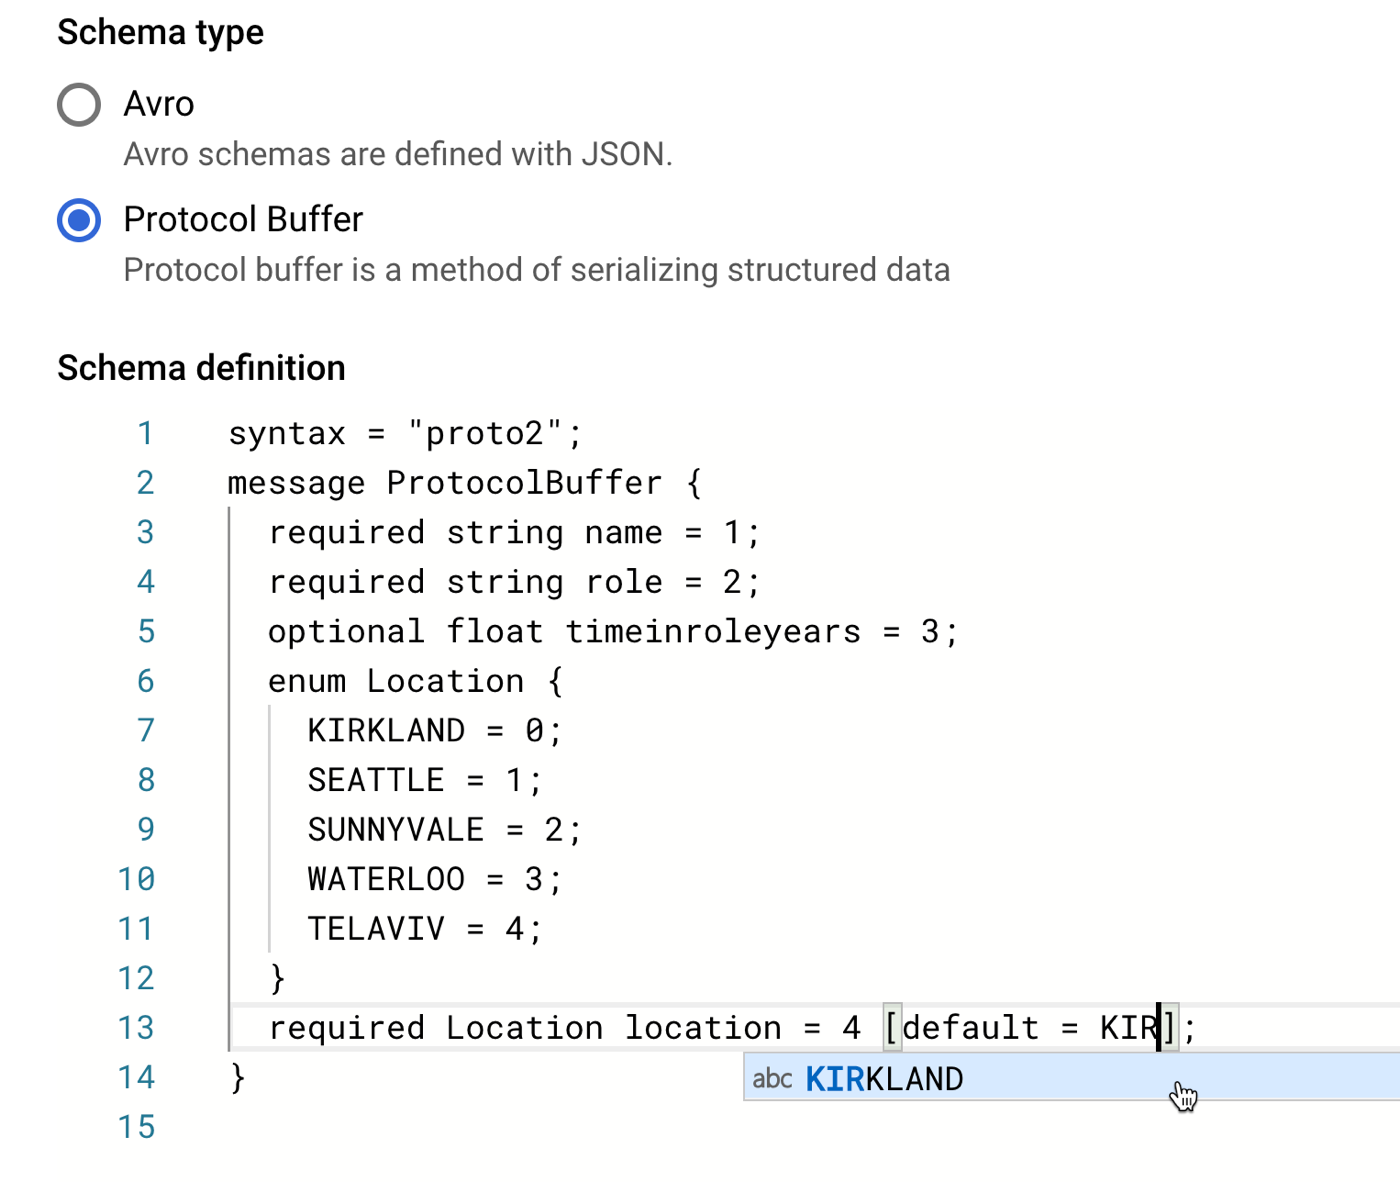
In that “schema definition” box, I get a nice little editor with type-ahead support. Here, I sketched out a basic schema for an “employee” message type.
No matter how basic, I’m still capable of typing things wrong. So, it’s handy that there’s a “validate schema” button at the bottom that shockingly confirmed that I got my structure correct.
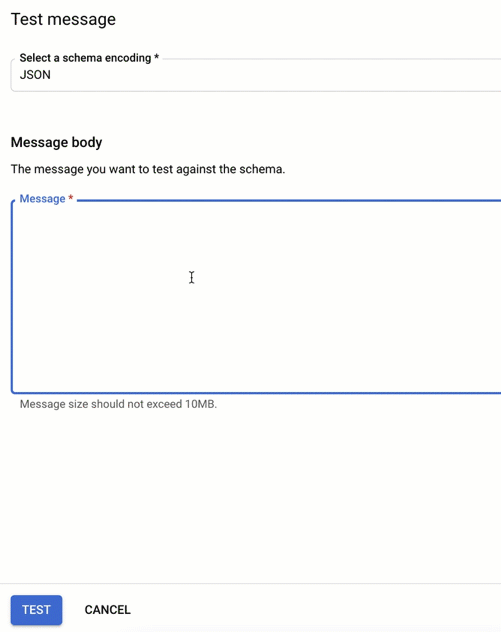
You’ll also notice a “test message” button. This is great. From here, I can validate input, and see what happens (below) if I skip a required field, or put the the wrong value into the enumeration.
Also note that the CLi lets you do this too. There are simple commands to test a message against a new schema, or one that already exists. For example:
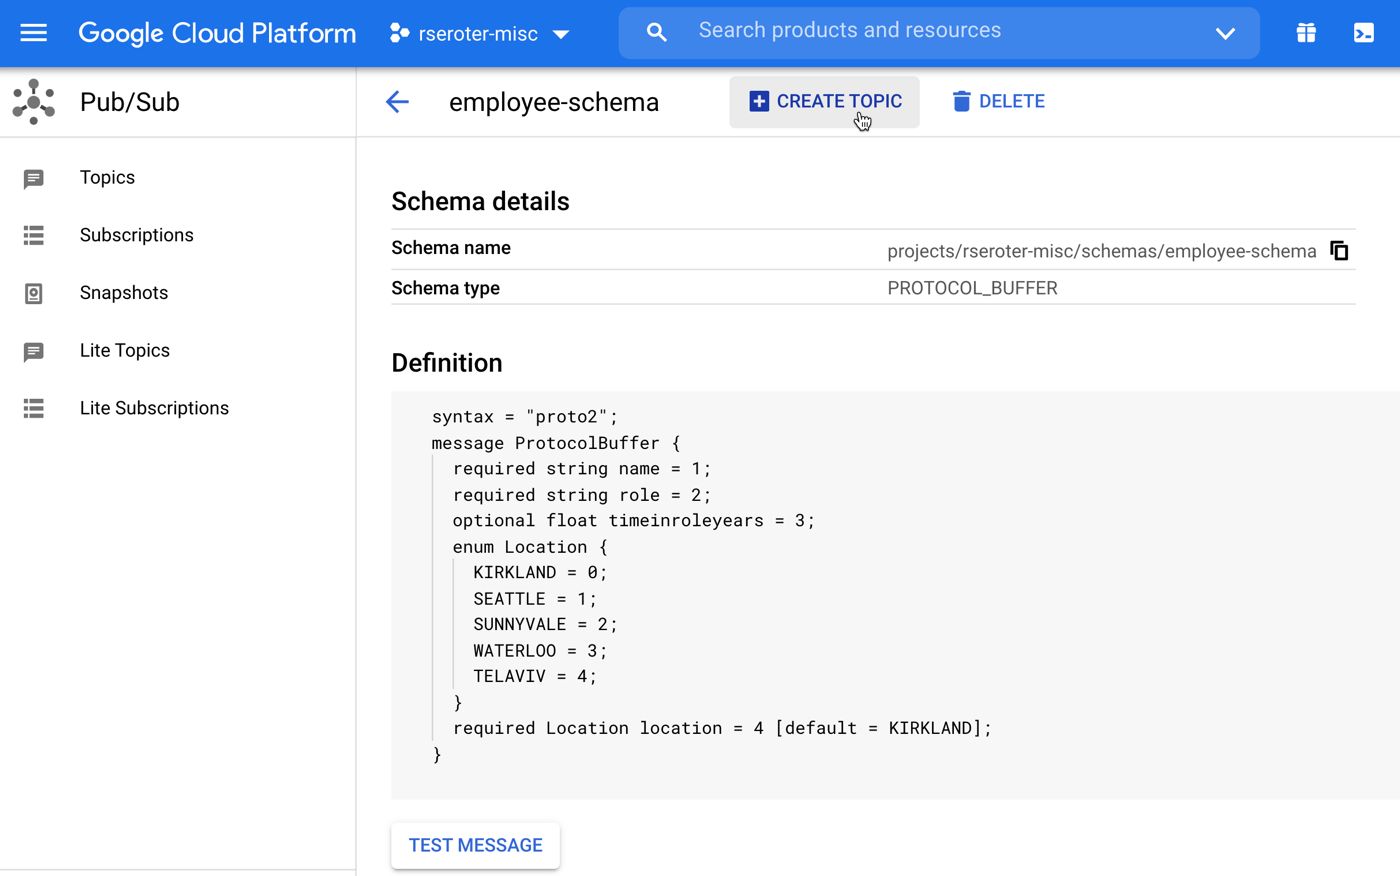
Once I’m content with the structure, I save the schema. Then it shows up in my list of available schemas. Note that I cannot change a published schema. If my structure changes over time, that’s a new schema. This is a fairly light UX, so I assume you should maintain versions in a source code repo elsewhere.
In that screenshot above, you see a button that says “create topic.” I can create a Topic from here, or, use the standard way of creating Topics and select a schema then. Let’s do that. When I go to the general “create Topic” view, you see I get a choice to use a schema and pick a message encoding. Be aware that you can ONLY attach schemas to new Topics, and once you attach a schema, you can’t remove it from that Topic. Make good choices.
How do I know that a Topic has schema attached? You have a few options.
First, the Google Cloud Console shows you! When I view the details of a given Topic, I notice that the encoding and schema get called out.
It’s not all about the portal UX, however. CLI fans need love too. Everything I did above, you can do in code or via CLi. That includes getting details about a given schema. Notice below that I can list all the schemas for my project, and get the details for any given one.
And also see that when I view my Topic, it shows that I have a schema applied.
Publishing messages
After ensuring that my Topic has a subscription or two—messages going to a Topic without a subscription are lost—I tried publishing some messages.
First, I did this from a C# application. It serializes a .NET object into a JSON object and sends it to my schema-enforcing Pub/Sub topic.
using System;
using Google.Cloud.PubSub.V1;
using Google.Protobuf;
using System.Text.Json;

namespace core_pubsub_schema
{
    class Program
    {
        static void Main(string[] args)
        {
            Console.WriteLine("Pub/Sub app started");

            PublishMessage();

            Console.WriteLine("App done!");
        }

        static void PublishMessage() {

            //define an employee object
            var employee = new Employee {
                name = "Jeff Reed",
                role = "VP",
                timeinroleyears = 0.5f,
                location = "SUNNYVALE"
            };
            //convert the .NET object to a JSON string
            string jsonString = JsonSerializer.Serialize(employee);

            //name of our topic
            string topicName ="projects/rseroter-misc/topics/new-employees";
            PublisherServiceApiClient publisher = PublisherServiceApiClient.Create();

            //create the message
            PubsubMessage message = new PubsubMessage
            {
                Data = ByteString.CopyFromUtf8(jsonString)
            };

            try {
                publisher.Publish(topicName, new[] { message });
                Console.WriteLine("Message published!");
            }
            catch (Exception ex) {
                Console.WriteLine(ex.ToString());
            }
        }
    }

    public class Employee {
        public string name {get; set; }
        public string role {get; set; }
        public float timeinroleyears {get; set;}
        public string location {get; set;}
    }
}
After running this app, I see that I successfully published a message to the Topic, and my lone subscription holds a copy for me to read.
For fun, I can also publish messages directly from the Google Cloud Console. I like that we’ve offered the ability to publish up to a hundred messages on an interval, which is great for testing purposes.
Below, I entered some JSON, and removed a required field (“role”) before publishing. You can see that I got an error before the message hit the Topic.
Dealing with schema changes
My first impression upon using this schema capability in Pub/Sub was that it’s cool, but I wish I could change schemas more easily, and detach schemas from Topics. But the more I thought about it, the more I understood the design decision.
If I’m attaching a schema to a Topic, then I’m serious about the data structure. And downstream consumers are expecting that specific data structure. Changing the schema means creating a new Topic, and establishing new subscribers.
What if your app can absorb schema changes, and you want to access new Subscriptions without redeploying your whole app? You might retrieve the subscription name from an external configuration (e.g. ConfigMap in Kubernetes) versus hard-coding it. Or use a proxy service/function/whatever in between publishers and Topics, or consumers and subscriptions. Changing that proxy might be simpler than changing your primary system. Regardless, once you sign up to use schemas, you’ll want to think through your strategy for handling changes.
I like this (optional) functionality in Google Cloud Pub/Sub. You can do the familiar schema-on-read approach, or now do a schema-on-write when needed. If you want to try this yourself, take advantage of our free tier for Pub/Sub (10GB of messages per month) and let me know if you come up with any cool use cases, or schema upgrade strategies!
Configurability matters. Whether it’s in our code editors, database engine, or compute runtimes, we want the option—even if we don’t regularly use it—to shape software to our needs. When it comes to using that software as a service, we also look for configurations related to quality attributes—think availability, resilience, security, and manageability.
For something like Kubernetes—a hyper-configurable platform on its own—you want a cloud service that makes this powerful software more resilient and cheaper to operate. This blog post focuses on configurability of each major Kubernetes service in the public cloud. I’ll make that judgement based on the provisioning options offered by each cloud.
Disclaimer: I work for Google Cloud, so obviously I’ll have some biases. That said, I’ve used AWS for over a decade, was an Azure MVP for years, and can be mostly fair when comparing products and services. Please call out any mistakes I make!
Google Kubernetes Engine (GKE)
GKE was the first Kubernetes service available in the public cloud. It’s got a lot of features to explore. Let’s check it out.
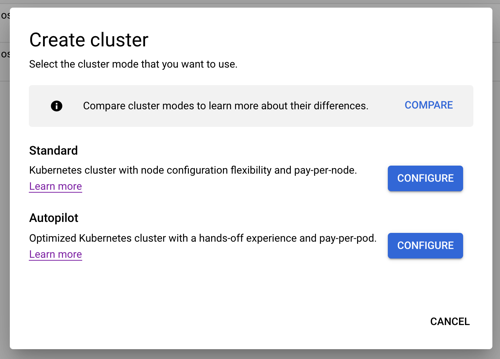
When creating a cluster, we’re immediately presented with two choices: standard cluster, or Autopilot cluster. The difference? A standard cluster gives the user full control of cluster configuration, and ownership of day-2 responsibilities like upgrades. An Autopilot cluster—which is still a GKE cluster—has a default configuration based on Google best practices, and all day-2 activities are managed by Google Cloud. This is ideal for developers who want the Kubernetes API but none of the management. For this evaluation, let’s consider the standard cluster type.
If the thought of all these configurations feels intimidating, you’ll like that GKE offers a “my first cluster” button which spins up a small instance with a default configuration. Also, this first “create cluster” tab has a “create” button at the bottom that provisions a regular (3-node) cluster without requiring you to enter or change any configuration values. Basically, you can get started with GKE in three clicks.
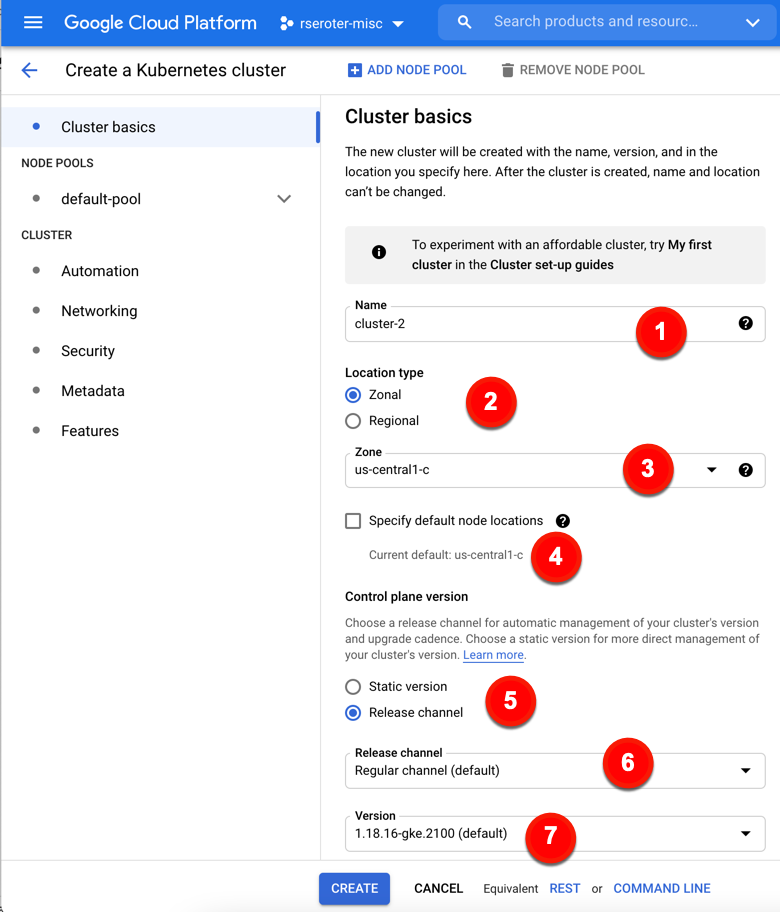
With that said, let’s look at the full set of provisioning configurations. On the left side of the “create a Kubernetes cluster” experience, you see the list of configuration categories.
How about we look at the specific configurations. On the cluster basics tab, we have seven configuration decisions to make (or keep, if you just want to accept default values). These configurations include:
1. Name. Naming is hard. These are 40 characters long, and permanent.
2. Location type. Where do you want your control plane and nodes? Zonal clusters only live in a chosen zone, while Regional clusters spread the control plane and workers across zones in a region.
3. Zone/Region. For zonal clusters, you pick a zone, for regional clusters, you pick a region.
4. Specify default node locations. Choose which zone(s) to deploy to.
5. Control plane version. GKE provisions and offers management of control plane AND worker nodes. Here, you choose whether you want to pick a static Kubernetes version and handle upgrades yourself, or a “release channel” where Google Cloud manages the upgrade cadence.
6. Release channel. If you chose release channel vs static, you get a configuration choice of which channel. Options include “rapid” (get Kubernetes versions right away), “regular” (get Kubernetes versions after a period of qualification), and “stable” (longer validation period).
7. Version. Whether choosing “static” or “release channel”, you configure which version you want to start with.
You see in the picture that I can click “Create” here and be done. But I want to explore all the possible configurations at my disposal with GKE.
My next (optional) set of configurations relates to node pools. A GKE cluster must have at least one node pool, which consists of an identical group of nodes. A cluster can have many node pools. You might want a separate pool for Windows nodes, or a bigger machine type, or faster storage.
In this batch of configurations, we have:
8. Add node pool. Here you have a choice on whether to stick with a single default node pool, or add others. You can add and remove node pools after cluster creation.
9. Name. More naming.
10. Number of nodes. By default there are three. Any fewer than three and you can have downtime during upgrades. Max of 1000 allowed here. Note that you get this number of nodes deployed PER location. 3 nodes x 3 locations = 9 nodes total.
11. Enable autoscaling. Cluster autoscaling is cool. It works on a per-node-pool basis.
12. Specify node locations. Where do you want the nodes? If you have a regional cluster, this is where you choose which AZs you want.
13. Enable auto-upgrade. It’s grayed-out below because this is automatically selected for any “release channel” clusters. GKE upgrades worker nodes automatically in that case. If you chose a static version, then you have the option of selecting auto-upgrades.
14. Enable auto-repair. If a worker node isn’t healthy, auto-repair kicks in to fix or replace the node. Like the previous configuration, this one is automatically applied for “release channel’ clusters.
15. Max surge. Surge updates is about letting you control how many nodes GKE can upgrade at a given time, and how disruptive an upgrade may be. The “max surge” configuration determines how many additional nodes GKE adds to the node pool during upgrades.
16. Max unavailable. This configuration refers to how many nodes can be simultaneously unavailable during an upgrade.
Once again, you could stop here, and build your cluster. I WANT MORE CONFIGURATION. Let’s keep going. What if I want to configure the nodes themselves? That’s the next available tab.
For node configurations, you can configure:
17. Image type. This refers to the base OS which includes Google’s container-optimized OS, Ubuntu, and Windows Server.
18. Machine family. GKE runs on virtual machines. Here is where you choose which type of underlying VM you want, including general purpose, compute-optimized, memory-optimized or GPU-based.
19. Series. Some machine families have sub-options for specific VMs.
20. Machine type. Here are the specific VM sizes you want, with combinations of CPU and memory.
21. Boot disk type. This is where you choose a standard or SSD persistent disk.
22. Boot disk size. Choose how big of a boot disk you want. Max size is 65,536 GB.
23. Enable customer-managed encryption for boot disk. You can encrypt the boot disk with your own key.
24. Local SSD disks. How many attached disks do you want? Enter here. Max of 24.
25. Enable preemptible nodes. Choose to use cheaper compute instances that only live for up to 24 hours.
26. Maximum pods per node. Limit how many pods you want on a given node, which has networking implications.
27. Network tags. This represents firewall rules applied to nodes.
Security. Let’s talk about it. You have a handful of possible configurations to secure your GKE node pools.
Node pool security configurations include:
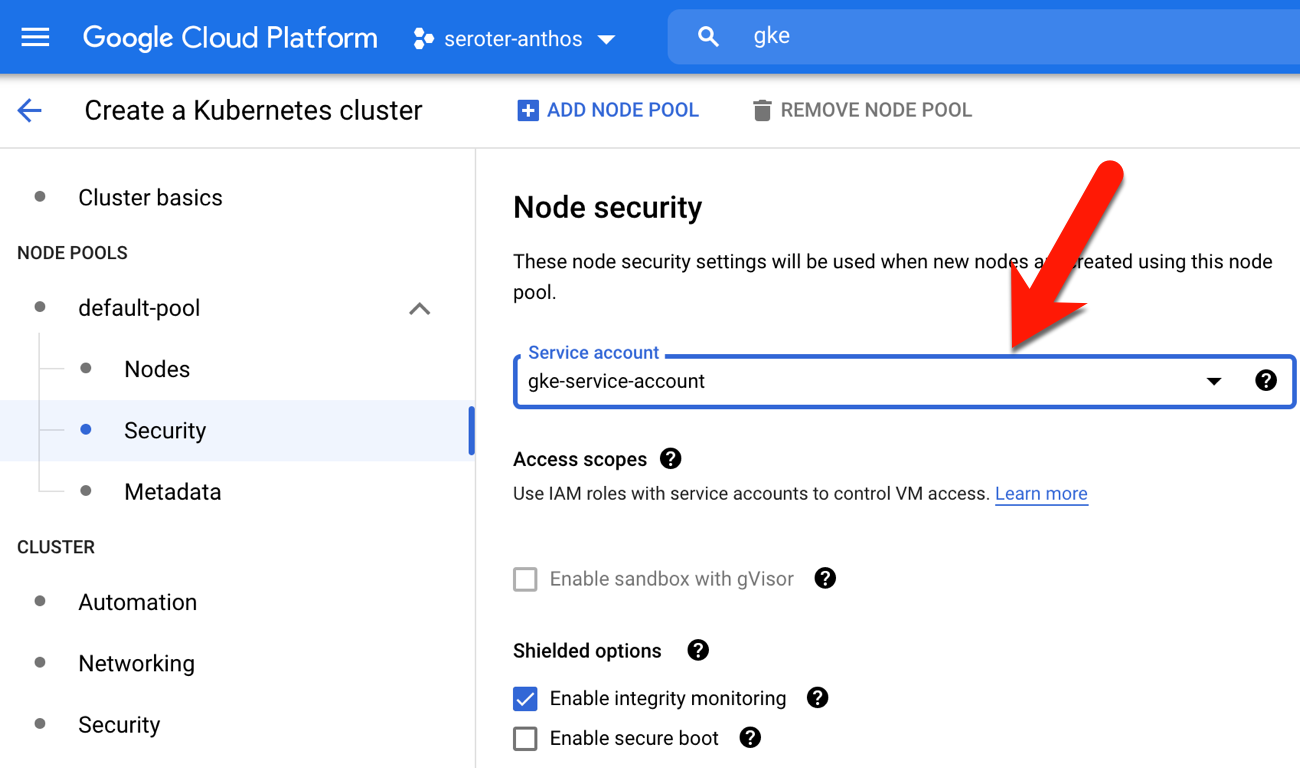
28. Service account. By default, containers running on this VM call Google Cloud APIs using this account. You may want a unique service account, and/or least-privilege one.
29. Access scopes. Control the type of level of API access to grant the underlying VM.
30. Enable sandbox with gVisor. This isn’t enabled for the default node pool, but for others, you can choose the extra level of isolation for pods on the node.
31. Enable integrity monitoring. Part of the “Shielded node” functionality, this configuration lets you monitor and verify boot integrity.
32. Enable secure boot. Use this configuration setting for additional protection from boot-level and kernel-level malware.
Our last set of options for each node pool relates to metadata. Specifically:
33. Kubernetes labels. These get applied to every node in the pool and can be used with selectors to place pods.
34. Node taints. These also apply to every node in the pool and help control what gets scheduled.
35. GCE instance metadata. This attaches info to the GCE instances
That’s the end of the node pool configurations. Now we have the option of cluster-wide configurations. First up are settings based on automation.
These cluster automation configurations include:
36. Enable Maintenance Window. If you want maintenance activities to happen during certain times or days, you can set up a schedule.
37. Maintenance exclusions. Define up to three windows where updates won’t happen.
38. Enable Notifications. GKE can publish upgrade notifications to a Google Cloud Pub/Sub topic.
39. Enable Vertical Pod Autoscaling. With this configured, your cluster will rightsize CPU and memory based on usage.
40. Enable node auto-provisioning. GKE can create/manage entire node pools on your behalf versus just nodes within a pool.
41. Autoscaling profile. Choose when to remove underutilized nodes.
The next set of cluster-level options refer to Networking. Those configurations include:
42. Network. Choose the network the GKE cluster is a member of.
43. Node subnet. Apply a subnet.
44. Public cluster / Private cluster. If you want only private IPs for your cluster, choose a private cluster.
45. Enable VPC-native traffic routing. Applies alias IP for more secure integration with Google Cloud services.
46. Automatically create secondary ranges. Disabled here because my chosen subnet doesn’t have available user-managed secondary ranges. If it did, I’d have a choice of letting GKE manage those ranges.
47. Port address range. Pods in the clusters are assigned IPs from this range.
48. Maximum pods per node. Has network implications.
49. Service address range. Any cluster services will be assigned an IP address from this range.
50. Enable intranode visibility. Pod-to-pod traffic because visible to the GCP networking fabric so that you could do flow logging, and more.
51. Enable NodeLocal DNSCache. Improve perf by running a DNS caching agent on nodes.
52. Enable HTTP load balancing. This installs a controller that applies configs to the Google Cloud Load Balancer.
53. Enable subsetting for L4 internal load balancers. Internal LBs use a subset of nodes as backends to improve perf.
54. Enable control plane authorized networks. Block untrusted, non-GCP sources from accessing the Kubernetes master.
55. Enable Kubernetes Network Policy. This API lets you define which pods can access each other.
GKE also offers a lot of (optional) cluster-level security options.
The cluster security configurations include:
56. Enable Binary Authorization. If you want a secure software supply chain, you might want to apply this configuration and ensure that only trusted images get deployed to GKE.
57. Enable Shielded GKE Nodes. This provides cryptographic identity for nodes joining a cluster.
58. Enable Confidential GKE Nodes. Encrypt the memory of your running nodes.
59. Enable Application-level Secrets Encryption. Protect secrets in etcd using a key stored in Cloud KMS.
60. Enable Workload Identity. Map Kubernetes service accounts to IAM accounts so that your workload doesn’t need to store creds. I wrote about it recently.
61. Enable Google Groups for RBAC. Grant roles to members of a Workspace group.
62. Enable legacy authorization. Prevents full Kubernetes RBAC from being used in cluster.
63. Enable basic authentication. This is a deprecated way to authenticate to a cluster. Don’t use it.
64. Issue a client certificate. Skip this too. This creates a specific cert for cluster access, and doesn’t automatically rotate.
It’s useful to have cluster metadata so that you can tag clusters by environment, and more.
The couple of metadata configurations are:
65. Description. Free text box to describe your cluster.
66. Labels. Add individual labels that can help you categorize.
We made it to the end! The last set of GKE configurations relate to features that you want to add to the cluster.
These feature-based configurations include:
67. Enable Cloud Run for Anthos. Throw Knative into your GKE cluster.
68. Enable Cloud Operations for GKE. A no-brainer. Send logs and metrics to the Cloud Ops service in Google Cloud.
69. Select logging and monitoring type. If you select #68, you can choose the level of logging (e.g. workload logging, system logging).
70. Enable Cloud TPU. Great for ML use cases within the cluster.
71. Enable Kubernetes alpha features in this cluster. Enabled if you are NOT using release channels. These are short lived clusters with everything new lit up.
72. Enable GKE usage metering. See usage broken down by namespace and label. Good for chargebacks.
73. Enable Istio. Throw Istio into your cluster. Lots of folks do it!
74. Enable Application Manager. Helps you do some GitOps style deployments.
75. Enable Compute Engine Persistent Disk CSI Driver. This is now the standard way to get volume claims for persistent storage.
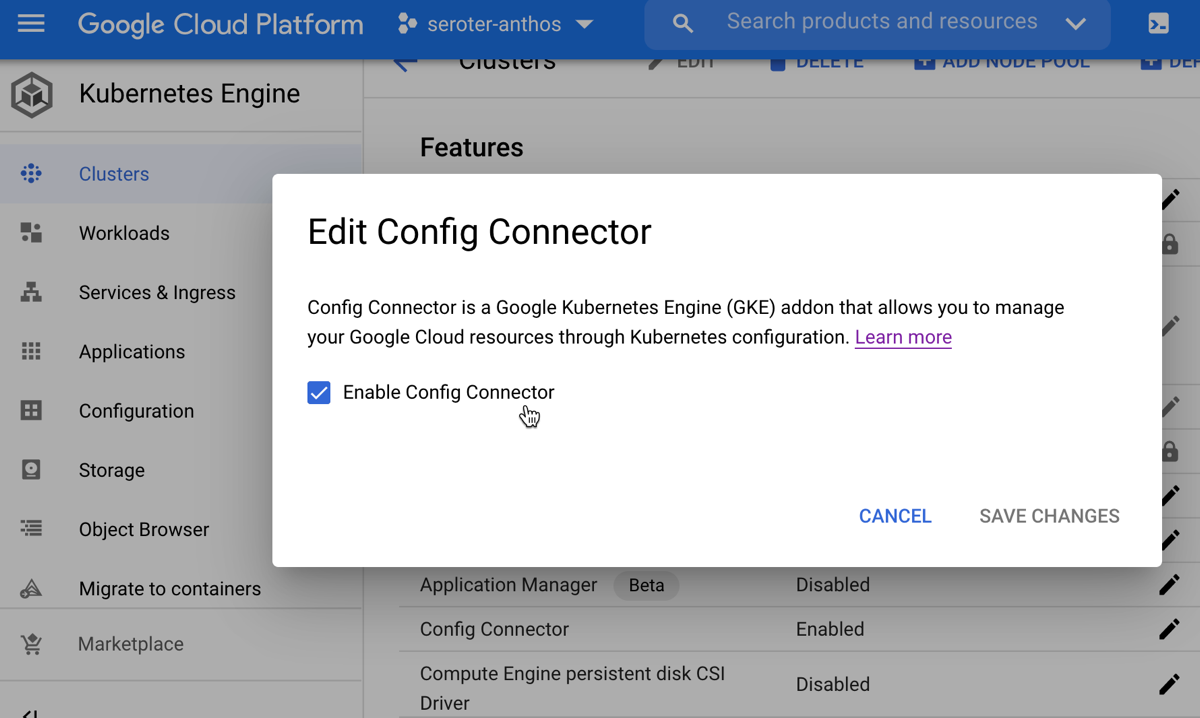
76. Enable Config Connector. If you have Workload Identity enabled, you can set this configuration. It adds custom resources and controllers to your cluster that let you create and manage 60+ Google Cloud services as if they were Kubernetes resources.
FINAL TALLY. Getting started: 3 clicks. Total configurations available: 76.
Azure Kubernetes Service (AKS)
Let’s turn our attention to Microsoft Azure. They’ve had a Kubernetes service for quite a while.
When creating an AKS cluster, I’m presented with an initial set of cluster properties. Two of them (resource group, and cluster name) are required before I can “review and create” and then create the cluster. Still, it’s a simple way to get started with just five clicks.
The first tab of the provisioning experience focuses on “basic” configurations.
These configurations include:
1. Subscription. Set which of your Azure subscriptions to use for this cluster.
2. Resource group. Decide which existing (or create a new) resource group to associate with this cluster.
3. Kubernetes cluster name. Give your cluster a name.
4. Region. Choose where in the world you want you cluster.
5. Availability zones. For regions with availability zones, you can choose how to stripe the cluster across those.
6. Kubernetes version. Pick a specific version of Kubernetes for the AKS cluster.
7. Node size. Here you choose the VM family and instance type for your cluster.
8. Node count. Pick how many nodes make up the primary node pool.
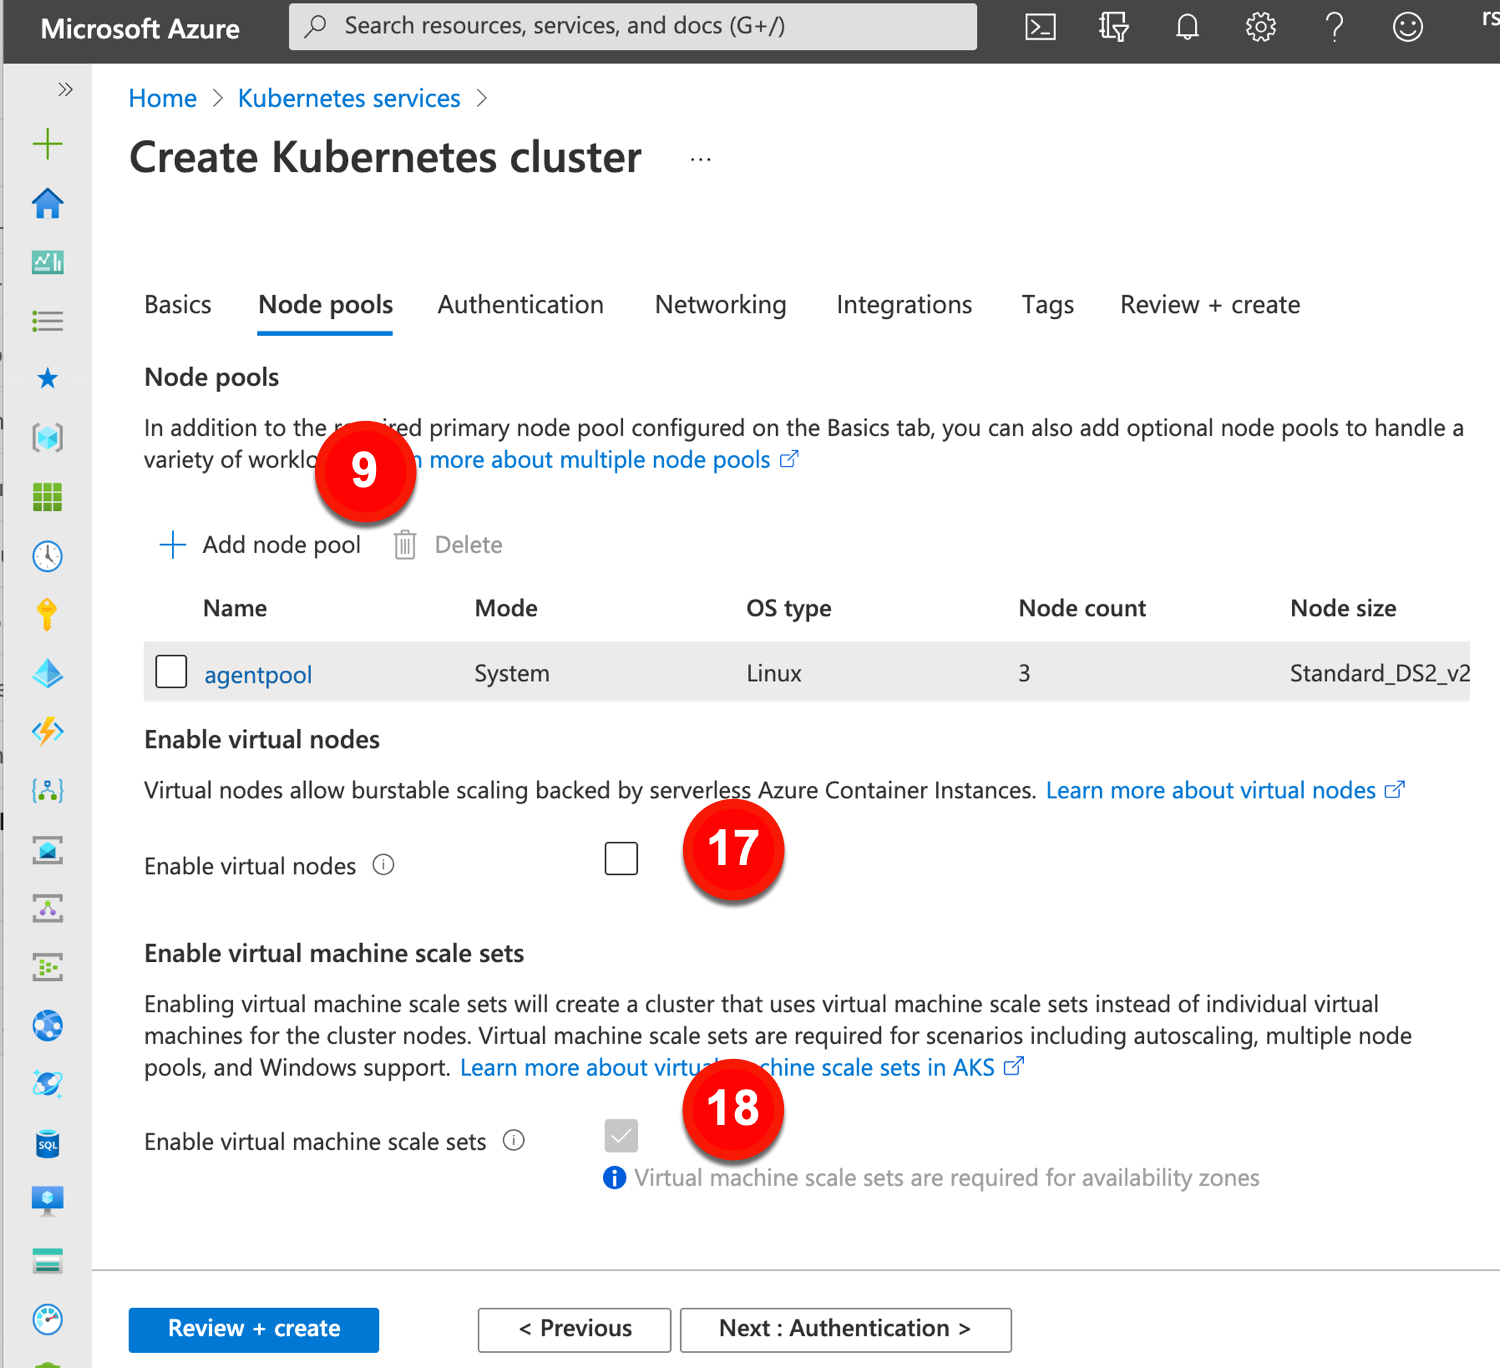
Now let’s explore the options for a given node pool. AKS offers a handful of settings, including ones that fly out into another tab. These include:
9. Add node pool. You can stick with the default node pool, or add more.
10. Node pool name. Give each node pool a unique name.
11. Mode. A “system” node pool is meant for running system pods. This is what the default node pool will always be set to. User node pools make sense for your workloads.
12. OS type. Choose Linux or Windows, although system node pools must be Linux.
13. Availability zones. Select the AZs for this particular node pool. You can change from the default set on the “basic” tab.
14. Node size. Keep or change the default VM type for the cluster.
15. Node count. Choose how many nodes to have in this pool.
16. Max pods per node. Impacts network setup (e.g. how many IP addresses are needed for each pool).
17. Enable virtual nodes. For bursty scenarios, this AKS features deploys containers to nodes backed by their “serverless” Azure Container Instances platform.
18. Enable virtual machine scale sets. Chosen by default if you use multiple AZs for a cluster. Plays a part in how AKS autoscales.
The next set of cluster-wide configurations for AKS relate to security.
These configurations include:
19. Authentication method. This determines how an AKS cluster interacts with other Azure sources like load balancers and container registries. The user has two choices here.
20. Role-based access control. This enables RBAC in the cluster.
21. AKS-managed Azure Active Directory. This configures Kubernetes RBAC using Azure AD group membership.
22. Encryption type. Cluster disks are encrypted at rest by default with Microsoft-managed keys. You can keep that setting, or change to a customer-managed key.
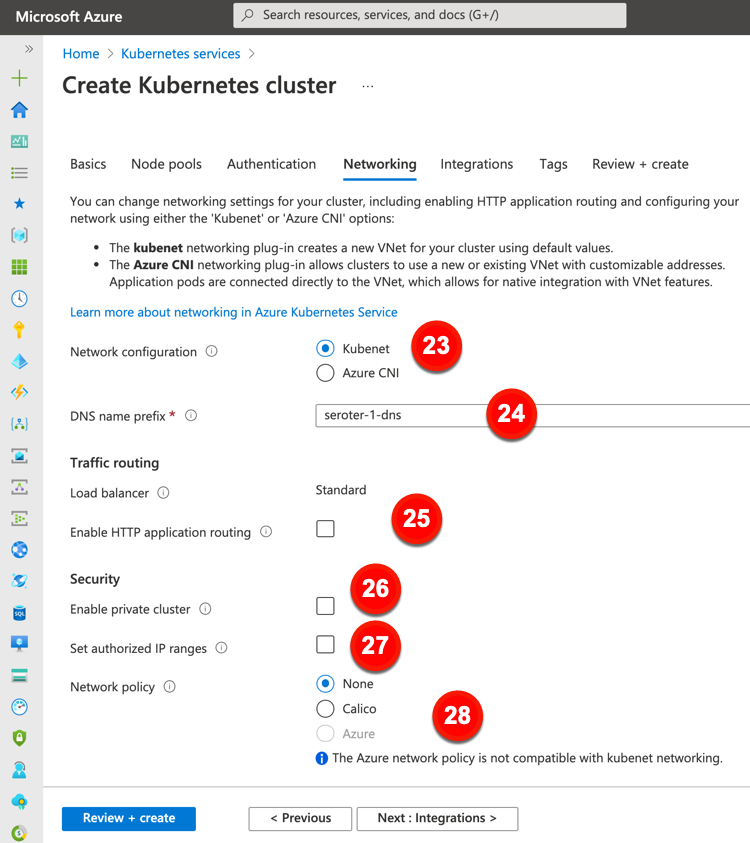
Now, we’ll take a gander at the network-related configurations offered by Azure. These configurations include:
23. Network configuration. The default option here is a virtual network and subnet created for you. You can also use CNI to get a new or existing virtual network/subnet with user-defined address ranges.
24. DNS name prefix. This is the prefix used with the hosted API server’s FQDDN.
25. Enable HTTP application routing. The previous “Load balancer” configuration is fixed for every cluster created in the Azure Portal. This setting is about creating publicly accessible DNS names for app endpoints.
26. Enable private cluster. This ensures that network traffic between the API server and node pools remains on a private network.
27. Set authorized IP ranges. Choose the IP ranges that can access the API server.
28. Network policy. Define rules for ingress and egress traffic between pods in a cluster. You can choose none, Calico, or Azure’s network policies.
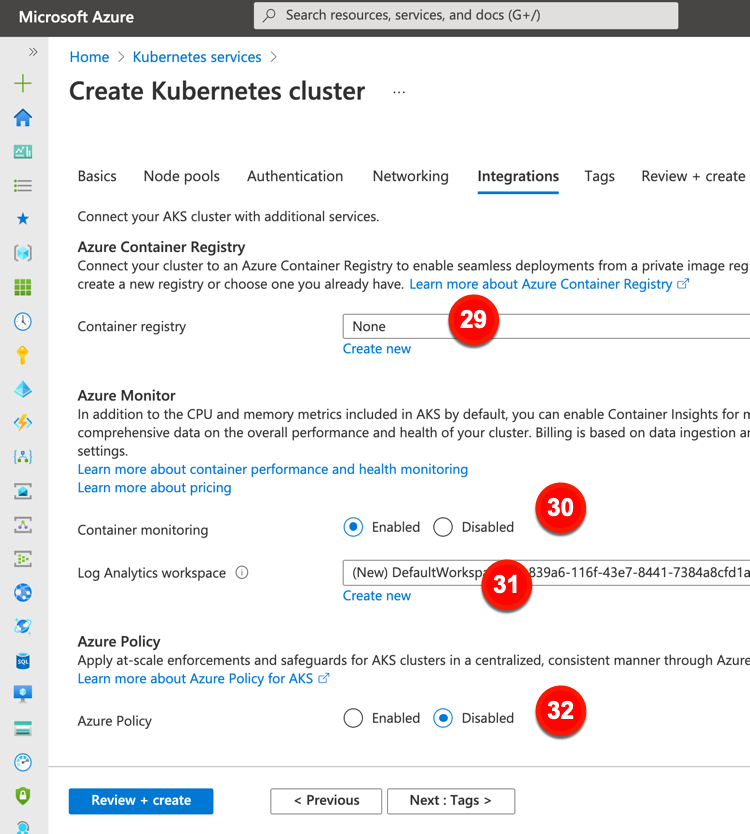
The final major configuration category is “integrations.” This offers a few options to connect AKS clusters to other Azure services.
These “integration” configurations include:
29. Container registry. Point to, or create, an Azure Container Registry instance.
30.Container monitoring. Decide whether you want workload metrics fed to Azure’s analytics suite.
31. Log Analytics workspace. Create a new one, or point to an existing one, to store monitoring data.
32. Azure Policy. Choose to apply an admission controller (via Gatekeeper) to enforce policies in the cluster.
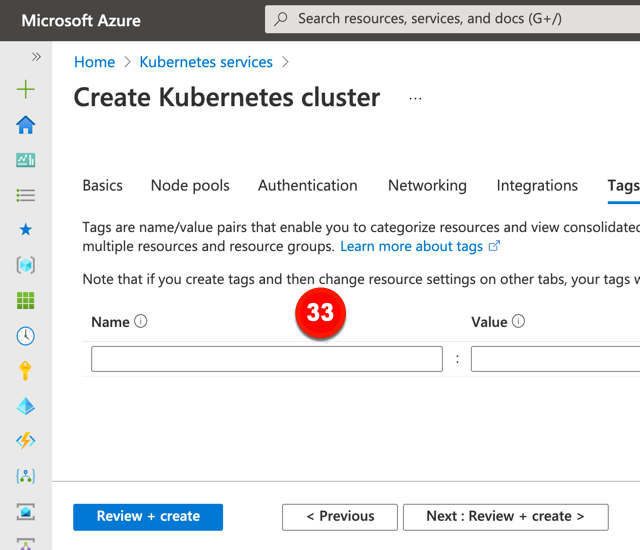
The last tab for AKS configuration relates to tagging. This can be useful for grouping and categorizing resources for chargebacks.
FINAL TALLY. Getting started: 5 clicks. Total configurations available: 33.
Amazon Elastic Kubernetes Service (EKS)
AWS is a go-to for many folks running Kubernetes, and they shipped a managed service for Kubernetes a few years back. EKS looks different from GKE or AKS. The provisioning experience is fairly simplistic, and doesn’t provision the worker nodes. That’s something you do yourself later, and then you see a series of configurations for node pools after you provision them. It also offers post-provisioning options for installing things like autoscalers, versus making that part of the provisioning.
Getting started with EKS means entering some basic info about your Kubernetes cluster.
These configurations include:
1. Name. Provide a unique name for your cluster.
2. Kubernetes version. Pick a specific version of Kubernetes for your cluster.
3. Cluster Service Role. This is the AWS IAM role that lets the Kubernetes control plan manage related resources (e.g. load balancers).
4. Secrets encryption. This gives you a way to encrypt the secrets in the cluster.
5. Tags. Add up to 50 tags for the cluster.
After these basic settings, we click through some networking settings for the cluster. Note that EKS doesn’t provision the node pools (workers) themselves, so all these settings are cluster related.
The networking configurations include:
6. Select VPC. Choose which VPC to use for the cluster. This is not optional.
7. Select subnets. Choose the VPC subnet for your cluster. Also, not optional.
8. Security groups. Choose one or more security groups that apply to worker node subnets.
9. Configure Kubernetes Service IP address range. Set the range that cluster services use for IPv4 addresses.
10. Cluster endpoint access. Decide if you want a public cluster endpoint accessible outside the VPC (including worker access), a mix of public and private, or private only.
11. Advanced settings. Here’s where you set source IPs for the public access endpoint.
12. Amazon VPC CNI version. Choose which version of the add-on you want for CNI.
The last major configuration view for provisioning a cluster relates to logging.
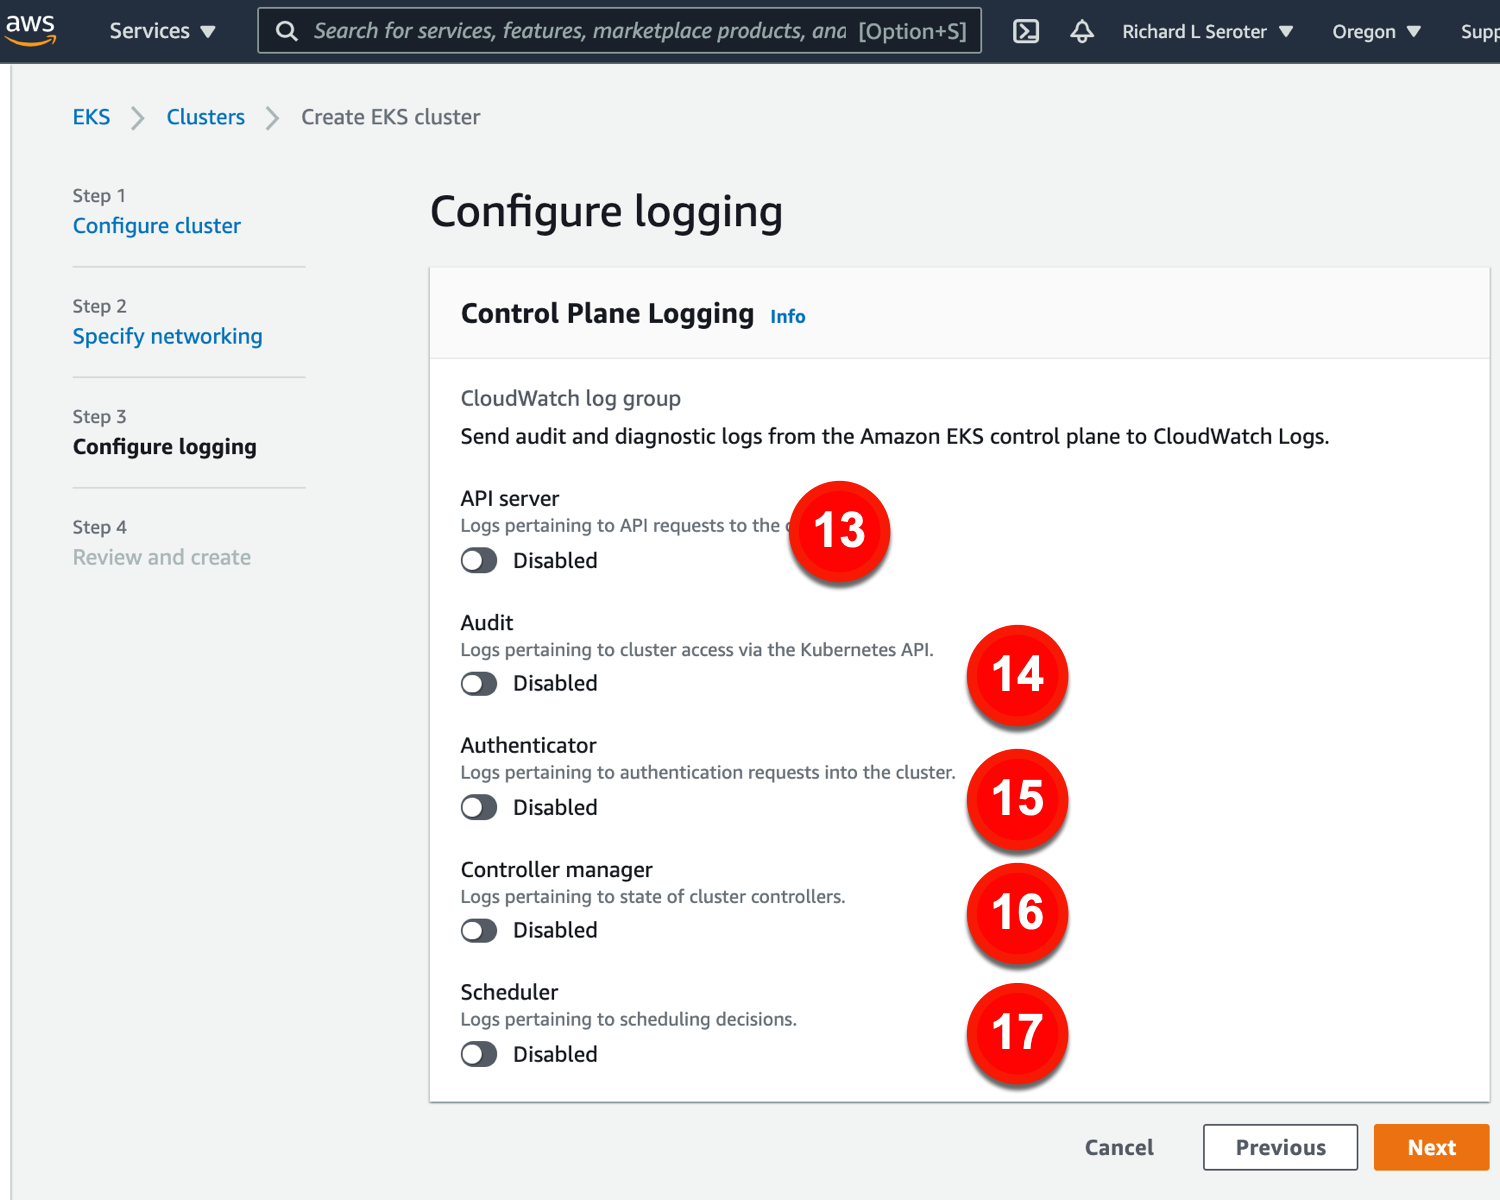
The logging configurations include:
13. API server. Log info for API requests.
14. Audit. Grab logs about cluster access.
15. Authenticator. Get lots for authentication requests.
16. Controller manager. Store logs for cluster controllers.
17. Scheduler. Get logs for scheduling decisions.
We have 17 configurations available in the provisioning experience. I really wanted to stop here (versus being forced to create and pay for a cluster to access the other configuration settings), but to be fair, let’s look at post-provisioning configurations of EKS, too.
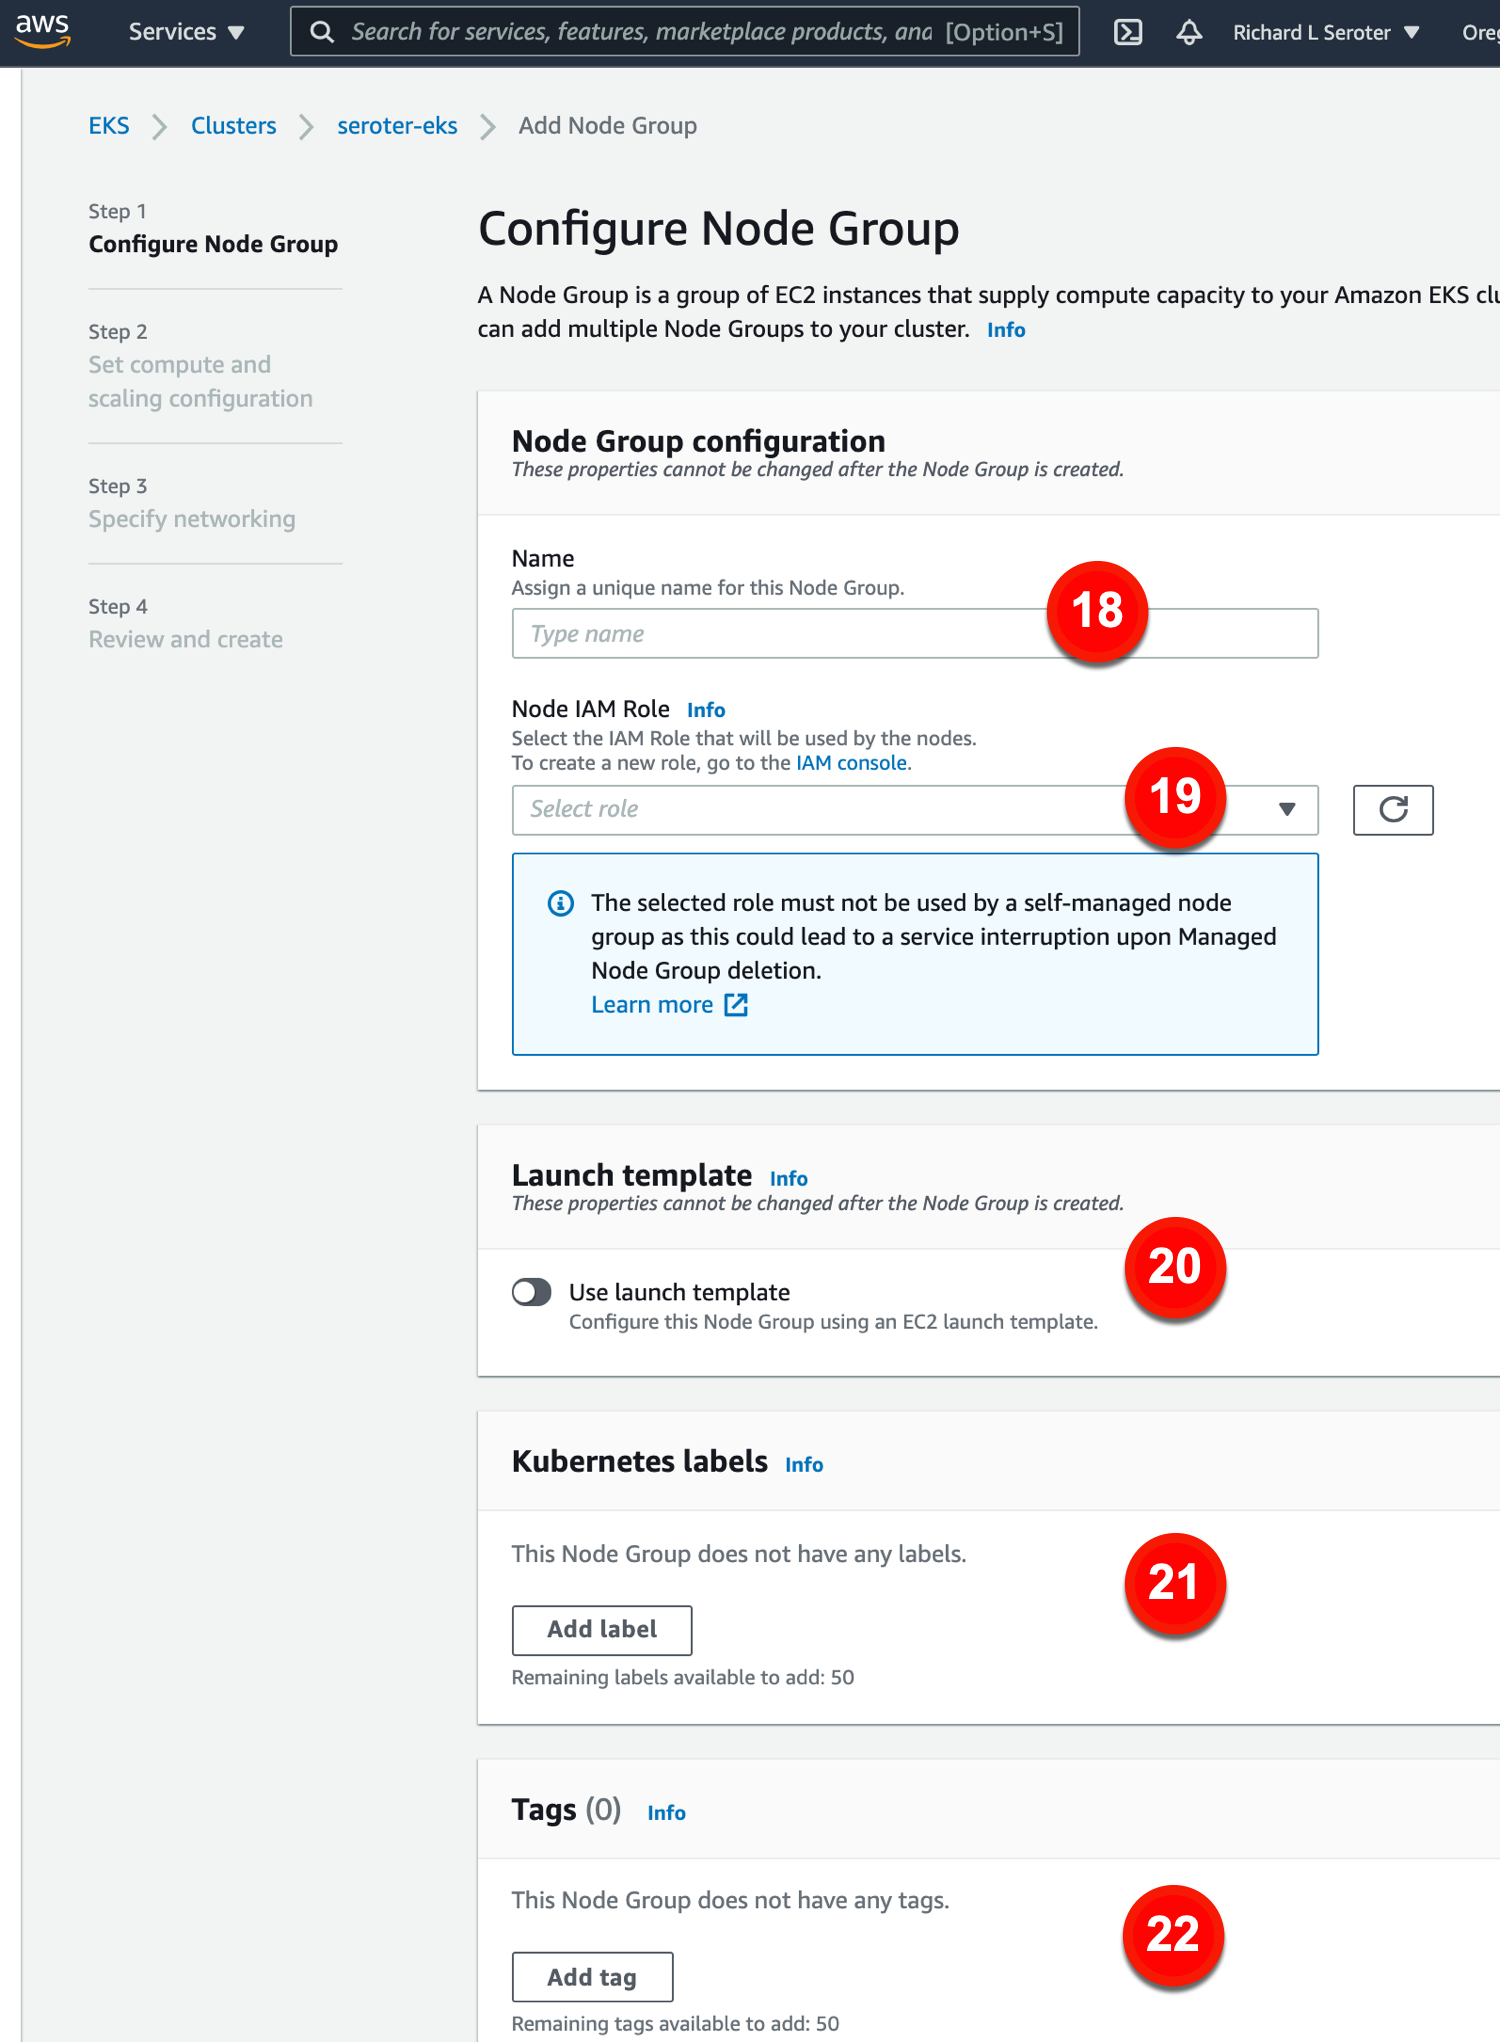
After creating an EKS cluster, we see that new configurations become available. Specifically, configurations for a given node pool.
The node group configurations include:
18. Name. This is the name for the node group.
19. Node IAM role. This is the role used by the nodes to access AWS services. If you don’t have a valid role, you need to create one here.
20. Use launch template. If you want a specific launch template, you can choose that here.
21. Kubernetes labels. Apply labels to the node group.
22. Tags. Add AWS tags to the node group.
Next we set up compute and scaling configs. These configs include:
23. AMI type. Pick the machine image you want for your nodes.
24. Capacity type. Choose on-demand or spot instances.
25. Instance type. Choose among dozens of VM instance types to host the nodes.
26. Disk size. Pick the size of attached EBS volumes.
27. Minimum size. Set the smallest size a cluster can be.
28. Maximum size. Set the largest size a cluster can be.
29. Desired size. Set the desired number of nodes to start with.
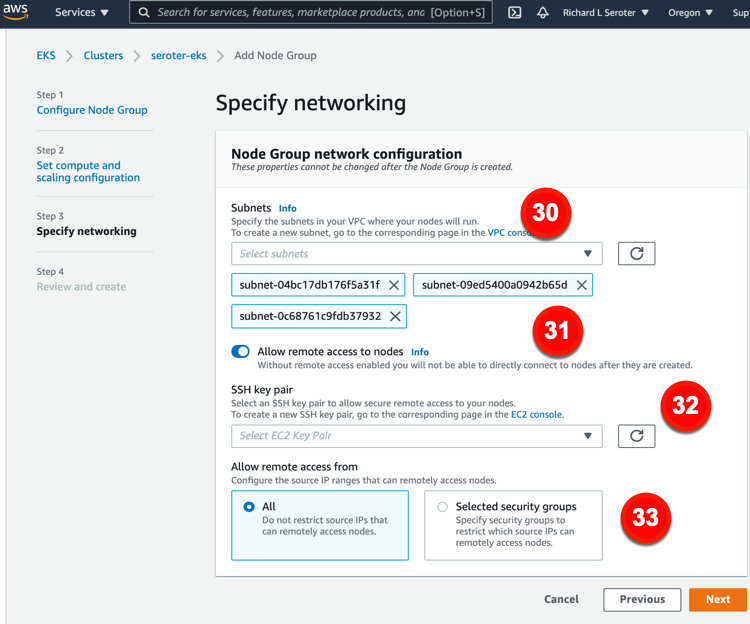
Our final set of node group settings relate to networking. The configurations you have access to here include:
30. Subnets. Choose which subnets for your nodes.
31. Allow remote access to nodes. This ensures you can access nodes after creation.
32. SSH keypair. Choose (or create) a key pair for remote access to nodes.
33. Allow remote access from. This lets you restrict access to source IP ranges.
FINAL TALLY. Getting started: 7 clicks (just cluster control plane, not nodes). Total configurations available: 33.
Wrap Up
GKE does indeed stand out here. GKE has fewest steps required to get a cluster up and running. If I want a full suite of configuration options, GKE has the most. If I want a fully managed cluster without any day-2 activities, GKE is the only one that has that, via GKE Autopilot.
Does it matter that GKE is the most configurable Kubernetes service in the public cloud? I think it does. Both AKS and EKS have a fine set of configurations. But comparing AKS or EKS to GKE, it’s clear how much more control GKE offers for cluster sizing, scaling, security, and automation. While I might not set most of these configurations on a regular basis, I can shape the platform to a wide variety of workloads and use cases when I need to. That ensures that Kubernetes can run a wide variety of things, and I’m not stuck using specialized platforms for each workload.
As you look to bring your Kubernetes platform to the cloud, keep an eye on the quality attributes you need, and who can satisfy them the best!
It’s a gift to the world that no one pays me to write software any longer. You’re welcome. But I still enjoy coding and trying out a wide variety of things. Given that I rarely have hours upon hours to focus on writing software, I seek things that make me more productive with the time I have. My inner development loop matters. You know, the iterative steps we perform to write, build, test, and commit code.
So let’s say I want to build a REST API in Java. This REST API stores and returns the names of television characters. What’s the bare minimum that I need to get going?
An IDE or code editor
A database to store records
A web server to host the app
A route to reach the app
What are things I personally don’t want to deal with, especially if I’m experimenting and learning quickly?
Provisioning lots of infrastructure. Either locally to emulate the target platform, or elsewhere to actually run my app. It takes time, and I don’t know what I need.
Creating database stubs or mocks, or even configuring Docker containers to stand-in for my database. I want the real thing, if possible.
Finding a container registry to use. All this stuff just needs to be there.
Writing Dockerfiles to package an app. I usually get them wrong.
Configuring API gateways or network routing rules. Just give me an endpoint.
Based on this, one of the quickest inner loop I know of involves Spring Boot, the Google Cloud SDK, Cloud Firestore, and Google Cloud Run. Spring Boot makes it easy to spin up API projects and it’s ORM capabilities make it simple to interact with a database. Speaking of databases, Cloud Firestore is powerful and doesn’t force me into a schema. That’s great when I don’t know the final state of my data structure. And Cloud Run seems like the single best way to run custom-built apps in the cloud. How about we run through this together?
On my local machine, I’ve installed Visual Studio Code—the FASTEST possible inner loop might have involved using the Google Cloud Shell and skipping any local work, but I still like doing local dev—along with the latest version of Java, and the Google Cloud SDK. The SDK comes with lots of CLI tools and emulators, including one for Firestore and Datastore (an alternate API).
Time to get to work. I visited start.spring.io to generate a project. I could choose a few dependencies from the curated list, including a default one for Google Cloud services, and another for exposing my data repository as a series of REST endpoints.
I generated the project, and opened it in Visual Studio Code. Then, I opened the pom.xml file and added one more dependency. While I’m using the Firestore database, I’m using it in “Datastore mode” which works better with Spring Data REST. Here’s my finished pom file.
Let’s sling a little code, shall we? Spring Boot almost makes this too easy. First, I created a class to describe a “character.” I started with just a couple of characteristics—full name, and role.
package com.seroter.bootgcprunfirestore;

import com.google.cloud.spring.data.datastore.core.mapping.Entity;
import org.springframework.data.annotation.Id;

@Entity
class Character {

    @Id
    private Long id;
    private String FullName;
    private String Role;

    public String getFullName() {
        return FullName;
    }
    public String getRole() {
        return Role;
    }
    public void setRole(String role) {
        this.Role = role;
    }
    public void setFullName(String fullName) {
        this.FullName = fullName;
    }
}
All that’s left is to create a repository resource and Spring Data handles the rest. Literally!
That’s kinda it. No other code is needed. Now I want to test it out and see if it works. The first option is to spin up an instance of the Datastore emulator—not Firestore since I’m using the Datastore API—when my app starts. That’s handy. It’s one line in my app.properties file.
spring.cloud.gcp.datastore.emulator.enabled=true
When I execute ./mvnw spring-boot:run I see the app compile, and get a notice that the Datastore emulator was started up. I went to Postman to call the API. First I added a record.
Then I called the endpoint to retrieve the store data. It worked. It’s great that Spring Data REST wires up all these endpoints automatically.
Now, I really like that I can start up the emulator as part of the build. But, that instance is ephemeral. When I stop running the app locally, my instance goes away. What if my inner loop involves constantly stopping the app to make changes, recompile, and start up again? Don’t worry. It’s also easy to stand up the emulator by itself, and attach my app to it. First, I ran gcloud beta emulators datastore start to get the local instance running in about 2 seconds.
Then I updated my app.properties file by commenting out the statement that enables local emulation, and replacing with this statement that points to the emulator:
spring.cloud.gcp.datastore.host=localhost:8081
Now I can start and stop the app as much as I want, and the data persists. Both options are great, depending on how you’re doing local development.
Let’s deploy. I wanted to see this really running, and iterate further after I’m confident in how it behaves in a production-like environment. The easiest option for any Spring Boot developer is Cloud Run. It’s quick, it’s serverless, and we support buildpacks, so you never need to see a container.
I issued a single CLI command—gcloud beta run deploy boot-app --memory=1024 --source .— to package up my app and get it to Cloud Run.
After a few moments, I had a container in the registry, and an instance of Cloud Run. I don’t have to do any other funny business to reach the endpoint. No gateways, proxies, or whatever. And everything is instantly wired up to Cloud Logging and Cloud Monitoring for any troubleshooting. And I can provision up to 8GB of RAM and 4 CPUs, while setting up to 250 concurrent connections per container, and 1000 maximum instances. There’s a lot you can run with that horsepower.
I pinged the public endpoint, and sure enough, it was easy to publish and retrieve data from my REST API …
… and see the data sitting in the database!
When I saw the results, I realized I wanted more data fields in here. No problem. I went back to my Spring Boot app, and added a new field, isHuman. There are lots of animals on my favorite shows.
This time when I deployed, I chose the “no traffic” flag—cloud beta run deploy boot-app --memory=1024 --source . --no-traffic—so that I could control who saw the new field. Once it deployed, I saw two “revisions” and had the ability to choose the amount of traffic to send to each.
I switched 50% of the traffic to the new revision, liked what I saw, and then flipped it to 100%.
So there you go. It’s possible to fly through this inner loop in minutes. Because I’m leaning on managed serverless technologies for things like application runtime and database, I’m not wasting any time building or managing infrastructure. The local dev tooling from Google Cloud is terrific, so I have easy use of IDE integrations, emulators and build tools. This stack makes it simple for me to iterate quickly, cheaply, and with tech that feels like the future, versus wrestling with old stuff that’s been retrofitted for today’s needs.
My name is Richard, and I like to run as admin. There, I said it. You should rarely listen to me for good security advice since I’m now (always?) a pretend developer who does things that are easy, not necessarily right. But identity management is something I wanted to learn more about in 2021, so now I’m actually trying. Specifically, I’m exploring the best ways for my applications to securely access cloud services. In this post, I’ll introduce you to GKE Workload Identity, and why it seems like a terrific way to do the right thing.
First, let’s review some of your options for providing access to distributed components—think databases, storage, message queues, and the like—from your application.
Store credentials in application variables. This is terrible. Which means I’ve done it before myself. Never do this, for roughly 500 different reasons.
Store credentials in property files. This is also kinda awful. First, you tend to leak your secrets often because of this. Second, it might as well be in the code itself, as you still have to change, check in, do a build, and do a deploy to make the config change.
Store credentials in environment variables. Not great. Yes, it’s out of your code and config, so that’s better. But I see at least three problems. First, it’s likely not encrypted. Second, you’re still exporting creds from somewhere and storing them here. Third, there’s no version history or easy management (although clouds offer some help here). Pass.
Store credentials in a secret store. Better. At least this is out of your code, and in a purpose-built structure for securely storing sensitive data. This might be something robust like Vault, or something more basic like Kubernetes Secrets. The downside is still that you are replicating credentials outside the Identity Management system.
Use identity federation. Here we go. How about my app runs under an account that has the access it needs to a given service? This way, we’re not extracting and stashing credentials. Seems like the ideal choice.
So, if identity federation is a great option, what’s the hard part? Well, if my app is running in Kubernetes, how do I run my workload with the right identity? Maybe through … Workload Identity? Basically, Workload Identity lets you map a Kubernetes service account to a given Google Cloud service account (there are similar types of things for EKS in AWS, and AKS in Azure). At no point does my app need to store or even reference any credentials. To experiment, I created a basic Spring Boot web app that uses Spring Cloud GCP to talk to Cloud Storage and retrieve all the files in a given bucket.
package com.seroter.gcpbucketreader;

import java.util.ArrayList;
import java.util.Iterator;
import java.util.List;

import com.google.api.gax.paging.Page;
import com.google.cloud.storage.Blob;
import com.google.cloud.storage.Storage;

import org.springframework.beans.factory.annotation.Autowired;
import org.springframework.boot.SpringApplication;
import org.springframework.boot.autoconfigure.SpringBootApplication;
import org.springframework.stereotype.Controller;
import org.springframework.ui.Model;
import org.springframework.web.bind.annotation.GetMapping;
import org.springframework.web.bind.annotation.RequestParam;

@Controller
@SpringBootApplication
public class GcpBucketReaderApplication {

	public static void main(String[] args) {
		SpringApplication.run(GcpBucketReaderApplication.class, args);
	}

	//initiate auto-configuration magic that pulls in the right credentials at runtime
	@Autowired(required=false)
	private Storage storage;

	@GetMapping("/")
	public String bucketList(@RequestParam(name="bucketname", required=false, defaultValue="seroter-bucket-logs") String bucketname, Model model) {

		List<String> blobNames = new ArrayList<String>();

		try {

			//get the objects in the bucket
			Page<Blob> blobs = storage.list(bucketname);
			Iterator<Blob> blobIterator = blobs.iterateAll().iterator();

			//stash bucket names in an array
			while(blobIterator.hasNext()) {
				Blob b = blobIterator.next();
				blobNames.add(b.getName());
			}
		}
		//if anything goes wrong, catch the generic error and add to view model
		catch (Exception e) {
			model.addAttribute("errorMessage", e.toString());
		}

		//throw other values into the view model
		model.addAttribute("bucketname", bucketname);
		model.addAttribute("bucketitems", blobNames);

		return "bucketviewer";
	}
}
I built and containerized this app using Cloud Build and Cloud Buildpacks. It only takes a few lines of YAML and one command (gcloud builds submit --config cloudbuild.yaml .) to initiate the magic.
steps:
# use Buildpacks to create a container image
- name: 'gcr.io/k8s-skaffold/pack'
  entrypoint: 'pack'
  args: ['build', '--builder=gcr.io/buildpacks/builder', '--publish', 'us-west1-docker.pkg.dev/seroter-anthos/seroter-images/boot-bucketreader:$COMMIT_SHA']
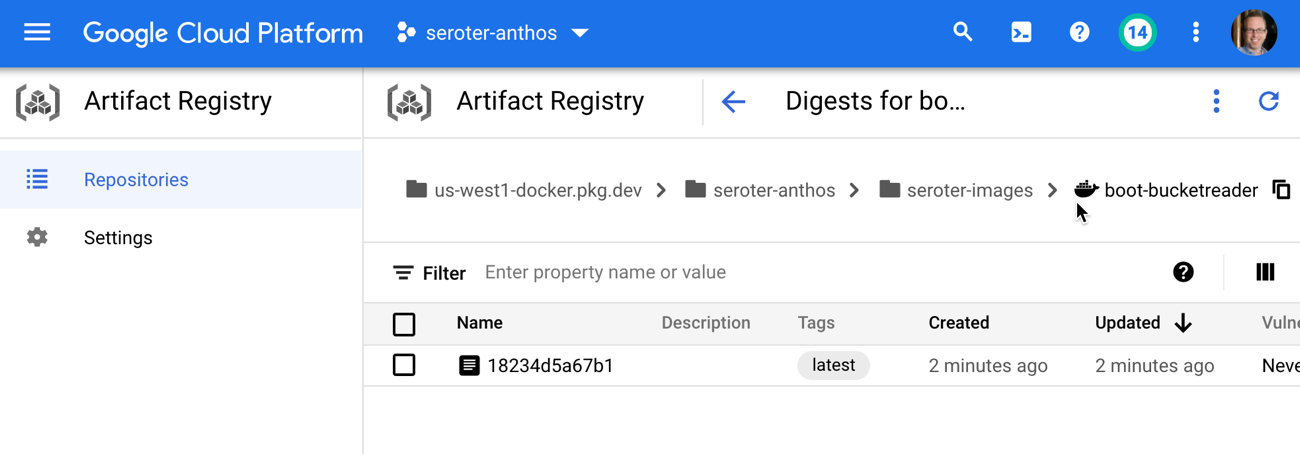
In a few moments, I had a container image in Artifact Registry to use for testing.
Then I loaded up a Cloud Storage bucket with a couple of nonsense files.
Let’s play through a few scenarios to get a better sense of what Workload Identity is all about.
Scenario #1 – Cluster runs as the default service account
Without Workload Identity, a pod in GKE assumes the identity of the service account associated with the cluster’s node pool.
When creating a GKE cluster, you choose a service account for a given node pool. All the nodes runs as this account.
I built a cluster using the default service account, which can basically do everything in my Google Cloud account. That’s fun for me, but rarely something you should ever do.
From within the GKE console, I went ahead and deployed an instance of our container to this cluster. Later, I’ll use Kubernetes YAML files to deploy pods and expose services, but the GUI is fun to use for basic scenarios.
Then, I created a service to route traffic to my pods.
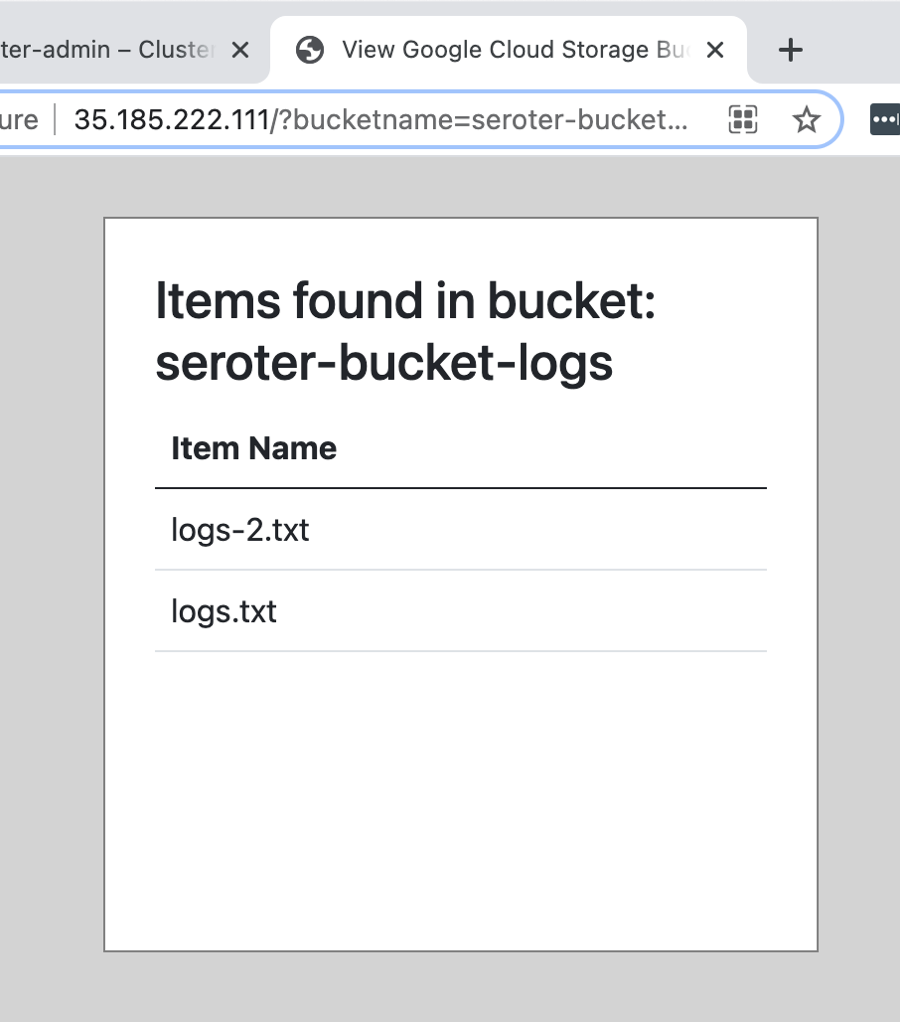
Once I had a public endpoint to ping, I sent a request to the page and provided the bucket name as a querystring parameter.
That worked, as expected. Since the pod runs as a super-user, it had full permission to Cloud Storage, and every bucket inside. While that’s a fun party trick, there aren’t many cases where the workloads in a cluster should have access to EVERYTHING.
Scenario #2 – Cluster runs as a least privilege service account
Let’s do the opposite and see what happens. This time, I started by creating a new Google Cloud service account that only had “read” permissions to the Artifact Registry (so that it could pull container images) and Kubernetes cluster administration rights.
Then, I built another GKE cluster, but this time, chose this limited account as the node pool’s service account.
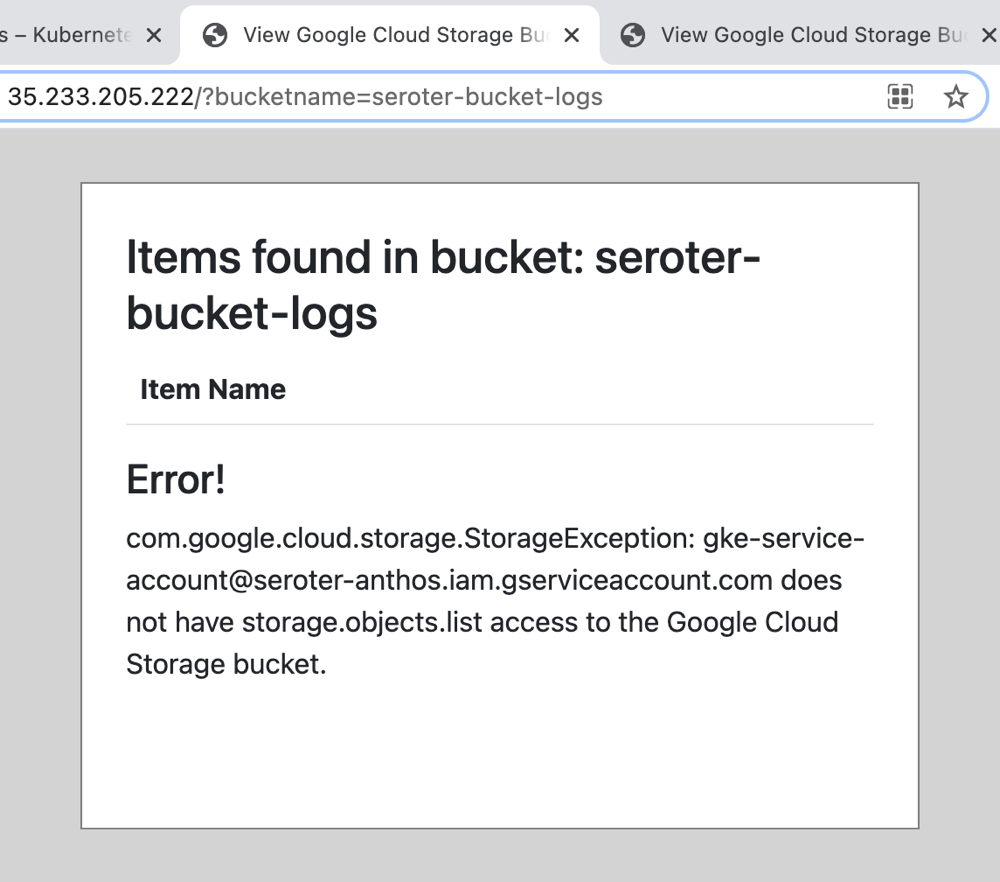
After building the cluster, I went ahead and deployed the same container image to the new cluster. Then I added a service to make these pods accessible, and called up the web page.
As expected, the attempt to read my Storage bucket failed, This least privilege account didn’t have rights to Cloud Storage.
This is a more secure setup, but now I need a way for this app to securely call the Cloud Storage service. Enter Workload Identity.
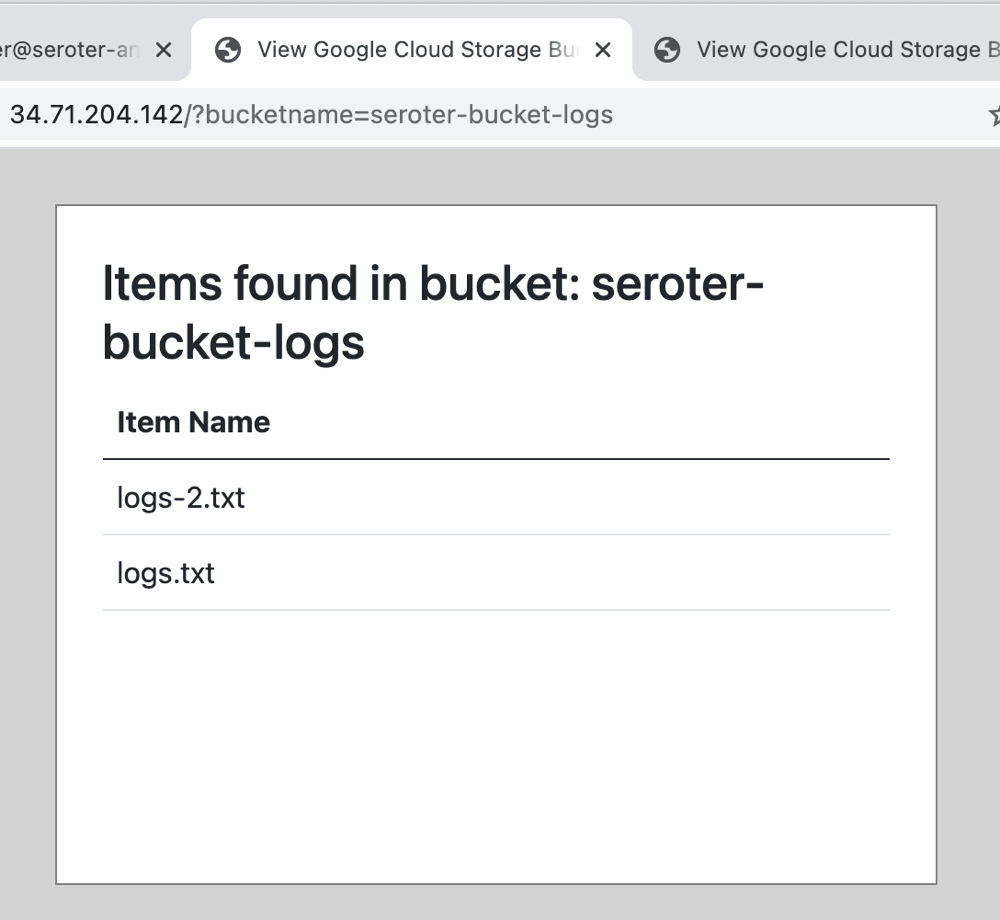
Scenario #3 – Cluster has Workload Identity configured with a mapped service account
I created yet another cluster. This time, I chose the least privilege account, and also chose to install Workload Identity. How does this work? When my app ran before, it used (via the Spring Cloud libraries) the Compute Engine metadata server to get a token to authenticate with Cloud Storage. When I configure Workload Identity, those requests to the metadata server get routed to the GKE metadata server. This server runs on each cluster node, mimics the Compute Engine metadata server, and gives me a token for whatever service account the pod has access to.
If I deploy my app now, it still won’t work. Why? I haven’t actually mapped a service account to the namespace my pod gets deployed into!
I created the namespace, created a Kubernetes service account, created a Google Cloud storage account, mapped the two together, and annotated our service account. Let’s go step by step.
First, I created the namespace to hold my app.
kubectl create namespace blog-demos
Next, I created a Kubernetes service account (“sa-storageapp”) that’s local to the cluster, and namespace.
I then deployed a YAML file to create a routable service, and pinged my application. Sure enough, I now had access to Cloud Storage.
Wrap
Thanks to Workload Identity for GKE, I created a cluster that had restricted permissions, and selectively gave permission to specific workloads. I could get even more fine-grained by tightening up the permissions on the GCP service account to only access a specific bucket (or database, or whatever). Or have different workloads with different permissions, all in the same cluster.
To me, this is the cleanest, most dev-friendly way to do access management in a Kubernetes cluster. And we’re bringing this functionality to GKE clusters that run anywhere, via Anthos.
What about you? Any other ways you really like doing access management for Kubernetes-based applications?
I keep getting more and more powerful laptops, and then offloading more and more processing to the cloud. SOMETHING’S GOTTA GIVE! My local machine doesn’t just run web browsers and chat apps. No, my laptop is still loaded up with dev tools, while all my virtual machines and container clusters now live in the cloud. That helps. But we’re seeing more and more of the dev tools sneak into the cloud, too.
One of those dev tools is the shell experience. If you’re like me—actually, you’re probably much more advanced than me—you invest in a loaded terminal on your machine. On my Mac, I directly install a few tools (e.g. git, gcloud CLI) but use Homebrew to keep most of my favorite tools close by.
It’s no small effort to maintain a local terminal environment that’s up to date, and authenticated to various endpoints. To make all this easier, each of three hyperscalers now has a “cloud shell” experience that offers developers a hosted, pre-loaded terminal for working with that cloud.
In this blog post, I’m going to look at the cloud shells from AWS, Microsoft Azure, and Google Cloud, and see what they really have to offer. Specifically, I’m going to assess:
Shell access. How exactly do you reach and use the shell?
Shells offered. Bash? Powershell?
Amount of storage provided. How much can you stash in your environment?
Durability period. How long does each cloud hold onto your compute environment? Storage?
Platform integrations. What ways does the shell integrate with the cloud experience?
Embedded tools. What comes pre-loaded in the shell?
Code editing options. Is there a way to edit files or build apps?
Compute environment configuration/extensibility. Can you change the shell environment temporarily or permanently?
UX and usability controls. What can you do to tweak the appearance or behavior?
Let’s take a look.
Disclaimer: I work for Google Cloud, so obviously I’ll have some biases. That said, I’ve used AWS for over a decade, was an Azure MVP for years, and can be mostly fair when comparing products and services. Please call out any mistakes I make!
How do you reach that cursor? From within the GCP Console, there’s an ever-present button in the top navigation. Of note, you can also access it via a dedicated link at shell.cloud.google.com.
Once you launch the Cloud Shell—and if it’s the first time, you’ll see a brief message about provisioning your infrastructure—you see a new frame on your screen. Note that this is a globally distributed service, and you’re automatically assigned to the closest geographic region.
Each user gets 5GB of persistent storage that’s mounted into this underlying virtual machine. This VM terminates after 20 minutes of inactivity. If you don’t use Cloud Shell at all for 120 days, the home disk goes away too.
You have two default shell interpreters (Bash and sh) at your disposal here. Google Cloud Shell lets you create unique sessions via tabs, and see below that I’m using one tab to list all the shells. I was able to switch between shells, including PowerShell too!
Cloud Shell comes with lots of pre-loaded tools including gcloud, vim, emacs, gradle, helm, maven, npm, pip, git, docker, MySQL client, TensorFlow, and Terraform. It also has built-in language support for Java, Go, Python, Node.js, Ruby, PHP, and .NET Core.
If you want tools that aren’t pre-loaded by Google Cloud, you’ve got a few options. You can manually install tools during your session, or, create a customer_environment script that runs whenever your instance boots up.
What about platform integrations? If you call a Google Cloud API that requires credentials, there’s a prompt for authorization. There’s also an “Open in Cloud Shell” feature that makes it simple to create links that trigger opinionated Cloud Shell instances. If you’re writing tutorials or want people to try the code in your git repo, you can generate a link. There’s also a baked-in cloudshell CLI to launch tutorials, download files, and more. You can also use the gcloud CLI on your local workstation to tunnel into the Cloud Shell, thanks to the gcloud beta cloud-shell operation.
The Google Cloud Shell also has a full-fledged code editor built in. This editor—also available directly via ide.cloud.google.com—gets launched right from the Cloud Shell, either through the button on the Cloud Shell navigation or by invoking the cloudshell edit . command.
This editor is based on Eclipse Theia and has the Cloud Code extensions built in. This means I can create apps, use source control, link to GCP services, run tests, and more. Because Cloud Shell supports Web Preview, you can also start up web applications and hit a local endpoint.
Let’s look at the overall user experience. In the Cloud Shell navigation menu, I have options to send key combinations (e.g. Ctrl+V), change the look and feel (e.g. color, font), upload or download files, run in safe mode, restart the Cloud Shell instance, minimize the frame itself, break it out into its own window, or close the terminal entirely.
With this mix of free storage, a wide set of tools, a fully functional code editor, and easily extendible environments, the Google Cloud Shell feels like a very complete experience.
Microsoft Azure
Azure provides a Cloud Shell that runs on a temporary virtual machine. Like with GCP, all the infrastructure details are invisible, and users just get a virtual terminal.
You have a few ways to reach Azure’s Cloud Shell. There’s an always-there button in the Portal and a direct link available at shell.azure.com.
Once you trigger the Cloud Shell, you quickly get a new resizable frame holding your terminal instance.
The compute instance is available at no charge. These instances use a 5GB persistent storage image in your file share, and it appears that you pay for that. Like the Google Cloud Shell, the Azure one uses non-durable compute nodes that time out after 20 minutes of inactivity.
You have two shell experiences: bash or PowerShell. Storage is shared between each.
The Azure Cloud Shell comes absolutely loaded with tools. You have all the standard Azure tools (Azure CLI, azcopy, etc) along with things like vim, emacs, git, maven, npm, Docker, kubectl, Helm, MySQL client, PostgreSQL client, Cloud Foundry CLI, Terraform, Ansible, Packer, and more. There’s also built-in language support for Go, Ruby. .NET Core, Java, Node.js, PowerShell, and Python. I didn’t see any obvious way to customize the experience that lasts beyond a given session.
As far as integrations, it appears there is SSO with Azure Active Directory. There’s also a special PowerShell commandlet for managing Exchange Online. Try to control yourselves. Similar to GCP, the Azure Cloud Shell supports a URL format that lets tutorial creators launch the Cloud Shell from anywhere. Visual Studio Code users can also integrate the Azure Cloud Shell into their local dev experience.
Azure also provides a handy code editor within their Cloud Shell experience. Based on the open source Monaco editor, has a basic file explorer, command palette, and language highlighting.
Let’s look at the user experience. In the Cloud Shell navigation bar, you have buttons to restart the shell, configure font style and size, download files, upload files, open the code editor, trigger a local web server, minimize the frame, or shut it down.
All in all, it’s a solid experience. Not as rich as what GCP has, but entirely functional with nice touches like the code editor, and easy switching between bash and PowerShell.
AWS
AWS is the newest entrant to the cloud-based terminal with their AWS CloudShell. AWS seems careful to call the host a “computing environment” versus ever saying “virtual machine.” It’s possible that you get a container in a shared environment.
It looks like you have one way to reach the CloudShell. There’s a button in the AWS Console navigation bar.
Clicking that button pops up a new browser instance holding your terminal.
There’s no cost for AWS CloudShell and you get 1GB of persistent storage (also for free). The service is available in a handful of AWS regions (3 in the US, 1 in Ireland, 1 in Tokyo). Sessions expire after 20-30 minutes, and data is held for 120 days.
The AWS CloudShell comes with a handful of useful pre-loaded tools. You get the AWS tools (e.g. AWS CLI, AWS SAM), as well as git, make, ssh, and vim. You can modify the default environment by creating a .bashrc script that runs whenever the bash shell fires up. There’s native language support for Node.js and Python.
There’s one platform integration I noticed, which helps you push and pull code from AWS CodeCommit.
There are some nice touches in the AWS CloudShell user experience. I like that you can stack tabs (session) or put them side by side. You can also download and upload files. AWS also offers settings to change the font size or switch from dark mode to light mode.
AWS offers a functional experience that’s basic, but useful for those living in an AWS world.
It’s great to see all the major clouds offering this functionality. GCP objectively has the most feature-rich experience, but each one is useful. Try them out, and see if they can make your dev environment simpler.
I’m seeing the usual blitz of articles that predict what’s going to happen this year in tech. I’m not smart enough to make 2021 predictions, but one thing that seems certain is that most every company is deploying more software to more places more often. Can we agree on that? Companies large and small are creating and buying lots of software. They’re starting to do more continuous integration and continuous delivery to get that software out the door faster. And yes, most companies are running that software in multiple places—including multiple public clouds.
So we have an emerging management problem, no? How do I create and maintain software systems made up of many types of components—virtual machines, containers, functions, managed services, network configurations—while using different clouds? And arguably the trickiest part isn’t building the system itself, but learning and working within each cloud’s tenancy hierarchy, identity system, administration tools, and API model.
Most likely, you’ll use a mix of different build orchestration tools and configuration management tools based on each technology and cloud you’re working with. Can we unify all of this without forcing a lowest-common-denominator model that keeps you from using each cloud’s unique stuff? I think so. In this post, I’ll show an example of how to provision and manage infrastructure, apps, and managed services in a consistent way, on any cloud. As a teaser for what we’re building here, see that we’ve got a GitHub repo of configurations, and 1st party cloud managed services deployed and configured in Azure and GCP as a result.
Before we start, let’s define a few things. GitOps—a term coined by Alexis and championed by the smart folks at Weaveworks—is about declarative definitions of infrastructure, stored in a git repo, and constantly applied to the environment so that you remain in the desired state.
@kelseyhightower discusses all things #GitOps with a personal twist in his latest talk delivered at @GitHub Universe 2020. If you're looking for a clear explanation of GitOps that includes an equally simple demo, this is it. https://t.co/umAqItpnsW
Next, let’s talk about the Kubernetes Resource Model (KRM). In Kubernetes, you define resources (built in, or custom) and the system uses controllers to create and manage those resources. It treats configurations as data without forcing you to specify *how* to achieve your desired state. Kubernetes does that for you. And this model is extendable to more than just containers!
Infrastructure-as-Code isn't enough. There are challenges to an imperative model for building infrastructure.
The final thing I want you to know about is Google Cloud Anthos. That’s what’s tying all this KRM and GitOps stuff together. Basically, it’s a platform designed to create and manage distributed Kubernetes clusters that are consistent, connected, and application ready. There are four capabilities you need to know to grok this KRM/GitOps scenario we’re building:
Anthos clusters and the cloud control plane. That sounds like the title of a terrible children’s book. For tech folks, it’s a big deal. Anthos deploys GKE clusters to GCP, AWS, Azure (in preview), vSphere, and bare metal environments. These clusters are then visible to (and configured by) a control plane in GCP. And you can attach any existing compliant Kubernetes cluster to this control plane as well.
Config Connector. This is a KRM component that lets you manage Google Cloud services as if they were Kubernetes resources—think BigQuery, Compute Engine, Cloud DNS, and Cloud Spanner. The other hyperscale clouds liked this idea, and followed our lead by shipping their own flavors of this (Azure version, AWS version).
Environs. These are logical groupings of clusters. It doesn’t matter where the clusters physically are, and which provider they run on. An environ treats them all as one virtual unit, and lets you apply the same configurations to them, and join them all to the same service mesh. Environs are a fundamental aspect of how Anthos works.
Config Sync. This Google Cloud components takes git-stored configurations and constantly applies them to a cluster or group of clusters. These configs could define resources, policies, reference data, and more.
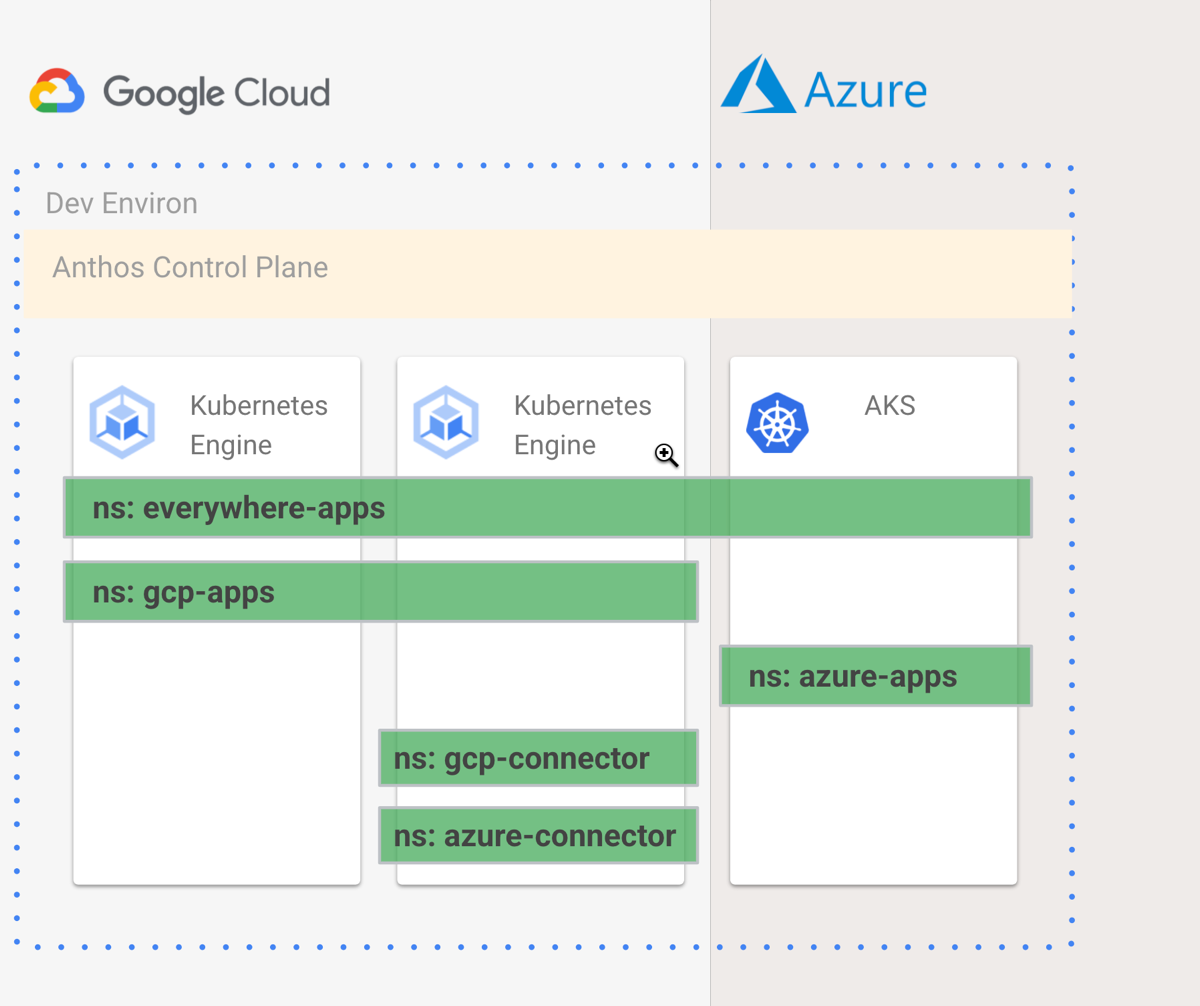
Now we’re ready. What are we building? I’m going to provision two Anthos clusters in GCP, then attach an Azure AKS cluster to that Anthos environ, apply a consistent configuration to these clusters, install the GCP Config Connector and Azure Service Operators into one cluster, and use Config Sync to deploy cloud managed services and apps to both clouds. Why? Once I have this in place, I have a single way to create managed services or deploy apps to multiple clouds, and keep all these clusters identically configured. Developers have less to learn, operators have less to do. GitOps and KRM, FTW!
Step 1: Create and Attach Clusters
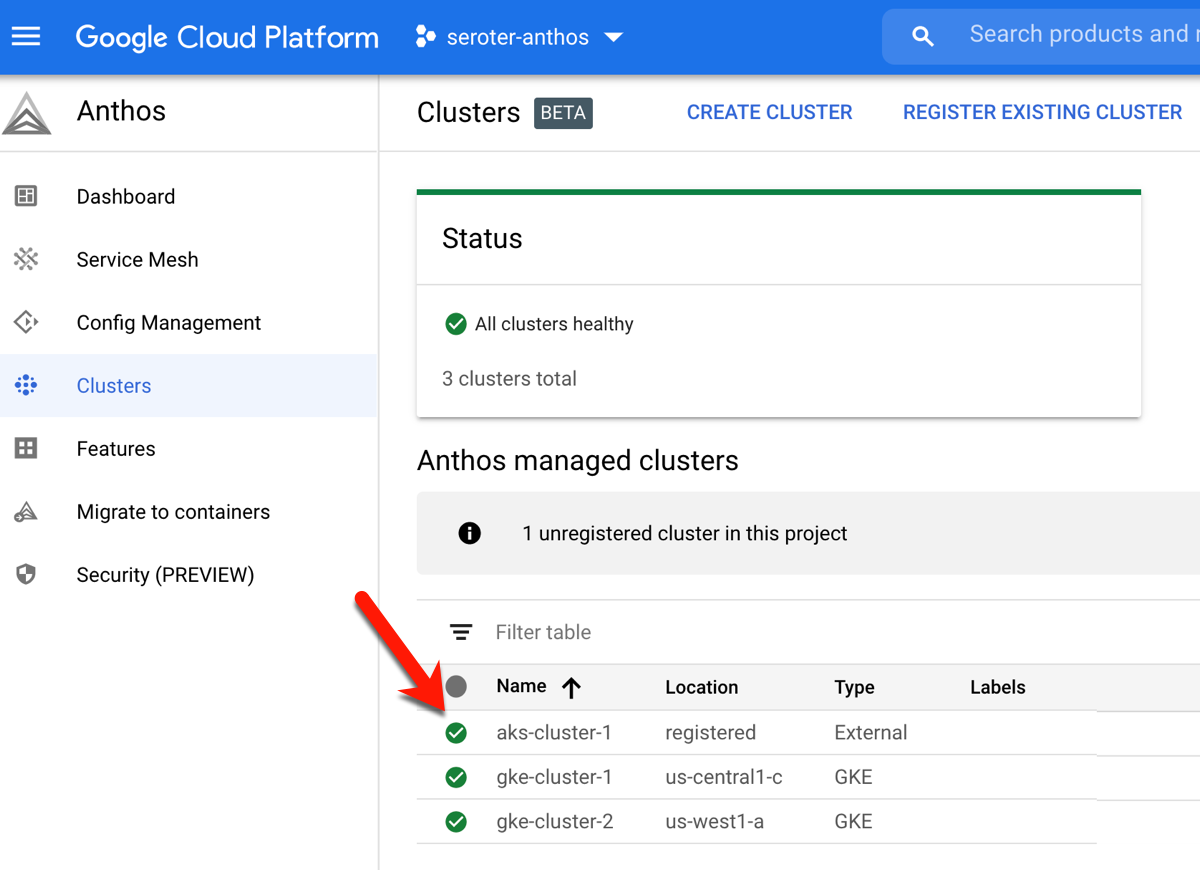
I started by creating two GKE clusters in GCP. I can do this via the Console, CLI, Terraform, and more. Once I created these clusters (in different regions, but same GCP project), I registered both to the Anthos control plane. In GCP, the “project” (here, seroter-anthos) is also the environ.
Next, I created a new AKS cluster via the Azure Portal.
In 2020, our Anthos team added the ability to attach existing clusters an an Anthos environ. Before doing anything else, I created a new minimum-permission GCP service account that the AKS cluster would use, and exported the JSON service account key to my local machine.
From the GCP Console, I followed the option to “Add clusters to environ” where I provided a name, and got back a single command to execute against my AKS cluster. After logging into my AKS cluster, I ran that command—which installs the Connect agent—and saw that the AKS cluster connected successfully to Anthos.
I also created a service account in my AKS cluster, bound it to the cluster-admin role, and grabbed the password (token) so that GCP could log into that cluster. At this point, I can see the AKS cluster as part of my environ.
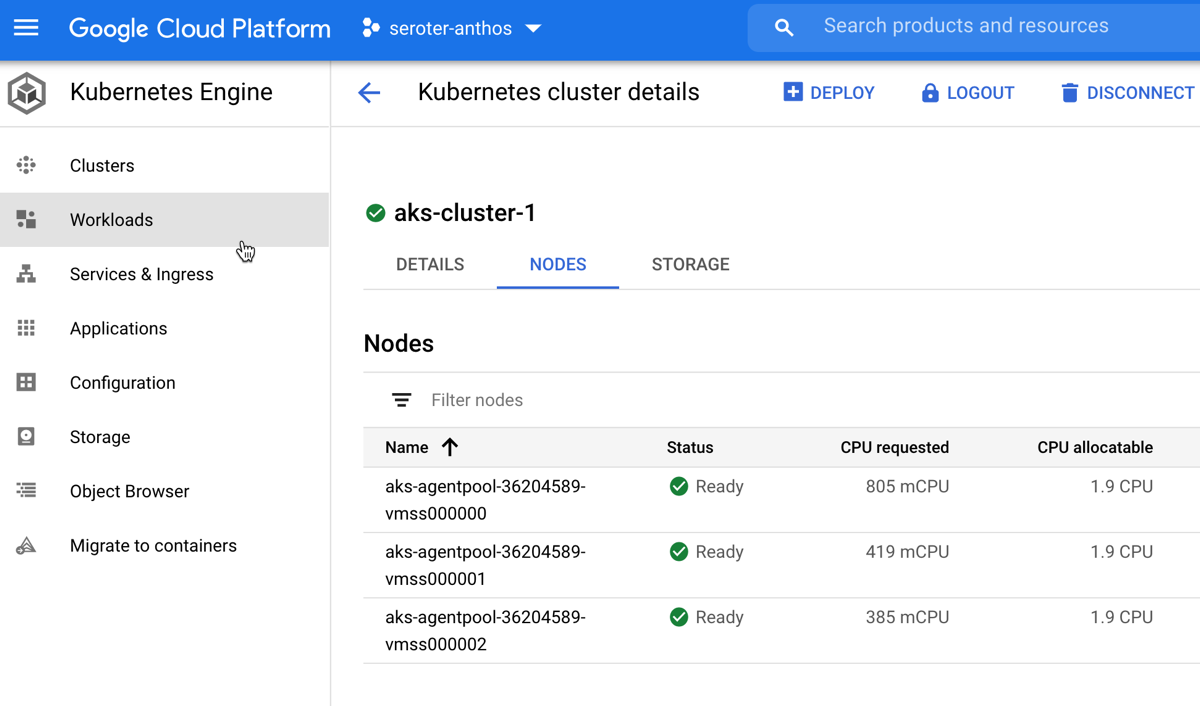
You know what’s pretty awesome? Once this AKS cluster is connected, I can view all sorts of information about cluster nodes, workloads, services, and configurations. And, I can even deploy workloads to AKS via the GCP Console. Wild.
But I digress. Let’s keep going.
Step 2: Instantiate a Git Repo
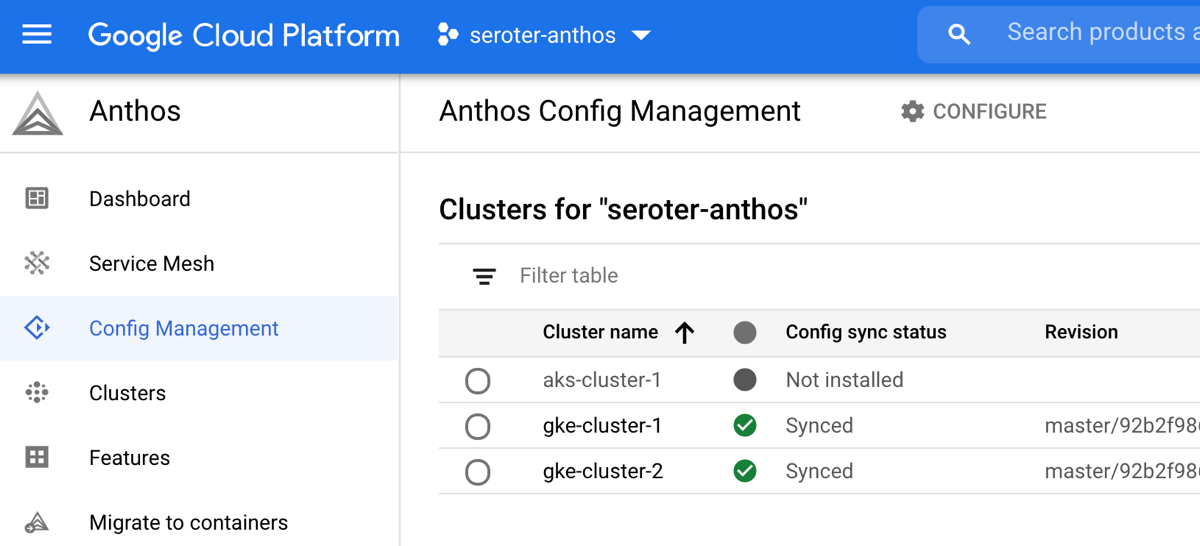
GitOps requires … a git repo. I decided to use GitHub, but any reachable git repository works. I created the repo via GitHub, opened it locally, and initialized the proper structure using the nomos CLI. What does a structured repo look like and why does the structure matter? Anthos Config Management uses this repo to figure out the clusters and namespaces for a given configuration. The clusterregistry directory contains ClusterSelectors that let me scope configs to a given cluster or set of clusters. The cluster directory holds any configs that you want applied to entire clusters versus individual namespaces. And the namespaces directory holds configs that apply to a specific namespace.
Now, I don’t want all my things deployed to all the clusters. I want some namespaces that span all clusters, and others that only sit in one cluster. To do this, I need ClusterSelectors. This lets me define labels that apply to clusters so that I can control what goes where.
For example, here’s my cluster definition for the AKS cluster (notice the “name” matches the name I gave it in Anthos) that applies an arbitrary label called “cloud” with a value of “azure.”
And here’s the corresponding ClusterSelector. If my namespace references this ClusterSelector, it’ll only apply to clusters that match the label “cloud: azure.”
After creating all the cluster definitions and ClusterSelectors, I committed and published the changes. You can see my full repo here.
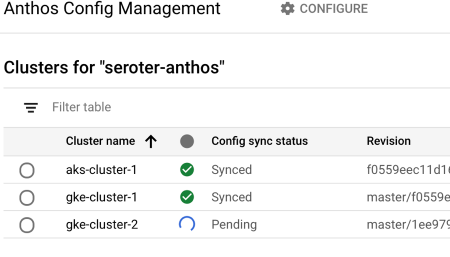
Step 3: Install Anthos Config Management
The Anthos Config Management (ACM) subsystem lets you do a variety of things such as synchronize configurations across clusters, apply declarative policies, and manage a hierarchy of namespaces.
Enabling and installing ACM on GKE clusters and attached clusters is straightforward. First, we need credentials to talk to our git repo. One option is to use an SSH keypair. I generated a new keypair, and added the public key to my GitHub account. Then, I created a secret in each Kubernetes cluster that references the private key value.
With that done, I went through the GCP Console (or you can do this via CLI) to add ACM to each cluster. I chose to use SSH as the authentication mechanism, and then pointed to my GitHub repo.
After walking through the GKE clusters, I could see that ACM was installed and configured. Then I installed ACM on the AKS cluster too, all from the GCP Console.
With that, the foundation of my multi-cloud platform was all set up.
Step 4: Install Config Connector and Azure Service Operator
As mentioned earlier, the Config Connector helps you treat GCP managed services like Kubernetes resources. I only wanted the Config Connector on a single GKE cluster, so I went to gke-cluster-2 in the GCP Console and “enabled” Workload Identity and the Config Connector features. Workload Identity connects Kubernetes service accounts to GCP identities. It’s pretty cool. I created a new service account (“seroter-cc”) that Config Connector would use to create managed services.
To confirm installation, I ran a “kubectl get crds” command to see all the custom resources added by the Config Connector.
There’s only one step to configure the Config Connector itself. I created a single configuration that referenced the service account and GCP project used by Config Connector.
# configconnector.yaml
apiVersion: core.cnrm.cloud.google.com/v1beta1
kind: ConfigConnector
metadata:
  # the name is restricted to ensure that there is only one
  # ConfigConnector instance installed in your cluster
  name: configconnector.core.cnrm.cloud.google.com
spec:
 mode: cluster
 googleServiceAccount: "seroter-cc@seroter-anthos.iam.gserviceaccount.com"
I ran “kubectl apply -f configconnector.yaml” for the configuration, and was all set.
Since I also wanted to provision Microsoft Azure services using the same GitOps + KRM mechanism, I installed the Azure Service Operators. This involved installing a cert manager, installing Helm, creating an Azure Service Principal (that has rights to create services), and then installing the operator.
Step 5: Check-In Configs to Deploy Managed Services and Applications
The examples for the Config Connector and Azure Service Operator talk about running “kubectl apply” for each service you want to create. But I want GitOps! So, that means setting up git directories that hold the configurations, and relying on ACM (and Config Sync) to “apply” these configurations on the target clusters.
I created five namespace directories in my git repo. The everywhere-apps namespace applies to every cluster. The gcp-apps namespace should only live on GCP. The azure-apps namespace only runs on Azure clusters. And the gcp-connector and azure-connector namespaces should only live on the cluster where the Config Connector and Azure Service Operator live. I wanted something like this:
How do I create configurations that make that above image possible? Easy. Each “namespace” directory in the repo has a namespace.yaml file. This file provides the name of the namespace, and optionally, annotations. The annotation for the gcp-connector namespace used the ClusterSelector that only applied to gke-cluster-2. I also added a second annotation that told the Config Connector which GCP project hosted the generated managed services.
I added namespace.yaml files for each other namespace, with ClusterSelector annotations on all but the everywhere-apps namespace, since that one runs everywhere.
Now, I needed the actual resource configurations for my cloud managed services. In GCP, I wanted to create a Cloud Storage bucket. With this “configuration as data” approach, we just define the resource, and ask Anthos to instantiate and manage it. The Cloud Storage configuration looks like this:
The Azure example really shows the value of this model. Instead of programmatically sequencing the necessary objects—first create a resource group, then a storage account, then a storage blob—I just need to define those three resources, and Kubernetes reconciles each resource until it succeeds. The Storage Blob resource looks like:
apiVersion: azure.microsoft.com/v1alpha1
kind: BlobContainer
metadata:
  name: blobcontainer-sample
spec:
  location: westus
  resourcegroup: resourcegroup-operators
  accountname: seroterstorageaccount
  # accessLevel - Specifies whether data in the container may be accessed publicly and the level of access.
  # Possible values include: 'Container', 'Blob', 'None'
  accesslevel: Container
The image below shows my managed-service-related configs. I checked all these configurations into GitHub.
A few seconds later, I saw that Anthos was processing the new configurations.
Ok, it’s the moment of truth. First, I checked Cloud Storage and saw my brand new bucket, provisioned by Anthos.
Switching over to the Azure Portal, I navigated to Storage area and saw my new account and blob container.
How cool is that? Now i just have to drop resource definitions into my GitHub repository, and Anthos spins up the service in GCP or Azure. And if I delete that resource manually, Anthos re-creates it automatically. I don’t have to learn each API or manage code that provisions services.
Finally, we can also deploy applications this way. Imagine using a CI pipeline to populate a Kubernetes deployment template (using kpt, or something else) and dropping it into a git repo. Then, we use the Kubernetes resource model to deploy the application container. In the gcp-apps directory, I added Kubernetes deployment and service YAML files that reference a basic app I containerized.
As you might expect, once the repo synced to the correct clusters, Anthos created a deployment and service that resulted in a routable endpoint. While there are tradeoffs for deploying apps this way, there are some compelling benefits.
Step 6: “Move” App Between Clouds by Moving Configs in GitHub
This last step is basically my way of trolling the people who complain that multi-cloud apps are hard. What if I want to take the above app from GCP and move it to Azure? Does it require a four week consulting project and sacrificing a chicken? No. I just have to copy the Kubernetes deploy and service YAML files to the azure-apps directory.
After committing my changes to GitHub, ACM fired up and deleted the app from GCP, and inflated it on Azure, including an Azure Load Balancer instance to get a routable endpoint. I can see all of that from within the GCP Console.
Now, in real life, apps aren’t so easily portable. There are probably sticky connections to databases, and other services. But if you have this sort of platform in place, it’s definitely easier.
Thanks to deep support for GitOps and the KRM, Anthos makes it possible to manage infrastructure, apps, and managed services in a consistent way, on any cloud. Whether you use Anthos or not, take a look at GitOps and the KRM and start asking your preferred vendors when they’re going to adopt this paradigm!
During the past decade, there’s been one constant in my professional life. Through four companies (including a couple of acquisitions) and a variety of different jobs, I’ve taught training courses for Pluralsight. Since I started in 2011, over 400,000 people have watched 450,000 hours of my content. I’m going to keep doing technical deep dive courses, but Pluralsight proposed a new type of course for me to experiment with: Executive Briefings.
Rather than screen sharing of slides and demos, Executive Briefings are short video presentations of the speaker delivering a talk, targeting a leadership audience. My first executive briefing course is about migrating to the public cloud.
In this 20 minute session, I go through what you need to migrate when adopting public cloud, seven specific pieces of advice for “how” you do it, and I close with a reminder on why you’re doing it.
Has the “serverless revolution stalled”? I dunno. I like serverless. Taught a popular course about it. But I reviewed and published an article written by Bernard Brode that made that argument, and it sparked a lot of discussion. If we can agree that serverless computing means building an architecture out of managed services that scale to zero—we’re not strictly talking about function-as-a-service—that’s a start. Has this serverless model crossed the chasm from early adopters to an early majority? I don’t think so. And the data shows that usage of FaaS—still a fundamental part of most people’s serverless architecture—has flattened a bit. Why is that? I’m no expert, but I wonder if some of the inherent friction of the 1st generation FaaS gets in the way.
We’re seeing a new generation of serverless computing that removes that friction and may restart the serverless revolution. I’m talking here about Google Cloud Run. Based on the Knative project, it’s a fully managed service that scales container-based apps to zero. To me, it takes the best attributes from three different computing paradigms:
Paradigm
Best Attributes
Platform-as-a-Service
– focus on the app, not underlying infrastructure – auto-wire networking components to expose your endpoint
Container-as-a-Service
– use portable app packages – develop and test locally
Function-as-a-Service
– improve efficiency by scaling to zero – trigger action based on events
Each of those above paradigms has standalone value. By all means, use any of them if they suit your needs. Right now, I’m interested in what it will take for large companies to adopt serverless computing more aggressively. I think it requires “fixing” some of the flaws of FaaS, and there are four reasons Cloud Run is positioned to do so.
1. It doesn’t require rearchitecting your systems
First-generation serverless doesn’t permit cheating. No, you have to actually refactor or rebuild your system to run this way. That’s different than all the previous paradigms. IaaS? You could take existing bare metal workloads and run them unchanged in a cloud VM platform. PaaS? It catered to 12-factor apps, but you could still run many existing things there. CaaS? You can containerize a lot of things without touching the source code. FaaS? Nope. Nothing in your data center “just works” in a FaaS platform.
While that’s probably a good thing from a purity perspective—stop shifting your debt from one abstraction to another without paying it down!—it’s impractical. Simultaneously, we’re asking staff at large companies to: redesign teams for agile, introduce product management, put apps on CI pipelines, upgrade their programming language/framework, introduce new databases, decouple apps into microservices, learn cloud and edge models, AND keep all the existing things up and running. It’s a lot. The companies I talk to are looking for ways to get incremental benefits for many workloads, and don’t have the time or people to rebuild many things at once.
This is where Cloud Run is better than FaaS. It hosts containers that respond to web requests or event-based triggers. You can write functions, or, containerize a complete app—Migrate for Anthos makes it easy. Your app’s entry point doesn’t have to conform to a specific method signature, and there are no annotations or code changes required to operate in Cloud Run. Take an existing custom-built app written in any language, or packaged (or no source-code-available) software and run it. You don’t have to decompose your existing API into a series of functions, or break down your web app into a dozen components. You might WANT to, but you don’t HAVE to. I think that’s powerful, and significantly lowers the barrier to entry.
2. It runs anywhere
Lock-in concerns are overrated. Everything is lock-in. You have to decide whether you’re getting unique value from the coupling. If so, go for it. A pristine serverless architecture consists of managed services with code (FaaS) in the gaps. The sticky part is all those managed services, not the snippets of code running in the FaaS. Just making a FaaS portable doesn’t give you all the benefits of serverless.
That said, I don’t need all the aspects of serverless to get some of the benefits. Replacing poorly utilized virtual machines with high-density nodes hosting scale-to-zero workloads is great. Improving delivery velocity by having an auto-wired app deployment experience versus ticket-defined networking is great. I think it’s naive to believe that most folks can skip from traditional software development directly to fully serverless architectures. There’s a learning and adoption curve. And one step on the journey is defining more distributed services, and introducing managed services. Cloud Run offers a terrific best-of-both-worlds model that makes the journey less jarring. And uniquely, it’s not only available on a single cloud.
Cloud Run is great on Google Cloud. Given the option, you should use it there. It’s fully managed and elastic, and integrates with all types of GCP-only managed services, security features, and global networking. But you won’t only use Google Cloud in your company. Or Azure. Or AWS. Or Cloudflare. Cloud Run for Anthos puts this same runtime most anywhere. Use it in your data center. Use it in your colocation or partner facility. Use it at the edge. Soon, use it on AWS or Azure. Get one developer-facing surface for apps running on a variety of hosts.
A portable Faas, based on open source software, is powerful. And I believe, necessary, to break into mainstream adoption within the enterprise. Bring the platform to the people!
3. It makes the underlying container as invisible, or visible, as you want
Cloud Run uses containers. On one hand, it’s a packaging mechanism, just like a ZIP file for AWS Lambda. On the other, it’s a way to bring apps written in any language, using any libraries, to a modern runtime. There’s no “supported languages” page on the website for Cloud Run. It’s irrelevant.
Now, I personally don’t like dealing with containers. I want to write code, and see that code running somewhere. Building containers is an intermediary step that should involve as little effort as possible. Fortunately, tools like Cloud Code make that a reality for me. I can use Visual Studio Code to sling some code, and then have it automatically containerized during deployment. Thanks Cloud Buildpacks! If I choose to, I can use Cloud Run while being blissfully unaware that there are containers involved.
That said, maybe I want to know about the container. My software may depend on specific app server settings, file system directories, or running processes. During live debugging, I may like knowing I can tunnel into the container and troubleshoot in sophisticated ways.
Cloud Run lets you choose how much you want to care about the container image and running container itself. That’s a flexibility that’s appealing.
4. It supports advanced use cases
Cloud Run is great for lots of scenarios. Do server-side streaming with gRPC. Build or migrate web apps or APIs that take advantage of our new API Gateway. Coordinate apps in Cloud Run with other serverless compute using the new Cloud Workflows. Trigger your Cloud Run apps based on events occurring anywhere within Google Cloud. Host existing apps that need a graceful shutdown before scaling to zero. Allocate more horsepower to new or existing apps by assigning up to 4 CPUs and 4GB of RAM, and defining concurrency settings. Decide if your app should always have an idle instance (no cold starts) and how many instances it should scale up to. Route traffic to a specific port that your app listens on, even if it’s not port 80.
If you use Cloud Run for Anthos (in GCP or on other infrastructure), you have access to underlying Kubernetes attributes. Create private services. Participate in the service mesh. Use secrets. Reference ConfigMaps. Turn on Workload Identity to secure access to GCP services. Even take advantage of GPUs in the cluster.
Cloud Run isn’t for every workload, of course. It’s not for background jobs. I wouldn’t run a persistent database. It’s ideal for web-based apps, new or old, that don’t store local state.
Give Cloud Run a look. It’s a fast-growing service, and it’s free to try out with our forever-free services on GCP. 2 million requests a month before we charge you anything! See if you agree that this is what the next generation of serverless compute should look like.