
Configurability matters. Whether it’s in our code editors, database engine, or compute runtimes, we want the option—even if we don’t regularly use it—to shape software to our needs. When it comes to using that software as a service, we also look for configurations related to quality attributes—think availability, resilience, security, and manageability.
For something like Kubernetes—a hyper-configurable platform on its own—you want a cloud service that makes this powerful software more resilient and cheaper to operate. This blog post focuses on configurability of each major Kubernetes service in the public cloud. I’ll make that judgement based on the provisioning options offered by each cloud.
Disclaimer: I work for Google Cloud, so obviously I’ll have some biases. That said, I’ve used AWS for over a decade, was an Azure MVP for years, and can be mostly fair when comparing products and services. Please call out any mistakes I make!
Google Kubernetes Engine (GKE)
GKE was the first Kubernetes service available in the public cloud. It’s got a lot of features to explore. Let’s check it out.
When creating a cluster, we’re immediately presented with two choices: standard cluster, or Autopilot cluster. The difference? A standard cluster gives the user full control of cluster configuration, and ownership of day-2 responsibilities like upgrades. An Autopilot cluster—which is still a GKE cluster—has a default configuration based on Google best practices, and all day-2 activities are managed by Google Cloud. This is ideal for developers who want the Kubernetes API but none of the management. For this evaluation, let’s consider the standard cluster type.
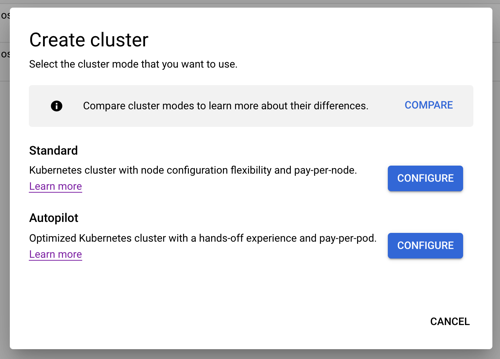
If the thought of all these configurations feels intimidating, you’ll like that GKE offers a “my first cluster” button which spins up a small instance with a default configuration. Also, this first “create cluster” tab has a “create” button at the bottom that provisions a regular (3-node) cluster without requiring you to enter or change any configuration values. Basically, you can get started with GKE in three clicks.

With that said, let’s look at the full set of provisioning configurations. On the left side of the “create a Kubernetes cluster” experience, you see the list of configuration categories.

How about we look at the specific configurations. On the cluster basics tab, we have seven configuration decisions to make (or keep, if you just want to accept default values). These configurations include:
1. Name. Naming is hard. These are 40 characters long, and permanent.
2. Location type. Where do you want your control plane and nodes? Zonal clusters only live in a chosen zone, while Regional clusters spread the control plane and workers across zones in a region.
3. Zone/Region. For zonal clusters, you pick a zone, for regional clusters, you pick a region.
4. Specify default node locations. Choose which zone(s) to deploy to.
5. Control plane version. GKE provisions and offers management of control plane AND worker nodes. Here, you choose whether you want to pick a static Kubernetes version and handle upgrades yourself, or a “release channel” where Google Cloud manages the upgrade cadence.
6. Release channel. If you chose release channel vs static, you get a configuration choice of which channel. Options include “rapid” (get Kubernetes versions right away), “regular” (get Kubernetes versions after a period of qualification), and “stable” (longer validation period).
7. Version. Whether choosing “static” or “release channel”, you configure which version you want to start with.
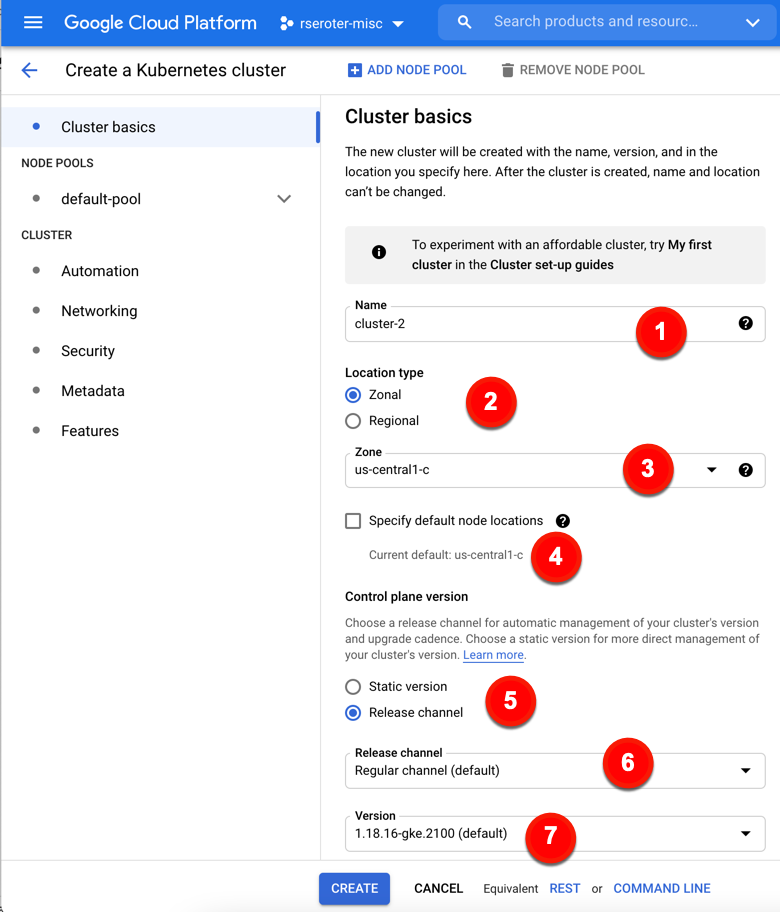
You see in the picture that I can click “Create” here and be done. But I want to explore all the possible configurations at my disposal with GKE.
My next (optional) set of configurations relates to node pools. A GKE cluster must have at least one node pool, which consists of an identical group of nodes. A cluster can have many node pools. You might want a separate pool for Windows nodes, or a bigger machine type, or faster storage.
In this batch of configurations, we have:
8. Add node pool. Here you have a choice on whether to stick with a single default node pool, or add others. You can add and remove node pools after cluster creation.
9. Name. More naming.
10. Number of nodes. By default there are three. Any fewer than three and you can have downtime during upgrades. Max of 1000 allowed here. Note that you get this number of nodes deployed PER location. 3 nodes x 3 locations = 9 nodes total.
11. Enable autoscaling. Cluster autoscaling is cool. It works on a per-node-pool basis.
12. Specify node locations. Where do you want the nodes? If you have a regional cluster, this is where you choose which AZs you want.
13. Enable auto-upgrade. It’s grayed-out below because this is automatically selected for any “release channel” clusters. GKE upgrades worker nodes automatically in that case. If you chose a static version, then you have the option of selecting auto-upgrades.
14. Enable auto-repair. If a worker node isn’t healthy, auto-repair kicks in to fix or replace the node. Like the previous configuration, this one is automatically applied for “release channel’ clusters.
15. Max surge. Surge updates is about letting you control how many nodes GKE can upgrade at a given time, and how disruptive an upgrade may be. The “max surge” configuration determines how many additional nodes GKE adds to the node pool during upgrades.
16. Max unavailable. This configuration refers to how many nodes can be simultaneously unavailable during an upgrade.

Once again, you could stop here, and build your cluster. I WANT MORE CONFIGURATION. Let’s keep going. What if I want to configure the nodes themselves? That’s the next available tab.
For node configurations, you can configure:
17. Image type. This refers to the base OS which includes Google’s container-optimized OS, Ubuntu, and Windows Server.
18. Machine family. GKE runs on virtual machines. Here is where you choose which type of underlying VM you want, including general purpose, compute-optimized, memory-optimized or GPU-based.
19. Series. Some machine families have sub-options for specific VMs.
20. Machine type. Here are the specific VM sizes you want, with combinations of CPU and memory.
21. Boot disk type. This is where you choose a standard or SSD persistent disk.
22. Boot disk size. Choose how big of a boot disk you want. Max size is 65,536 GB.
23. Enable customer-managed encryption for boot disk. You can encrypt the boot disk with your own key.
24. Local SSD disks. How many attached disks do you want? Enter here. Max of 24.
25. Enable preemptible nodes. Choose to use cheaper compute instances that only live for up to 24 hours.
26. Maximum pods per node. Limit how many pods you want on a given node, which has networking implications.
27. Network tags. This represents firewall rules applied to nodes.

Security. Let’s talk about it. You have a handful of possible configurations to secure your GKE node pools.
Node pool security configurations include:
28. Service account. By default, containers running on this VM call Google Cloud APIs using this account. You may want a unique service account, and/or least-privilege one.
29. Access scopes. Control the type of level of API access to grant the underlying VM.
30. Enable sandbox with gVisor. This isn’t enabled for the default node pool, but for others, you can choose the extra level of isolation for pods on the node.
31. Enable integrity monitoring. Part of the “Shielded node” functionality, this configuration lets you monitor and verify boot integrity.
32. Enable secure boot. Use this configuration setting for additional protection from boot-level and kernel-level malware.

Our last set of options for each node pool relates to metadata. Specifically:
33. Kubernetes labels. These get applied to every node in the pool and can be used with selectors to place pods.
34. Node taints. These also apply to every node in the pool and help control what gets scheduled.
35. GCE instance metadata. This attaches info to the GCE instances

That’s the end of the node pool configurations. Now we have the option of cluster-wide configurations. First up are settings based on automation.
These cluster automation configurations include:
36. Enable Maintenance Window. If you want maintenance activities to happen during certain times or days, you can set up a schedule.
37. Maintenance exclusions. Define up to three windows where updates won’t happen.
38. Enable Notifications. GKE can publish upgrade notifications to a Google Cloud Pub/Sub topic.
39. Enable Vertical Pod Autoscaling. With this configured, your cluster will rightsize CPU and memory based on usage.
40. Enable node auto-provisioning. GKE can create/manage entire node pools on your behalf versus just nodes within a pool.
41. Autoscaling profile. Choose when to remove underutilized nodes.

The next set of cluster-level options refer to Networking. Those configurations include:
42. Network. Choose the network the GKE cluster is a member of.
43. Node subnet. Apply a subnet.
44. Public cluster / Private cluster. If you want only private IPs for your cluster, choose a private cluster.
45. Enable VPC-native traffic routing. Applies alias IP for more secure integration with Google Cloud services.
46. Automatically create secondary ranges. Disabled here because my chosen subnet doesn’t have available user-managed secondary ranges. If it did, I’d have a choice of letting GKE manage those ranges.
47. Port address range. Pods in the clusters are assigned IPs from this range.
48. Maximum pods per node. Has network implications.
49. Service address range. Any cluster services will be assigned an IP address from this range.
50. Enable intranode visibility. Pod-to-pod traffic because visible to the GCP networking fabric so that you could do flow logging, and more.
51. Enable NodeLocal DNSCache. Improve perf by running a DNS caching agent on nodes.
52. Enable HTTP load balancing. This installs a controller that applies configs to the Google Cloud Load Balancer.
53. Enable subsetting for L4 internal load balancers. Internal LBs use a subset of nodes as backends to improve perf.
54. Enable control plane authorized networks. Block untrusted, non-GCP sources from accessing the Kubernetes master.
55. Enable Kubernetes Network Policy. This API lets you define which pods can access each other.

GKE also offers a lot of (optional) cluster-level security options.
The cluster security configurations include:
56. Enable Binary Authorization. If you want a secure software supply chain, you might want to apply this configuration and ensure that only trusted images get deployed to GKE.
57. Enable Shielded GKE Nodes. This provides cryptographic identity for nodes joining a cluster.
58. Enable Confidential GKE Nodes. Encrypt the memory of your running nodes.
59. Enable Application-level Secrets Encryption. Protect secrets in etcd using a key stored in Cloud KMS.
60. Enable Workload Identity. Map Kubernetes service accounts to IAM accounts so that your workload doesn’t need to store creds. I wrote about it recently.
61. Enable Google Groups for RBAC. Grant roles to members of a Workspace group.
62. Enable legacy authorization. Prevents full Kubernetes RBAC from being used in cluster.
63. Enable basic authentication. This is a deprecated way to authenticate to a cluster. Don’t use it.
64. Issue a client certificate. Skip this too. This creates a specific cert for cluster access, and doesn’t automatically rotate.

It’s useful to have cluster metadata so that you can tag clusters by environment, and more.
The couple of metadata configurations are:
65. Description. Free text box to describe your cluster.
66. Labels. Add individual labels that can help you categorize.

We made it to the end! The last set of GKE configurations relate to features that you want to add to the cluster.
These feature-based configurations include:
67. Enable Cloud Run for Anthos. Throw Knative into your GKE cluster.
68. Enable Cloud Operations for GKE. A no-brainer. Send logs and metrics to the Cloud Ops service in Google Cloud.
69. Select logging and monitoring type. If you select #68, you can choose the level of logging (e.g. workload logging, system logging).
70. Enable Cloud TPU. Great for ML use cases within the cluster.
71. Enable Kubernetes alpha features in this cluster. Enabled if you are NOT using release channels. These are short lived clusters with everything new lit up.
72. Enable GKE usage metering. See usage broken down by namespace and label. Good for chargebacks.
73. Enable Istio. Throw Istio into your cluster. Lots of folks do it!
74. Enable Application Manager. Helps you do some GitOps style deployments.
75. Enable Compute Engine Persistent Disk CSI Driver. This is now the standard way to get volume claims for persistent storage.
76. Enable Config Connector. If you have Workload Identity enabled, you can set this configuration. It adds custom resources and controllers to your cluster that let you create and manage 60+ Google Cloud services as if they were Kubernetes resources.

FINAL TALLY. Getting started: 3 clicks. Total configurations available: 76.
Azure Kubernetes Service (AKS)
Let’s turn our attention to Microsoft Azure. They’ve had a Kubernetes service for quite a while.
When creating an AKS cluster, I’m presented with an initial set of cluster properties. Two of them (resource group, and cluster name) are required before I can “review and create” and then create the cluster. Still, it’s a simple way to get started with just five clicks.
The first tab of the provisioning experience focuses on “basic” configurations.
These configurations include:
1. Subscription. Set which of your Azure subscriptions to use for this cluster.
2. Resource group. Decide which existing (or create a new) resource group to associate with this cluster.
3. Kubernetes cluster name. Give your cluster a name.
4. Region. Choose where in the world you want you cluster.
5. Availability zones. For regions with availability zones, you can choose how to stripe the cluster across those.
6. Kubernetes version. Pick a specific version of Kubernetes for the AKS cluster.
7. Node size. Here you choose the VM family and instance type for your cluster.
8. Node count. Pick how many nodes make up the primary node pool.

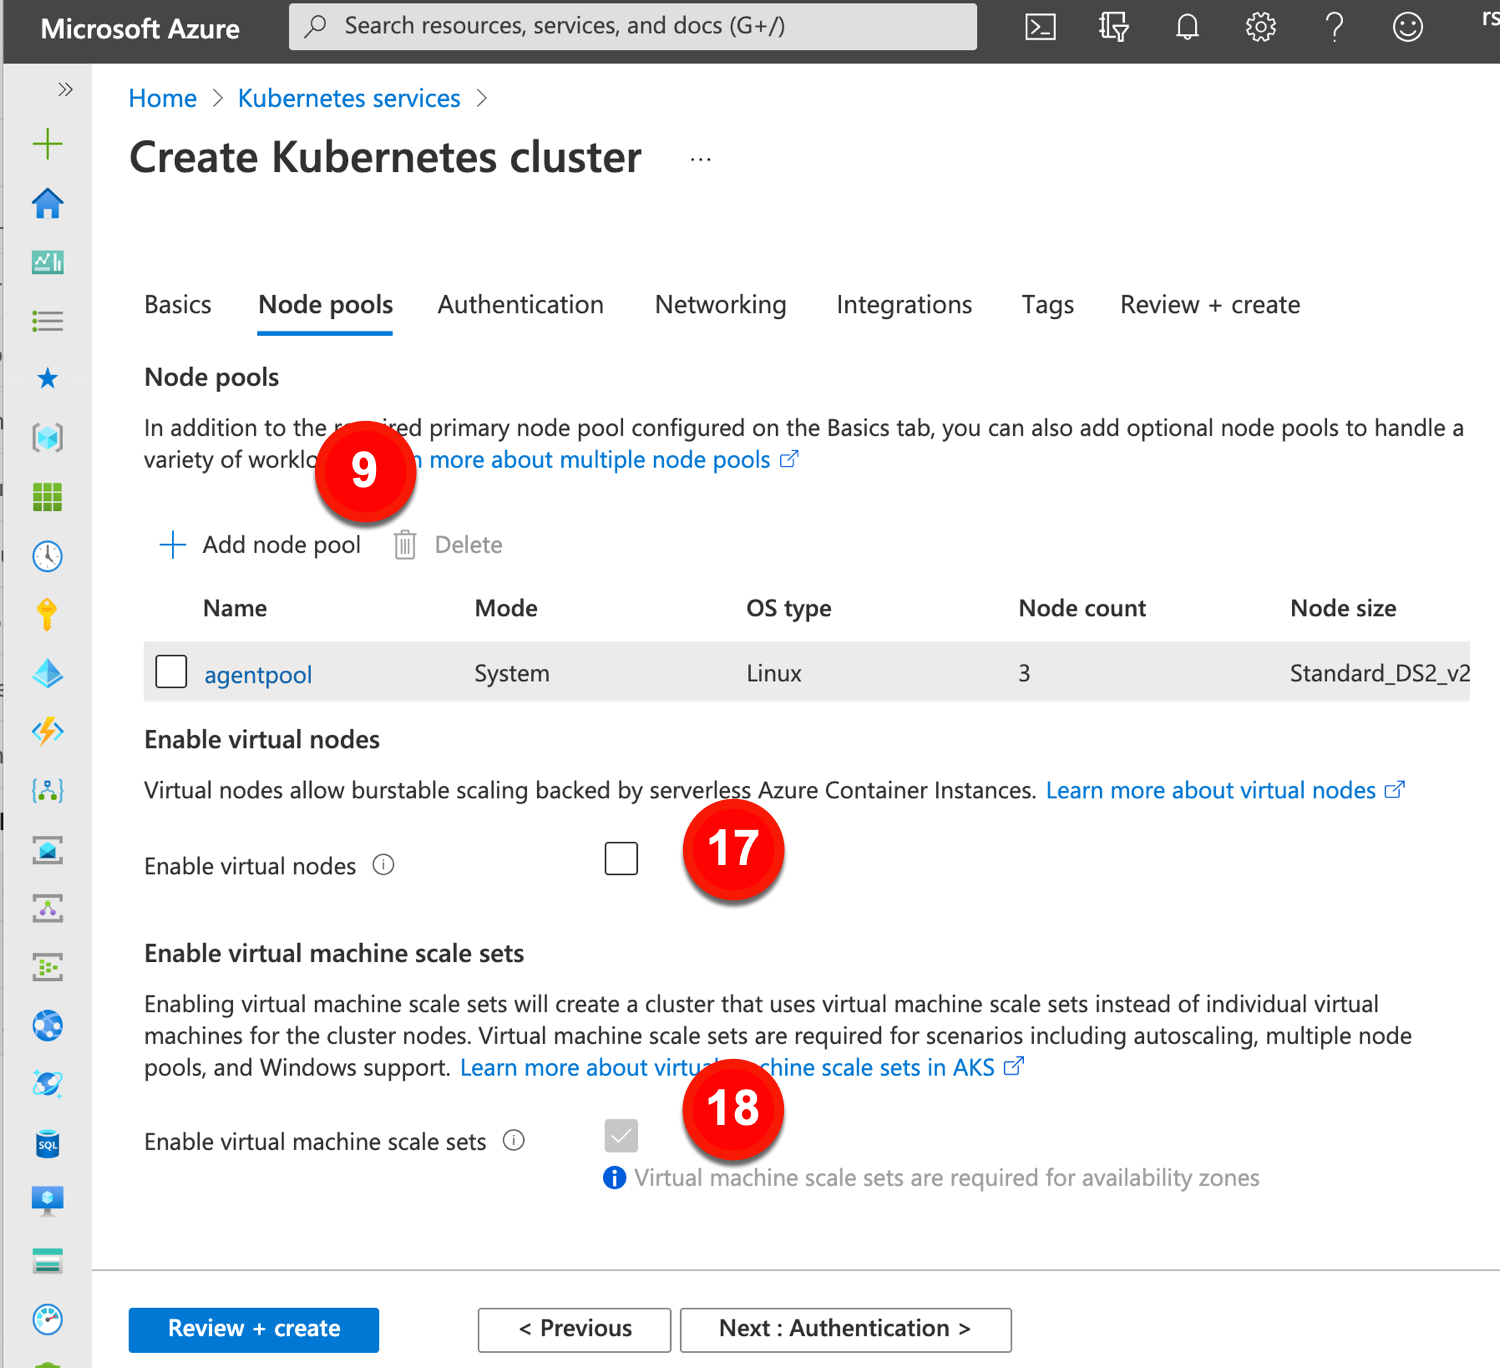
Now let’s explore the options for a given node pool. AKS offers a handful of settings, including ones that fly out into another tab. These include:
9. Add node pool. You can stick with the default node pool, or add more.
10. Node pool name. Give each node pool a unique name.
11. Mode. A “system” node pool is meant for running system pods. This is what the default node pool will always be set to. User node pools make sense for your workloads.
12. OS type. Choose Linux or Windows, although system node pools must be Linux.
13. Availability zones. Select the AZs for this particular node pool. You can change from the default set on the “basic” tab.
14. Node size. Keep or change the default VM type for the cluster.
15. Node count. Choose how many nodes to have in this pool.
16. Max pods per node. Impacts network setup (e.g. how many IP addresses are needed for each pool).
17. Enable virtual nodes. For bursty scenarios, this AKS features deploys containers to nodes backed by their “serverless” Azure Container Instances platform.
18. Enable virtual machine scale sets. Chosen by default if you use multiple AZs for a cluster. Plays a part in how AKS autoscales.

The next set of cluster-wide configurations for AKS relate to security.
These configurations include:
19. Authentication method. This determines how an AKS cluster interacts with other Azure sources like load balancers and container registries. The user has two choices here.
20. Role-based access control. This enables RBAC in the cluster.
21. AKS-managed Azure Active Directory. This configures Kubernetes RBAC using Azure AD group membership.
22. Encryption type. Cluster disks are encrypted at rest by default with Microsoft-managed keys. You can keep that setting, or change to a customer-managed key.

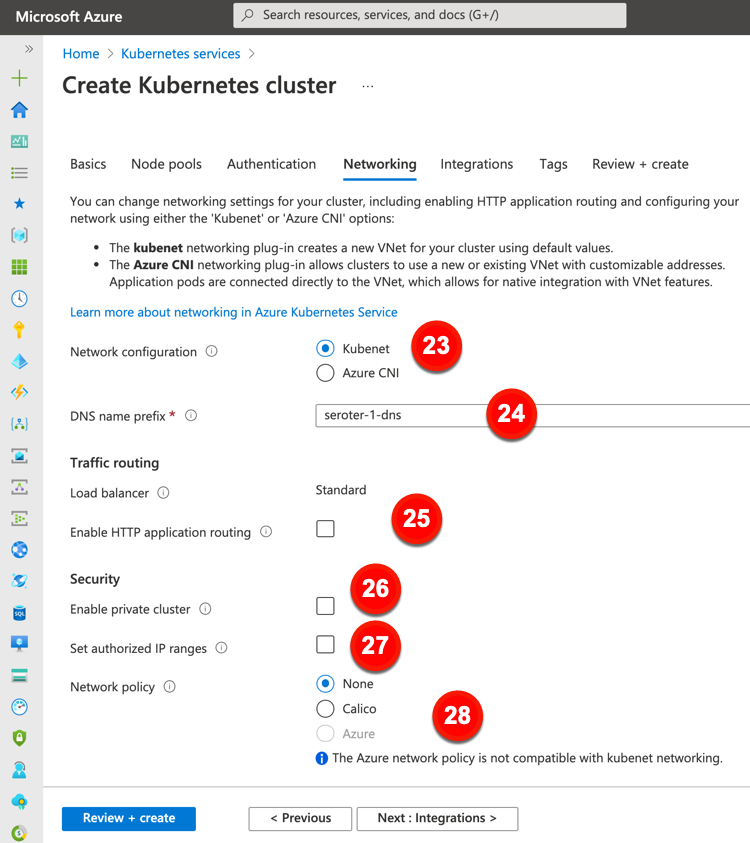
Now, we’ll take a gander at the network-related configurations offered by Azure. These configurations include:
23. Network configuration. The default option here is a virtual network and subnet created for you. You can also use CNI to get a new or existing virtual network/subnet with user-defined address ranges.
24. DNS name prefix. This is the prefix used with the hosted API server’s FQDDN.
25. Enable HTTP application routing. The previous “Load balancer” configuration is fixed for every cluster created in the Azure Portal. This setting is about creating publicly accessible DNS names for app endpoints.
26. Enable private cluster. This ensures that network traffic between the API server and node pools remains on a private network.
27. Set authorized IP ranges. Choose the IP ranges that can access the API server.
28. Network policy. Define rules for ingress and egress traffic between pods in a cluster. You can choose none, Calico, or Azure’s network policies.
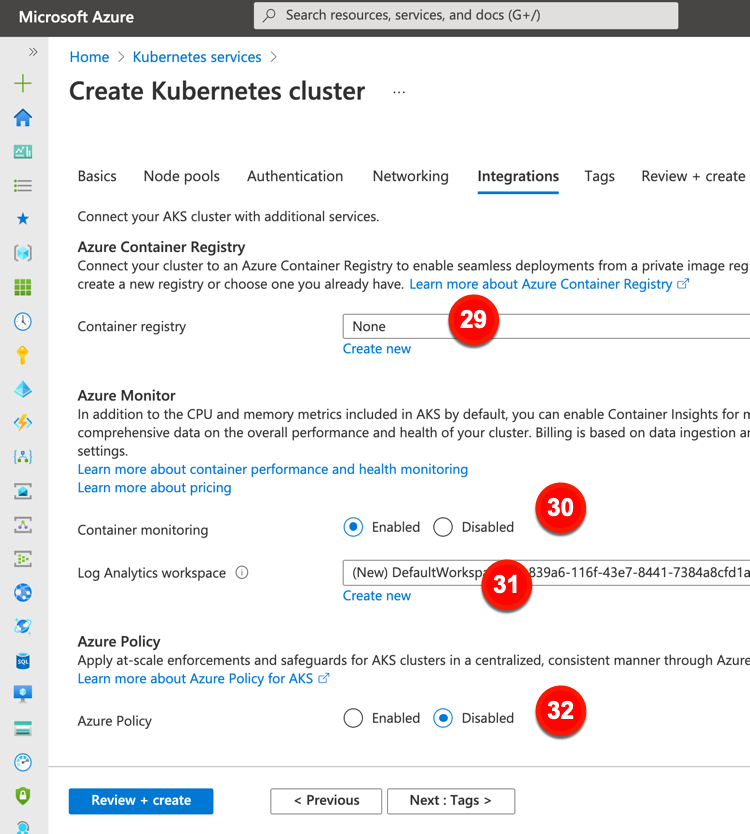
The final major configuration category is “integrations.” This offers a few options to connect AKS clusters to other Azure services.
These “integration” configurations include:
29. Container registry. Point to, or create, an Azure Container Registry instance.
30. Container monitoring. Decide whether you want workload metrics fed to Azure’s analytics suite.
31. Log Analytics workspace. Create a new one, or point to an existing one, to store monitoring data.
32. Azure Policy. Choose to apply an admission controller (via Gatekeeper) to enforce policies in the cluster.
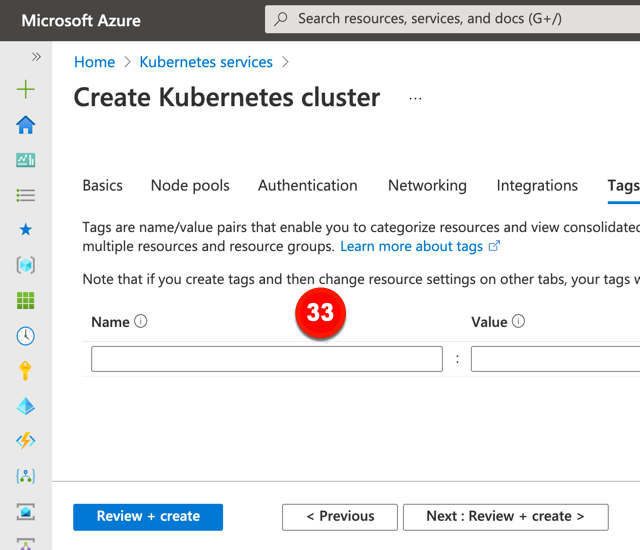
The last tab for AKS configuration relates to tagging. This can be useful for grouping and categorizing resources for chargebacks.
FINAL TALLY. Getting started: 5 clicks. Total configurations available: 33.
Amazon Elastic Kubernetes Service (EKS)
AWS is a go-to for many folks running Kubernetes, and they shipped a managed service for Kubernetes a few years back. EKS looks different from GKE or AKS. The provisioning experience is fairly simplistic, and doesn’t provision the worker nodes. That’s something you do yourself later, and then you see a series of configurations for node pools after you provision them. It also offers post-provisioning options for installing things like autoscalers, versus making that part of the provisioning.
Getting started with EKS means entering some basic info about your Kubernetes cluster.
These configurations include:
1. Name. Provide a unique name for your cluster.
2. Kubernetes version. Pick a specific version of Kubernetes for your cluster.
3. Cluster Service Role. This is the AWS IAM role that lets the Kubernetes control plan manage related resources (e.g. load balancers).
4. Secrets encryption. This gives you a way to encrypt the secrets in the cluster.
5. Tags. Add up to 50 tags for the cluster.

After these basic settings, we click through some networking settings for the cluster. Note that EKS doesn’t provision the node pools (workers) themselves, so all these settings are cluster related.
The networking configurations include:
6. Select VPC. Choose which VPC to use for the cluster. This is not optional.
7. Select subnets. Choose the VPC subnet for your cluster. Also, not optional.
8. Security groups. Choose one or more security groups that apply to worker node subnets.
9. Configure Kubernetes Service IP address range. Set the range that cluster services use for IPv4 addresses.
10. Cluster endpoint access. Decide if you want a public cluster endpoint accessible outside the VPC (including worker access), a mix of public and private, or private only.
11. Advanced settings. Here’s where you set source IPs for the public access endpoint.
12. Amazon VPC CNI version. Choose which version of the add-on you want for CNI.

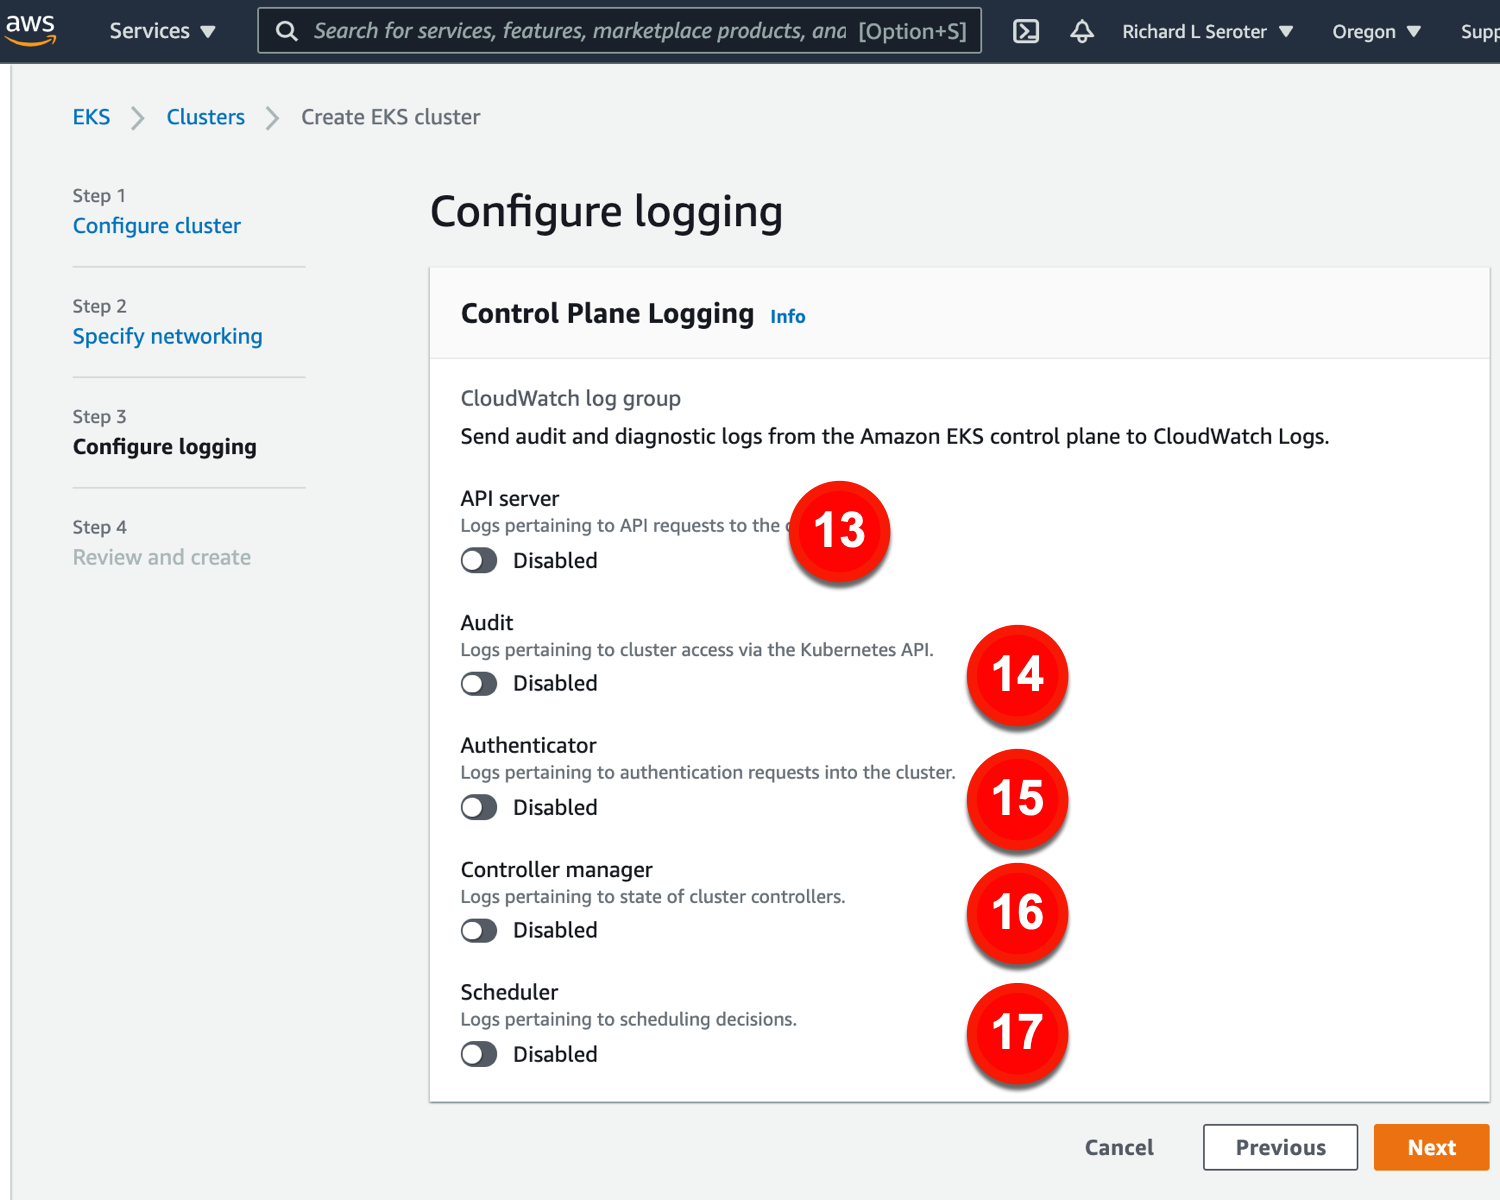
The last major configuration view for provisioning a cluster relates to logging.
The logging configurations include:
13. API server. Log info for API requests.
14. Audit. Grab logs about cluster access.
15. Authenticator. Get lots for authentication requests.
16. Controller manager. Store logs for cluster controllers.
17. Scheduler. Get logs for scheduling decisions.
We have 17 configurations available in the provisioning experience. I really wanted to stop here (versus being forced to create and pay for a cluster to access the other configuration settings), but to be fair, let’s look at post-provisioning configurations of EKS, too.
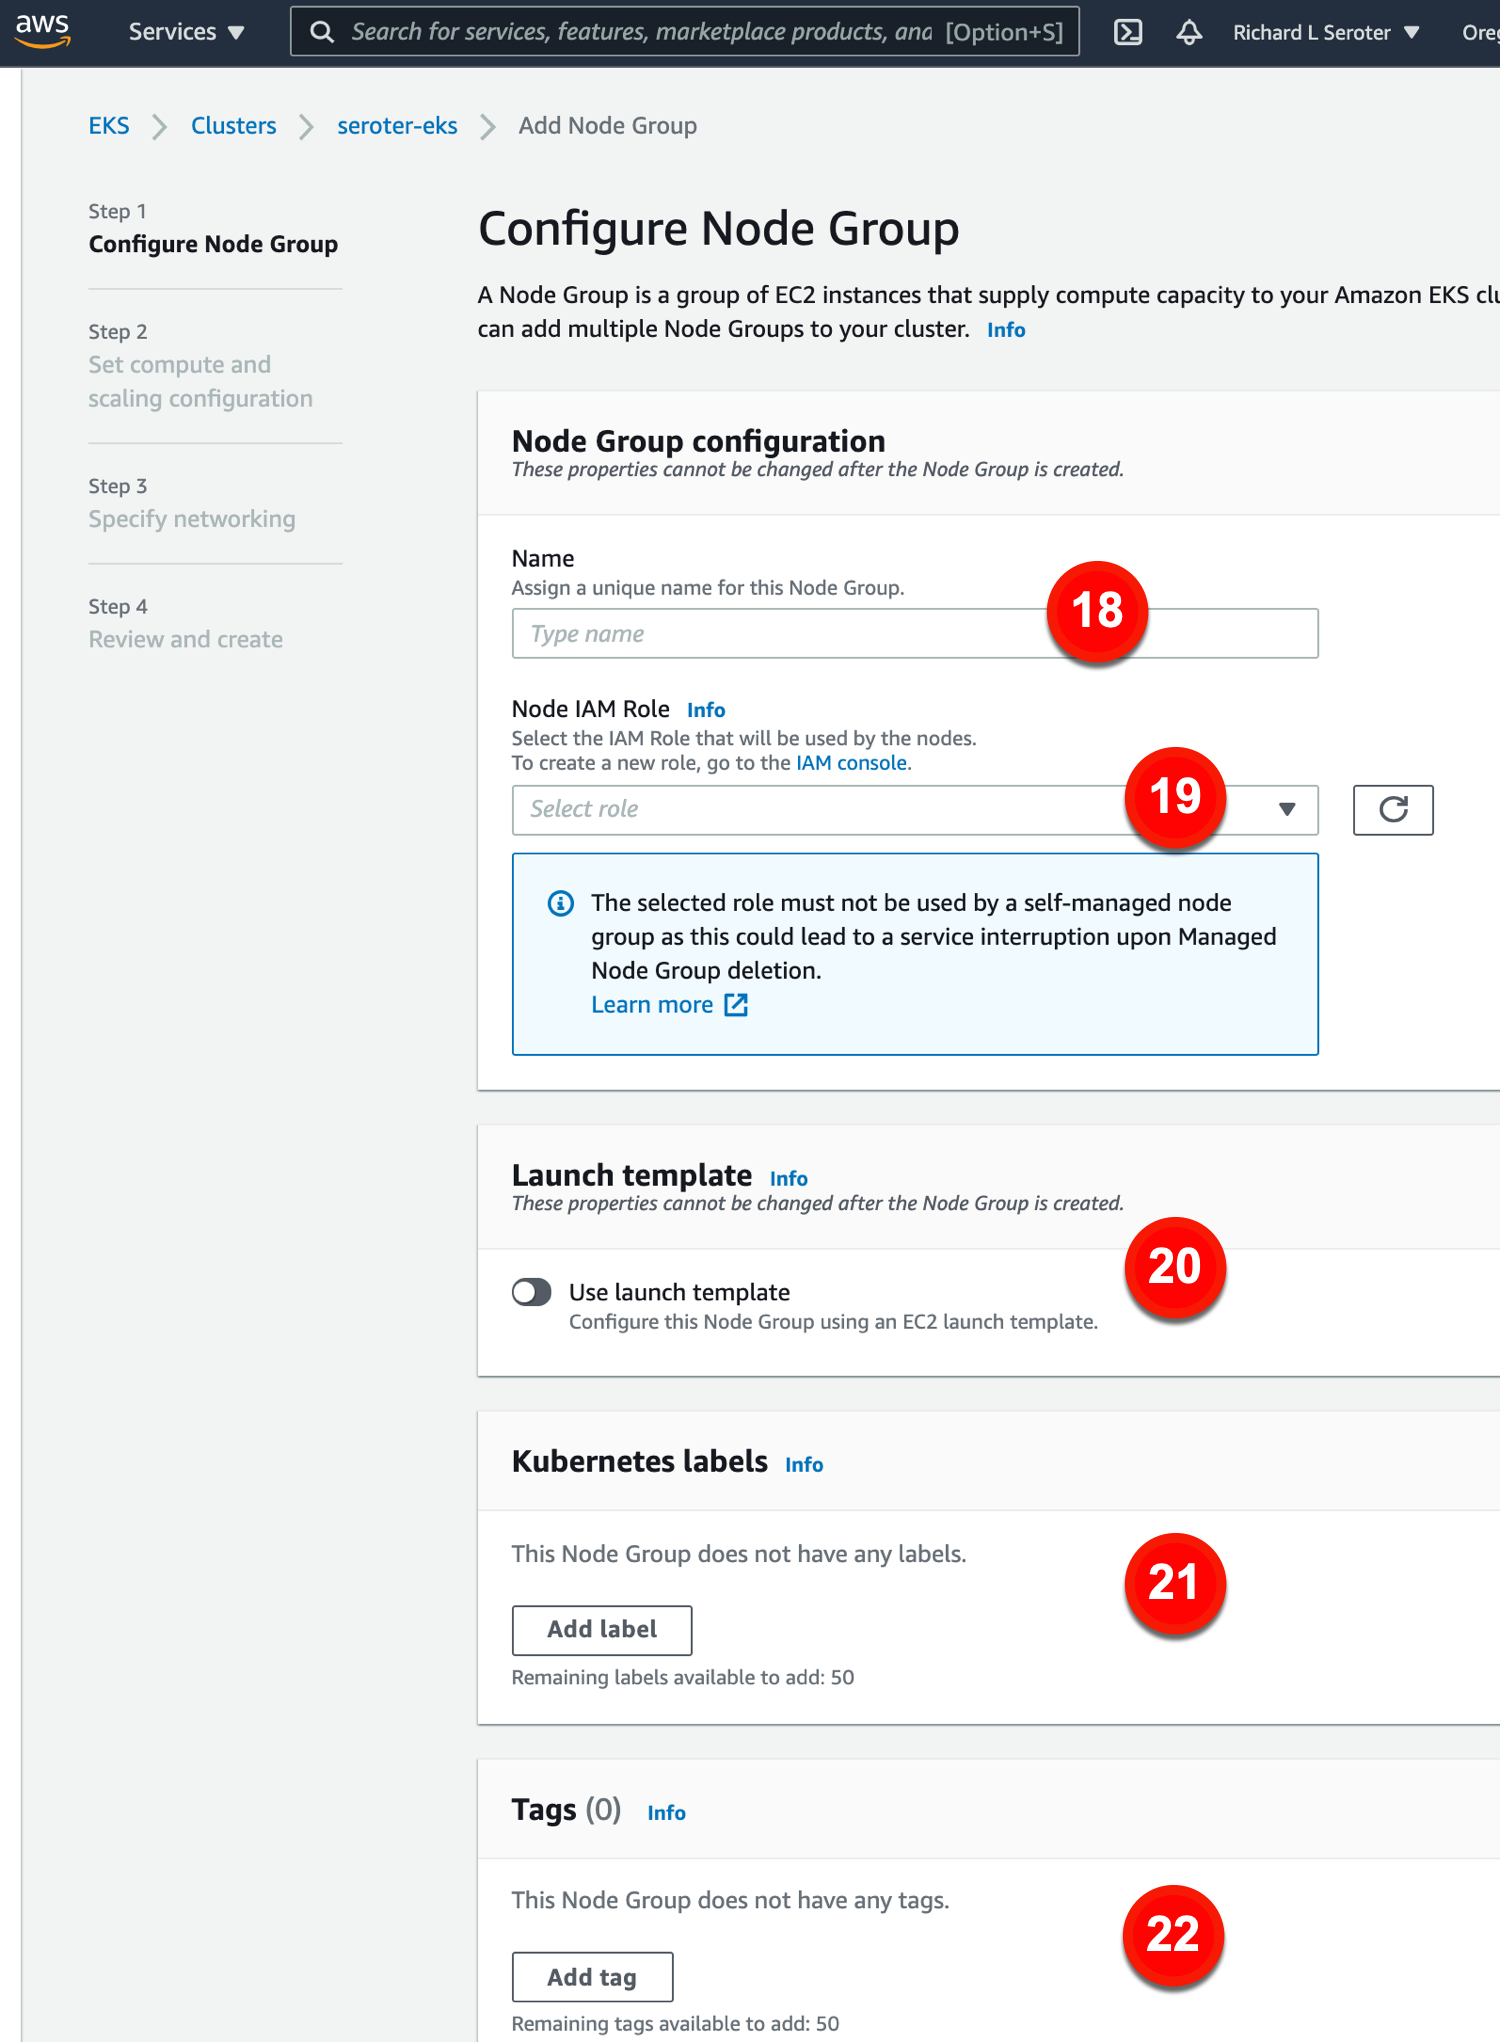
After creating an EKS cluster, we see that new configurations become available. Specifically, configurations for a given node pool.
The node group configurations include:
18. Name. This is the name for the node group.
19. Node IAM role. This is the role used by the nodes to access AWS services. If you don’t have a valid role, you need to create one here.
20. Use launch template. If you want a specific launch template, you can choose that here.
21. Kubernetes labels. Apply labels to the node group.
22. Tags. Add AWS tags to the node group.
Next we set up compute and scaling configs. These configs include:
23. AMI type. Pick the machine image you want for your nodes.
24. Capacity type. Choose on-demand or spot instances.
25. Instance type. Choose among dozens of VM instance types to host the nodes.
26. Disk size. Pick the size of attached EBS volumes.
27. Minimum size. Set the smallest size a cluster can be.
28. Maximum size. Set the largest size a cluster can be.
29. Desired size. Set the desired number of nodes to start with.

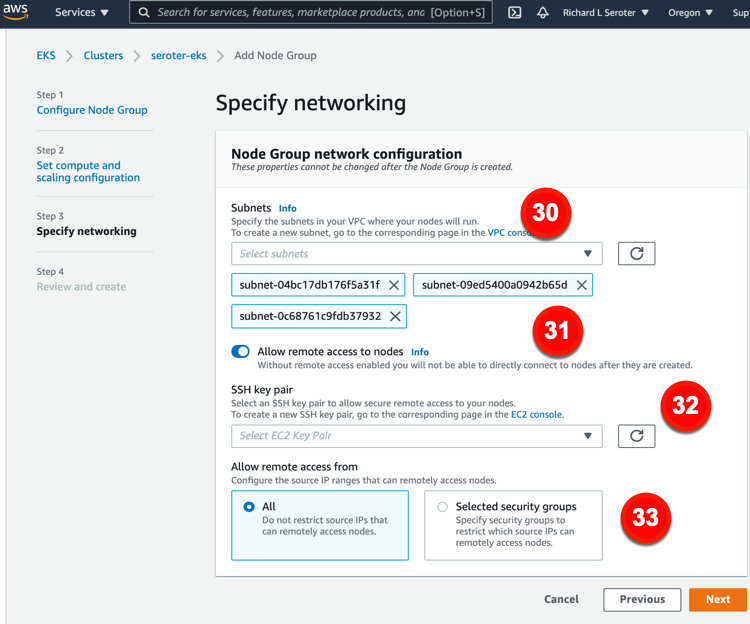
Our final set of node group settings relate to networking. The configurations you have access to here include:
30. Subnets. Choose which subnets for your nodes.
31. Allow remote access to nodes. This ensures you can access nodes after creation.
32. SSH keypair. Choose (or create) a key pair for remote access to nodes.
33. Allow remote access from. This lets you restrict access to source IP ranges.
FINAL TALLY. Getting started: 7 clicks (just cluster control plane, not nodes). Total configurations available: 33.
Wrap Up
GKE does indeed stand out here. GKE has fewest steps required to get a cluster up and running. If I want a full suite of configuration options, GKE has the most. If I want a fully managed cluster without any day-2 activities, GKE is the only one that has that, via GKE Autopilot.
Does it matter that GKE is the most configurable Kubernetes service in the public cloud? I think it does. Both AKS and EKS have a fine set of configurations. But comparing AKS or EKS to GKE, it’s clear how much more control GKE offers for cluster sizing, scaling, security, and automation. While I might not set most of these configurations on a regular basis, I can shape the platform to a wide variety of workloads and use cases when I need to. That ensures that Kubernetes can run a wide variety of things, and I’m not stuck using specialized platforms for each workload.
As you look to bring your Kubernetes platform to the cloud, keep an eye on the quality attributes you need, and who can satisfy them the best!

Leave a comment