Category: Messaging

  • Code was the least interesting part of my multi-agent app, and here’s what that means to me

    Code was the least interesting part of my multi-agent app, and here’s what that means to me

    At least 80% of the code I’ve ever written could have been written by AI, probably at higher quality. I’ve been “in tech” for twenty seven years and spent seven of those as a software developer. Even when I stopped getting paid for it, I never stopped coding. But little of it’s been truly novel; most of my code has been straightforward database access code, web APIs, presentation logic, and a handful of reasonably-complex systems. No doubt, many of you have done truly sophisticated things in code—compilers, performance-tuned algorithms, language frameworks—and AI isn’t replacing that any time soon. But I’d bet that much of the interesting tech work is moving away from raw code, and towards higher-order architecture.

    I wanted to build out an agentic solution, and I used AI to generate 90% of the code. That code isn’t where the unique value was at. None of it was particularly noteworthy. You can find the whole app here. The most interesting work related to architectural decisions. Here are eight choices I had to make, and I suspect you’ll have fun wrestling with the same ones.

    Choice #1 – What am I trying to accomplish and do agents make sense?

    My goal was to build an app that could take in a customer’s roofing needs, create a service appointment, and generate a personalized invoice for the work. I’m cheating here, since this exercise started as “Richard wants to learn some agent tech.” So I did start with the end in mind. Judge me accordingly.

    But in every legit situation, we start by evaluating the user need. What functional requirements do I need to satisfy? What performance or quality attributes are necessary? Can I solve this with a simple service, or modular monolith? Is the user flow deterministic or variable?

    This scenario could certainly be solved by a simple data collection form and PDF generator. What requirements might make an agentic architecture the truly correct choice?

    • Data collection from the user requires image, video, and audio input to best scope the services and pricing we should offer.
    • The scheduling or invoicing process requires a dynamic workflow based on a variety of factors, and hard-coding all the conditions would be tricky.

    Either way, this is always a critical choice before you write a single line of code.

    Choice #2 – What data or services are available to work with?

    Before we build anything new, what do we already have at our disposal?

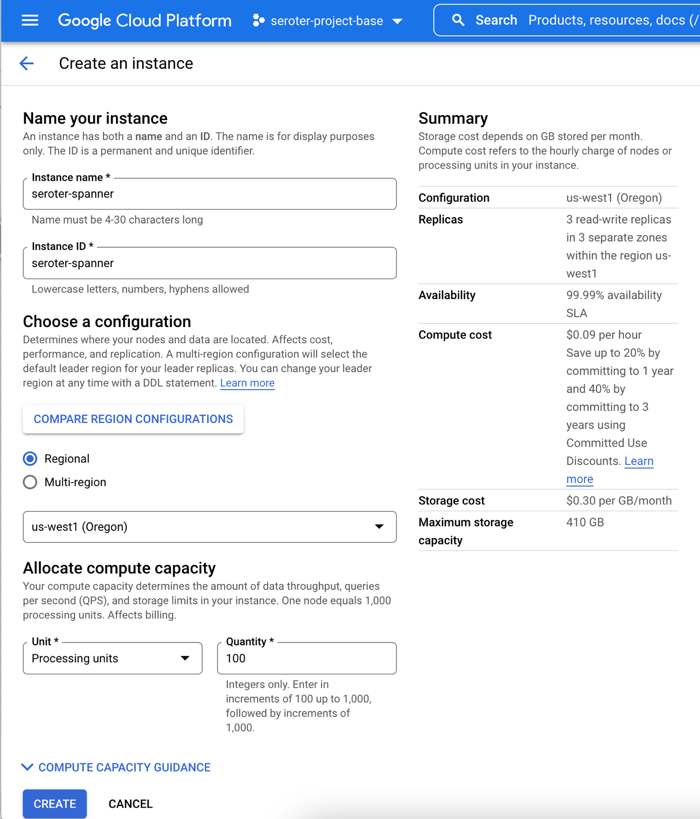
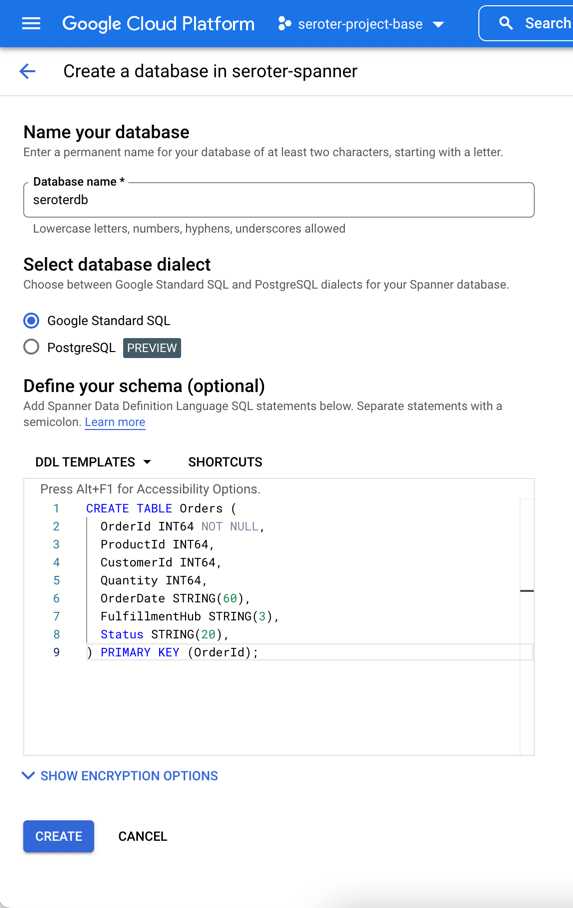
    In my case, let’s assume I already have an appointments web API for retrieving available appointment times and making new appointments. I’ve also got an existing database that stores promotional offers that I want to conditionally add to my customer invoice. And I’ve got an existing Cloud Storage bucket where I store customer invoice PDFs.

    It’s easy to just jump into the application build, but pause for a few moments and take stock of your existing inventory and what you can build around.

    Choice #3 – What (agent) framework should I use and why?

    So. Many. Choices.

    There’s AI app frameworks like Genkit, LlamaIndex, and Spring AI. There are agent frameworks like LangChain, LangGraph, Autogen, CrewAI, and more. Google recently shipped the Agent Development Kit, available for Python and Java developers. An agent built with something like ADK is basically made up of three things: a model, instructions, and tools. ADK adds sweeteners that give you a lot of flexibility. Things I like about ADK:

    And look, I like it because my employer invests in it. So, that’s a big factor. I also wanted to build agents in both Python and Java, and this made ADK a great choice.

    Don’t get married to any framework, but learn the fundamentals of tool use, memory management, and agent patterns.

    Choice #4 – How should I use tools in the appointment agent?

    I suspect that tool selection will be a fascinating area for many builders in the years ahead. In this scenario, I had some decisions to make.

    I don’t want to book any roof repairs on rainy days. But where can I get the weather forecast from? I chose the built-in Google Search tool instead of trying to find some weather API on the internet.

    weather_agent = Agent(
        name="weather_agent",
        model="gemini-2.0-flash",
        description=(
            "Agent answers questions about the current and future weather in any city"
        ),
        instruction=(
            "You are an agent for Seroter Roofing. You can answer user questions about the weather in their city right now or in the near future"
    ),
        tools=[google_search],
    )
    

    For interacting with my existing appointments API, what’s the right tool choice? Using the OpenAPI tool baked into the ADK, I can just hand the agent an OpenAPI spec and it’ll figure out the right functions to call. For retrieving open appointment times, that’s a straightforward choice.

    openapi_spec = openapi_spec_template.replace("{API_BASE_URL}", config.API_BASE_URL)
    
    toolset = OpenAPIToolset(spec_str=openapi_spec, spec_str_type="json")
    api_tool_get_appointments = toolset.get_tool("get_available_appointments")
    

    But what about booking appointments? While that’s also an API operation, I want to piggyback a successful booking with a message to Google Cloud Pub/Sub that downstream subscribers can read from. That’s not part of the appointments API (nor should it be). Instead, I think a function tool makes sense here, where I manually invoke the appointments API, and then make as subsequent call to Pub/Sub.

    def add_appointment(customer: str, slotid: str, address: str, services: List[str], tool_context: ToolContext) -> dict:
        """Adds a roofing appointment by calling the booking API and logs the conversation history.
    
        This function serves as a tool for the agent. It orchestrates the booking process by:
        1. Calling the internal `_book_appointment_api_call` function to make the actual API request.
        2. If the booking is successful, it retrieves the conversation history from the
           `tool_context` and logs it to a Pub/Sub topic via `_log_history_to_pubsub`.
    
        Args:
            customer: The name of the customer.
            slotid: The ID of the appointment slot to book.
            address: The full address for the appointment.
            services: A list of services to be booked for the appointment.
            tool_context: The context provided by the ADK, containing session information.
    
        Returns:
            A dictionary containing the booking confirmation details from the API,
            or an error dictionary if the booking failed.
        """
        booking_response = _book_appointment_api_call(customer, slotid, address, services)
    
        if "error" not in booking_response:
            history_list: List[Event] = tool_context._invocation_context.session.events # type: ignore
            _log_history_to_pubsub(history_list)
        
        return booking_response
    

    Choice #5 – When/how do I separate agent boundaries?

    There’s a good chance that an agentic app has more than one agent. Stuffing everything into a single agent with a complex prompt and a dozen tools seems … suboptimal.

    But multi-agent doesn’t have to mean you’re sliding into a distributed system. You can include multiple agents in the same process space and deployment artifact. The Sequential Agent pattern in the ADK makes it simple to define distinct agents that run one and at time. So it seems wise to think of service boundaries for your agents, and only make a hard split when the context changes.

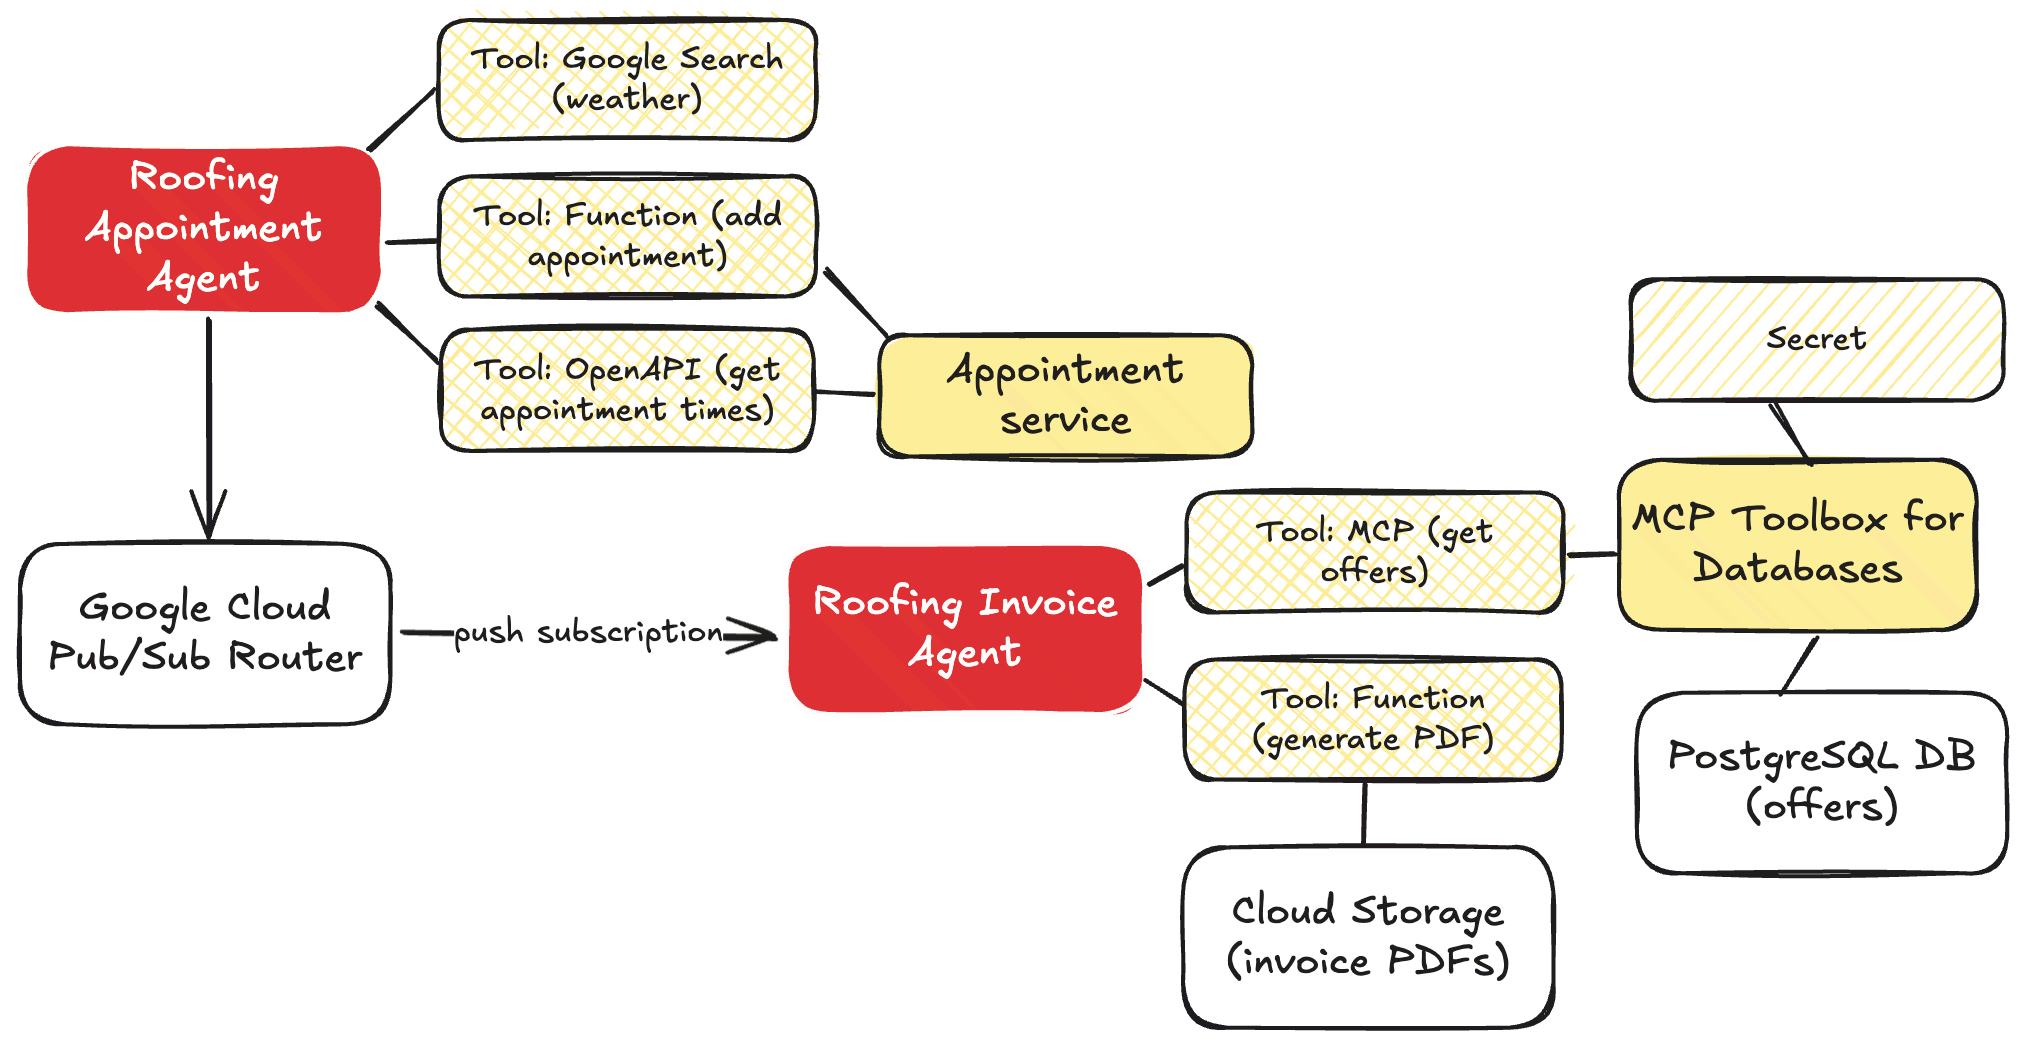
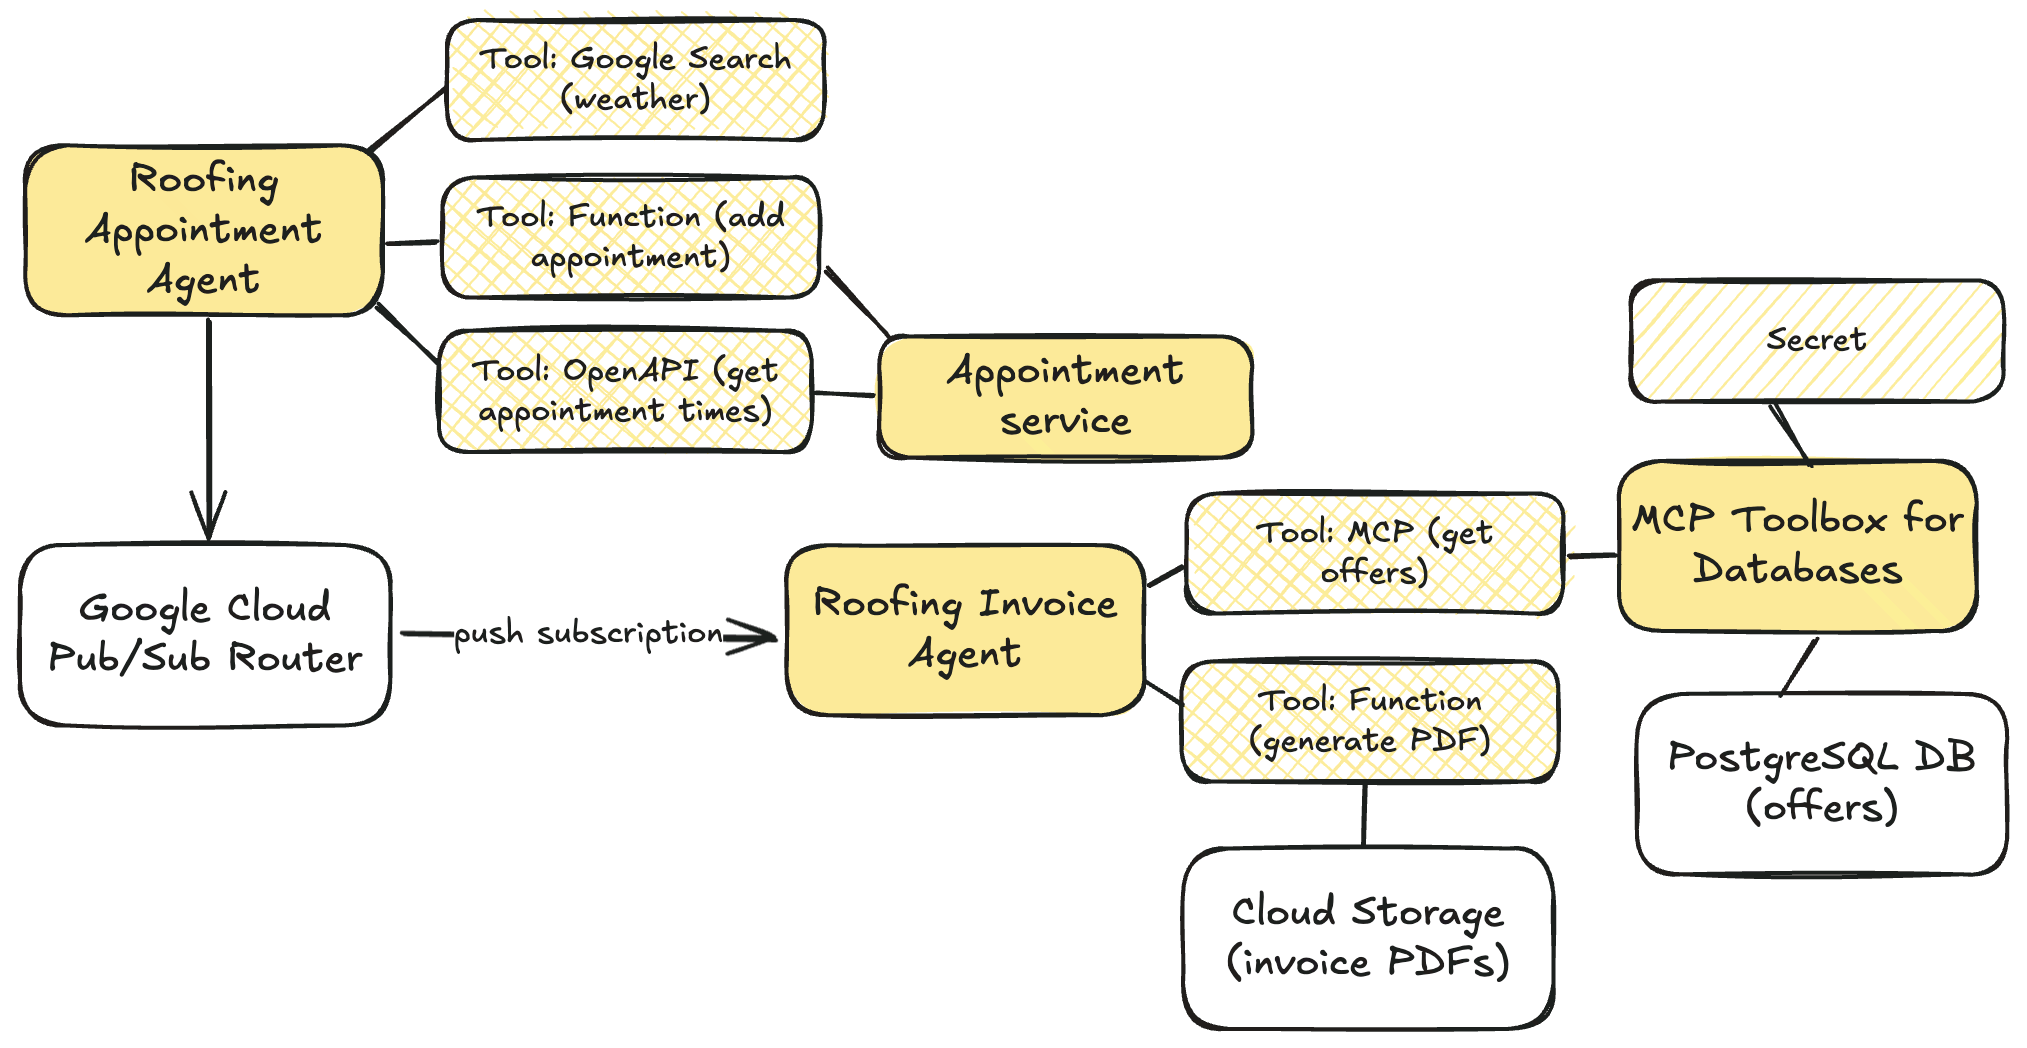
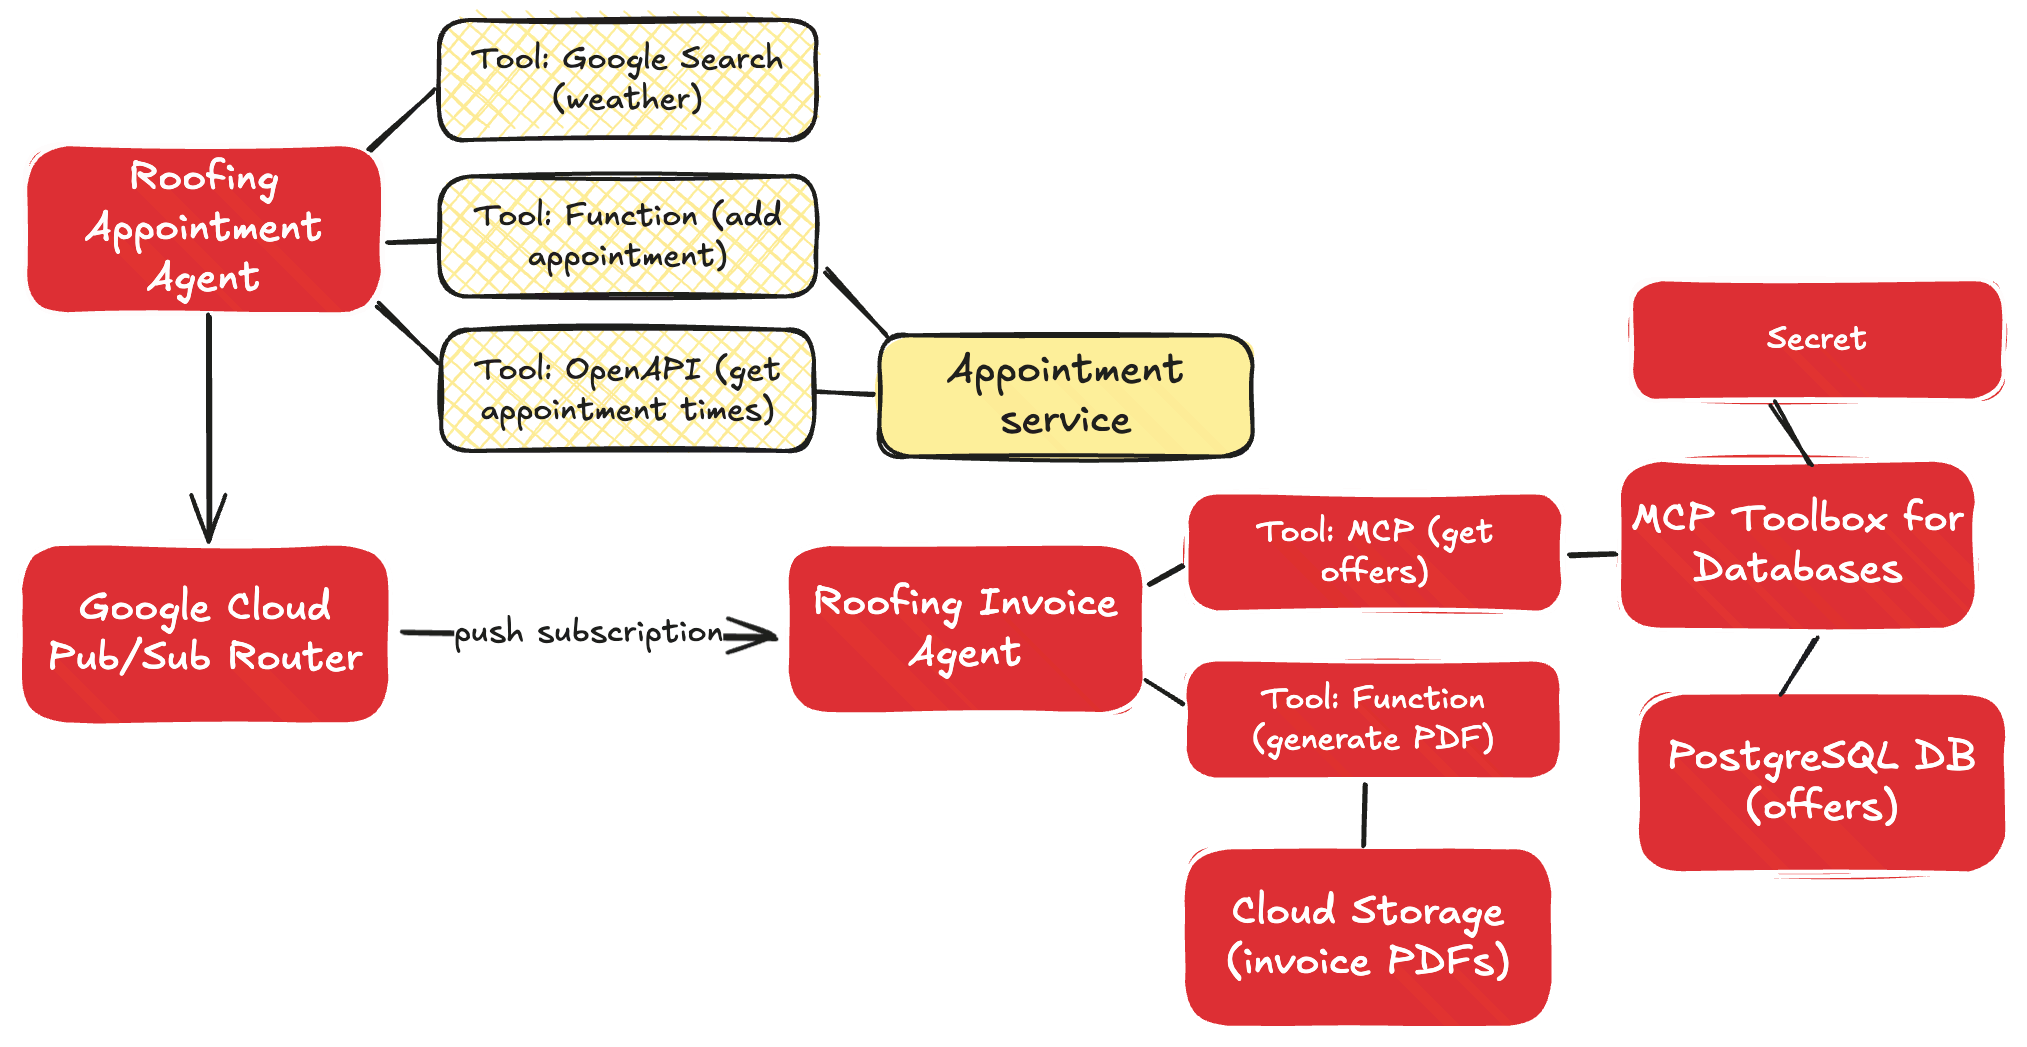
    For me, that meant one set of agents handling all the appointment stuff, and another distinct set of agents that worked on invoices. These don’t depend on each other, and should run separately. Both sets of agents use the Sequential Agent pattern.

    The appointment agent has sub-agents to look up the weather, and uses that agent as a tool within the primary root agent.

    The invoicing agent is more complex with sub-agents to build up HTML out of the chat history, another agent that looks up the best promotional offers to attach to the invoice, and a final agent that generates a PDF.

    private SequentialAgent createInvoiceAgent(
                PdfTool pdfTool,
                String mcpServerUrl,
                Resource htmlGeneratorPrompt,
                Resource bestOfferPrompt,
                Resource pdfWriterPrompt
        ) {
            String modelName = properties.getAgent().getModelName();
    
            LlmAgent htmlGeneratorAgent = LlmAgent.builder().model(modelName).name("htmlGeneratorAgent").description("Generates an HTML invoice from conversation data.").instruction(resourceToString(htmlGeneratorPrompt)).outputKey("invoicehtml").build();
    
            List<BaseTool> mcpTools = loadMcpTools(mcpServerUrl);
    
            LlmAgent bestOfferAgent = LlmAgent.builder().model(modelName).name("bestOfferAgent").description("Applies the best offers available to the invoice").instruction(resourceToString(bestOfferPrompt)).tools(mcpTools).outputKey("bestinvoicehtml").build();
    
            FunctionTool generatePdfTool = FunctionTool.create(PdfTool.class, "generatePdfFromHtml");
    
            LlmAgent pdfWriterAgent = LlmAgent.builder().model(modelName).name("pdfWriterAgent").description("Creates a PDF from HTML and saves it to cloud storage.").instruction(resourceToString(pdfWriterPrompt)).tools(List.of(generatePdfTool)).build();
    
            return SequentialAgent.builder().name(properties.getAgent().getAppName()).description("Execute the complete sequence to generate, improve, and publish an PDF invoice to Google Cloud Storage.").subAgents(htmlGeneratorAgent, bestOfferAgent, pdfWriterAgent).build();
        }
    

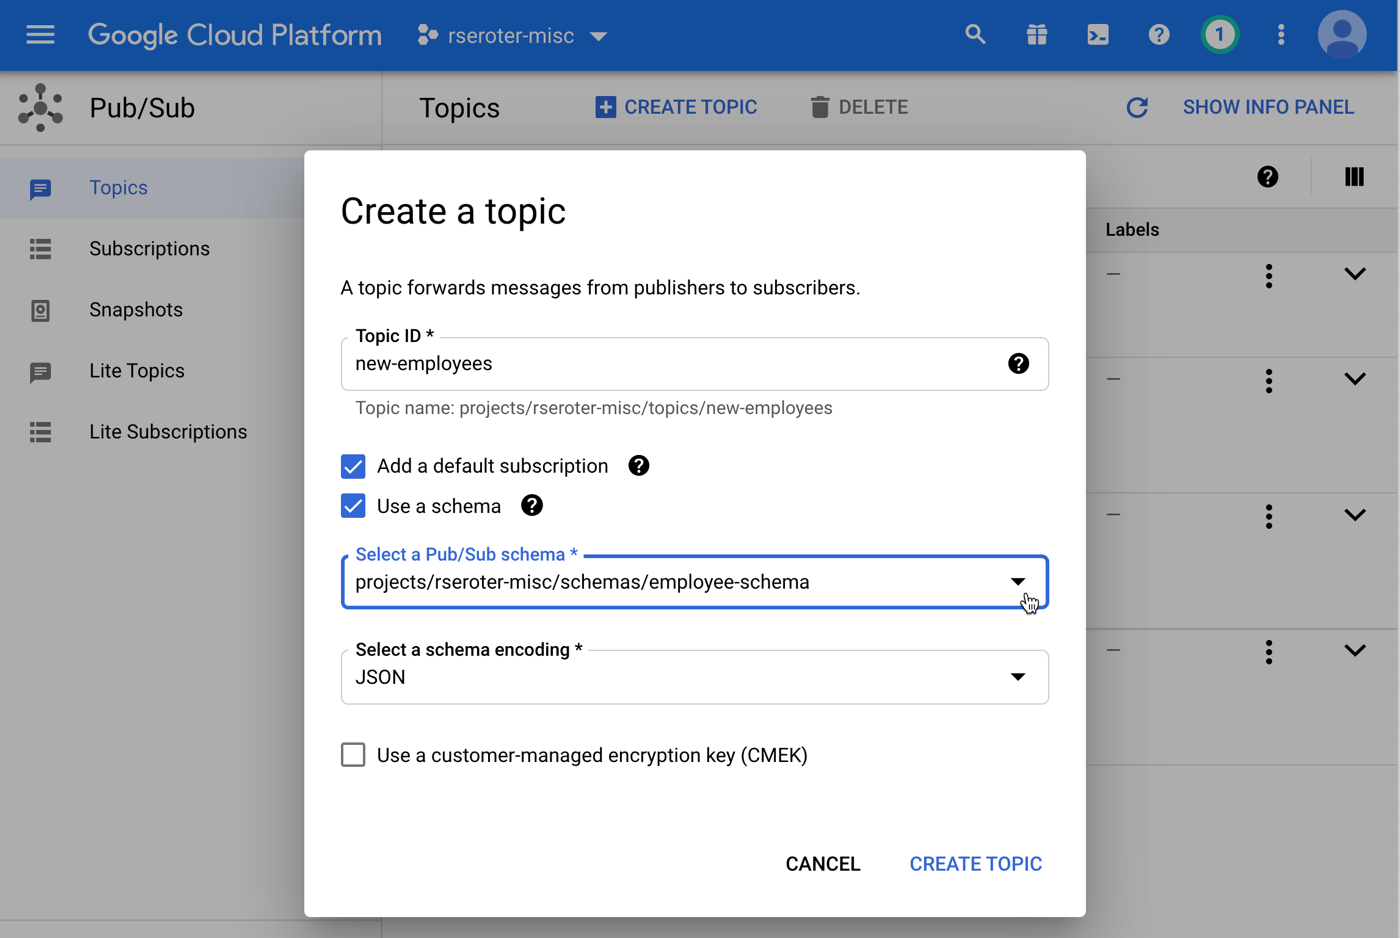
    How should I connect these agents? I didn’t want hard-coded links between the services, as they can operate async and independently. You could imagine other services being interested in a booking too. So I put Google Cloud Pub/Sub in the middle. I used a push notification (to the invoice agent’s HTTP endpoint), but I’ll probably refactor it and make it a pull subscription that listens for work.

    Choice #6 – What’s needed in my agent instructions?

    I’m getting better at this. Still not great. But I’m using AI to help me, and learning more about what constraints and direction make the biggest impact.

    For the booking agent, my goal was to collect all the data needed, while factoring in constraints such as weather. My agent instructions here included core principles, operational steps, the must-have data to collect, which decisions to make, and how to use the available tools.

    root_agent = Agent(
        name="root_agent",
        model="gemini-2.5-flash",
        description="This is the starting agent for Seroter Roofing and customers who want to book a roofing appointment",
        instruction=(
            """
    You are an AI agent specialized in booking roofing appointments. Your primary goal is to find available appointments for roofing services, and preferably on days where the weather forecast predicts dry weather.
    
    ## Core Principles:
    
        *   **Information First:** You must gather the necessary information from the user *before* attempting to use any tools.
        *   **Logical Flow:** Follow the steps outlined below strictly.
        *   **Professional & Helpful:** Maintain a polite, professional, and helpful tone throughout the interaction.
    
    ## Operational Steps:
    
    1.  **Greeting:**
        *   Start by politely greeting the user and stating your purpose (booking roofing appointments).
        *   *Example:* "Hello! I can help you book a roofing appointment. What kind of service are you looking for today?"
    
    2.  **Information Gathering:**
        *   You need two key pieces of information from the user:
            *   **Type of Service:** What kind of roofing service is needed? (e.g., repair, replacement, inspection, estimate)
            *   **Service Location:** What city is the service required in?
        *   Ask for this information clearly if the user doesn't provide it upfront. You *cannot* proceed to tool usage until you have both the service type and the city.
        *   *Example follow-up:* "Great, and in which city is the property located?"
    
    3.  **Tool Usage - Step 1: Check Appointment Availability (Filtered):**
        *   Get information about available appointment times:
        *   **[Use Tool: Appointment availability]** for the specified city.
        *   **Crucially:** When processing the results from the appointment tool, **filter** the available appointments to show *only* those that fall on the specific dates without rain in the forecast. You should also consider the service type if the booking tool supports filtering by type.
    
    4.  **Tool Usage - Step 2: Check Weather Forecast:**
        *   Once you have the service type and city, your next action is to check the weather.
        *   **[Use Tool: 7-day weather forecast]** for the specified city.
        *   Analyze the forecast data returned by the tool. Identify which days within the next 7 days are predicted to be 'sunny' or at least dry. Be specific about what constitutes 'dry' based on the tool's output.
    
    5.  **Decision Point 1: Are there Appointments on Dry Days?**
        *   If the appointment availability tool returns available slots *specifically* on the identified dry days:
            *   Present these available options clearly to the user, including the date, time, and potentially the service type (if applicable).
            *   Explain that these options meet the dry weather preference.
            *   Prompt the user to choose an option to book.
            *   *Example:* "Great news! The forecast for [City] shows dry weather on [Date 1], [Date 2], etc. I've checked our schedule and found these available appointments on those days: [List appointments]."
    
        *   If the appointment availability tool returns slots, but *none* of them fall on the identified sunny days (or if the tool returns no slots at all):
            *   Inform the user that while there are dry days coming up, there are currently no appointments available on those specific dry dates within the next 7 days.
            *   Explain that your search was limited to the dry days based on the forecast.
            *   Suggest they might want to try a different service type (if relevant) or check back later as availability changes.
            *   *Example:* "While the forecast for [City] does show some dry days coming up, I wasn't able to find any available appointments specifically on those dates within the next week. Our schedule on sunny days is quite popular. Please try again in a few days, as availability changes, or let me know if you need a different type of service."
    
    6.  **Confirmation/Booking (If Applicable):**
        *   Be sure to get the full name and full address of the location for the appointment.
             
    **Tools**
        You have access to the following tools to assist you:
        `weather_agent`: use this tool to find the upcoming weather forecast and identify rainy days
        `api_tool_get_appointments -> json`: use this OpenAPI tool to answer any questions about available appointments
        `add_appointment(customer: str, slotid: str, address: str, services: List[str]) -> dict`: use this tool to add a new appointment
    """
        ),
        tools=[agent_tool.AgentTool(weather_agent), api_tool_get_appointments, tools.add_appointment],
    )
    

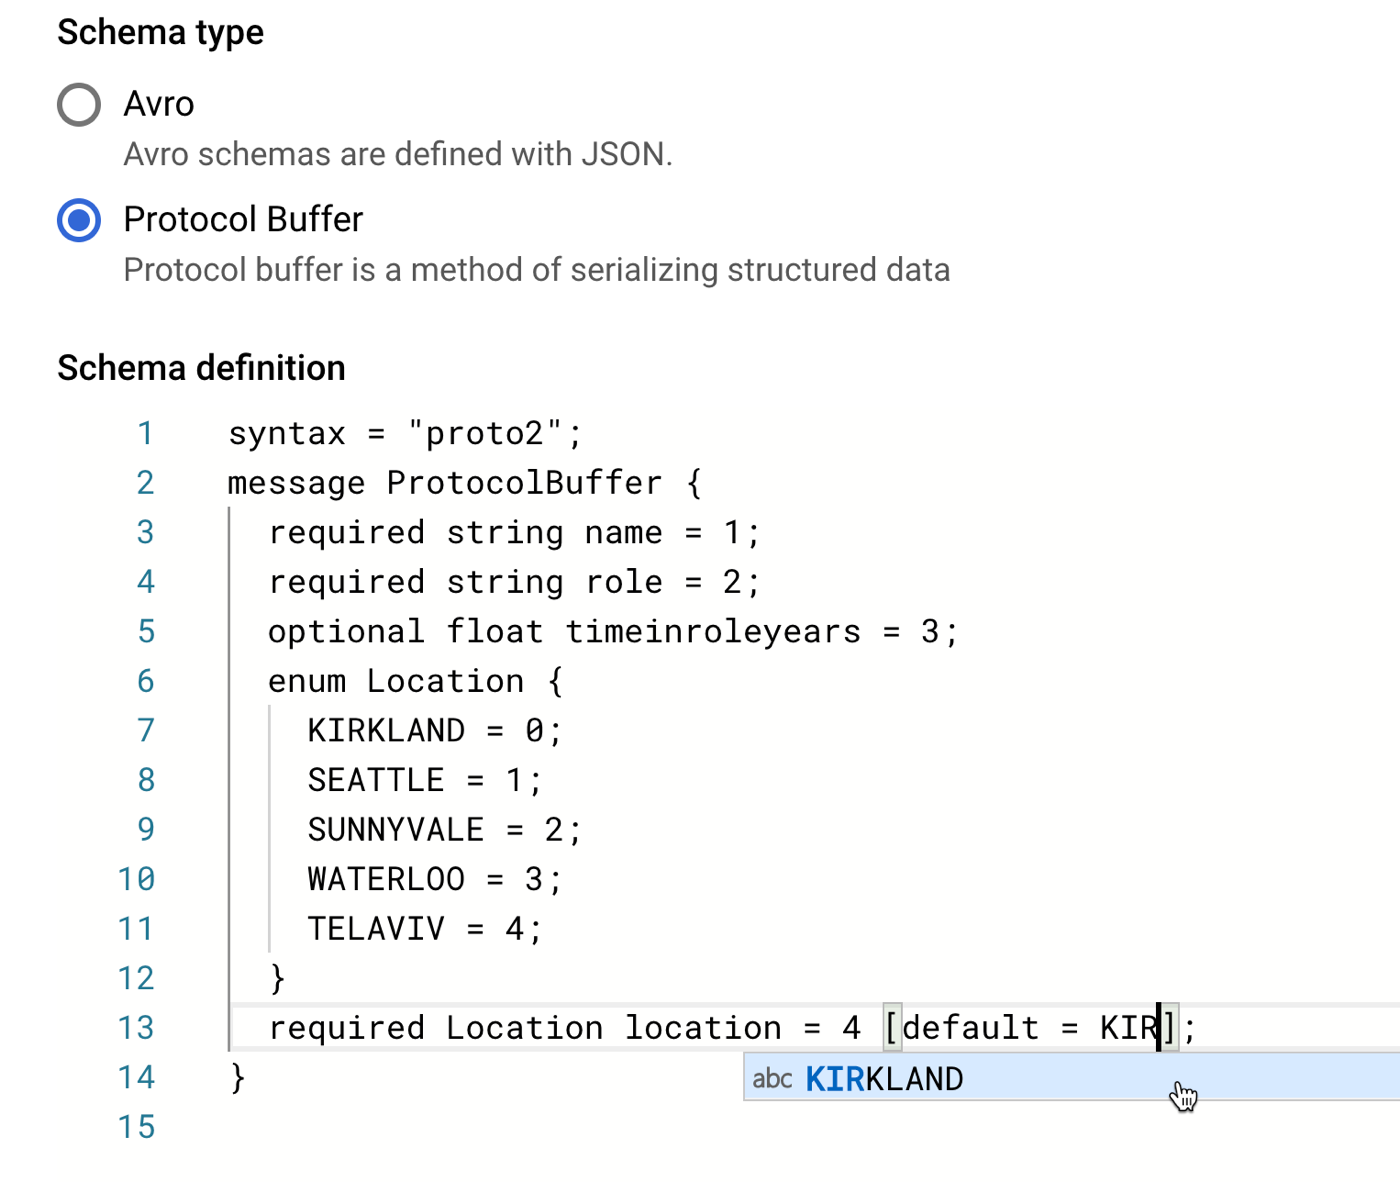
    The invoicing agent had a more complex prompt as I wanted to shape the blob of chat history into a structured JSON and then into valid HTML. Of course, I could have (should have?) structured the raw data before it left the original agent, but I wanted try it this way. My agent instructions show an example of the preferred JSON, and also the valid HTML structure.

    **Role:** You are a specialized agent designed to generate an HTML invoice from a successful appointment booking history.
    
    **Task:** Process the entire user prompt, which contains conversation history in a JSON format. Your goal is to create a complete HTML invoice based on the details found in that JSON.
    
    [...]
    
    4.  **Invoice JSON Structure:** The JSON invoice you internally generate **must** strictly adhere to the format provided in the example below. Do not add extra fields or change field names. Ensure numbers are formatted correctly (e.g., 100.00, 0.00).
        ```json
        {
        "invoiceNumber": "INV-BOOKING-[Current Date YYYYMMDD]", // Generate based on date
        "issueDate": [YYYY, M, D], // Current Date
        "dueDate": [YYYY, M, D], // Current Date + 30 days
        "customerName": "[Extracted Customer Name]",
        "customerAddress": "[Extracted Customer Address]",
        "items": [
            {
            "description": "[Description of Booked Service]",
            "quantity": 1,
            "unitPrice": [Price of Service],
            "lineTotal": [Price of Service]
            }
        ],
        "subtotal": [Price of Service],
        "taxAmount": 0.00,
        "summary": "Invoice for booked [Service Name]",
        "totalAmount": [Price of Service]
        }
        ```
    
    [...]
    
    7.  ** Create an HTML string based on the example structure here **
    ```html
    <!DOCTYPE html>
    <html>
    <head>
    	<meta charset="UTF-8" />
    	<title>Seroter Roofing Invoice</title>
    	<style type="text/css">
    		body { font-family: sans-serif; margin: 20px; }
    		h1 { color: navy; }
    		.header, .customer-info, .summary-block, .footer { margin-bottom: 20px; }
    		.invoice-details { margin-top: 20px; padding: 10px; border: 1px solid #ccc; }
    		.invoice-details p { margin: 5px 0; }
    		table { width: 100%; border-collapse: collapse; margin-top: 20px; }
    		.summary-block { padding: 10px; border: 1px dashed #eee; background-color: #f9f9f9; }
    		th, td { border: 1px solid #ddd; padding: 8px; text-align: left; }
    		th { background-color: #f2f2f2; }
    		.text-right { text-align: right; }
    	</style>
    </head>
    <body>
    	<h1>Invoice</h1>
    
    	<div class="header">
    		<p><strong>Invoice Number:</strong>INV-001</p>
    		<p><strong>Date Issued:</strong>January 01, 2024</p>
    		<p><strong>Date Due:</strong>January 15, 2024</p>
    	</div>
    
    	<div class="customer-info">
    		<h2>Bill To:</h2>
    		<p>Customer Name</p>
    		<p>123 Customer Street, Denver, CO 80012</p>
    	</div>
    
    	<div class="summary-block">
    		<h2>Summary</h2>
    		<p>Details about the appointment and order...</p>
    	</div>
    
    	<table>
    		<thead>
    			<tr>
    				<th>Description</th>
    				<th>Quantity</th>
    				<th>Unit Price</th>
    				<th>Line Total</th>
    			</tr>
    		</thead>
    		<tbody>
    			<tr >
    				<td>Sample Item</td>
    				<td class="text-right">1</td>
    				<td class="text-right">10.00</td>
    				<td class="text-right">10.00</td>
    			</tr>
    		</tbody>
    	</table>
    
    	<div class="invoice-details">
    		<p class="text-right"><strong>Subtotal:</strong>>0.00</p>
    		<p class="text-right"><strong>Tax:</strong>0.00</p>
    		<p class="text-right"><strong>Total Amount:</strong> <strong>$123.45</strong></p>
    	</div>
    	<div class="footer">
    		<p>Thank you for your business!</p>
    	</div>
    </body>
    </html>
    ```
    

    Doing this “context engineering” well is important. Think through the instructions, data, and tools that you’re giving an agent to work with.

    Choice #7 – What’s the right approach to accessing Cloud services?

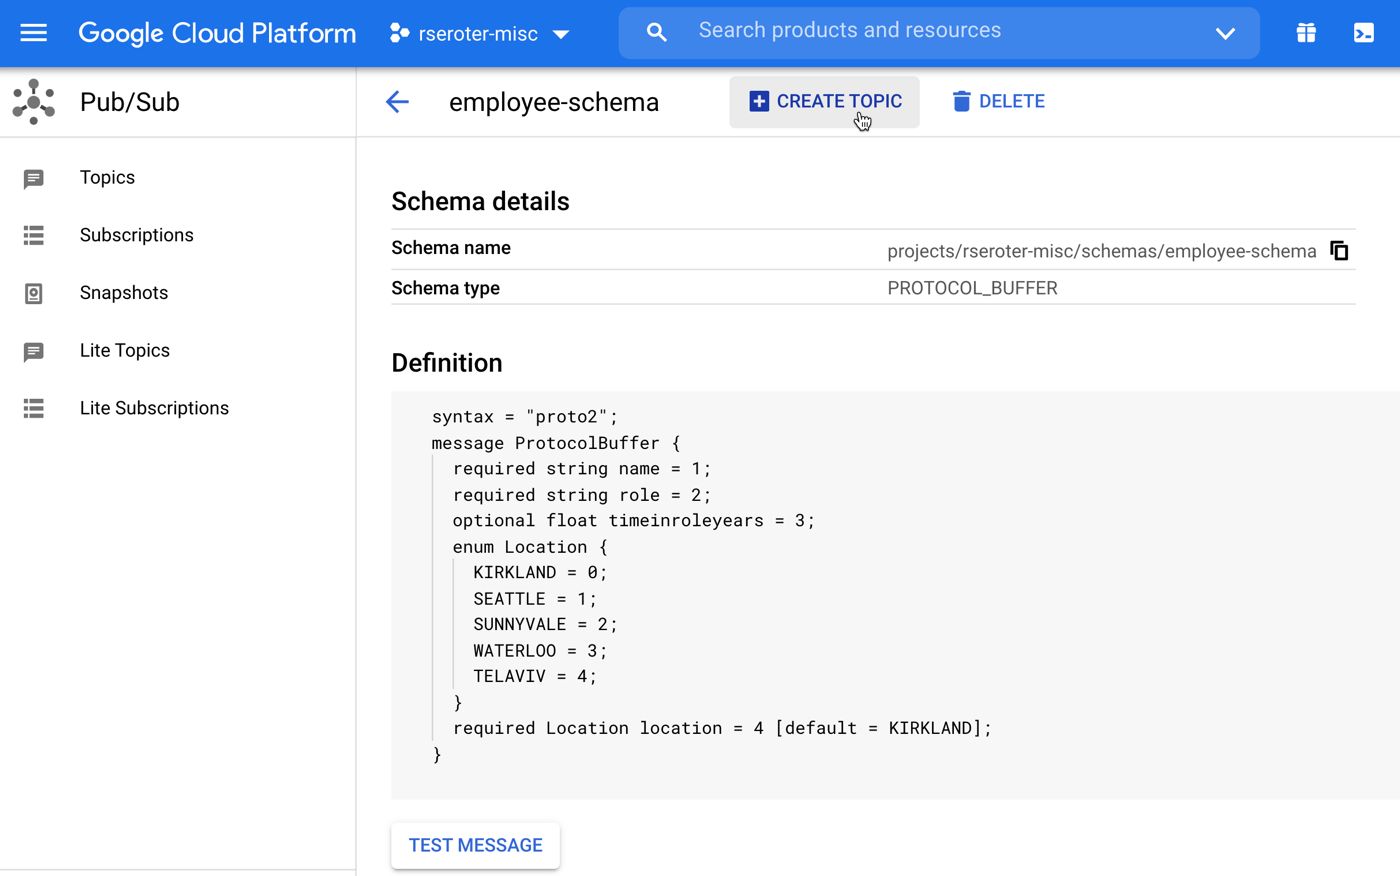
    My agent solution sent data to Pub/Sub (addressed above), but also relied on data sitting in a PostgreSQL database. And PDF blobs sitting in Cloud Storage.

    I had at least three implementation options here for PostgreSQL and Cloud Storage:

    • Function calling. Use functions that call the Cloud APIs directly, and leverage those functions as tools.
    • Model Context Protocol (MCP). Use MCP servers that act as API proxies for the LLM to use
    • YOLO mode. Ask the LLM to figure out the right API call to make for the given service.

    The last option works (mostly), but would be an absurd choice to make in 99.98% of situations.

    The appointment agent calls the Pub/Sub API directly by using that encompassing function as a tool. For the database access, I chose MCP. The MCP Toolbox for Databases is open source and fairly simple to use. It saves me from a lot of boilerplate database access code.

    private List<BaseTool> loadMcpTools(String mcpServerUrl) {
            try {
                SseServerParameters params = SseServerParameters.builder().url(mcpServerUrl).build();
                logger.info("Initializing MCP toolset with params: {}", params);
                McpToolset.McpToolsAndToolsetResult result = McpToolset.fromServer(params, new ObjectMapper()).get();
                if (result.getTools() != null && !result.getTools().isEmpty()) {
                    logger.info("MCP tools loaded: {}", result.getTools().size());
                    return result.getTools().stream().map(mcpTool -> (BaseTool) mcpTool).collect(Collectors.toList());
                }
            } catch (Exception e) {
                logger.error("Error initializing MCP toolset", e);
            }
            return new ArrayList<>();
        }
    

    When creating the PDF and adding it to Cloud Storage, I decided to use a robust function that I passed to the agent as a tool.

    private Map<String, Object> generatePdfFromHtmlInternal(String htmlContent) throws IOException {
            if (htmlContent == null || htmlContent.trim().isEmpty()) {
                throw new IllegalArgumentException("HTML content cannot be null or empty.");
            }
    
            try (ByteArrayOutputStream baos = new ByteArrayOutputStream()) {
                ITextRenderer renderer = new ITextRenderer();
                renderer.setDocumentFromString(htmlContent);
                renderer.layout();
                renderer.createPDF(baos);
    
                String timestamp = LocalDateTime.now().format(DateTimeFormatter.ofPattern("yyyyMMddHHmmssSSS"));
                String uniquePdfFilename = OUTPUT_PDF_FILENAME.replace(".pdf", "_" + timestamp + ".pdf");
                String bucketName = properties.getGcs().getBucketName();
    
                BlobId blobId = BlobId.of(bucketName, uniquePdfFilename);
                BlobInfo blobInfo = BlobInfo.newBuilder(blobId).setContentType("application/pdf").build();
    
                storage.create(blobInfo, baos.toByteArray());
    
                String gcsPath = "gs://" + bucketName + "/" + uniquePdfFilename;
                logger.info("Successfully generated PDF and uploaded to GCS: {}", gcsPath);
                return Map.of("status", "success", "file_path", gcsPath);
    
            } catch (DocumentException e) {
                logger.error("Error during PDF document generation", e);
                throw new IOException("Error during PDF document generation: " + e.getMessage(), e);
            } catch (Exception e) {
                logger.error("Error during PDF generation or GCS upload", e);
                throw new IOException("Error during PDF generation or GCS upload: " + e.getMessage(), e);
            }
        }
    

    Choice #8 – How do I package up and run the agents?

    This choice may depend on who the agent is for (internal or external audiences), who has to support the agent, and how often you expect to update the agent.

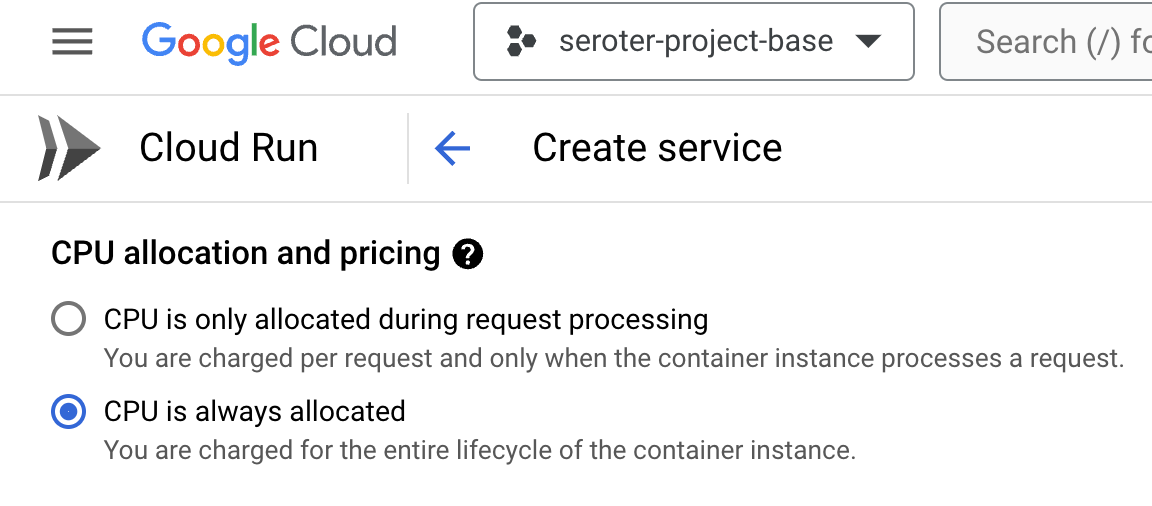
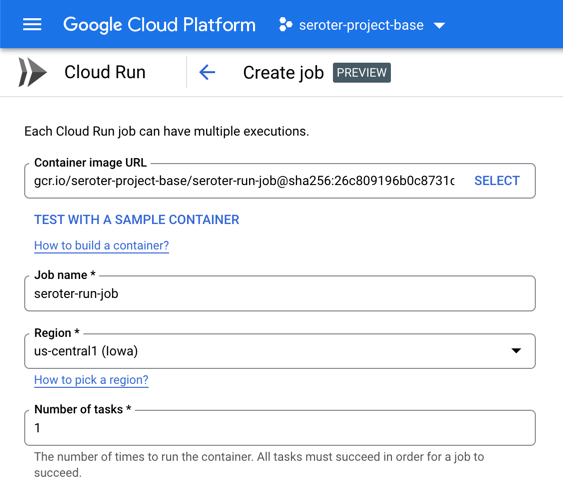
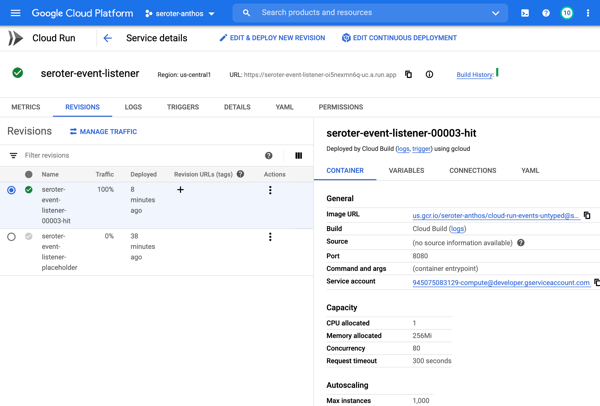
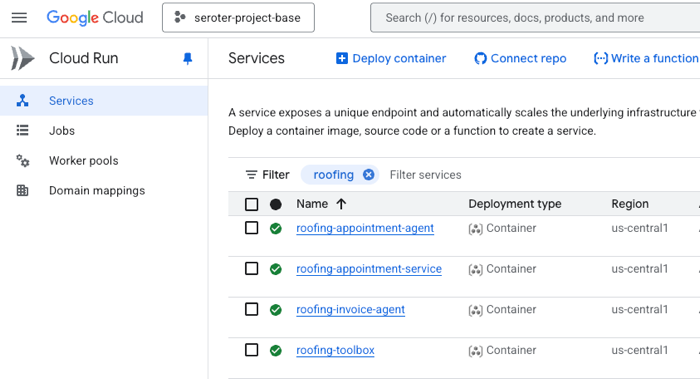
    I chose to containerize the components so that I had maximum flexibility. I could have easily used the ADK CLI to deploy directly to Vertex AI Agent Engine—which comes with convenient features like memory management—but wanted more control than that. So I have Dockerfiles for each agent, and deploy them to Google Cloud Run. Here I get easy scale, tons of optional configurations, and I don’t pay for anything when the agent is dormant.

    In this case, I’m just treating the agent like any other type of code. You might make a different choice based on your use case.

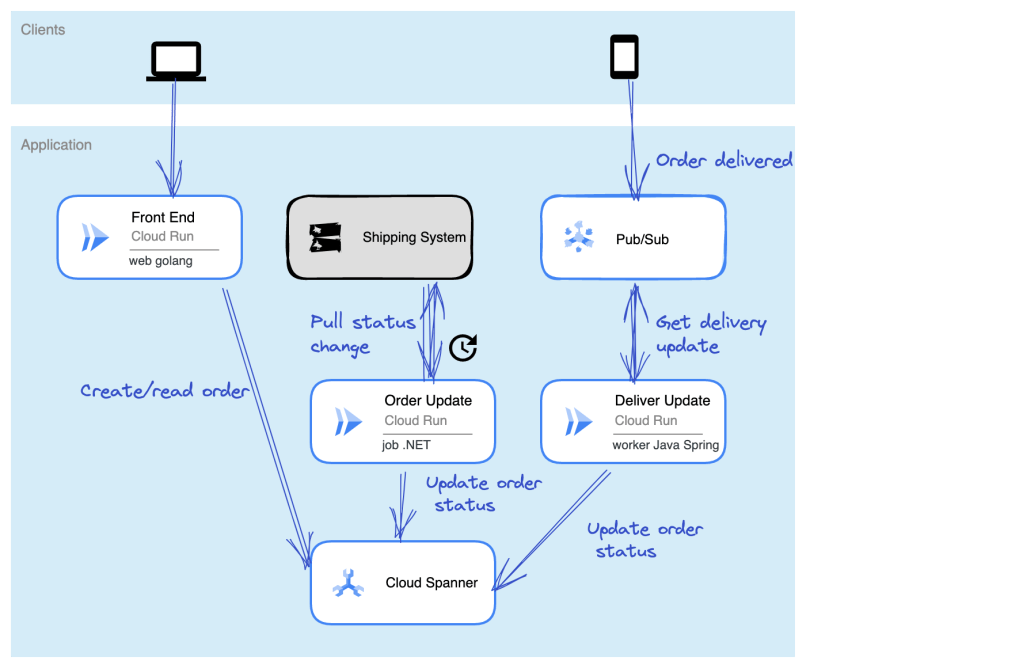
    The final solution in action

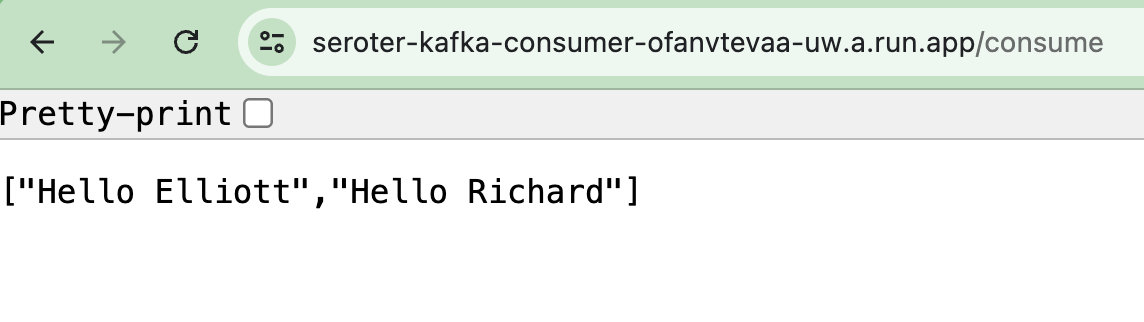
    Let’s run this thing through. All the source code is sitting in my GitHub repo.

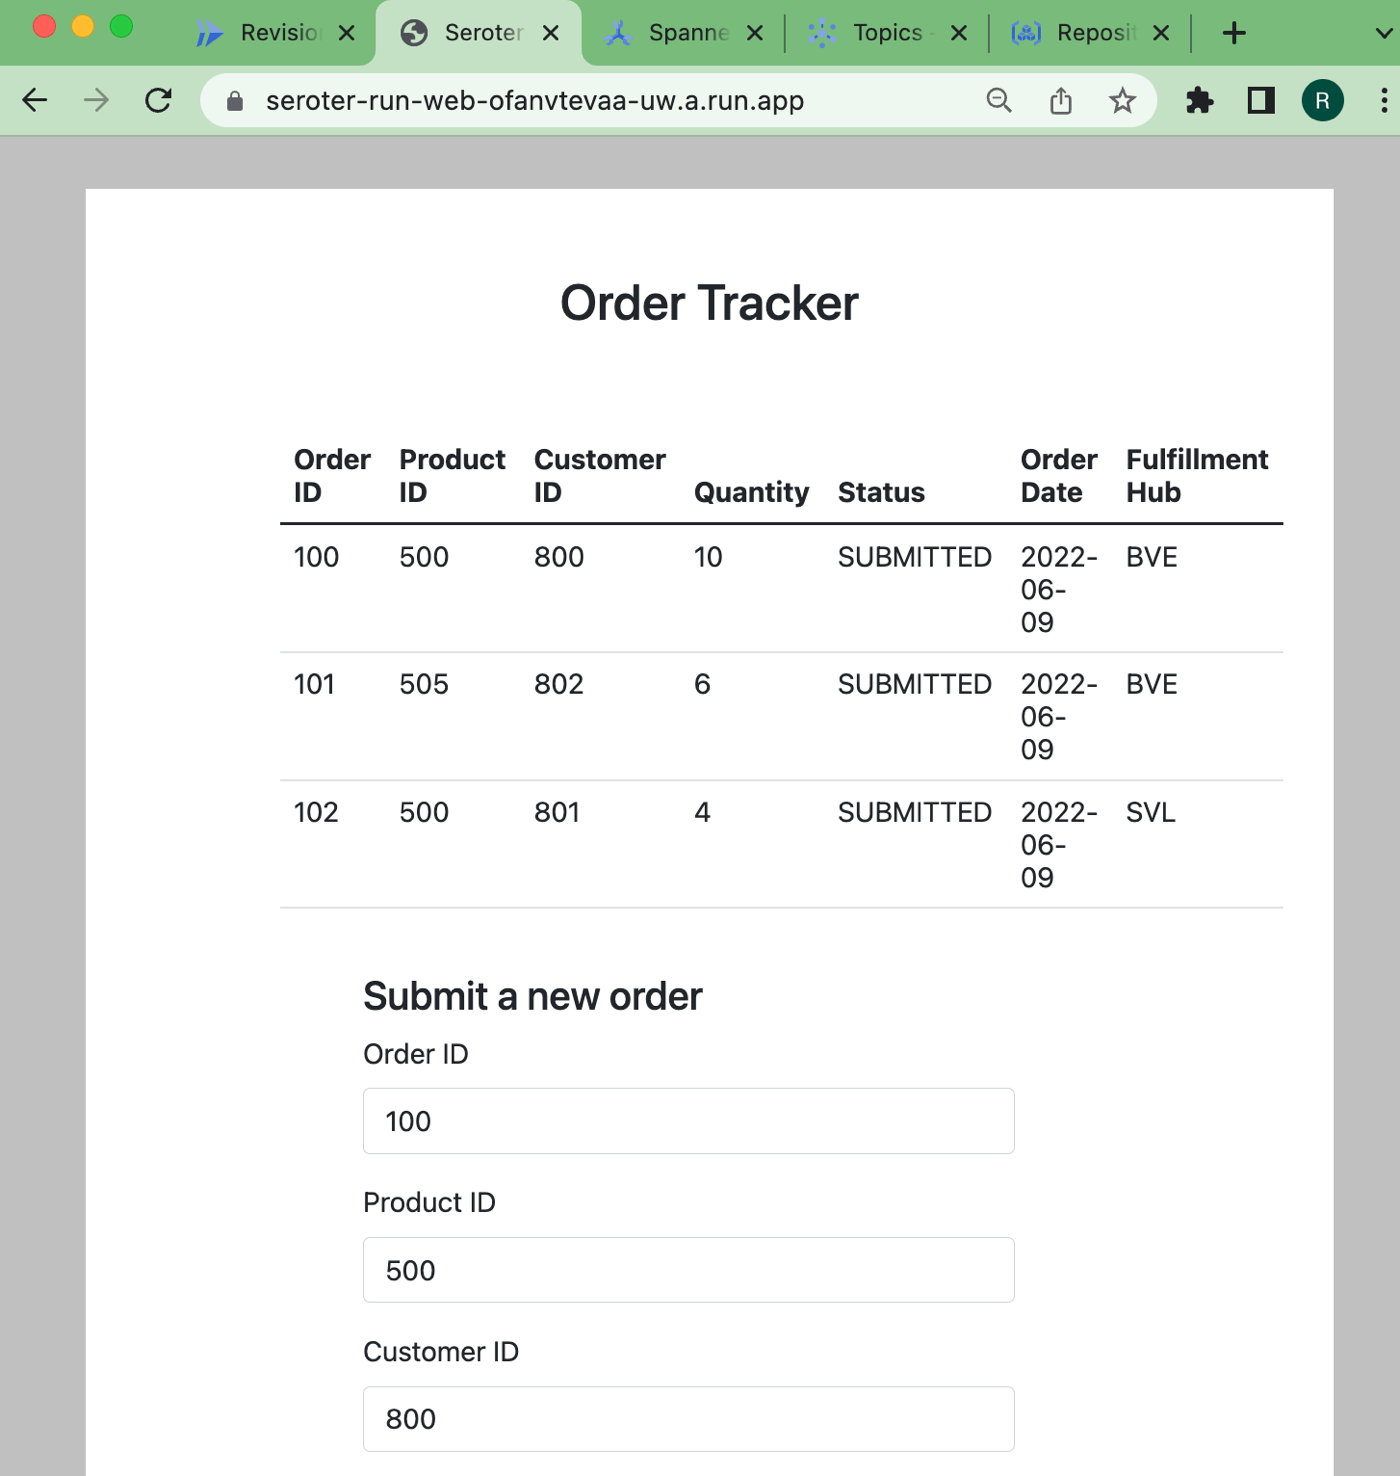
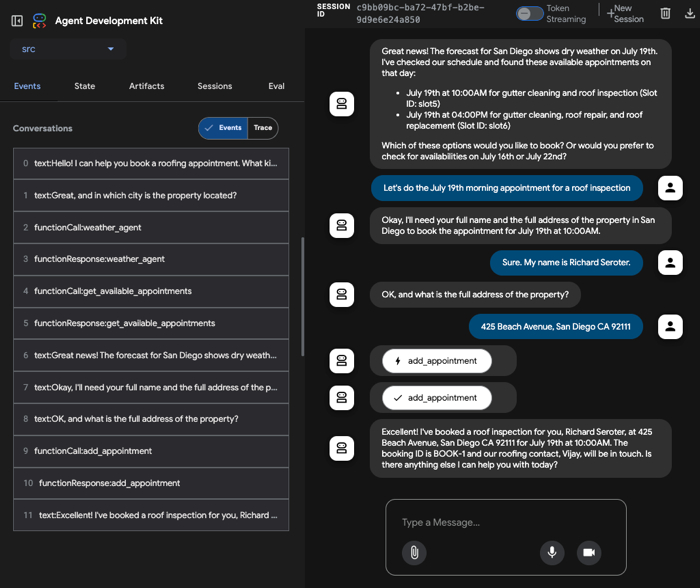
    I start by opening the the appointment agent hosted in Cloud Run. I’m using the built-in ADK web UI to have a conversational chat with the initial agent. I mention that I might have a leaky roof and want an inspection or repair. The agent then follows its instructions. After checking the weather in the city I’m in, it retrieves appointments via the API. On the left, there’s a handy set of tools to trace events, do evals, and more.

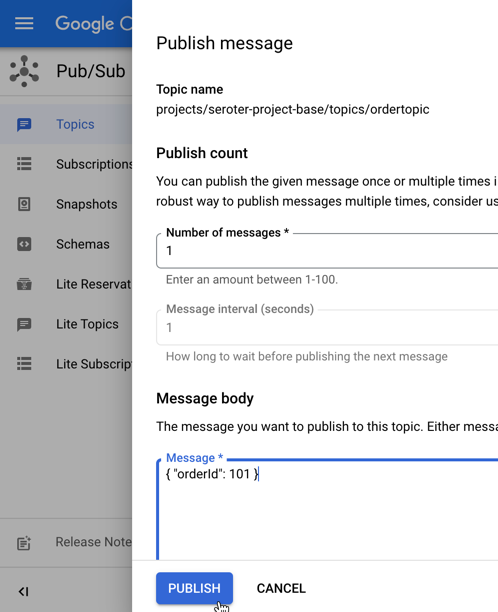
    At this point, I chose an available appointment, and the agent followed it’s next set of instructions. The appointment required two pieces of info (my name, and address), and wouldn’t proceed until I provided it. Once it had the data, it called the right function to make an appointment and publish a message to Pub/Sub.

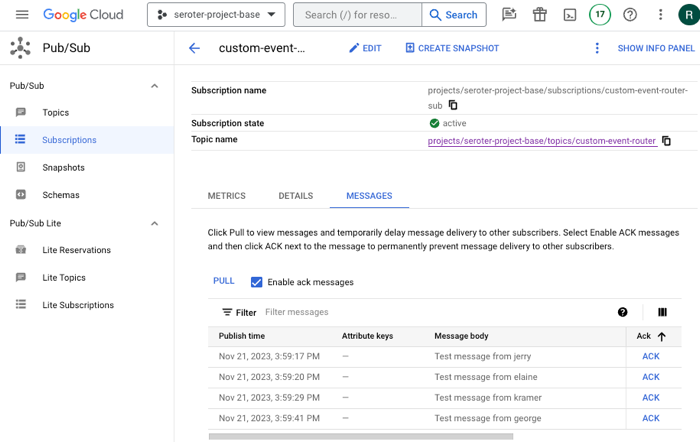
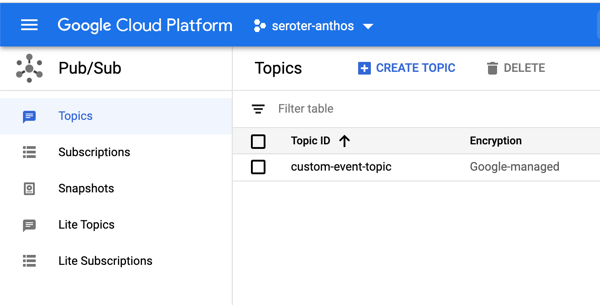
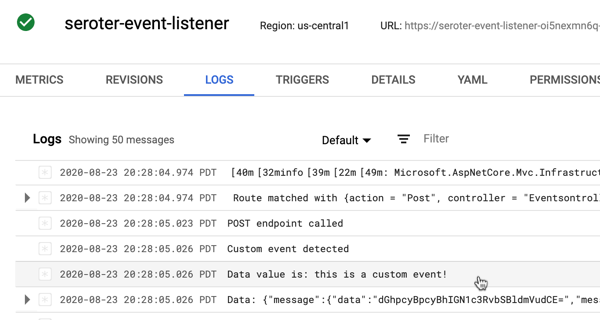
    That data flowed through Google Cloud Pub/Sub, and got pushed to another agent hosted in Cloud Run.

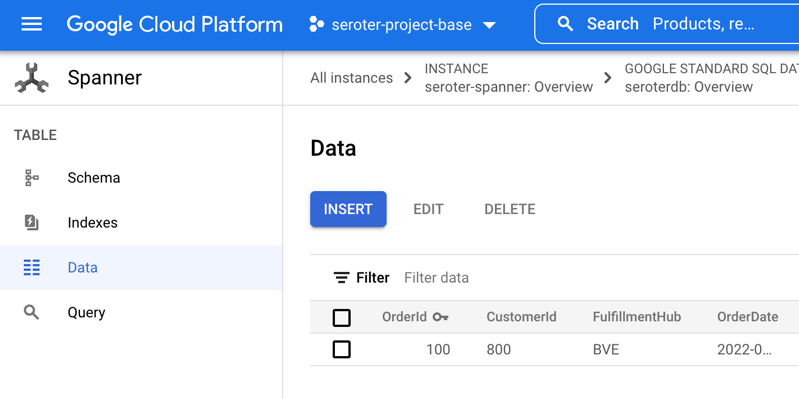
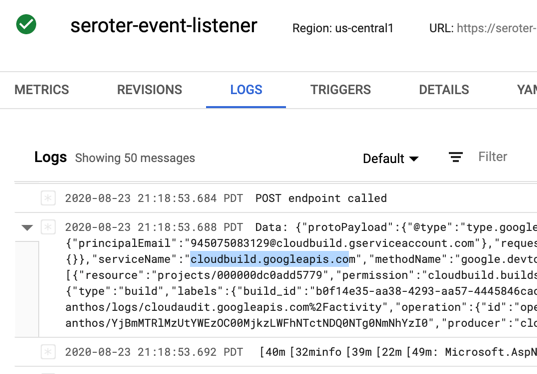
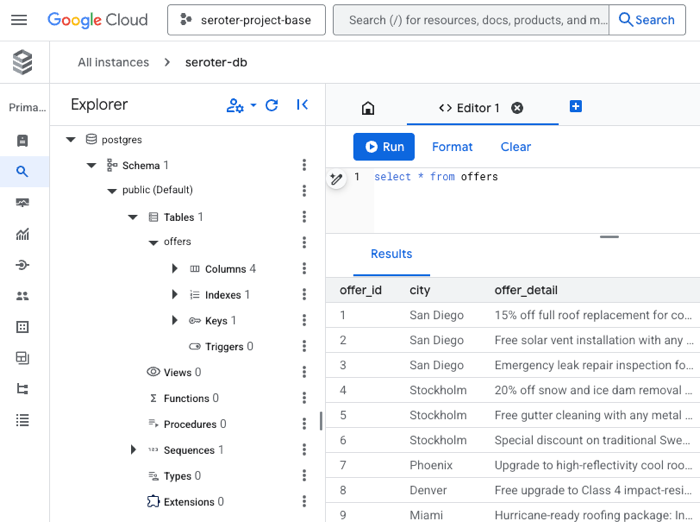
    That agent immediately loaded up its MCP tools by calling the MCP server also hosted in Cloud Run. That server retrieved the list of offers for the city in question.

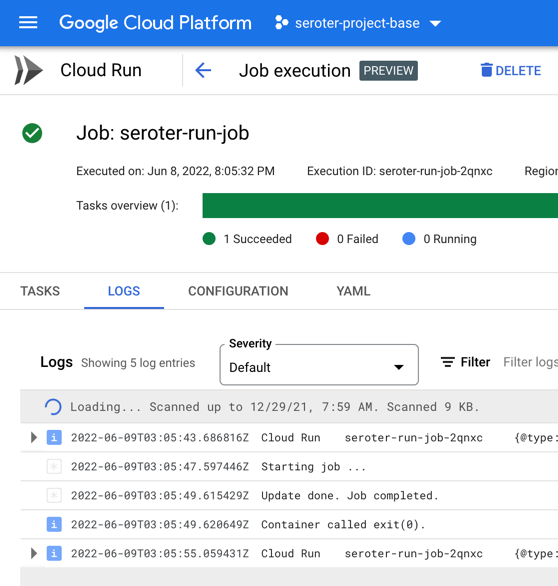
    This agent runs unattended in the background, so there’s no chat interface or interactivity. Instead, I can track progress by reading the log stream.

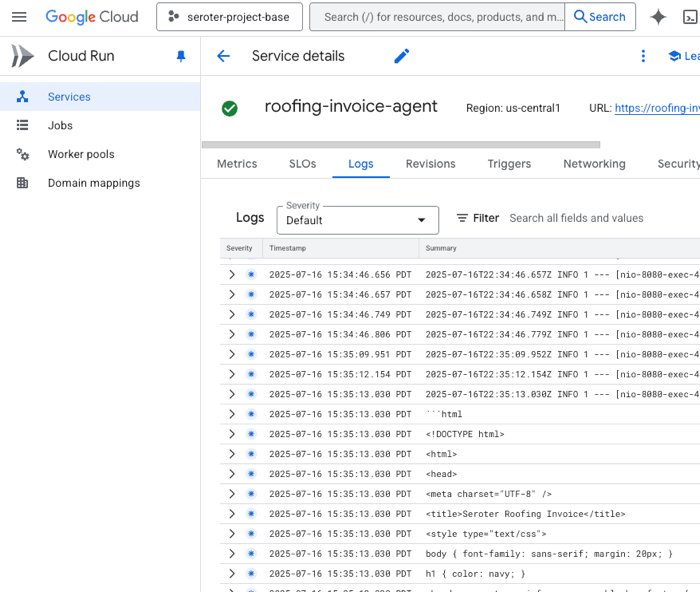
    When this agent got done converting the chat blob to JSON, then creating an HTML template, and calling the MCP tools to attach offers, it wrote the final PDF to Cloud Storage.

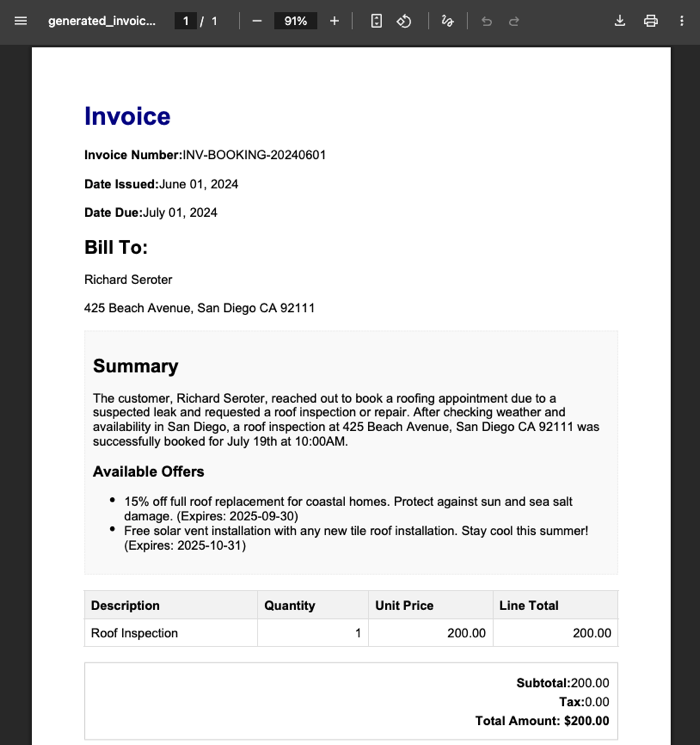
    There you go. It’s not perfect and I have improvements I want to make. Heck, the example here has the wrong date in the invoice, which didn’t happen before. So I need better instructions there. I’d like to switch the second agent from a push to a pull. It’d be fun to add some video or audio intake to the initial agent.

    Nobody knows the future, but it looks we’ll be building more agents, and fewer standalone apps. APIs matter more than ever, as do architectural decisions. Make good ones!

  • From AI-assisted creation to smart test plans, I like all the recent updates to this cloud integration service

    From AI-assisted creation to smart test plans, I like all the recent updates to this cloud integration service

    I’m approaching twenty-five years of connecting systems together. Yikes. In the summer of 2000, I met a new product called BizTalk Server that included a visual design tool for building workflows. In the years following, that particular toolset got better (see image), and a host of other cloud-based point-and-click services emerged. Cloud integration platforms are solid now, but fairly stagnant. I haven’t noticed a ton of improvements over the past twelve months. That said, Google Cloud’s Application Integration service is improving (and catching up) month over month, and I wanted to try out the latest and greatest capabilities. I think you’ll see something you like.

    Could you use code (and AI-generated code) to create all your app integrations instead of using visual modeling tools like this? Probably. But you’d see scope creep. You’d have to recreate system connectors (e.g. Salesforce, Stripe, databases, Google Sheets), data transformation logic, event triggers, and a fault-tolerant runtime for async runners. You might find yourself creating a fairly massive system to replace one you can use as-a-service. So what’s new with Google Cloud Application Integration?

    Project setup improvements

    Let’s first look at templates. These are pre-baked blueprints that you can use to start a new project. Google now offers a handful of built-in templates, and you can see custom ones shared with you by others.

    I like that anyone can define a new template from an existing integration, as I show here.

    Once I create a template, it shows up under “project templates” along with a visual preview of the integration, the option to edit, share or download as JSON, and any related templates.

    The next new feature of Google Cloud Application Integration related to setup is the Gemini assistance. This is woven into a few different features—I’ll show another later—including the ability to create new integrations with natural language.

    After clicking that button, I’m asked to provide a natural language description of the integration I want to create. There’s a subset of triggers and tasks recognized here. See here that I’m asking for a message to be read from Pub/Sub, approvals sent, and a serverless function called if the approval is provided.

    I’m shown the resulting integration, and iterate in place as much as I want. Once I land on the desired integration, I accept the Gemini-created configuration and start working with the resulting workflow.

    This feels like a very useful AI feature that helps folks learn the platform, and set up integrations.

    New design and development features

    Let’s look at new features for doing the core design and development of integrations.

    First up, there’s a new experience for seeing and editing configuration variables. What are these? Think of config variable as settings for the integration itself that you can set at deploy time. It might be something like a connection string or desired log level.

    Here’s another great use of AI assistance. The do-whatever-you-want JavaScript task in an integration can now be created with Gemini. Instead of writing the JavaScript yourself, use Gemini to craft it.

    I’m provided a prompt and asked for updated JavaScript to also log the ID of the employee record. I’m then shown a diff view that I can confirm, or continue editing.

    As you move data between applications or systems, you likely need to switch up structure and format. I’ve long been jealous of the nice experience in Azure Logic Apps, and now our mapping experience is finally catching up.

    The Data Transformer task now has a visual mapping tool for the Jsonnet templates. This provides a drag-and-drop experience between data structures.

    Is the mapping not as easy as one to one? No problem. There are now transformation operations for messing with arrays, performing JSON operations, manipulating strings, and much more.

    I’m sure your integrations NEVER fail, but for everyone else, it’s useful to know have advanced failure policies for rich error handling strategies. For a given task, I can set up one or more failure policies that tell the integration what to do when an issue occurs? Quit? Retry? Ignore it? I like the choices I have available.

    There’s a lot to like the authoring experience, but these recent updates make it even better.

    Fresh testing capabilities

    Testing? Who wants to test anything? Not me, but that’s because I’m not a good software engineer.

    We shipped a couple of interesting features for those who want to test their integrations.

    First, it’s a small thing, but when you have an API Trigger kicking off your integration—which means that someone invokes it via web request—we now make it easy to see the associated OpenAPI spec. This makes it easier to understand a service, and even consume it from external testing tools.

    Once I choose to “view OpenAPI spec“, I get a slide-out pane with the specification, along with options to copy or download the details.

    But by far, the biggest addition to the Application Integration toolchain for testers is the ability to create and run test plans. Add one or more test cases to an integration, and apply some sophisticated configurations to a test.

    When I choose that option, I’m first asked to name the test case and optionally provide a description. Then, I enter “test mode” and set up test configurations for the given components in the integration. For instance, here I’ve chosen the initial API trigger. I can see the properties of the trigger, and then set a test input value.

    A “task” in the integration has more test case configuration options. When I choose the JavaScript task, I see that I can choose a mocking strategy. Do you play it straight with the data coming in, purposely trigger a skip or failure, or manipulate the output?

    Then I add one or more “assertions” for the test case. I can check whether the step succeeded or failed, if a variable equals what I think it should, or if a variable meets a specific condition.

    Once I have a set of test cases, the service makes it easy to list them, duplicate them, download them, and manage them. But I want to run them.

    Even if you don’t use test cases, you can run a test. In that case, you click the “Test” button and provide an input value. If you’re using test cases, you stay in (or enter) “test case mode” and then the “Test” button runs your test cases.

    Very nice. There’s a lot you can do here to create integrations that exist in a typical Ci/CD environment.

    Better “day 2” management

    This final category looks at operational features for integrations.

    This first feature shipped a few days ago. Now we’re offering more detailed execution logs that you can also download as JSON. A complaint with systems like this is that they’re a black box and you can’t tell what’s going on. The more transparency, the better. Lots of log details now!

    Another new operational feature is the ability replay an integration. Maybe something failed downstream and you want to retry the whole process. Or something transient happened and you need a fresh run. No problem. Now I can pick any completed (or failed) integration and run it again.

    When I use this, I’m asked for a reason to replay. And what I liked is that after the replay occurs, there’s an annotation indicating that this given execution was the result of a replay.

    Also be aware that you can now cancel an execution. This is hand for long-running instances that may no longer matter.

    Summary

    You don’t need to use tools like this, of course. You can connect your systems together with code or scripts. But I personally like managed experiences like this that handle the machinery of connecting to systems, transforming data, and dealing with running the dozens or thousands of hourly events between systems.

    If you’re hunting for a solution here, give Google Cloud Application Integration a good look.

  • Three Ways to Run Apache Kafka in the Public Cloud

    Three Ways to Run Apache Kafka in the Public Cloud

    Yes, people are doing things besides generative AI. You’ve still got other problems to solve, systems to connect, and data to analyze. Apache Kafka remains a very popular product for event and data processing, and I was thinking about how someone might use it in the cloud right now. I think there are three major options, and one of them (built-in managed service) is now offered by Google Cloud. So we’ll take that for a spin.

    Option 1: Run it yourself on (managed) infrastructure

    Many companies choose to run Apache Kafka themselves on bare metal, virtual machines, or Kubernetes clusters. It’s easy to find stories about companies like Netflix, Pinterest, and Cloudflare running their own Apache Kafka instances. Same goes for big (and small) enterprises that choose to setup and operate dedicated Apache Kafka environments.

    Why do this? It’s the usual reasons why people decide to manage their own infrastructure! Kafka has a lot of configurability, and experienced folks may like the flexibility and cost profile of running Apache Kafka themselves. Pick your infrastructure, tune every setting, and upgrade on your timetable. On the downside, self-managed Apache Kafka can result in a higher total cost of ownership, requires specialized skills in-house, and could distract you from other high-priority work.

    If you want to go that route, I see a few choices.

    There’s no shame in going this route! It’s actually very useful to know how to run software like Apache Kafka yourself, even if you decide to switch to a managed service later.

    Option 2: Use a built-in managed service

    You might want Apache Kafka, but not want to run Apache Kafka. I’m with you. Many folks, including those at big web companies and classic enterprises, depend on managed services instead of running the software themselves.

    Why do this? You’d sign up for this option when you want the API, but not the ops. It may be more elastic and cost-effective than self-managed hosting. Or, it might cost more from a licensing perspective, but provide more flexibility on total cost of ownership. On the downside, you might not have full access to every raw configuration option, and may pay for features or vendor-dictated architecture choices you wouldn’t have made yourself.

    AWS offers an Amazon Managed Streaming for Apache Kafka product. Microsoft doesn’t offer a managed Kafka product, but does provide a subset of the Apache Kafka API in front of their Azure Event Hubs product. Oracle cloud offers self-managed infrastructure with a provisioning assist, but also appears to have a compatible interface on their Streaming service.

    Google Cloud didn’t offer any native service until just a couple of months ago. The Apache Kafka for BigQuery product is now in preview and looks pretty interesting. It’s available in a global set of regions, and provides a fully-managed set of brokers that run in a VPC within a tenant project. Let’s try it out.

    Set up prerequisites

    First, I needed to enable the API within Google Cloud. This gave me the ability to use the service. Note that this is NOT FREE while in preview, so recognize that you’ll incur changes.

    Next, I wanted a dedicated service account for accessing the Kafka service from client applications. The service supports OAuth and SASL_PLAIN with service account keys. The latter is appropriate for testing, so I chose that.

    I created a new service account named seroter-bq-kafka and gave it the roles/managedkafka.client role. I also created a JSON private key and saved it to my local machine.

    That’s it. Now I was ready to get going with the cluster.

    Provision the cluster and topic

    I went into the Apache Kafka for BigQuery dashboard in the Google Cloud console—I could have also used the CLI which has the full set of control plane commands—to spin up a new cluster. I get very few choices, and that’s not a bad thing. You give the CPU and RAM capacity for the cluster, and Google Cloud creates the right shape for the brokers, and creates a highly available architecture. You’ll also see that I choose the VPC for the cluster, but that’s about it. Pretty nice!

    In about twenty minutes, my cluster was ready. Using the console or CLI, I could see the details of my cluster.

    Topics are a core part of Apache Kafka represent the resource you publish and subscribe to. I could create a topic via the UI or CLI. I created a topic called “topic1”.

    Build the producer and consumer apps

    I wanted two client apps. One to publish new messages to Apache Kafka, and another to consume messages. I chose Node.js and JavaScript as the language for the app. There are a handful of libraries for interacting with Apache Kafka, and I chose the mature kafkajs.

    Let’s start with the consuming app. I need (a) the cluster’s bootstrap server URL and (b) the encoded client credentials. We access the cluster through the bootstrap URL and it’s accessible via the CLI or the cluster details (see above). The client credentials for SASL_PLAIN authentication consists of the base64 encoded service account key JSON file.

    My index.js file defines a Kafka object with the client ID (which identifies our consumer), the bootstrap server URL, and SASL credentials. Then I define a consumer with a consumer group ID and subscribe to the “topic1” we created earlier. I process and log each message before appending to an array variable. There’s an HTTP GET endpoint that returns the array. See the whole index.js below, and the GitHub repo here.

    const express = require('express');
    const { Kafka, logLevel } = require('kafkajs');
    const app = express();
    const port = 8080;
    
    const kafka = new Kafka({
      clientId: 'seroter-consumer',
      brokers: ['bootstrap.seroter-kafka.us-west1.managedkafka.seroter-project-base.cloud.goog:9092'],
      ssl: {
        rejectUnauthorized: false
      },
      logLevel: logLevel.DEBUG,
      sasl: {
        mechanism: 'plain', // scram-sha-256 or scram-sha-512
        username: 'seroter-bq-kafka@seroter-project-base.iam.gserviceaccount.com',
        password: 'tybgIC ... pp4Fg=='
      },
    });
    
    const consumer = kafka.consumer({ groupId: 'message-retrieval-group' });
    
    //create variable that holds an array of "messages" that are strings
    let messages = [];
    
    async function run() {
      await consumer.connect();
      //provide topic name when subscribing
      await consumer.subscribe({ topic: 'topic1', fromBeginning: true }); 
    
      await consumer.run({
        eachMessage: async ({ topic, partition, message }) => {
          console.log(`################# Received message: ${message.value.toString()} from topic: ${topic}`);
          //add message to local array
          messages.push(message.value.toString());
        },
      });
    }
    
    app.get('/consume', (req, res) => {
        //return the array of messages consumed thus far
        res.send(messages);
    });
    
    run().catch(console.error);
    
    app.listen(port, () => {
      console.log(`App listening at http://localhost:${port}`);
    });
    

    Now we switch gears and go through the producer app that publishes to Apache Kafka.

    This app starts off almost identically to the consumer app. There’s a Kafka object with a client ID (different for the producer) and the same pointer to the bootstrap server URL and credentials. I’ve got an HTTP GET endpoint that takes the querystring parameters and publishes the key and value content to the request payload. The code is below, and the GitHub repo is here.

    const express = require('express');
    const { Kafka, logLevel } = require('kafkajs');
    const app = express();
    const port = 8080; // Use a different port than the consumer app
    
    const kafka = new Kafka({
        clientId: 'seroter-publisher',
        brokers: ['bootstrap.seroter-kafka.us-west1.managedkafka.seroter-project-base.cloud.goog:9092'],
        ssl: {
          rejectUnauthorized: false
        },
        logLevel: logLevel.DEBUG,
        sasl: {
          mechanism: 'plain', // scram-sha-256 or scram-sha-512
          username: 'seroter-bq-kafka@seroter-project-base.iam.gserviceaccount.com',
          password: 'tybgIC ... pp4Fg=='
        },
      });
    
    const producer = kafka.producer();
    
    app.get('/publish', async (req, res) => {
      try {
        await producer.connect();
    
        const _key = req.query.key; // Extract key from querystring
        console.log('key is ' + _key);
        const _value = req.query.value // Extract value from querystring
        console.log('value is ' + _value);
    
        const message = {
          key: _key, // Optional key for partitioning
          value: _value
        };
    
        await producer.send({
          topic: 'topic1', // Replace with your topic name
          messages: [message]
        });
    
        res.status(200).json({ message: 'Message sent successfully' });
    
      } catch (error) {
        console.error('Error sending message:', error);
        res.status(500).json({ error: 'Failed to send message' });
      }
    });
    
    app.listen(port, () => {
      console.log(`Producer listening at http://localhost:${port}`);
    });


    Next up, containerizing both apps so that I could deploy to a runtime.

    I used Google Cloud Artifact Registry as my container store, and created a Docker image from source code using Cloud Native buildpacks. It took one command for each app:

    gcloud builds submit --pack image=gcr.io/seroter-project-base/seroter-kafka-consumer
    gcloud builds submit --pack image=gcr.io/seroter-project-base/seroter-kafka-publisher

    Now we had everything needed to deploy and test our client apps.

    Deploy apps to Cloud Run and test it out

    I chose Google Cloud Run because I like nice things. It’s still one of the best two or three ways to host apps in the cloud. We also make it much easier now to connect to a VPC, which is what I need. Instead of creating some tunnel out of my cluster, I’d rather access it more securely.

    Here’s how I configured the consuming app. I first picked my container image and a target location.

    Then I chose to use always-on CPU for the consumer, as I had connection issues when I had a purely ephemeral container.

    The last setting was the VPC egress that made it possible for this instance to talk to the Apache Kafka cluster.

    About three seconds later, I had a running Cloud Run instance ready to consume.

    I ran through a similar deployment process for the publisher app, except I kept the true “scale to zero” setting turned on since it doesn’t matter if the publisher app comes and goes.

    With all apps deployed, I fired up the browser and issued a pair of requests to the “publish” endpoint.

    I checked the consumer app’s logs and saw that messages were successfully retrieved.

    Sending a request to the GET endpoint on the consumer app returns the pair of messages I sent from the publisher app.

    Sweet! We proved that we could send messages to the Apache Kafka cluster, and retrieve them. I get all the benefits of Apache Kafka, integrated into Google Cloud, with none of the operational toil.

    Read more in the docs about this preview service.

    Option 3: Use a managed provider on your cloud(s) of choice

    The final way you might choose to run Apache Kafka in the cloud is to use a SaaS product designed to work on different infrastructures.

    The team at Confluent does much of the work on open source Apache Kafka and offers a managed product via Confluent Cloud. It’s performant, feature-rich, and runs in AWS, Azure, and Google Cloud. Another option is Redpanda, who offer a managed cloud service that they operate on their infrastructure in AWS or Google Cloud.

    Why do this? Choosing a “best of breed” type of managed service is going to give you excellent feature coverage and operational benefits. These platforms are typically operated by experts and finely tuned for performance and scale. Are there any downside? These platforms aren’t free, and don’t always have all the native integrations into their target cloud (logging, data services, identity, etc) that a built-in service does. And you won’t have all the configurability or infrastructure choice that you’d have running it yourself.

    Wrap up

    It’s a great time to run Apache Kafka in the cloud. You can go full DIY or take advantage of managed services. As always, there are tradeoffs with each. You might even use a mix of products and approaches for different stages (dev/test/prod) and departments within your company. Are there any options I missed? Let me know!

  • Building an event-driven architecture in the cloud? These are three approaches for generating events.

    Building an event-driven architecture in the cloud? These are three approaches for generating events.

    When my son was 3 years old, he would often get out of bed WAAAAY too early and want to play with me. I’d send him back to bed, and inevitably he’d check in again just a few minutes later. Eventually, we got him a clock with a timed light on it, so there was a clear trigger that it was time to get up.

    Originally, my son was like a polling component that keeps asking “is it time yet?” I’ve built many of those myself in software. It’s a simple way to produce an event (“time to get up”, or “new order received”) when it’s the proper moment. But these pull-based approaches are remarkably inefficient and often return empty results until the time is right. Getting my son a clock that turned green when it was time to get out of bed is more like a push-based approach where the system tells you when something happened.

    In software, there are legit reasons to do pull-based activities—maybe you intentionally want to batch the data retrieval and process it once a day—but it’s more common nowadays to see architects and developers embrace a push-driven event-based architecture that can operate in near real-time. Cloud platforms make this much easier to set up than it used to be with on-premises software!

    I see three ways to activate events in your cloud architecture. Let’s look at examples of each.

    Events automatically generated by service changes

    This is all about creating event when something happens to the cloud service. Did someone create a new IAM role? Build a Kubernetes cluster? Delete a database backup? Update a machine learning model?

    The major hyperscale cloud providers offer managed services that capture and route these events. AWS offers Amazon EventBridge, Microsoft gives you Azure Event Grid, and Google Cloud serves up Eventarc. Instead of creating your own polling component, retry logic, data schemas, observability system, and hosting infrastructure, you can use a fully managed end-to-end option in the cloud. Yes, please. Let’s look at doing this with Eventarc.

    I can create triggers for most Google Cloud services, then choose among all the possible events for each service, provide any filters for what I’m looking for, and then choose a destination. Supported destinations for the routed event include serverless functions (Cloud Functions), serverless containers (Cloud Run), declarative workflow (Cloud Workflows), a Kubernetes service (GKE), or a random internal HTTP endpoint.

    Starting here assumes I have a event destination pre-configured to receive the CloudEvents-encoded event. Let’s assume I don’t have anything in place to “catch” the event and need to create a new Cloud Function.

    When I create a new Cloud Function, I have a choice of picking a non-HTTP trigger. This flys open an Eventarc pane where I follow the same steps as above. Here, I chose to catch the “enable service account” event for IAM.

    Then I get function code that shows me how to read the key data from the CloudEvent payload. Handy!

    Use these sorts of services to build loosely-coupled solutions to react to what’s going on in our cloud environment.

    Events automatically generated by data changes

    This is the category most of us are familiar with. Here, it’s about change data capture (CDC) that triggers an event based on new, updated, or deleted data in some data source.

    Databases

    Again, in most hyperscale clouds, you’ll find databases with CDC interfaces built in. I found three within Google Cloud: Cloud Spanner, Bigtable, and Firestore.

    Cloud Spanner, our cloud-native relational database, offers change streams. You can “watch” an entire database, or narrow it down to specific tables or columns. Each data change record has the name of the affected table, the before-and-after data values, and a timestamp. We can read these change streams within our Dataflow product, calling the Spanner API, or using the Kafka connector. Learn more here.

    Bigtable, our key-value database service, also supports change streams. Every data change record contains a bunch of relevant metadata, but does not contain the “old” value of the database record. Similar to Spanner, you can read Bigtable change streams using Dataflow or the Java client library. Learn more here.

    Firestore is our NoSQL cloud database that’s often associated with the Firebase platform. This database has a feature to create listeners on a particular document or document collection. It’s different from the previous options, and looks like it’s mostly something you’d call from code. Learn more here.

    Some of our other databases like Cloud SQL support CDC using their native database engine (e.g. SQL Server), or can leverage our manage change data capture service called Datastream. Datastream pulls from PostgreSQL, MySQL, and Oracle data sources and publishes real-time changes to storage or analytical destinations.

    “Other” services

    There is plenty of “data” in systems that aren’t “databases.” What if you want events from those? I looked through Google Cloud services and saw many others that can automatically send change events to Google Cloud Pub/Sub (our message broker) that you can then subscribe to. Some of these look like a mix of the first category (notifications about a service) and this category (notifications about data in the service):

    • Cloud Storage. When objects change in Cloud Storage, you can send notifications to Pub/Sub. The payload contains info about the type of event, the bucket ID, and the name of the object itself.
    • Cloud Build. Whenever your build state changes in Cloud Build (our CI engine), you can have a message sent to Pub/Sub. These events go to a fixed topic called “cloud-builds” and the event message holds a JSON version of your build resource. You can configure either push or pull subscriptions for these messages.
    • Artifact Registry. Want to set up an event for changes to Docker repositories? You can get messages for image uploads, new tags, or image deletions. Here’s how to set it up.
    • Artifact Analysis. This package scanning tool look for vulnerabilities, and you can send notifications to Pub/Sub when vulnerabilities are discovered. The simple payloads tell you what happened, and when.
    • Cloud Deploy. Our continuous deployment tool also offers notifications about changes to resources (rollouts, pipelines), when approvals are needed, or when a pipeline is advancing phases. It can be handy to use these notifications to kick off further stages in your workflows.
    • GKE. Our managed Kubernetes service also offers automatic notifications. These apply at the cluster level versus events about individual workloads. But you can get events about security bulletins for the cluster, new GKE versions, and more.
    • Cloud Monitoring Alerts. Our built-in monitoring service can send alerts to all sorts of notification channels including email, PagerDuty, SMS, Slack, Google Chat, and yes, Pub/Sub. It’s useful to have metric alert events routing through your messaging system, and you can see how to configure that here.
    • Healthcare API. This capability isn’t just for general-purpose cloud services. We offer a rich API for ingesting, storing, analyzing, and integrating healthcare data. You can set up automatic events for FHIR, HL7 resources, and more. You get metadata attributes and an identifier for the data record.

    And there are likely other services I missed! Many cloud services have built-in triggers that route events to downstream components in your architecture.

    Events manually generated by code or DIY orchestration

    Sometimes you need fine-grained control for generating events. You might use code or services to generate and publish events.

    First, you may wire up managed services to do your work. Maybe you use Azure Logic Apps or Google Cloud App Integration to schedule a database poll every hour, and then route any relevant database records as individual events. Or you use a data processing engine like Google Cloud Dataflow to generate batch or real-time messages from data sources into Pub/Sub or another data destination. And of course, you may use third-party integration platform that retrieve data from services and generates events.

    Secondly, you may hand-craft an event in your code. Your app could generate events when specific things happen in your business logic. Every cloud offers a managed messaging service, and you can always send events from your code to best-of-breed products like RabbitMQ, Apache Kafka, or NATS.

    In this short example, I’m generating an event from within a Google Cloud Function and sending it to Pub/Sub. BTW, since Cloud Functions and Pub/Sub both have generous free tiers, you can follow along at no cost.

    I created a brand new function and chose Node.js 20 as my language/framework. I added a single reference to the package.json file:

    "@google-cloud/pubsub": "4.0.7"
    

    Then I updated the default index.js code with a reference to the pubsub package, and added code to publish the incoming querystring value as an event to Pub/Sub.

    const functions = require('@google-cloud/functions-framework');
    const {PubSub} = require('@google-cloud/pubsub');
    
    functions.http('helloHttp', (req, res) => {
    
      var projectId = 'seroter-project-base'; 
      var topicNameOrId = 'custom-event-router';
    
      // Instantiates a client
      const pubsub = new PubSub({projectId});
      const topic = pubsub.topic(topicNameOrId);
    
      // Send a message to the topic
      topic.publishMessage({data: Buffer.from('Test message from ' + req.query.name)});
    
      // return result
      res.send(`Hello ${req.query.name || req.body.name || 'World'}!`);
    });
    

    That’s it. Once I deployed the function and called the endpoint with a querystring, I saw all the messages show up in Pub/Sub, ready to be consumed.

    Wrap

    Creating and processing events using managed services in the cloud is powerful. It can both simplify and complicate your architecture. It can make it simpler by getting rid of all the machinery to poll and process data from your data sources. Events make your architecture more dynamic and reactive. And that’s where it can get more complicated if you’re not careful. Instead of a clumsy, but predictable set of code that pulls data and processes it inline, now you might have a handful of loosely-coupled components that are lightly orchestrated. Do what makes sense, versus what sounds exciting!

  • There’s a new cloud-based integration platform available. Here are eight things I like (and two I don’t) about Google Cloud Application Integration.

    There’s a new cloud-based integration platform available. Here are eight things I like (and two I don’t) about Google Cloud Application Integration.

    At this time, exactly twenty three years ago, I was in a downtown Seattle skyscraper learning how to use a rough version of a new integration product from Microsoft called BizTalk Server. Along with 100+ others at this new consulting startup called Avanade (now, 50,000+ people), we were helping companies use Microsoft server products. From that point on at Avanade, through a stint at Microsoft and then a biotech company, I lived in the messaging/integration/ESB space. Even after I switched my primary attention to cloud a decade or so ago, I kept an eye on this market. It’s a very mature space, full of software products and as-a-service offerings. That’s why I was intrigued to see my colleagues at Google Cloud (note: not in my product area) ship a brand new service named Application Integration. I spent some time reading all the docs and building some samples, and formed some impressions. Here are the many things I like, and a few things I don’t like.

    I LIKE the extremely obvious product naming. We don’t have a lot of whimsy or mystery in our Google Cloud product names. You can mostly infer what the service does from the name. You won’t find many Snowballs, Lightsails, or Fargates in this portfolio. The new service is for those doing application integration, as the name says.

    I LIKE the rich set of triggers that kick off an integration. The Application Integration service is what Gartner calls an “integration platform as a service” and it takes advantage of other Google Cloud services instead of reinventing existing components. That means it doesn’t need to create its own messaging or operational layers. This gives us a couple of “free” triggers. Out of the box, Application Integration offers triggers for Pub/Sub, web requests (API), scheduler, Salesforce, and even some preview triggers for Jira, ZenDesk, and ServiceNow.

    I LIKE the reasonable approach to data management. Any decent integration product needs to give you good options for defining, mapping, and transporting data. With Application Integrations, we work with “variables” that hold data. Variables can be global or local. See here how I explore the different data types including strings, arrays, and JSON.

    The service also generates variables for you. If you connect to a database or a service like Google Cloud Storage, the service gives you typed objects that represent the input and output. Once you have variables, you can create data mappings. Here, I took an input variable and mapped the values to the values in the Cloud Storage variable.

    There are some built-in functions to convert data types, extract values, and such. It’s a fairly basic interface, but functional for mappings that aren’t super complex.

    I LIKE the strong list of tasks and control flow options. How do you actually do stuff in an integration? The answer: tasks. These are pre-canned activities that stitch together to build your process. The first type are “integration tasks” like data mapping (shown above), looping (for-each, do-while), sending-and-receiving user approval, sending emails, calling connectors, and more. This is on top of native support for forks and joins, along true/false conditions. You can do a lot with all these.

    As you might expect (hope for? dream?), the service includes a handful of Google Cloud service tasks. Pull data from Firestore, invoke Translation AI services, list files in Google Drive, add data to a Google Sheet, call a Cloud Function, and more.

    I LIKE the solid list of pre-built connectors. An iPaaS is really only as good as its connector library. Otherwise, it’s just a workflow tool. A good “connector” (or adapter) offers a standard interface for authentication, protocol translation, data handling, and more. Application Integration offers a good—not great—list of initial Google Cloud services, and an impressive set of third-party connectors. The Google Cloud ones are primarily databases (which makes sense), and the third party ones include popular systems like Active Directory, Cassandra, MongoDB, SAP HANA, Splunk, Stripe, Twilio, Workday and more. And through support for Private Service Connect, connectors can reach into private—even on-premises—endpoints.

    I LIKE the extensibility options baked into the service. One of the complaints I’ve had with other iPaaS products is they initially offered constrained experiences. All you could use were the pre-built components which limited you to a fixed set of use cases. With Application Integration, I see a few smart ways the service lets me do my own thing:

    • JavaScript task. This “catch-all” tasks lets you run arbitrary JavaScript that might mess with variables, do more complex data transformations, or whatever else. It’s pretty slick that the code editor offers code completion and syntax highlighting.
    • Generic REST and HTTP call support. The service offers a task that invokes a generic REST endpoint—with surprisingly sophisticated configuration options—as well as a connector for a generic HTTP endpoint. This ensures that you can reach into a variety of systems that don’t have pre-built connectors.
    • Cloud Functions integration. We can debate whether you should ever embed business logic or code into maps or workflows. Ideally, all of that sits outside in components that you can independently version and manage. With Cloud Functions integration, that’s possible.
    • Build custom mappings using Jsonnet templates. The default mapping may not be the right choice for complex or big mappings. Fortunately you can define your own maps using a fairly standard approach.

    I LIKE the post-development tools. I’ve occasionally seen “day 2” concerns left behind on the first release of an iPaaS. The focus is on the dev experience, with limited help for managing deployed resources. Not here. It’s coming out of the gate with good logging transparency:

    It also offers a versioning concept so that you can not fear making changes and immediately having those changes in “production.”

    The pre-defined monitoring dashboard is good and because it’s built on our Cloud Monitoring service, offers straightforward customization and powerful chart features.

    I LIKE the fit and finish of the UX. This feels better than a v1 product to me. The UI is clean, the visual designer surface is smooth, there are a wide range of security configurations, it has useful inline testing tools, and it has some well thought out error handling strategies. Additionally, it offers features that took a while to come to other iPaaS products including upload/download of integrations, versioning, and programmable APIs.

    I DON’T LIKE the explicit infrastructure feel of the connectors. With Application Integration, you explicit provision and become aware of connections. When creating a connection, you pick node pool sizes and wait for infrastructure to come online. This is likely good for predictable performance and security, but I’d rather this be hidden from the user!

    I DON’T LIKE the lack of CI/CD options. Admittedly, this isn’t common for every mature iPaaS, but I’d like to see more turnkey ways to author, test, version, and deploy an integration using automation tools. I’m sure it’s coming, but not here yet.

    All-in-all this, this is an impressive new service. The pricing is pay-as-you-go with a free tier, and seems reasonable overall. Would I recommend that you use this if you use NOTHING else from Google Cloud? I don’t think so. There are other very good, general purpose iPaaS products. But if you’re in our Cloud ecosystem, want easy access to our data and AI services from your integration workflows, then you should absolutely give this a look.

  • Build event handlers and scale them across regions, all with serverless cloud services? Let’s try it.

    Build event handlers and scale them across regions, all with serverless cloud services? Let’s try it.

    Is a serverless architecture realistic for every system? Of course not. But it’s never been easier to build robust solutions out of a bunch of fully-managed cloud services. For instance, what if I want to take uploaded files, inspect them, and route events to app instances hosted in different regions around the world? Such a solution might require a lot of machinery to set up and manage—file store, file listeners, messaging engines, workflow system, hosting infrastructure, and CI/CD products. Yikes. How about we do that with serverless technology such as:

    The final architecture (designed with the free and fun Architecture Diagramming Tool) looks like this:

    Let’s build this together, piece by piece.

    Step 1: Build Java app that processes CloudEvents

    The heart of this system is the app that processes “loan” events. The events produced by Eventarc are in the industry-standard CloudEvents format. Do I want to parse and process those events in code manually? No, no I do not. Two things will help here. First, our excellent engineers have built client libraries for every major language that you can use to process CloudEvents for various Google Cloud services (e.g. Storage, Firestore, Pub/Sub). My colleague Mete took it a step further by creating VS Code templates for serverless event-handlers in Java, .NET, Python, and Node. We’ll use those.

    To add these templates to your Visual Studio Code environment, you start with Cloud Code, our Google Cloud extension to popular IDEs. Once Cloud Code is installed, I can click the “Cloud Code” menu and then choose the “New Application” option.

    Then I chose the “Custom Application” option and “Import Sample from Repo” and added a link to Mete’s repo.

    Now I have the option to pick a “Cloud Storage event” code template for Cloud Functions (traditional function as a service) or Cloud Run (container-based serverless). I picked the Java template for Cloud Run.

    The resulting project is a complete Java application. It references the client library mentioned above, which you can see as google-cloudevent-types in the pom.xml file. The code is fairly straightforward and the core operation accepts the inbound CloudEvent and creates a typed StorageObjectData object.

    @PostMapping("/")
    ResponseEntity<Void> handleCloudEvent(@RequestBody CloudEvent cloudEvent) throws InvalidProtocolBufferException {
    
          // CloudEvent information
          logger.info("Id: " + cloudEvent.getId());
          logger.info("Source: " + cloudEvent.getSource());
          logger.info("Type: " + cloudEvent.getType());
    
          String json = new String(cloudEvent.getData().toBytes());
          StorageObjectData.Builder builder = StorageObjectData.newBuilder();
          JsonFormat.parser().merge(json, builder);
          StorageObjectData data = builder.build();
    
          // Storage object data
          logger.info("Name: " + data.getName());
          logger.info("Bucket: " + data.getBucket());
          logger.info("Size: " + data.getSize());
          logger.info("Content type: " + data.getContentType());
    
          return ResponseEntity.ok().build();
     }
    

    This generated project has directions and scripts to test locally, if you’re so inclined. I went ahead and deployed an instance of this app to Cloud Run using this simple command:

    gcloud run deploy --source .
    

    That gave me a running instance, and, a container image I could use in our next step.

    Step 2: Create parallel deployment of Java app to multiple Cloud Run locations

    In our fictitious scenario, we want an instance of this Java app in three different regions. Let’s imagine that the internal employees in each geography need to work with a local application.

    I’d like to take advantage of a new feature of Cloud Deploy, parallel deployments. This makes it possible to deploy the same workload to a set of GKE clusters or Cloud Run environments. Powerful! To be sure, the MOST applicable way to use parallel deployments is a “high availability” scenario where you’d deploy identical instances across locations and put a global load balancer in front of it. Here, I’m using this feature as a way to put copies of an app closer to specific users.

    First, I need to create “service” definitions for each Cloud Run environment in my deployment pipeline. I’m being reckless, so let’s just have “dev” and “prod.”

    My “dev” service definition looks like this. The “image” name can be anything, as I’ll replace this placeholder in realtime when I deploy the pipeline.

    apiVersion: serving.knative.dev/v1
    kind: Service
    metadata:
      name: event-app-dev
    spec:
      template:
        spec:
          containers:
          - image: java-eventlistener
    

    The “production” YAML service is identical except for a different service name.

    Next, I need a Skaffold file that identifies the environments for my pipeline, and points to the respective YAML files that represent each environment.

    apiVersion: skaffold/v4beta1
    kind: Config
    metadata: 
      name: deploy-run-webapp
    profiles:
    - name: dev
      manifests:
        rawYaml:
        - run-dev.yaml
    - name: prod
      manifests:
        rawYaml:
        - run-prod.yaml
    deploy:
      cloudrun: {}
    

    The final artifact I need is a DeliveryPipeline definition. It calls out two stages (dev and prod), and for production that points to a multiTarget that refers to three Cloud Run targets.

    apiVersion: deploy.cloud.google.com/v1
    kind: DeliveryPipeline
    metadata:
     name: my-parallel-event-app
    description: event application pipeline
    serialPipeline:
     stages:
     - targetId: app-dev
       profiles: [dev]
     - targetId: app-prod-multi
       profiles: [prod]
    ---
    
    apiVersion: deploy.cloud.google.com/v1
    kind: Target
    metadata:
     name: app-dev
    description: Cloud Run development service
    run:
     location: projects/seroter-project-base/locations/us-central1
    
    ---
    
    apiVersion: deploy.cloud.google.com/v1
    kind: Target
    metadata:
     name: app-prod-multi
    description: production
    multiTarget:
     targetIds: [prod-east, prod-west, prod-northeast2]
    ---
    
    apiVersion: deploy.cloud.google.com/v1
    kind: Target
    metadata:
     name: prod-east
    description: production us-east1
    run:
     location: projects/seroter-project-base/locations/us-east1
    ---
    
    apiVersion: deploy.cloud.google.com/v1
    kind: Target
    metadata:
     name: prod-west
    description: production us-west1
    run:
     location: projects/seroter-project-base/locations/us-west1
    
    ---
    
    apiVersion: deploy.cloud.google.com/v1
    kind: Target
    metadata:
     name: prod-northeast2
    description: production northamerica-northeast2
    run:
     location: projects/seroter-project-base/locations/northamerica-northeast2 
    

    All set. It takes a single command to create the deployment pipeline.

    gcloud deploy apply --file=clouddeploy.yaml --region=us-central1 --project=seroter-project-base
    

    In the Google Cloud Console, I can see my deployed pipeline with two stages and multiple destinations for production.

    Now it’s time to create a release for this deployment and see everything provisioned.

    The command to create a release might be included in your CI build process (whether that’s Cloud Build, GitHub Actions, or something else), or you can run the command manually. I’ll do that for this example. I named the release, gave it the name of above pipeline, and swapped the placeholder image name in my service YAML files with a reference to the container image generated by the previously-deployed Cloud Run instance.

    gcloud deploy releases create test-release-001 \
    --project=seroter-project-base \
    --region=us-central1 \
    --delivery-pipeline=my-parallel-event-app \
    --images=java-eventlistener=us-south1-docker.pkg.dev/seroter-project-base/cloud-run-source-deploy/java-cloud-run-storage-event
    

    After a few moments, I see a deployment to “dev” rolling out.

    When that completed, I “promoted” the release to production and saw a simultaneous deployment to three different cloud regions.

    Sweet. Once this is done, I check and see four total Cloud Run instances (one for dev, three for prod) created. I like the simplicity here for shipping the same app instance to any cloud region. For GKE clusters, this also works with Anthos environments, meaning you could deploy to edge, on-prem or other clouds as part of a parallel deploy.

    We’re done with this step. I have an event-receiving app deployed around North America.

    Step 3: Set up Cloud Storage bucket

    This part is simple. I use the Cloud Console to create a new object storage bucket named seroter-loan-applications. We’ll assume that an application drops files into this bucket.

    Step 4: Write Cloud Workflow that routes events to correct Cloud Run instance

    There are MANY ways one could choose to architect this solution. Maybe you upload files to specific bucket and route directly to the target Cloud Run instance using a trigger. Or you route all bucket uploads to a Cloud Function and decide there where you’ll send it next. Plus dozens of other options. I’m going to use a Cloud Workflow that receives an event, and figures out where to send it next.

    A Cloud Workflow is described with a declarative definition written in YAML or JSON. It’s got a standard library of functions, supports control flow, and has adapters to lots of different cloud services. This Workflow needs to parse an incoming CloudEvent and route to one of our three (secured) Cloud Run endpoints. I do a very simple switch statement that looks at the file name of the uploaded file, and routes it accordingly. This is a terrible idea in real life, but go with me here.

    main:
        params: [eventmsg]
        steps:
            - get-filename:
                assign:
                    - filename: ${eventmsg.data.name}
            - choose_endpoint:
                switch:
                    - condition: ${text.match_regex(filename, "northeast")}
                      next: forward_request_northeast
                    - condition: ${text.match_regex(filename, "uswest")}
                      next: forward_request_uswest
                    - condition: ${text.match_regex(filename, "useast")}
                      next: forward_request_useast
            - forward_request_northeast: 
                call: http.post
                args:
                    url: https://event-app-prod-ofanvtevaa-pd.a.run.app
                    auth:
                        type: OIDC
                    headers:
                        Content-Type: "application/json"
                        ce-id: ${eventmsg.id} #"123451234512345"
                        ce-specversion: ${eventmsg.specversion} #"1.0"
                        ce-time: ${eventmsg.time} #"2020-01-02T12:34:56.789Z"
                        ce-type: ${eventmsg.type} #"google.cloud.storage.object.v1.finalized"
                        ce-source: ${eventmsg.source} #"//storage.googleapis.com/projects/_/buckets/MY-BUCKET-NAME"
                        ce-subject: ${eventmsg.subject} #"objects/MY_FILE.txt"
                    body:
                        ${eventmsg.data}
                result: the_message
                next: returnval
            - forward_request_uswest: 
                call: http.post
                args:
                    url: https://event-app-prod-ofanvtevaa-uw.a.run.app
                    auth:
                        type: OIDC
                    headers:
                        Content-Type: "application/json"
                        ce-id: ${eventmsg.id} #"123451234512345"
                        ce-specversion: ${eventmsg.specversion} #"1.0"
                        ce-time: ${eventmsg.time} #"2020-01-02T12:34:56.789Z"
                        ce-type: ${eventmsg.type} #"google.cloud.storage.object.v1.finalized"
                        ce-source: ${eventmsg.source} #"//storage.googleapis.com/projects/_/buckets/MY-BUCKET-NAME"
                        ce-subject: ${eventmsg.subject} #"objects/MY_FILE.txt"
                    body:
                        ${eventmsg.data}
                result: the_message
                next: returnval
            - forward_request_useast: 
                call: http.post
                args:
                    url: https://event-app-prod-ofanvtevaa-ue.a.run.app
                    auth:
                        type: OIDC
                    headers:
                        Content-Type: "application/json"
                        ce-id: ${eventmsg.id} #"123451234512345"
                        ce-specversion: ${eventmsg.specversion} #"1.0"
                        ce-time: ${eventmsg.time} #"2020-01-02T12:34:56.789Z"
                        ce-type: ${eventmsg.type} #"google.cloud.storage.object.v1.finalized"
                        ce-source: ${eventmsg.source} #"//storage.googleapis.com/projects/_/buckets/MY-BUCKET-NAME"
                        ce-subject: ${eventmsg.subject} #"objects/MY_FILE.txt"
                    body:
                        ${eventmsg.data}
                result: the_message
                next: returnval
            - returnval:    
                return: ${the_message}    
    

    This YAML results in a workflow that looks like this:

    Step 5: Configure Eventarc trigger to kick off a Cloud Workflow

    Our last step is to wire up the “file upload” event to this workflow. For that, we use Eventarc. Eventarc handles the machinery for listening to events and routing them. See here that I chose Cloud Storage as my event source (there are dozens and dozens), and then the event I want to listen to. Next I selected my source bucket, and chose a destination. This could be Cloud Run, Cloud Functions, GKE, or Workflows. I chose Workflows and then my specific Workflow that should kick off.

    All good. Now I have everything wired up and can see this serverless solution in action.

    Step 6: Test and enjoy

    Testing this solution is straightforward. I dropped three “loan application” files into the bucket, each named with a different target region.

    Sure enough, three Workflows kick off and complete successfully. Clicking into one of them shows the Workflow’s input and output.

    Looking at the Cloud Run logs, I see that each instance received an event corresponding to its location.

    Wrap Up

    No part of this solution required me to stand up hardware, worry about operating systems, or configure networking. Except for storage costs for my bucket objects, there’s no cost to this solution when it’s not running. That’s amazing. As you look to build more event-driven systems, consider stitching together some fully managed services that let you focus on what matters most.

  • Loading data directly into a warehouse via your messaging engine? Here’s how this handy new feature works in Google Cloud.

    Loading data directly into a warehouse via your messaging engine? Here’s how this handy new feature works in Google Cloud.

    First off, I am NOT a data analytics person. My advice is sketchy enough when it comes to app development and distributed systems that I don’t need to overreach into additional areas. That said, we at Google Cloud quietly shipped a new data-related feature this week that sparked my interest, and I figured that we could explore it together.

    To be sure, loading data into a data warehouse is a solved problem. Many of us have done this via ETL (extract-transform-load) tools and streaming pipelines for years. It’s all very mature technology, even when steering your data towards newfangled cloud data warehouses like the fully-managed Google Cloud’s BigQuery. Nowadays, app developers can also insert directly into these systems from their code. But what about your event-driven apps? It could be easier than it is today! This is why I liked this new subscription type for Google Cloud Pub/Sub—our messaging engine for routing data between systems—that is explicitly for BigQuery. That’s right, you can directly subscribe your data warehouse to your messaging system.

    Let’s try it out, end to end.

    First, I needed some data. BigQuery offers an impressive set of public data sets, including those with crime statistics, birth data summaries, GitHub activity, census data, and even baseball statistics. I’m not choosing any of those, because I wanted to learn more about how BigQuery works. So, I built a silly comma-separated file of “pet visits” to my imaginary pet store chain.

    1,"store400","2022-07-26 06:22:10","Mittens","cat","camp",806
    2,"store405","2022-07-26 06:29:15","Jessie","dog","bath",804
    3,"store400","2022-07-26 07:01:34","Ellie","dog","nailtrim",880
    4,"store407","2022-07-26 07:02:00","Rocket","cat","bath",802
    5,"store412","2022-07-26 07:06:45","Frank","cat","bath",853
    6,"store400","2022-07-26 08:08:08","Nala","cat","nailtrim",880
    7,"store407","2022-07-26 08:15:04","Rocky","dog","camp",890
    8,"store402","2022-07-26 08:39:16","Cynthia","bird","spa",857
    9,"store400","2022-07-26 08:51:14","Watson","dog","haircut",831
    10,"store412","2022-07-26 09:05:58","Manny","dog","camp",818

    I saved this data as “pets.csv” and uploaded it into a private, regional Google Cloud Storage Bucket.

    Excellent. Now I wanted this data loaded into a BigQuery table that I could run queries against. And eventually, load new data into when it flows through Pub/Sub.

    I’m starting with no existing data sets or tables in BigQuery. You can see here that all I have is my “project.” And there’s no infrastructure to provision or manage here, so all we have to think about is our data. Amazing.

    As an aside, we make it very straightforward to pull in data from all sorts of sources, even those outside of Google Cloud. So, this really can be a single solution for all your data analytics needs. Just sayin’. In this scenario, I wanted to add data to a BigQuery table, so I started by selecting my project and choosing to “create a dataset“, which is really just a container for data tables.

    Next, I picked my data set and click the menu option to “create table.” Here’s where it gets fun. I can create an empty table, upload some data or point to object storage repos like Google Cloud Storage, Amazon S3, or Azure Blob Storage. I chose Cloud Storage. Then I located my Storage bucket and chose “CSV” as the file format. Other options include JSON, Avro, and Parquet. Then I gave my table a name (“visits_table”). So far so good.

    The last part of this table creation process involves schema definition. BigQuery can autodetect the schema (data types and such), but I wanted to define it manually. The graphical interface offers a way to define column name, data type, and whether it’s a required data point or not.

    After creating the table, I could see the schema and run queries against the data. For example, this is a query that returns the count of each animal type coming into my chain of pet stores for service.

    You could imagine there might be some geospatial analysis, machine learning models, or other things we constantly do with this data set over time. That said, let’s hook it up to Pub/Sub so that we can push a real-time stream of “visits” from our event-driven architecture.

    Before we forget, we need to change permissions to allow Pub/Sub to send data to BigQuery tables. From within Google Cloud IAM, I chose to “include Google-provided role grants” in the list of principals, located my built-in Pub/Sub service account, and added the “BigQuery Data Editor” and “BigQuery Metadata Viewer” roles.

    When publishing from Pub/Sub to BigQuery you have a couple of choices for how to handle the data. One option is to dump the entire payload into a single “data” field, which doesn’t sound exciting. The other option is to use a Pub/Sub schema so that the data fields map directly to BigQuery table columns. That’s better. I navigated to the Pub/Sub “Schemas” dashboard and created a new schema.

    If kids are following along at home, the full schema looks like this:

    {
        "type": "record",
        "name": "Avro",
        "fields": [
          {
            "name": "apptid",
            "type": "int"
          },
          {
            "name": "storeid",
            "type": "string"
          },
          {
            "name": "visitstamp",
            "type": "string"
          },
          {
            "name": "petname",
            "type": "string"
          },
          {
            "name": "animaltype",
            "type": "string"
          },
          {
            "name": "servicetype",
            "type": "string"
          },
          {
            "name": "customerid",
            "type": "int"
          }
        ]
      }
    

    We’re almost there. Now we just needed to create the actual Pub/Sub topic and subscription. I defined a new topic named “pets-topic”, and selected the box to “use a schema.” Then I chose the schema we created above.

    Now for the subscription itself. As you see below, there’s a “delivery type” for “Write to BigQuery” which is super useful. Once I chose that, I was asked for the dataset and table, and I chose the option to “use topic schema” so that the message body would map to the individual columns in the table.

    This is still a “regular” Pub/Sub subscription, so if I wanted to, I could set properties like message retention duration, expiration period, subscription filters, and retry policies.

    Nothing else to it. And we did it all from the Cloud Console. To test this out, I went to my topic in the Cloud Console, and chose to send a message. Here, I sent a single message that conformed to the topic schema.

    Almost immediately, my BigQuery table got updated and I saw the new data in my query results.

    When I searched online, I saw various ways that people have stitched together their (cloud) messaging engines with their data warehouse. But from what I can tell, what we did here is the simplest, most-integrated way to pull that off. Try it out and tell me what you think!

  • Running serverless web, batch, and worker apps with Google Cloud Run and Cloud Spanner

    Running serverless web, batch, and worker apps with Google Cloud Run and Cloud Spanner

    If it seems to you that cloud providers offer distinct compute services for every specific type of workload, you’re not imagining things. Fifteen years ago when I was building an app, my hosting choices included a virtual machine or a physical server. Today? You’ll find services targeting web apps, batch apps, commercial apps, containerized apps, Windows apps, Spring apps, VMware-based apps, and more. It’s a lot. So, it catches my eye when I find a modern cloud service that support a few different types of workloads. Our serverless compute service Google Cloud Run might be the fastest and easiest way to get web apps running in the cloud, and we just added support for background jobs. I figured I’d try out Cloud Run for three distinct scenarios: web app (responds to HTTP requests, scales to zero), job (triggered, runs to completion), and worker (processes background work continuously).

    Let’s make this scenario come alive. I want a web interface that takes in “orders” and shows existing orders (via Cloud Run web app). There’s a separate system that prepares orders for delivery and we poll that system occasionally (via Cloud Run job) to update the status of our orders. And when the order itself is delivered, the mobile app used by the delivery-person sends a message to a queue that a worker is constantly listening to (via Cloud Run app). The basic architecture is something like this:

    Ok, how about we build it out!

    Setting up our Cloud Spanner database

    The underlying database for this system is Cloud Spanner. Why? Because it’s awesome and I want to start using it more. Now, I should probably have a services layer sitting in front of the database instead of doing direct read/write, but this is my demo and I’ll architect however I damn well please!

    I started by creating a Spanner instance. We’ve recently made it possible to create smaller instances, which means you can get started at less cost, without sacrificing resilience. Regardless of the number of “processing units” I choose, I get 3 replicas and the same availability SLA. The best database in the cloud just got a lot more affordable.

    Next, I add a database to this instance. After giving it a name, I choose the “Google Standard SQL” option, but I could have also chosen a PostgreSQL interface. When defining my schema, I like that we offer script templates for actions like “create table”, “create index”, and “create change stream.” Below, you see my table definition.

    With that, I have a database. There’s nothing left to do, besides bask in the glory of having a regionally-deployed, highly available relational database instance at my disposal in about 60 seconds.

    Creating the web app in Go and deploying to Cloud Run

    With the database in place, I can build a web app with read/write capabilities.

    This app is written in Go and uses the echo web framework. I defined a basic struct that matches the fields in the database.

    package model
    
    type Order struct {
    	OrderId        int64
    	ProductId      int64
    	CustomerId     int64
    	Quantity       int64
    	Status         string
    	OrderDate      string
    	FulfillmentHub string
    }
    

    I’m using the Go driver for Spanner and the core of the logic consists of the operations to retrieve Spanner data and create a new record. I need to be smarter about reusing the connection, but I’ll refactor it later. Narrator: He probably won’t refactor it.

    package web
    
    import (
    	"context"
    	"log"
    	"time"
    	"cloud.google.com/go/spanner"
    	"github.com/labstack/echo/v4"
    	"google.golang.org/api/iterator"
    	"seroter.com/serotershop/model"
    )
    
    func GetOrders() []*model.Order {
    
    	//create empty slice
    	var data []*model.Order
    
    	//set up context and client
    	ctx := context.Background()
    	db := "projects/seroter-project-base/instances/seroter-spanner/databases/seroterdb"
    	client, err := spanner.NewClient(ctx, db)
    	if err != nil {
    		log.Fatal(err)
    	}
    
    	defer client.Close()
        //get all the records in the table
    	iter := client.Single().Read(ctx, "Orders", spanner.AllKeys(), []string{"OrderId", "ProductId", "CustomerId", "Quantity", "Status", "OrderDate", "FulfillmentHub"})
    
    	defer iter.Stop()
    
    	for {
    		row, e := iter.Next()
    		if e == iterator.Done {
    			break
    		}
    		if e != nil {
    			log.Println(e)
    		}
    
    		//create object for each row
    		o := new(model.Order)
    
    		//load row into struct that maps to same shape
    		rerr := row.ToStruct(o)
    		if rerr != nil {
    			log.Println(rerr)
    		}
    		//append to collection
    		data = append(data, o)
    
    	}
    	return data
    }
    
    func AddOrder(c echo.Context) {
    
    	//retrieve values
    	orderid := c.FormValue("orderid")
    	productid := c.FormValue("productid")
    	customerid := c.FormValue("customerid")
    	quantity := c.FormValue("quantity")
    	status := c.FormValue("status")
    	hub := c.FormValue("hub")
    	orderdate := time.Now().Format("2006-01-02")
    
    	//set up context and client
    	ctx := context.Background()
    	db := "projects/seroter-project-base/instances/seroter-spanner/databases/seroterdb"
    	client, err := spanner.NewClient(ctx, db)
    	if err != nil {
    		log.Fatal(err)
    	}
    
    	defer client.Close()
    
    	//do database table write
    	_, e := client.Apply(ctx, []*spanner.Mutation{
    		spanner.Insert("Orders",
    			[]string{"OrderId", "ProductId", "CustomerId", "Quantity", "Status", "FulfillmentHub", "OrderDate"},
    			[]interface{}{orderid, productid, customerid, quantity, status, hub, orderdate})})
    
    	if e != nil {
    		log.Println(e)
    	}
    }
    

    Time to deploy! I’m using Cloud Build to generate a container image without using a Dockerfile. A single command triggers the upload, build, and packaging of my app.

    gcloud builds submit --pack image=gcr.io/seroter-project-base/seroter-run-web
    

    After a moment, I have a container image ready to go. I jumped in the Cloud Run experience and chose to create a new service. After picking the container image I just created, I kept the default autoscaling (minimum of zero instances), concurrency, and CPU allocation settings.

    The app started in seconds, and when I call up the URL, I see my application. And I went ahead and submitted a few orders, which then show up in the list.

    Checking Cloud Spanner—just to ensure this wasn’t only data sitting client-side—shows that I have rows in my database table.

    Ok, my front end web application is running (when requests come in) and successfully talking to my Cloud Spanner database.

    Creating the batch processor in .NET and deploying to Cloud Run jobs

    As mentioned in the scenario summary, let’s assume we have some shipping system that prepares the order for delivery. Every so often, we want to poll that system for changes, and update the order status in the Spanner database accordingly.

    Until lately, you’d run these batch jobs in App Engine, Functions, a GKE pod, or some other compute service that you could trigger on a schedule. But we just previewed Cloud Run jobs which offers a natural choice moving forward. Here, I can run anything that can be containerized, and the workload runs until completion. You might trigger these via Cloud Scheduler, or kick them off manually.

    Let’s write a .NET console application that does the work. I’m using the new minimal API that hides a bunch of boilerplate code. All I have is a Program.cs file, and a package dependency on Google.Cloud.Spanner.Data. Because I don’t like you THAT much, I didn’t actually create a stub for the shipping system, and decided to update the status of all the rows at once.

    using Google.Cloud.Spanner.Data;
    
    Console.WriteLine("Starting job ...");
    
    //connection string
    string conn = "Data Source=projects/seroter-project-base/instances/seroter-spanner/databases/seroterdb";
    
    using (var connection = new SpannerConnection(conn)) {
    
        //command that updates all rows with the initial status
        SpannerCommand cmd = connection.CreateDmlCommand("UPDATE Orders SET Status = 'SHIPPED' WHERE Status = 'SUBMITTED'");
    
        //execute and hope for the best
        cmd.ExecuteNonQuery();
    }
    
    //job should end after this
    Console.WriteLine("Update done. Job completed.");


    Like before, I use a single Cloud Build command to compile and package my app into a container image: gcloud builds submit --pack image=gcr.io/seroter-project-base/seroter-run-job

    Let’s go back into the Cloud Run interface, where we just turned on a UI for creating and managing jobs. I start by choosing my just-now-created container image and keeping the “number of tasks” to 1.

    For reference, there are other fun “job” settings. I can allocate up to 32GB of memory and 8 vCPUs. I can set the timeout (up to an hour), choose how much parallelism I want, and even select the option to run the job right away.

    After creating the job, I click the button that says “execute” and run my job. I see job status and application logs, updated live. My job succeeded!

    Checking Cloud Spanner confirms that my all table rows were updated to a status of “SHIPPED”.

    It’s great that I didn’t have to leave the Cloud Run API or interface to build this batch processor. Super convenient!

    Creating the queue listener in Spring and deploying to Cloud Run

    The final piece of our architecture requires a queue listener. When our delivery drivers drop off a package, their system sends a message to Google Cloud Pub/Sub, our pretty remarkable messaging system. To be sure, I could trigger Cloud Run (or Cloud Functions) automatically whenever a message hits Pub/Sub. That’s a built-in capability. I don’t need to use a processor that directly pulls from the queue.

    But maybe I want to control the pull from the queue. I could do stateful processing over a series of messages, or pull batches instead of one-at-a-time. Here, I’m going to use Spring Cloud Stream which talks to any major messaging system and triggers a function whenever a message arrives.

    Also note that Cloud Run doesn’t explicitly support this worker pattern, but you can make it work fairly easily. I’ll show you.

    I went to start.spring.io and configured my app by choosing a Spring Web and GCP Support dependency. Why “web” if this is a background worker? Cloud Run still expects a workload that binds to a web port, so we’ll embed a web server that’s never used.

    After generating the project and opening it, I deleted the “GCP support” dependency (I just wanted an auto-generated dependency management value) and added a couple of POM dependencies that my app needs. The first is the Google Cloud Pub/Sub “binder” for Spring Cloud Stream, and the second is the JDBC driver for Cloud Spanner.

    <dependency>
    	<groupId>org.springframework.cloud</groupId>
    	<artifactId>spring-cloud-gcp-pubsub-stream-binder</artifactId>
    	<version>1.2.8.RELEASE</version>
    </dependency>
    <dependency>
    	<groupId>com.google.cloud</groupId>
    	<artifactId>google-cloud-spanner-jdbc</artifactId>
    </dependency>
    

    I then created an object definition for “Order” with the necessary fields and getters/setters. Let’s review the primary class that does all the work. The way Spring Cloud Stream works is that reactive functions annotated as beans are invoked when a message comes in. The Spring machinery wires up the connection to the message broker and does most of the work. In this case, when I get an order message, I update the order status in Cloud Spanner to “DELIVERED.”

    package com.seroter.runworker;
    
    
    import java.util.function.Consumer;
    import org.springframework.boot.SpringApplication;
    import org.springframework.boot.autoconfigure.SpringBootApplication;
    import org.springframework.context.annotation.Bean;
    import reactor.core.publisher.Flux;
    import java.sql.Connection;
    import java.sql.DriverManager;
    import java.sql.Statement;
    import java.sql.SQLException;
    
    @SpringBootApplication
    public class RunWorkerApplication {
    
    	public static void main(String[] args) {
    		SpringApplication.run(RunWorkerApplication.class, args);
    	}
    
    	//takes in a Flux (stream) of orders
    	@Bean
    	public Consumer<Flux<Order>> reactiveReadOrders() {
    
    		//connection to my database
    		String connectionUrl = "jdbc:cloudspanner:/projects/seroter-project-base/instances/seroter-spanner/databases/seroterdb";
    		
    		return value -> 
    			value.subscribe(v -> { 
    				try (Connection c = DriverManager.getConnection(connectionUrl); Statement statement = c.createStatement()) {
    					String command = "UPDATE Orders SET Status = 'DELIVERED' WHERE OrderId = " + v.getOrderId().toString();
    					statement.executeUpdate(command);
    				} catch (SQLException e) {
    					System.out.println(e.toString());
    				}
    			});
    	}
    }
    

    My corresponding properties file has the few values Spring Cloud Stream needs to know about. Specifically, I’m specifying the Pub/Sub topic, indicating that I can take in batches of data, and setting the “group” which corresponds to the topic subscription. What’s cool is that if these topics and subscriptions don’t exist already, Spring Cloud Stream creates them for me.

    server.port=8080
    spring.cloud.stream.bindings.reactiveReadOrders-in-0.destination=ordertopic
    spring.cloud.stream.bindings.reactiveReadOrders-in-0.consumer.batch-mode=true
    spring.cloud.stream.bindings.reactiveReadOrders-in-0.content-type=application/json
    spring.cloud.stream.bindings.reactiveReadOrders-in-0.group=orderGroup
    

    For the final time, I run the Cloud Build command to build and package my Java app into a container image: gcloud builds submit --pack image=gcr.io/seroter-project-base/seroter-run-worker

    With this container image ready to go, I slide back to the Cloud Run UI and create a new service instance. This time, after choosing my image, I choose “always allocated CPU” to ensure that the CPU stays on the whole time. And I picked a minimum instance of one so that I have a single always-on worker pulling from Pub/Sub. I also chose “internal only” traffic and require authentication to make this harder for someone to randomly invoke.

    My service quickly starts up, and upon initialization, creates both the topic and queue for my app.

    I go into the Pub/Sub UI where I can send a message directly into a topic. All I need to send in is a JSON payload that holds the order ID of the record to update.

    The result? My database record is updated, and I see this by viewing my web application and noticing the second row has a new “status” value.

    Wrap up

    Instead of using two or three distinct cloud compute services to satisfy this architecture, I used one. Cloud Run defies your expectations of what serverless can be, especially now that you can run serverless jobs or even continuously-running apps. In all cases, I have no infrastructure to provision, scale, or manage.

    You can use Cloud Run, Pub/Sub, and Cloud Build with our generous free tier, and Spanner has never been cheaper to try out. Give it a whirl, and tell me what you think of Cloud Run jobs.

  • Schema-on-write and schema-on-read doesn’t just apply to databases. It applies to message queues, too.

    Schema-on-write and schema-on-read doesn’t just apply to databases. It applies to message queues, too.

    When does your app enforce its data structure? If you’re using a relational database, you comply with a pre-defined data structure when you write data to its tables. The schema—made up of field names, data types, and foreign key constraints, for example—is enforced up front. Your app won’t successfully write data if it violates the schema. Many of us have been working with schema-on-write relational databases for a long time, and they make sense when you have relatively static data structures.

    If you’d prefer to be more flexible with what data you store, and want data consumers to be responsible for enforcing structure, you’ll prefer a NoSQL database. Whether you’ve got a document-style database like Firestore or MongoDB, or key-value stores like Redis, you’re mostly leaving it up the client to retrieve the data and deserialize it into a structure it expects. These clients apply a schema when they read the data.

    Both of these approaches are fine. It’s all about what you need for a given scenario. While this has been a choice for database folks for a while, today’s message queue services often apply a schema-on-read approach. Publish whatever, and subscribers retrieve the data and deserialize it into the object they expects. To be sure, there are some queues with concepts of message structure—ActiveMQ has something, and traditional ESB products like TIBCO EMS and BizTalk Server offer schemas—but modern cloud-based queue services are typically data-structure-neutral.

    Amazon SQS is one of the oldest cloud services. It doesn’t look at any of the messages that pass through, and there’s no concept of a message schema. Same goes for Azure Service Bus, another robust queuing service that asks the consumer to apply a schema when a message is read. To be clear, there’s nothing is wrong with that. It’s a good pattern. Heck, it’s one that Google Cloud applies too with Pub/Sub. However, we’ve recently added schema support, and I figured we should take a look at this unique feature.

    I wrote about Pub/Sub last year. It’s a fairly distinct cloud service. You can do traditional message queuing, of course. But it also supports things like message replay—which feels Kafka-esque—and push notifications. Instead of using 3+ cloud messaging services, maybe just use one?

    The schema functionality in Pub/Sub is fairly straightforward. A schema defines a message structure, you apply it to one or many new Topics, and only messages that comply with that schema may be published to those Topics. You can continue using Topics without schemas and accept any input, while attaching schemas to Topics that require upfront validation.

    Creating schemas

    Schemas work with schemas encoded as JSON or in a binary format. And the schema itself is structured using either Apache Avro or the protocol buffer language. Both support basic primitive types, and complex structures (e.g. nested types, arrays, enumerations).

    With Google Cloud Pub/Sub, you can create schemas independently and then attach to Topics, or you can create them at the same time as creating a Topic. Let’s do the former.

    You can create schemas programmatically, as you’d expect, but let’s use the Google Cloud Console to do it here. I’M A VISUAL LEARNER.

    On the schemas view of the Console, I see options to view, create, and delete schemas.

    I chose to create a brand new schema. In this view, I’m asked to give the schema a name, and then choose if I’m using Avro or Protocol Buffers to define the structure.

    In that “schema definition” box, I get a nice little editor with type-ahead support. Here, I sketched out a basic schema for an “employee” message type.

    No matter how basic, I’m still capable of typing things wrong. So, it’s handy that there’s a “validate schema” button at the bottom that shockingly confirmed that I got my structure correct.

    You’ll also notice a “test message” button. This is great. From here, I can validate input, and see what happens (below) if I skip a required field, or put the the wrong value into the enumeration.

    Also note that the CLi lets you do this too. There are simple commands to test a message against a new schema, or one that already exists. For example:

    gcloud pubsub schemas validate-message \
            --message-encoding=JSON \
            --message="{\"name\":\"Jeff Reed\",\"role\":\"VP\",\"timeinroleyears\":0.5,\"location\":\"SUNNYVALE\"}" \
            --schema-name=employee-schema
    

    Once I’m content with the structure, I save the schema. Then it shows up in my list of available schemas. Note that I cannot change a published schema. If my structure changes over time, that’s a new schema. This is a fairly light UX, so I assume you should maintain versions in a source code repo elsewhere.

    [March 20, 2023 update: Schemas can now be updated.]

    Apply schemas to Topics

    In that screenshot above, you see a button that says “create topic.” I can create a Topic from here, or, use the standard way of creating Topics and select a schema then. Let’s do that. When I go to the general “create Topic” view, you see I get a choice to use a schema and pick a message encoding. Be aware that you can ONLY attach schemas to new Topics, and once you attach a schema, you can’t remove it from that Topic. Make good choices.

    [March 20, 2023 update: Schemas can now be added and removed from topics.]

    How do I know that a Topic has schema attached? You have a few options.

    First, the Google Cloud Console shows you! When I view the details of a given Topic, I notice that the encoding and schema get called out.

    It’s not all about the portal UX, however. CLI fans need love too. Everything I did above, you can do in code or via CLi. That includes getting details about a given schema. Notice below that I can list all the schemas for my project, and get the details for any given one.

    And also see that when I view my Topic, it shows that I have a schema applied.

    Publishing messages

    After ensuring that my Topic has a subscription or two—messages going to a Topic without a subscription are lost—I tried publishing some messages.

    First, I did this from a C# application. It serializes a .NET object into a JSON object and sends it to my schema-enforcing Pub/Sub topic.

    using System;
    using Google.Cloud.PubSub.V1;
    using Google.Protobuf;
    using System.Text.Json;
    
    namespace core_pubsub_schema
    {
        class Program
        {
            static void Main(string[] args)
            {
                Console.WriteLine("Pub/Sub app started");
    
                PublishMessage();
    
                Console.WriteLine("App done!");
            }
    
            static void PublishMessage() {
                
                //define an employee object
                var employee = new Employee {
                    name = "Jeff Reed",
                    role = "VP",
                    timeinroleyears = 0.5f,
                    location = "SUNNYVALE"
                };
                //convert the .NET object to a JSON string
                string jsonString = JsonSerializer.Serialize(employee);
    
                //name of our topic
                string topicName ="projects/rseroter-misc/topics/new-employees";
                PublisherServiceApiClient publisher = PublisherServiceApiClient.Create();
    
                //create the message
                PubsubMessage message = new PubsubMessage
                {
                    Data = ByteString.CopyFromUtf8(jsonString)
                };
    
                try {
                    publisher.Publish(topicName, new[] { message });
                    Console.WriteLine("Message published!");
                }
                catch (Exception ex) {
                    Console.WriteLine(ex.ToString());
                }
            }
        }
    
        public class Employee {
            public string name {get; set; }
            public string role {get; set; }
            public float timeinroleyears {get; set;}
            public string location {get; set;}
        }
    }
    

    After running this app, I see that I successfully published a message to the Topic, and my lone subscription holds a copy for me to read.

    For fun, I can also publish messages directly from the Google Cloud Console. I like that we’ve offered the ability to publish up to a hundred messages on an interval, which is great for testing purposes.

    Below, I entered some JSON, and removed a required field (“role”) before publishing. You can see that I got an error before the message hit the Topic.

    Dealing with schema changes

    My first impression upon using this schema capability in Pub/Sub was that it’s cool, but I wish I could change schemas more easily, and detach schemas from Topics. But the more I thought about it, the more I understood the design decision.

    If I’m attaching a schema to a Topic, then I’m serious about the data structure. And downstream consumers are expecting that specific data structure. Changing the schema means creating a new Topic, and establishing new subscribers.

    What if your app can absorb schema changes, and you want to access new Subscriptions without redeploying your whole app? You might retrieve the subscription name from an external configuration (e.g. ConfigMap in Kubernetes) versus hard-coding it. Or use a proxy service/function/whatever in between publishers and Topics, or consumers and subscriptions. Changing that proxy might be simpler than changing your primary system. Regardless, once you sign up to use schemas, you’ll want to think through your strategy for handling changes.

    [March 20, 2023 update: Schemas can now be updated.]

    Wrap up

    I like this (optional) functionality in Google Cloud Pub/Sub. You can do the familiar schema-on-read approach, or now do a schema-on-write when needed. If you want to try this yourself, take advantage of our free tier for Pub/Sub (10GB of messages per month) and let me know if you come up with any cool use cases, or schema upgrade strategies!

  • First look: Triggering Google Cloud Run with events generated by GCP services

    First look: Triggering Google Cloud Run with events generated by GCP services

    When you think about “events” in an event-driven architecture, what comes to mind? Maybe you think of business-oriented events like “file uploaded”, “employee hired”, “invoice sent”, “fraud detected”, or “batch job completed.” You might emit (or consume) these types of events in your application to develop more responsive systems. 

    What I find even more interesting right now are the events generated by the systems beneath our applications. Imagine what your architects, security pros, and sys admins could do if they could react to databases being provisioned, users getting deleted, firewall being changed, or DNS zone getting updated. This sort of thing is what truly enables the “trust, but verify” approach for empowered software teams. Let those teams run free, but “listen” to things that might be out of compliance.

    This week, the Google Cloud team announced Events for Cloud Run, in beta this September. What this capability does is let you trigger serverless containers when lifecycle events happen in most any Google Cloud service. These lifecycle events are in the CloudEvents format, and distributed (behind the scenes) to Cloud Run via Google Cloud PubSub. For reference, this capability bears some resemblance to AWS EventBridge and Azure Event GridIn this post, I’ll give you a look at Events for Cloud Run, and show you how simple it is to use.

    Code and deploy the Cloud Run service

    Developers deploy containers to Cloud Run. Let’s not get ahead of ourselves. First, let’s build the app. This app is Seroter-quality, and will just do the basics. I’ll read the incoming event and log it out. This is a simple ASP.NET Core app, with the source code in GitHub

    I’ve got a single controller that responds to a POST command coming from the eventing system. I take that incoming event, serialize from JSON to a string, and print it out. Events for Cloud Run accepts either custom events, or CloudEvents from GCP services. If I detect a custom event, I decode the payload and print it out. Otherwise, I just log the whole CloudEvent.

    namespace core_sample_api.Controllers
    {
        [ApiController]
        [Route("")]
        public class Eventsontroller : ControllerBase
        {
            private readonly ILogger<Eventsontroller> _logger;
            public Eventsontroller(ILogger<Eventsontroller> logger)
            {
                _logger = logger;
            }
            [HttpPost]
            public void Post(object receivedEvent)
            {
                Console.WriteLine("POST endpoint called");
                string s = JsonSerializer.Serialize(receivedEvent);
                //see if custom event with "message" root property
                using(JsonDocument d = JsonDocument.Parse(s)){
                    JsonElement root = d.RootElement;
                    if(root.TryGetProperty("message", out JsonElement msg)) {
                        Console.WriteLine("Custom event detected");
                        JsonElement rawData = msg.GetProperty("data");
                        //decode
                        string data = System.Text.Encoding.UTF8.GetString(Convert.FromBase64String(rawData.GetString()));
                        Console.WriteLine("Data value is: " + data);
                    }
                }
                Console.WriteLine("Data: " + s);
            }
        }
    }
    

    After checking all my source code into GitHub, I was ready to deploy it to Cloud Run. Note that you can use my same repo to continue on this example!

    I switched over to the GCP Console, and chose to create a new Cloud Run service. I picked a region and service name. Then I could have chosen either an existing container image, or, continuous deployment from a git repo. I chose the latter. First I picked my GitHub repo to get source from.

    Then, instead of requiring a Dockerfile, I picked the new Cloud Buildpacks support. This takes my source code and generates a container for me. Sweet. 

    After choosing my code source and build process, I kept the default HTTP trigger. After a few moments, I had a running service.

    Add triggers to Cloud Run

    Next up, adding a trigger. By default, the “triggers” tab shows the single HTTP trigger I set up earlier. 

    I wanted to show custom events in addition to CloudEvents ones, so I went to the PubSub dashboard and created a new queue that would trigger Cloud Run.

    Back in the Cloud Run UX, I added a new trigger. I chose the trigger type of “com.google.cloud.pubsub.topic.publish” and picked the Topic I created earlier. After saving the trigger, I saw it show up in the list.

    After this, I wanted to trigger my Cloud Run service with CloudEvents. If you’re receiving events from Google Cloud services, you’ll have to enable Data Access Logs so that events can be spun up from Cloud Logs. I’m going to listen for events from Cloud Storage and Cloud Build, so I turned on audit logging for each.

    All that was left to define the final triggers. For Cloud Storage, I chose the storage.create.bucket trigger.

    I wanted to react to Cloud Build, so that I could see whenever a build started.

    Terrific. Now I was ready to test. I sent in a message to PubSub to trigger the custom event.

    I checked the logs for Cloud Run, and almost immediately saw that the service ran, accepted the event, and logged the body.

    Next, I tested Cloud Storage by adding a new bucket.

    Almost immediately, I saw a CloudEvent in the log.

    Finally, I kicked off a new Build pipeline, and saw an event indicating that Cloud Run received a message, and logged it.

    If you care about what happens inside the systems your apps depend on, take a look at the new Events for Cloud Run and start tapping into the action.