I just installed the July 2009 .NET Services SDK and after reviewing it for changes, I started wondering how I might call a cloud service from BizTalk using the out-of-the-box BizTalk adapters. While I showed in a previous blog how to call .NET Services service anonymously, that isn’t practical for most scenarios. I want to SECURELY call an Azure cloud service from BizTalk.
If you’re familiar with the “Echo” sample for the .NET Service Bus, then you know that the service host authenticates with the bus via inline code like this:
// create the credentials object for the endpoint
TransportClientEndpointBehavior userNamePasswordServiceBusCredential =
   new TransportClientEndpointBehavior();
userNamePasswordServiceBusCredential.CredentialType =
    TransportClientCredentialType.UserNamePassword;
userNamePasswordServiceBusCredential.Credentials.UserName.UserName =
    solutionName;
userNamePasswordServiceBusCredential.Credentials.UserName.Password =
    solutionPassword;
While that’s ok for the service host, BizTalk would never go for that (without a custom adapter). I need my client to use configuration-based credentials instead. To test this out, try removing the Echo client’s inline credential code and adding a new endpoint behavior to the configuration file:
<endpointBehaviors>
  <behavior name="SbEndpointBehavior">
    <transportClientEndpointBehavior credentialType="UserNamePassword">
       <clientCredentials>
          <userNamePassword userName="xxxxx" password="xxxx" />
       </clientCredentials>
     </transportClientEndpointBehavior>
   </behavior>
</endpointBehaviors>
Works fine. Nice. So that proves that we can definitely take care of credentials outside of code, and thus have an offering that BizTalk stands a chance of calling securely.
With that out of the way, let’s see how to actually get BizTalk to call a cloud service. First, I need my metadata to call the service (schemas, bindings). While I could craft these by hand, it’s convenient to auto-generate them. Now, to make life easier (and not have to wrestle with code generation wizards trying to authenticate with the cloud), I’ve rebuilt my Echo service to run locally (basicHttpBinding). I did this by switching the binding, adding a base URI, adding a metadata behavior, and commenting out any cloud-specific code from the service. Now my BizTalk project can use the Consume Adapter Service wizard to generate metadata.
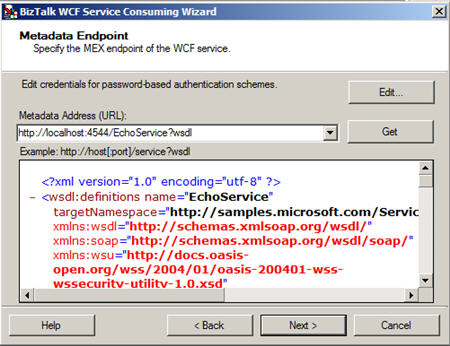
I end up with a number of artifacts (schemas, bindings, orchestration with ports) including the schema which describes the input and output of the .NET Services Echo sample service.

After flipping my Echo service back to the Cloud-friendly configuration (including the netTcpRelayBinding), I deployed the BizTalk solution. Then, I imported the (custom) binding into my BizTalk application. Sure enough, I get a send port added to my application.

First thing I do is switch the address of my service to the valid .NET Services Bus URI.

Next, on the Bindings tab, I switch to the netTcpRelayBinding.
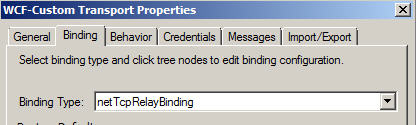
I made sure my security mode was set to “Transport” and used the RelayAccessToken for its RelayClientAuthenticationType.

Now, much my like my updated client configuration above, I need to add an endpoint behavior to my BizTalk send port configuration so that I can provide valid credentials to the service bus. Now the WCF Configuration Editor within Visual Studio didn’t seem to provide me a way to add those username and password values; I had to edit the XML configuration manually. So, I expected that the BizTalk adapter configuration would be equally deficient and I’d have to create a custom binding and hope that BizTalk accepted it. However, imagine my surprise when I saw that BizTalk DID expose those credential fields to me!
I first had to add a new endpoint behavior of type transportClientEndpointBehavior. Then, set its credentialType attribute to UserNamePassword.

Then, click the ClientCredential type we’re interested in (UserNamePassword) and key in the data valid to the .NET Services authentication service.

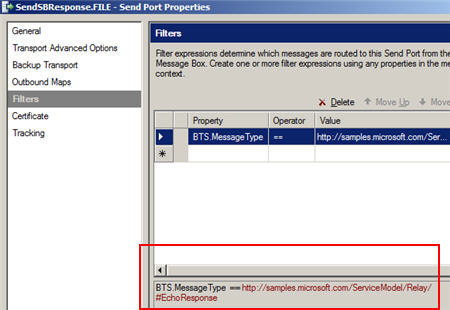
After that, I added a subscription and saved the send port. Next I created a new send port that would process the Echo response. I subscribed on the message type of the cloud service result.
Now we’re ready to test this masterpiece. First, I fired up the Echo service and ensured that it was bound to the cloud. The image below shows that my service host is running locally, and the public service bus has my local service in its registry. Neato.

Now for magic time. Here’s the message I’ll send in:

If this works, I should see a message printed on my service host’s console, AND, I should get a message sent to disk. What happens?
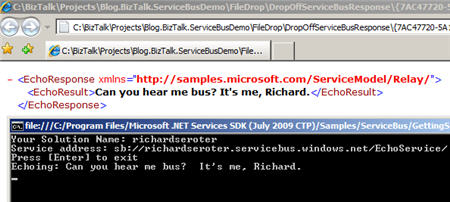
I have to admit that I didn’t think this would work. But, you would have never read my blog again if I had strung you along this far and showed you a broken demo. Disaster averted.
So there you have it. I can use BizTalk Server 2009 to SECURELY call the Service Bus from the Azure .NET Services offering which means that I am seamlessly doing integration between on-premises offerings via the cloud. Lots and lots of use cases (and more demos from me) on this topic.
Technorati Tags: BizTalk, WCF, Azure, .NET Services


Leave a comment