Category: Microservices

  • Build and deploy secure containers to a serverless runtime using Google Cloud Buildpacks and this six-line file.

    Build and deploy secure containers to a serverless runtime using Google Cloud Buildpacks and this six-line file.

    I rarely enjoy the last mile of work. Sure, there’s pleasure in seeing something reach its conclusion, but when I’m close, I just want to be done! For instance, when I create a Pluralsight course—my new one, Cloud Foundry: The Big Picture just came out—I enjoy the building part, and dread the record+edit portion. Same with writing software. I like coding an app to solve a problem. Then, I want a fast deployment so that I can see how the app works, and wrap up. Ideally, each app I write doesn’t require a unique set of machinery or know-how. Thus, I wanted to see if I could create a *single* Google Cloud Build deployment pipeline that shipped any custom app to the serverless Google Cloud Run environment.

    Cloud Build is Google Cloud’s continuous integration and delivery service. It reminds me of Concourse in that it’s declarative, container-based, and lightweight. It’s straightforward to build containers or non-container artifacts, and deploy to VMs, Kubernetes, and more. The fact that it’s a hosted service with a great free tier is a bonus. To run my app, I don’t want to deal with configuring any infrastructure, so I chose Google Cloud Run as my runtime. It just takes a container image and offers a fully-managed, scale-to-zero host. Before getting fancy with buildpacks, I wanted to learn how to use Build and Run to package up and deploy a Spring Boot application.

    First, I generated a new Spring Boot app from start.spring.io. It’s going to be a basic REST API, so all I needed was the Web dependency.

    I’m not splitting the atom with this Java code. It simply returns a greeting when you hit the root endpoint.

    @RestController
    @SpringBootApplication
    public class HelloAppApplication {
    
    	public static void main(String[] args) {
    		SpringApplication.run(HelloAppApplication.class, args);
    	}
    
    	@GetMapping("/")
    	public String SayHello() {
    		return "Hi, Google Cloud Run!";
    	}
    }
    

    Now, I wanted to create a pipeline that packaged up the Boot app into a JAR file, built a Docker image, and deployed that image to Cloud Run. Before crafting the pipeline file, I needed a Dockerfile. This file offers instructions on how to assemble the image. Here’s my basic one:

    FROM openjdk:11-jdk
    ARG JAR_FILE=target/hello-app-0.0.1-SNAPSHOT.jar
    COPY ${JAR_FILE} app.jar
    ENTRYPOINT ["java", "-Djava.security.edg=file:/dev/./urandom","-jar","/app.jar"]
    

    On to the pipeline. A build configuration isn’t hard to understand. It consists of a series of sequential or parallel steps that produce an outcome. Each step runs in its own container image (specified in the name attribute), and if needed, there’s a simple way to transfer state between steps. My cloudbuild.yaml file for this Spring Boot app looked like this:

    steps:
    # build the Java app and package it into a jar
    - name: maven:3-jdk-11
      entrypoint: mvn
      args: ["package", "-Dmaven.test.skip=true"]
    # use the Dockerfile to create a container image
    - name: gcr.io/cloud-builders/docker
      args: ["build", "-t", "gcr.io/$PROJECT_ID/hello-app", "--build-arg=JAR_FILE=target/hello-app-0.0.1-SNAPSHOT.jar", "."]
    # push the container image to the Registry
    - name: gcr.io/cloud-builders/docker
      args: ["push", "gcr.io/$PROJECT_ID/hello-app"]
    #deploy to Google Cloud Run
    - name: 'gcr.io/cloud-builders/gcloud'
      args: ['run', 'deploy', 'seroter-hello-app', '--image', 'gcr.io/$PROJECT_ID/hello-app', '--region', 'us-west1', '--platform', 'managed']
    images: ["gcr.io/$PROJECT_ID/hello-app"]
    

    You’ll notice four steps. The first uses the Maven image to package my application. The result of that is a JAR file. The second step uses a Docker image that’s capable of generating an image using the Dockerfile I created earlier. The third step pushes that image to the Container Registry. The final step deploys the container image to Google Cloud Run with an app name of seroter-hello-app. The final “images” property puts the image name in my Build results.

    As you can imagine, I can configure triggers for this pipeline (based on code changes, etc), or execute it manually. I’ll do the latter, as I haven’t stored this code in a repository anywhere yet. Using the terrific gcloud CLI tool, I issued a single command to kick off the build.

    gcloud builds submit --config cloudbuild.yaml .
    

    After a minute or so, I have a container image in the Container Registry, an available endpoint in Cloud Run, and a full audit log in Cloud Build.

    Container Registry:

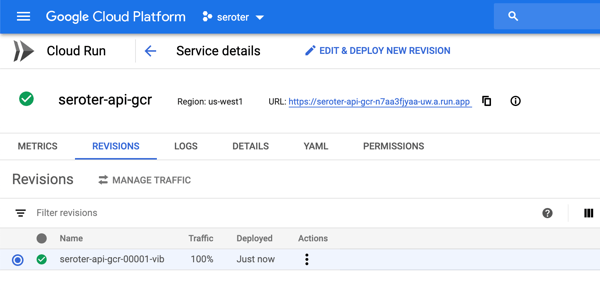
    Cloud Run (with indicator that app was deployed via Cloud Build:

    Cloud Build:

    I didn’t expose the app publicly, so to call it, I needed to authenticate myself. I used the “gcloud auth print-identity-token” command to get a Bearer token, and plugged that into the Authorization header in Postman. As you’d expect, it worked. And when traffic dies down, the app scales to zero and costs me nothing.

    So this was great. I did all this without having to install build infrastructure, or set up an application host. But I wanted to go a step further. Could I eliminate the Dockerization portion? I have zero trust in myself to build a good image. This is where buildpacks come in. They generate well-crafted, secure container images from source code. Google created a handful of these using the CNCF spec, and we can use them here.

    My new cloudbuild.yaml file looks like this. See that I’ve removed the steps to package the Java app, and build and push the Docker image, and replaced them with a single “pack” step.

    steps:
    # use Buildpacks to create a container image
    - name: 'gcr.io/k8s-skaffold/pack'
      entrypoint: 'pack'
      args: ['build', '--builder=gcr.io/buildpacks/builder', '--publish', 'gcr.io/$PROJECT_ID/hello-app-bp:$COMMIT_SHA']
    #deploy to Google Cloud Run
    - name: 'gcr.io/cloud-builders/gcloud'
      args: ['run', 'deploy', 'seroter-hello-app-bp', '--image', 'gcr.io/$PROJECT_ID/hello-app-bp:latest', '--region', 'us-west1', '--platform', 'managed']
    

    With the same gcloud command (gcloud builds submit --config cloudbuild.yaml .) I kicked off a new build. This time, the streaming logs showed me that the buildpack built the JAR file, pulled in a known-good base container image, and containerized the app. The result: a new image in the Registry (21% smaller in size, by the way), and a fresh service in Cloud Run.

    I started out this blog post saying that I wanted a single cloudbuild.yaml file for *any* app. With Buildpacks, that seemed possible. The final step? Tokenizing the build configuration. Cloud Build supports “substitutions” which lets you offer run-time values for variables in the configuration. I changed my build configuration above to strip out the hard-coded names for the image, region, and app name.

    steps:
    # use Buildpacks to create a container image
    - name: 'gcr.io/k8s-skaffold/pack'
      entrypoint: 'pack'
      args: ['build', '--builder=gcr.io/buildpacks/builder', '--publish', 'gcr.io/$PROJECT_ID/$_IMAGE_NAME:$COMMIT_SHA']
    #deploy to Google Cloud Run
    - name: 'gcr.io/cloud-builders/gcloud'
      args: ['run', 'deploy', '$_RUN_APPNAME', '--image', 'gcr.io/$PROJECT_ID/$_IMAGE_NAME:latest', '--region', '$_REGION', '--platform', 'managed']
    

    Before trying this with a new app, I tried this once more with my Spring Boot app. For good measure, I changed the source code so that I could confirm that I was getting a fresh build. My gcloud command now passed in values for the variables:

    gcloud builds submit --config cloudbuild.yaml . --substitutions=_IMAGE_NAME="hello-app-bp",_RUN_APPNAME="seroter-hello-app-bp",_REGION="us-west1"
    

    After a minute, the deployment succeeded, and when I called the endpoint, I saw the updated API result.

    For the grand finale, I want to take this exact file, and put it alongside a newly built ASP.NET Core app. I did a simple “dotnet new webapi” and dropped the cloudbuild.yaml file into the project folder.

    After tweaking the Program.cs file to read the application port from the platform-provided environment variable, I ran the following command:

    gcloud builds submit --config cloudbuild.yaml . --substitutions=_IMAGE_NAME="hello-app-core",_RUN_APPNAME="seroter-hello-app-core",_REGION="us-west1"
    

    A few moments later, I had a container image built, and my ASP.NET Core app listening to requests in Cloud Run.

    Calling that endpoint (with authentication) gave me the API results I expected.

    Super cool. So to recap, that six line build configuration above works for your Java, .NET Core, Python, Node, and Go apps. It’ll create a secure container image that works anywhere. And if you use Cloud Build and Cloud Run, you can do all of this with no mess. I might actually start enjoying the last mile of app development with this setup.

  • Take a fresh look at Cloud Foundry? In 20 minutes we’ll get Tanzu Application Service for Kubernetes running on your machine.

    Take a fresh look at Cloud Foundry? In 20 minutes we’ll get Tanzu Application Service for Kubernetes running on your machine.

    It’s been nine years since I first tried out Cloud Foundry, and it remains my favorite app platform. It runs all kinds of apps, has a nice dev UX for deploying and managing software, and doesn’t force me to muck with infrastructure. The VMware team keeps shipping releases (another today) of the most popular packaging of Cloud Foundry, Tanzu Application Service (TAS). One knock against Cloud Foundry has been its weight—in typically runs on dozens of VMs. Others have commented on its use of open-source, but not widely-used, components like BOSH, the Diego scheduler, and more. I think there are good justifications for its size and choice of plumbing components, but I’m not here to debate that. Rather, I want to look at what’s next. The new Tanzu Application Service (TAS) for Kubernetes (now in beta) eliminates those prior concerns with Cloud Foundry, and just maybe, leapfrogs other platforms by delivering the dev UX you like, with the underlying components—things like Kubernetes, Cluster API, Istio, Envoy, fluentd, and kpack—you want. Let me show you.

    TAS runs on any Kubernetes cluster: on-premises or in the cloud, VM-based or a managed service, VMware-provided or delivered by others. It’s based on the OSS Cloud Foundry for Kubernetes project, and available for beta download with a free (no strings attached) Tanzu Network account. You can follow along with me in this post, and in just a few minutes, have a fully working app platform that accepts containers or source code and wires it all up for you.

    Step 1 – Download and Start Stuff (5 minutes)

    Let’s get started. Some of these initial steps will go away post-beta as the install process gets polished up. But we’re brave explorers, and like trying things in their gritty, early stages, right?

    First, we need a Kubernetes. That’s the first big change for Cloud Foundry and TAS. Instead of pointing it at any empty IaaS and using BOSH to create VMs, Cloud Foundry now supports bring-your-own-Kubernetes. I’m going to use Minikube for this example. You can use KinD, or any other number of options.

    Install kubectl (to interact with the Kubernetes cluster), and then install Minikube. Ensure you have a recent version of Minikube, as we’re using the Docker driver for better performance. With Minikube installed, execute the following command to build out our single-node cluster. TAS for Kubernetes is happiest running on a generously-sized cluster.

    minikube start --cpus=4 --memory=8g --kubernetes-version=1.15.7 --driver=docker

    After a minute or two, you’ll have a hungry Kubernetes cluster running, just waiting for workloads.

    We also need a few command line tools to get TAS installed. These tools, all open source, do things like YAML templating, image building, and deploying things like Cloud Foundry as an “app” to Kubernetes. Install the lightweight kapp, klbd, and ytt tools using these simple instructions.

    You also need the Cloud Foundry command line tool. This is for interacting with the environment, deploying apps, etc. This same CLI works against a VM-based Cloud Foundry, or Kubernetes-based one. You can download the latest version via your favorite package manager or directly.

    Finally, you’ll want to install the BOSH CLI. Wait a second, you say, didn’t you say BOSH wasn’t part of this? Am I just a filthy liar? First off, no name calling, you bastards. Secondly, no, you don’t need to use BOSH, but the CLI itself helps generate some configuration values we’ll use in a moment. You can download the BOSH CLI via your favorite package manager, or grab it from the Tanzu Network. Install via the instructions here.

    With that, we’re done the environmental setup.

    Step 2 – Generate Stuff (2 minute)

    This is quick and easy. Download the 844KB TAS for Kubernetes bundle from the Tanzu Network.

    I downloaded the archive to my desktop, unpacked it, and renamed the folder “tanzu-application-service.” Create a sibling folder named “configuration-values.”

    Now we’re going to create the configuration file. Run the following command in your console, which should be pointed at the tanzu-application-service directory. The first quoted value is the domain. For my local instance, this value is vcap.me. When running this in a “real” environment, this value is the DNS name associated with your cluster and ingress point. The output of this command is a new file in the configuration-values folder.

    ./bin/generate-values.sh -d "vcap.me" > ../configuration-values/deployment-values.yml

    After a couple of seconds, we have an impressive-looking YAML file with passwords, certificates, and all sorts of delightful things.

    We’re nearly done. Our TAS environment won’t just run containers; it will also use kpack and Cloud Native Buildpacks to generate secure container images from source code. That means we need a registry for stashing generated images. You can use most any one you want. I’m going to use Docker Hub. Thus, the final configuration values we need are appended to the above file. First, we need the credentials to the Tanzu Network for retrieving platform images, and secondly, credentials for container registry.

    With our credentials in hand, add them to the very bottom of the file. Indentation matters, this is YAML after all, so ensure you’ve got it lined up right.

    The last thing? There’s a file that instructs the installation to create a cluster IP ingress point versus a Kubernetes load balancer resource. For Minikube (and in public cloud Kubernetes-as-a-Service environments) I want the load balancer. So, within the tanzu-application-service folder, move the replace-loadbalancer-with-clusterip.yaml file from the custom-overlays folder to the config-optional folder.

    Finally, to be safe, I created a copy of this remove-resource-requirements.yml file and put it in the custom-overlays folder. It relaxes some of the resource expectations for the cluster. You may not need it, but I saw CPU exhaustion issues pop up when I didn’t use it.

    All finished. Let’s deploy this rascal.

    Step 3 – Deploy Stuff (10 minutes)

    Deploying TAS to Kubernetes takes 5-9 minutes. With your console pointed at the tanzu-application-service directory, run this command:

    ./bin/install-tas.sh ../configuration-values

    There’s a live read-out of progress, and you can also keep checking the Kubernetes environment to see the pods inflate. Tools like k9s make it easy to keep an eye on what’s happening. Notice the Istio components, and some familiar Cloud Foundry pieces. Observe that the entire Cloud Foundry control plane is containerized here—no VMs anywhere to be seen.

    While this is still installing, let’s open up the Minikube tunnel to expose the LoadBalancer service our ingress gateway needs. Do this in a separate console window, as its a blocking call. Note that the installation can’t complete until you do it!

    minikube tunnel

    After a few minutes, we’re ready to deploy workloads.

    Step 4 – Test Stuff (3 minutes)

    We now have a full-featured Tanzu Application Service up and running. Neat. Let’s try a few things. First, we need to point the Cloud Foundry CLI at our environment.

    cf api --skip-ssl-validation https://api.vcap.me

    Great. Next, we log in, using generated cf_admin_password from the deployment-values.yaml file.

    cf auth admin <password>

    After that, we’ll enable containers in the environment.

    cf enable-feature-flag diego_docker

    Finally, we set up a tenant. Cloud Foundry natively supports isolation between tenants. Here, I set up an organization, and within that organization, a “space.” Finally, I tell the Cloud Foundry CLI that we’re working with apps in that particular org and space.

    cf create-org seroter-org
    cf create-space -o seroter-org dev-space
    cf target -o seroter-org -s dev-space

    Let’s do something easy, first. Push a previously-containerized app. Here’s one from my Docker Hub, but it can be anything you want.

    cf push demo-app -o rseroter/simple-k8s-app-kpack

    After you enter that command, 15 seconds later you have a hosted, routable app. The URL is presented in the Cloud Foundry CLI.

    How about something more interesting? TAS for Kubernetes supports a variety of buildpacks. These buildpacks detect the language of your app, and then assemble a container image for you. Right now, the platform builds Java, .NET Core, Go, and Node.js apps. To make life simple, clone this sample Node app to your machine. Navigate your console to that folder, and simple enter cf push.

    After a minute or so, you end up with a container image in whatever registry you specified (for me, Docker Hub), and a running app.

    This beta release of TAS for Kubernetes also supports commands around log streaming (e.g. cf logs cf-nodejs), connecting to backing services like databases, and more. And yes, even the simple, yet powerful, cf scale command works to expand and contract pod instances.

    It’s simple to uninstall the entire TAS environment from your Kubernetes cluster with a single command:

    kapp delete -a cf

    Thanks for trying this out with me! If you only read along, and want to try it yourself later, read the docs, download the bits, and let me know how it goes.

  • I’ve noticed three types of serverless compute platforms. Let’s deploy something to each.

    I’ve noticed three types of serverless compute platforms. Let’s deploy something to each.

    Are all serverless compute platforms—typically labeled Function-as-a-Service—the same? Sort of. They all offer scale-to-zero compute triggered by events and billed based on consumed resources. But I haven’t appreciated the nuances of these offerings, until now. Last week, Laurence Hecht did great work analyzing the latest CNCF survey data. It revealed which serverless (compute) offerings have the most usage. To be clear, this is about compute, not databases, API gateways, workflow services, queueing, or any other managed services.

    To me, the software in that list falls into one of three categories: connective compute, platform expanding, and full stack apps. Depending on what you want to accomplish, one may be better than the others. Let’s look at those three categories, see which platforms fall into each one, and see an example in action.

    Category 1: Connective Compute

    Trigger / DestinationSignaturePackagingDeployment
    Database, storage, message queue, API Gateway, CDN, Monitoring service Handlers with specific parametersZIP archive, containersWeb portal, CLI, CI/CD pipelines

    The best functions are small functions that fill the gaps between managed services. This category is filled with products like AWS Lambda, Microsoft Azure Functions, Google Cloud Functions, Alibaba Cloud Functions, and more. These functions are triggered when something happens in another managed service—think of database table changes, messages reaching a queue, specific log messages hitting the monitoring system, and files uploaded to storage. With this category of serveless compute, you stitch together managed services into apps, writing as little code as possible. Little-to-none of your existing codebase transfers over, as this caters to greenfield solutions based on a cloud-first approach.

    AWS Lambda is the grandaddy of them all, so let’s take a look at it.

    In my example, I want to read messages from a queue. Specifically, have an AWS Lambda function read from Amazon SQS. Sounds simple enough!

    You can write AWS Lambda functions in many ways. You can also deploy them in many ways. There are many frameworks that try to simplify the latter, as you would rarely deploy a single function as your “app.” Rather, a function is part of a broader collection of resources that make up your system. Those resources might be described via the AWS Serverless Application Model (SAM), where you can lay out all the functions, databases, APIs and more that should get deployed together. And you could use the AWS Serverless Application Repository to browse and deploy SAM templates created by you, or others. However you define it, you’ll deploy your function-based system via the AWS CLI, AWS console, AWS-provided CI/CD tooling, or 3rd party tools like CircleCI.

    For this simple demo, I’m going to build a C#-based function and deploy it via the AWS console.

    First up, I went to the AWS console and defined a new queue in SQS. I chose the “standard queue” type.

    Next up, creating a new AWS Lambda function. I gave it a name, chose .NET Core 3.1 as my runtime, and created a role with basic permissions.

    After clicking “create function”, I get a overview screen that shows the “design” of my function and provides many configuration settings.

    I clicked “add trigger” to specify what event kicks off my function. I’ve got lots of options to choose from, which is the hallmark of a “connective compute” function platform. I chose SQS, selected my previously-created queue from the dropdown list, and clicked “Add.”

    Now all I have to do is the write the code that handles the queue message. I chose VS Code as my tool. At first, I tried using the AWS Toolkit for Visual Studio Code to generate a SAM-based project, but the only template was an API-based “hello world” one that forced me to retrofit a bunch of stuff after code generation. So, I decided to skip SAM for now, and code the AWS Lambda function directly, by itself.

    The .NET team at AWS has done below-the-radar great work for years now, and their Lambda tooling is no exception. They offer a handful of handy templates you can use with the .NET CLI. One basic command installs them for you: dotnet new -i Amazon.Lambda.Templates

    I chose to create a new project by entering dotnet new lambda.sqs. This produced a pair of projects, one with the function source code, and one that has unit tests. The primary project also has a aws-lambda-tools-default.json file that includes command line options for deploying your function. I’m not sure if I need it given I’m deploying via CLI, but I updated references to .NET Core 3.1 anyway. Note that the “function-handler” value *is* important, as we’ll need that shortly. This tells Lambda which operation (in which class) to invoke.

    I kept the generated function code, which simply prints out the contents of the message pulled from Amazon SQS.

    I successfully built the project, and then had to “publish” it to get the right assets for packaging. This publish command ensures that configuration files get bundled up as well:

    dotnet publish /p:GenerateRuntimeConfigurationFiles=true

    Now, all I have to do is zip up the resulting files in the “publish” directory. With those DLLs and *.json files zipped up, I return to the AWS console to upload my code. In most cases, you’re going to stash the archive file in Amazon S3 (either manually, or as the result of a CI process). Here, I uploaded my ZIP file directly, AND, set the function handler value equal to the “function-handler” value from my configuration file.

    After I click “save”, I get a notice that my function was updated. I went back to Amazon SQS, and sent a few messages to the queue, using the “send a message” option.

    After a moment, I saw entries in the “monitoring” view of the AWS Lambda console, and drilled into the CloudWatch logs and saw that my function wrote out the SQS payloads.

    I’m impressed at how far the AWS Lambda experience has come since I first tried it out. You’ll find similarly solid experiences from Microsoft, Google and others as you use their FaaS platforms as glue code to connect managed services.

    Category 2: Platform Expanding

    Trigger / DestinationSignaturePackagingDeployment
    HTTPHandlers with specific parameterscode packagesWeb portal, CLI

    There’s a category of FaaS that, to me, isn’t about connecting services together, as much as it’s about expanding or enriching the capabilities of a host platform. From the list above, I’d put offerings like Cloudflare Workers, Twilio Functions, and Zeit Serverless Functions into that bucket.

    Most, if not all, of these start with an HTTP request and only support specific programming languages. For Twilio, you can use their integrated FaaS to serve up tokens, call outbound APIs after receiving an SMS, or even change voice calls. Zeit is an impressive host for static sites, and their functions platform supports backend operations like authentication, form submissions, and more. And Cloudflare Workers is about adding cool functionality whenever someone sends a request to a Cloudfare-managed domain. Let’s actually mess around with Cloudflare Workers.

    I go to my (free) Cloudflare account to get started. You can create these running-at-the-edge functions entirely in the browser, or via the Wrangler CLI. Notice here that Workers support JavaScript, Rust, C, and C++.

    After I click “create a Worker”, I’m immediately dropped into a web console where I can author, deploy, and test my function. And, I get some sample code that represents a fully-working Worker. All workers start by responding to a “fetch” event.

    I don’t think you’d use this to create generic APIs or standalone apps. No, you’d use this to make the Cloudflare experience better. They handily have a whole catalog of templates to inspire you, or do your work for you. Most of these show examples of legit Cloudflare use cases: inspect and purge sensitive data from responses, deny requests missing an authorization header, do A/B testing based on cookies, and more. I copied the code from the “redirect” template which redirects requests to a different URL. I changed a couple things, clicked “save and deploy” and called my function.

    On the left is my code. In the middle is the testing console, where I submitted a GET request, and got back a “301 Moved Permanently” HTTP response. I also see a log entry from my code. If you call my function in your browser, you’ll get redirected to cloudflare.com.

    That was super simple. The serverless compute products in this category have a constrained set of functionality, but I think that’s on purpose. They’re meant to expand the set of problems you can solve with their platform, versus creating standalone apps or services.

    Category 3: Full Stack Apps

    Trigger / DestinationSignaturePackagingDeployment
    HTTP, queue, timeNoneContainersWeb portal, CLI, CI/CD pipelines

    This category—which I can’t quite figure out the right label for—is about serverless computing for complete web apps. These aren’t functions, per-se, but run on a serverless stack that scales to zero and is billed based on usage. The unit of deployment is a container, which means you are providing more than code to the platform—you are also supplying a web server. This can make serverless purists squeamish since a key value prop of FaaS is the outsourcing of the server to the platform, and only focusing on your code. I get that. The downside of that pure FaaS model is that it’s an unforgiving host for any existing apps.

    What fits in this category? The only obvious one to me is Google Cloud Run, but AWS Fargate kinda fits here too. Google Cloud Run is based on the popular open source Knative project, and runs as a managed service in Google Cloud. Let’s try it out.

    First, install the Google Cloud SDK to get the gcloud command line tool. Once the CLI gets installed, you do a gcloud init in order to link up your Google Cloud credentials, and set some base properties.

    Now, to build the app. What’s interesting here, is this is just an app. There’s no special format or method signature. The app just has to accept HTTP requests. You can write the app in any language, use any base image, and end up with a container of any size. The app should still follow some basic cloud-native patterns around fast startup and attached storage. This means—and Google promotes this—that you can migrate existing apps fairly easily. For my example, I’ll use Visual Studio for Mac to build a new ASP.NET Web API project with a couple RESTful endpoints.

    The default project generates a weather-related controller, so let’s stick with that. To show that Google Cloud Run handles more than one endpoint, I’m adding a second method. This one returns a forecast for Seattle, which has been wet and cold for months.

    namespace seroter_api_gcr.Controllers
    {
        [ApiController]
        [Route("[controller]")]
        public class WeatherForecastController : ControllerBase
        {
            private static readonly string[] Summaries = new[]
            {
                "Freezing", "Bracing", "Chilly", "Cool", "Mild", "Warm", "Balmy", "Hot", "Sweltering", "Scorching"
            };
    
            private readonly ILogger<WeatherForecastController> _logger;
    
            public WeatherForecastController(ILogger<WeatherForecastController> logger)
            {
                _logger = logger;
            }
    
            [HttpGet]
            public IEnumerable<WeatherForecast> Get()
            {
                var rng = new Random();
                return Enumerable.Range(1, 5).Select(index => new WeatherForecast
                {
                    Date = DateTime.Now.AddDays(index),
                    TemperatureC = rng.Next(-20, 55),
                    Summary = Summaries[rng.Next(Summaries.Length)]
                })
                .ToArray();
            }
    
            [HttpGet("seattle")]
            public WeatherForecast GetSeattleWeather()
            {
                return new WeatherForecast { Date = DateTime.Now, Summary = "Chilly", TemperatureC = 6 };
            }
        }
    }
    

    If I were doing this the right way, I’d also change my Program.cs file and read the port from a provided environment variable, as Google suggests. I’m NOT going to do that, and instead will act like I’m just shoveling an existing, unchanged API into the service.

    The app is complete and works fine when running locally. To work with Google Cloud Run, my app must be containerized. You can do this a variety of ways, including the most reasonable, which involves Google Cloud Build and continuous delivery. I don’t roll like that. WE’RE DOING IT BY HAND.

    I will cheat and have Visual Studio give me a valid Dockerfile. Right-click the project, and add Docker support. This creates a Docker Compose project, and throws a Dockerfile into my original project.

    Let’s make one small tweak. In the Dockerfile, I’m exposing port 5000 from my container, and setting an environment variable to tell my app to listen on that port.

    I opened my CLI, and navigated to the folder directly above this project. From there, I executed a Docker build command that pointed to the generated Dockerfile, and tagged the image for Google Container Registry (where Google Cloud Run looks for images).

    docker build --file ./seroter-api-gcr/Dockerfile . --tag gcr.io/seroter/seroter-api-gcr

    That finished, and I had a container image in my local registry. I need to get it up to Google Container Registry, so I ran a Docker push command.

    docker push gcr.io/seroter/seroter-api-gcr

    After a moment, I see that container in the Google Container Registry.

    Neat. All that’s left is to spin up Google Cloud Run. From the Google Cloud portal, I choose to create a new Google Cloud Run service. I choose a region and name for my service.

    Next up, I chose the container image to use, and set the container port to 5000. There are lots of other settings here too. I can create a connection to managed services like Cloud SQL, choose max requests per container, set the request timeout, specify the max number of container instances, and more.

    After creating the service, I only need to wait a few seconds before my app is reachable.

    As expected, I can ping both API endpoints and get back a result. After a short duration, the service spins compute down to zero.

    Wrap up

    The landscape of serverless computing is broader than you may think. Depending on what you’re trying to do, it’s possible to make a sub-optimal choice. If you’re working with many different managed services and writing code to connect them, use the first category. If you’re enriching existing platforms with bits of compute functionality, use the second category. And if you’re migrating or modernizing existing apps, or have workloads that demand more platform flexibility, choose the third. Comments? Violent disagreement? Tell me below.

  • Creating an event-driven architecture out of existing, non-event-driven systems

    Creating an event-driven architecture out of existing, non-event-driven systems

    Function-as-a-service gets all the glory in the serverless world, but the eventing backplane is the unheralded star of modern architectures, serverless or otherwise. Don’t get me wrong, scale-to-zero compute is cool. But is your company really transforming because you’re using fewer VMs? I’d be surprised. No, it seems that big benefits comes from a reimagined architecture, often powered by (managed) software that emit and consume events. If you have this in place, creative developers can quickly build out systems by tapping into event streams. If you have a large organization, and business systems that many IT projects tap into, this sort of event-driven architecture can truly speed up delivery.

    But I doubt that most existing software at your company is powered by triggers and events. How can you start being more event-driven with all the systems you have in place now? In this post, I’ll look at three techniques I’ve used or seen.

    First up, what do you need at your disposal? What’s the critical tech if you want to event-enable your existing SaaS or on-premises software? How about:

    • Event bus/backbone. You need an intermediary to route events among systems. It might be on-premises or in the public cloud, in-memory or persistent, open source or commercial. The important thing is having a way to fan-out the information instead of only offering point-to-point linkages.
    • Connector library. How are you getting events to and from software systems? You may use HTTP APIs or some other protocol. What you want is a way to uniformly talk to most source/destination systems without having to learn the nuances of each system. A series of pre-built connectors play a big part.
    • Schema registry. Optional, but important. What do the events looks like? Can I discover the available events and how to tap into them?
    • Event-capable targets. Your downstream systems need to be able to absorb events. They might need a translation layer or buffer to do so.

    MOST importantly, you need developers/architects that understand asynchronous programming, stateful stream processing, and distributed systems. Buying the technology doesn’t matter if you don’t know how to best use it.

    Let’s look at how you might use these technologies and skills to event-ify your systems. In the comments, tell me what I’m missing!

    Option #1: Light up natively event-driven capabilities in the software

    Some software is already event-ready and waiting for you to turn it on! Congrats if you use a wide variety of SaaS systems like Salesforce (via outbound messaging), Oracle Cloud products (e.g. Commerce Cloud), GSuite (via push notifications), Office 365 (via graph API) and many more. Heck, even some cloud-based databases like Azure Cosmos DB offer a change feed you can snack on. It’s just a matter of using these things.

    On-premises software can work here as well. A decade ago, I worked at Amgen and we created an architecture where SAP events were broadcasted through a broker, versus countless individual systems trying to query SAP directly. SAP natively supported eventing then, and plenty of systems do now.

    For either case—SaaS systems or on-premises software—you have to decide where the events go. You can absolutely publish events to single-system web endpoints. But realistically, you want these events to go into an event backplane so that everyone (who’s allowed) can party on the event stream.

    AWS has a nice offering that helps here. Amazon EventBridge came out last year with a lot of fanfare. It’s a fully managed (serverless!) service for ingesting and routing events. EventBridge takes in events from dozens of AWS services, and (as of this writing) twenty-five partners. It has a nice schema registry as well, so you can quickly understand the events you have access to. The list of integrated SaaS offerings is a little light, but getting better. 

    Given their long history in the app integration space, Microsoft also has a good cloud story here. Their eventing subsystem, called Azure Event Grid, ingests events from Azure (or custom) sources, and offers sophisticated routing rules. Today, its built-in event sources are all Azure services. If you’re looking to receive events from a SaaS system, you bolt on Azure Logic Apps. This service has a deep array of connectors that talk to virtually every system you can think of. Many of these connectors—including SharePointSalesforceWorkdayMicrosoft Dynamics 365, and Smartsheet—support push-based triggers from the SaaS source. It’s fairly easy to create a Logic App that receives a trigger, and publishes to Azure Event Grid.

    And you can always use “traditional” service brokers like Microsoft’s BizTalk Server which offer connectors, and pub/sub routing on any infrastructure, on-premises or off.

    Option #2: Turn request-driven APIs into event streams

    What if your software doesn’t have triggers or webhooks built in? That doesn’t mean you’re out of luck. 

    Virtually all modern packaged (on-premises or SaaS) software offers APIs. Even many custom-built apps do. These APIs are mostly request-response based (versus push-based async, or request-stream) but we can work with this.

    One pattern? Have a scheduler call those request-response APIs and turn the results into broadcasted events. Is it wasteful? Yes, polling typically is. But, the wasted polling cycles are worth it if you want to create a more dynamic architecture.

    Microsoft Azure users have good options. Specifically, you can quickly set up an Azure Logic App that talks to most everything, and then drops the results to Azure EventGrid for broadcast to all interested parties. Logic Apps also supports debatching, so you can parse the polled results and create an outbound stream of individual events. Below, every minute I’m listing records from ServiceNow that I publish to EventGrid.

    Note that Amazon EventBridge also supports scheduled invocation of targets. Those targets include batch job queues, code pipelines, ECS tasks, Lambda functions, and more.

    Option #3: Hack the subsystems to generate events

    You’ll have cases where you don’t have APIs at all. Just give up? NEVER. 

    A last resort is poking into the underlying subsystems. That means generating events from file shares, FTP locations, queues, and databases. Now, be careful here. You need to REALLY know your software before doing this. If you create a change feed for the database that comes with your packaged software, you could end up with data integrity issues. So, I’d probably never do this unless it was a custom-built (or well-understood) system.

    How do public cloud platforms help? Amazon EventBridge primarily integrates with AWS services today. That means if your custom or packaged app runs in AWS, you can trigger events off the foundational pieces. You might trigger events off EC2 state changes, new objects added to S3 blob storage, deleted users in the identity management system, and more. Most of these are about the service lifecycle, versus about the data going through the service, but still useful.

    In Azure, the EventGrid service ingests events from lots of foundational Azure services. You can listen on many of the same types of things that Amazon EventBridge does. That includes blob storage, although nothing yet on virtual machines.

    Your best bet in Azure may be once again to use Logic Apps and turn subsystem queries into an outbound event stream. In this example, I’m monitoring IBM DB2 database changes, and publishing events. 

    I could do the same with triggers on FTP locations …

    … and file shares.

    In all those cases, it’s fairly straightforward to publish the queried items to Azure EventGrid for fan-out processing to trigger-based recipient systems

    Ideally, you have option #1 at your disposal. If not, you can selectively choose #2 or #3 to get more events flowing in your architecture. Are there other patterns and techniques you use to generate events out of existing systems?

  • It turns out there might be a better dev abstraction than "serverless." Enter Dark.

    It turns out there might be a better dev abstraction than "serverless." Enter Dark.

    My favorite definition of “serverless computing” still comes from Rachel Stephens at RedMonk: managed services that scale to zero. There’s a lot packed into that statement. It elevates consumption-based pricing, and a bias towards managed services, not raw infrastructure. That said, do today’s mainstream serverless technologies represent a durable stack for the next decade? I’m not sure. It feels like there’s still plenty of tradeoffs and complexity. I especially feel this way after spending time with Dark.

    If you build apps by writing code, you’re doing a lot of setup and wiring. Before writing code, you figure out tech choices, spin up dependent services (databases, etc), get your CI/CD pipeline figured out, and decide out how to stitch it all together. Whether you’re building on-premises or off, it’s generally the same. Look at a typical serverless stack from AWS. it’s made up of AWS Lambda or Fargate, Amazon S3, Amazon DynamoDB, Amazon Cognito, Amazon API Gateway, Amazon SQS or Kinesis, Amazon CloudWatch, AWS X-Ray and more. All managed services, but still a lot to figure out and pre-provision. To be fair, frameworks like AWS Amplify or Google’s Firebase pull things together better than pure DIY. Regardless, it might be serverless, but it’s not setup-less or maintain-less.

    Dark seems different. It’s a complete system—language, editor, runtime, and infrastructure. You spend roughly 100% of your time building the app. It’s a deploy-less model where your code changes are instantly deployed behind the scenes. It’s setup-less as you don’t create databases, message brokers, API gateways, or compute hosts. Everything is interconnected. Some of this sounds reminiscent of low-code platforms like Salesforce, Microsoft PowerApps, or OutSystems. But Dark still targets professional programmers, I think, so it’s a different paradigm.

    In this post, I’ll build a simple app with Dark. As we go along, I’ll explain some of the interesting aspects of the platform. This app serves up a couple REST endpoints, stores data in database, and uses a background worker to “process” incoming orders.

    Step 0: Understand Dark Language and Components

    With Dark, you’re coding in their language. They describe it as “statically-typed functional/imperative hybrid, based loosely on ML. It is a high-level language, with immutable values, garbage collection, and support for generics/polymorphic types.” It offers the standard types (e.g. Strings, Integers, Booleans, Lists, Dictionaries), and doesn’t really support custom objects.

    The Dark team also describes their language as “expression-oriented.” You basically build up expressions. You use (immutable) variables, conditional statements, and pipelining to accomplish your objectives. We’ll see a few examples of this below.

    There are five (kinda, six) components that make up a Dark app. These “handlers” sit on your “canvas” and hold all your code. These components are:

    • HTTP endpoints. These are for creating application entry points via the major HTTP verbs.
    • Cron jobs. These are tasks that run on whatever schedule you set.
    • Background Workers. They receive events, run asynchronously, and support automatic retries.
    • Persistent Datastores. This is a key-value store.
    • REPL. These are developer tools you create to run commands outside of your core components.

    All of these components are first-class in the Dark language itself. I can write Dark code that inherently knows what to do with all the above things.

    The other component that’s available is a “Function” which is just that. It’s an extracted command that you can call from your other components.

    Ok, we know the basics. Let’s get to work.

    Step 1: Create a Datastore

    I need to store state. Almost every system does. Whether your compute nodes store it locally, or you pull it from an attached backing store, you have to factor in provisioning, connecting to, and maintaining it. Not with Dark.

    First, let’s look at the canvas. Here, I add and position the components that make up my app. Each user (or app) gets its own canvas.

    I need a database. To create it, I just click the “plus” next to the Datastores item in the left sidebar, or click on the canvas and choose New DB.

    I named mine “Orders” and proceeded to define a handful of fields and corresponding data types. That’s it. I didn’t pick an instance size, throughput units, partition IDs, or replication factors.

    I can also test out my database by adding a REPL to my canvas, and writing some quick code to inject a record in the database. A button in the REPL lights up and when I click it, it runs whatever code is there. I can then see the record in the database, and add a second REPL to purge the database.

    Step 2: Code the REST endpoints

    Let’s add some data to this database, via a REST API.

    I could click the “plus” button next to the HTTP component in the sidebar, or click the canvas. A better way of doing this is via the Trace-Based Development model in Dark. Specifically, I can issue a request to a non-existent endpoint, Dark will capture that, and I can build up a handler based on it. Reminds me a bit of consumer-driven contract testing where you’re building based on what the client needs.

    So, I go to Postman and submit an HTTP POST request to a URL that references my canvas, but the path doesn’t exist (yet). I’m also sending in the shape of the JSON payload that I want my app to handle.

    Back in Dark, I see a new entry under “404s.”

    When I click the “plus” sign next to it, I get a new HTTP handler on my canvas. Not only that, the handler is pre-configured to handle POST requests to the URL I specified, and, shows me the raw trace of the 404 request.

    What’s kinda crazy is that I can choose this trace (or others) and replay them through the component. This is a powerful way to first create the stub, and then run that request through the component after writing the handler code.

    So let’s write the code. All I want to do is create a record in the database with the data from the HTTP request. If the fields map 1:1, you can just dump it right in there. I chose to more explicitly map it, and set some DB values that didn’t exist in the JSON payload.

    As I start typing my code in, I’m really just filling in the expressions, and choosing from the type-ahead values. Also notice that each expression resolves immediately and shows you the result of that expression on the left side.

    My code itself is fairly simple. I use the built-in operators to set a new database record, and return a simple JSON acknowledgement to the caller.

    That’s it. Dark recognized that this handler is now using the Orders database, and shows a ghostly connection visualization. When I click the “replay” button on my HTTP handler, it runs my code against the selected trace, and sure enough, a record shows up in the database.

    I want a second API endpoint to retrieve a specific order from the system. So, I go back to Postman, and issue another HTTP request to the URL that I want the system to give me.

    As expected, I have another trace to leverage when inflating my HTTP handler.

    For this handler, I changed the handler’s URL to tokenize the request (and get the “orderid” as a variable), and added some simple code to retrieve a record from the database using that order ID.

    That’s all. I now have two REST endpoints that work together to create and retrieve data from a persistent datastore. At no point was I creating containers, deployment pipelines, or switching to logging dashboards. It’s all in one place, as one experience.

    Step 3: Build a Worker

    The final step is to build a worker. This component receives an event and does some work. In my case, I want it to receive new orders, and change the order status to “processing.”

    Once again, I can trigger creation of a worker by “calling” it before it exists. Back in my HTTP post handler, I’m adding the reserved emit command. This is how you send events to a background worker. In this case, I specify the payload, and the name of the yet-to-be-created worker. Then I replay that specific command against the latest trace, and see a new 404 for the worker request.

    In my Dark code, I overwrite the existing record with a new one, and set the OrderStatus value. By replaying the trace, I can see the inbound payload (left) and resulting database update (bottom).

    At this point, my app is done. I can POST new orders, and almost immediately see the changed “status” because the workers run so fast.

    Dark won’t be a fit for many apps and architectures. That said, if my app has me debating between integrating a dozen individual serverless services from a cloud provider, or Dark, I’m choosing Dark.

  • Let’s look at your options for local development with Kubernetes

    Let’s look at your options for local development with Kubernetes

    For a while, I’ve been saying that developers should build great software, and pick their host at the last responsible moment. Apps first, not infrastructure. But now, I don’t think that’s exactly right. It’s naive. As you’re writing code, there are at least three reasons you’ll want to know where you app will eventually run:

    1. It impacts your architecture. You likely need to know if you’re dealing with a function-as-a-service environment, Kubernetes, virtual machines, Cloud Foundry, or whatever. This changes how you lay out components, store state, etc.
    2. There are features your app may use. For each host, there are likely capabilities you want to tap into. Whether it’s input/output bindings in Azure Functions, ConfigMaps in Kubernetes, or something else, you probably can take advantage of what’s there.
    3. It changes your local testing setup. It makes sense that you want to test your code in a production-like environment before you get to production. That means you’ll invest in a local setup that mimics the eventual destination.

    If you’re using Kubernetes, you’ve got lots of options to address #3. I took four popular Kubernetes development options for a spin, and thought I’d share my findings. There are more than four options (e.g. k3dMicrok8sMicronetes), but I had to draw the line somewhere.

    For this post, I’m considering solutions that run on my local machine. Developers using Kubernetes may also spin up cloud clusters (and use features like Dev Spaces in Azure AKS), or sandboxes in something like Katacoda. But I suspect that most will be like me, and enjoy doing things locally. Let’s dig in.

    Option 1: Docker Desktop

    For many, this is the “easy” choice. You’re probably already running Docker Desktop on your PC or Mac.

    By default, you have to explicitly enable it. The screen below is accessible via the “Preferences” menu. 

    After a few minutes, my cluster was running, and I could switch my Kubernetes context to Docker Desktop environment.

    I proved this by running a couple simple kubectl commands that show I’ve got a single node, local cluster.

    This cluster doesn’t have the Kubernetes Dashboard installed by default, so you can follow a short set of steps to add it. You can also, of course, use other dashboards, like Octant

    With my cluster running, I wanted to create a pod, and expose it via a service. 

    My corresponding YAML file is as such:

    ---
    apiVersion: apps/v1
    kind: Deployment
    metadata:
      name: simple-k8s-app
    spec:
      replicas: 1
      selector:
        matchLabels:
          app: simple-k8s-app
      template:
        metadata:
          labels:
            app: simple-k8s-app
        spec:
          containers:
          - name: simple-k8s-app
            image: rseroter/simple-k8s-app-kpack:latest
            ports:
            - containerPort: 8080
            env:
            - name: FLAG_VALUE
              value: "on"
    ---
    apiVersion: v1
    kind: Service
    metadata:
      name: simple-k8s-app
    spec:
      type: LoadBalancer
      ports:
      - port: 9001
        protocol: TCP
        targetPort: 8080
      selector:
        app: simple-k8s-app
    

    I used the “LoadBalancer” type, which I honestly didn’t expect to see work. Everything I’ve seen online says I need to explicitly set up ingress via NodePort. But, once I deployed, my container was running, and service was available on localhost:9001.

    Nice. Now that there was something in my cluster, I started up Octant, and saw my pods, containers, and more.

    Option 2: Minikube

    This has been my go-to for years. Seemingly, for many others as well. It’s featured prominently in the Kubernetes docs and gives you a complete (single node via VM) solution. If you’re on a Mac, it’s super easy to install with a simple “brew install minikube” command.

    To start up Kubernetes, I simply enter “minikube start” in my Terminal. I usually specify a Kubernetes version number, because it defaults to the latest, and some software that I install expects a specific version. 

    After a few minutes, I’m up and running. Minikube has some of its own commands, like one below that returns the status of the environment.

    There are other useful commands for setting Docker environment variables, mounting directories into minikube, tunneling access to containers, and serving up the Kubernetes dashboard.

    My deployment and service YAML definitions are virtually the same as the last time. The only difference? I’m using NodePort here, and it worked fine. 

    ---
    apiVersion: apps/v1
    kind: Deployment
    metadata:
      name: simple-k8s-app
    spec:
      replicas: 1
      selector:
        matchLabels:
          app: simple-k8s-app
      template:
        metadata:
          labels:
            app: simple-k8s-app
        spec:
          containers:
          - name: simple-k8s-app
            image: rseroter/simple-k8s-app-kpack:latest
            ports:
            - containerPort: 8080
            env:
            - name: FLAG_VALUE
              value: "on"
    ---
    apiVersion: v1
    kind: Service
    metadata:
      name: simple-k8s-app
    spec:
      type: NodePort
      ports:
      - port: 9001
        protocol: TCP
        targetPort: 8080
      selector:
        app: simple-k8s-app
    

    After applying this configuration, I could reach my container using the host IP (retrieved via “minikube ip”) and generated port number.

    Option 3: kind

    A handful of people have been pushing this on me, so I wanted to try it out as well. How’s it different from minikube? A few ways. First, it’s not virtual machine-based. The name stands for Kubernetes in Docker, as the cluster nodes are running in Docker containers. Since it’s all local Docker stuff, it’s easy to use your local registry without any extra hoops to jump through. What’s also nice is that you can create multiple worker nodes, so you can test more realistic scenarios. kind is meant to be used by those testing Kubernetes, but you can use it on your own as well.

    Installing is fairly straightforward. For those on Mac, a simple “brew install kind” gets you going. When creating clusters, you can simply do “kind create cluster”, or do that with a configuration file to customize the build. I created a simple config that created two control plane nodes, and two workers nodes.

    # a cluster with 2 control-plane nodes and 2 workers
    kind: Cluster
    apiVersion: kind.x-k8s.io/v1alpha4
    nodes:
    - role: control-plane
    - role: control-plane
    - role: worker
    - role: worker
    

    After creating the cluster with that YAML configuration, I had a nice little cluster running inside Docker containers.

    It doesn’t look like the UI Dashboard is built in, so again, you can either install it yourself, or point your favorite dashboard at the cluster. Here, Octant shows me the four nodes.

    This time, I deployed my pod without a corresponding service. It’s the same YAML as above, but no service definition. Why? Two reasons: (1) I wanted to try port forward in this environment, and (2) ingress in kind is a little trickier than in the above platforms.

    So, I got the name of my pod, and tunneled to it via this command:

    kubectl port-forward pod/simple-k8s-app-6dd8b59b97-qwsjb 9001:8080

    Once I did that, I pinged http://127.0.0.1:9001 and pulled my the app in the container. Nice!

    Option 4: Tilt

    This is a fairly new option. Tilt is positioned as “local Kubernetes development with no stress.” BOLD CLAIM. Instead of just being a vanilla Kubernetes cluster to deploy to, Tilt offers dev-friendly experiences for packaging code into containers, seeing live updates, troubleshooting, and more. So, you do have to bring your Kubernetes cluster to the table before using Tilt.

    So, I again started up Docker Desktop and got that Kubernetes environment ready to go. Then, I followed the Tilt installation instructions for my machine. After a bit, everything was installed, and typing “tilt” into my Terminal gave me a summary of what Tilt does, and available commands.

    I started by just typing “tilt up” and got a console and web UI. The web UI told me I needed a Tilefile, and I do what I’m told. My file just contained a reference to the YAML file I used for the above Docker Desktop demo.

    k8s_yaml('simple-k8s-app.yaml')

    As soon as I saved the file, things started happening. Tilt immediately applied my YAML file, and started the container up. In a separate window I checked the state of deployment via kubectl, and sure enough everything was up and running.

    But that’s not really the power of this thing. For devs, the fun comes from having the builds automated too. Not just a finished container image. So, I built a new ASP.NET Core app using Visual Studio Code, added a Dockerfile, a put it at the same directory level as the Tiltfile. Then, I updated my Tiltfile to reference the Dockerfile.

    k8s_yaml('simple-k8s-app.yaml')
    docker_build("tilt-demo-app", "./webapp", dockerfile="Dockerfile")

    After saving the files, Tilt got to work and built my image, added it to my local Docker registry, and deployed it to the Kubernetes cluster.

    The fun part, is now I could just change the code, save it, and seconds later Tilt rebuilt the container image and deployed the changes.

    If your future includes Kubernetes, and it looks like for most, it does, you’ll want a good developer workflow. That means using a decent local experience. You may also use clusters in the cloud to complement the one-premises ones. That’s cool. Also consider how you’ll manage all of them. Today, VMware shipped Tanzu Mission Control, which is a cool way to manage Kubernetes clusters created there, or attached from anywhere. For fun, I attached my existing Azure Kubernetes Services (AKS) cluster, and, the kind cluster we created here. Here’s the view of the kind clusters, with all its nodes visible and monitored.

    What else do you use for local Kubernetes development?

  • These six integrations show that Microsoft is serious about Spring Boot support in Azure

    Microsoft doesn’t play favorites. Oh sure, they heavily promote their first party products. But after that, they typically take a big-tent, welcome-all-comers approach and rarely call out anything as “the best” or “our choice.” They do seem to have a soft spot for Spring, though. Who can blame them? You’ve got millions of Java/Spring developers out there, countless Spring-based workloads in the wild, and 1.6 million new projects created each month at start.spring.io. I’m crazy enough to think that whichever vendor attracts the most Spring apps will likely “win” the first phase of the public cloud wars.

    With over a dozen unique integrations between Spring projects and Azure services, the gang in Redmond has been busy. A handful stand out to me, although all of them make a developer’s life easier.

    #6 Azure Functions

    I like Azure Functions. There’s not a lot extra machinery—such as API gateways—you have to figure out to use it. The triggers and bindings model are powerful. And it supports lots of different programming languages.

    While many (most?) developers are polyglot and comfortable switching between languages, it’d make sense if you want to keep your coding patterns and tooling the same as you adopt a new runtime like Azure Functions. The Azure team worked with the Spring team to ensure that  developers could take advantage of Azure Functions, while still retaining their favorite parts of Spring. Specifically, they partnered on the adapter that wires up Azure’s framework into the user’s code, and testing of the end-to-end experience. The result? A thoughtful integration of Spring Cloud Functions and Azure Functions that gives you the best of both worlds. I’ve seen a handful of folks offer guidance, and tutorials. And Microsoft offers a great guide.

    Always pick the right language based on performance needs, scale demands, etc. Above all else, you may want to focus on developer productivity, and using the language/framework that’s best for your team. Your productivity (or lack thereof) is more costly than any compute infrastructure!

    #5 Azure Service Bus and Event Hubs

    I’m a messaging geek. Connecting systems together is an underrated, but critically valuable skill. I’ve written a lot about Spring Cloud Stream in the past. Specifically, I’ve shown you how to use it with Azure Event Hubs, and even the Kafka interface.

    Basically, you can now use Microsoft’s primary messaging platforms—Service Bus Queues, Service Bus Topics, Event Hubs—as the messaging backbone of a Spring Boot app. And you can do all that, without actually learning the unique programming models of each platform. The Spring Boot developer writes platform-agnostic code to publish messages to subscribe to messages, and the Spring Cloud Stream objects take care of the rest.

    Microsoft has guides for working with Service BusEvent Hubs, and Event Hubs Kafka API. When you’re using Azure messaging services, I’m hard pressed to think of any easier way to interact with them than Spring Boot.

    #4 Azure Cosmos DB

    Frankly, all the database investment’s by Microsoft’s Java/Spring team have been impressive. You can cleanly interact with their whole suite of relational databases with JDBC and JPA via Spring Data.

    I’m more intrigued by their Cosmos DB work. Cosmos DB is Microsoft’s global scale database service that serves up many different APIs. Want a SQL API? You got it. How about a MongoDB or Cassandra facade? Sure. Or maybe a graph API using Gremlin? It’s got that too.

    Spring developers can use Microsoft-created SDKs for any of it. There’s a whole guide for using the SQL API. Likewise, Microsoft created walkthroughs for Spring devs using CassandraMongo, or Gremlin APIs. They all seem to be fairly expressive and expose the core capabilities you want from a Cosmos DB instance. 

    #3 Azure Active Directory B2C

    Look, security stuff doesn’t get me super pumped. Of course it’s important. I just don’t enjoy coding for it. Microsoft’s making it easier, though. They’ve got a Spring Boot Starter just for Azure Key Vault, and clean integration with Azure Active Directory via Spring Security. I’m also looking forward to seeing managed identities in these developer SDKs.

    I like the support for Azure Active Directory B2C. This is a standalone Azure service that offer single sign-on using social or other 3rd party identities. Microsoft claims it can support millions of users, and billions of authentication requests. I like that Spring developers have such a scalable service to seamlessly weave into their apps. The walkthrough that Microsoft created is detailed, but straightforward. 

    My friend Asir also presented this on stage with me at SpringOne last year in Austin. Here’s the part of the video where he’s doing the identity magic:

    #2 Azure App Configuration

    When you’re modernizing an app, you might only be aiming for one or two factors. Can you gracefully restart the thing, and did you yank configuration out of code? Azure App Configuration is a new service that supports the latter.

    This service is resilient, and supports labeling, queryingencryption, and event listeners. And Spring was one of the first things they announced support for. Spring offers a robust configuration subsystem, and it looks like Azure App Configuration slides right in. Check out their guide to see how to tap into cloud-stored config values, whether your app itself is in the cloud, or not.

    #1 Azure Spring Cloud

    Now, I count about a dozen ways to run a Java app on Azure today. You’re not short of choices. Why add another? Microsoft saw demand for a Spring-centric runtime that caters to microservices using Spring Cloud. Azure Spring Cloud will reach General Availability soon, so I’m told, and offers features like config management, service discovery, blue/green deployments, integrated monitoring, and lots more. I’ve been playing with it for a while, and am impressed with what’s possible.

    These integrations help you stitch together some pretty cool Azure cloud services into a broader Spring Boot app. That makes sense, when you consider what Spring Boot lead Phil Webb said at SpringOne a couple years back:

    “A lot of people think that Spring is a dependency injection framework … Spring is more of an integration framework. It’s designed to take lots of different technologies that you might want to use and allow you to combine them in ways that feel nature.”

  • 2019 in Review: Watching, Reading, and Writing Highlights

    Be still and wait. This was the best advice I heard in 2019, and it took until the end of the year for me to realize it. Usually, when I itch for a change, I go all in, right away. I’m prone to thinking that “patience” is really just “indecision.” It’s not. The best things that happened this year were the things that didn’t happen when I wanted! I’m grateful for an eventful, productive, and joyful year where every situation worked out for the best.

    2019 was something else. My family grew, we upgraded homes, my team was amazing, my company was acquired by VMware, I spoke at a few events around the world, chaired a tech conference, kept up a podcast, created a couple new Pluralsight classes, continued writing for InfoQ.com, and was awarded a Microsoft MVP for the 12th straight time.

    For the last decade+, I’ve started each year by recapping the last one. I usually look back at things I wrote, and books I read. This year, I’ll also add “things I watched.”

    Things I Watched

    I don’t want a ton of “regular” TV—although I am addicted to Bob’s Burgers and really like the new FBI—and found myself streaming or downloading more things while traveling this year. These shows/seasons stood out to me:

    Crashing – Season 3 [HBO] Pete Holmes is one of my favorite stand-up comedians, and this show has some legit funny moments, but it’s also complex, dark, and real. This was a good season with a great ending.

    BoJack Horseman – Season 5 [Netflix] Again, a show with absurdist humor, but also a dark, sobering streak. I’m got to catch up on the latest season, but this one was solid.

    Orange is the New Black – Season 7 [Netflix] This show has had some ups and downs, but I’ve stuck with it because I really like the cast, and there are enough surprises to keep me hooked. This final season of the show was intense and satisfying.

    Bosch – Season 4 [Amazon Prime] Probably the best thing I watched this year? I love this show. I’ve read all the books the show is based on, but the actors and writers have given this its own tone. This was a super tense season, and I couldn’t stop watching.

    Schitt’s Creek – Seasons 1-4 [Netflix] Tremendous cast and my favorite overall show from 2019. Great writing, and some of the best characters on TV. Highly recommended.

    Jack Ryan – Season 1 [Amazon Prime] Wow, what a show. Throughly enjoyed the story and cast. Plenty of twists and turns that led me to binge watch this on one of my trips this year.

    Things I Wrote

    I kept up a reasonable writing rhythm on my own blog, as well as publication to the Pivotal blog and InfoQ.com site. Here were a few pieces I enjoyed writing the most:

    [Pivotal blog] Five part series on digital transformation. You know what you should never do? Write a blog post and in it, promise that you’ll write four more. SO MUCH PRESSURE. After the overview post, I looked at the paradox of choice, design thinking, data processing, and automated delivery. I’m proud of how it all ended up.

    [blog] Which of the 295,680 platform combinations will you create on Microsoft Azure? The point of this post wasn’t that Microsoft, or any cloud provider for that matter, has a lot of unique services. They do, but the point was that we are prone to thinking that we’re getting a complete solution from someone, but really getting some really cool components to stitch together.

    [Pivotal blog] Kubernetes is a platform for building platforms. Here’s what that means. This is probably my favorite piece I wrote this year. It required a healthy amount of research and peer review, and dug into something I see very few people talking about.

    [blog] Go “multi-cloud” while *still* using unique cloud services? I did it using Spring Boot and MongoDB APIs. There’s so many strawman arguments on Twitter when it comes to multi-cloud that it’s like a scarecrow convention. Most people I see using multiple clouds aren’t dumb or lazy. They have real reasons, including a well-founded lack of trust in putting all their tech in one vendor’s basket. This blog post looked at how to get the best of all worlds.

    [blog] Looking to continuously test and patch container images? I’ll show you one way. I’m not sure when I give up on being a hands on technology person. Maybe never? This was a demo I put together for my VMworld Barcelona talk, and like the final result.

    [blog] Building an Azure-powered Concourse pipeline for Kubernetes – Part 3: Deploying containers to Kubernetes. I waved the white flag and learned Kubernetes this year. One way I forced myself to do so was sign up to teach an all-day class with my friend Rocky. While leading up to that, I wrote up this 3-part series of posts on continuous delivery of containers.

    [blog] Want to yank configuration values from your .NET Core apps? Here’s how to store and access them in Azure and AWS. It’s fun to play with brand new tech, curse at it, and document your journey for others so they curse less. Here I tried out Microsoft’s new configuration storage service, and compared it to other options.

    [blog] First Look: Building Java microservices with the new Azure Spring Cloud. Sometimes it’s fun to be first. Pivotal worked with Microsoft on this offering, so on the day it was announced, I had a blog post ready to go. Keep an eye on this service in 2020; I think it’ll be big.

    [InfoQ] Swim Open Sources Platform That Challenges Conventional Wisdom in Distributed Computing. One reason I keep writing for InfoQ is that it helps me discover exciting new things. I don’t know if SWIM will be a thing long term, but their integrated story is unconventional in today’s “I’ll build it all myself” world.

    [InfoQ] Weaveworks Releases Ignite, AWS Firecracker-Powered Software for Running Containers as VMs. The other reason I keep writing for InfoQ is that I get to talk to interesting people and learn from them. Here, I engaged in an informative Q&A with Alexis and pulled out some useful tidbits about GitOps.

    [InfoQ] Cloudflare Releases Workers KV, a Serverless Key-Value Store at the Edge. Feels like edge computing has the potential to disrupt our current thinking about what a “cloud” is. I kept an eye on Cloudflare this year, and this edge database warranted a closer look.

    Things I Read

    I like to try and read a few books a month, but my pace was tested this year. Mainly because I chose to read a handful of enormous biographies that took a while to get through. I REGRET NOTHING. Among the 32 books I ended up finishing in 2019, these were my favorites:

    Churchill: Walking with Destiny by Andrew Roberts (@aroberts_andrew). This was the most “highlighted” book on my Kindle this year. I knew the caricature, but not the man himself. This was a remarkably detailed and insightful look into one of the giants of the 20th century, and maybe all of history. He made plenty of mistakes, and plenty of brilliant decisions. His prolific writing and painting were news to me. He’s a lesson in productivity.

    At Home: A Short History of Private Life by Bill Bryson. This could be my favorite read of 2019. Bryson walks around his old home, and tells the story of how each room played a part in the evolution of private life. It’s a fun, fascinating look at the history of kitchens, studies, bedrooms, living rooms, and more. I promise that after you read this book, you’ll be more interesting at parties.

    Messengers: Who We Listen To, Who We Don’t, and Why by Stephen Martin (@scienceofyes) and Joseph Marks (@Joemarks13). Why is it that good ideas get ignored and bad ideas embraced? Sometimes it depends on who the messenger is. I enjoyed this book that looked at eight traits that reliably predict if you’ll listen to the messenger: status, competence, attractiveness, dominance, warm, vulnerability, trustworthiness, and charisma.

    Six Days of War: June 1967 and the Making of the Modern Middle East by Michael Oren (@DrMichaelOren). What a story. I had only a fuzzy understanding of what led us to the Middle East we know today. This was a well-written, engaging book about one of the most consequential events of the 20th century.

    The Unicorn Project: A Novel about Developers, Digital Disruption, and Thriving in the Age of Data by Gene Kim (@RealGeneKim). The Phoenix Project is a must-read for anyone trying to modernize IT. Gene wrote that book from a top-down leadership perspective. In The Unicorn Project, he looks at the same situation, but from the bottom-up perspective. While written in novel form, the book is full of actionable advice on how to chip away at the decades of bureaucratic cruft that demoralizes IT and prevents forward progress.

    Talk Triggers: The Complete Guide to Creating Customers with Word of Mouth by Jay Baer (@jaybaer) and Daniel Lemin (@daniellemin). Does your business have a “talk trigger” that leads customers to voluntarily tell your story to others? I liked the ideas put forth by the authors, and the challenge to break out from the pack with an approach (NOT a marketing gimmick) that really resonates with customers.

    I Heart Logs: Event Data, Stream Processing, and Data Integration by Jay Kreps (@jaykreps). It can seem like Apache Kafka is the answer to everything nowadays. But go back to the beginning and read Jay’s great book on the value of the humble log. And how it facilitates continuous data processing in ways that preceding technologies struggled with.

    Kafka: The Definitive Guide: Real-Time Data and Stream Processing at Scale by Neha Narkhede (@nehanarkhede), Gwen Shapira (@gwenshap), and Todd Palino (@bonkoif). Apache Kafka is probably one of the five most impactful OSS projects of the last ten years, and you’d benefit from reading this book by the people who know it. Check it out for a great deep dive into how it works, how to use it, and how to operate it.

    The Players Ball: A Genius, a Con Man, and the Secret History of the Internet’s Rise by David Kushner (@davidkushner). Terrific story that you’ve probably never heard before, but have felt its impact. It’s a wild tale of the early days of the Web where the owner of sex.com—who also created match.com—had it stolen, and fought to get it back. It’s hard to believe this is a true story.

    Mortal Prey by John Sanford. I’ve read a dozen+ of the books in this series, and keep coming back for more. I’m a sucker for a crime story, and this is a great one. Good characters, well-paced plots.

    Your God is Too Safe: Rediscovering the Wonder of a God You Can’t Control by Mark Buchanan (@markaldham). A powerful challenge that I needed to hear last year. You can extrapolate the main point to many domains—is something you embrace (spirituality, social cause, etc) a hobby, or a belief? Is it something convenient to have when you want it, or something powerful you do without regard for the consequences? We should push ourselves to get off the fence!

    Escaping the Build Trap: How Effective Product Management Creates Real Value by Melissa Perri (@lissijean). I’m not a product manager any longer, but I still care deeply about building the right things. Melissa’s book is a must-read for people in any role, as the “build trap” (success measured by output instead of outcomes) infects an entire organization, not just those directly developing products. It’s not an easy change to make, but this book offers tangible guidance to making the transition.

    Project to Product: How to Survive and Thrive in the Age of Digital Disruption with the Flow Framework by Mik Kersten (@mik_kersten). This is such a valuable book for anyone trying to unleash their “stuck” I.T. organization. Mik does a terrific job explaining what’s not working given today’s realities, and how to unify an organization around the value streams that matter. The “flow framework” that he pioneered, and explains here, is a brilliant way of visualizing and tracking meaningful work.

    Range: Why Generalists Triumph in a Specialized World by David Epstein (@DavidEpstein). I felt “seen” when I read this. Admittedly, I’ve always felt like an oddball who wasn’t exceptional at one thing, but pretty good at a number of things. This book makes the case that breadth is great, and most of today’s challenges demand knowledge transfer between disciplines and big-picture perspective. If you’re a parent, read this to avoid over-specializing your child at the cost of their broader development. And if you’re starting or midway through a career, read this for inspiration on what to do next.

    John Newton: From Disgrace to Amazing Grace by Jonathan Aitken. Sure, everyone knows the song, but do you know the man? He had a remarkable life. He was the captain of a slave ship, later a pastor and prolific writer, and directly influenced the end of the slave trade.

    Blue Ocean Shift: Beyond Competing – Proven Steps to Inspire Confidence and Seize New Growth by W. Chan Kim and Renee Mauborgne. This is a book about surviving disruption, and thriving. It’s about breaking out of the red, bloody ocean of competition and finding a clear, blue ocean to dominate. I liked the guidance and techniques presented here. Great read.

    Leonardo da Vinci by Walter Isaacson (@WalterIsaacson). Huge biography, well worth the time commitment. Leonardo had range. Mostly self-taught, da Vinci studying a variety of topics, and preferred working through ideas to actually executing on them. That’s why he had so many unfinished projects! It’s amazing to think of his lasting impact on art, science, and engineering, and I was inspired by his insatiable curiosity.

    AI Superpowers: China, Silicon Valley, and the New World Order by Kai-Fu Lee (@kaifulee). Get past some of the hype on artificial intelligence, and read this grounded book on what’s happening RIGHT NOW. This book will make you much smarter on the history of AI research, and what AI even means. It also explains how China has a leg up on the rest of the world, and gives you practical scenarios where AI will have a big impact on our lives.

    Never Split the Difference: Negotiating As If Your Life Depended On It by Chris Voss (@VossNegotiation) and Tahl Raz (@tahlraz). I’m fascinated by the psychology of persuasion. Who better to learn negotiation from than an FBI’s international kidnapping negotiator? He promotes empathy over arguments, and while the book is full of tactics, it’s not about insincere manipulation. It’s about getting to a mutually beneficial state.

    Amazing Grace: William Wilberforce and the Heroic Campaign to End Slavery by Eric Metaxas (@ericmetaxas). It’s tragic that this generation doesn’t know or appreciate Wilberforce. The author says that Wilberforce could be the “greatest social reformer in the history of the world.” Why? His decades-long campaign to abolish slavery from Europe took bravery, conviction, and effort you rarely see today. Terrific story, well written.

    Unlearn: : Let Go of Past Success to Achieve Extraordinary Results by Barry O’Reilly (@barryoreilly). Barry says that “unlearning” is a system of letting go and adapting to the present state. He gives good examples, and offers actionable guidance for leaders and team members. This strikes me as a good book for a team to read together.

    The Soul of a New Machine by Tracy Kidder. Our computer industry is younger than we tend to realize. This is such a great book on the early days, featuring Data General’s quest to design and build a new minicomputer. You can feel the pressure and tension this team was under. Many of the topics in the book—disruption, software compatibility, experimentation, software testing, hiring and retention—are still crazy relevant today.

    Billion Dollar Whale: The Man Who Fooled Wall Street, Hollywood, and the World by Tom Wright (@TomWrightAsia) and Bradley Hope (@bradleyhope). Jho Low is a con man, but that sells him short. It’s hard not to admire his brazenness. He set up shell companies, siphoned money from government funds, and had access to more cash than almost any human alive. And he spent it. Low befriended celebrities and fooled auditors, until it all came crashing down just a few years ago.

    Multipliers: How the Best Leaders Make Everyone Smarter by Liz Wiseman (@LizWiseman). It’s taken me very long (too long?) to appreciate that good managers don’t just get out of the way, they make me better. Wiseman challenges us to release the untapped potential of our organizations, and people. She contrasts the behavior of leaders that diminish their teams, and those that multiply their impact. Lots of food for thought here, and it made a direct impact on me this year.

    Darwin’s Doubt: The Explosive Origin of Animal Life and the Case for Intelligent Design by Stephen Meyer (@StephenCMeyer). The vast majority of this fascinating, well-researched book is an exploration of the fossil record and a deep dive into Darwin’s theory, and how it holds up to the scientific research since then. Whether or not you agree with the conclusion that random mutation and natural selection alone can’t explain the diverse life that emerged on Earth over millions of years, it will give you a humbling appreciation for the biological fundamentals of life.

    Napoleon: A Life by Adam Zamoyski. This was another monster biography that took me months to finish. Worth it. I had superficial knowledge of Napoleon. From humble beginnings, his ambition and talent took him to military celebrity, and eventually, the Emperorship. This meticulously researched book was an engaging read, and educational on the time period itself, not just Bonaparte’s rise and fall.

    The Paradox of Choice: Why More Is Less by Barry Schwartz. I know I’ve used this term for year’s since it was part of other book’s I’ve read. But I wanted to go to the source. We hate having no choices, but are often paralyzed by having too many. This book explores the effects of choice on us, and why more is often less. It’s a valuable read, regardless of what job you have.

    I say it every year, but thank you for having me as part of your universe in 2019. You do have a lot of choices of what to read or watch, and I truly appreciate when you take time to turn that attention to something of mine. Here’s to a great 2020!

  • Fronting web sites, a classic .NET app, and a serverless function with Spring Cloud Gateway

    Fronting web sites, a classic .NET app, and a serverless function with Spring Cloud Gateway

    Automating deployment of custom code and infrastructure? Not always easy, but feels like a solved problem. It gets trickier when you want to use automation to instantiate and continuously update databases and middleware. Why? This type of software stores state which makes upgrades more sensitive. You also may be purchasing this type of software from vendors who haven’t provided a full set of automation-friendly APIs. Let’s zero in on one type of middleware: API gateways.

    API gateways do lots of things. They selectively expose private services to wider audiences. With routing rules, they make it possible to move clients between versions of a service without them noticing. They protect downstream services by offering capabilities like rate limiting and caching. And they offer a viable way for those with a microservices architecture to secure services without requiring each service to do their own authentication. Historically, your API gateway was a monolith of its own. But a new crop of automation-friendly OSS (and cloud-hosted) options are available, and this gives you new ways to deploy many API gateway instances that get continuously updated.

    I’ve been playing around with Spring Cloud Gateway, which despite its name, can proxy traffic to a lot more than just Spring Boot applications. In fact, I wanted to try and create a configuration-only-no-code API Gateway that could do three things:

    1. Weighted routing between “regular’ web pages on the internet.
    2. Add headers to a JavaScript function running in Microsoft Azure.
    3. Performing rate-limiting on a classic ASP.NET Web Service running on the Pivotal Platform.

    Before starting, let me back up and briefly explain what Spring Cloud Gateway is. Basically, it’s a project that turns a Spring Boot app into an API gateway that routes requests while applying cross-cutting functionality for things like security. Requests come in, and if the request matches a declared route, the request is passed through a series of filters, sent to the target endpoint, and “post” filters get applied on the way back to the client. Spring Cloud Gateway built on a Reactive base, which means it’s non-blocking and efficiently handles many simultaneous requests.

    The biggest takeaway? This is just an app. You can write tests and do continuous integration. You can put it on a pipeline and continuously deliver your API gateway. That’s awesome.

    Note that you can easily follow along with the steps below without ANY Java knowledge! Everything I’m doing using configuration you can also do with the Java DSL, but I wanted to prove how straightforward the configuration-only option is.

    Creating the Spring Cloud Gateway project

    This is the first, and easiest, part of this demonstration. I went to start.spring.io, and generated a new Spring Boot project. This project has dependencies on Gateway (to turn this into an API gateway), Spring Data Reactive Redis (for storing rate limiting info), and Spring Boot Actuator (so we get “free” metrics and insight into the gateway). Click this link to generate an identical project.

    Doing weighed routing between web pages

    For the first demonstration, I wanted to send traffic to either spring.io or pivotal.io/spring-app-framework. You might use weighted routing to do A/B testing with different versions of your site, or even to send a subset of traffic to a new API.

    I added an application.yml file (to replace the default application.properties file) to hold all my configuration settings. Here’s the configuration, and we’ll go through it bit by bit.

    spring:
      cloud:
        gateway:
          routes:
          # doing weighted routing between two sites
          - id: test1
            uri: https://www.pivotal.io
            predicates:
            - Path=/spring
            - Weight=group1, 3
            filters:
            - SetPath=/spring-app-framework
          - id: test2
            uri: https://www.spring.io
            predicates:
            - Path=/spring
            - Weight=group1, 7
            filters:
            - SetPath=/
    

    Each “route” is represented by a section in the YAML configuration. A route has a URI (which represents the downstream host), and a route predicate that indicates the path on the gateway you’re invoking. For example, in this case, my path is “/spring” which means that sending a request to “localhost:8080/spring” would map to this route configuration.

    Now, you’ll see I have two routes with the same path. These are part of the same weighted routing group, which means that traffic to /spring will go to one of the two downstream endpoints. The second endpoint is heavily weighted (7 vs 3), so most traffic goes there. Also see that I applied one filter to clear out the path. If I didn’t do this, then requests to localhost:8080/spring would result in a call to spring.io/spring, as the path (and querystring) is forwarded. Instead, I stripped that off for requests to spring.io, and added the secondary path into the pivotal.io endpoint.

    I’ve got Java and Maven installed locally, so a simple command (mvn spring-boot:run) starts up my Spring Cloud Gateway. Note that so far, I’ve written exactly zero code. Thanks to Spring Boot autoconfiguration and dependency management, all the right packages exist and runtime objects get inflated. Score!

    Once, the Spring Cloud Gateway was up and running, I pinged the Gateway’s endpoint in the browser. Note that some browser’s try to be helpful by caching things, which screws up a weighted routing demo! I opened the Chrome DevTools and disabled request caching before running a test.

    That worked great. Our gateway serves up a single endpoint, but through basic configuration, I can direct a subset of traffic somewhere else.

    Adding headers to serverless function calls

    Next, I wanted to stick my gateway in front of some serverless functions running in Azure Functions. You could imagine having a legacy system that you were slowly strangling and replacing with managed services, and leveraging Spring Cloud Gateway to intercept calls and redirect to the new destination.

    For this example, I built a dead-simple JavaScript function that’s triggered via HTTP call. I added a line of code that prints out all the request headers before sending a response to the caller.

    The Spring Cloud Gateway configuration is fairly simple. Let’s walk through it.

    spring:
      cloud:
        gateway:
          routes:
          # doing weighted routing between two sites
          - id: test1
            ...
          # adding a header to an Azure Function request
          - id: test3
            uri: https://seroter-function-app.azurewebsites.net
            predicates:
            - Path=/function
            filters:
            - SetPath=/api/HttpTrigger1
            - SetRequestHeader=X-Request-Seroter, Pivotal
    

    Like before, I set the URI to the target host, and set a gateway path. On the pre-filters, I reset the path (removing the /function and replacing with the “real” path to the Azure Function) and added a new request header.

    I started up the Spring Cloud Gateway project and sent in a request via Postman. My function expects a “name” value, which I provided as a query parameter.

    I jumped back to the Azure Portal and checked the logs associated with my Azure Function. Sure enough, I see all the HTTP request headers, including the random one that I added via the gateway. You could imagine this type of functionality helping if you have modern endpoints and legacy clients and need to translate between them!

    Applying rate limiting to an ASP.NET Web Service

    You know what types of apps can benefit from an API Gateway? Legacy apps that weren’t designed for high load or modern clients. One example is rate limiting. Your legacy service may not be able to handle internet-scale requests, or have a dependency on a downstream system that isn’t mean to get pummeled with traffic. You can apply request caching and rate limiting to prevent clients from burying the legacy app.

    First off, I built a classic ASP.NET Web Service. I hoped to never use SOAP again, but I’m dedicated to my craft.

    I did a “cf push” to my Pivotal Application Service environment and deployed two instances of the app to a Windows environment. In a few seconds, I had a publicly-accessible endpoint.

    Then it was back to my Gateway configuration. To do rate limiting, you need a way to identify callers. You know, some way to say that client X has exceeded their limit. Out of the box, there’s a rate limiter that uses Redis to store information about clients. That means I need a Redis instance. The simplest answer is “Docker”, so I ran a simple command to get Redis running locally (docker run --name my-redis -d -p 6379:6379 redis).

    I also needed a way to identify the caller. Here, I finally had to write some code. Specifically, this rate limiter filter expects a “key resolver.” I don’t see a way to declare one via configuration, so I opened the .java file in my project and added a Bean declaration that pulls a query parameter named “user.” That’s not enterprise ready (as you’d probably pull source IP, or something from a header), but this’ll do.

    @SpringBootApplication
    public class CloudGatewayDemo1Application {
    
      public static void main(String[] args) {	 
       SpringApplication.run(CloudGatewayDemo1Application.class, args);
      }
    	
      @Bean
      KeyResolver userKeyResolver() {
        return exchange -> 
       Mono.just(exchange.getRequest().getQueryParams().getFirst("user"));
      }
    }
    

    All that was left was my configuration. Besides adding rate limiting, I also wanted to to shield the caller from setting all those gnarly SOAP-related headings, so I added filters for that too.

    spring:
      cloud:
        gateway:
          routes:
          # doing weighted routing between two sites
          - id: test1
            ...
            
          # adding a header to an Azure Function request
          - id: test3
            ...
            
          # introducing rate limiting for ASP.NET Web Service
          - id: test4
            uri: https://aspnet-web-service.apps.pcfone.io
            predicates:
            - Path=/dotnet
            filters:
            - name: RequestRateLimiter
              args:
                key-resolver: "#{@userKeyResolver}"
                redis-rate-limiter.replenishRate: 1
                redis-rate-limiter.burstCapacity: 1
            - SetPath=/MyService.asmx
            - SetRequestHeader=SOAPAction, http://pivotal.io/SayHi
            - SetRequestHeader=Content-Type, text/xml
            - SetRequestHeader=Accept, text/xml
    

    Here, I set the replenish rate, which is how many request per second per user, and burst capacity, which is the max number of requests in a single second. And I set the key resolver to that custom bean that reads the “user” querystring parameter. Finally, notice the three request headers.

    I once again started up the Spring Cloud Gateway, and send a SOAP payload (no extra headers) to the localhost:8080/dotnet endpoint.

    A single call returned the expected response. If I rapidly submitted requests in, I saw an HTTP 429 response.

    So almost zero code to do some fairly sophisticated things with my gateway. None of those things involved a Java microservice, although obviously, Spring Cloud Gateway does some very nice things for Spring Boot apps.

    I like this trend of microservices-machinery-as-code where I can test and deploy middleware the same way I do custom apps. The more things we can reliably deliver via automation, the more bottlenecks we can remove.

  • First Look: Building Java microservices with the new Azure Spring Cloud

    First Look: Building Java microservices with the new Azure Spring Cloud

    One of the defining characteristics of the public cloud is choice. Need to host an app? On-premises, your choices were a virtual machine or a virtual machine. Now? A public cloud like Microsoft Azure offers nearly a dozen options. You’ve got spectrum of choices ranging from complete control over the stack (e.g. Azure Virtual Machines) to opinionated runtimes (e.g. Azure Functions). While some of these options, like Azure App Service, cater to custom software, no platforms cater to a specific language or framework. Until today.

    At Pivotal’s SpringOne Platform conference, Microsoft took the wraps off Azure Spring Cloud. This first-party managed service sits atop Azure Kubernetes Service and helps Java developers run cloud-native apps. How? It runs managed instances of Spring Cloud components like a Config Server and Service Registry. It builds secure container images using Cloud Native Buildpacks and kpack (both, Pivotal-sponsored OSS). It offers secure binding to other Azure services like Cosmos DB. It has integrated load balancing, log streaming, monitoring, and distributed tracing. And it delivers rolling upgrades and blue-green deployments so that it’s easy to continuously deliver changes. At the moment, Azure Spring Cloud is available as a private preview, so I thought I’d give you a quick tour.

    First off, since it’s a first-party service, I can provision instances via the az command line tool, or the Azure Portal. From the Azure Portal, it’s quite simple. You just provide an Azure subscription, target region, and resource name.

    Once my instance was created, I accessed the unique dashboard for Azure Spring Cloud. I saw some of the standard things that are part of every service (e.g. activity log, access control), as well as the service-specific things like Apps, Config Server, Deployments, and more.

    A Spring Cloud Config Server pulls and aggregates name-value pairs from various sources and serves them up to your application via a single interface. In a typical architecture, you have to host that somewhere. For Azure Spring Cloud, it’s a managed service. So, all I need to do is point this instance to a repository holding my configuration files, and I’m set.

    There’s no “special” way to build Spring Boot apps that run here. They’re just … apps. So I went to start.spring.io to generate my project scaffolding. Here, I chose dependencies for web, eureka (service registry), config client, actuator (health monitoring), and zipkin + sleuth (distributed tracing). Click here to generate an identical project.

    My sample code is basic here. I just expose a REST endpoint, and pull a property value from the attached configuration store.

    @RestController
    @SpringBootApplication
    public class AzureBasicAppApplication {
    
    	public static void main(String[] args) {
    	  SpringApplication.run(AzureBasicAppApplication.class, args);
    	}
    	
    	@Value("${company:Not configured by a Spring Cloud Server}")
            private String company;
    	
    	@GetMapping("/hello")
    	public String Hello() {
    	  return "hello, from " + company;
    	}
    }
    

    To deploy, first I create an application from the CLI or Portal. “Creating” the application doesn’t deploy it, as that’s a separate step.

    With that created, I packaged my Spring Boot app into a JAR file, and deployed it via the az CLI.

    az spring-cloud app deploy -n azure-app --jar-path azure-basic-app-0.0.1-SNAPSHOT.jar

    What happened next? Azure Spring Cloud created a container image, stored it in an Azure Container Registry, and deployed it to AKS. And you don’t need to care about any of that, as you can’t access the registry or AKS! It’s plumbing, that forms a platform. After a few moments, I saw my running instance, and the service registry shows that my instance is UP.

    We’re dealing with containers here, so scaling is fast and easy. The “scale” section lets me scale up with more RAM and CPU, or out with more instances.

    Cloud native, 12-factor apps should treat backing services like attached resources. Azure Spring Cloud embodies this by letting me set up service bindings. Here, I set up a linkage to another Azure service, and at runtime, its credentials and connection string are injected into the app’s configuration. All of this is handled auto-magically by the Spring Boot starters from Azure.

    Logging data goes into Azure Monitor. You can set up Log Analytics for analysis, or pump out to a third party Application Performance Monitoring tool.

    So you have logging, you have built-in monitoring, and you ALSO get distributed tracing. For microservices, this helps you inspect the call graph and see where your performance bottlenecks are. The pic below is from an example app built by Julien at Microsoft.

    Finally, I can do blue/green deploy. This means that I deploy a second instance of the app (via the az CLI, it’s another “deployment”), can independently test it, and then choose to swap traffic over to that instance when I’m ready. If something goes wrong, I can switch back.

    So far, it’s pretty impressive. This is one of the first industry examples of turning Kubernetes into an actual application platform. There’s more functionality planned as the service moves to public preview, beta, and general availability. I’m happy to see Microsoft make such a big bet on Spring, and even happier that developers have a premium option for running Java apps in the public cloud.