Category: Go

  • Which programming languages offer built-in tools for modernizing your code?

    If you’ve been a software developer for more than five minutes, then you probably have some old code running somewhere. It probably works fine, so who cares if it’s a little dusty and based on an n-5 language version? Remember that upgrades are an important means for grabbing security patches and performance improvements. But those syntax and architectural changes are important too.

    I wondered which popular languages provided deterministic tools for upgrading code to the latest version. Let’s see what Go, Java, C#, JavaScript, Python, and Rust have to offer.

    Go offers the built-in go fix tool

    Bias alert: I lead the product and engineering of Go at Google. But I’ve also used Go for years before that org shift happened a few months back.

    Go includes syntax modernization directly inside the standard toolchain. It uses modular static analyzers to inspect packages and automatically rewrite legacy code patterns. Go projects are simple—no random XML or JSON settings, no “project” files—so this can be a focused, efficient tool.

    How do you use it? Update your Go toolchain version in the go.mod file. Run go fix. That’s it. This tool was recently rewritten atop the go/analysis engine to be even more powerful.

    Let’s see an example. Maybe I’ve got a CLI tool written in idiomatic Go 1.18 code. This CLI tool renames image files. The code does safe concurrency and uses a helper for slices.

    package main
    
    import (
    	"flag"
    	"fmt"
    	"io/fs"
    	"log"
    	"os"
    	"path/filepath"
    	"strings"
    	"sync"
    )
    
    // Supported image extensions (Go 1.18 slice)
    var imageExts = []string{".jpg", ".jpeg", ".png", ".gif", ".webp"}
    
    // RenameRegistry ensures destination filenames are unique, resolving collisions thread-safely.
    type RenameRegistry struct {
    	mu    sync.Mutex
    	names map[string]int
    }
    
    func NewRenameRegistry() *RenameRegistry {
    	return &RenameRegistry{
    		names: make(map[string]int),
    	}
    }
    
    // GetUniqueName returns a collision-free filename in the destination directory.
    func (r *RenameRegistry) GetUniqueName(base, ext, destDir string) string {
    	r.mu.Lock()
    	defer r.mu.Unlock()
    
    	count := r.names[base]
    	r.names[base] = count + 1
    
    	var targetName string
    	if count == 0 {
    		targetName = base + ext
    	} else {
    		targetName = fmt.Sprintf("%s_%d%s", base, count, ext)
    	}
    
    	// Double check disk existence to avoid overwriting existing files
    	for {
    		targetPath := filepath.Join(destDir, targetName)
    		if _, err := os.Stat(targetPath); os.IsNotExist(err) {
    			break
    		}
    		// If it exists, increment the counter and try again
    		count++
    		r.names[base] = count + 1
    		targetName = fmt.Sprintf("%s_%d%s", base, count, ext)
    	}
    
    	return targetName
    }
    
    // isImageFile checks if a file has a supported image extension (pre-slices inline check)
    func isImageFile(path string) bool {
    	ext := strings.ToLower(filepath.Ext(path))
    	for _, item := range imageExts {
    		if item == ext {
    			return true
    		}
    	}
    	return false
    }
    
    func main() {
    	// Parse CLI flags
    	srcDir := flag.String("src", ".", "Source directory containing photos")
    	destDir := flag.String("dest", "", "Destination directory for renamed photos (defaults to source)")
    	dryRun := flag.Bool("dry", false, "Dry run mode (lists proposed changes without executing)")
    	verbose := flag.Bool("verbose", false, "Enable verbose logging output")
    	flag.Parse()
    
    	// Default destination to source directory if not specified
    	if *destDir == "" {
    		*destDir = *srcDir
    	}
    
    	// Clean paths
    	*srcDir = filepath.Clean(*srcDir)
    	*destDir = filepath.Clean(*destDir)
    
    	log.Printf("Starting photorename CLI...")
    	log.Printf("Source directory: %s", *srcDir)
    	log.Printf("Destination directory: %s", *destDir)
    	if *dryRun {
    		log.Printf("DRY RUN MODE ENABLED - No files will be moved or renamed.")
    	}
    
    	// Scan source directory recursively
    	var photos []string
    	err := filepath.WalkDir(*srcDir, func(path string, d fs.DirEntry, err error) error {
    		if err != nil {
    			return err
    		}
    		if !d.IsDir() && isImageFile(path) {
    			photos = append(photos, path)
    		}
    		return nil
    	})
    
    	if err != nil {
    		log.Fatalf("Error scanning source directory: %v", err)
    	}
    
    	totalPhotos := len(photos)
    	log.Printf("Found %d photo(s) to process.", totalPhotos)
    	if totalPhotos == 0 {
    		return
    	}
    
    	// Ensure destination directory exists (unless dry run)
    	if !*dryRun {
    		if err := os.MkdirAll(*destDir, 0755); err != nil {
    			log.Fatalf("Failed to create destination directory: %v", err)
    		}
    	}
    
    	registry := NewRenameRegistry()
    	var wg sync.WaitGroup
    	// Allocate worker pool limit using custom new helper (pre-Go 1.26 newexpr target)
    	limit := newInt(4)
    	// Limit concurrency using a semaphore (buffered channel)
    	sem := make(chan struct{}, *limit)
    
    	var successCount int
    	var successMu sync.Mutex
    
    	for _, photoPath := range photos {
    		photoPath := photoPath
    		wg.Add(1)
    		sem <- struct{}{}
    
    		go func() {
    			defer wg.Done()
    			defer func() { <-sem }()
    
    			logDebug(*verbose, "[Processing] %s", photoPath)
    
    			// Get file info for modification time
    			info, err := os.Stat(photoPath)
    			if err != nil {
    				log.Printf("Error stating file %s: %v", photoPath, err)
    				return
    			}
    
    			// Format modification time as YYYYMMDD_HHMMSS
    			modTime := info.ModTime()
    			baseName := fmt.Sprintf("IMG_%s", modTime.Format("20060102_150405"))
    			ext := strings.ToLower(filepath.Ext(photoPath))
    
    			// Get unique target name to avoid collisions
    			targetName := registry.GetUniqueName(baseName, ext, *destDir)
    			targetPath := filepath.Join(*destDir, targetName)
    
    			if *dryRun {
    				log.Printf("[Dry-Run] Would rename: %s -> %s", photoPath, targetPath)
    				successMu.Lock()
    				successCount++
    				successMu.Unlock()
    				return
    			}
    
    			// Perform the rename/move operation
    			err = os.Rename(photoPath, targetPath)
    			if err != nil {
    				log.Printf("Rename failed for %s -> %s, attempting copy: %v", photoPath, targetPath, err)
    			} else {
    				logDebug(*verbose, "[Success] Renamed: %s -> %s", photoPath, targetPath)
    				successMu.Lock()
    				successCount++
    				successMu.Unlock()
    			}
    		}()
    	}
    
    	wg.Wait()
    
    	if *dryRun {
    		log.Printf("Dry run complete. Checked %d/%d photos.", successCount, totalPhotos)
    	} else {
    		log.Printf("Renaming complete. Successfully processed %d/%d photos.", successCount, totalPhotos)
    	}
    }
    
    // logDebug helper that prints debug logs using interface{} (pre-Go 1.18 any)
    func logDebug(verbose bool, format string, args ...interface{}) {
    	if verbose {
    		log.Printf(format, args...)
    	}
    }
    
    // newInt is a custom helper to return a pointer to an int value (pre-Go 1.26 newexpr helper target)
    func newInt(x int) *int {
    	return &x
    }


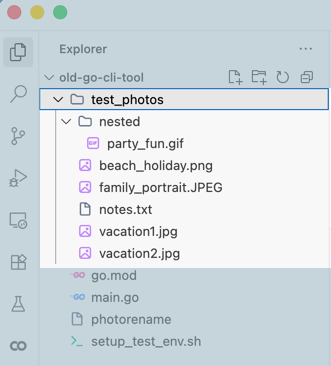
    On disk, my app contained a folder of randomly named pictures in various folders, as well as a misplaced text file that should be ignored:

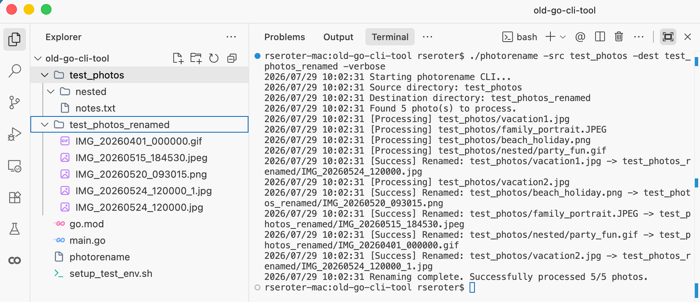
    After building and running the tool, it takes milliseconds to complete. And I end up with renamed files in a fresh folder.

    Let’s modernize! I updated my go.mod to now reference Go 1.26.

    go mod edit -go=1.26
    

    Then ran the following command to do a dry run and see what it would change.

    go fix -diff ./...
    

    I get back a +/- view in the console that shows me which modernizers kicked in.

    It won’t find EVERY opportunity to upgrade the code, as it looks for specific patterns. But in this case, it refactored legacy handling of slices, deleted some now-unnecessary code for loop variable shadowing, upgraded an interface parameter to any, and improved a pointer. All in under a second.

    Go has a backwards compatibility promise, so it doesn’t need an aggressive modernizer. Instead, a first-party tool like go fix —which is an Abstract Syntax Tree (AST) that focuses on grammar and structural shape of source code—is meant for continuous codebase modernizations.

    And I’ll note that Dart, the language that powers the popular Flutter framework, also has a pretty great dart fix command that does similar things. Google is pretty good at these things.

    Java has built-in analysis tools, but relies on third party modernization tools

    Modernizing Java code is a lot more than updating your build file! Bumping the version in your maven/gradle file simply tells the compiler what byte code to emit, but your source code doesn’t change.

    The JDK does ship with diagnostic tools to help you identify upgrade issues, but these are read-only. No proactive rewrites. Useful JDK tools include:

    • jdeps: This scans your class files and JARs to report any static dependencies. It helps you get ready for migrations by finding deprecated features, broken third-party tools, and any references to restricted internal JDK APIs.
    • jdeprscan: Another static analysis tool that scans class files, directories, and JAR files for any use of deprecated Java APIs.

    Many Java rewrites start in the IDE, like IntelliJ. There are some built-in analyzers and code fixing tools. You’re constrained to the GUI here, so people doing at-scale rewrites often use OpenRewrite. This build plug-in can upgrade syntax and do framework refactoring.

    Given it’s established enterprise presence, Java has many documented modernization practices and a strong ecosystem of vendor-created modernization tools. But don’t look deeply into the built-in toolchain for a lot of support.

    C# (.NET) provides a built in upgrade assistant

    For some reason, .NET has had an (unnecessarily?) exciting journey. That means you need some industrial-strength modernization tooling to get you from one major iteration to the next.

    Microsoft doesn’t bake any modernization tools directly into the language toolchain. They introduced the .NET Upgrade Assistant years ago, powered by their Roslyn compiler platform. You could run this sophisticated tool as a Visual Studio plug-in or via a standalone CLI. It scanned your code and then helped you upgrade to the latest version. It covered a lot of ground, because .NET projects are relatively heavy and the framework has seen some major architectural changes over the years.

    However, this tool is now deprecated in favor of the GitHub Copilot modernization chat agent. That’s a very different solution. Now you have commercial implications that impact who can access it. It’s online-only, and internet-dependent. You’re not running this easily in a headless fashion. And now it’s non-deterministic, and not following preset rules. That’s also a “plus” as you’ll probably see deeper modernizations, self-correcting loops, and more flexibility. But some big token costs!

    Like Java, C#/.NET has a massive community and plenty of well-documented practices. The ever-changing tools landscape means those practices aren’t timeless, but it’s not hard to find experts to help you modernize .NET apps. Just don’t look at the framework for a major assist.

    JavaScript doesn’t offer built-in tools for modernization

    You won’t find a built-in modernizer for JavaScript/TypeScript. It’s a fluid, fast-moving, and fragmented ecosystem with different pace layers. You’ve got the language-level updates (ECMAScript) and then the framework-level (React, Next.js, Angular, Vue). Instead of using heavyweight Node.js-native AST-style parsers, developers are embracing faster structural engines and framework CLI orchestrators.

    These developers relied heavily on codemods, like jscodeshift. But that can be heavy and slow on giant repos. There’s a new class of Rust-based codemod engines like ast-grep, jssg, and GritQL.

    You’ve also got framework-first codemod orchestrators like the upgrade CLI baked into Next.js . Angular provides an ng update experience. Tailwind also offers a version upgrade tool.

    JavaScript is probably too decentralized to offer a single, language-included code modernization tool. But the ecosystem has stepped up with useful options.

    Python relies on third party modernizers

    Plenty of devs are still scarred by the Python 2 to Python 3 migration. Python 3 came out in 2008, but Python 2 wasn’t retired until 2020. This wasn’t a simple version bump, but what felt like a whole different programming language. Python 3 did ship with an official AST-based modernization tool called 2to3. But it had issues, and didn’t make migrations easy.

    Today’s Python doesn’t include any built-in source code rewriting tools. For any minor release upgrade, modernizing this code is entirely an ecosystem (third party) story. The built-in tooling basically covers diagnostics and signaling of deprecation. You get runtime warnings for deprecated API use, and compiler warnings for risky or outdated control flows. That’s about it.

    Here’s where the ecosystem stepped up. You have syntax fixers like ruff that work at the base layer of the language. It includes many built-in rules and is used by many OSS projects. Another option is LibCST from Meta that preserves all the whitespace, inline comments, and code formatting which makes it good at complex refactorings. Then, like with JavaScript, there are framework-specific upgraders like django-upgrade for Django.

    Rust offers a built-in cargo fix tool

    Rust, like Go years earlier, added a native code modernizer in their toolchain. However, it’s quite different in how it works, despite doing conceptually-similar things.

    cargo fix uses rustc compiler diagnostics to detect deprecated features or edition-incompatible idioms to drive changes to source files. A foundational part of Rust modernization relies on Editions. Rust uses an “Edition” approach (2015, 2018, 2021, 2024) to introduce potential opt-in breaking syntax changes without breaking the ecosystem. cargo fix was introduced to automate code modifications needed to transition crates (packages) from one Edition to the next.

    I can’t run cargo fix to jump from a 2018 Edition to 2024. I’d execute a step-by-step path to first go to 2021, then to 2024. The tool’s goal is to modify code so that it’s valid in both the current Edition and target one simultaneously.

    Of note, there are more modernization options than just cargo fix. Clippy is the official code linting tool for Rust. It analyzes source code to catch any design mistakes and improve your code. cargo upgrade also upgrades crate dependencies, while cargo outdated shows you a detailed tree of outdated dependencies. Our friend ast-grep also applies to Rust and can help you with codebase-wide refactoring.

    Wrap Up

    Does any of this matter now that we have LLMs? Can I just point Claude Code, Cursor, or Google Antigravity at a legacy code base and ask it to shine it up? Sort of.

    Yes, you can use LLMs for some of this code modernization effort. But solely relying on an LLM? You’ll see a significant token spend, it’ll take magnitudes longer to execute a modernization, and you risk context truncation or degradation across massive files. It’s an “and” where you ideally couple LLMs with deterministic tools like some of the ones we listed here.

    What did I get wrong? Do you have other favorite tools that help you modernize code written in your favorite language?

  • How to force your custom agent to stop and seek human approval

    Autonomous agents are cool and all, but we all know there are plenty of circumstances where we want human review. Your custom built agent might have instructions to stop and get input, but that doesn’t guarantee it happens. The Agent Development Kit recently added a human-in-the-loop feature, and I decided to try it out.

    Let’s build an agent that generates product tutorials on-demand. The agent takes in a request, and uses tools to ground its output. Before it publishes a tutorial, it requires explicit approval from outside its own workflow. ADK now offers both a simple boolean approval, and a more sophisticated option. I’ll test out both, using the built-in web UI and the raw REST API. FYI, all my source code is here.

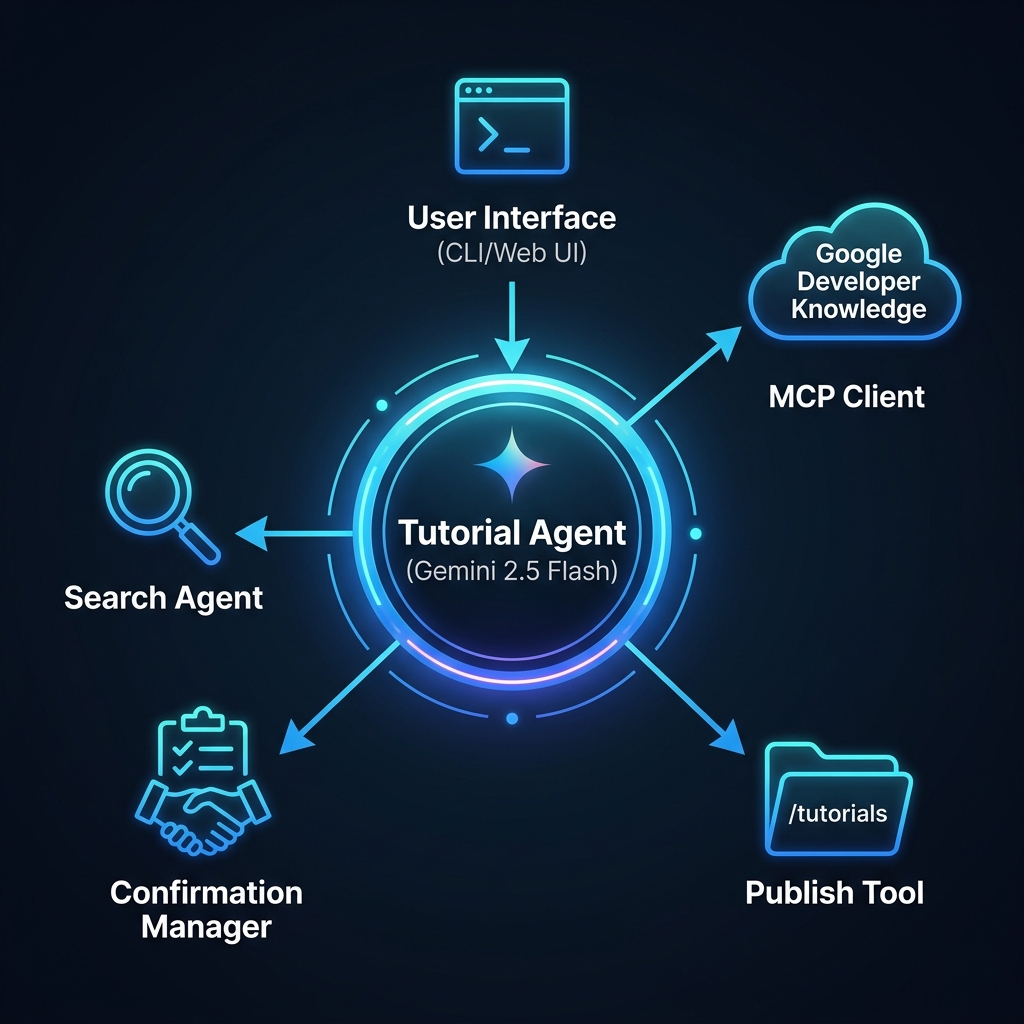
    First, here’s the architecture:

    Simple Tutorial Agent

    First, there’s a basic tutorial agent that uses the simple action confirmation.

    Below is the core agent code. The agent definition (at the bottom) has instructions, a model, and some tools. I’m using the Google Search tool and our Developer Knowledge API MCP server tools. The former grounds results in Google Search results, and the latter points to Google’s core documentation.

    func createTutorialAgent(ctx context.Context, llmModel model.LLM) (agent.Agent, error) {
    	transport, err := mcpTransport(ctx)
    	if err != nil {
    		return nil, err
    	}
    	mcpToolSet, _ := mcptoolset.New(mcptoolset.Config{Transport: transport})
    
    	publishTool, _ := functiontool.New(functiontool.Config{
    		Name:                "publish_tutorial",
    		Description:         "Publish the tutorial. Requires user confirmation.",
    		RequireConfirmation: true,
    	}, publishTutorial)
    
    	searchAgent, _ := llmagent.New(llmagent.Config{
    		Name:        "search_agent",
    		Model:       llmModel,
    		Tools:       []tool.Tool{geminitool.GoogleSearch{}},
    		Instruction: "Search the web.",
    	})
    
    	return llmagent.New(llmagent.Config{
    		Name:        "tutorial_agent",
    		Model:       llmModel,
    		Description: "Simple tutorial agent.",
    		Instruction: `You are a technical writer. Draft a Google Cloud tutorial based on user requests.
    Once the draft is complete, show it to the user and ask them if they would like to start the publishing process. The 'publish_tutorial' tool will then handle the review and approval.`,
    		Tools:    []tool.Tool{agenttool.New(searchAgent, nil), publishTool},
    		Toolsets: []tool.Toolset{mcpToolSet},
    	})
    }
    

    Notice that the publish_tutorial tool has a RequireConfirmation attribute. The corresponding publishTutorial function only gets called for a true result.

    To start the agent (after setting environment variables for Google Cloud project and any credentials) for the built-in web UI, I used this command:

    ADK_AGENT=tutorial go run . web api webui
    

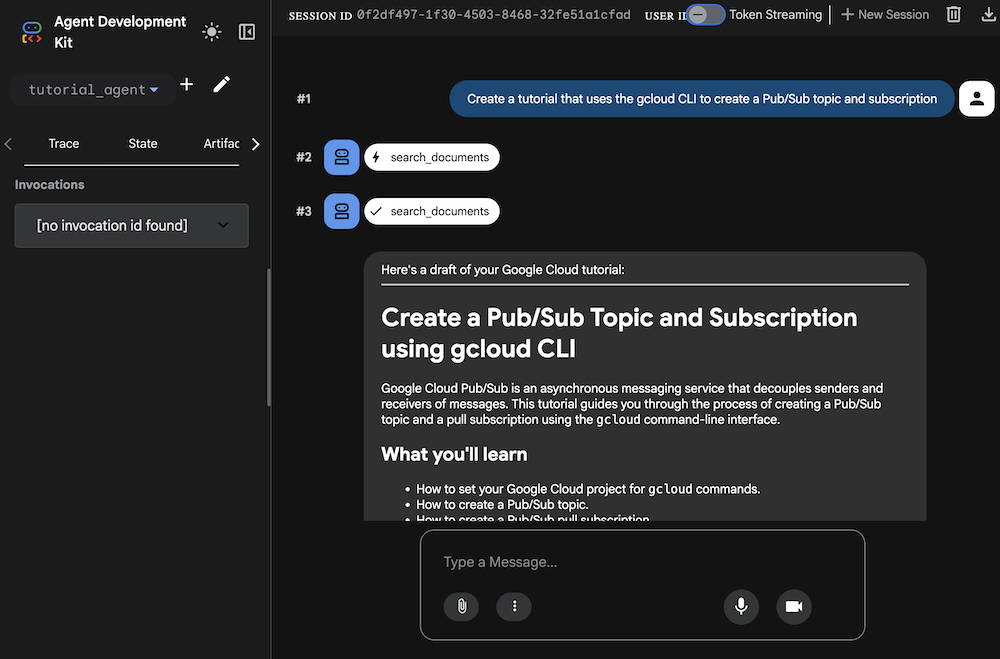
    This provides me a localhost web UI to explore my agent. I asked for a tutorial and saw it use the right tools to generate a response.

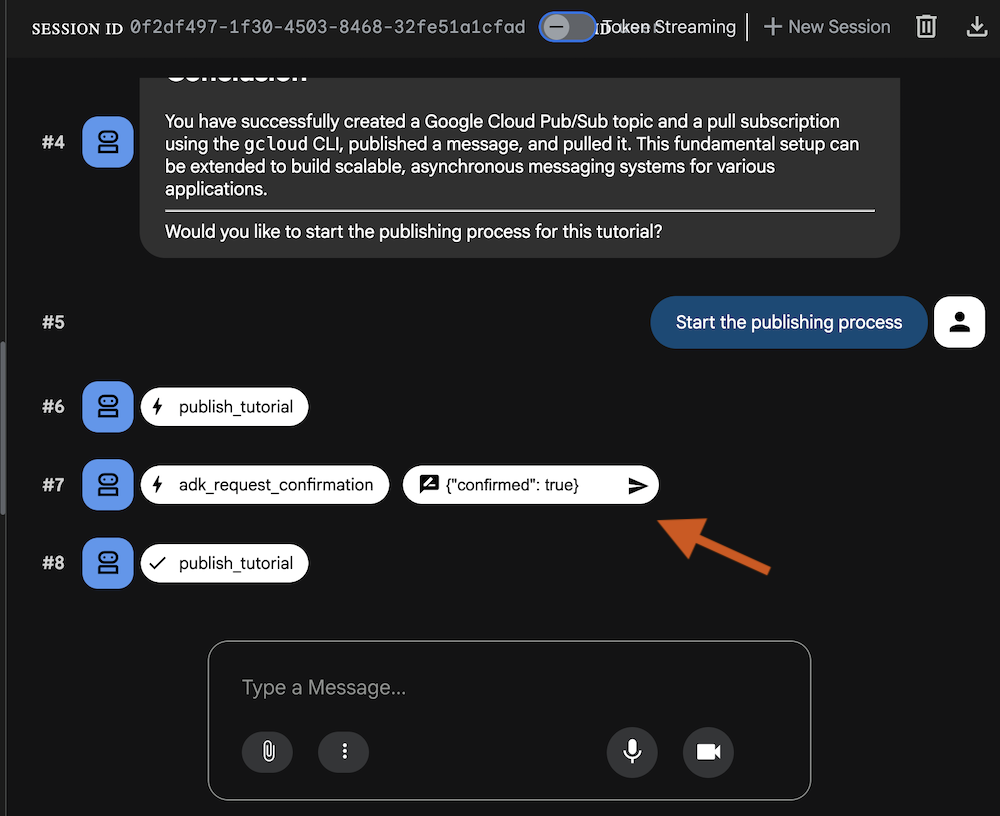
    I then ask to start the publishing process, and the confirmation flow kicks in. Notice the small free text box asking for my response.

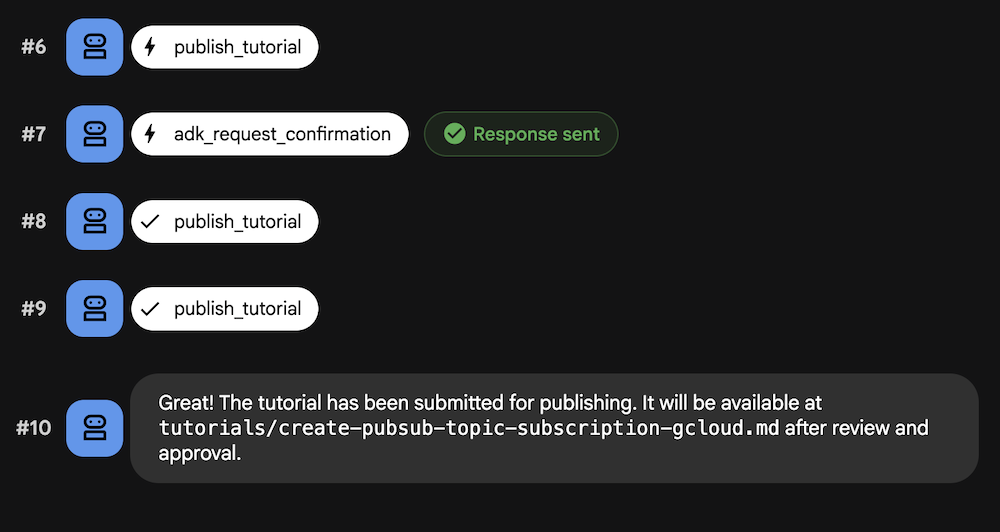
    The accepts a JSON payload of {"confirmed": true} only. When I provide that value, the control returns to the agent and it publishes the Markdown tutorial to the local folder.

    Let’s do the same workflow with the REST API.

    This time, I started up the agent with this command to get the API endpoint only:

    ADK_AGENT=tutorial go run . web api
    

    The http://localhost:8080/api/list-apps endpoint shows that I have one “app” named tutorial_agent. To start, I need to create a session with my agent. I’ll set the username and (optionally) the session ID. If I just post to the session endpoint, I get back a random session ID.

    curl -X POST http://localhost:8080/api/apps/tutorial_agent/users/u_123/sessions/s_123 \
      -H "Content-Type: application/json"
    

    Now I can send in a prompt to my agent. Notice that I’m passing in the user ID and session ID from above.

    curl -X POST http://localhost:8080/api/run \
    -H "Content-Type: application/json" \
    -d '{
    "appName": "tutorial_agent",
    "userId": "u_123",
    "sessionId": "s_123",
    "newMessage": {
        "role": "user",
        "parts": [{
        "text": "create a tutorial for deploying a container to an existing GKE Autopilot cluster. use the cli."
        }]
    }
    }'
    

    I get back a pile of JSON that includes the tutorial itself. Like with the web UI experience, I’m asked if I want to kickstart the publishing process. I send in a follow-on message like this:

    curl -X POST http://localhost:8080/api/run \
    -H "Content-Type: application/json" \
    -d '{
    "appName": "tutorial_agent",
    "userId": "u_123",
    "sessionId": "s_123",
    "newMessage": {
        "role": "user",
        "parts": [{
        "text": "yes, start the process to publish the tutorial"
        }]
    }
    }'
    

    There’s another pile of JSON to parse through, and I need to find the ID tied to the adk_request_confirmation object.

    [ ... "content":{"role":"model","parts":[{"functionCall":{"id":"adk-e6d32a67-c1d4-46b8-87f6-6922a3af3d98","name":"adk_request_confirmation","args":{"originalFunctionCall":{"id":"adk-0e6c0394-a22b-4d5f-9af6-e27284bc175f","args":{"content":"# Deploy a Container to an Existing GKE Autopilot Cluster using the gcloud CLI and kubectl\n\nThis tutorial guides you through" ...]
    

    The next REST API call includes the ID from above and the familiar “confirmed” property.

    curl -X POST http://localhost:8080/api/run \
    -H "Content-Type: application/json" \
    -d '{
     "appName": "tutorial_agent",
     "userId": "u_123",
     "sessionId": "s_123",
        "newMessage": {
            "role": "user",
            "parts": [
                {
                    "functionResponse": {
                        "name": "adk_request_confirmation",
                        "id": "adk-e6d32a67-c1d4-46b8-87f6-6922a3af3d98",
                        "response": {
                            "confirmed": true
                        }
                    }
                }
            ]
        }
    }'
    

    After this call, I see the Markdown tutorial written to disk.

    Advanced Tutorial Agent

    This agent itself looks nearly the same as the prior one, but has a more sophisticated toolset. Here’s the agent code, with the confirmation behavior in the downstream function, not the function tool.

    func publishTutorialAdvanced(ctx tool.Context, args PublishTutorialArgs) (map[string]any, error) {
    	confirmation := ctx.ToolConfirmation()
    	if confirmation == nil {
    		ctx.RequestConfirmation(
    			"Reviewer approval required to publish.",
    			map[string]any{
    				"status": "approved", // approved, rejected, update
    				"notes":  "",
    			},
    		)
    		return map[string]any{"status": "Pending reviewer approval."}, nil
    	}
    
    	payload := confirmation.Payload.(map[string]any)
    	status, _ := payload["status"].(string)
    	notes, _ := payload["notes"].(string)
    
    	if strings.ToLower(status) == "approved" {
    		if !strings.HasSuffix(args.Filename, ".md") {
    			args.Filename += ".md"
    		}
    
    		if err := os.MkdirAll("tutorials", 0755); err != nil {
    			return nil, fmt.Errorf("failed to create tutorials directory: %w", err)
    		}
    
    		fullPath := filepath.Join("tutorials", filepath.Base(args.Filename))
    		if err := os.WriteFile(fullPath, []byte(args.Content), 0644); err != nil {
    			return nil, fmt.Errorf("failed to save tutorial: %w", err)
    		}
    		return map[string]any{"status": "published", "path": fullPath}, nil
    	}
    
    	return map[string]any{"status": status, "notes": notes}, nil
    }
    
    func createAdvancedTutorialAgent(ctx context.Context, llmModel model.LLM) (agent.Agent, error) {
    	transport, err := mcpTransport(ctx)
    	if err != nil {
    		return nil, err
    	}
    
    	mcpToolSet, err := mcptoolset.New(mcptoolset.Config{Transport: transport})
    	if err != nil {
    		return nil, err
    	}
    
    	publishTool, err := functiontool.New(functiontool.Config{
    		Name:        "publish_tutorial_advanced",
    		Description: "Publishes the tutorial. Requires status and notes from a reviewer.",
    	}, publishTutorialAdvanced)
    	if err != nil {
    		return nil, err
    	}
    
    	searchAgent, _ := llmagent.New(llmagent.Config{
    		Name:        "search_agent",
    		Model:       llmModel,
    		Description: "Web search agent.",
    		Instruction: "Search the web for info.",
    		Tools:       []tool.Tool{geminitool.GoogleSearch{}},
    	})
    
    	return llmagent.New(llmagent.Config{
    		Name:        "advanced_tutorial_agent",
    		Model:       llmModel,
    		Description: "Tutorial agent with advanced confirmation.",
    		Instruction: `You are a technical writer. Draft a Google Cloud tutorial based on user requests.
    Once the draft is complete, show it to the user and ask them if they would like to start the publishing process.
    The 'publish_tutorial_advanced' tool will then handle the multi-stage review and approval.
    If the reviewer provides feedback (status 'update' or 'rejected'), revise the draft and try again.`,
    		Tools:    []tool.Tool{agenttool.New(searchAgent, nil), publishTool},
    		Toolsets: []tool.Toolset{mcpToolSet},
    	})
    }
    

    Notice the RequestConfirmation command in the publishTutorialAdvanced function. Here, we have more control over sending notifications or doing whatever to solicit the confirmation approval.

    Note that I tried to get this agent to work with the built-in web UI but couldn’t get it. The same text box pops up for approval confirmation, but no values seem to get the agent to proceed. The only way I got this to work was with a bunch of custom handling in the agent.

    So let’s go straight to the REST API. I started the agent using this command:

    ADK_AGENT=advanced go run . web api
    

    When I check the list-apps endpoint, I see that my agent app is called advanced_tutorial_agent. So just like above, we start by creating a session with the correct agent name.

    curl -X POST http://localhost:8080/api/apps/advanced_tutorial_agent/users/u_123/sessions/s_123 \
      -H "Content-Type: application/json"
    

    Now I can prompt the agent with a tutorial request.

    curl -X POST http://localhost:8080/api/run \
    -H "Content-Type: application/json" \
    -d '{
    "appName": "advanced_tutorial_agent",
    "userId": "u_123",
    "sessionId": "s_123",
    "newMessage": {
        "role": "user",
        "parts": [{
        "text": "create a cli tutorial for creating a pub/sub topic."
        }]
    }
    }'
    

    My custom tutorial comes back in a second, and I can kick off the publishing process.

    curl -X POST http://localhost:8080/api/run \
    -H "Content-Type: application/json" \
    -d '{
    "appName": "advanced_tutorial_agent",
    "userId": "u_123",
    "sessionId": "s_123",
    "newMessage": {
        "role": "user",
        "parts": [{
        "text": "yes start the publishing process"
        }]
    }
    }'
    

    After parsing the JSON response, I again find the adk_request_confirmation object and snag the ID.

    [ ... "content":{"role":"model","parts":[{"functionCall":{"id":"adk-7744ece0-a82d-4796-96b7-f376d96bf925","name":"adk_request_confirmation","args":{"originalFunctionCall":{"id":"adk-30c04217-3c0b-4519-a866-b914e9357872","args":{"content":"## Creating a Pub/Sub Topic with the `gcloud` CLI\n\nThis tutorial guides you through creating a Google Cloud Pub/Sub topic using the" ...]
    

    In the next REST call, see that I can now send a richer payload back to the agent and react accordingly.

    curl -X POST http://localhost:8080/api/run \
    -H "Content-Type: application/json" \
    -d '{
     "appName": "advanced_tutorial_agent",
     "userId": "u_123",
     "sessionId": "s_123",
        "newMessage": {
            "role": "user",
            "parts": [
                {
                    "functionResponse": {
                        "name": "adk_request_confirmation",
                        "id": "adk-7744ece0-a82d-4796-96b7-f376d96bf925",
                        "response": {
                            "confirmed": true,
                            "payload": {
                                "status": "approved",
                                "notes": "Tutorial looks great, proceed with publishing"
                            }
                        }
                    }
                }
            ]
        }
    }'
    

    And once again, I get a Markdown file saved to disk.

    After this initial demo, I may play with putting an A2UI interface on top of the agent, or even building it again using Genkit Go. But either way, make sure you give yourself some discrete moments where your agent stops and asks for input!