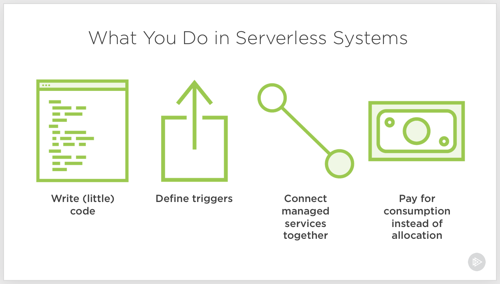
Serverless computing. Let’s talk about it. I don’t think it’s crazy to say that it represents the first cloud-native software model. Done right, it is inherently elastic and pay-per-use, and strongly encourages the use of cloud managed services. And to be sure, it’s about much more than just Function-as-a-Service platforms like AWS Lambda.
So, what exactly is it, why does it matter, and what technologies and architecture patterns should you know? To answer that question, I spent a few months researching the topic, and put together a new Pluralsight course, Serverless Computing: The Big Picture.
The course is only an hour long, but I get into some depth on benefits, challenges, and patterns you should know.
The first module looks at the various serverless definitions offered by industry experts, why serverless is different from what came before it, how serverless compares to serverful systems, challenges you may face adopting it, and example use cases.
The second module digs into the serverless tech that matters. I look at public cloud function-as-a-service platforms, installable platforms, dev tools, and managed services.
The final module of the course looks at architecture patterns. We start by looking at best practices, then review a handful of patterns.
As always, I had fun putting this together. It’s my 19th Pluralsight course, and I don’t see stopping any time soon. If you watch it, I’d love your feedback. I hope it helps you get a handle on this exciting, but sometimes-confusing, topic!
You’ve got microservices. Great. They’re being continuous delivered. Neato. Ok … now what? The next hurdle you may face is data processing amongst this distributed mesh o’ things. Brokered messaging engines like Azure Service Bus or RabbitMQ are nice choices if you want pub/sub routing and smarts residing inside the broker. Lately, many folks have gotten excited by stateful stream processing scenarios and using distributed logs as a shared source of events. In those cases, you use something like Apache Kafka or Azure Event Hubs and rely on smart(er) clients to figure out what to read and what to process. What should you use to build these smart stream processing clients?
I’ve written about Spring Cloud Stream a handful of times, and last year showed how to integrate with the Kafka interface on Azure Event Hubs. Just today, Microsoft shipped a brand new “binder” for Spring Cloud Stream that works directly with Azure Event Hubs. Event processing engines aren’t useful if you aren’t actually publishing or subscribing to events, so I thought I’d try out this new binder and see how to light up Azure Event Hubs.
Setting Up Microsoft Azure
First, I created a new Azure Storage account. When reading from an Event Hubs partition, the client maintains a cursor. This cursor tells the client where it should start reading data from. You have the option to store this cursor server-side in an Azure Storage account so that when your app restarts, you can pick up where you left off.
There’s no need for me to create anything in the Storage account, as the Spring Cloud Stream binder can handle that for me.
Next, the actual Azure Event Hubs account! First I created the namespace. Here, I chose things like a name, region, pricing tier, and throughput units.
Like with the Storage account, I could stop here. My application will automatically create the actual Event Hub if it doesn’t exist. In reality, I’d probably want to create it first so that I could pre-define things like partition count and message retention period.
Creating the event publisher
The event publisher takes in a message via web request, and publishes that message for others to process. The app is a Spring Boot app, and I used the start.spring.io experience baked into Spring Tools (for Eclipse, Atom, and VS Code) to instantiate my project. Note that I chose “web” and “cloud stream” dependencies.
With the project created, I added the Event Hubs binder to my project. In the pom.xml file, I added a reference to the Maven package.
Now before going much farther, I needed a credentials file. Basically, it includes all the info needed for the binder to successfully chat with Azure Event Hubs. You use the az CLI tool to generate it. If you don’t have it handy, the easiest option is to use the Cloud Shell built into the Azure Portal.
From here, I did az list to show all my Azure subscriptions. I chose the one that holds my Azure Event Hub and copied the associated GUID. Then, I set that account as my default one for the CLI with this command:
az account set -s 11111111-1111-1111-1111-111111111111
With that done, I issued another command to generate the credential file.
az ad sp create-for-rbac --sdk-auth > my.azureauth
I opened up that file within the Cloud Shell, copied the contents, and pasted the JSON content into a new file in the resources directory of my Spring Boot app.
Next up, the code. Because we’re using Spring Cloud Stream, there’s no specific Event Hubs logic in my code itself. I only use Spring Cloud Stream concepts, which abstracts away any boilerplate configuration and setup. The code below shows a simple REST controller that takes in a message, and publishes that message to the output channel. Behind the scenes, when my app starts up, Boot discovers and inflates all the objects needed to securely talk to Azure Event Hubs.
How simple is that? All that’s left is the application properties used by the app. Here, I set a few general Spring Cloud Stream properties, and a few related to the Event Hubs binder.
 #point to credentials
 spring.cloud.azure.credential-file-path=my.azureauth
 #get these values from the Azure Portal
 spring.cloud.azure.resource-group=demos
 spring.cloud.azure.region=East US
 spring.cloud.azure.eventhub.namespace=seroter-event-hub

 #choose where to store checkpoints
 spring.cloud.azure.eventhub.checkpoint-storage-account=serotereventhubs

 #set the name of the Event Hub
 spring.cloud.stream.bindings.output.destination=seroterhub

 #be lazy and let the app create the Storage blobs and Event Hub
 spring.cloud.azure.auto-create-resources=true
With that, I had a working publisher.
Creating the event subscriber
It’s no fun publishing messages if no one ever reads them. So, I built a subscriber. I walked through the same start.spring.io experience as above, this time ONLY choosing the Cloud Stream dependency. And then added the Event Hubs binder to the pom.xml file of the created project. I also copied the my.azureauth file (containing our credentials) from the publisher project to the subscriber project.
It’s criminally simple to pull messages from a broker using Spring Cloud Stream. Here’s the full extent of the code. Stream handles things like content type transformation, and so much more.
The final step involved defining the application properties, including the Storage account for checkpointing, and whether to automatically create the Azure resources.
 #point to credentials
 spring.cloud.azure.credential-file-path=my.azureauth
 #get these values from the Azure Portal
 spring.cloud.azure.resource-group=demos
 spring.cloud.azure.region=East US
 spring.cloud.azure.eventhub.namespace=seroter-event-hub

 #choose where to store checkpoints
 spring.cloud.azure.eventhub.checkpoint-storage-account=serotereventhubs

 #set the name of the Event Hub
 spring.cloud.stream.bindings.input.destination=seroterhub
 #set the consumer group
 spring.cloud.stream.bindings.input.group=system3

 #read from the earliest point in the log; default val is LATEST
 spring.cloud.stream.eventhub.bindings.input.consumer.start-position=EARLIEST

 #be lazy and let the app create the Storage blobs and Event Hub
 spring.cloud.azure.auto-create-resources=true
And now we have a working subscriber.
Testing this thing
First, I started up the producer app. It started up successfully, and I can see in the startup log that it created the Event Hub automatically for me after connecting.
To be sure, I checked the Azure Portal and saw a new Event Hub with 4 partitions.
Sweet. I called the REST endpoint on my app three times to get a few messages into the Event Hub.
Now remember, since we’re dealing with a log versus a queuing system, my consumers don’t have to be online (or even registered anywhere) to get the data at their leisure. I can attach to the log at any time and start reading it. So that data is just hanging out in Event Hubs until its retention period expires.
I started up my Spring Boot subscriber app. After a couple moments, it connected to Azure Event Hubs, and read the three entries that it hadn’t ever seen before.
Back in the Azure Portal, I checked and saw a new blob container in my Storage account, with a folder for my consumer group, and checkpoints for each partition.
If I sent more messages into the REST endpoint, they immediately appeared in my subscriber app. What if I defined a new consumer group? Would it read all the messages from the beginning?
I stopped the subscriber app, changed the application property for “consumer group” to “system4” and restarted the app. After Spring Cloud Stream connected to each partition, it pumped out whatever it found, and responded immediately to any new entries.
Whether you’re building a change-feed listener off of Cosmos DB, sharing data between business partners, or doing data processing between microservices, you’ll probably be using a broker. If it’s an event bus like Azure Event Hubs, you now have an easy path with Spring Cloud Stream.
Creating new .NET apps, or modernizing existing ones? If you’re following the 12-factor criteria, you’re probably keeping your configuration out of the code. That means not stashing feature flags in your web.config file, or hard-coding connection strings inside your classes. So where’s this stuff supposed to go? Environment variables are okay, but not a great choice; no version control or access restrictions. What about an off-box configuration service? Now we’re talking. Fortunately AWS, and now Microsoft Azure, offer one that’s friendly to .NET devs. I’ll show you how to create and access configurations in each cloud, and as a bonus, throw out a third option.
.NET Core has a very nice configuration system that makes it easy to read configuration data from a variety of pluggable sources. That means that for the three demos below, I’ve got virtually identical code even though the back-end configuration stores are wildly different.
AWS
Setting it up
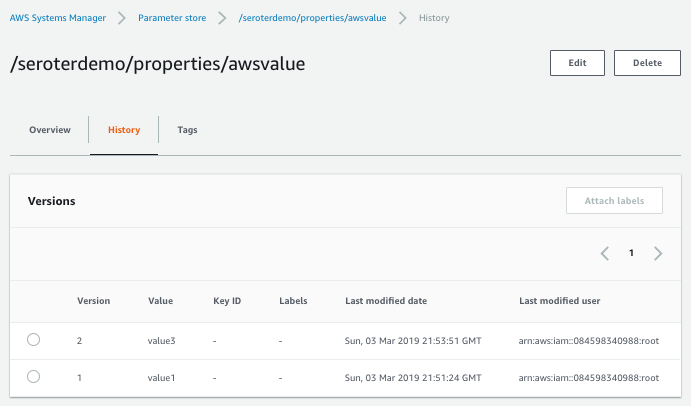
AWS offers a parameter store as part of the AWS Systems Manager service. This service is designed to surface information and automate tasks across your cloud infrastructure. While the parameter store is useful to support infrastructure automation, it’s also a handy little place to cram configuration values. And from what I can tell, it’s free to use.
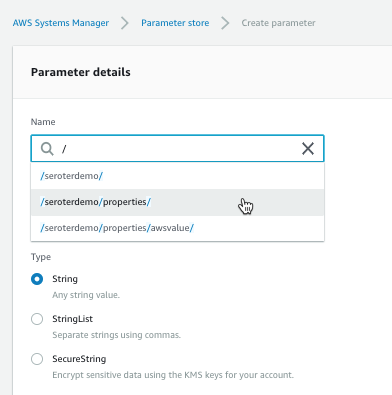
To start, I went to the AWS Console, found the Systems Manager service, and chose Parameter Store from the left menu. From here, I could see, edit or delete existing parameters, and create new ones.
Each parameter gets a name and value. For the name, I used a “/” to define a hierarchy. The parameter type can be a string, list of strings, or encrypted string.
The UI was smart enough that when I went to go add a second parameter (/seroterdemo/properties/awsvalue2), it detected my existing hierarchy.
Ok, that’s it. Now I was ready to use it my .NET Core web app.
Using from code
Before starting, I installed the AWS CLI. I tried to figure out where to pass credentials into the AWS SDK, and stumbled upon some local introspection that the SDK does. Among other options, it looks for files in a local directory, and those files get created for you when you install the AWS CLI. Just a heads up!
I created a new .NET Core MVC project, and added the Amazon.Extensions.Configuration.SystemsManager package. Then I created a simple “Settings” class that holds the configuration values we’ll get back from AWS.
public class Settings
{
   public string awsvalue { get; set; }
   public string awsvalue2 { get; set; }
}
In the appsettings.json file, I told my app which AWS region to use.
Finally, I wanted to make my configuration properties available to my app code. So in the Startup.cs file, I grabbed the configuration properties I wanted, inflated the Settings object, and made it available to the runtime container.
public void ConfigureServices(IServiceCollection services) { services.Configure<Settings>(Configuration.GetSection("properties"));
Last step? Accessing the configuration properties! In my controller, I defined a private variable that would hold a local reference to the configuration values, pulled them in through the constructor, and then grabbed out the values in the Index() operation.
        private readonly Settings _settings;

        public HomeController(IOptions<Settings> settings)
        {
            _settings = settings.Value;
        }

        public IActionResult Index()
        {
            ViewData["configval"] = _settings.awsvalue;
            ViewData["configval2"] = _settings.awsvalue2;

            return View();
        }
After updating my View to show the two properties, I started up my app. As expected, the two configuration values showed up.
What I like
You gotta like that price! AWS Systems Manager is available at no cost, and there appears to be no cost to the parameter store. Wicked.
Also, it’s cool that you have an easily-visible change history. You can see below that the audit trail shows what changed for each version, and who changed it.
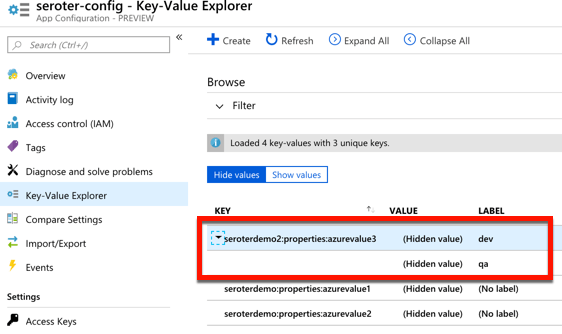
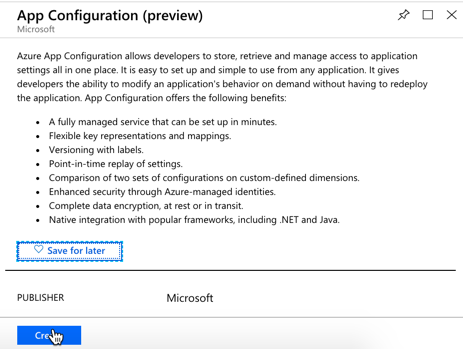
Microsoft just shared the preview release of the Azure App Configuration service. This managed service is specifically created to help you centralize configurations. It’s brand new, but seems to be in pretty good shape already. Let’s take it for a spin.
From the Microsoft Azure Portal, I searched for “configuration” and found the preview service.
I named my resource seroter-config, picked a region and that was it. After a moment, I had a service instance to mess with. I quickly added two key-value combos.
public class Settings
{
    public string azurevalue1 { get; set; }
    public string azurevalue2 { get; set; }
}
Next up, I updated my Program.cs file to read the Azure App Configuration. I passed the connection string in here, but there are better ways available.
public class Program
{
    public static void Main(string[] args)
    {
        CreateWebHostBuilder(args).Build().Run();
    }

    public static IWebHostBuilder CreateWebHostBuilder(string[] args) =>
        WebHost.CreateDefaultBuilder(args)
            .ConfigureAppConfiguration((hostingContext, config) => {
                var settings = config.Build();
                    config.AddAzureAppConfiguration("[con string]");
                })
            .UseStartup<Startup>();
}
I also updated the ConfigureServices() operation in my Startup.cs file. Here, I chose to only pull configurations that started with seroterdemo:properties.
public void ConfigureServices(IServiceCollection services) { //added services.Configure<Settings>(Configuration.GetSection("seroterdemo:properties"));
To read those values in my controller, I’ve got just about the same code as in the AWS example. The only difference was what I called my class members!
private readonly Settings _settings;

public HomeController(IOptions<Settings> settings)
{
    _settings = settings.Value;
}

public IActionResult Index()
{
   ViewData["configval"] = _settings.azurevalue1;
   ViewData["configval2"] = _settings.azurevalue2;

   return View();
}
I once again updated my View to print out the configuration values, and not shockingly, it worked fine.
What I like
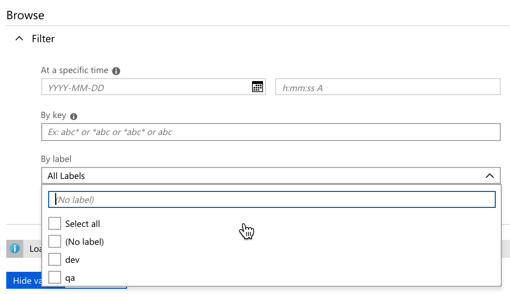
For a new service, there’s a few good things to like here. The concept of labels is handy, as it lets me build keys that serve different environments. See here that I created labels for “qa” and “dev” on the same key.
I saw a “compare” feature which looks handy. There’s also a simple search interface here too, which is valuable.
Pricing isn’t yet available, no I’m not clear as to how I’d have to pay for this.
Spring Cloud Config
Setting it up
Both of the above service are quite nice. And super convenient if you’re running in those clouds. You might also want a portable configuration store that offers its own pluggable backing engines. Spring Cloud Config makes it easy to build a config store backed by a file system, git, GitHub, Hashicorp Vault, and more. It’s accessible via HTTP/S, supports encryption, is fully open source, and much more.
I created a new Spring project from start.spring.io. I chose to include the Spring Cloud Config Server and generate the project.
Literally all the code required is a single annotation (@EnableConfigServer).
My GitHub repo has a configuration file called blogconfig.properties with the following content:
With that, I started up the project, and had a running configuration server.
Using from code
To talk to this configuration store from my .NET app, I used the increasingly-popular Steeltoe library. These packages, created by Pivotal, bring microservices patterns to your .NET (Framework or Core) apps.
For the last time, I created a .NET Core MVC project. This time I added a dependency to Steeltoe.Extensions.Configuration.ConfigServerCore. Again, I added a Settings class to hold these configuration properties.
public class Settings
{
    public string property1 { get; set; }
    public string property2 { get; set; }
    public string property3 { get; set; }
    public string property4 { get; set; }
}
In my appsettings.json, I set my application name (to match the config file’s name I want to access) and URI of the config server.
My Program.cs file has a “using” statement for the Steeltoe.Extensions.Configuration.ConfigServer package, and then used the “AddConfigServer” operation to add the config server as a source.
public class Program
{
    public static void Main(string[] args)
    {
        CreateWebHostBuilder(args).Build().Run();
    }

    public static IWebHostBuilder CreateWebHostBuilder(string[] args) =>
        WebHost.CreateDefaultBuilder(args)
            .AddConfigServer()
            .UseStartup<Startup>();
}
I once again updated the Startup.cs file to load the target configurations into my typed object.
public IActionResult Index() { ViewData["configval"] = _mySettings.property1; return View(); }
Updating the view, and starting the .NET Core app yielded the expected results.
What I like
Spring Cloud Config is a very mature OSS project. You can deliver this sort of microservices machinery along with your apps in your CI/CD pipelines — these components are software that you ship versus services that need to be running — which is powerful. It offers a variety of backends, OAuth2 for security, encryption/decryption of values, and much more. It’s a terrific choice for a consistent configuration store on every infrastructure.
But realistically, I don’t care which of the above you use. Just use something to extract environment-specific configuration settings from your .NET apps. Use these robust external stores to establish some rigor around these values, and make it easier to share configurations, and keep them in sync across all of your application instances.
Of all the app modernization strategies, “lift and shift” is my least favorite. To me, picking up an app and dropping it onto a new host is like transferring your debt to a new credit card with a lower interest rate. It’s better, but mostly temporary relief. That said, if your app can inherit legitimate improvements without major changes by running on a new platform, you’d be crazy to not consider it.
Examples? Here are eight things I think you should expect of a platform that runs your existing .NET apps. And when I say “platform”, I don’t mean an infrastructure host or container runtime. Rather, I’m talking about application-centric platform that supplies what’s needed for a fully configured, routable app. I’ll use Azure Web Apps (part of Azure App Service) and Pivotal Cloud Foundry (PCF) as the demo platforms for this post.
#1 Secure app packaging
First, a .NET-friendly app platform should package up my app for me. Containers are cool. I’ll be happy if I never write another Dockerfile, though. Just get me from source-to-runnable-artifact as easily as possible. This can be a BIG value-add for existing .NET apps where getting them to production is a pain in the neck.
Both Azure Web Apps and PCF do this for me.
I built a “classic” ASP.NET Web Service to simulate a legacy app that I want to run on one of these new-fangled platforms. The source code is in GitHub, so you can follow along. This SOAP web service returns a value, and also does things like pull values from environment variables, and writes out log statements.
To deploy it to Azure Web Apps using the Azure CLI, I followed a few steps, none of which required up-front containerization. First, I created a “plan” for my app, which can include things like a resource group, data center location, and more.
az appservice plan create -g demos -n BlogPlan
Next, I created the actual Web App. For the moment, I didn’t point to source code, but just provisioned the environment. In reality, this creates lightweight Windows Server VMs. Microsoft did recently add experimental support for Windows Containers, but I’m not using that here.
az webapp create -g demos -p BlogPlan -n aspnetservice
After a few minutes, I saw everything show up in the Azure portal. Microsoft took care of the packaging of my application and properly laying it atop a managed runtime. I manually went into the “Application Settings” properties for my Web App and added environment variables too.
PCF (and Pivotal Application Service, specifically) is similar, and honestly a bit easier. While I could have published this .NET Framework project completely as-is to PCF, I did add a manifest.yml file to the project. This file simply tells Cloud Foundry what to name the app, how many instances to run, and such. From the local git repo, I used the Cloud Foundry CLI to simply cf push. This resulted in my app artifacts getting uploaded, a buildpack compiling and packaging the app, and a Windows Container spinning up on the platform. Yes, it’s a full-on Windows Server Container, built on your behalf, and managed by the platform.
When I built this project using Visual Studio for Mac, I could only push the app to PCF. Azure kept gurgling about a missing build profile. Once I built the app using classic Visual Studio on Windows, it all worked. Probably user error.
Either way, both platforms took care of building up the runnable artifact. No need for me to find the right Windows base image, and securely configure the .NET runtime. That’s all taken care of by a good platform.
#2 Routable endpoints
A web app needs to be reachable. SHOCKING, I KNOW. Simply deploying an application to a VM or container environment isn’t the end state. A good platform also ensures that my app has a routable endpoint that humans or machines can access. Again, for existing .NET apps, if you have a way to speed up the path to production by making apps reachable in seconds, that’s super valuable.
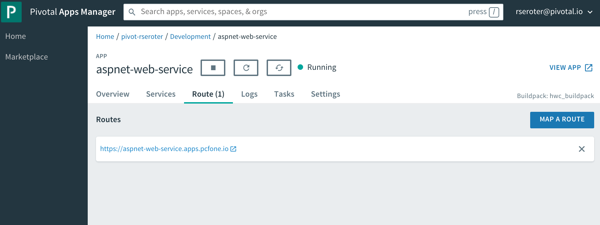
For Azure Web Apps, this is built-in. When I deployed the app above, I immediately got a URL back from the platform. Azure Web Apps automatically takes care of getting me an HTTP/S endpoint.
Same for PCF. When you push an app to PCF, you immediately get a load balanced network route. And you have complete control over DNS names, etc. And you can easily set up TCP routes in addition to HTTP/S ones.
It’s one thing to get app binaries onto a host. For many, it’s a whole DIFFERENT task to get routable IPs, firewalls opened up, load balancers configured, and all that gooey networking stuff required to call an app “ready.” A good application platform does that, especially for .NET apps.
#3 Log aggregation
As someone who had to spend lots of time scouring Windows Event Logs to troubleshoot, I’m lovin’ the idea of something that automatically collects application logs from all the hosts. If you have existing .NET apps and don’t like spelunking around for logs, a good application platform should help.
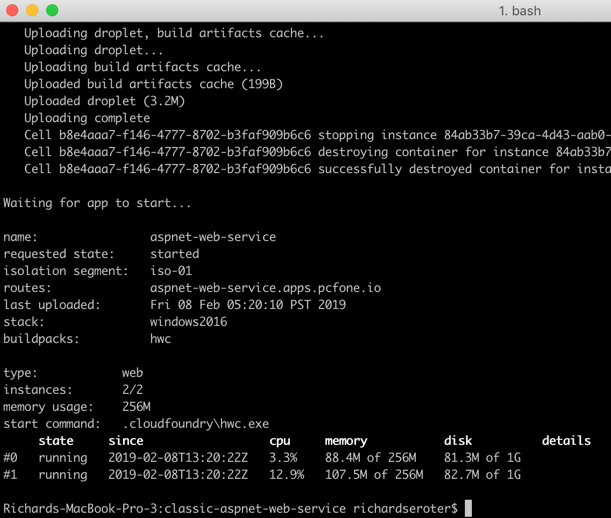
Azure Web Apps offers built-in log collection and log streaming. These are something you turn on (after picking where to store the logs), but it’s there.
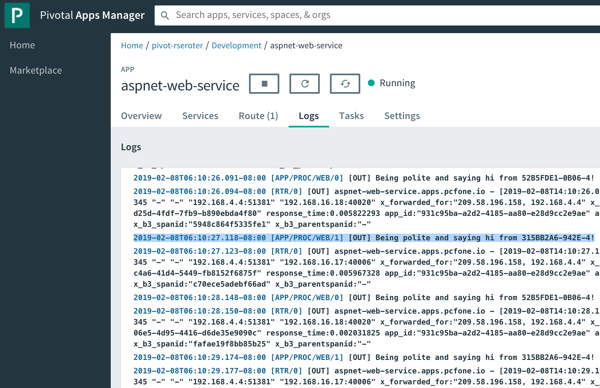
PCF immediately starts streaming application logs when you deploy an app, and also has collectors for things like the Windows Event Log. As you see below, after calling my ASP.NET Web Service a few times, I see the log output, and the reference to the individual hosts each instance is running on (pulled from the environment and written to the log). You can pipe these aggregated logs to off-platform environments like Splunk or even Azure Log Analytics.
Log aggregation is one of those valuable things you may not consider up front, but it’s super handy if the platform does it for you automatically.
#4 App metrics collection and app monitoring
No matter how great, no platform will magically light up your existing apps with unimaginable telemetry. But, a good application platform does automatically capture infrastructure and application metrics and correlate them. And preferably, such a platform does it without requiring you to explicitly add monitoring agents or code to your existing app. If your .NET app can instantly get high quality, integrated monitoring simply by running somewhere else, that’s good, right?
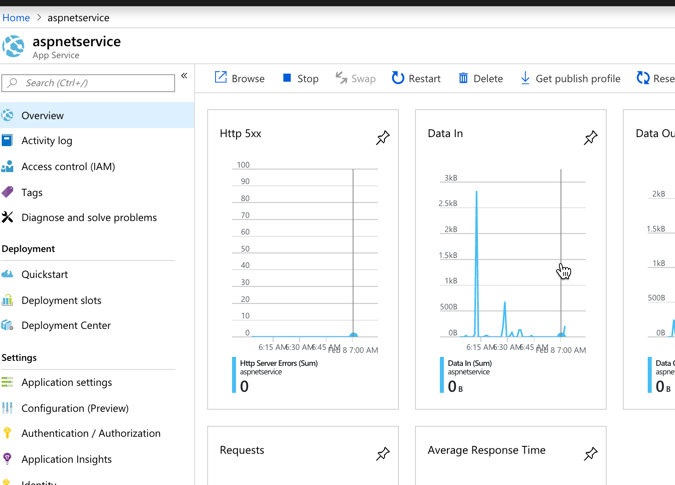
Does Azure Web Apps do this? You betcha. By default, you get some basic traffic-in/traffic-out sort of metrics on the Web Apps dashboard in the Azure Portal.
Once you flip on Application Insights (not on by default), you get a much, much deeper look at your running application. This seems pretty great, and it “just works” with my old-and-busted ASP.NET Web Service.
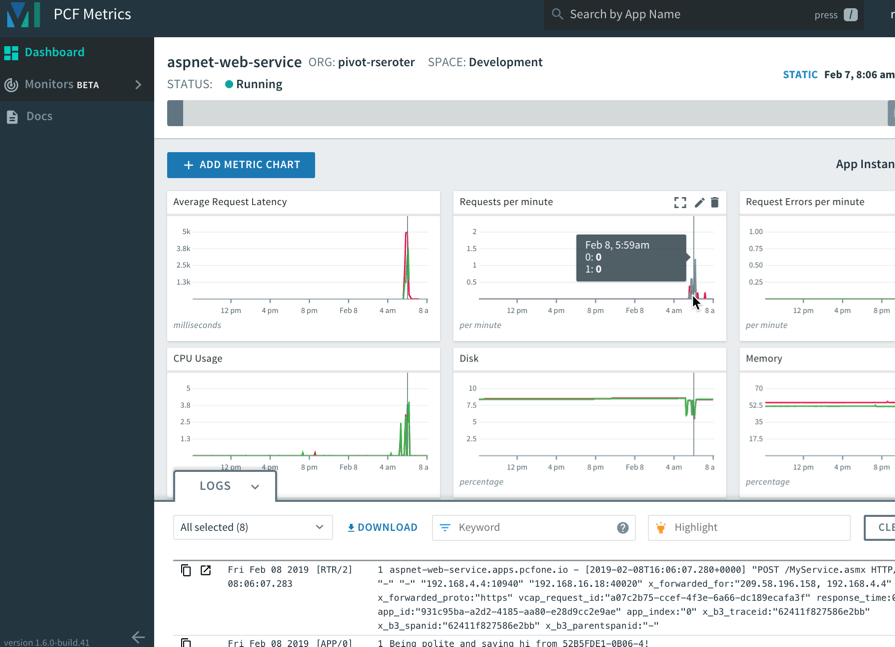
Speaking of “just works”, the same applies to PCF and your .NET Framework apps. After I pushed the ASP.NET Web Service to PCF, I automatically saw a set of data points, thanks to the included, integrated PCF Metrics service.
It’s simple to add, remove, or change charts based on included or your own custom metrics. And the application logs get correlated here, so clicking on a time slice in the chart also highlights logs from that time period.
For either Azure or PCF, you can use best-of-breed application performance monitoring tools like New Relic too. Whatever you do, expect that your .NET applications get native access to at-scale monitoring capabilities.
#5 Manual or auto-scaling
An application platform knows how to scale apps. Up or down, in or out. Manually or automatically. If “file a ticket” is your scaling strategy, maybe it’s time for a new one?
As you’d expect, both Azure and PCF make app scaling easy, even on Windows Server. Azure Web Apps let you scale the amount of allocated resources (up or down) and number of instances (in or out). Because I was a cheapskate with my Azure Web App, I chose a tier that didn’t support autoscaling. So, know ahead of time what you’ve chosen as it can impact how much you can scale.
For PCF, there aren’t any “plans” that constrain features. So I can either manually scale resource allocation or instance count, or define an auto-scale policy that triggers based on resource consumption, queue depth, or HTTP traffic.
Move .NET apps to a platform that improve app resilience. One way you get that is through easy, automated scaling.
#6 Fault detection and recovery
If you’re lifting-and-shifting .NET apps, you’re probably not going back and fixing a lot of stuff. Maybe your app has a memory leak and crashes every 14 hours. And maybe you wrote a Windows Scheduled Task that bounces the web server’s app pool every 13 hours to prevent the crash. NO ONE IS JUDGING YOU. A good platform knows that things went wrong, and automatically recovers you to a good state.
Now, most of the code I write crashes on its own, but I wanted to be even more explicit to see how each platform handles unexpected failures. So, I did a VERY bad thing. I created a SOAP endpoint that violently aborts the thread.
[WebMethod]
public void CrashMe()
{
     System.Threading.Thread.CurrentThread.Abort();
}
After calling that endpoint on the Azure Web Apps-hosted service, the instance crashed, and Azure resurrected after a minute or two. Nice!
In PCF, things worked the same way. Since we’re dealing with Windows Server Containers in PCF, the recovery was faster. You can see in the screenshot below that the app instance crashed, and a new instance immediately spawned to replace it.
Cool. My classic .NET Framework app gets auto-recovery in these platforms. This is an underrated feature, but one you should demand.
#7 Underlying infrastructure access
One of the biggest benefits of PaaS is that developers can stop dealing with infrastructure. FINALLY. The platform should do all the things above so that I never mess with servers, networking, agents, or anything that makes me sad. That said, sometimes you do want to dip into the infrastructure. For a legacy .NET app, maybe you want to inspect a temporary log file written to disk, see what got installed into which directories, or even to download extra bits after deploying the app. I’d barely recommend doing any of those things on ephemeral instances, but sometimes the need is there.
Both Azure and PCF make it straightforward to access the application instances. From the Azure portal, I can dip into a console pointing at the hosting VM.
I can browse elsewhere on the hosting VM, but only have r/w access to the directory the console drops me into.
PCF uses Windows Server Containers, so I could SSH right into it. Once I’m in this isolated space, I have r/w access to lots of things. And can trigger PowerShell commands and more.
If infrastructure access is REQUIRED to deploy and troubleshoot your app, you’re not using an application platform. And that may be fine, but you should expect more. For those cases when you WANT to dip down to the host, a platform should offer a pathway.
#8 Zero-downtime deployment
Does your .NET Framework app need to be rebuilt to support continuous updates? Not necessarily. In fact, a friendly .NET app platform makes it possible to keep updating the app in production without taking downtime.
Azure Web Apps offers deployment slots. This makes it possible to publish a new version, and swap it out for what’s already running. It’s a cool feature that requires a “standard” or “premium” plan to use.
PCF supports rolling deployments for apps written in any language, to Windows or Linux. Let’s say I have four instances of my app running. I made a small code change to my ASP.NET Web Service and did a cf v3-zdt-push aspnet-web-service. This command did a zero-downtime push, which means that new instances of the app replaced old instances, without disrupting traffic. As you can see below, 3 of the instances were swapped out, and the fourth one was coming online. When the fourth came online, it replaced the last remaining “old” instance of the app.
Over time, you should probably replatform most .NET Framework apps to .NET Core. It makes sense for many reasons. But that journey may take a decade. Find platforms that treat Windows and Linux, .NET Framework and .NET Core the same way. Expect all these 8 features in your platform of choice so that you get lots of benefits for “free” until you can do further modernization.
What do you think of when you hear the phrase “multi-cloud”? Ok, besides stupid marketing people and their dumb words. You might think of companies with on-premises environments who are moving some workloads into a public cloud. Or those who organically use a few different clouds, picking the best one for each workload. While many suggest that you get the best value by putting everything on one provider, that clearly isn’t happening yet. And maybe it shouldn’t. Who knows. But can you get the best of each cloud while retaining some portability? I think you can.
One multi-cloud solution is to do the lowest-common-denominator thing. I really don’t like that. Multi-cloud management tools try to standardize cloud infrastructure but always leave me disappointed. And avoiding each cloud’s novel services in the name of portability is unsatisfying and leaves you at a competitive disadvantage. But why should we choose the cloud (Azure! AWS! GCP!) and runtime (Kubernetes! VMs!) before we’ve even written a line of code? Can’t we make those into boring implementation details, and return our focus to writing great software? I’d propose that with good app frameworks, and increasingly-standard interfaces, you can create great software that runs on any cloud, while still using their novel services.
In this post, I’ll build a RESTful API with Spring Boot and deploy it, without code changes, to four different environments, including:
Local environment running MongoDB software in a Docker container.
Side note: Ok, so multi-cloud sounds good, but it seems like a nightmare of ops headaches and nonstop dev training. That’s true, it sure can be. But if you use a good multi-cloud app platform like Pivotal Cloud Foundry, it honestly makes the dev and ops experience virtually the same everywhere. So, it doesn’t HAVE to suck, although there are still going to be challenges. Ideally, your choice of cloud is a deploy-time decision, not a design-time constraint.
Creating the app
In my career, I’ve coded (poorly) with .NET, Node, and Java, and I can say that Spring Boot is the fastest way I’ve seen to build production-quality apps. So, I chose Spring Boot to build my RESTful API. This API stores and returns information about cloud databases. HOW VERY META. I chose MongoDB as my backend database, and used the amazing Spring Data to simplify interactions with the data source.
From start.spring.io, I created a project with dependencies on spring-boot-starter-data-rest (auto-generated REST endpoints for interacting with databases), spring-boot-starter-data-mongodb (to talk to MongoDB), spring-boot-starter-actuator (for “free” health metrics), and spring-cloud-cloudfoundry-connector (to pull connection details from the Cloud Foundry environment). Then I opened the project and created a new Java class representing a CloudProvider.
package seroter.demo.cloudmongodb;

import org.springframework.data.annotation.Id;

public class CloudProvider {

	@Id private String id;

	private String providerName;
	private Integer numberOfDatabases;
	private Boolean mongoAsService;

	public String getProviderName() {
		return providerName;
	}

	public void setProviderName(String providerName) {
		this.providerName = providerName;
	}

	public Integer getNumberOfDatabases() {
		return numberOfDatabases;
	}

	public void setNumberOfDatabases(Integer numberOfDatabases) {
		this.numberOfDatabases = numberOfDatabases;
	}

	public Boolean getMongoAsService() {
		return mongoAsService;
	}

	public void setMongoAsService(Boolean mongoAsService) {
		this.mongoAsService = mongoAsService;
	}
}
Thanks to Spring Data REST (which is silly powerful), all that was left was to define a repository interface. If all I did was create an annotate the interface, I’d get full CRUD interactions with my MongoDB collection. But for fun, I also added an operation that would return all the clouds that did (or did not) offer a MongoDB service.
package seroter.demo.cloudmongodb;

import java.util.List;

import org.springframework.data.mongodb.repository.MongoRepository;
import org.springframework.data.rest.core.annotation.RepositoryRestResource;

@RepositoryRestResource(collectionResourceRel = "clouds", path = "clouds")
public interface CloudProviderRepository extends MongoRepository<CloudProvider, String> {

	//add an operation to search for a specific condition
	List<CloudProvider> findByMongoAsService(Boolean mongoAsService);
}
That’s literally all my code. Crazy.
Run using Dockerized MongoDB
To start this test, I wanted to use “real” MongoDB software. So I pulled the popular Docker image and started it up on my local machine:
docker run -d -p 27017:27017 --name serotermongo mongo
When starting up my Spring Boot app, I could provide database connection info (1) in an app.properties file, or, as (2) input parameters that require nothing in the compiled code package itself. I chose the file option for readability and demo purposes, which looked like this:
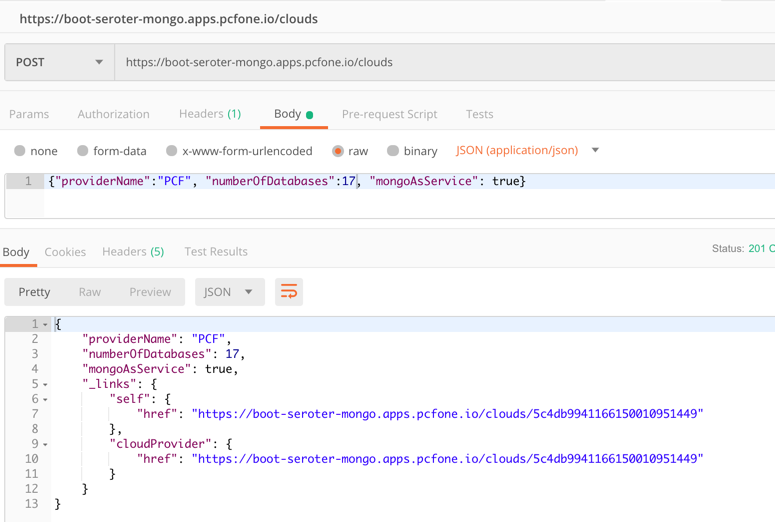
After starting the app, I issued a base request to my API via Postman. Sure enough, I got a response. As expected, no data in my MongoDB database. Note that Spring Data automatically creates a database if it doesn’t find the one specified, so the “demodb” now existed.
I then issued a POST command to add a record to MongoDB, and that worked great too. I got back the URI for the new record in the response.
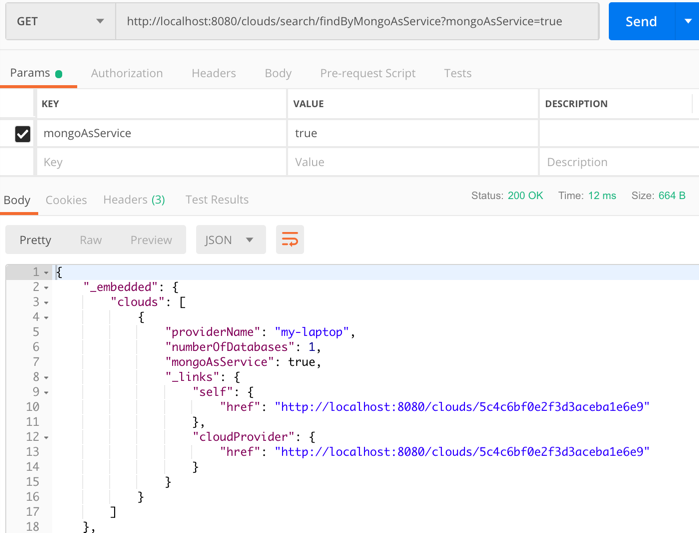
I also tried calling that custom “search” interface to filter the documents where “mongoAsService” is true. That worked.
So, running my Spring Boot REST API with a local MongoDB worked fine.
Run using Microsoft Azure Cosmos DB
Next up, I pointed this application to Microsoft Azure. One of the many databases in Azure is Cosmos DB. This underrated database offers some pretty amazing performance and scale, and is only available from Microsoft in their cloud. NO PROBLEM. It serves up a handful of standard interfaces, including Cassandra and MongoDB. So I can take advantage of all the crazy-great hosting features, but not lock myself into any of them.
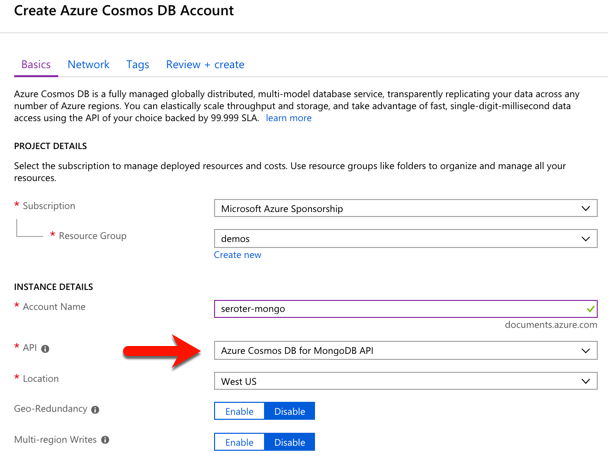
I started by visiting the Microsoft Azure portal. I chose to create a new Cosmos DB instance, and selected which API (SQL, Cassandra, Gremlin, MongoDB) I wanted.
After a few minutes, I had an instance of Cosmos DB. If I had wanted to, I could have created a database and collection from the Azure portal, but I wanted to confirm that Spring Data would do it for me automatically.
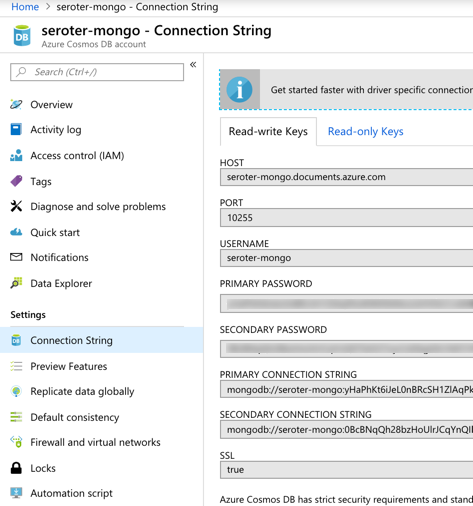
I located the “Connection String” properties for my new instance, and grabbed the primary one.
With that in hand, I went back to my application.properties file, commented out my “local” configuration, and added entries for the Azure instance.
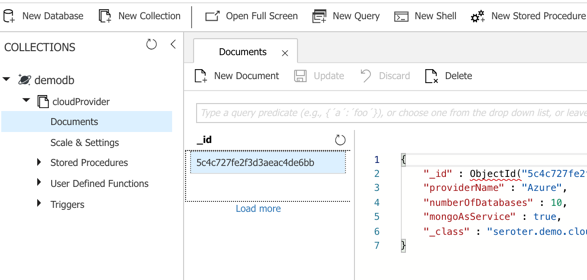
I could publish this app to Azure, but because it’s also easy to test it locally, I just started up my Spring Boot REST API again, and pinged the database. After POSTing a new record to my endpoint, I checked the Azure portal and sure enough, saw a new database and collection with my “document” in it.
Here, I’m using a super-unique cloud database but don’t need to manage my own software to remain “portable”, thanks to Spring Boot and MongoDB interfaces. Wicked.
Run using Amazon DocumentDB
Amazon DocumentDB is the new kid in town. I wrote up an InfoQ story about it, which frankly inspired me to try all this out.
Like Azure Cosmos DB, this database isn’t running MongoDB software, but offers a MongoDB-compatible interface. It also offers some impressive scale and performance capabilities, and could be a good choice if you’re an AWS customer.
For me, trying this out was a bit of a chore. Why? Mainly because the database service is only accessible from within an AWS private network. So, I had to properly set up a Virtual Private Cloud (VPC) network and get my Spring Boot app deployed there to test out the database. Not rocket science, but something I hadn’t done in a while. Let me lay out the steps here.
First, I created a new VPC. It had a single public subnet, and I added two more private ones. This gave me three total subnets, each in a different availability zone.
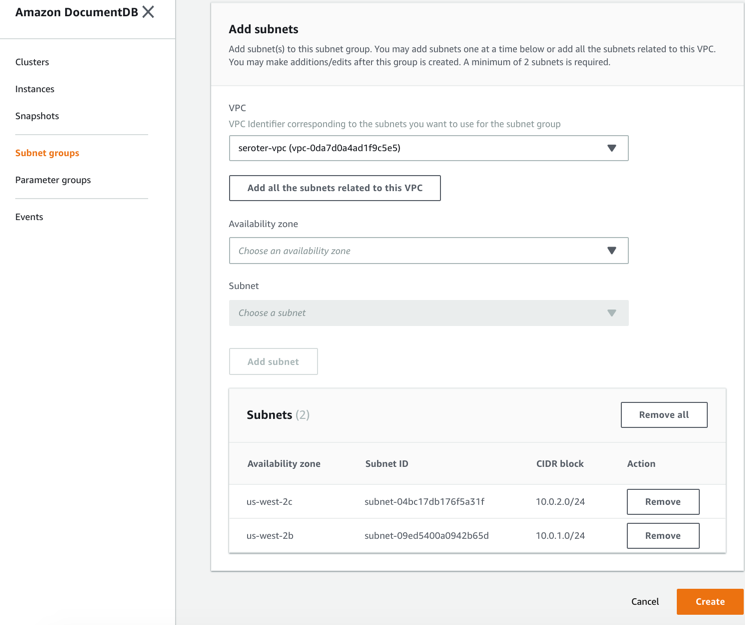
Next, I switched to the DocumentDB console in the AWS portal. First, I created a new subnet group. Each DocumentDB cluster is spread across AZs for high availability. This subnet group contains both the private subnets in my VPC.
I also created a parameter group. This group turned off the requirement for clients to use TLS. I didn’t want my app to deal with certs, and also wanted to mess with this capability in DocumentDB.
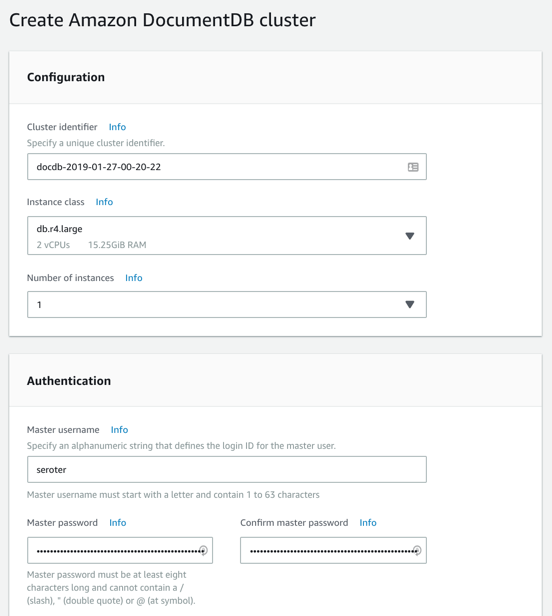
Next, I created my DocumentDB cluster. I chose an instance class to match my compute and memory needs. Then I chose a single instance cluster; I could have chosen up to 16 instances of primaries and replicas.
I also chose my pre-configured VPC and the DocumentDB subnet group I created earlier. Finally, I set my parameter group, and left default values for features like encryption and database backups.
After a few minutes, my cluster and instance were up and running. While this console doesn’t expose the ability to create databases or browse data, it does show me health metrics and cluster configuration details.
Next, I took the connection string for the cluster, and updated my application.properties file.
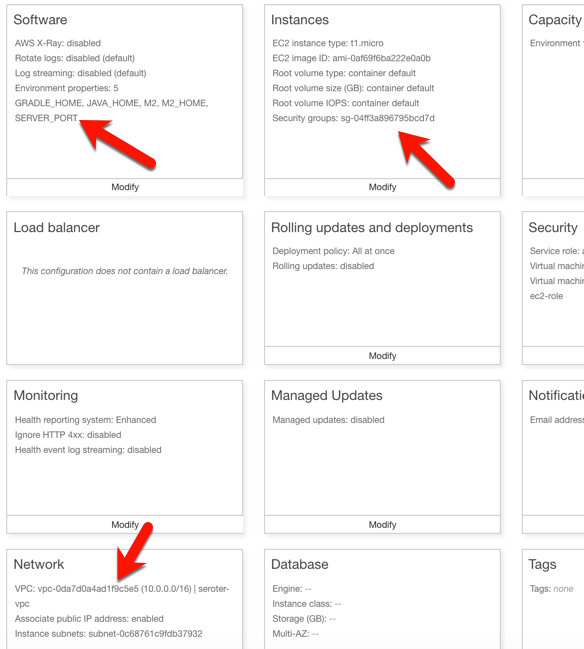
Now to deploy the app to AWS. I chose Elastic Beanstalk as the application host. I selected Java as my platform, and uploaded the JAR file associated with my Spring Boot REST API.
I had to set a few more parameters for this app to work correctly. First, I set a SERVER_PORT environment variable to 5000, because that’s what Beanstalk expects. Next, I ensured that my app was added to my VPC, provisioned a public IP address, and chose to host on the public subnet. Finally, I set the security group to the default one for my VPC. All of this should ensure that my app is on the right network with the right access to DocumentDB.
After the app was created in Beanstalk, I queried the endpoint of my REST API. Then I created a new document, and yup, it was added successfully.
So again, I used a novel, interesting cloud-only database, but didn’t have to change a lick of code.
Run using MongoDB in Pivotal Cloud Foundry
The last place to try this app out? A multi-cloud platform like PCF. If you did use something like PCF, the compute layer is consistent regardless of what public/private cloud you use, and connectivity to data services is through a Service Broker. In this case, MongoDB clusters are managed by PCF, and I get my own cluster via a Broker. Then my apps “bind” to that cluster.
First up, provisioning MongoDB. PCF offers MongoDB Enterprise from Mongo themselves. To a developer, this looks like a database-as–a-service because clusters are provisioned, optimized, backed up, and upgraded via automation. Via the command line or portal, I could provision clusters. I used the portal to get myself happy little instance.
After giving the service a name, I was set. As with all the other examples, no code changes were needed. I actually removed any MongoDB-related connection info from my application.properties file because that spring-cloud-cloudfoundry-connector dependency actually grabs the credentials from the environment variables set by the service broker.
One thing I *did* create for this environment — which is entirely optional — is a Cloud Foundry manifest file. I could pass these values into a command line instead of creating a declarative file, but I like writing them out. These properties simply tell Cloud Foundry what to do with my app.
With that, I jumped to a terminal, navigated to a directory holding that manifest file, and typed cf push. About 25 seconds later, I had a containerized, reachable application that connected to my MongoDB instance.
Fortunately, PCF treats Spring Boot apps special, so it used the Spring Boot Actuator to pull health metrics and more. Above, you can see that for each instance, I saw extra health information for my app, and, MongoDB itself.
Once again, I sent some GET requests into my endpoint, saw the expected data, did a POST to create a new document, and saw that succeed.
Wrap Up
Now, obviously there are novel cloud services without “standard” interfaces like the MongoDB API. Some of these services are IoT, mobile, or messaging related —although Azure Event Hubs has a Kafka interface now, and Spring Cloud Stream keeps message broker details out of the code. Other unique cloud services are in emerging areas like AI/ML where standardization doesn’t really exist yet. So some applications will have a hard coupling to a particular cloud, and of course that’s fine. But increasingly, where you run, how you run, and what you connect to, doesn’t have to be something you choose up front. Instead, first you build great software. Then, you choose a cloud. And that’s pretty cool.
Platforms should run on Kubernetes, apps should run on PaaS. That simple heuristic seems to resonate with the companies I talk to. When you have access to both environments, it makes sense to figure out what runs where. PaaS is ideal when you have custom code and want an app-aware environment that wires everything together. It’s about velocity, and straightforward Day 2 management. Kubernetes is a great choice when you have closely coordinated, distributed components with multiple exposed network ports and a need to access to infrastructure primitives. You know, a platform! Things like databases, message brokers, and hey, integration platforms.In this post, I see what it takes to get a platform up and running on Azure’s new Kubernetes service.
While Kubernetes itself is getting to be a fairly standard component, each public cloud offers it up in a slightly different fashion. Some clouds manage the full control plane, others don’t. Some are on the latest version of Kubernetes, others aren’t. When you want a consistent Kubernetes experience in every infrastructure pool, you typically use an installable product like Pivotal Container Service (PKS). But I’ll be cloud-specific in this demo, since I wanted to take Azure Kubernetes Service (AKS) for a spin. And we’ll use Spring Cloud Data Flow as our “platform” to install on AKS.
To start with, I went to the Azure Portal and chose to add a new instance of AKS. I was first asked to name my cluster, choose a location, pick a Kubernetes version, and set my initial cluster size.
For my networking configuration, I turned on “HTTP application routing” which gives me a basic (non-production grade) ingress controller. Since my Spring Cloud Data Flow is routable and this is a basic demo, it’ll work fine.
After about eleven minutes, I had a fully operational Kubernetes cluster.
Now, this is a “managed” service from Microsoft, but they definitely show you all the guts of what’s stood up to support it. When I checked out the Azure Resource Group that AKS created, it was … full. So, this is apparently the hooves and snouts of the AKS sausage. It’s there, but I don’t want to know about it.
The Azure Cloud Shell is a hidden gem of the Microsoft cloud. It’s a browser-based shell that’s stuffed with powerful components. Instead of prepping my local machine to talk to AKS, I just used this. From the Azure Portal, I spun up the Shell, loaded my credentials to the AKS cluster, and used the kubectl command to check out my nodes.
Groovy. Let’s install stuff. Spring Cloud Data Flow (SCDF) makes it easy to build data pipelines. These pipelines are really just standalone apps that get stitched together to form a sequential data processing pipeline. SCDF is a platform itself; it’s made up of a server, Redis node, MySQL node, and messaging broker (RabbitMQ, Apache Kafka, etc). It runs atop a number of different engines, including Cloud Foundry or Kubernetes. Spring Cloud Data Flow for Kubernetes has simple instructions for installing it via Helm.
I issued a Helm command from the Azure Cloud Shell (as Helm is pre-installed there) and in moments, had SCDF deployed.
When it finished, I saw that I had new Kubernetes pods running, and a load balancer service for routing traffic to the Data Flow server.
SCDF offers up a handful of pre-built “apps” to bake into pipelines, but the real power comes from building your own apps. I showed that off a few weeks ago, so for this demo, I’ll keep it simple. This streaming pipeline simply takes in an HTTP request, and drop the payload into a log file. THRILLING!
The power of a platform like SCDF comes out during deployment of a pipeline. See here that I chose Kubernetes as my underlying engine, created a load balancer service (to make my HTTP component routable) via a property setting, and could have optionally chose different instance counts for each component in the pipeline. Love that.
If you have GUI-fatique, you can always set these deploy-time properties via free text. I won’t judge you.
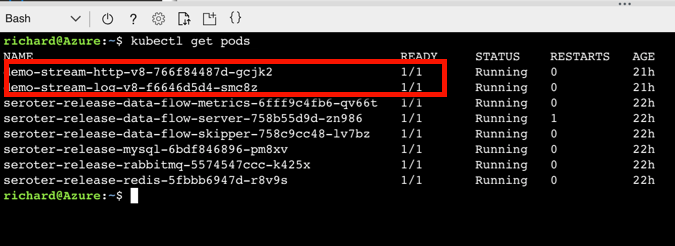
After deploying my streaming pipeline, I saw new pods shows up in AKS: one pod for each component of my pipeline.
I ran the kubectl get services command to confirm that SCDF built out a load balancer service for the HTTP app and assigned a public IP.
SCDF reads runtime information from the underlying engine (AKS, in this case) and showed me that my HTTP app was running, and its URL.
I spun up Postman and sent a bunch of JSON payloads to the first component of the SCDF pipeline running on AKS.
I then ran a kubectl logs [log app’s pod name] command to check the logs of the pipeline component that’s supposed to write logs.
And that’s it. In a very short period of time, I stood up a Kubernetes cluster, deployed a platform on top of it, and tested it out. AKS makes this fairly easy, and the fact that it’s vanilla Kubernetes is nice. When using public cloud container-as-a-service products or installable software that runs everywhere, consider Kubernetes a great choice for running platforms.
I might be the first person to write a technical book because of peer pressure. Let me back up.
I’m fortunate to be surrounded by smart folks at Pivotal. Many of them write books. We usually buy copies of them to give out at conferences. After one of conferences in May, my colleague Nima pointed out that folks wanted a book about .NET. He then pushed all the right buttons to motivate me.
So, I signed a contract with O’Reilly Media in June, started writing in July, and released the book yesterday.
Modernizing .NET Applications is a 100-page book that for now, is free from Pivotal. At some point soon, O’Reilly will put it on Safari (and other channels). So what’s in this book, before you part with your hard-earned email address?
Chapter 1 looks at why app modernization actually matters. I define “modernization” and give you a handful of reasons why you should do it. Chapter 2 offers an audit of what .NET software you’re running today, and why you’re motivated to upgrade it. Chapter 3 takes a quick look at the types of software your stakeholders are asking you to create now. Chapter 4 defines “cloud-native” and explains why you should care. I also define some key characteristics of cloud-native software and what “good” looks like.
Chapter 5 helps you decide between using the .NET Framework or .NET Core for your applications. Then in Chapter 6, I lay out the new anti-patterns for .NET software and what things you have to un-learn. Chapter 7 calls out some of the new components that you’ll want to introduce to your modernized .NET apps. Chapter 8 helps you decide where you should run your .NET apps, with an assessment of all the various public/private software abstractions to choose from. Chapter 9 digs into five specific recipes you should follow to modernize your apps. These include event storming, externalized configuration, remote session stores, token-based security schemes, and apps on pipelines. Finally, Chapter 10 leaves you with some next steps.
I’ve had the pleasure/pain of writing books before, and have held off doing it again since our tech information consumption patterns have changed. But, it seems like there’s still a hunger for long-form content, and I’m passionate about .NET developers. So, I invested in a topic I care about, and hopefully wrote a book in a way that you find enjoyable to read.
Looking for a host suitable for .NET Framework apps? Windows Server virtual machines are almost your only option. The only public cloud PaaS product that offers a higher abstraction than virtual machines is Azure’s App Service. And that’s not really meant to run an entire enterprise portfolio. So … what to do? Don’t say “switch to .NET Core and run on all the Linux-based platforms” because that’s cheating. What can you do today? The best option you don’t know about is Pivotal Cloud Foundry (PCF). In this post, I’ll show you how to easily deploy and operate .NET apps in PCF on any infrastructure.
This is part five of a five part series. Hopefully you’ve enjoyed my exploration of workloads you might not expect to see on a cloud-native platform like PCF.
Part 5 – Deploying .NET Framework apps to Windows Server
About PAS for Windows
Quickly, I want to tell you about Pivotal Application Service (PAS) for Windows. Recall that PCF is really made up of two software abstractions atop a sophisticated infrastructure management platform (BOSH): Pivotal Application Service (for apps) and Pivotal Container Service (for raw containers). PAS for Windows extends PAS with managed Windows Server instances. As an operator, you can deploy, patch, upgrade, and operate Windows Server instances entirely through automation. For developers, you get a on-demand, scalable host that supports remote debugging and much more. I feel pretty safe saying that this is better than whatever you’re doing today for Windows workloads!
PAS for Windows extends PAS and uses all the same machinery
Deploying a WCF application to PCF
Let’s do this. First, I confirmed that I had a Windows “stack” available to me. In my PCF environment, I ran a cf stacks command.
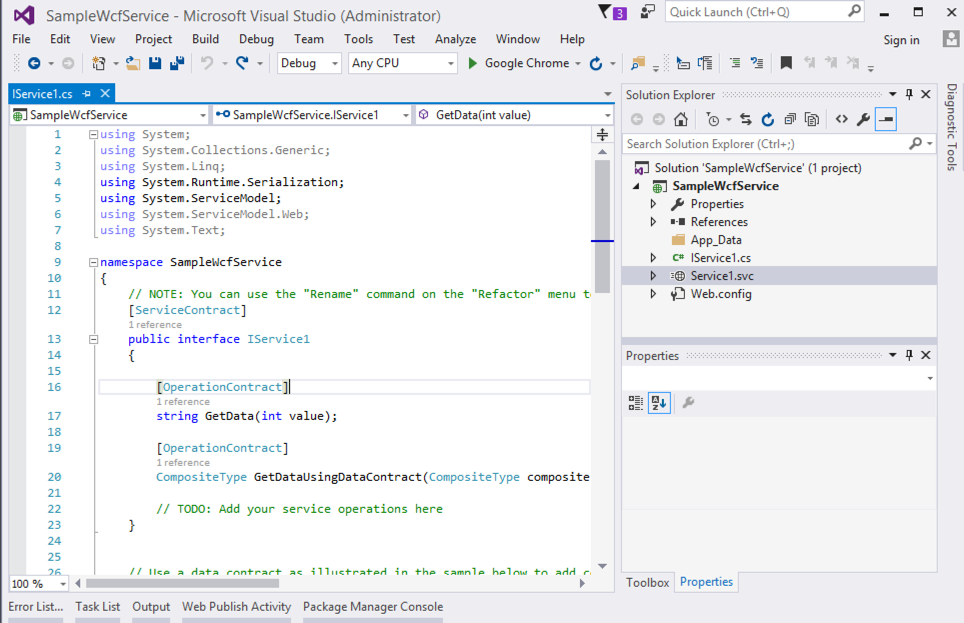
Yup, all good. I created a new Windows Communication Foundation (WCF) application targeting .NET Framework 4.0. All of your apps aren’t using the latest framework, so why should my sample? Note that you can run all types of classic .NET projects in PCF: ASP.NET Web Forms, MVC, Web API, WCF, console, and more.
My WCF service doesn’t need to change at all to run in PCF. To publish to PCF, I just need to provide a set of command line parameters, or, write a manifest with those parameters. My manifest looked like this:
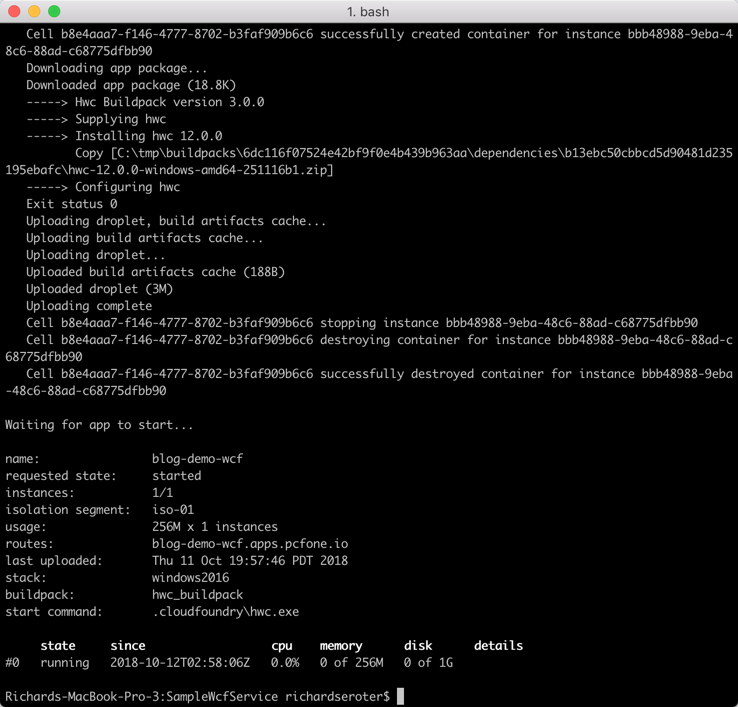
There’s a buildpack just for .NET apps on Windows and all I have to do is push the code itself. About fifteen seconds after typing cf push, my WCF service was packaged up and loaded into a Windows Server container.
Browsing the endpoint returned that familiar page of WCF service metadata.
Operating your .NET app on PCF
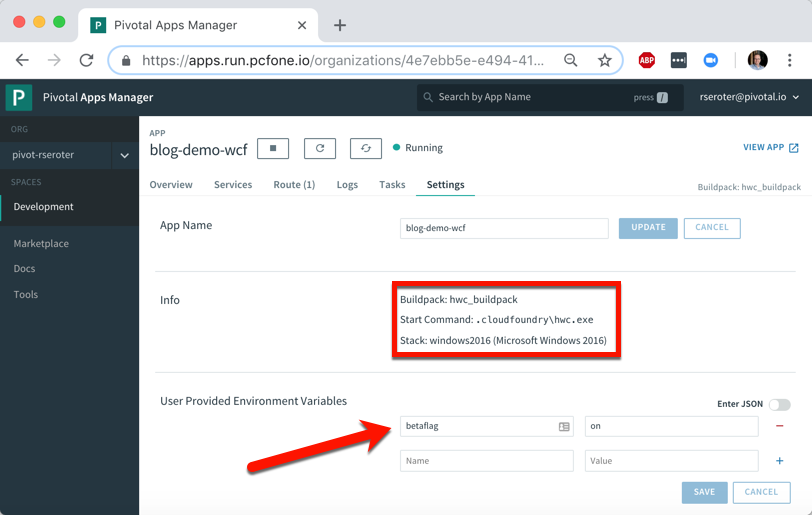
It’s one thing to deploy an app, it’s another thing to manage it. PCF makes that pretty easy. After deploying a .NET app, I see some helpful metadata. It shows me the stack, buildpack, and any environment variables visible to the app.
How long does it take you to get a new instance of your .NET app into production today? Weeks? Months? I just scaled up from one to three Windows container instances in less than ten seconds. I just love that.
Any app written in any language gets access to the same set of PCF functionality. Your .NET Framework apps get built-in log aggregation, metrics and monitoring, autoscaling, and more. All in a multi-tenant environment. And with straightforward access to anything in the marketplace through the Service Broker interface. Want your .NET Framework app to talk to Azure’s Cosmos DB or Google Cloud Spanner? Just use the broker.
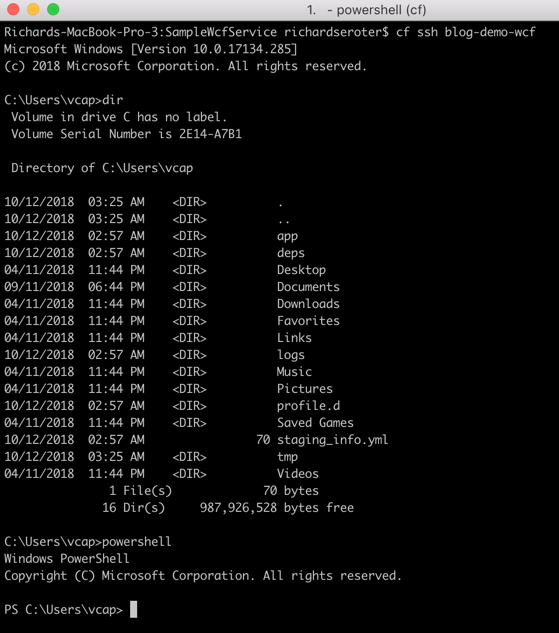
Oh, and don’t forget that because PAS for Windows uses legit Windows Server containers, each app instance gets its own copy of the file system, registry, and GAC. You can see this by SSH-ing into the container. Yes, I said you could SSH in. It’s just a cf ssh command.
That’s a full Windows file system, and I can even spin up Powershell in there. Crazy times.
Streaming is all the rage! No, not binge-watching Arrested Development on Netflix. Rather, I mean data stream processing: ingesting and handling infinite datasets. Instead of chewing through a nightly or weekly batch of records, you’re doing near real-time processing. Done correctly, this helps you improve data quality and make faster decisions. But how do you arrange the sequence of steps to process that data? Data pipelines! In this post, I’ll show you that this is yet another unexpected workload that runs pretty darn well on Pivotal Cloud Foundry (PCF).
So far in this series, we’ve looked at other workloads ranging from Docker images to batch jobs.
Let’s build a pipeline that processes a stream of shipment data that flows out of a relational database, gets enriched with additional info, and finally gets written to a log.
Spinning up Spring Cloud Data Flow on PCF
You could do streaming a few ways in PCF. You could manually deploy a PCF-managed instance of RabbitMQ, Solace PubSub+, or Apache Kafka. Or connect to a cloud-based broker like Azure Service Bus or Google Pub/Sub through a Service Broker. Any of those options give you a messaging backbone, but a data pipeline often involves a sequence of orchestrated steps. One turnkey solution that combines lightweight messaging with smart orchestration is Spring Cloud Data Flow (SCDF).
While it’s not that challenging to install SCDF yourself, PCF bundles it all up into a single package. All it takes is deploying the “Data Flow Server” from the PCF marketplace.
After BOSH built and deployed the Spring Cloud Data Flow server and dependent services (database, Redis cache, RabbitMQ instance), I also provisioned an instance of PostgreSQL from Crunchy Data. This is the source to my data stream.
That was easy. From this screen on PCF Apps Manager, I could click through and log into the SCDF dashboard. From here, I loaded all the Spring Cloud Stream App Starters. These are “just” Spring Boot apps, but we can use these to build data streams. We can build our own apps to, but it’s great to pre-load these starters. Note that everything I’m doing with this dashboard you can also do with a CLI.
With that, I had everything I needed to build out my data pipeline.
Building and deploying a data pipeline
Before building my pipeline, I wanted to prep my PostgreSQL database. To do this, I built a simple ASP.NET Core app that created a data table and added records. I deployed this to PCF, bound it to the Crunchy Data instance, and now had a way to instantiate my relational database and add rows.
I wanted to enrich data as part of my data pipeline. When a “shipment” record comes out of PostgreSQL, it has an identifier for which warehouse it came from. I wanted to use that ID to look up the US state associated with the warehouse. I could try and use an out-of-the-box App Starter to do it, or just build my own. I chose the latter. What’s wicked is these are just Spring Cloud Stream apps. I created a new app from start.spring.io, created a POJO that represents a “warehouse shipment”, added an annotation and a method, and assembled the jar file. No other configurations needed!
@EnableBinding(Processor.class)
@SpringBootApplication
public class DemoPipelineEnricherApplication {

  public static void main(String[] args) {
     SpringApplication.run(DemoPipelineEnricherApplication.class,
  args);
  }

  @StreamListener(Processor.INPUT)
  @SendTo(Processor.OUTPUT)
  public shipment EnrichShipment(shipment s) {
    switch(s.warehouse_id) {
    case 400:
        s.warehouse_location="CA";
        break;
    case 401:
        s.warehouse_location="WA";
        break;
    case 402:
        s.warehouse_location="TX";
        break;
    case 403:
        s.warehouse_location="FL";
        break;
    }
    return s;
  }
}
To make this app available to my new data pipeline, I needed to register it with the SCDF server. That means the jar file needed to be visible to the server. I uploaded the jar file to GitHub (better choices include the Maven repo, or another legit artifact repository) and registered it:
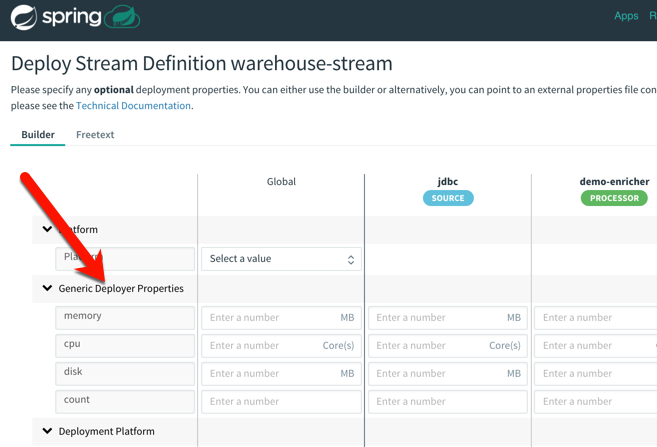
It’s pipeline time! I designed a pipeline that started with a JDBC source, sent the individual rows to my “enricher” app, and then routed the results to the application log. For fun, I also tapped that result stream to count how many messages came in for each US state.
The pipeline definition is something you can add to source control and version like any other deployment artifact. My pipeline looks like:
warehouse-stream=jdbc
--spring.datasource.username='[username]'
--spring.datasource.url='jdbc:postgresql://[url]:5432/shipments'
--jdbc.max-rows-per-poll=5 --jdbc.query='SELECT * FROM WarehouseShipments WHERE
is_read=FALSE' --jdbc.update='UPDATE WarehouseShipments SET is_read=TRUE WHERE
is_read=FALSE;' --spring.datasource.password='[password]' |
demo-enricher | log
What’s cool is that after creating the stream, I had all sorts of deployment options for each app in the pipeline. That means that each app could have its own instance count and resource allocation. Much better than coarsely scaling the whole pipeline when just one component needs to scale!
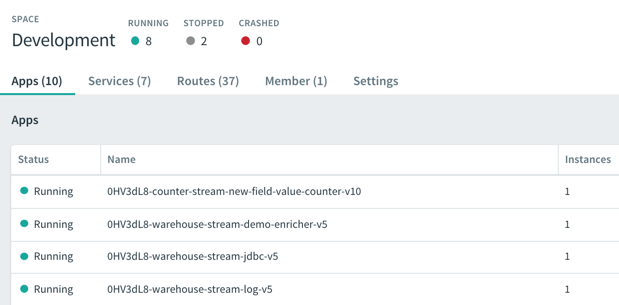
After deploying the streams, I saw the underlying Spring Boot apps deployed to my PCF environment. SCDF is pretty sophisticated but still an easy-to-use platform!
I continually added records to my PostgreSQL database, and saw them immediately stream through SCDF on PCF. Each individual message got enriched with additional details before printing out to the log.
In this post, we saw that data pipelines have a natural home in PCF. Spring Cloud Data Flow is an ideal replacement for heavyweight ESB products in certain scenarios, and a replacement for ETL in others. Give it a try on PCF, Kubernetes, or other runtimes.
So far in this series of posts, we’ve seen that Pivotal Cloud Foundry (PCF) runs a lot more than just web applications. Not every app has a user-facing front-end component. Some of your systems run in the background or on a schedule and perform a variety of important tasks. In this post, I’ll take a look at how to deploy background workers, on-demand batch tasks, and scheduled jobs.
Pivotal Cloud Foundry makes it easy to run workers that don’t have a routable address. These background jobs might listen to a database and respond to data changes, or respond to messages in a work queue. Let’s demonstrate the latter.
I built a .NET Core console app that’s responsible for pulling “loan” records from RabbitMQ and processing them. You can built these background jobs is any programming language supported by Cloud Foundry.
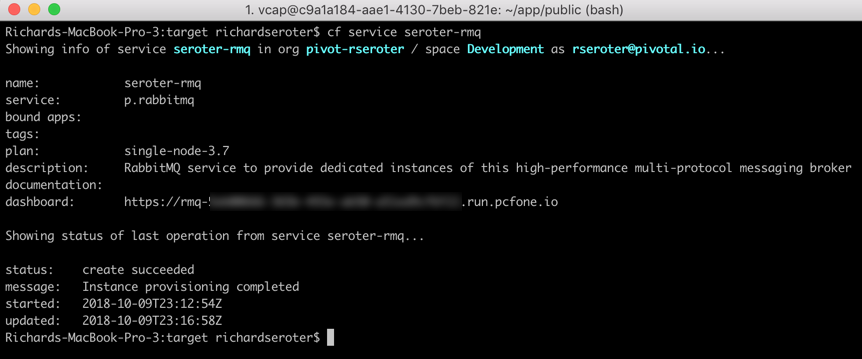
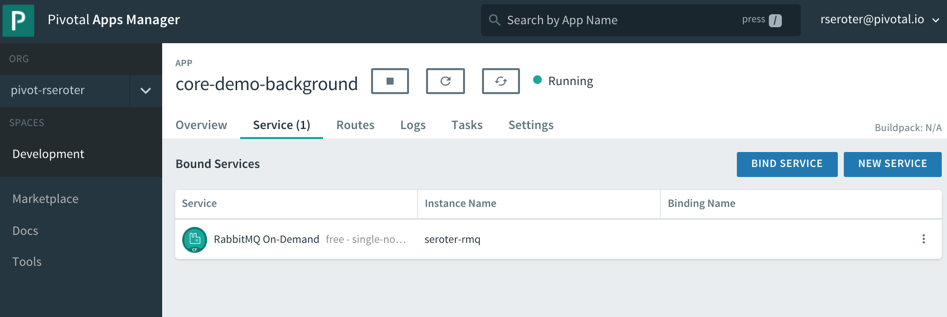
What’s nice is that background jobs have access to all the useful PCF capabilities that web apps do. One such capability? Service Brokers! Devs love using Service Brokers to provision and access backing services. My background job needs access to RabbitMQ and I don’t want to hard-code any connection details. No big deal. I first spun up an on-demand RabbitMQ instance via the PCF Service Broker.
static void Main(string[] args){
   //pull service broker configuration
   var builder = new ConfigurationBuilder()
   .AddEnvironmentVariables()
   .AddCloudFoundry();

   var configuration = builder.Build();
   //get our fully loaded service
   var services = new ServiceCollection();
   services.AddRabbitMQConnection(configuration);
   var provider = services.BuildServiceProvider();
   ConnectionFactory f = provider.GetService<ConnectionFactory>();

   //connect to RMQ
   using (var connection = f.CreateConnection())
   using (var channel = connection.CreateModel())
   {
       channel.QueueDeclare(queue: "loans", durable: true, exclusive: false, autoDelete: false, arguments: null);
       var consumer = new EventingBasicConsumer(channel);

       //fire up when a new message comes in
       consumer.Received += (model, ea) => {
          var body = ea.Body;
          var message = Encoding.UTF8.GetString(body);
          Console.WriteLine("[x] Received loan data: {0}", message);
       };
       channel.BasicConsume(queue: "loans", autoAck: true, consumer: consumer);
       Console.ReadLine();
   }
}
Apps deployed to Cloud Foundry are typically accompanied by a YAML manifest. You can provide the parameters on the CLI, but versioned, source-controlled manifests are a better way to go. For these background jobs, the manifests are simple. Note two key things: the no-route parameter is “true” so that we don’t get a route assigned, and the health-check-type is set to “process” so that the orchestrator monitors process availability and doesn’t try to ping a non-existent web endpoint. Also notice that I bound my app to the previously-created RabbitMQ service instance.
After a quick cf push, my background app was running, and bound to the RabbitMQ instance.
This job quietly sits and waits for work to do. What’s neat is this can also take advantage of PCF’s autoscale capability, and scale by monitoring RabbitMQ queue depth, for example. For now, one instance is plenty. I logged into RabbitMQ and sent in a couple sample “loan” messages.
Sure enough, when I viewed the aggregated application logs for my background job, I saw the content of each read message printed out.
These sorts of workers are a useful part of most systems, and PCF offers a resilient, manageable place to run them.
Deploying and running on-demand batch tasks
How many useful, random scripts do your system administrators have sitting around? You know, the ones that create users, reset demo environments, or purge FTP shares. Instead of having those scripts buried on administrator desktops, you can run these one-off batch jobs in PCF.
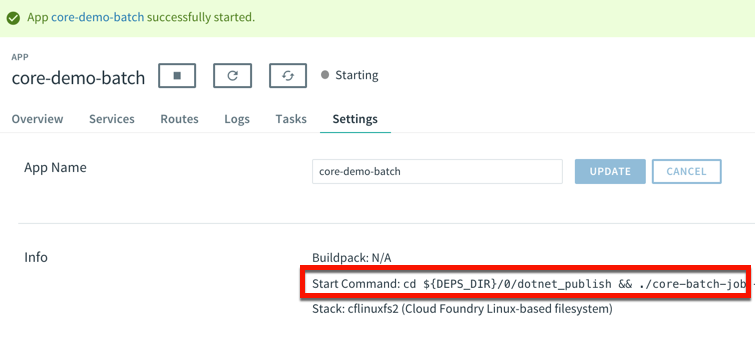
I created another .NET Core console application. This one pretends to sweep expired files from a shared folder. I deployed this application to PCF with a –no-start command since I want to trigger it on demand.
cf push --no-start
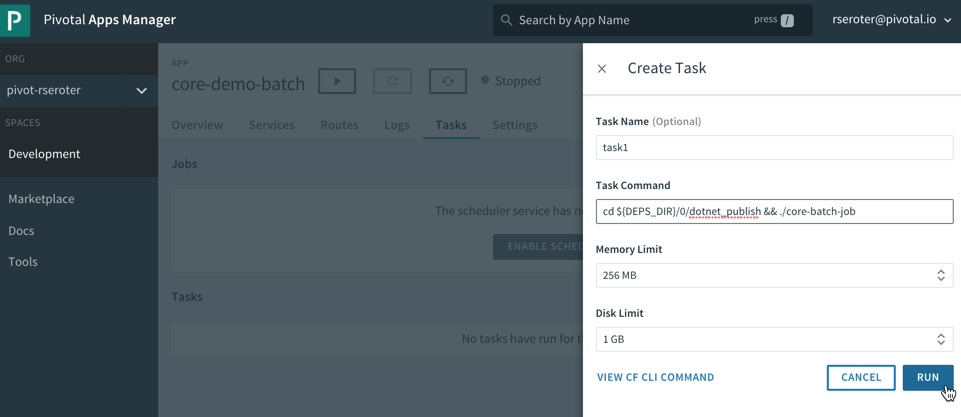
Now, to trigger the job, I need to know the start command. This depends on how you deployed it. Since I used the .NET Core buildpack, I want to start up the app one time to discover how PCF starts up the app.
That command showed me where the .NET Core executable lives in the container. I stopped the app again, and switched over the “Tasks” view in the PCF Apps Manager interface. I can do all these things via the CLI as well, but I’m a sucker for a nice UX. There’s a “run task” button that lets me define a one-off task definition.
Here I gave the task a name, pasted the start command I found above, and that was it! When I hit, “run”, PCF instantiated a new container instance and shut down the container when the task was complete. And that’s what I saw. There was a log entry indicating a successful job run, and the application logs showed the output of the task. Nice!
This is a great option for one-off jobs and scripts. Consolidate them in PCF, and get all the availability and auditing you need.
Deploying and running scheduled jobs
Finally, some of those one-off jobs may not be as one-off as you thought! Instead of asking your admin to trigger a task once a day to purge expired files, how about you schedule the job to run on a schedule?
PCF also offers a scheduling component to trigger tasks (or API calls!) on a recurring basis. On the same “tasks” tab of the PCF Apps Manager UX, there’s a “jobs” section for scheduled tasks. Besides giving the job a name and a command (the same as the task command above), you enter a Cron expression for the schedule itself. The expression is in a MIN HOUR DAY-OF-MONTH MONTH DAY-OF-WEEK format. For example “15 * ? * * *” means you should run the job every 15 minutes, and “30 10 * * 5” means you should run the job at 10:30am every Friday. My job below is set to run every minute.
We’re all building lots of web apps nowadays, but you have lots of need for event-driven or scheduled background work. PCF may surprise you as an entirely suitable platform for those workloads.