You’ve got a lot of options when connecting microservices together. You could use service discovery and make direct calls. Or you might use a shared database to transfer work. But message brokers continue to be a popular choice. These range from single purpose engines like Amazon SQS or RabbitMQ, to event stream processors like Azure Event Hubs or Apache Kafka, all the way to sophisticated service buses like Microsoft BizTalk Server. When developers choose any one of those, they need critical knowledge to be use them effectively. How can you shrink the time to value and help developers be productive, faster? For Java developers, Spring Cloud Stream offers a valuable abstraction.
Spring Cloud Stream offers an interface for developers that requires no knowledge of the underlying broker. That broker, either Apache Kafka or RabbitMQ, gets configured by Spring Cloud Stream. Communication to and from the broker is also done via the Stream library.
What’s exciting to me is that all brokers are treated the same. Spring Cloud Stream normalizes behavior, even if it’s not native to the broker. For example, want a competing consumer model for your clients, or partitioned processing? Those concepts behave differently in RabbitMQ and Kafka. No problem. Spring Cloud Stream makes it work the same, transparently. Let’s actually try both of those scenarios.
Competing consumers through “consumer groups”
By default, Spring Cloud Stream sets up everything as a publish-subscribe relationship. This makes it easy to share data among many different subscribers. But what if you want multiple instances of one subscriber (for scale out processing)? One solution is consumer groups. These don’t behave the same in both messaging brokers. Spring Cloud Stream don’t care! Let’s build an example app using RabbitMQ.
Before writing code, we need an instance of RabbitMQ running. The most dead-simple option? A Docker container for it. If you’ve got Docker installed, the only thing you need to do is run the following command:
-docker run -d –hostname local-rabbit –name demo-rmq -p 15672:15672 -p 5672:5672 rabbitmq:3.6.11-management

After running that, I have a local cache of the image, and a running container with port mapping that makes the container accessible from my host.
How do we get messages into RabbitMQ? Spring Cloud Stream supports a handful of patterns. We could publish on a schedule, or on-demand. Here, let’s build a web app that publishes to the bus when the user issues a POST command to a REST endpoint.
Publisher app
First, build a Spring Boot application that leverages spring-cloud-starter-stream-rabbit (and spring-boot-starter-web). This brings in everything I need to use Spring Cloud Stream, and RabbitMQ as a destination.

Add a new class that acts as our REST controller. A simple @EnableBinding annotation lights this app up as a Spring Cloud Stream project. Here, I’m using the built-in “Source” interface that defines a single communication channel, but you can also build your own.
@EnableBinding(Source.class)
@RestController
public class BriefController {
In this controller class, add an @Autowired variable that references the bean that Spring Cloud Stream adds for the Source interface. We can then use this variable to directly publish to the bound channel! Same code whether talking to RabbitMQ or Kafka. Simple stuff.
@EnableBinding(Source.class)
@RestController
public class BriefController {
  //refer to instance of bean that Stream adds to container
  @Autowired
  Source mysource;

  //take in a message via HTTP, publish to broker
  @RequestMapping(path="/brief", method=RequestMethod.POST)
  public String publishMessage(@RequestBody String payload) {

    System.out.println(payload);

    //send message to channel
    mysource.output().send(MessageBuilder.withPayload(payload).build());

    return "success";
  }
Our publisher app is done, so all that’s left is some basic configuration. This configuration tells Spring Cloud Stream how to connect to the right broker. Note that we don’t have to tell Spring Cloud Stream to use RabbitMQ; it happens automatically by having that dependency in our classpath. No, all we need is connection info to our broker, an explicit reference to a destination (without it, the RabbitMQ exchange would be called “output”), and a command to send JSON.
server.port=8080

#rabbitmq settings for Spring Cloud Stream to use
spring.rabbitmq.host=127.0.0.1
spring.rabbitmq.port=5672
spring.rabbitmq.username=guest
spring.rabbitmq.password=guest

spring.cloud.stream.bindings.output.destination=legalbriefs
spring.cloud.stream.default.contentType=application/json
Consumer app
This part’s almost too easy. Here, build a new Spring Boot application and only choose the spring-cloud-starter-stream-rabbit dependency.
In the default class, decorate it with @EnableBinding and use the built-in Sink interface. Then, all that’s left is to create a method to process any messages found in the broker. To do that, we decorate the operation with @StreamListener, and all the content type handling is done for us. Wicked.
@EnableBinding(Sink.class)
@SpringBootApplication
public class BlogStreamSubscriberDemoApplication {

  public static void main(String[] args) {
    SpringApplication.run(BlogStreamSubscriberDemoApplication.class, args);
  }

  @StreamListener(target=Sink.INPUT)
  public void logfast(String msg) {
    System.out.println(msg);
  }
}
The configuration for this app is straightforward. Like above, we have connection details for RabbitMQ. Also, note that the binding now references “input”, which was the name of the channel in the default “Sink” interface. Finally, observe that I used the SAME destination as the source, to ensure that Spring Cloud Stream wires up my publisher and subscriber successfully. For kicks, I didn’t yet add the consumer group settings.
server.port=0

#rabbitmq settings for Spring Cloud Stream to use
spring.rabbitmq.host=127.0.0.1
spring.rabbitmq.port=5672
spring.rabbitmq.username=guest
spring.rabbitmq.password=guest

spring.cloud.stream.bindings.input.destination=legalbriefs
Test the solution
Let’s see how this works. First, start up three instances of the subscriber app. I generated a jar file, and started up three instances in the shell.

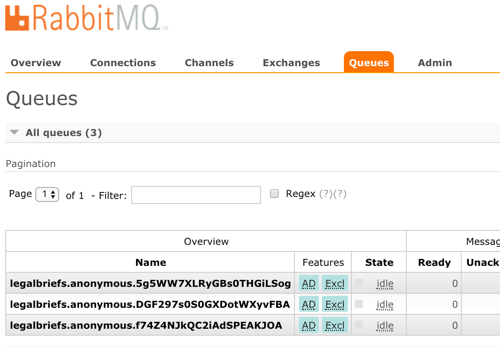
When you start up these apps, Spring Cloud Stream goes to work. Log into the RabbitMQ admin console, and notice that one exchange got generated. This one, named “legalbriefs”, maps to the name we put in our configuration file.

We also have three queues that map to each of the three app instances we started up.

Nice! Finally, start up the publisher, and post a message to the /briefs endpoint.

What happens? As expected, each subscriber gets a copy of the message, because by default, everything happens in a pub/sub fashion.

Add consumer group configuration
We don’t want each instance to get a copy. Rather, we want these instances to share the processing load. Only one should get each message. In the subscriber app, we add a single line to our configuration file. This tells Spring Cloud Stream that all the instances form a single consumer group that share work.
#adds consumer group processing
spring.cloud.stream.bindings.input.group=briefProcessingGroup
After regenerating the subscriber jar file, and starting up each file, we see a different setup in RabbitMQ. What you see is a single, named queue, but three “consumers” of the queue.

Send in two different messages, and see that each is only processed by a single subscriber instance. This is a simple way to use a message broker to scale out processing.

Doing stateful processing using partitioning
Partitioning feels like a related, but different scenario than consumer groups. Partitions in Kafka introduce a level of parallel processing by writing data to different partitions. Then, each subscriber pulls from a given partition to do work. Here in Spring Cloud Stream, partitioning is useful for parallel processing, but also for stateful processing. When setting it up, you specify a characteristic that steers messages to a given partition. Then, a single app instance processes all the data in that partition. This can be handy for event processing or any scenario where it’s useful for related messages to get processed by the same instance. Think counters, complex event processing, or time-sensitive calculations.
Unlike with consumer groups. partitioning requires configuration changes to both publishers AND subscribers. On the publisher side, all that’s needed is (a) the number of partitions, and (b) the expression that describes how data is partitioned. That’s it. No code changes.
#adding configuration for partition processing
spring.cloud.stream.bindings.output.producer.partitionKeyExpression=payload.attorney
spring.cloud.stream.bindings.output.producer.partitionCount=3
On the subscriber side, you set the number of partitions, and set the “partitioned” property equal to “true.” What’s also interesting, but logical, is that as each subscriber starts, you need to give it an “index” so that Spring Cloud Streams knows which partition it should read from.
#add partition processing
spring.cloud.stream.bindings.input.consumer.partitioned=true
#spring.cloud.stream.instanceIndex=0
spring.cloud.stream.instanceCount=3
Let’s start everything up again. The publisher starts up the same as before. Now though, each subscriber instance starts up with a “”spring.cloud.stream.instanceIndex=X” flag that specifies which index applies.

In RabbitMQ, the setup is different than before. Now, we have three queues, each with a different “routing key” that corresponds to its partition.

Send in a message, and notice that all messages with the same attorney name go to one instance. Change the case number, and see that all messages still go to the same place. Switch the attorney ID, and observe that a different partition (likely) gets it. If you have more data varieties than you do partitions, you’ll see a partition handle more than one set of data. No problem, just know that happens.

Summary
It shouldn’t have to be hard to deal with message brokers. Of course there are plenty of scenarios where you want to flex the advanced options of a broker, but there are also many cases where you just want a reliable intermediary. In those cases, Spring Cloud Stream makes it super easy to abstract away knowledge of the broker, while still normalizing behavior across the unique engines.
In my latest Pluralsight course, I spent over an hour digging into Spring Cloud Stream, and another ninety minutes working with Spring Cloud Data Flow. That project helps you quickly string together Stream applications. Check it out for a deeper dive!

Leave a comment