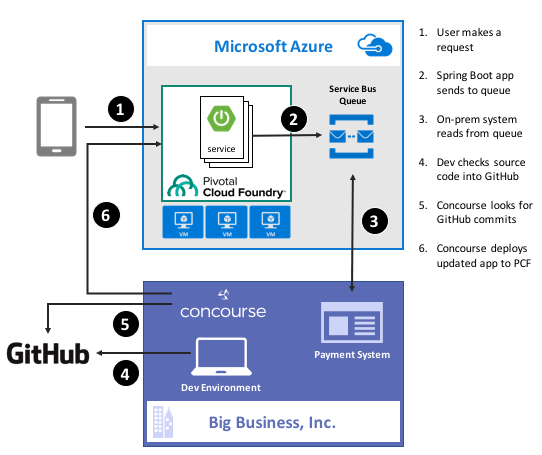
Guess what? Deep down, cloud providers know you’re not moving your whole tech portfolio to their public cloud any time soon. Oh, your transition is probably underway, but you’ve got a whole stash of apps, data stores, and services that may not move for a while. That’s cool. There are more and more patterns and services available to squeeze value out of existing apps by extending them with more modern, scalable, cloudy tech. For instance, how might you take an existing payment transfer system that did B2B transactions and open it up to consumers without requiring your team to do a complete rewrite? One option might be to add a load-leveling queue in front of it, and take in requests via a scalable, cloud-based front-end app. In this post, I’ll show you how to implement that pattern by writing a Spring Boot app that uses Azure Service Bus Queues. Then, I’ll build a Concourse deployment pipeline to ship the app to Pivotal Cloud Foundry running atop Microsoft Azure.

Ok, but why use a platform on top of Azure?
That’s a fair question. Why not just use native Azure (or AWS, or Google Cloud Platform) services instead of putting a platform overlay like Pivotal Cloud Foundry atop it? Two reasons: app-centric workflow for developers, and “day 2” operations at scale.
Most every cloud platform started off by automating infrastructure. That’s their view of the world, and it still seeps into most of their cloud app services. There’s no fundamental problem with that, except that many developers (“full stack” or otherwise) aren’t infrastructure pros. They want to build and ship great apps for customers. Everything else is a distraction. A platform such as Pivotal Cloud Foundry is entirely application-focused. Instead of the developer finding an app host, packaging the app, deploying the app, setting up a load balancer, configuring DNS, hooking up log collection, and configuring monitoring, the Cloud Foundry dev just cranks out an app and does a single action to get everything correctly configured in the cloud. And it’s an identical experience whether Pivotal Cloud Foundry is deployed to Azure, AWS, OpenStack, or whatever. The smartest companies realized that their developers should be exceptional at writing customer-facing software, not configuring firewall rules and container orchestration.
Secondly, it’s about “day 2” operations. You know, all the stuff that happens to actually maintain apps in production. I have no doubt that any of you can build an app and quickly get it to cloud platforms like Azure Web Sites or Heroku with zero trouble. But what about when there are a dozen apps, or thousands? How about when it’s not just you, but a hundred of your fellow devs? Most existing app-centric platforms just aren’t set up to be org-wide, and you end up with costly inconsistencies between teams. With something like Pivotal Cloud Foundry, you have a resilient, distributed system that supports every major programing language, and provides a set of consistent patterns for app deployment, logging, scaling, monitoring, and more. Some of the biggest companies in the world deploy thousands of apps to their respective environments today, and we just proved that the platform can handle 250,000 containers with no problem. It’s about operations at scale.
With that out of the way, let’s see what I built.
Step 1 – Prerequisites
Before building my app, I had to set up a few things.
- Azure account. This is kind of important for a demo of things running on Azure. Microsoft provides a free trial, so take it for a spin if you haven’t already. I’ve had my account for quite a while, so all my things for this demo hang out there.
- GitHub account. The Concourse continuous integration software knows how to talk to a few things, and git is one of them. So, I stored my app code in GitHub and had Concourse monitoring it for changes.
- Amazon account. I know, I know, an Azure demo shouldn’t use AWS. But, Amazon S3 is a ubiquitous object store, and Concourse made it easy to drop my binaries there after running my continuous integration process.
- Pivotal Cloud Foundry (PCF). You can find this in the Azure marketplace, and technically, this demo works with PCF running anywhere. I’ve got a full PCF on Azure environment available, and used that here.
- Azure Service Broker. One fundamental concept in Cloud Foundry is a “service broker.” Service brokers advertise a catalog of services to app developers, and provide a consistent way to provision and de-provision the service. They also “bind” services to an app, which puts things like service credentials into that app’s environment variables for easy access. Microsoft built a service broker for Azure, and it works for DocumentDB, Azure Storage, Redis Cache, SQL Database, and the Service Bus. I installed this into my PCF-on-Azure environment, but you can technically run it on any PCF installation.
Step 2 – Build Spring Boot App
In my fictitious example, I wanted a Java front-end app that mobile clients interact with. That microservice drops messages into an Azure Service Bus Queue so that the existing on-premises app can pull messages from at their convenience, and thus avoid getting swamped by all this new internet traffic.
Why Java? Java continues to be very popular in enterprises, and Spring Boot along with Spring Cloud (both maintained by Pivotal) have completely modernized the Java experience. Microsoft believes that PCF helps companies get a first-class Java experience on Azure.
I used Spring Tool Suite to build a new Spring Boot MVC app with “web” and “thymeleaf” dependencies. Note that you can find all my code in GitHub if you’d like to reproduce this.
To start with, I created a model class for the web app. This “web payment” class represents the data I connected from the user and passed on to the Service Bus Queue.
package seroter.demo;

public class WebPayment {
	private String fromAccount;
	private String toAccount;
	private long transferAmount;

	public String getFromAccount() {
		return fromAccount;
	}

	public void setFromAccount(String fromAccount) {
		this.fromAccount = fromAccount;
	}

	public String getToAccount() {
		return toAccount;
	}

	public void setToAccount(String toAccount) {
		this.toAccount = toAccount;
	}

	public long getTransferAmount() {
		return transferAmount;
	}

	public void setTransferAmount(long transferAmount) {
		this.transferAmount = transferAmount;
	}
}
Next up, I built a bean that my web controller used to talk to the Azure Service Bus. Microsoft has an official Java SDK in the Maven repository, so I added this to my project.

Within this object, I referred to the VCAP_SERVICES environment variable that I would soon get by binding my app to the Azure service. I used that environment variable to yank out the credentials for the Service Bus namespace, and then created the queue if it didn’t exist already.
@Configuration
public class SbConfig {

 @Bean
 ServiceBusContract serviceBusContract() {

   //grab env variable that comes from binding CF app to the Azure service
   String vcap = System.getenv("VCAP_SERVICES");

   //parse the JSON in the environment variable
   JsonParser jsonParser = JsonParserFactory.getJsonParser();
   Map<String, Object> jsonMap = jsonParser.parseMap(vcap);

   //create map of values for service bus creds
   Map<String,Object> creds = (Map<String,Object>)((List<Map<String, Object>>)jsonMap.get("seroter-azureservicebus")).get(0).get("credentials");

   //create service bus config object
   com.microsoft.windowsazure.Configuration config =
	ServiceBusConfiguration.configureWithSASAuthentication(
		creds.get("namespace_name").toString(),
		creds.get("shared_access_key_name").toString(),
		creds.get("shared_access_key_value").toString(),
		".servicebus.windows.net");

   //create object used for interacting with service bus
   ServiceBusContract svc = ServiceBusService.create(config);
   System.out.println("created service bus contract ...");

   //check if queue exists
   try {
	ListQueuesResult r = svc.listQueues();
	List<QueueInfo> qi = r.getItems();
	boolean hasQueue = false;

	for (QueueInfo queueInfo : qi) {
          System.out.println("queue is " + queueInfo.getPath());

	  //queue exist already?
	  if(queueInfo.getPath().equals("demoqueue"))  {
		System.out.println("Queue already exists");
		hasQueue = true;
		break;
	   }
	 }

	if(!hasQueue) {
	//create queue because we didn't find it
	  try {
	    QueueInfo q = new QueueInfo("demoqueue");
            CreateQueueResult result = svc.createQueue(q);
	    System.out.println("queue created");
	  }
	  catch(ServiceException createException) {
	    System.out.println("Error: " + createException.getMessage());
	  }
        }
    }
    catch (ServiceException findException) {
       System.out.println("Error: " + findException.getMessage());
     }
    return svc;
   }
}
Cool. Now I could connect to the Service Bus. All that was left was my actual web controller that returned views, and sent messages to the Service Bus. One of my operations returned the data collection view, and the other handled form submissions and sent messages to the queue via the @autowired ServiceBusContract object.
@SpringBootApplication
@Controller
public class SpringbootAzureConcourseApplication {

   public static void main(String[] args) {
     SpringApplication.run(SpringbootAzureConcourseApplication.class, args);
   }

   //pull in autowired bean with service bus connection
   @Autowired
   ServiceBusContract serviceBusContract;

   @GetMapping("/")
   public String showPaymentForm(Model m) {

      //add webpayment object to view
      m.addAttribute("webpayment", new WebPayment());

      //return view name
      return "webpayment";
   }

   @PostMapping("/")
   public String paymentSubmit(@ModelAttribute WebPayment webpayment) {

      try {
         //convert webpayment object to JSON to send to queue
	 ObjectMapper om = new ObjectMapper();
	 String jsonPayload = om.writeValueAsString(webpayment);

	 //create brokered message wrapper used by service bus
	 BrokeredMessage m = new BrokeredMessage(jsonPayload);
	 //send to queue
	 serviceBusContract.sendMessage("demoqueue", m);
	 System.out.println("message sent");

      }
      catch (ServiceException e) {
	 System.out.println("error sending to queue - " + e.getMessage());
      }
      catch (JsonProcessingException e) {
	 System.out.println("error converting payload - " + e.getMessage());
      }

      return "paymentconfirm";
   }
}
With that, my microservice was done. Spring Boot makes it silly easy to crank out apps, and the Azure SDK was pretty straightforward to use.
Step 3 – Deploy and Test App
Developers use the “cf” command line interface to interact with Cloud Foundry environments. Running a “cf marketplace” command shows all the services advertised by registered service brokers. Since I added the Azure Service Broker to my environment, I instantiated an instance of the Service Bus service to my Cloud Foundry org. To tell the Azure Service Broker what to actually create, I built a simple JSON document that outlined the Azure resource group. region, and service.
{
  "resource_group_name": "pivotaldemorg",
  "namespace_name": "seroter-boot",
  "location": "westus",
  "type": "Messaging",
  "messaging_tier": "Standard"
}
By using the Azure Service Broker, I didn’t have to go into the Azure Portal for any reason. I could automate the entire lifecycle of a native Azure service. The command below created a new Service Bus namespace, and made the credentials available to any app that binds to it.
cf create-service seroter-azureservicebus default seroterservicebus -c sb.json
After running this, my PCF environment had a service instance (seroterservicebus) ready to be bound to an app. I also confirmed that the Azure Portal showed a new namespace, and no queues (yet).

Awesome. Next, I added a “manifest” that described my Cloud Foundry app. This manifest specified the app name, how many instances (containers) to spin up, where to get the binary (jar) to deploy, and which service instance (seroterservicebus) to bind to.
---
applications:
- name: seroter-boot-azure
  memory: 256M
  instances: 2
  path: target/springboot-azure-concourse-0.0.1-SNAPSHOT.jar
  buildpack: https://github.com/cloudfoundry/java-buildpack.git
  services:
    - seroterservicebus
By doing a “cf push” to my PCF-on-Azure environment, the platform took care of all the app packaging, container creation, firewall updates, DNS changes, log setup, and more. After a few seconds, I had a highly-available front end app bound to the Service Bus. Below that you can see I had an app started with two instances, and the service was bound to my new app.

All that was left was to test it. I fired up the app’s default view, and filled in a few values to initiate a money transfer.

After submitting, I saw that there was a new message in my queue. I built another Spring Boot app (to simulate an extension of my legacy “payments” system) that pulled from the queue. This app ran on my desktop and logged the message from the Azure Service Bus.

That’s great. I added a mature, highly-available queue in between my cloud-native Java web app, and my existing line-of-business system. With this pattern, I could accept all kinds of new traffic without overloading the backend system.
Step 4 – Build Concourse Pipeline
We’re not done yet! I promised continuous delivery, and I deliver on my promises, dammit.
To build my deployment process, I used Concourse, a pipeline-oriented continuous integration and delivery tool that’s easy to use and amazingly portable. Instead of wizard-based tools that use fixed environments, Concourse uses pipelines defined in configuration files and executed in ephemeral containers. No conflicts with previous builds, no snowflake servers that are hard to recreate. And, it has a great UI that makes it obvious when there are build issues.
I downloaded a Vagrant virtual machine image with Concourse pre-configured. Then I downloaded the lightweight command line interface (called Fly) for interacting with pipelines.
My “build and deploy” process consisted of four files: bootpipeline.yml that contained the core pipeline, build.yml which set up the Java build process, build.sh which actually performs the build, and secure.yml which holds my credentials (and isn’t checked into GitHub).
The build.sh file clones my GitHub repo (defined as a resource in the main pipeline) and does a maven install.
#!/usr/bin/env bash

set -e -x

git clone resource-seroter-repo resource-app

cd resource-app

mvn clean

mvn install
The build.yml file showed that I’m using the Maven Docker image to build my code, and points to the build.sh file to actually build the app.
---
platform: linux

image_resource:
  type: docker-image
  source:
    repository: maven
    tag: latest

inputs:
  - name: resource-seroter-repo

outputs:
  - name: resource-app

run:
  path: resource-seroter-repo/ci/build.sh
Finally, let’s look at my build pipeline. Here, I defined a handful of “resources” that my pipeline interacts with. I’ve got my GitHub repo, an Amazon S3 bucket to store the JAR file, and my PCF-on-Azure environment. Then, I have two jobs: one that builds my code and puts the result into S3, and another that takes the JAR from S3 (and manifest from GitHub) and pushes to PCF on Azure.
---
resources:
# resource for my GitHub repo
- name: resource-seroter-repo
  type: git
  source:
    uri: https://github.com/rseroter/springboot-azure-concourse.git
    branch: master
#resource for my S3 bucket to store the binary
- name: resource-s3
  type: s3
  source:
    bucket: spring-demo
    region_name: us-west-2
    regexp: springboot-azure-concourse-(.*).jar
    access_key_id: {{s3-key-id}}
    secret_access_key: {{s3-access-key}}
# resource for my Cloud Foundry target
- name: resource-azure
  type: cf
  source:
    api: {{cf-api}}
    username: {{cf-username}}
    password: {{cf-password}}
    organization: {{cf-org}}
    space: {{cf-space}}

jobs:
- name: build-binary
  plan:
    - get: resource-seroter-repo
      trigger: true
    - task: build-task
      privileged: true
      file: resource-seroter-repo/ci/build.yml
    - put: resource-s3
      params:
        file: resource-app/target/springboot-azure-concourse-0.0.1-SNAPSHOT.jar

- name: deploy-to-prod
  plan:
    - get: resource-s3
      trigger: true
      passed: [build-binary]
    - get: resource-seroter-repo
    - put: resource-azure
      params:
        manifest: resource-seroter-repo/manifest-ci.yml
I was now ready to deploy my pipeline and see the magic.
After spinning up the Concourse Vagrant box, I hit the default URL and saw that I didn’t have any pipelines. NOT SURPRISING.

From my Terminal, I used Fly CLI commands to deploy a pipeline. Note that I referred again to the “secure.yml” file containing credentials that get injected into the pipeline definition at deploy time.
fly -t lite set-pipeline --pipeline azure-pipeline --config bootpipeline.yml --load-vars-from secure.yml
In a second or two, a new (paused) pipeline popped up in Concourse. As you can see below, this tool is VERY visual. It’s easy to see how Concourse interpreted my pipeline definition and connected resources to jobs.

I then un-paused the pipeline with this command:
fly -t lite unpause-pipeline --pipeline azure-pipeline
Immediately, the pipeline started up, retrieved my code from GitHub, built the app within a Docker container, dropped the result into S3, and deployed to PCF on Azure.

After Concourse finished running the pipeline, I checked the PCF Application Manager UI and saw my new app up and running. Think about what just happened: I didn’t have to muck with any infrastructure or open any tickets to get an app from dev to production. Wonderful.

The way I built this pipeline, I didn’t version the JAR when I built my app. In reality, you’d want to use the semantic versioning resource to bump the version on each build. Because of the way I designed this, the second job (“deploy to PCF”) won’t fire automatically after the first build, since there technically isn’t a new artifact in the S3 bucket. A cool side effect of this is that I could constantly do continuous integration, and then choose to manually deploy (clicking the “+” button below) when the company was ready for the new version to go to production. Continuous delivery, not deployment.

Wrap Up
Whew. That was a big demo. But in the scheme of things, it was pretty straightforward. I used some best-of-breed services from Azure within my Java app, and then pushed that app to Pivotal Cloud Foundry entirely through automation. Now, every time I check in a code change to GitHub, Concourse will automatically build the app. When I choose to, I take the latest build and tell Concourse to send it to production.

A platform like PCF helps companies solve their #1 problem with becoming software-driven: improving their deployment pipeline. Try to keep your focus on apps not infrastructure, and make sure that whatever platform you use, you focus on sustainable operations at scale!

Leave a comment