Do you ever look at a new technology and ask yourself: “I wonder if it could do THAT?” I had that moment last week when reading up on the latest release of Visual Studio Code, the free, lightweight, cross-platform IDE from Microsoft. I noticed that it had extensibility points for code and frameworks, as well as executing automated tasks. So, I wondered if it was possible to develop and push an app to AppFog (a Cloud Foundry-based PaaS), all from within the Visual Studio Code shell. TL;DR; It’s totally possible.
All I wanted to try out was a simple “hello world” scenario. It would have been too easy to just use Node.js (which is where I do most casual development nowadays), so I decided to use Go instead. Go is so hot right now, and I’m trying to get back into it. I went over to the Go site and downloaded the binary release for my local machine.
After installing Go, I created a typical Go project structure in my workspace. It’s a best practice to put all your projects into a single workspace, but I set up one just for this project.

Next up, I downloaded the latest version of Visual Studio Code (VS Code). Whether you’re running Windows, Linux, or OSX, there’s a free copy for you to grab.

From within VS Code, I opened the workspace I created on my file system. VS Code doesn’t natively support Go out of the box, but you can use an extension to add support for multiple other languages, including Go. The Visual Studio Marketplace lists all the extensions. The Go extension adds colorization, formatting, build support, and more. Once I confirmed which Go extension I wanted to use, I went back into VS Code hit CTL+Shift+P to open the command window, typed Install Extensions, and found the Go extension I wanted.

I then created a handful of Go files. First I created the main program in an app.go file. It’s super basic; just starting up a web server on whatever port Cloud Foundry gives me, and returning a “hello, world” message upon HTTP request.
package main

import (
    "fmt"
    "log"
    "net/http"
    "os"
)

func main() {
    http.HandleFunc("/", hello)
    err := http.ListenAndServe(":"+os.Getenv("PORT"), nil)
    if err != nil {
        log.Fatal("ListenAndServe:", err)
    }
}

func hello(w http.ResponseWriter, req *http.Request) {
    fmt.Fprintln(w, "hello, world!")
}
I added a Procfile that’s used to declare the command that’s executed to start the app. In my case, the Procfile just contains “web: app” (where app is the package I created). I didn’t have any dependencies in this app, so I didn’t go through the effort to set up godep (which is the only Cloud Foundry-supported Go package manager) on my machine. Instead, I used the deprecated .godir file that simply includes the name of my binary (app). If I actually had dependencies, Cloud Foundry wouldn’t like that I did this, but I decided to live dangerously. Finally, I wanted a Cloud Foundry YAML manifest that described my app deployment.
---
applications:
  - name: hellogo
    memory: 64M
    instances: 1
    host: hellogo
My workspace now looked like this:

Now, I *could* have stopped here. By hitting the CTL-Shift+C keyboard sequence, I can open a command prompt that points at the current directory. I could kick off the simple Cloud Foundry deployment process from that outside command window, but I wanted it all within VS Code. Fortunately, VS Code supports automation tasks that run built-in or custom commands. To create a file for the Cloud Foundry “push” task, I entered the command window within VS Code (CTL+Shift+P) and selected Tasks: Configure Task Runner. This generated a tasks.json stub.
The tasks file contains single command. You could choose to augment that command with (optional) “tasks” that represent calls against that base command. For instance, in this case I’m using the “cf” command, and individual tasks for logging in, and pushing an app. Below is my complete tasks.json file. The isShellCommand means that VS Code executes the command itself, and I want to see the output in the command window (showOutput equals “always”). For each declared task, I set a friendly name, suppressed it from being used in the command, and passed in an array of command line parameters. The commands are executing in a sub-directory that’s not holding my source code, so I set the necessary path to my source code and YAML manifest. I’m targeting AppFog, so you can see the target endpoint called out in my login request.
{
    "version": "0.1.0",
    "command": "cf",
    "isShellCommand": true,
    "showOutput": "always",
    "args": [],
	"tasks": [
         {
            "taskName": "login",
            "suppressTaskName": true,
            "args": ["login", "-a", "https://api.uswest.appfog.ctl.io", "-o", "ORG", "-u", "USER", "-p", "PASSWORD", "-s", "SPACE"]
 	     },
         {
            "taskName": "push",
            "suppressTaskName": true,
            "args": ["push", "-p", ".\\src\\", "-f", ".\\src\\manifest.yml"]
         }
    ]

}
I opened my app.go file, and spun up the VS Code command window. After choosing Tasks: Run Task, I’m asked to choose a task. If I choose my “push” command before logging in, I get the expected error (“not authenticated”). If I run the “login” task, and then the “push” task, you can see that my app runs through the Cloud Foundry deployment process.

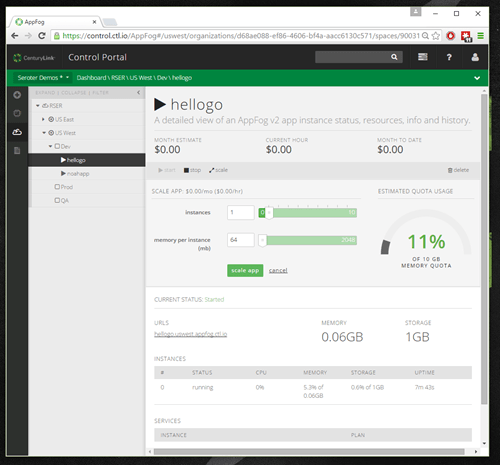
Sweet! My app deployed – with a warning that I was using a deprecated package manager – and I could see app configuration in the AppFog console (below). I then tested my app by browsing the application URL.

VS Code looks like a pretty handy, extensible IDE for those doing development in .NET, Node, Go, or other languages. The automated tasks capability isn’t perfect, but hey, I got it working with the Cloud Foundry deployment tools in a few minutes, so that’s not too shabby!
Are you looking at using VS Code for any development?

Leave a comment