Category: Spring

  • Let’s try out the new durable, replicated quorum queues in RabbitMQ

    Let’s try out the new durable, replicated quorum queues in RabbitMQ

    Coordination in distributed systems is hard. How do a series of networked processes share information and stay in sync with each other? Recently, the RabbitMQ team released a new type of queue that uses the Raft Consensus Algorithm to offer a durable, first-in-first-out queuing experience in your cluster. This is a nice fit for scenarios where you can’t afford data loss, and you also want the high availability offered by a clustered environment. Since RabbitMQ is wildly popular and used all over the place, I thought it’d be fun to dig into quorum queues, and give you an example that you can follow along with.

    What do you need on your machine to follow along? Make sure you have Docker Desktop, or some way to instantiate containers from a Docker Compose file. And you should have git installed. You COULD stop there, but I’m also building a small pair of apps (publisher, subscriber) in Spring Boot. To do that part, ensure you have the JDK installed, and an IDE (Eclipse or IntelliJ) or code editor (like VS Code with Java + Boot extensions) handy. That’s it.

    Before we start, a word about quorum queues. They shipped as part of a big RabbitMQ 3.8 release in the Fall of 2019. Quorum queues are the successor to mirrored queues, and improve on them in a handful of ways. By default, queues are located on a single node in a cluster. Obviously something that sits on a single node is at risk of downtime! So, we mitigate that risk by creating clusters. Mirrored queues have a master node, and mirrors across secondary nodes in the cluster for high availability. If a master fails, one of the mirrors gets promoted and processing continues. My new colleague Jack has a great post on how quorum queues “fix” some of the synchronization and storage challenges with mirrored queues. They’re a nice improvement, which is why I wanted to explore them a bit.

    Let’s get going. First, we need to get a RabbitMQ cluster up and running. Thanks to containers, this is easy. And thanks to the RabbitMQ team, it’s super easy. Just git clone the following repo:

    git clone https://github.com/rabbitmq/rabbitmq-prometheus
    

    In that repo are Docker Compose files. The one we care about is in the docker folder and called docker-compose-qq.yml. In here, you’ll see a network defined, and some volumes and services. This setup creates a three node RabbitMQ cluster. If you run this right now (docker-compose -f docker/docker-compose-qq.yml up) you’re kind of done (but don’t stop here!). The final service outlined in the Compose file (qq-moderate-load) creates some queues for you, and generates some load, as seen below in the RabbitMQ administration console.

    You can see above that the queue I selected is a “quorum” queue, and that there’s a leader of the queue and multiple online members. If I deleted that leader node, the messaging traffic would continue uninterrupted and a new leader would get “elected.”

    I don’t want everything done for me, so after cleaning up my environment (docker-compose -f docker/docker-compose-qq.yml down), I deleted the qq-moderate-load service definition from my Docker Compose file, and renamed it. Then I spun it up again, with the new file name:

    docker-compose -f docker/docker-compose-qq-2.yml up
    

    We now have an “empty” RabbitMQ, with three nodes in the cluster, but no queues or exchanges.

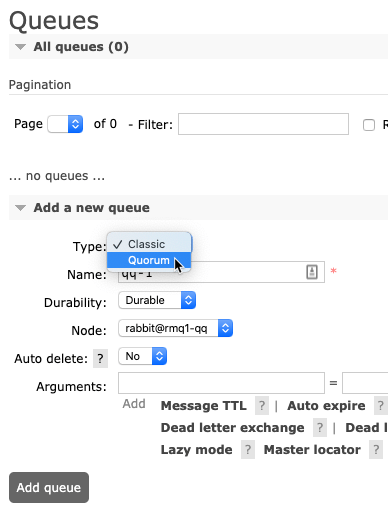
    Let’s create a quorum queue. On the “Queues” tab of this administration console, fill in a name for the new queue (I called mine qq-1), select quorum as the type, and pick a node to set as the leader. I picked rmq1-qq. Click the “Add queue” button.

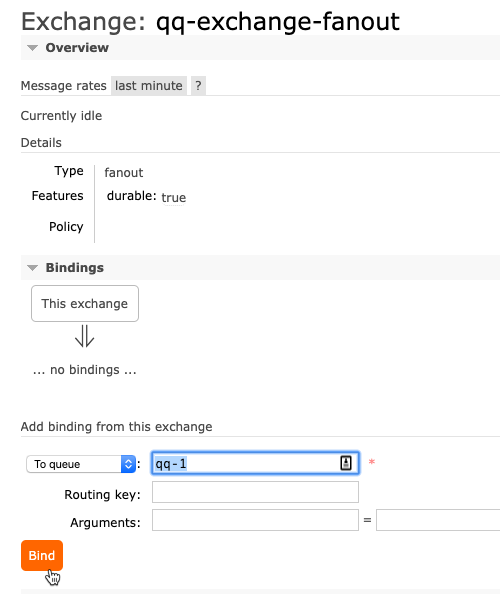
    Now we need an exchange, which is the publisher-facing interface. Create a fanout exchange named qq-exchange-fanout and then bind our queue to this exchange.

    Ok, that’s it for RabbitMQ. We have a highly available queue stood up with replication across three total nodes. Sweet. Now, we need an app to publish messages to the exchange.

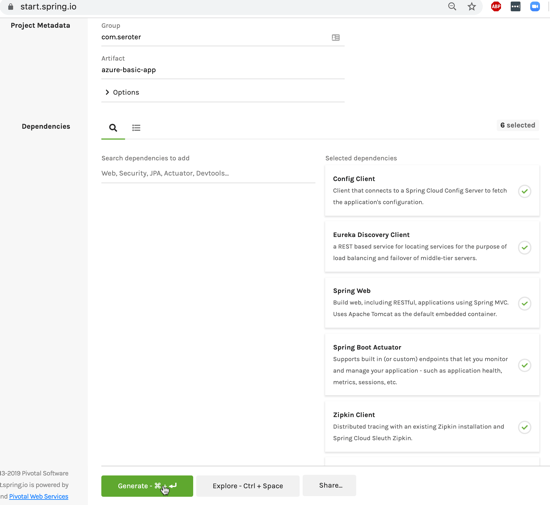
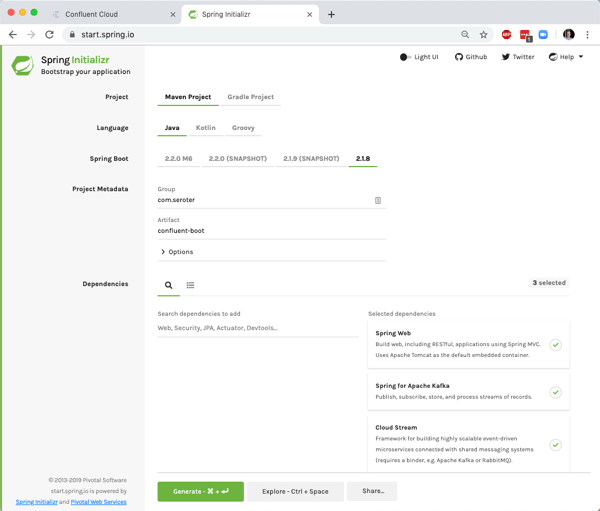
    I went to start.spring.io to generate a Spring Boot project. You can talk to RabbitMQ from virtually any language, using any number of supported SDKs. This link gives you a Spring Boot project identical to mine.

    I included dependencies on Spring Cloud Stream and Spring for RabbitMQ. These packages inflate all the objects necessary to talk to RabbitMQ, without forcing my code to know anything about RabbitMQ itself.

    Two words to describe my code? Production Grade. Here’s all I needed to write to publish a message every 500ms.

    package com.seroter.demo;
    
    import org.springframework.boot.SpringApplication;
    import org.springframework.boot.autoconfigure.SpringBootApplication;
    import org.springframework.cloud.stream.annotation.EnableBinding;
    import org.springframework.cloud.stream.messaging.Source;
    import org.springframework.context.annotation.Bean;
    import org.springframework.integration.annotation.InboundChannelAdapter;
    import org.springframework.integration.core.MessageSource;
    import org.springframework.messaging.support.GenericMessage;
    import org.springframework.integration.annotation.Poller;
    
    @EnableBinding(Source.class)
    @SpringBootApplication
    public class RmqPublishQqApplication {
    
    	public static void main(String[] args) {
    		SpringApplication.run(RmqPublishQqApplication.class, args);
    	}
    	
    	private int counter = 0;
    	
    	@Bean
    	@InboundChannelAdapter(value = Source.OUTPUT, poller = @Poller(fixedDelay = "500", maxMessagesPerPoll = "1"))
    	public MessageSource<String> timerMessageSource() {
    		
    		return () -> {
    			counter++;
    			System.out.println("Spring Cloud Stream message number " + counter);
    			return new GenericMessage<>("Hello, number " + counter);
    		};
    	}
    }


    The @EnableBinding attribute and reference to the Source class marks this as streaming source, and I used Spring Integration’s InboundChannelAdapter to generate a message, with an incrementing integer, on a pre-defined interval.

    My configuration properties are straightforward. I list out all the cluster nodes (to enable failover if a node fails) and provide the name of the existing exchange. I could use Spring Cloud Stream to generate the exchange, but wanted to experiment with creating it ahead of time.

    spring.rabbitmq.addresses=localhost:5679,localhost:5680,localhost:5681
    
    spring.rabbitmq.username=guest
    spring.rabbitmq.password=guest
     
    spring.cloud.stream.bindings.output.destination=qq-exchange-fanout
    spring.cloud.stream.rabbit.bindings.output.producer.exchange-type=fanout
    

    Before starting up the publisher, let’s create the subscriber. Back in start.spring.io, create another app named rmq-subscribe-qq with the same dependencies as before. Click here for a link to download this project definition.

    The code for the subscriber is criminally simple. All it takes is the below code to pull a message from the queue and process it.

    package com.seroter.demo;
    
    import org.springframework.boot.SpringApplication;
    import org.springframework.boot.autoconfigure.SpringBootApplication;
    import org.springframework.cloud.stream.annotation.EnableBinding;
    import org.springframework.cloud.stream.annotation.StreamListener;
    import org.springframework.cloud.stream.messaging.Sink;
    
    @EnableBinding(Sink.class)
    @SpringBootApplication
    public class RmqSubscribeQqApplication {
    
    	public static void main(String[] args) {
    		SpringApplication.run(RmqSubscribeQqApplication.class, args);
    	}
    	
    	@StreamListener(target = Sink.INPUT)
    	public void pullMessages(String s) {
    		System.out.println("Spring Cloud Stream message received: " + s);
    	}
    }
    

    It’s also annotated with an @EnableBinding declaration and references the Sink class which gets this wired up as a message receiver. The @StreamListener annotation marks this method as the one that handles whatever gets pulled off the queue. Note that the new functional paradigm for Spring Cloud Stream negates the need for ANY streaming annotations, but I like the existing model for explaining what’s happening.

    The configuration for this project looks pretty similar to the publisher’s configuration. The only difference is that we’re setting the queue name (as “group”) and indicating that Spring Cloud Stream should NOT generate a queue, but use the existing one.

    spring.rabbitmq.addresses=localhost:5679,localhost:5680,localhost:5681
    
    spring.rabbitmq.username=guest
    spring.rabbitmq.password=guest
     
    spring.cloud.stream.bindings.input.destination=qq-exchange-fanout
    spring.cloud.stream.bindings.input.group=qq-1
    spring.cloud.stream.rabbit.bindings.input.consumer.queue-name-group-only=true
    

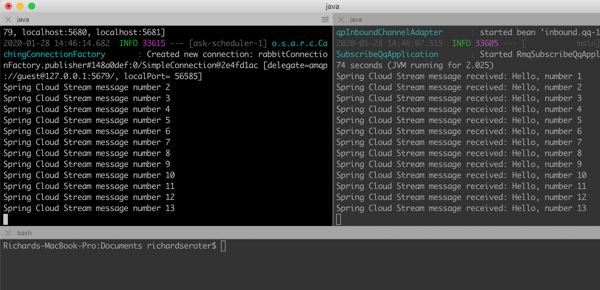
    We’re done! Let’s test it out. I opened up a few console windows, the first pointing to the publisher project, the second to the subscriber project, and a third that will shut down a RabbitMQ node when the time comes.

    To start up each Spring Boot project, enter the following command into each console:

    ./mvnw spring-boot:run
    

    Immediately, I see the publisher publishing, and the subscriber subscribing. The messages arrive in order from a quorum queue.

    In the RabbitMQ management console, I can see that we’re processing messages, and that rmq1-qq is the queue leader. Let’s shut down that node. From the other console (not the publisher or subscriber) switch the git folder that you downloaded at the beginning, and enter the following command to remove the RabbitMQ node from the cluster:

    docker-compose -f docker/docker-compose-qq-2.yml stop rmq1-qq

    As you can see, the node goes away, and there’s no pause in processing, and the Spring Boot app keeps happily sending and receiving data, in order.

    Back in the RabbitMQ administration console, note that there’s a new leader for the quorum queue (not rmq1-qq as we originally set up), and just two of the three cluster members are online. All of this “just happens” for you.

    For fun, I also started up the stopped node, and watched it quickly rejoin the cluster and start participating in the quorum queue again.

    A lot of your systems depend on your messaging middleware. It probably doesn’t get much praise, but everyone sure yells when it goes down! Because distributed systems are hard, keeping that infrastructure highly available with no data loss isn’t easy. I like things like RabbitMQ’s quorum queues, and you should keep playing with them. Check out the terrific documentation to go even deeper.

  • 2019 in Review: Watching, Reading, and Writing Highlights

    Be still and wait. This was the best advice I heard in 2019, and it took until the end of the year for me to realize it. Usually, when I itch for a change, I go all in, right away. I’m prone to thinking that “patience” is really just “indecision.” It’s not. The best things that happened this year were the things that didn’t happen when I wanted! I’m grateful for an eventful, productive, and joyful year where every situation worked out for the best.

    2019 was something else. My family grew, we upgraded homes, my team was amazing, my company was acquired by VMware, I spoke at a few events around the world, chaired a tech conference, kept up a podcast, created a couple new Pluralsight classes, continued writing for InfoQ.com, and was awarded a Microsoft MVP for the 12th straight time.

    For the last decade+, I’ve started each year by recapping the last one. I usually look back at things I wrote, and books I read. This year, I’ll also add “things I watched.”

    Things I Watched

    I don’t want a ton of “regular” TV—although I am addicted to Bob’s Burgers and really like the new FBI—and found myself streaming or downloading more things while traveling this year. These shows/seasons stood out to me:

    Crashing – Season 3 [HBO] Pete Holmes is one of my favorite stand-up comedians, and this show has some legit funny moments, but it’s also complex, dark, and real. This was a good season with a great ending.

    BoJack Horseman – Season 5 [Netflix] Again, a show with absurdist humor, but also a dark, sobering streak. I’m got to catch up on the latest season, but this one was solid.

    Orange is the New Black – Season 7 [Netflix] This show has had some ups and downs, but I’ve stuck with it because I really like the cast, and there are enough surprises to keep me hooked. This final season of the show was intense and satisfying.

    Bosch – Season 4 [Amazon Prime] Probably the best thing I watched this year? I love this show. I’ve read all the books the show is based on, but the actors and writers have given this its own tone. This was a super tense season, and I couldn’t stop watching.

    Schitt’s Creek – Seasons 1-4 [Netflix] Tremendous cast and my favorite overall show from 2019. Great writing, and some of the best characters on TV. Highly recommended.

    Jack Ryan – Season 1 [Amazon Prime] Wow, what a show. Throughly enjoyed the story and cast. Plenty of twists and turns that led me to binge watch this on one of my trips this year.

    Things I Wrote

    I kept up a reasonable writing rhythm on my own blog, as well as publication to the Pivotal blog and InfoQ.com site. Here were a few pieces I enjoyed writing the most:

    [Pivotal blog] Five part series on digital transformation. You know what you should never do? Write a blog post and in it, promise that you’ll write four more. SO MUCH PRESSURE. After the overview post, I looked at the paradox of choice, design thinking, data processing, and automated delivery. I’m proud of how it all ended up.

    [blog] Which of the 295,680 platform combinations will you create on Microsoft Azure? The point of this post wasn’t that Microsoft, or any cloud provider for that matter, has a lot of unique services. They do, but the point was that we are prone to thinking that we’re getting a complete solution from someone, but really getting some really cool components to stitch together.

    [Pivotal blog] Kubernetes is a platform for building platforms. Here’s what that means. This is probably my favorite piece I wrote this year. It required a healthy amount of research and peer review, and dug into something I see very few people talking about.

    [blog] Go “multi-cloud” while *still* using unique cloud services? I did it using Spring Boot and MongoDB APIs. There’s so many strawman arguments on Twitter when it comes to multi-cloud that it’s like a scarecrow convention. Most people I see using multiple clouds aren’t dumb or lazy. They have real reasons, including a well-founded lack of trust in putting all their tech in one vendor’s basket. This blog post looked at how to get the best of all worlds.

    [blog] Looking to continuously test and patch container images? I’ll show you one way. I’m not sure when I give up on being a hands on technology person. Maybe never? This was a demo I put together for my VMworld Barcelona talk, and like the final result.

    [blog] Building an Azure-powered Concourse pipeline for Kubernetes – Part 3: Deploying containers to Kubernetes. I waved the white flag and learned Kubernetes this year. One way I forced myself to do so was sign up to teach an all-day class with my friend Rocky. While leading up to that, I wrote up this 3-part series of posts on continuous delivery of containers.

    [blog] Want to yank configuration values from your .NET Core apps? Here’s how to store and access them in Azure and AWS. It’s fun to play with brand new tech, curse at it, and document your journey for others so they curse less. Here I tried out Microsoft’s new configuration storage service, and compared it to other options.

    [blog] First Look: Building Java microservices with the new Azure Spring Cloud. Sometimes it’s fun to be first. Pivotal worked with Microsoft on this offering, so on the day it was announced, I had a blog post ready to go. Keep an eye on this service in 2020; I think it’ll be big.

    [InfoQ] Swim Open Sources Platform That Challenges Conventional Wisdom in Distributed Computing. One reason I keep writing for InfoQ is that it helps me discover exciting new things. I don’t know if SWIM will be a thing long term, but their integrated story is unconventional in today’s “I’ll build it all myself” world.

    [InfoQ] Weaveworks Releases Ignite, AWS Firecracker-Powered Software for Running Containers as VMs. The other reason I keep writing for InfoQ is that I get to talk to interesting people and learn from them. Here, I engaged in an informative Q&A with Alexis and pulled out some useful tidbits about GitOps.

    [InfoQ] Cloudflare Releases Workers KV, a Serverless Key-Value Store at the Edge. Feels like edge computing has the potential to disrupt our current thinking about what a “cloud” is. I kept an eye on Cloudflare this year, and this edge database warranted a closer look.

    Things I Read

    I like to try and read a few books a month, but my pace was tested this year. Mainly because I chose to read a handful of enormous biographies that took a while to get through. I REGRET NOTHING. Among the 32 books I ended up finishing in 2019, these were my favorites:

    Churchill: Walking with Destiny by Andrew Roberts (@aroberts_andrew). This was the most “highlighted” book on my Kindle this year. I knew the caricature, but not the man himself. This was a remarkably detailed and insightful look into one of the giants of the 20th century, and maybe all of history. He made plenty of mistakes, and plenty of brilliant decisions. His prolific writing and painting were news to me. He’s a lesson in productivity.

    At Home: A Short History of Private Life by Bill Bryson. This could be my favorite read of 2019. Bryson walks around his old home, and tells the story of how each room played a part in the evolution of private life. It’s a fun, fascinating look at the history of kitchens, studies, bedrooms, living rooms, and more. I promise that after you read this book, you’ll be more interesting at parties.

    Messengers: Who We Listen To, Who We Don’t, and Why by Stephen Martin (@scienceofyes) and Joseph Marks (@Joemarks13). Why is it that good ideas get ignored and bad ideas embraced? Sometimes it depends on who the messenger is. I enjoyed this book that looked at eight traits that reliably predict if you’ll listen to the messenger: status, competence, attractiveness, dominance, warm, vulnerability, trustworthiness, and charisma.

    Six Days of War: June 1967 and the Making of the Modern Middle East by Michael Oren (@DrMichaelOren). What a story. I had only a fuzzy understanding of what led us to the Middle East we know today. This was a well-written, engaging book about one of the most consequential events of the 20th century.

    The Unicorn Project: A Novel about Developers, Digital Disruption, and Thriving in the Age of Data by Gene Kim (@RealGeneKim). The Phoenix Project is a must-read for anyone trying to modernize IT. Gene wrote that book from a top-down leadership perspective. In The Unicorn Project, he looks at the same situation, but from the bottom-up perspective. While written in novel form, the book is full of actionable advice on how to chip away at the decades of bureaucratic cruft that demoralizes IT and prevents forward progress.

    Talk Triggers: The Complete Guide to Creating Customers with Word of Mouth by Jay Baer (@jaybaer) and Daniel Lemin (@daniellemin). Does your business have a “talk trigger” that leads customers to voluntarily tell your story to others? I liked the ideas put forth by the authors, and the challenge to break out from the pack with an approach (NOT a marketing gimmick) that really resonates with customers.

    I Heart Logs: Event Data, Stream Processing, and Data Integration by Jay Kreps (@jaykreps). It can seem like Apache Kafka is the answer to everything nowadays. But go back to the beginning and read Jay’s great book on the value of the humble log. And how it facilitates continuous data processing in ways that preceding technologies struggled with.

    Kafka: The Definitive Guide: Real-Time Data and Stream Processing at Scale by Neha Narkhede (@nehanarkhede), Gwen Shapira (@gwenshap), and Todd Palino (@bonkoif). Apache Kafka is probably one of the five most impactful OSS projects of the last ten years, and you’d benefit from reading this book by the people who know it. Check it out for a great deep dive into how it works, how to use it, and how to operate it.

    The Players Ball: A Genius, a Con Man, and the Secret History of the Internet’s Rise by David Kushner (@davidkushner). Terrific story that you’ve probably never heard before, but have felt its impact. It’s a wild tale of the early days of the Web where the owner of sex.com—who also created match.com—had it stolen, and fought to get it back. It’s hard to believe this is a true story.

    Mortal Prey by John Sanford. I’ve read a dozen+ of the books in this series, and keep coming back for more. I’m a sucker for a crime story, and this is a great one. Good characters, well-paced plots.

    Your God is Too Safe: Rediscovering the Wonder of a God You Can’t Control by Mark Buchanan (@markaldham). A powerful challenge that I needed to hear last year. You can extrapolate the main point to many domains—is something you embrace (spirituality, social cause, etc) a hobby, or a belief? Is it something convenient to have when you want it, or something powerful you do without regard for the consequences? We should push ourselves to get off the fence!

    Escaping the Build Trap: How Effective Product Management Creates Real Value by Melissa Perri (@lissijean). I’m not a product manager any longer, but I still care deeply about building the right things. Melissa’s book is a must-read for people in any role, as the “build trap” (success measured by output instead of outcomes) infects an entire organization, not just those directly developing products. It’s not an easy change to make, but this book offers tangible guidance to making the transition.

    Project to Product: How to Survive and Thrive in the Age of Digital Disruption with the Flow Framework by Mik Kersten (@mik_kersten). This is such a valuable book for anyone trying to unleash their “stuck” I.T. organization. Mik does a terrific job explaining what’s not working given today’s realities, and how to unify an organization around the value streams that matter. The “flow framework” that he pioneered, and explains here, is a brilliant way of visualizing and tracking meaningful work.

    Range: Why Generalists Triumph in a Specialized World by David Epstein (@DavidEpstein). I felt “seen” when I read this. Admittedly, I’ve always felt like an oddball who wasn’t exceptional at one thing, but pretty good at a number of things. This book makes the case that breadth is great, and most of today’s challenges demand knowledge transfer between disciplines and big-picture perspective. If you’re a parent, read this to avoid over-specializing your child at the cost of their broader development. And if you’re starting or midway through a career, read this for inspiration on what to do next.

    John Newton: From Disgrace to Amazing Grace by Jonathan Aitken. Sure, everyone knows the song, but do you know the man? He had a remarkable life. He was the captain of a slave ship, later a pastor and prolific writer, and directly influenced the end of the slave trade.

    Blue Ocean Shift: Beyond Competing – Proven Steps to Inspire Confidence and Seize New Growth by W. Chan Kim and Renee Mauborgne. This is a book about surviving disruption, and thriving. It’s about breaking out of the red, bloody ocean of competition and finding a clear, blue ocean to dominate. I liked the guidance and techniques presented here. Great read.

    Leonardo da Vinci by Walter Isaacson (@WalterIsaacson). Huge biography, well worth the time commitment. Leonardo had range. Mostly self-taught, da Vinci studying a variety of topics, and preferred working through ideas to actually executing on them. That’s why he had so many unfinished projects! It’s amazing to think of his lasting impact on art, science, and engineering, and I was inspired by his insatiable curiosity.

    AI Superpowers: China, Silicon Valley, and the New World Order by Kai-Fu Lee (@kaifulee). Get past some of the hype on artificial intelligence, and read this grounded book on what’s happening RIGHT NOW. This book will make you much smarter on the history of AI research, and what AI even means. It also explains how China has a leg up on the rest of the world, and gives you practical scenarios where AI will have a big impact on our lives.

    Never Split the Difference: Negotiating As If Your Life Depended On It by Chris Voss (@VossNegotiation) and Tahl Raz (@tahlraz). I’m fascinated by the psychology of persuasion. Who better to learn negotiation from than an FBI’s international kidnapping negotiator? He promotes empathy over arguments, and while the book is full of tactics, it’s not about insincere manipulation. It’s about getting to a mutually beneficial state.

    Amazing Grace: William Wilberforce and the Heroic Campaign to End Slavery by Eric Metaxas (@ericmetaxas). It’s tragic that this generation doesn’t know or appreciate Wilberforce. The author says that Wilberforce could be the “greatest social reformer in the history of the world.” Why? His decades-long campaign to abolish slavery from Europe took bravery, conviction, and effort you rarely see today. Terrific story, well written.

    Unlearn: : Let Go of Past Success to Achieve Extraordinary Results by Barry O’Reilly (@barryoreilly). Barry says that “unlearning” is a system of letting go and adapting to the present state. He gives good examples, and offers actionable guidance for leaders and team members. This strikes me as a good book for a team to read together.

    The Soul of a New Machine by Tracy Kidder. Our computer industry is younger than we tend to realize. This is such a great book on the early days, featuring Data General’s quest to design and build a new minicomputer. You can feel the pressure and tension this team was under. Many of the topics in the book—disruption, software compatibility, experimentation, software testing, hiring and retention—are still crazy relevant today.

    Billion Dollar Whale: The Man Who Fooled Wall Street, Hollywood, and the World by Tom Wright (@TomWrightAsia) and Bradley Hope (@bradleyhope). Jho Low is a con man, but that sells him short. It’s hard not to admire his brazenness. He set up shell companies, siphoned money from government funds, and had access to more cash than almost any human alive. And he spent it. Low befriended celebrities and fooled auditors, until it all came crashing down just a few years ago.

    Multipliers: How the Best Leaders Make Everyone Smarter by Liz Wiseman (@LizWiseman). It’s taken me very long (too long?) to appreciate that good managers don’t just get out of the way, they make me better. Wiseman challenges us to release the untapped potential of our organizations, and people. She contrasts the behavior of leaders that diminish their teams, and those that multiply their impact. Lots of food for thought here, and it made a direct impact on me this year.

    Darwin’s Doubt: The Explosive Origin of Animal Life and the Case for Intelligent Design by Stephen Meyer (@StephenCMeyer). The vast majority of this fascinating, well-researched book is an exploration of the fossil record and a deep dive into Darwin’s theory, and how it holds up to the scientific research since then. Whether or not you agree with the conclusion that random mutation and natural selection alone can’t explain the diverse life that emerged on Earth over millions of years, it will give you a humbling appreciation for the biological fundamentals of life.

    Napoleon: A Life by Adam Zamoyski. This was another monster biography that took me months to finish. Worth it. I had superficial knowledge of Napoleon. From humble beginnings, his ambition and talent took him to military celebrity, and eventually, the Emperorship. This meticulously researched book was an engaging read, and educational on the time period itself, not just Bonaparte’s rise and fall.

    The Paradox of Choice: Why More Is Less by Barry Schwartz. I know I’ve used this term for year’s since it was part of other book’s I’ve read. But I wanted to go to the source. We hate having no choices, but are often paralyzed by having too many. This book explores the effects of choice on us, and why more is often less. It’s a valuable read, regardless of what job you have.

    I say it every year, but thank you for having me as part of your universe in 2019. You do have a lot of choices of what to read or watch, and I truly appreciate when you take time to turn that attention to something of mine. Here’s to a great 2020!

  • Looking to continuously test and patch container images? I’ll show you one way.

    Looking to continuously test and patch container images? I’ll show you one way.

    A lot of you are packaging code into container images before shipping it off to production. That’s cool. For many, this isn’t a one-time exercise at the end of a project; it’s an ongoing exercise throughout the lifespan of your product. Last week in Barcelona, I did a presentation at VMworld Europe where I took a custom app, ran tests in a pipeline, containerized it, and pushed to a cloud runtime. I did all of this with fresh open-source technologies like Kubernetes, Concourse, and kpack. For this blog post, I’ll show you my setup, and for fun, take the resulting container image and deploy it, unchanged, to one Microsoft Azure service, and one Pivotal service.

    First off, containers. Let’s talk about them. The image that turns into running container is made up of a series of layers. This union of read-only layers gets mounted to present itself as a single filesystem. Many commands in your Dockerfile, generate a layer. When I pull the latest Redis image, and run a docker history command, I see all the layers:

    Ok, Richard, we get it. Like onions and ogres, images have layers. I bring it up, because responsibly maintaining a container image means continually monitoring and updating those layers. For a custom app, that means updating layers that store app code, the web server, and the root file system. All the time. Ideally, I want a solution that automatically builds and patches all this stuff so that I don’t have to. Whatever pipeline to production you build should have that factored in!

    Let’s get to it. Here’s what I built. After coding a Spring Boot app, I checked the code into a GitHub master branch. That triggered a Concourse pipeline (running in Kubernetes) that ran unit tests, and promoted the code to a “stable” branch if the tests passed. The container build service (using the kpack OSS project) monitored the stable branch, and built a container image which got stored in the Docker Hub. From there, I deployed the Docker image to a container-friendly application runtime. Easy!

    Step #1 – Build the app

    The app is simple, and relatively inconsequential. Build a .NET app, Go app, Node.js app, whatever. I built a Spring Boot app using Spring Initializr. Click here to download the same scaffolding. This app will simply serve up a web endpoint, and also offer a health endpoint.

    In my code, I have a single RESTful endpoint that responds to GET requests at the root. It reads an environment variable (so that I can change it per runtime), and returns that in the response.

    @RestController
    public class GreetingController {
    	
      @Value("${appruntime:Spring Boot}")
      private String appruntime;
    	
      @GetMapping("/")
      public String SayHi() {
        return "Hello VMworld Europe! Greetings from " + appruntime;
      }
    }
    

    I also created a single JUnit test to check the response value from my RESTful service. I write great unit tests; don’t be jealous.

    @RunWith(SpringRunner.class)
    @SpringBootTest(webEnvironment = WebEnvironment.RANDOM_PORT)
    public class BootKpackDemoApplicationTests {
    
      @LocalServerPort
      private int port;
    	
      @Autowired
      private TestRestTemplate restTemplate;
    	
      @Test
      public void testEndpoint() {
        assertThat(this.restTemplate.getForObject("http://localhost:" + port + "/",
        String.class)).contains("Hello");
      }
    }
    

    After crafting this masterpiece, I committed it to a GitHub repo. Ideally, this is all a developer ever has to do in their job. Write code, test it, check it in, repeat. I don’t want to figure out the right Dockerfile format, configure infrastructure, or any other stuff. Just let me write code, and trigger a pipeline that gets my code securely to production, over and over again.

    Step #2 – Set up the CI pipeline

    For this example, I’m using minikube on my laptop to host the continuous integration software and container build service. I got my Kubernetes 1.15 cluster up (since Concourse currently works up to v 1.15) with this command:

    minikube start --memory=4096 --cpus=4 --vm-driver=hyperkit --kubernetes-version v1.15.0
    

    Since I wanted to install Concourse in Kubernetes via Helm, I needed Helm and tiller set up. I used a package manager to install Helm on my laptop. Then I ran three commands to generate a service account, bind a cluster role to that service account, and initialize Helm in the cluster.

    kubectl create serviceaccount -n kube-system tiller 
    kubectl create clusterrolebinding tiller-cluster-rule --clusterrole=cluster-admin --serviceaccount=kube-system:tiller 
    helm init --service-account tiller 
    

    With that business behind me, I could install Concourse. I talk a lot about Concourse, taught a Pluralsight course about it, and use it regularly. It’s such a powerful tool for continuous processing of code. To install into Kubernetes, it’s just a single reference to a Helm chart.

    helm install --name vmworld-concourse stable/concourse
    

    After a few moments, I saw that I had pods created and services configured.

    The chart also printed out commands for how to do port forwarding to access the Concourse web console.

    export POD_NAME=$(kubectl get pods --namespace default -l "app=vmworld-concourse-web" -o jsonpath="{.items[0].metadata.name}")
     echo "Visit http://127.0.0.1:8080 to use Concourse"
     kubectl port-forward --namespace default $POD_NAME 8080:8080
    

    After running those commands, I pinged the localhost URL and saw the dashboard.

    All that was left was the actual pipeline. Concourse pipelines are defined in YAML. My GitHub repo has two branches (master and stable), so I declared “resources” for both. Since I have to write to the stable branch, I also included credentials to GitHub in the “stable” resource definition. My pipeline has two jobs: one that runs the JUnit tests, and another puts the master branch code into the stable branch if the unit tests pass.

    ---
    # declare resources
    resources:
    - name: source-master
      type: git
      icon: github-circle
      source:
        uri: https://github.com/rseroter/boot-kpack-demo
        branch: master
    - name: source-stable
      type: git
      icon: github-circle
      source:
        uri: git@github.com:rseroter/boot-kpack-demo.git
        branch: stable
        private_key: ((github-private-key))
    
    jobs:
    - name: run-tests
      plan:
      - get: source-master
        trigger: true
      - task: first-task
        config: 
          platform: linux
          image_resource:
            type: docker-image
            source: {repository: maven, tag: latest}
          inputs:
          - name: source-master
          run:
              path: sh
              args:
              - -exec
              - |
                cd source-master
                mvn package
    - name: promote-to-stable
      plan:
      - get: source-master
        trigger: true
        passed: [run-tests]
      - get: source-stable
      - put: source-stable
        params:
          repository: source-master
    

    Deploying this pipeline is easy. From the fly CLI tool, it’s one command. Note that my GitHub creds are stored in another file, which is the one I reference in the command.

    fly -t vmworld set-pipeline --pipeline vmworld-pipeline --config vmworld-pipeline.yaml --load-vars-from params.yaml
    

    After unpausing the pipeline, it ran. Once it executed the unit tests, and promoted the master code to the stable branch, the pipeline was green.

    Step #3 – Set up kpack for container builds

    Now to take that tested, high-quality code and containerize it. Cloud Native Buildpacks turn code into Docker images. Buildpacks are something initially created by Heroku, and then used by Cloud Foundry to algorithmically determine how to build a container image based on the language/framework of the code. Instead of developers figuring out how to layer up an image, buildpacks can compile and package up code in a repeatable way by bringing in all the necessary language runtimes and servers. What’s cool is that operators can also extend buildpacks to add org-specific certs, monitoring agents, or whatever else should be standard in your builds.

    kpack is an open-source project from Pivotal that uses Cloud Native Buildpacks, also adds the ability to watch for changes to anything impacting the image, and initiating an update. kpack, which is commercialized as the Pivotal Build Service, watches for changes in source code, buildpacks, or base image and then puts the new or patched image into the registry. Thanks to some smarts, it only updates the impacted layers, thus saving you on data transfer costs and build times.

    The installation instructions are fairly straightforward. You can put this into your Kubernetes cluster in a couple minutes. Once installed, I saw the single kpack controller pod running.

    The only thing left to do was define an image configuration. This declarative config tells kpack where to find the code, and what to do with it. I had already set up a secret to hold my Docker Hub creds, and that corresponding Kubernetes service account is referenced in the image configuration.

    apiVersion: build.pivotal.io/v1alpha1
    kind: Image
    metadata:
      name: vmworld-image
    spec:
      tag: rseroter/vmworld-demo
      serviceAccount: vmworld-service-account
      builder:
        name: default-builder
        kind: ClusterBuilder
      source:
        git:
          url: https://github.com/rseroter/boot-kpack-demo.git
          revision: stable
    

    That’s it. Within moments, kpack detected my code repo, compiled my app, built a container image, cached some layers for later, and updated the Docker Hub image.

    I made a bunch of code changes to generate lots of builds, and all the builds showed up my Kubernetes cluster as well.

    Now when I updated my code, my pipeline automatically kicks off and updates the stable branch. Thus, whenever my tested code changes, or the buildpack gets updated (every week or so) with framework updates and patches, my container automatically gets rebuilt. That’s crazy powerful stuff, especially as we create more and more containers, that deploy to more and more places.

    Step #4 – Deploy the container image

    And that’s the final step. I had to deploy this sucker and see it run.

    First, I pushed it to Pivotal Application Service (PAS) because I make good choices. I can push code or containers here. This single command takes that Docker image, deploys it, and gives me a routable endpoint in 20 seconds.

    cf push vmworld-demo --docker-image rseroter/vmworld-demo -i 2
    

    That worked great, and my endpoint returned the expected values after I added an environment variable to the app.

    Can I deploy the same container to Azure Web Apps? Sure. That takes code or containers too. I walked through the wizard experience in the Azure Portal and chose the Docker Hub image created by kpack.

    After a few minutes, the service was up. Then I set the environment variable that the Spring Boot app was looking for (appruntime to “Azure App Service”) and another to expose the right port (WEBSITES_PORT to 8080), and pinged the RESTful endpoint.

    Whatever tech you land on, just promise me that you’ll invest in a container patching strategy. Automation is non-negotiable, and there are good solutions out there that can improve your security posture, while speeding up software delivery.

  • Fronting web sites, a classic .NET app, and a serverless function with Spring Cloud Gateway

    Fronting web sites, a classic .NET app, and a serverless function with Spring Cloud Gateway

    Automating deployment of custom code and infrastructure? Not always easy, but feels like a solved problem. It gets trickier when you want to use automation to instantiate and continuously update databases and middleware. Why? This type of software stores state which makes upgrades more sensitive. You also may be purchasing this type of software from vendors who haven’t provided a full set of automation-friendly APIs. Let’s zero in on one type of middleware: API gateways.

    API gateways do lots of things. They selectively expose private services to wider audiences. With routing rules, they make it possible to move clients between versions of a service without them noticing. They protect downstream services by offering capabilities like rate limiting and caching. And they offer a viable way for those with a microservices architecture to secure services without requiring each service to do their own authentication. Historically, your API gateway was a monolith of its own. But a new crop of automation-friendly OSS (and cloud-hosted) options are available, and this gives you new ways to deploy many API gateway instances that get continuously updated.

    I’ve been playing around with Spring Cloud Gateway, which despite its name, can proxy traffic to a lot more than just Spring Boot applications. In fact, I wanted to try and create a configuration-only-no-code API Gateway that could do three things:

    1. Weighted routing between “regular’ web pages on the internet.
    2. Add headers to a JavaScript function running in Microsoft Azure.
    3. Performing rate-limiting on a classic ASP.NET Web Service running on the Pivotal Platform.

    Before starting, let me back up and briefly explain what Spring Cloud Gateway is. Basically, it’s a project that turns a Spring Boot app into an API gateway that routes requests while applying cross-cutting functionality for things like security. Requests come in, and if the request matches a declared route, the request is passed through a series of filters, sent to the target endpoint, and “post” filters get applied on the way back to the client. Spring Cloud Gateway built on a Reactive base, which means it’s non-blocking and efficiently handles many simultaneous requests.

    The biggest takeaway? This is just an app. You can write tests and do continuous integration. You can put it on a pipeline and continuously deliver your API gateway. That’s awesome.

    Note that you can easily follow along with the steps below without ANY Java knowledge! Everything I’m doing using configuration you can also do with the Java DSL, but I wanted to prove how straightforward the configuration-only option is.

    Creating the Spring Cloud Gateway project

    This is the first, and easiest, part of this demonstration. I went to start.spring.io, and generated a new Spring Boot project. This project has dependencies on Gateway (to turn this into an API gateway), Spring Data Reactive Redis (for storing rate limiting info), and Spring Boot Actuator (so we get “free” metrics and insight into the gateway). Click this link to generate an identical project.

    Doing weighed routing between web pages

    For the first demonstration, I wanted to send traffic to either spring.io or pivotal.io/spring-app-framework. You might use weighted routing to do A/B testing with different versions of your site, or even to send a subset of traffic to a new API.

    I added an application.yml file (to replace the default application.properties file) to hold all my configuration settings. Here’s the configuration, and we’ll go through it bit by bit.

    spring:
      cloud:
        gateway:
          routes:
          # doing weighted routing between two sites
          - id: test1
            uri: https://www.pivotal.io
            predicates:
            - Path=/spring
            - Weight=group1, 3
            filters:
            - SetPath=/spring-app-framework
          - id: test2
            uri: https://www.spring.io
            predicates:
            - Path=/spring
            - Weight=group1, 7
            filters:
            - SetPath=/
    

    Each “route” is represented by a section in the YAML configuration. A route has a URI (which represents the downstream host), and a route predicate that indicates the path on the gateway you’re invoking. For example, in this case, my path is “/spring” which means that sending a request to “localhost:8080/spring” would map to this route configuration.

    Now, you’ll see I have two routes with the same path. These are part of the same weighted routing group, which means that traffic to /spring will go to one of the two downstream endpoints. The second endpoint is heavily weighted (7 vs 3), so most traffic goes there. Also see that I applied one filter to clear out the path. If I didn’t do this, then requests to localhost:8080/spring would result in a call to spring.io/spring, as the path (and querystring) is forwarded. Instead, I stripped that off for requests to spring.io, and added the secondary path into the pivotal.io endpoint.

    I’ve got Java and Maven installed locally, so a simple command (mvn spring-boot:run) starts up my Spring Cloud Gateway. Note that so far, I’ve written exactly zero code. Thanks to Spring Boot autoconfiguration and dependency management, all the right packages exist and runtime objects get inflated. Score!

    Once, the Spring Cloud Gateway was up and running, I pinged the Gateway’s endpoint in the browser. Note that some browser’s try to be helpful by caching things, which screws up a weighted routing demo! I opened the Chrome DevTools and disabled request caching before running a test.

    That worked great. Our gateway serves up a single endpoint, but through basic configuration, I can direct a subset of traffic somewhere else.

    Adding headers to serverless function calls

    Next, I wanted to stick my gateway in front of some serverless functions running in Azure Functions. You could imagine having a legacy system that you were slowly strangling and replacing with managed services, and leveraging Spring Cloud Gateway to intercept calls and redirect to the new destination.

    For this example, I built a dead-simple JavaScript function that’s triggered via HTTP call. I added a line of code that prints out all the request headers before sending a response to the caller.

    The Spring Cloud Gateway configuration is fairly simple. Let’s walk through it.

    spring:
      cloud:
        gateway:
          routes:
          # doing weighted routing between two sites
          - id: test1
            ...
          # adding a header to an Azure Function request
          - id: test3
            uri: https://seroter-function-app.azurewebsites.net
            predicates:
            - Path=/function
            filters:
            - SetPath=/api/HttpTrigger1
            - SetRequestHeader=X-Request-Seroter, Pivotal
    

    Like before, I set the URI to the target host, and set a gateway path. On the pre-filters, I reset the path (removing the /function and replacing with the “real” path to the Azure Function) and added a new request header.

    I started up the Spring Cloud Gateway project and sent in a request via Postman. My function expects a “name” value, which I provided as a query parameter.

    I jumped back to the Azure Portal and checked the logs associated with my Azure Function. Sure enough, I see all the HTTP request headers, including the random one that I added via the gateway. You could imagine this type of functionality helping if you have modern endpoints and legacy clients and need to translate between them!

    Applying rate limiting to an ASP.NET Web Service

    You know what types of apps can benefit from an API Gateway? Legacy apps that weren’t designed for high load or modern clients. One example is rate limiting. Your legacy service may not be able to handle internet-scale requests, or have a dependency on a downstream system that isn’t mean to get pummeled with traffic. You can apply request caching and rate limiting to prevent clients from burying the legacy app.

    First off, I built a classic ASP.NET Web Service. I hoped to never use SOAP again, but I’m dedicated to my craft.

    I did a “cf push” to my Pivotal Application Service environment and deployed two instances of the app to a Windows environment. In a few seconds, I had a publicly-accessible endpoint.

    Then it was back to my Gateway configuration. To do rate limiting, you need a way to identify callers. You know, some way to say that client X has exceeded their limit. Out of the box, there’s a rate limiter that uses Redis to store information about clients. That means I need a Redis instance. The simplest answer is “Docker”, so I ran a simple command to get Redis running locally (docker run --name my-redis -d -p 6379:6379 redis).

    I also needed a way to identify the caller. Here, I finally had to write some code. Specifically, this rate limiter filter expects a “key resolver.” I don’t see a way to declare one via configuration, so I opened the .java file in my project and added a Bean declaration that pulls a query parameter named “user.” That’s not enterprise ready (as you’d probably pull source IP, or something from a header), but this’ll do.

    @SpringBootApplication
    public class CloudGatewayDemo1Application {
    
      public static void main(String[] args) {	 
       SpringApplication.run(CloudGatewayDemo1Application.class, args);
      }
    	
      @Bean
      KeyResolver userKeyResolver() {
        return exchange -> 
       Mono.just(exchange.getRequest().getQueryParams().getFirst("user"));
      }
    }
    

    All that was left was my configuration. Besides adding rate limiting, I also wanted to to shield the caller from setting all those gnarly SOAP-related headings, so I added filters for that too.

    spring:
      cloud:
        gateway:
          routes:
          # doing weighted routing between two sites
          - id: test1
            ...
            
          # adding a header to an Azure Function request
          - id: test3
            ...
            
          # introducing rate limiting for ASP.NET Web Service
          - id: test4
            uri: https://aspnet-web-service.apps.pcfone.io
            predicates:
            - Path=/dotnet
            filters:
            - name: RequestRateLimiter
              args:
                key-resolver: "#{@userKeyResolver}"
                redis-rate-limiter.replenishRate: 1
                redis-rate-limiter.burstCapacity: 1
            - SetPath=/MyService.asmx
            - SetRequestHeader=SOAPAction, http://pivotal.io/SayHi
            - SetRequestHeader=Content-Type, text/xml
            - SetRequestHeader=Accept, text/xml
    

    Here, I set the replenish rate, which is how many request per second per user, and burst capacity, which is the max number of requests in a single second. And I set the key resolver to that custom bean that reads the “user” querystring parameter. Finally, notice the three request headers.

    I once again started up the Spring Cloud Gateway, and send a SOAP payload (no extra headers) to the localhost:8080/dotnet endpoint.

    A single call returned the expected response. If I rapidly submitted requests in, I saw an HTTP 429 response.

    So almost zero code to do some fairly sophisticated things with my gateway. None of those things involved a Java microservice, although obviously, Spring Cloud Gateway does some very nice things for Spring Boot apps.

    I like this trend of microservices-machinery-as-code where I can test and deploy middleware the same way I do custom apps. The more things we can reliably deliver via automation, the more bottlenecks we can remove.

  • First Look: Building Java microservices with the new Azure Spring Cloud

    First Look: Building Java microservices with the new Azure Spring Cloud

    One of the defining characteristics of the public cloud is choice. Need to host an app? On-premises, your choices were a virtual machine or a virtual machine. Now? A public cloud like Microsoft Azure offers nearly a dozen options. You’ve got spectrum of choices ranging from complete control over the stack (e.g. Azure Virtual Machines) to opinionated runtimes (e.g. Azure Functions). While some of these options, like Azure App Service, cater to custom software, no platforms cater to a specific language or framework. Until today.

    At Pivotal’s SpringOne Platform conference, Microsoft took the wraps off Azure Spring Cloud. This first-party managed service sits atop Azure Kubernetes Service and helps Java developers run cloud-native apps. How? It runs managed instances of Spring Cloud components like a Config Server and Service Registry. It builds secure container images using Cloud Native Buildpacks and kpack (both, Pivotal-sponsored OSS). It offers secure binding to other Azure services like Cosmos DB. It has integrated load balancing, log streaming, monitoring, and distributed tracing. And it delivers rolling upgrades and blue-green deployments so that it’s easy to continuously deliver changes. At the moment, Azure Spring Cloud is available as a private preview, so I thought I’d give you a quick tour.

    First off, since it’s a first-party service, I can provision instances via the az command line tool, or the Azure Portal. From the Azure Portal, it’s quite simple. You just provide an Azure subscription, target region, and resource name.

    Once my instance was created, I accessed the unique dashboard for Azure Spring Cloud. I saw some of the standard things that are part of every service (e.g. activity log, access control), as well as the service-specific things like Apps, Config Server, Deployments, and more.

    A Spring Cloud Config Server pulls and aggregates name-value pairs from various sources and serves them up to your application via a single interface. In a typical architecture, you have to host that somewhere. For Azure Spring Cloud, it’s a managed service. So, all I need to do is point this instance to a repository holding my configuration files, and I’m set.

    There’s no “special” way to build Spring Boot apps that run here. They’re just … apps. So I went to start.spring.io to generate my project scaffolding. Here, I chose dependencies for web, eureka (service registry), config client, actuator (health monitoring), and zipkin + sleuth (distributed tracing). Click here to generate an identical project.

    My sample code is basic here. I just expose a REST endpoint, and pull a property value from the attached configuration store.

    @RestController
    @SpringBootApplication
    public class AzureBasicAppApplication {
    
    	public static void main(String[] args) {
    	  SpringApplication.run(AzureBasicAppApplication.class, args);
    	}
    	
    	@Value("${company:Not configured by a Spring Cloud Server}")
            private String company;
    	
    	@GetMapping("/hello")
    	public String Hello() {
    	  return "hello, from " + company;
    	}
    }
    

    To deploy, first I create an application from the CLI or Portal. “Creating” the application doesn’t deploy it, as that’s a separate step.

    With that created, I packaged my Spring Boot app into a JAR file, and deployed it via the az CLI.

    az spring-cloud app deploy -n azure-app --jar-path azure-basic-app-0.0.1-SNAPSHOT.jar

    What happened next? Azure Spring Cloud created a container image, stored it in an Azure Container Registry, and deployed it to AKS. And you don’t need to care about any of that, as you can’t access the registry or AKS! It’s plumbing, that forms a platform. After a few moments, I saw my running instance, and the service registry shows that my instance is UP.

    We’re dealing with containers here, so scaling is fast and easy. The “scale” section lets me scale up with more RAM and CPU, or out with more instances.

    Cloud native, 12-factor apps should treat backing services like attached resources. Azure Spring Cloud embodies this by letting me set up service bindings. Here, I set up a linkage to another Azure service, and at runtime, its credentials and connection string are injected into the app’s configuration. All of this is handled auto-magically by the Spring Boot starters from Azure.

    Logging data goes into Azure Monitor. You can set up Log Analytics for analysis, or pump out to a third party Application Performance Monitoring tool.

    So you have logging, you have built-in monitoring, and you ALSO get distributed tracing. For microservices, this helps you inspect the call graph and see where your performance bottlenecks are. The pic below is from an example app built by Julien at Microsoft.

    Finally, I can do blue/green deploy. This means that I deploy a second instance of the app (via the az CLI, it’s another “deployment”), can independently test it, and then choose to swap traffic over to that instance when I’m ready. If something goes wrong, I can switch back.

    So far, it’s pretty impressive. This is one of the first industry examples of turning Kubernetes into an actual application platform. There’s more functionality planned as the service moves to public preview, beta, and general availability. I’m happy to see Microsoft make such a big bet on Spring, and even happier that developers have a premium option for running Java apps in the public cloud.

  • Messing around with Apache Kafka using the Confluent Cloud free trial

    Messing around with Apache Kafka using the Confluent Cloud free trial

    This week, Confluent announced that there’s now a free trial for their Confluent Cloud. If you’re unfamiliar with either, Confluent is the company founded by the creators of Apache Kafka, and Confluent Cloud is their managed Kafka offering that runs on every major public cloud. There are various ways to kind-of use Kafka in the public cloud (e.g. Amazon Managed Streaming for Apache Kafka, Azure Event Hubs with Kafka interface), but what Confluent offers is the single, best way to use the full suite of Apache Kafka capabilities as a managed service. It’s now free to try out, so I figured I’d take it for a spin.

    First, I went to the Confluent Cloud site and clicked the “try free” button. I was prompted to create an account.

    I was asked for credit card info to account for overages above the free tier (and after the free credits expire in 3 months), which I provided. With that, I was in.

    First, I was prompted to create a cluster. I do what I’m told.

    Here, I was asked to provide a cluster name, and choose a public cloud provider. For each cloud, I was shown a set of available regions. Helpfully, the right side also showed me the prices, limits, billing cycle, and SLA. Transparency, FTW!

    While that was spinning up, I followed the instructions to install the Confluent Cloud CLI so that I could also geek-out at the command line. I like the the example CLI commands in the docs actually reflect the values of my environment (e.g. cluster name). Nice touch.

    Within maybe a minute, my Kafka cluster was running. That’s pretty awesome. I chose to create a new topic with 6 partitions. I’m able to choose up to 60 partitions for a topic, and define other settings like data retention period, max size on disk, and cleanup policy.

    Before building an app to publish data to Confluent Cloud, I needed an API key and secret. I could create this via the CLI, or the dashboard. I generated the key via the dashboard, saved it (since I can’t see it again after generating), and saw the example Java client configuration updated with those values. Handy, especially because I’m going to talk to Kafka via Spring Cloud Stream!

    Now I needed an app that would send messages to Apache Kafka in the Confluent Cloud. I chose Spring Boot because I make good decisions. Thanks to the Spring Cloud Stream project, it’s super-easy to interact with Apache Kafka without having to be an expert in the tech itself. I went to start.spring.io to generate a project. If you click this link, you can download an identical project configuration.

    I opened up this project and added the minimum code and configuration necessary to gab with Apache Kafka in Confluent Cloud. I wanted to be able to submit an HTTP request and see that message published out. That required one annotation to create a REST controller, and one annotation to indicate that this app is a source to the stream. I then have a “Source” variable is autowired, which means it’s inflated by Spring Boot at runtime. Finally, I have a single operation that responds to an HTTP post command and writes the payload to the message stream. That’s it!

    package com.seroter.confluentboot;
    
    import org.springframework.beans.factory.annotation.Autowired;
    import org.springframework.boot.SpringApplication;
    import org.springframework.boot.autoconfigure.SpringBootApplication;
    import org.springframework.cloud.stream.annotation.EnableBinding;
    import org.springframework.cloud.stream.messaging.Source;
    import org.springframework.messaging.support.GenericMessage;
    import org.springframework.web.bind.annotation.PostMapping;
    import org.springframework.web.bind.annotation.RequestBody;
    import org.springframework.web.bind.annotation.RestController;
    
    @EnableBinding(Source.class)
    @RestController
    @SpringBootApplication
    public class ConfluentBootApplication {
    
        public static void main(String[] args) {
          SpringApplication.run(ConfluentBootApplication.class, args);
        }
    	
        @Autowired
        private Source source;
     
        @PostMapping("/messages")
        public String postMsg(@RequestBody String msg) {
         this.source.output().send(new GenericMessage<>(msg));
         return "success";
        }
    }
    

    The final piece? The application configuration. In the application.properties file, I set the handful of parameters, mostly around the target cluster, topic name, and credentials.

    spring.cloud.stream.kafka.binder.brokers=pkc-41973.westus2.azure.confluent.cloud:9092
    spring.cloud.stream.bindings.output.destination=seroter-topic
     
    spring.cloud.stream.kafka.binder.configuration.sasl.jaas.config=org.apache.kafka.common.security.plain.PlainLoginModule required username="[KEY]" password="[SECRET]";
    spring.cloud.stream.kafka.binder.configuration.sasl.mechanism=PLAIN
    spring.cloud.stream.kafka.binder.configuration.security.protocol=SASL_SSL
    

    I started up the app, confirmed that it connected (via application logs), and opened Postman to issue an HTTP POST command.

    After switching back to the Confluent Cloud dashboard, I saw my messages pop up.

    You can probably repeat this whole demo in about 10 minutes. As you can imagine, there’s a LOT more you can do with Apache Kafka than what I showed you. If you want an environment to learn Apache Kafka in depth, it’s now a no-brainer to spin up a free account in Confluent Cloud. And if you want to use a legit managed Apache Kafka for production in any cloud, this seems like a good bet as well.

  • Connecting your Java microservices to each other? Here’s how to use Spring Cloud Stream with Azure Event Hubs.

    You’ve got microservices. Great. They’re being continuous delivered. Neato. Ok … now what? The next hurdle you may face is data processing amongst this distributed mesh o’ things. Brokered messaging engines like Azure Service Bus or RabbitMQ are nice choices if you want pub/sub routing and smarts residing inside the broker. Lately, many folks have gotten excited by stateful stream processing scenarios and using distributed logs as a shared source of events. In those cases, you use something like Apache Kafka or Azure Event Hubs and rely on smart(er) clients to figure out what to read and what to process. What should you use to build these smart stream processing clients?

    I’ve written about Spring Cloud Stream a handful of times, and last year showed how to integrate with the Kafka interface on Azure Event Hubs. Just today, Microsoft shipped a brand new “binder” for Spring Cloud Stream that works directly with Azure Event Hubs. Event processing engines aren’t useful if you aren’t actually publishing or subscribing to events, so I thought I’d try out this new binder and see how to light up Azure Event Hubs.

    Setting Up Microsoft Azure

    First, I created a new Azure Storage account. When reading from an Event Hubs partition, the client maintains a cursor. This cursor tells the client where it should start reading data from. You have the option to store this cursor server-side in an Azure Storage account so that when your app restarts, you can pick up where you left off.

    There’s no need for me to create anything in the Storage account, as the Spring Cloud Stream binder can handle that for me.

    Next, the actual Azure Event Hubs account! First I created the namespace. Here, I chose things like a name, region, pricing tier, and throughput units.

    Like with the Storage account, I could stop here. My application will automatically create the actual Event Hub if it doesn’t exist. In reality, I’d probably want to create it first so that I could pre-define things like partition count and message retention period.

    Creating the event publisher

    The event publisher takes in a message via web request, and publishes that message for others to process. The app is a Spring Boot app, and I used the start.spring.io experience baked into Spring Tools (for Eclipse, Atom, and VS Code) to instantiate my project. Note that I chose “web” and “cloud stream” dependencies.

    With the project created, I added the Event Hubs binder to my project. In the pom.xml file, I added a reference to the Maven package.

     <dependency>
      <groupId>com.microsoft.azure</groupId>
      <artifactId>spring-cloud-azure-eventhubs-stream-binder</artifactId>
      <version>1.1.0.RC5</version>
    </dependency>

    Now before going much farther, I needed a credentials file. Basically, it includes all the info needed for the binder to successfully chat with Azure Event Hubs. You use the az CLI tool to generate it. If you don’t have it handy, the easiest option is to use the Cloud Shell built into the Azure Portal.

    From here, I did az list to show all my Azure subscriptions. I chose the one that holds my Azure Event Hub and copied the associated GUID. Then, I set that account as my default one for the CLI with this command:

    az account set -s 11111111-1111-1111-1111-111111111111

    With that done, I issued another command to generate the credential file.

    az ad sp create-for-rbac --sdk-auth > my.azureauth

    I opened up that file within the Cloud Shell, copied the contents, and pasted the JSON content into a new file in the resources directory of my Spring Boot app.

    Next up, the code. Because we’re using Spring Cloud Stream, there’s no specific Event Hubs logic in my code itself. I only use Spring Cloud Stream concepts, which abstracts away any boilerplate configuration and setup. The code below shows a simple REST controller that takes in a message, and publishes that message to the output channel. Behind the scenes, when my app starts up, Boot discovers and inflates all the objects needed to securely talk to Azure Event Hubs.

     @EnableBinding(Source.class)
    @RestController
    @SpringBootApplication
    public class SpringStreamEventhubsProducerApplication {

    public static void main(String[] args) {
    SpringApplication.run(SpringStreamEventhubsProducerApplication.class, args);
    }

    @Autowired
    private Source source;

    @PostMapping("/messages")
    public String postMsg(@RequestBody String msg) {

    this.source.output().send(new GenericMessage<>(msg));
    return msg;
    }
    }

    How simple is that? All that’s left is the application properties used by the app. Here, I set a few general Spring Cloud Stream properties, and a few related to the Event Hubs binder.

     #point to credentials
    spring.cloud.azure.credential-file-path=my.azureauth
    #get these values from the Azure Portal
    spring.cloud.azure.resource-group=demos
    spring.cloud.azure.region=East US
    spring.cloud.azure.eventhub.namespace=seroter-event-hub

    #choose where to store checkpoints
    spring.cloud.azure.eventhub.checkpoint-storage-account=serotereventhubs

    #set the name of the Event Hub
    spring.cloud.stream.bindings.output.destination=seroterhub

    #be lazy and let the app create the Storage blobs and Event Hub
    spring.cloud.azure.auto-create-resources=true

    With that, I had a working publisher.

    Creating the event subscriber

    It’s no fun publishing messages if no one ever reads them. So, I built a subscriber. I walked through the same start.spring.io experience as above, this time ONLY choosing the Cloud Stream dependency. And then added the Event Hubs binder to the pom.xml file of the created project. I also copied the my.azureauth file (containing our credentials) from the publisher project to the subscriber project.

    It’s criminally simple to pull messages from a broker using Spring Cloud Stream. Here’s the full extent of the code. Stream handles things like content type transformation, and so much more.

     @EnableBinding(Sink.class)
    @SpringBootApplication
    public class SpringStreamEventhubsConsumerApplication {

    public static void main(String[] args) {
    SpringApplication.run(SpringStreamEventhubsConsumerApplication.class, args);
    }

    @StreamListener(Sink.INPUT)
    public void handleMessage(String msg) {
    System.out.println("message is " + msg);
    }
    }

    The final step involved defining the application properties, including the Storage account for checkpointing, and whether to automatically create the Azure resources.

     #point to credentials
    spring.cloud.azure.credential-file-path=my.azureauth
    #get these values from the Azure Portal
    spring.cloud.azure.resource-group=demos
    spring.cloud.azure.region=East US
    spring.cloud.azure.eventhub.namespace=seroter-event-hub

    #choose where to store checkpoints
    spring.cloud.azure.eventhub.checkpoint-storage-account=serotereventhubs

    #set the name of the Event Hub
    spring.cloud.stream.bindings.input.destination=seroterhub
    #set the consumer group
    spring.cloud.stream.bindings.input.group=system3

    #read from the earliest point in the log; default val is LATEST
    spring.cloud.stream.eventhub.bindings.input.consumer.start-position=EARLIEST

    #be lazy and let the app create the Storage blobs and Event Hub
    spring.cloud.azure.auto-create-resources=true

    And now we have a working subscriber.

    Testing this thing

    First, I started up the producer app. It started up successfully, and I can see in the startup log that it created the Event Hub automatically for me after connecting.

    To be sure, I checked the Azure Portal and saw a new Event Hub with 4 partitions.

    Sweet. I called the REST endpoint on my app three times to get a few messages into the Event Hub.

    Now remember, since we’re dealing with a log versus a queuing system, my consumers don’t have to be online (or even registered anywhere) to get the data at their leisure. I can attach to the log at any time and start reading it. So that data is just hanging out in Event Hubs until its retention period expires.

    I started up my Spring Boot subscriber app. After a couple moments, it connected to Azure Event Hubs, and read the three entries that it hadn’t ever seen before.

    Back in the Azure Portal, I checked and saw a new blob container in my Storage account, with a folder for my consumer group, and checkpoints for each partition.

    If I sent more messages into the REST endpoint, they immediately appeared in my subscriber app. What if I defined a new consumer group? Would it read all the messages from the beginning?

    I stopped the subscriber app, changed the application property for “consumer group” to “system4” and restarted the app. After Spring Cloud Stream connected to each partition, it pumped out whatever it found, and responded immediately to any new entries.

    Whether you’re building a change-feed listener off of Cosmos DB, sharing data between business partners, or doing data processing between microservices, you’ll probably be using a broker. If it’s an event bus like Azure Event Hubs, you now have an easy path with Spring Cloud Stream.

  • Want to yank configuration values from your .NET Core apps? Here’s how to store and access them in Azure and AWS.

    Want to yank configuration values from your .NET Core apps? Here’s how to store and access them in Azure and AWS.

    Creating new .NET apps, or modernizing existing ones? If you’re following the 12-factor criteria, you’re probably keeping your configuration out of the code. That means not stashing feature flags in your web.config file, or hard-coding connection strings inside your classes. So where’s this stuff supposed to go? Environment variables are okay, but not a great choice; no version control or access restrictions. What about an off-box configuration service? Now we’re talking. Fortunately AWS, and now Microsoft Azure, offer one that’s friendly to .NET devs. I’ll show you how to create and access configurations in each cloud, and as a bonus, throw out a third option.

    .NET Core has a very nice configuration system that makes it easy to read configuration data from a variety of pluggable sources. That means that for the three demos below, I’ve got virtually identical code even though the back-end configuration stores are wildly different.

    AWS

    Setting it up

    AWS offers a parameter store as part of the AWS Systems Manager service. This service is designed to surface information and automate tasks across your cloud infrastructure. While the parameter store is useful to support infrastructure automation, it’s also a handy little place to cram configuration values. And from what I can tell, it’s free to use.

    To start, I went to the AWS Console, found the Systems Manager service, and chose Parameter Store from the left menu. From here, I could see, edit or delete existing parameters, and create new ones.

    Each parameter gets a name and value. For the name, I used a “/” to define a hierarchy. The parameter type can be a string, list of strings, or encrypted string.

    The UI was smart enough that when I went to go add a second parameter (/seroterdemo/properties/awsvalue2), it detected my existing hierarchy.

    Ok, that’s it. Now I was ready to use it my .NET Core web app.

    Using from code

    Before starting, I installed the AWS CLI. I tried to figure out where to pass credentials into the AWS SDK, and stumbled upon some local introspection that the SDK does. Among other options, it looks for files in a local directory, and those files get created for you when you install the AWS CLI. Just a heads up!

    I created a new .NET Core MVC project, and added the Amazon.Extensions.Configuration.SystemsManager package. Then I created a simple “Settings” class that holds the configuration values we’ll get back from AWS.

    public class Settings
    {
    public string awsvalue { get; set; }
    public string awsvalue2 { get; set; }
    }

    In the appsettings.json file, I told my app which AWS region to use.

    {
    "Logging": {
    "LogLevel": {
    "Default": "Warning"
    }
    },
    "AllowedHosts": "*",
    "AWS": {
    "Profile": "default",
    "Region": "us-west-2"
    }
    }

    In the Program.cs file, I updated the web host to pull configurations from Systems Manager. Here, I’m pulling settings that start with /seroterdemo.

    public class Program
    {
    public static void Main(string[] args)
    {
    CreateWebHostBuilder(args).Build().Run();
    }

    public static IWebHostBuilder CreateWebHostBuilder(string[] args) =>
    WebHost.CreateDefaultBuilder(args)
    .ConfigureAppConfiguration(builder =>
    {
    builder.AddSystemsManager("/seroterdemo");
    })
    .UseStartup<Startup>();
    }

    Finally, I wanted to make my configuration properties available to my app code. So in the Startup.cs file, I grabbed the configuration properties I wanted, inflated the Settings object, and made it available to the runtime container.

    public void ConfigureServices(IServiceCollection services)
    {
    services.Configure<Settings>(Configuration.GetSection("properties"));

    services.Configure<CookiePolicyOptions>(options =>
    {
    options.CheckConsentNeeded = context => true;
    options.MinimumSameSitePolicy = SameSiteMode.None;
    });
    }

    Last step? Accessing the configuration properties! In my controller, I defined a private variable that would hold a local reference to the configuration values, pulled them in through the constructor, and then grabbed out the values in the Index() operation.

            private readonly Settings _settings;

    public HomeController(IOptions<Settings> settings)
    {
    _settings = settings.Value;
    }

    public IActionResult Index()
    {
    ViewData["configval"] = _settings.awsvalue;
    ViewData["configval2"] = _settings.awsvalue2;

    return View();
    }

    After updating my View to show the two properties, I started up my app. As expected, the two configuration values showed up.

    What I like

    You gotta like that price! AWS Systems Manager is available at no cost, and there appears to be no cost to the parameter store. Wicked.

    Also, it’s cool that you have an easily-visible change history. You can see below that the audit trail shows what changed for each version, and who changed it.

    The AWS team built this extension for .NET Core, and they added capabilities for reloading parameters automatically. Nice touch!

    Microsoft Azure

    Setting it up

    Microsoft just shared the preview release of the Azure App Configuration service. This managed service is specifically created to help you centralize configurations. It’s brand new, but seems to be in pretty good shape already. Let’s take it for a spin.

    From the Microsoft Azure Portal, I searched for “configuration” and found the preview service.

    I named my resource seroter-config, picked a region and that was it. After a moment, I had a service instance to mess with. I quickly added two key-value combos.

    That was all I needed to do to set this up.

    Using from code

    I created another new .NET Core MVC project and added the Microsoft.Extensions.Configuration.AzureAppConfiguration package. Once again I created a Settings class to hold the values that I got back from the Azure service.

    public class Settings
    {
    public string azurevalue1 { get; set; }
    public string azurevalue2 { get; set; }
    }

    Next up, I updated my Program.cs file to read the Azure App Configuration. I passed the connection string in here, but there are better ways available.

    public class Program
    {
    public static void Main(string[] args)
    {
    CreateWebHostBuilder(args).Build().Run();
    }

    public static IWebHostBuilder CreateWebHostBuilder(string[] args) =>
    WebHost.CreateDefaultBuilder(args)
    .ConfigureAppConfiguration((hostingContext, config) => {
    var settings = config.Build();
    config.AddAzureAppConfiguration("[con string]");
    })
    .UseStartup<Startup>();
    }

    I also updated the ConfigureServices() operation in my Startup.cs file. Here, I chose to only pull configurations that started with seroterdemo:properties.

     public void ConfigureServices(IServiceCollection services)
    {
    //added
    services.Configure<Settings>(Configuration.GetSection("seroterdemo:properties"));

    services.Configure<CookiePolicyOptions>(options =>
    {
    options.CheckConsentNeeded = context => true;
    options.MinimumSameSitePolicy = SameSiteMode.None;
    });
    }

    To read those values in my controller, I’ve got just about the same code as in the AWS example. The only difference was what I called my class members!

    private readonly Settings _settings;

    public HomeController(IOptions<Settings> settings)
    {
    _settings = settings.Value;
    }

    public IActionResult Index()
    {
    ViewData["configval"] = _settings.azurevalue1;
    ViewData["configval2"] = _settings.azurevalue2;

    return View();
    }

    I once again updated my View to print out the configuration values, and not shockingly, it worked fine.

    What I like

    For a new service, there’s a few good things to like here. The concept of labels is handy, as it lets me build keys that serve different environments. See here that I created labels for “qa” and “dev” on the same key.

    I saw a “compare” feature which looks handy. There’s also a simple search interface here too, which is valuable.

    Pricing isn’t yet available, no I’m not clear as to how I’d have to pay for this.

    Spring Cloud Config

    Setting it up

    Both of the above service are quite nice. And super convenient if you’re running in those clouds. You might also want a portable configuration store that offers its own pluggable backing engines. Spring Cloud Config makes it easy to build a config store backed by a file system, git, GitHub, Hashicorp Vault, and more. It’s accessible via HTTP/S, supports encryption, is fully open source, and much more.

    I created a new Spring project from start.spring.io. I chose to include the Spring Cloud Config Server and generate the project.

    Literally all the code required is a single annotation (@EnableConfigServer).

     @EnableConfigServer
    @SpringBootApplication
    public class SpringBlogConfigServerApplication {

    public static void main(String[] args) {
    SpringApplication.run(SpringBlogConfigServerApplication.class, args);
    }
    }

    In my application properties, I pointed my config server to the location of the configs to read (my GitHub repo), and which port to start up on.

    server.port=8888
    spring.cloud.config.server.encrypt.enabled=false
    spring.cloud.config.server.git.uri=https://github.com/rseroter/spring-demo-configs

    My GitHub repo has a configuration file called blogconfig.properties with the following content:

    With that, I started up the project, and had a running configuration server.

    Using from code

    To talk to this configuration store from my .NET app, I used the increasingly-popular Steeltoe library. These packages, created by Pivotal, bring microservices patterns to your .NET (Framework or Core) apps.

    For the last time, I created a .NET Core MVC project. This time I added a dependency to Steeltoe.Extensions.Configuration.ConfigServerCore. Again, I added a Settings class to hold these configuration properties.

    public class Settings
    {
    public string property1 { get; set; }
    public string property2 { get; set; }
    public string property3 { get; set; }
    public string property4 { get; set; }
    }

    In my appsettings.json, I set my application name (to match the config file’s name I want to access) and URI of the config server.

    {
    "Logging": {
    "LogLevel": {
    "Default": "Warning"
    }
    },
    "AllowedHosts": "*",
    "spring": {
    "application": {
    "name": "blogconfig"
    },
    "cloud": {
    "config": {
    "uri": "http://localhost:8888"
    }
    }
    }
    }

    My Program.cs file has a “using” statement for the Steeltoe.Extensions.Configuration.ConfigServer package, and then used the “AddConfigServer” operation to add the config server as a source.

    public class Program
    {
    public static void Main(string[] args)
    {
    CreateWebHostBuilder(args).Build().Run();
    }

    public static IWebHostBuilder CreateWebHostBuilder(string[] args) =>
    WebHost.CreateDefaultBuilder(args)
    .AddConfigServer()
    .UseStartup<Startup>();
    }

    I once again updated the Startup.cs file to load the target configurations into my typed object.

    public void ConfigureServices(IServiceCollection services)
    {
    services.Configure<CookiePolicyOptions>(options =>
    {
    options.CheckConsentNeeded = context => true;
    options.MinimumSameSitePolicy = SameSiteMode.None;
    });

    services.Configure<Settings>(Configuration);
    }

    My controller pulled the configuration object, and I used it to yank out values to share with the View.

    public HomeController(IOptions<Settings> mySettings) {
    _mySettings = mySettings.Value;
    }
    Settings _mySettings {get; set;}

    public IActionResult Index()
    {
    ViewData["configval"] = _mySettings.property1;
    return View();
    }

    Updating the view, and starting the .NET Core app yielded the expected results.

    What I like

    Spring Cloud Config is a very mature OSS project. You can deliver this sort of microservices machinery along with your apps in your CI/CD pipelines — these components are software that you ship versus services that need to be running — which is powerful. It offers a variety of backends, OAuth2 for security, encryption/decryption of values, and much more. It’s a terrific choice for a consistent configuration store on every infrastructure.

    But realistically, I don’t care which of the above you use. Just use something to extract environment-specific configuration settings from your .NET apps. Use these robust external stores to establish some rigor around these values, and make it easier to share configurations, and keep them in sync across all of your application instances.

  • Go “multi-cloud” while *still* using unique cloud services? I did it using Spring Boot and MongoDB APIs.

    Go “multi-cloud” while *still* using unique cloud services? I did it using Spring Boot and MongoDB APIs.

    What do you think of when you hear the phrase “multi-cloud”? Ok, besides stupid marketing people and their dumb words. You might think of companies with on-premises environments who are moving some workloads into a public cloud. Or those who organically use a few different clouds, picking the best one for each workload. While many suggest that you get the best value by putting everything on one provider, that clearly isn’t happening yet. And maybe it shouldn’t. Who knows. But can you get the best of each cloud while retaining some portability? I think you can.

    One multi-cloud solution is to do the lowest-common-denominator thing. I really don’t like that. Multi-cloud management tools try to standardize cloud infrastructure but always leave me disappointed. And avoiding each cloud’s novel services in the name of portability is unsatisfying and leaves you at a competitive disadvantage. But why should we choose the cloud (Azure! AWS! GCP!) and runtime (Kubernetes! VMs!) before we’ve even written a line of code? Can’t we make those into boring implementation details, and return our focus to writing great software? I’d propose that with good app frameworks, and increasingly-standard interfaces, you can create great software that runs on any cloud, while still using their novel services.

    In this post, I’ll build a RESTful API with Spring Boot and deploy it, without code changes, to four different environments, including:

    1. Local environment running MongoDB software in a Docker container.
    2. Microsoft Azure Cosmos DB with MongoDB interface.
    3. Amazon DocumentDB with MongoDB interface.
    4. MongoDB Enterprise running as a service within Pivotal Cloud Foundry

    Side note: Ok, so multi-cloud sounds good, but it seems like a nightmare of ops headaches and nonstop dev training. That’s true, it sure can be. But if you use a good multi-cloud app platform like Pivotal Cloud Foundry, it honestly makes the dev and ops experience virtually the same everywhere. So, it doesn’t HAVE to suck, although there are still going to be challenges. Ideally, your choice of cloud is a deploy-time decision, not a design-time constraint.

    Creating the app

    In my career, I’ve coded (poorly) with .NET, Node, and Java, and I can say that Spring Boot is the fastest way I’ve seen to build production-quality apps. So, I chose Spring Boot to build my RESTful API. This API stores and returns information about cloud databases. HOW VERY META. I chose MongoDB as my backend database, and used the amazing Spring Data to simplify interactions with the data source.

    From start.spring.io, I created a project with dependencies on spring-boot-starter-data-rest (auto-generated REST endpoints for interacting with databases), spring-boot-starter-data-mongodb (to talk to MongoDB), spring-boot-starter-actuator (for “free” health metrics), and spring-cloud-cloudfoundry-connector (to pull connection details from the Cloud Foundry environment). Then I opened the project and created a new Java class representing a CloudProvider.

    package seroter.demo.cloudmongodb;
    
    import org.springframework.data.annotation.Id;
    
    public class CloudProvider {
    	
    	@Id private String id;
    	
    	private String providerName;
    	private Integer numberOfDatabases;
    	private Boolean mongoAsService;
    	
    	public String getProviderName() {
    		return providerName;
    	}
    	
    	public void setProviderName(String providerName) {
    		this.providerName = providerName;
    	}
    	
    	public Integer getNumberOfDatabases() {
    		return numberOfDatabases;
    	}
    	
    	public void setNumberOfDatabases(Integer numberOfDatabases) {
    		this.numberOfDatabases = numberOfDatabases;
    	}
    	
    	public Boolean getMongoAsService() {
    		return mongoAsService;
    	}
    	
    	public void setMongoAsService(Boolean mongoAsService) {
    		this.mongoAsService = mongoAsService;
    	}
    }

    Thanks to Spring Data REST (which is silly powerful), all that was left was to define a repository interface. If all I did was create an annotate the interface, I’d get full CRUD interactions with my MongoDB collection. But for fun, I also added an operation that would return all the clouds that did (or did not) offer a MongoDB service.

    package seroter.demo.cloudmongodb;
    
    import java.util.List;
    
    import org.springframework.data.mongodb.repository.MongoRepository;
    import org.springframework.data.rest.core.annotation.RepositoryRestResource;
    
    @RepositoryRestResource(collectionResourceRel = "clouds", path = "clouds")
    public interface CloudProviderRepository extends MongoRepository<CloudProvider, String> {
    	
    	//add an operation to search for a specific condition
    	List<CloudProvider> findByMongoAsService(Boolean mongoAsService);
    }

    That’s literally all my code. Crazy.

    Run using Dockerized MongoDB

    To start this test, I wanted to use “real” MongoDB software. So I pulled the popular Docker image and started it up on my local machine:

    docker run -d -p 27017:27017 --name serotermongo mongo

    When starting up my Spring Boot app, I could provide database connection info (1) in an app.properties file, or, as (2) input parameters that require nothing in the compiled code package itself. I chose the file option for readability and demo purposes, which looked like this:

    #local configuration
    spring.data.mongodb.uri=mongodb://0.0.0.0:27017
    spring.data.mongodb.database=demodb
    
    #port configuration
    server.port=${PORT:8080}

    After starting the app, I issued a base request to my API via Postman. Sure enough, I got a response. As expected, no data in my MongoDB database. Note that Spring Data automatically creates a database if it doesn’t find the one specified, so the “demodb” now existed.

    I then issued a POST command to add a record to MongoDB, and that worked great too. I got back the URI for the new record in the response.

    I also tried calling that custom “search” interface to filter the documents where “mongoAsService” is true. That worked.

    So, running my Spring Boot REST API with a local MongoDB worked fine.

    Run using Microsoft Azure Cosmos DB

    Next up, I pointed this application to Microsoft Azure. One of the many databases in Azure is Cosmos DB. This underrated database offers some pretty amazing performance and scale, and is only available from Microsoft in their cloud. NO PROBLEM. It serves up a handful of standard interfaces, including Cassandra and MongoDB. So I can take advantage of all the crazy-great hosting features, but not lock myself into any of them.

    I started by visiting the Microsoft Azure portal. I chose to create a new Cosmos DB instance, and selected which API (SQL, Cassandra, Gremlin, MongoDB) I wanted.

    After a few minutes, I had an instance of Cosmos DB. If I had wanted to, I could have created a database and collection from the Azure portal, but I wanted to confirm that Spring Data would do it for me automatically.

    I located the “Connection String” properties for my new instance, and grabbed the primary one.

    With that in hand, I went back to my application.properties file, commented out my “local” configuration, and added entries for the Azure instance.

    #local configuration
    #spring.data.mongodb.uri=mongodb://0.0.0.0:27017
    #spring.data.mongodb.database=demodb
    
    #port configuration
    server.port=${PORT:8080}
    
    #azure cosmos db configuration
    spring.data.mongodb.uri=mongodb://seroter-mongo:<password>@seroter-mongo.documents.azure.com:10255/?ssl=true&replicaSet=globaldb
    spring.data.mongodb.database=demodb

    I could publish this app to Azure, but because it’s also easy to test it locally, I just started up my Spring Boot REST API again, and pinged the database. After POSTing a new record to my endpoint, I checked the Azure portal and sure enough, saw a new database and collection with my “document” in it.

    Here, I’m using a super-unique cloud database but don’t need to manage my own software to remain “portable”, thanks to Spring Boot and MongoDB interfaces. Wicked.

    Run using Amazon DocumentDB

    Amazon DocumentDB is the new kid in town. I wrote up an InfoQ story about it, which frankly inspired me to try all this out.

    Like Azure Cosmos DB, this database isn’t running MongoDB software, but offers a MongoDB-compatible interface. It also offers some impressive scale and performance capabilities, and could be a good choice if you’re an AWS customer.

    For me, trying this out was a bit of a chore. Why? Mainly because the database service is only accessible from within an AWS private network. So, I had to properly set up a Virtual Private Cloud (VPC) network and get my Spring Boot app deployed there to test out the database. Not rocket science, but something I hadn’t done in a while. Let me lay out the steps here.

    First, I created a new VPC. It had a single public subnet, and I added two more private ones. This gave me three total subnets, each in a different availability zone.

    Next, I switched to the DocumentDB console in the AWS portal. First, I created a new subnet group. Each DocumentDB cluster is spread across AZs for high availability. This subnet group contains both the private subnets in my VPC.

    I also created a parameter group. This group turned off the requirement for clients to use TLS. I didn’t want my app to deal with certs, and also wanted to mess with this capability in DocumentDB.

    Next, I created my DocumentDB cluster. I chose an instance class to match my compute and memory needs. Then I chose a single instance cluster; I could have chosen up to 16 instances of primaries and replicas.

    I also chose my pre-configured VPC and the DocumentDB subnet group I created earlier. Finally, I set my parameter group, and left default values for features like encryption and database backups.

    After a few minutes, my cluster and instance were up and running. While this console doesn’t expose the ability to create databases or browse data, it does show me health metrics and cluster configuration details.

    Next, I took the connection string for the cluster, and updated my application.properties file.

    #local configuration
    #spring.data.mongodb.uri=mongodb://0.0.0.0:27017
    #spring.data.mongodb.database=demodb
    
    #port configuration
    server.port=${PORT:8080}
    
    #azure cosmos db configuration
    #spring.data.mongodb.uri=mongodb://seroter-mongo:<password>@seroter-mongo.documents.azure.com:10255/?ssl=true&replicaSet=globaldb
    #spring.data.mongodb.database=demodb
    
    #aws documentdb configuration
    spring.data.mongodb.uri=mongodb://seroter:<password>@docdb-2019-01-27-00-20-22.cluster-cmywqx08yuio.us-west-2.docdb.amazonaws.com:27017
    spring.data.mongodb.database=demodb

    Now to deploy the app to AWS. I chose Elastic Beanstalk as the application host. I selected Java as my platform, and uploaded the JAR file associated with my Spring Boot REST API.

    I had to set a few more parameters for this app to work correctly. First, I set a SERVER_PORT environment variable to 5000, because that’s what Beanstalk expects. Next, I ensured that my app was added to my VPC, provisioned a public IP address, and chose to host on the public subnet. Finally, I set the security group to the default one for my VPC. All of this should ensure that my app is on the right network with the right access to DocumentDB.

    After the app was created in Beanstalk, I queried the endpoint of my REST API. Then I created a new document, and yup, it was added successfully.

    So again, I used a novel, interesting cloud-only database, but didn’t have to change a lick of code.

    Run using MongoDB in Pivotal Cloud Foundry

    The last place to try this app out? A multi-cloud platform like PCF. If you did use something like PCF, the compute layer is consistent regardless of what public/private cloud you use, and connectivity to data services is through a Service Broker. In this case, MongoDB clusters are managed by PCF, and I get my own cluster via a Broker. Then my apps “bind” to that cluster.

    First up, provisioning MongoDB. PCF offers MongoDB Enterprise from Mongo themselves. To a developer, this looks like a database-as–a-service because clusters are provisioned, optimized, backed up, and upgraded via automation. Via the command line or portal, I could provision clusters. I used the portal to get myself happy little instance.

    After giving the service a name, I was set. As with all the other examples, no code changes were needed. I actually removed any MongoDB-related connection info from my application.properties file because that spring-cloud-cloudfoundry-connector dependency actually grabs the credentials from the environment variables set by the service broker.

    One thing I *did* create for this environment — which is entirely optional — is a Cloud Foundry manifest file. I could pass these values into a command line instead of creating a declarative file, but I like writing them out. These properties simply tell Cloud Foundry what to do with my app.

    ---
    applications:
    - name: boot-seroter-mongo
      memory: 1G
      instances: 1
      path: target/cloudmongodb-0.0.1-SNAPSHOT.jar
      services:
      - seroter-mongo

    With that, I jumped to a terminal, navigated to a directory holding that manifest file, and typed cf push. About 25 seconds later, I had a containerized, reachable application that connected to my MongoDB instance.

    Fortunately, PCF treats Spring Boot apps special, so it used the Spring Boot Actuator to pull health metrics and more. Above, you can see that for each instance, I saw extra health information for my app, and, MongoDB itself.

    Once again, I sent some GET requests into my endpoint, saw the expected data, did a POST to create a new document, and saw that succeed.

    Wrap Up

    Now, obviously there are novel cloud services without “standard” interfaces like the MongoDB API. Some of these services are IoT, mobile, or messaging related —although Azure Event Hubs has a Kafka interface now, and Spring Cloud Stream keeps message broker details out of the code. Other unique cloud services are in emerging areas like AI/ML where standardization doesn’t really exist yet. So some applications will have a hard coupling to a particular cloud, and of course that’s fine. But increasingly, where you run, how you run, and what you connect to, doesn’t have to be something you choose up front. Instead, first you build great software. Then, you choose a cloud. And that’s pretty cool.

  • Deploying a platform (Spring Cloud Data Flow) to Azure Kubernetes Service

    Deploying a platform (Spring Cloud Data Flow) to Azure Kubernetes Service

    Platforms should run on Kubernetes, apps should run on PaaS. That simple heuristic seems to resonate with the companies I talk to. When you have access to both environments, it makes sense to figure out what runs where. PaaS is ideal when you have custom code and want an app-aware environment that wires everything together. It’s about velocity, and straightforward Day 2 management. Kubernetes is a great choice when you have closely coordinated, distributed components with multiple exposed network ports and a need to access to infrastructure primitives. You know, a platform! Things like databases, message brokers, and hey, integration platforms. In this post, I see what it takes to get a platform up and running on Azure’s new Kubernetes service.

    While Kubernetes itself is getting to be a fairly standard component, each public cloud offers it up in a slightly different fashion. Some clouds manage the full control plane, others don’t. Some are on the latest version of Kubernetes, others aren’t. When you want a consistent Kubernetes experience in every infrastructure pool, you typically use an installable product like Pivotal Container Service (PKS).  But I’ll be cloud-specific in this demo, since I wanted to take Azure Kubernetes Service (AKS) for a spin. And we’ll use Spring Cloud Data Flow as our “platform” to install on AKS.

    To start with, I went to the Azure Portal and chose to add a new instance of AKS. I was first asked to name my cluster, choose a location, pick a Kubernetes version, and set my initial cluster size.

    For my networking configuration, I turned on “HTTP application routing” which gives me a basic (non-production grade) ingress controller. Since my Spring Cloud Data Flow is routable and this is a basic demo, it’ll work fine.

    After about eleven minutes, I had a fully operational Kubernetes cluster.

    Now, this is a “managed” service from Microsoft, but they definitely show you all the guts of what’s stood up to support it. When I checked out the Azure Resource Group that AKS created, it was … full. So, this is apparently the hooves and snouts of the AKS sausage. It’s there, but I don’t want to know about it.

    The Azure Cloud Shell is a hidden gem of the Microsoft cloud. It’s a browser-based shell that’s stuffed with powerful components. Instead of prepping my local machine to talk to AKS, I just used this. From the Azure Portal, I spun up the Shell, loaded my credentials to the AKS cluster, and used the kubectl command to check out my nodes.

    Groovy. Let’s install stuff. Spring Cloud Data Flow (SCDF) makes it easy to build data pipelines. These pipelines are really just standalone apps that get stitched together to form a sequential data processing pipeline. SCDF is a platform itself; it’s made up of a server, Redis node, MySQL node, and messaging broker (RabbitMQ, Apache Kafka, etc). It runs atop a number of different engines, including Cloud Foundry or Kubernetes. Spring Cloud Data Flow for Kubernetes has simple instructions for installing it via Helm.

    I issued a Helm command from the Azure Cloud Shell (as Helm is pre-installed there) and in moments, had SCDF deployed.

    When it finished, I saw that I had new Kubernetes pods running, and a load balancer service for routing traffic to the Data Flow server.

    SCDF offers up a handful of pre-built “apps” to bake into pipelines, but the real power comes from building your own apps. I showed that off a few weeks ago, so for this demo, I’ll keep it simple. This streaming pipeline simply takes in an HTTP request, and drop the payload into a log file. THRILLING!

    The power of a platform like SCDF comes out during deployment of a pipeline. See here that I chose Kubernetes as my underlying engine, created a load balancer service (to make my HTTP component routable) via a property setting, and could have optionally chose different instance counts for each component in the pipeline. Love that.

    If you have GUI-fatique, you can always set these deploy-time properties via free text. I won’t judge you.

    After deploying my streaming pipeline, I saw new pods shows up in AKS: one pod for each component of my pipeline.

    I ran the kubectl get services command to confirm that SCDF built out a load balancer service for the HTTP app and assigned a public IP.

    SCDF reads runtime information from the underlying engine (AKS, in this case) and showed me that my HTTP app was running, and its URL.

    I spun up Postman and sent a bunch of JSON payloads to the first component of the SCDF pipeline running on AKS. 

    I then ran a kubectl logs [log app’s pod name] command to check the logs of the pipeline component that’s supposed to write logs.

    And that’s it. In a very short period of time, I stood up a Kubernetes cluster, deployed a platform on top of it, and tested it out. AKS makes this fairly easy, and the fact that it’s vanilla Kubernetes is nice. When using public cloud container-as-a-service products or installable software that runs everywhere, consider Kubernetes a great choice for running platforms.