Category: OSS

  • The Gemini CLI might change how I work. Here are four prompts that prove it.

    The Gemini CLI might change how I work. Here are four prompts that prove it.

    Yesterday morning, we took the wraps off one of the most interesting Google releases of 2025. The Gemini CLI is here, giving you nearly unlimited access to Gemini from directly within the terminal. This is a new space, but there are other great solutions already out there. Why is this different? Yes, it’s good at multi-step reasoning, code generation, and creative tasks. Build apps, fix code, parse images, build slides, analyze content, or whatever. But what’s truly unique is that It’s fully open source, no cost to use, usable anywhere, and super extensible. Use Gemini 2.5 Pro’s massive context window (1m tokens), multimodality, and strong reasoning ability to do some amazing stuff.

    Requirements? Have Node installed, and a Google account. That’s it. You get lots of free queries against our best models. You get more by being a cloud customer if you need it. Let’s have a quick look around, and then I’ll show you four prompts that demonstrate what it can really do.

    The slash command shows me what’s available here. I can see and resume previous chats, configure the editor environment, leverage memory via context files like GEMINI.md, change the theme, and use tools. Choosing that option shows us the available tools such as reading files and folders, finding files and folders, performing Google searches, running Shell commands, and more.

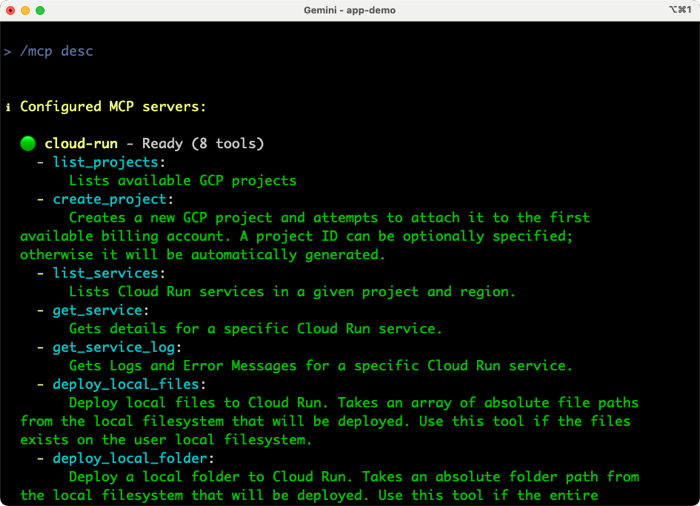
    The Gemini CLI has many extensibility points, including use of MCP servers. I added the Cloud Run MCP server but you can add anything here.

    I’m only scratching the surface here, so don’t forget to check out the official repo, docs, and blog post announcement. But now, let’s walk through four prompts that you can repeat to experience the power of the Gemini CLI, and why each is a big deal.

    Prompt #1 – Do some research.

    Software engineering is more than coding. You spend time researching, planning, and thinking. I want to build a new app, but I’m not sure which frontend framework I should use. And I don’t want stale answers from an LLM that was trained a year ago.

    I’ve got a new research report on JavaScript frameworks, and also want to factor in web results. My prompt:

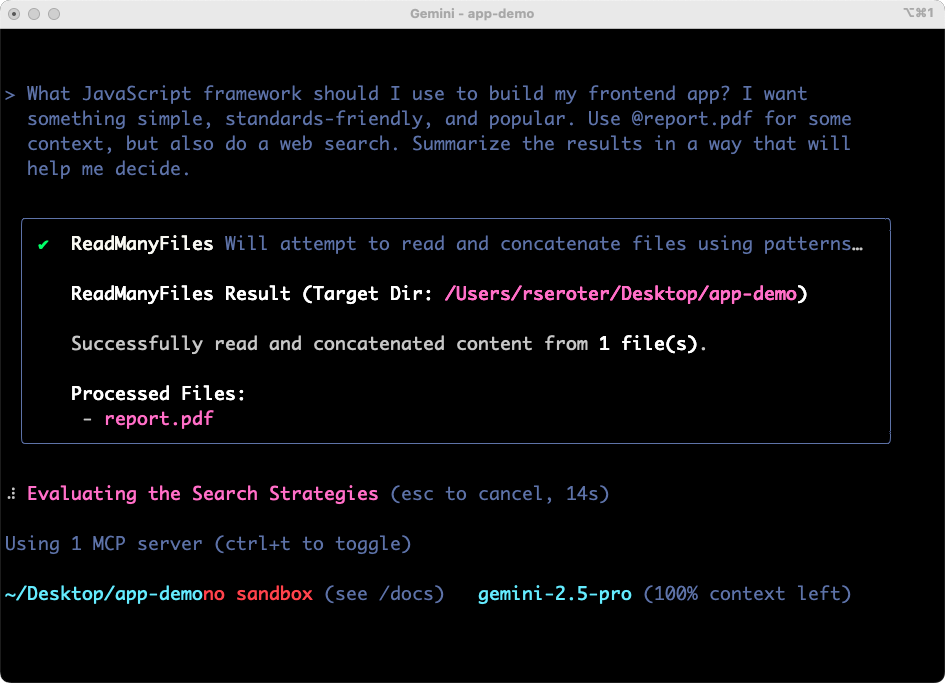
    What JavaScript framework should I use to build my frontend app? I want something simple, standards-friendly, and popular. Use @report.pdf for some context, but also do a web search. Summarize the results in a way that will help me decide.

    The Gemini CLI figured out some tools to use, successfully considered the file into the prompt, started off on its work searching the web, and preparing results.

    The results were solid. I got tradeoff and analysis on three viable options. The summary was helpful and I could have continued going back and forth on clarifying questions. For architects, team leaders, and engineers, having a research partner in the terminal is powerful.

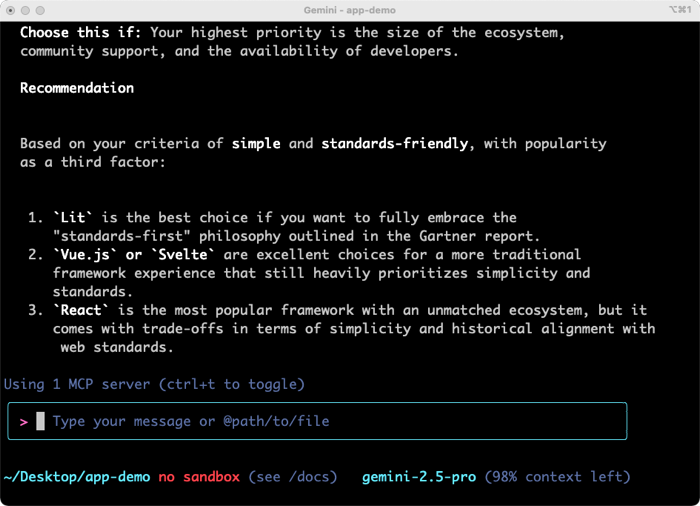
    Why was this a big deal? This prompt showed the use of live Google Search, local (binary) file processing, and in-context learning for devs. These tools are changing how I do quick research.

    Prompt #2 – Build an app.

    These tools will absolutely change how folks build, fix, change, and modernize software. Let’s build something new.

    I fed in this prompt, based on my new understanding of relevant JavaScript frameworks.

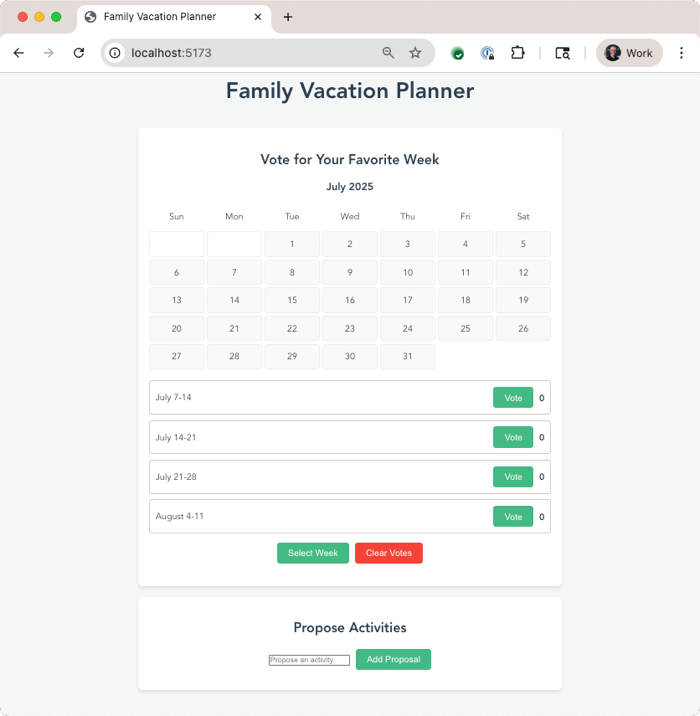
    Let’s build a calendar app for my family to plan a vacation together. It should let us vote on weeks that work best, and then nominate activities for each day. Use Vue.js for the JavaScript framework.

    Now to be sure, we didn’t build this to be excellent at one-shot results. Instead, it’s purposely built for an interactive back-and-forth with the software developer. You can start it with –yolo mode to have it automatically proceed without asking permission to do things, and even with –b to run it headless assuming no interactivity. But I want to stay in control here. So I’m not in YOLO mode.

    I quickly got back a plan, and was asked if I wanted to proceed.

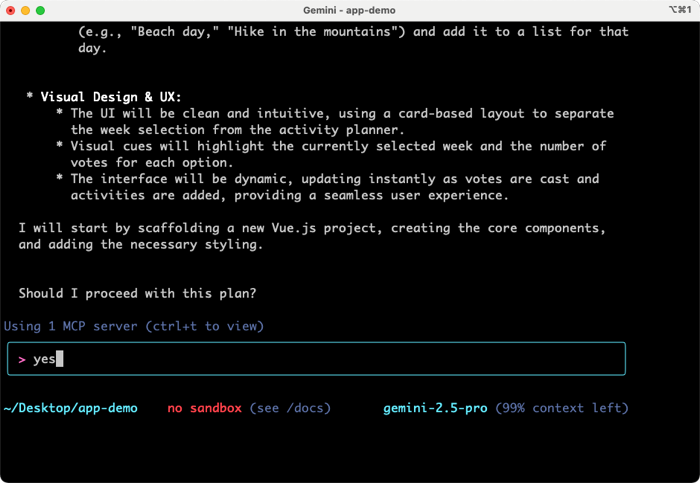
    Gemini CLI also asks me about running Shell commands. I can allow it once, allow it always, or cancel. I like these options. It’s fun watching Gemini make decisions and narrate what it’s working on. Once it’s done building directories, writing code, and evaluating its results, the CLI even starts up a server so that I can test the application. The first draft was functional, but not attractive, so I asked for a cleanup.

    The next result was solid, and I could have continued iterating on new features along with look and feel.

    Why was this a big deal? This prompt showed iterative code development, important security (request permission) features, and more. We’ll also frequently offer to pop you into the IDE for further coding. This will change how I understand or bootstrap most of the code I work with.

    Prompt #3 – Do a quick deploy to the cloud.

    I’m terrible at remembering the syntax and flags for various CLI tools. The right git command or Google Cloud CLI request? Just hopeless. The Gemini CLI is my solution. I can ask for what I want, and the Gemini CLI figures out the right type of request to make.

    We added MCP as a first-class citizen, so I added the Cloud Run MCP server, as mentioned above. I also made this work without it, as the Gemini CLI figured out the right way to directly call the Google Cloud CLI (gcloud) to deploy my app. But, MCP servers provide more structure and ensure consistent implementation. Here’s the prompt I tried to get this app deployed. Vibe deployment, FTW.

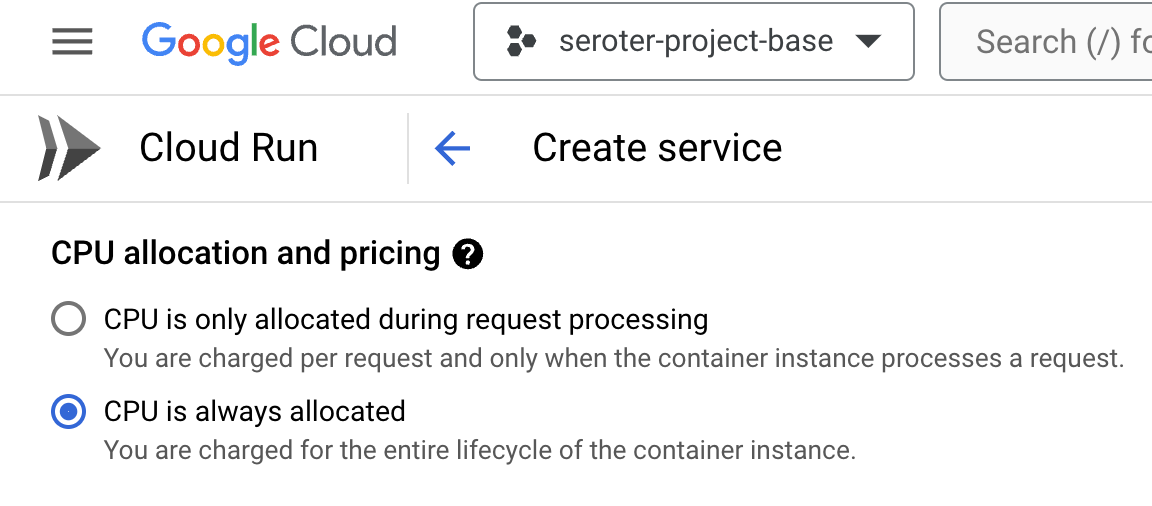
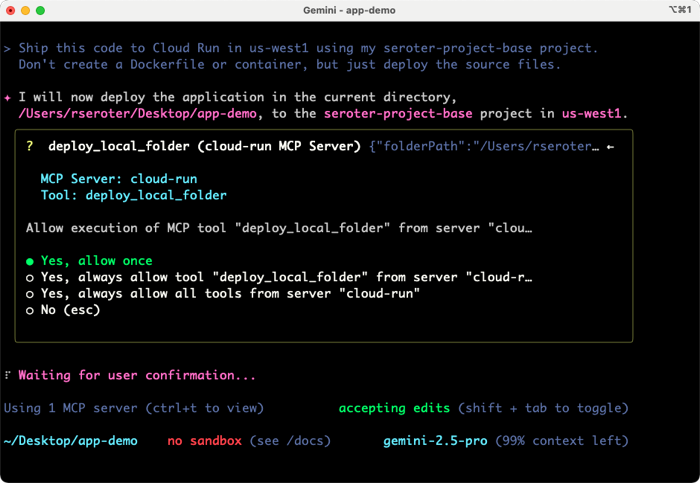
    Ship this code to Cloud Run in us-west1 using my seroter-project-base project. Don’t create a Dockerfile or container, but just deploy the source files.

    The Gemini CLI immediately recognizes that a known MCP tool can help, and shows me the tool it chose.

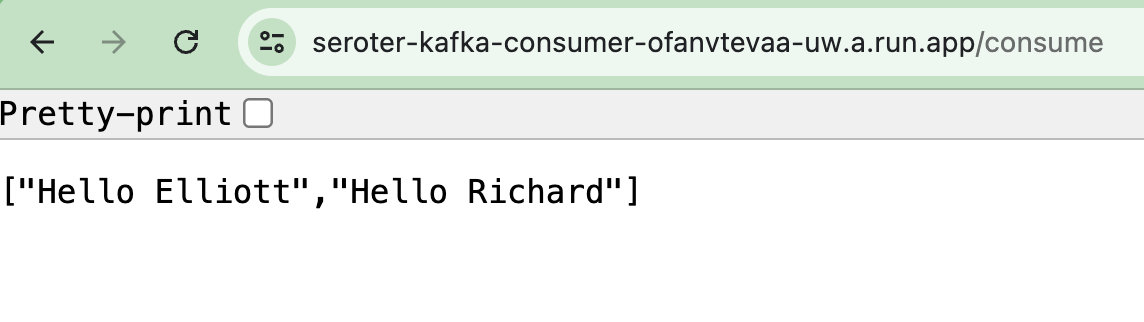
    It got going, and shipped my code successfully to Cloud Run using the MCP server. But the app didn’t start correctly. The Gemini CLI noticed that by reading the service logs, and diagnosed the issue. We didn’t provide a reference for which port to listen on. No problem.

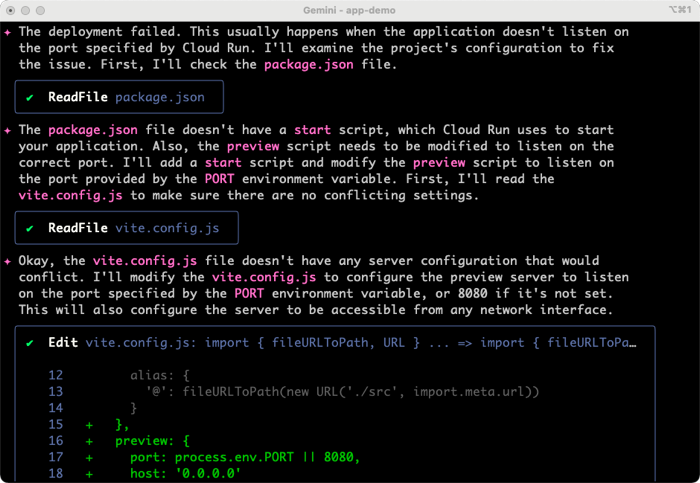
    It came up with a fix, made the code changes, and redeployed.

    Why was this a big deal? We saw the extensibility of MCP servers, and the ability to “forget” some details of exactly how other tools and CLIs work. Plus we observed that the Gemini CLI did some smart reasoning and resolved issues on its own. This is going to change how I deploy, and how much time I spend (waste?) deploying.

    Prompt #4 – Do responsible CI/CD to the cloud.

    The third prompt was cool and showed how you can quickly deploy to a cloud target, even without knowing the exact syntax to make it happen. I got it working with Kubernetes too. But can the Gemini CLI help me do proper CI/CD, even if I don’t know exactly how to do it? In this case I do know how to set up Google Cloud Build and Cloud Deploy, but let’s pretend I don’t. Here’s the prompt.

    Create a Cloud Build file that would build a container out of this app code and store it in Artifact Registry. Then create the necessary Cloud Deploy files that defines a dev and production environment in Cloud Run. Create the Cloud Deploy pipeline, and then reference it in the Cloud Build file so that the deploy happens when a build succeeds. And then go ahead trigger the Cloud Build. Pay very careful attention for how to create the correct files and syntax needed for targeting Cloud Run from Cloud Deploy.

    The Gemini CLI started by asking me for some info from my Google Cloud account (project name, target region) and then created YAML files for Cloud Build and Cloud Deploy. It also put together a CLI command to instantiate a Docker repo in Artifact Registry. Now, I know that the setup for Cloud Deploy working with Cloud Run has some specific syntax and formatting. Even with my above command, I can see that I didn’t get syntactically correct YAML in the skaffold file.

    I rejected the request of the Gemini CLI to do a deployment, since I knew it would fail. Then I gave it the docs URL for setting up Cloud Run with Cloud Deploy and asked it to make a correction.

    That Skaffold file doesn’t look correct. Take a look at the docs (https://cloud.google.com/deploy/docs/deploy-app-run), and follow its guidance for setting up the service YAML files, and referencing the right Skaffold version at the top. Show me the result before pushing a change to the Cloud Deploy pipeline.

    Fortunately, the Gemini CLI can do a web fetch and process the latest product documentation. I did a couple of turns and got what I wanted. Then I asked it to go ahead and update the pipeline and trigger Cloud Build.

    It failed at first because I didn’t have a Dockerfile, but after realizing that, automatically created one and started the build again.

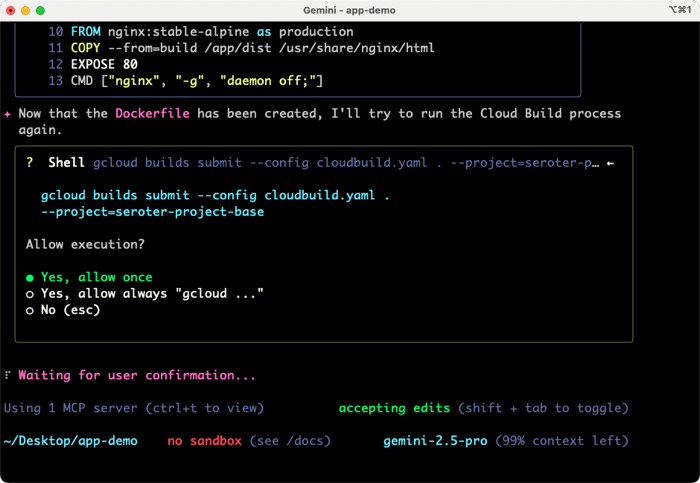
    It took a few iterations of failed builds for the Gemini CLI to land on the right syntax. But it kept dutifully trying, making changes, and redeploy until it got it right. Just like I would have if I were doing it myself!

    After that back and forth a few times, I had all the right files, syntax, container artifacts, and pipelines going.

    Some of my experiments went faster than others, but that’s the nature of these tools, and I still did this faster overall than I would have manually.

    Why was this a big deal? This showcased some sophisticated file creation, iterative improvements, and Gemini CLI’s direct usage of the Google Cloud CLI to package, deploy, and observe running systems in a production-like way. It’ll change how confident I am doing more complex operations.

    Background agents, orchestrated agents, conversational AI. All of these will play a part in how we design, build, deploy, and operate software. What does that mean to your team, your systems, and your expectations? We’re about to find out.

  • Three Ways to Run Apache Kafka in the Public Cloud

    Three Ways to Run Apache Kafka in the Public Cloud

    Yes, people are doing things besides generative AI. You’ve still got other problems to solve, systems to connect, and data to analyze. Apache Kafka remains a very popular product for event and data processing, and I was thinking about how someone might use it in the cloud right now. I think there are three major options, and one of them (built-in managed service) is now offered by Google Cloud. So we’ll take that for a spin.

    Option 1: Run it yourself on (managed) infrastructure

    Many companies choose to run Apache Kafka themselves on bare metal, virtual machines, or Kubernetes clusters. It’s easy to find stories about companies like Netflix, Pinterest, and Cloudflare running their own Apache Kafka instances. Same goes for big (and small) enterprises that choose to setup and operate dedicated Apache Kafka environments.

    Why do this? It’s the usual reasons why people decide to manage their own infrastructure! Kafka has a lot of configurability, and experienced folks may like the flexibility and cost profile of running Apache Kafka themselves. Pick your infrastructure, tune every setting, and upgrade on your timetable. On the downside, self-managed Apache Kafka can result in a higher total cost of ownership, requires specialized skills in-house, and could distract you from other high-priority work.

    If you want to go that route, I see a few choices.

    There’s no shame in going this route! It’s actually very useful to know how to run software like Apache Kafka yourself, even if you decide to switch to a managed service later.

    Option 2: Use a built-in managed service

    You might want Apache Kafka, but not want to run Apache Kafka. I’m with you. Many folks, including those at big web companies and classic enterprises, depend on managed services instead of running the software themselves.

    Why do this? You’d sign up for this option when you want the API, but not the ops. It may be more elastic and cost-effective than self-managed hosting. Or, it might cost more from a licensing perspective, but provide more flexibility on total cost of ownership. On the downside, you might not have full access to every raw configuration option, and may pay for features or vendor-dictated architecture choices you wouldn’t have made yourself.

    AWS offers an Amazon Managed Streaming for Apache Kafka product. Microsoft doesn’t offer a managed Kafka product, but does provide a subset of the Apache Kafka API in front of their Azure Event Hubs product. Oracle cloud offers self-managed infrastructure with a provisioning assist, but also appears to have a compatible interface on their Streaming service.

    Google Cloud didn’t offer any native service until just a couple of months ago. The Apache Kafka for BigQuery product is now in preview and looks pretty interesting. It’s available in a global set of regions, and provides a fully-managed set of brokers that run in a VPC within a tenant project. Let’s try it out.

    Set up prerequisites

    First, I needed to enable the API within Google Cloud. This gave me the ability to use the service. Note that this is NOT FREE while in preview, so recognize that you’ll incur changes.

    Next, I wanted a dedicated service account for accessing the Kafka service from client applications. The service supports OAuth and SASL_PLAIN with service account keys. The latter is appropriate for testing, so I chose that.

    I created a new service account named seroter-bq-kafka and gave it the roles/managedkafka.client role. I also created a JSON private key and saved it to my local machine.

    That’s it. Now I was ready to get going with the cluster.

    Provision the cluster and topic

    I went into the Apache Kafka for BigQuery dashboard in the Google Cloud console—I could have also used the CLI which has the full set of control plane commands—to spin up a new cluster. I get very few choices, and that’s not a bad thing. You give the CPU and RAM capacity for the cluster, and Google Cloud creates the right shape for the brokers, and creates a highly available architecture. You’ll also see that I choose the VPC for the cluster, but that’s about it. Pretty nice!

    In about twenty minutes, my cluster was ready. Using the console or CLI, I could see the details of my cluster.

    Topics are a core part of Apache Kafka represent the resource you publish and subscribe to. I could create a topic via the UI or CLI. I created a topic called “topic1”.

    Build the producer and consumer apps

    I wanted two client apps. One to publish new messages to Apache Kafka, and another to consume messages. I chose Node.js and JavaScript as the language for the app. There are a handful of libraries for interacting with Apache Kafka, and I chose the mature kafkajs.

    Let’s start with the consuming app. I need (a) the cluster’s bootstrap server URL and (b) the encoded client credentials. We access the cluster through the bootstrap URL and it’s accessible via the CLI or the cluster details (see above). The client credentials for SASL_PLAIN authentication consists of the base64 encoded service account key JSON file.

    My index.js file defines a Kafka object with the client ID (which identifies our consumer), the bootstrap server URL, and SASL credentials. Then I define a consumer with a consumer group ID and subscribe to the “topic1” we created earlier. I process and log each message before appending to an array variable. There’s an HTTP GET endpoint that returns the array. See the whole index.js below, and the GitHub repo here.

    const express = require('express');
    const { Kafka, logLevel } = require('kafkajs');
    const app = express();
    const port = 8080;
    
    const kafka = new Kafka({
      clientId: 'seroter-consumer',
      brokers: ['bootstrap.seroter-kafka.us-west1.managedkafka.seroter-project-base.cloud.goog:9092'],
      ssl: {
        rejectUnauthorized: false
      },
      logLevel: logLevel.DEBUG,
      sasl: {
        mechanism: 'plain', // scram-sha-256 or scram-sha-512
        username: 'seroter-bq-kafka@seroter-project-base.iam.gserviceaccount.com',
        password: 'tybgIC ... pp4Fg=='
      },
    });
    
    const consumer = kafka.consumer({ groupId: 'message-retrieval-group' });
    
    //create variable that holds an array of "messages" that are strings
    let messages = [];
    
    async function run() {
      await consumer.connect();
      //provide topic name when subscribing
      await consumer.subscribe({ topic: 'topic1', fromBeginning: true }); 
    
      await consumer.run({
        eachMessage: async ({ topic, partition, message }) => {
          console.log(`################# Received message: ${message.value.toString()} from topic: ${topic}`);
          //add message to local array
          messages.push(message.value.toString());
        },
      });
    }
    
    app.get('/consume', (req, res) => {
        //return the array of messages consumed thus far
        res.send(messages);
    });
    
    run().catch(console.error);
    
    app.listen(port, () => {
      console.log(`App listening at http://localhost:${port}`);
    });
    

    Now we switch gears and go through the producer app that publishes to Apache Kafka.

    This app starts off almost identically to the consumer app. There’s a Kafka object with a client ID (different for the producer) and the same pointer to the bootstrap server URL and credentials. I’ve got an HTTP GET endpoint that takes the querystring parameters and publishes the key and value content to the request payload. The code is below, and the GitHub repo is here.

    const express = require('express');
    const { Kafka, logLevel } = require('kafkajs');
    const app = express();
    const port = 8080; // Use a different port than the consumer app
    
    const kafka = new Kafka({
        clientId: 'seroter-publisher',
        brokers: ['bootstrap.seroter-kafka.us-west1.managedkafka.seroter-project-base.cloud.goog:9092'],
        ssl: {
          rejectUnauthorized: false
        },
        logLevel: logLevel.DEBUG,
        sasl: {
          mechanism: 'plain', // scram-sha-256 or scram-sha-512
          username: 'seroter-bq-kafka@seroter-project-base.iam.gserviceaccount.com',
          password: 'tybgIC ... pp4Fg=='
        },
      });
    
    const producer = kafka.producer();
    
    app.get('/publish', async (req, res) => {
      try {
        await producer.connect();
    
        const _key = req.query.key; // Extract key from querystring
        console.log('key is ' + _key);
        const _value = req.query.value // Extract value from querystring
        console.log('value is ' + _value);
    
        const message = {
          key: _key, // Optional key for partitioning
          value: _value
        };
    
        await producer.send({
          topic: 'topic1', // Replace with your topic name
          messages: [message]
        });
    
        res.status(200).json({ message: 'Message sent successfully' });
    
      } catch (error) {
        console.error('Error sending message:', error);
        res.status(500).json({ error: 'Failed to send message' });
      }
    });
    
    app.listen(port, () => {
      console.log(`Producer listening at http://localhost:${port}`);
    });


    Next up, containerizing both apps so that I could deploy to a runtime.

    I used Google Cloud Artifact Registry as my container store, and created a Docker image from source code using Cloud Native buildpacks. It took one command for each app:

    gcloud builds submit --pack image=gcr.io/seroter-project-base/seroter-kafka-consumer
    gcloud builds submit --pack image=gcr.io/seroter-project-base/seroter-kafka-publisher

    Now we had everything needed to deploy and test our client apps.

    Deploy apps to Cloud Run and test it out

    I chose Google Cloud Run because I like nice things. It’s still one of the best two or three ways to host apps in the cloud. We also make it much easier now to connect to a VPC, which is what I need. Instead of creating some tunnel out of my cluster, I’d rather access it more securely.

    Here’s how I configured the consuming app. I first picked my container image and a target location.

    Then I chose to use always-on CPU for the consumer, as I had connection issues when I had a purely ephemeral container.

    The last setting was the VPC egress that made it possible for this instance to talk to the Apache Kafka cluster.

    About three seconds later, I had a running Cloud Run instance ready to consume.

    I ran through a similar deployment process for the publisher app, except I kept the true “scale to zero” setting turned on since it doesn’t matter if the publisher app comes and goes.

    With all apps deployed, I fired up the browser and issued a pair of requests to the “publish” endpoint.

    I checked the consumer app’s logs and saw that messages were successfully retrieved.

    Sending a request to the GET endpoint on the consumer app returns the pair of messages I sent from the publisher app.

    Sweet! We proved that we could send messages to the Apache Kafka cluster, and retrieve them. I get all the benefits of Apache Kafka, integrated into Google Cloud, with none of the operational toil.

    Read more in the docs about this preview service.

    Option 3: Use a managed provider on your cloud(s) of choice

    The final way you might choose to run Apache Kafka in the cloud is to use a SaaS product designed to work on different infrastructures.

    The team at Confluent does much of the work on open source Apache Kafka and offers a managed product via Confluent Cloud. It’s performant, feature-rich, and runs in AWS, Azure, and Google Cloud. Another option is Redpanda, who offer a managed cloud service that they operate on their infrastructure in AWS or Google Cloud.

    Why do this? Choosing a “best of breed” type of managed service is going to give you excellent feature coverage and operational benefits. These platforms are typically operated by experts and finely tuned for performance and scale. Are there any downside? These platforms aren’t free, and don’t always have all the native integrations into their target cloud (logging, data services, identity, etc) that a built-in service does. And you won’t have all the configurability or infrastructure choice that you’d have running it yourself.

    Wrap up

    It’s a great time to run Apache Kafka in the cloud. You can go full DIY or take advantage of managed services. As always, there are tradeoffs with each. You might even use a mix of products and approaches for different stages (dev/test/prod) and departments within your company. Are there any options I missed? Let me know!

  • Four reasons that Google Cloud Run is better than traditional FaaS offerings

    Has the “serverless revolution stalled”? I dunno. I like serverless. Taught a popular course about it. But I reviewed and published an article written by Bernard Brode that made that argument, and it sparked a lot of discussion. If we can agree that serverless computing means building an architecture out of managed services that scale to zero—we’re not strictly talking about function-as-a-service—that’s a start. Has this serverless model crossed the chasm from early adopters to an early majority? I don’t think so. And the data shows that usage of FaaS—still a fundamental part of most people’s serverless architecture—has flattened a bit. Why is that? I’m no expert, but I wonder if some of the inherent friction of the 1st generation FaaS gets in the way.

    We’re seeing a new generation of serverless computing that removes that friction and may restart the serverless revolution. I’m talking here about Google Cloud Run. Based on the Knative project, it’s a fully managed service that scales container-based apps to zero. To me, it takes the best attributes from three different computing paradigms:

    ParadigmBest Attributes
    Platform-as-a-Service– focus on the app, not underlying infrastructure
    – auto-wire networking components to expose your endpoint
    Container-as-a-Service– use portable app packages
    – develop and test locally
    Function-as-a-Service– improve efficiency by scaling to zero
    – trigger action based on events

    Each of those above paradigms has standalone value. By all means, use any of them if they suit your needs. Right now, I’m interested in what it will take for large companies to adopt serverless computing more aggressively. I think it requires “fixing” some of the flaws of FaaS, and there are four reasons Cloud Run is positioned to do so.

    1. It doesn’t require rearchitecting your systems

    First-generation serverless doesn’t permit cheating. No, you have to actually refactor or rebuild your system to run this way. That’s different than all the previous paradigms. IaaS? You could take existing bare metal workloads and run them unchanged in a cloud VM platform. PaaS? It catered to 12-factor apps, but you could still run many existing things there. CaaS? You can containerize a lot of things without touching the source code. FaaS? Nope. Nothing in your data center “just works” in a FaaS platform.

    While that’s probably a good thing from a purity perspective—stop shifting your debt from one abstraction to another without paying it down!—it’s impractical. Simultaneously, we’re asking staff at large companies to: redesign teams for agile, introduce product management, put apps on CI pipelines, upgrade their programming language/framework, introduce new databases, decouple apps into microservices, learn cloud and edge models, AND keep all the existing things up and running. It’s a lot. The companies I talk to are looking for ways to get incremental benefits for many workloads, and don’t have the time or people to rebuild many things at once.

    This is where Cloud Run is better than FaaS. It hosts containers that respond to web requests or event-based triggers. You can write functions, or, containerize a complete app—Migrate for Anthos makes it easy. Your app’s entry point doesn’t have to conform to a specific method signature, and there are no annotations or code changes required to operate in Cloud Run. Take an existing custom-built app written in any language, or packaged (or no source-code-available) software and run it. You don’t have to decompose your existing API into a series of functions, or break down your web app into a dozen components. You might WANT to, but you don’t HAVE to. I think that’s powerful, and significantly lowers the barrier to entry.

    2. It runs anywhere

    Lock-in concerns are overrated. Everything is lock-in. You have to decide whether you’re getting unique value from the coupling. If so, go for it. A pristine serverless architecture consists of managed services with code (FaaS) in the gaps. The sticky part is all those managed services, not the snippets of code running in the FaaS. Just making a FaaS portable doesn’t give you all the benefits of serverless.

    That said, I don’t need all the aspects of serverless to get some of the benefits. Replacing poorly utilized virtual machines with high-density nodes hosting scale-to-zero workloads is great. Improving delivery velocity by having an auto-wired app deployment experience versus ticket-defined networking is great. I think it’s naive to believe that most folks can skip from traditional software development directly to fully serverless architectures. There’s a learning and adoption curve. And one step on the journey is defining more distributed services, and introducing managed services. Cloud Run offers a terrific best-of-both-worlds model that makes the journey less jarring. And uniquely, it’s not only available on a single cloud.

    Cloud Run is great on Google Cloud. Given the option, you should use it there. It’s fully managed and elastic, and integrates with all types of GCP-only managed services, security features, and global networking. But you won’t only use Google Cloud in your company. Or Azure. Or AWS. Or Cloudflare. Cloud Run for Anthos puts this same runtime most anywhere. Use it in your data center. Use it in your colocation or partner facility. Use it at the edge. Soon, use it on AWS or Azure. Get one developer-facing surface for apps running on a variety of hosts.

    A portable Faas, based on open source software, is powerful. And I believe, necessary, to break into mainstream adoption within the enterprise. Bring the platform to the people!

    3. It makes the underlying container as invisible, or visible, as you want

    Cloud Run uses containers. On one hand, it’s a packaging mechanism, just like a ZIP file for AWS Lambda. On the other, it’s a way to bring apps written in any language, using any libraries, to a modern runtime. There’s no “supported languages” page on the website for Cloud Run. It’s irrelevant.

    Now, I personally don’t like dealing with containers. I want to write code, and see that code running somewhere. Building containers is an intermediary step that should involve as little effort as possible. Fortunately, tools like Cloud Code make that a reality for me. I can use Visual Studio Code to sling some code, and then have it automatically containerized during deployment. Thanks Cloud Buildpacks! If I choose to, I can use Cloud Run while being blissfully unaware that there are containers involved.

    That said, maybe I want to know about the container. My software may depend on specific app server settings, file system directories, or running processes. During live debugging, I may like knowing I can tunnel into the container and troubleshoot in sophisticated ways.

    Cloud Run lets you choose how much you want to care about the container image and running container itself. That’s a flexibility that’s appealing.

    4. It supports advanced use cases

    Cloud Run is great for lots of scenarios. Do server-side streaming with gRPC. Build or migrate web apps or APIs that take advantage of our new API Gateway. Coordinate apps in Cloud Run with other serverless compute using the new Cloud Workflows. Trigger your Cloud Run apps based on events occurring anywhere within Google Cloud. Host existing apps that need a graceful shutdown before scaling to zero. Allocate more horsepower to new or existing apps by assigning up to 4 CPUs and 4GB of RAM, and defining concurrency settings. Decide if your app should always have an idle instance (no cold starts) and how many instances it should scale up to. Route traffic to a specific port that your app listens on, even if it’s not port 80.

    If you use Cloud Run for Anthos (in GCP or on other infrastructure), you have access to underlying Kubernetes attributes. Create private services. Participate in the service mesh. Use secrets. Reference ConfigMaps. Turn on Workload Identity to secure access to GCP services. Even take advantage of GPUs in the cluster.

    Cloud Run isn’t for every workload, of course. It’s not for background jobs. I wouldn’t run a persistent database. It’s ideal for web-based apps, new or old, that don’t store local state.

    Give Cloud Run a look. It’s a fast-growing service, and it’s free to try out with our forever-free services on GCP. 2 million requests a month before we charge you anything! See if you agree that this is what the next generation of serverless compute should look like.

  • I’m looking forward these 8 sessions at Google Cloud Next ’20 OnAir (Week 7)

    I’m looking forward these 8 sessions at Google Cloud Next ’20 OnAir (Week 7)

    It’s here. After six weeks of OTHER topics, we’re up to week seven of Google Cloud Next OnAir, which is all about my area: app modernization. The “app modernization” bucket in Google Cloud covers lots of cool stuff including Cloud Code, Cloud Build, Cloud Run, GKE, Anthos, Cloud Operations, and more. It basically addresses the end-to-end pipeline of modern apps. I recently sketched it out like this:

    I think this the biggest week of Next, with over fifty breakout sessions. I like that most of the breakouts so far have been ~20 minutes, meaning you can log in, set playback speed to 1.5x, and chomp through lots of topic quickly. 

    Here are eight of the sessions I’m looking forward to most:

    1. Ship Faster, Spend Less By Going Multi-Cloud with Anthos. This is the “keynote” for the week. We’re calling out a few product announcements, highlighting some new customers, and saying keynote-y things. You’ll like it.
    2. GKE Turns 5: What’s New? All Kubernetes aren’t the same. GKE stands apart, and the team continues solving customer problems in new ways. This should be a great look back, and look ahead.
    3. Cloud Run: What’s New? To me, Cloud Run has the best characteristics of PaaS, combined with the the event-driven, scale-to-zero of serverless functions. This is the best place I know of to run custom-built apps in the Google Cloud (or anywhere, with Anthos).
    4. Modernize Legacy Java Apps Using Anthos. Whoever figures out how to unlock value from existing (Java) apps faster, wins. Here’s what Google Cloud is doing to help customers improve their Java apps and run them on a great host.
    5. Running Anthos on Bare Metal and at the Edge with Major League Baseball (MLB). Baseball’s back, my Slam Diego Padres are fun again, and Anthos is part of the action. Good story here.
    6. Getting Started with AnthosAnthos Deep Dive: Part OneAnthos Deep Dive: Part Two. Am I cheating by making three sessions into one entry? Fine, you caught me. But this three part trilogy is a great way to grok Anthos and understand its value.
    7. Develop for Cloud Run in the IDE with Cloud Code. Cloud Code extends your IDE to support Google Cloud, and Cloud Run is great. Combine the two, and you’ve got some good stuff.
    8. Event-Driven Microservices with Cloud Run. You’re going to enjoy this one, and seeing what’s now possible.

    I’m looking forward to this week. We’re sharing lots of fun progress, and demonstrating some fresh perspectives on what app modernization should look like. Enjoy watching!

  • Take a fresh look at Cloud Foundry? In 20 minutes we’ll get Tanzu Application Service for Kubernetes running on your machine.

    Take a fresh look at Cloud Foundry? In 20 minutes we’ll get Tanzu Application Service for Kubernetes running on your machine.

    It’s been nine years since I first tried out Cloud Foundry, and it remains my favorite app platform. It runs all kinds of apps, has a nice dev UX for deploying and managing software, and doesn’t force me to muck with infrastructure. The VMware team keeps shipping releases (another today) of the most popular packaging of Cloud Foundry, Tanzu Application Service (TAS). One knock against Cloud Foundry has been its weight—in typically runs on dozens of VMs. Others have commented on its use of open-source, but not widely-used, components like BOSH, the Diego scheduler, and more. I think there are good justifications for its size and choice of plumbing components, but I’m not here to debate that. Rather, I want to look at what’s next. The new Tanzu Application Service (TAS) for Kubernetes (now in beta) eliminates those prior concerns with Cloud Foundry, and just maybe, leapfrogs other platforms by delivering the dev UX you like, with the underlying components—things like Kubernetes, Cluster API, Istio, Envoy, fluentd, and kpack—you want. Let me show you.

    TAS runs on any Kubernetes cluster: on-premises or in the cloud, VM-based or a managed service, VMware-provided or delivered by others. It’s based on the OSS Cloud Foundry for Kubernetes project, and available for beta download with a free (no strings attached) Tanzu Network account. You can follow along with me in this post, and in just a few minutes, have a fully working app platform that accepts containers or source code and wires it all up for you.

    Step 1 – Download and Start Stuff (5 minutes)

    Let’s get started. Some of these initial steps will go away post-beta as the install process gets polished up. But we’re brave explorers, and like trying things in their gritty, early stages, right?

    First, we need a Kubernetes. That’s the first big change for Cloud Foundry and TAS. Instead of pointing it at any empty IaaS and using BOSH to create VMs, Cloud Foundry now supports bring-your-own-Kubernetes. I’m going to use Minikube for this example. You can use KinD, or any other number of options.

    Install kubectl (to interact with the Kubernetes cluster), and then install Minikube. Ensure you have a recent version of Minikube, as we’re using the Docker driver for better performance. With Minikube installed, execute the following command to build out our single-node cluster. TAS for Kubernetes is happiest running on a generously-sized cluster.

    minikube start --cpus=4 --memory=8g --kubernetes-version=1.15.7 --driver=docker

    After a minute or two, you’ll have a hungry Kubernetes cluster running, just waiting for workloads.

    We also need a few command line tools to get TAS installed. These tools, all open source, do things like YAML templating, image building, and deploying things like Cloud Foundry as an “app” to Kubernetes. Install the lightweight kapp, klbd, and ytt tools using these simple instructions.

    You also need the Cloud Foundry command line tool. This is for interacting with the environment, deploying apps, etc. This same CLI works against a VM-based Cloud Foundry, or Kubernetes-based one. You can download the latest version via your favorite package manager or directly.

    Finally, you’ll want to install the BOSH CLI. Wait a second, you say, didn’t you say BOSH wasn’t part of this? Am I just a filthy liar? First off, no name calling, you bastards. Secondly, no, you don’t need to use BOSH, but the CLI itself helps generate some configuration values we’ll use in a moment. You can download the BOSH CLI via your favorite package manager, or grab it from the Tanzu Network. Install via the instructions here.

    With that, we’re done the environmental setup.

    Step 2 – Generate Stuff (2 minute)

    This is quick and easy. Download the 844KB TAS for Kubernetes bundle from the Tanzu Network.

    I downloaded the archive to my desktop, unpacked it, and renamed the folder “tanzu-application-service.” Create a sibling folder named “configuration-values.”

    Now we’re going to create the configuration file. Run the following command in your console, which should be pointed at the tanzu-application-service directory. The first quoted value is the domain. For my local instance, this value is vcap.me. When running this in a “real” environment, this value is the DNS name associated with your cluster and ingress point. The output of this command is a new file in the configuration-values folder.

    ./bin/generate-values.sh -d "vcap.me" > ../configuration-values/deployment-values.yml

    After a couple of seconds, we have an impressive-looking YAML file with passwords, certificates, and all sorts of delightful things.

    We’re nearly done. Our TAS environment won’t just run containers; it will also use kpack and Cloud Native Buildpacks to generate secure container images from source code. That means we need a registry for stashing generated images. You can use most any one you want. I’m going to use Docker Hub. Thus, the final configuration values we need are appended to the above file. First, we need the credentials to the Tanzu Network for retrieving platform images, and secondly, credentials for container registry.

    With our credentials in hand, add them to the very bottom of the file. Indentation matters, this is YAML after all, so ensure you’ve got it lined up right.

    The last thing? There’s a file that instructs the installation to create a cluster IP ingress point versus a Kubernetes load balancer resource. For Minikube (and in public cloud Kubernetes-as-a-Service environments) I want the load balancer. So, within the tanzu-application-service folder, move the replace-loadbalancer-with-clusterip.yaml file from the custom-overlays folder to the config-optional folder.

    Finally, to be safe, I created a copy of this remove-resource-requirements.yml file and put it in the custom-overlays folder. It relaxes some of the resource expectations for the cluster. You may not need it, but I saw CPU exhaustion issues pop up when I didn’t use it.

    All finished. Let’s deploy this rascal.

    Step 3 – Deploy Stuff (10 minutes)

    Deploying TAS to Kubernetes takes 5-9 minutes. With your console pointed at the tanzu-application-service directory, run this command:

    ./bin/install-tas.sh ../configuration-values

    There’s a live read-out of progress, and you can also keep checking the Kubernetes environment to see the pods inflate. Tools like k9s make it easy to keep an eye on what’s happening. Notice the Istio components, and some familiar Cloud Foundry pieces. Observe that the entire Cloud Foundry control plane is containerized here—no VMs anywhere to be seen.

    While this is still installing, let’s open up the Minikube tunnel to expose the LoadBalancer service our ingress gateway needs. Do this in a separate console window, as its a blocking call. Note that the installation can’t complete until you do it!

    minikube tunnel

    After a few minutes, we’re ready to deploy workloads.

    Step 4 – Test Stuff (3 minutes)

    We now have a full-featured Tanzu Application Service up and running. Neat. Let’s try a few things. First, we need to point the Cloud Foundry CLI at our environment.

    cf api --skip-ssl-validation https://api.vcap.me

    Great. Next, we log in, using generated cf_admin_password from the deployment-values.yaml file.

    cf auth admin <password>

    After that, we’ll enable containers in the environment.

    cf enable-feature-flag diego_docker

    Finally, we set up a tenant. Cloud Foundry natively supports isolation between tenants. Here, I set up an organization, and within that organization, a “space.” Finally, I tell the Cloud Foundry CLI that we’re working with apps in that particular org and space.

    cf create-org seroter-org
    cf create-space -o seroter-org dev-space
    cf target -o seroter-org -s dev-space

    Let’s do something easy, first. Push a previously-containerized app. Here’s one from my Docker Hub, but it can be anything you want.

    cf push demo-app -o rseroter/simple-k8s-app-kpack

    After you enter that command, 15 seconds later you have a hosted, routable app. The URL is presented in the Cloud Foundry CLI.

    How about something more interesting? TAS for Kubernetes supports a variety of buildpacks. These buildpacks detect the language of your app, and then assemble a container image for you. Right now, the platform builds Java, .NET Core, Go, and Node.js apps. To make life simple, clone this sample Node app to your machine. Navigate your console to that folder, and simple enter cf push.

    After a minute or so, you end up with a container image in whatever registry you specified (for me, Docker Hub), and a running app.

    This beta release of TAS for Kubernetes also supports commands around log streaming (e.g. cf logs cf-nodejs), connecting to backing services like databases, and more. And yes, even the simple, yet powerful, cf scale command works to expand and contract pod instances.

    It’s simple to uninstall the entire TAS environment from your Kubernetes cluster with a single command:

    kapp delete -a cf

    Thanks for trying this out with me! If you only read along, and want to try it yourself later, read the docs, download the bits, and let me know how it goes.

  • Let’s look at your options for local development with Kubernetes

    Let’s look at your options for local development with Kubernetes

    For a while, I’ve been saying that developers should build great software, and pick their host at the last responsible moment. Apps first, not infrastructure. But now, I don’t think that’s exactly right. It’s naive. As you’re writing code, there are at least three reasons you’ll want to know where you app will eventually run:

    1. It impacts your architecture. You likely need to know if you’re dealing with a function-as-a-service environment, Kubernetes, virtual machines, Cloud Foundry, or whatever. This changes how you lay out components, store state, etc.
    2. There are features your app may use. For each host, there are likely capabilities you want to tap into. Whether it’s input/output bindings in Azure Functions, ConfigMaps in Kubernetes, or something else, you probably can take advantage of what’s there.
    3. It changes your local testing setup. It makes sense that you want to test your code in a production-like environment before you get to production. That means you’ll invest in a local setup that mimics the eventual destination.

    If you’re using Kubernetes, you’ve got lots of options to address #3. I took four popular Kubernetes development options for a spin, and thought I’d share my findings. There are more than four options (e.g. k3dMicrok8sMicronetes), but I had to draw the line somewhere.

    For this post, I’m considering solutions that run on my local machine. Developers using Kubernetes may also spin up cloud clusters (and use features like Dev Spaces in Azure AKS), or sandboxes in something like Katacoda. But I suspect that most will be like me, and enjoy doing things locally. Let’s dig in.

    Option 1: Docker Desktop

    For many, this is the “easy” choice. You’re probably already running Docker Desktop on your PC or Mac.

    By default, you have to explicitly enable it. The screen below is accessible via the “Preferences” menu. 

    After a few minutes, my cluster was running, and I could switch my Kubernetes context to Docker Desktop environment.

    I proved this by running a couple simple kubectl commands that show I’ve got a single node, local cluster.

    This cluster doesn’t have the Kubernetes Dashboard installed by default, so you can follow a short set of steps to add it. You can also, of course, use other dashboards, like Octant

    With my cluster running, I wanted to create a pod, and expose it via a service. 

    My corresponding YAML file is as such:

    ---
    apiVersion: apps/v1
    kind: Deployment
    metadata:
      name: simple-k8s-app
    spec:
      replicas: 1
      selector:
        matchLabels:
          app: simple-k8s-app
      template:
        metadata:
          labels:
            app: simple-k8s-app
        spec:
          containers:
          - name: simple-k8s-app
            image: rseroter/simple-k8s-app-kpack:latest
            ports:
            - containerPort: 8080
            env:
            - name: FLAG_VALUE
              value: "on"
    ---
    apiVersion: v1
    kind: Service
    metadata:
      name: simple-k8s-app
    spec:
      type: LoadBalancer
      ports:
      - port: 9001
        protocol: TCP
        targetPort: 8080
      selector:
        app: simple-k8s-app
    

    I used the “LoadBalancer” type, which I honestly didn’t expect to see work. Everything I’ve seen online says I need to explicitly set up ingress via NodePort. But, once I deployed, my container was running, and service was available on localhost:9001.

    Nice. Now that there was something in my cluster, I started up Octant, and saw my pods, containers, and more.

    Option 2: Minikube

    This has been my go-to for years. Seemingly, for many others as well. It’s featured prominently in the Kubernetes docs and gives you a complete (single node via VM) solution. If you’re on a Mac, it’s super easy to install with a simple “brew install minikube” command.

    To start up Kubernetes, I simply enter “minikube start” in my Terminal. I usually specify a Kubernetes version number, because it defaults to the latest, and some software that I install expects a specific version. 

    After a few minutes, I’m up and running. Minikube has some of its own commands, like one below that returns the status of the environment.

    There are other useful commands for setting Docker environment variables, mounting directories into minikube, tunneling access to containers, and serving up the Kubernetes dashboard.

    My deployment and service YAML definitions are virtually the same as the last time. The only difference? I’m using NodePort here, and it worked fine. 

    ---
    apiVersion: apps/v1
    kind: Deployment
    metadata:
      name: simple-k8s-app
    spec:
      replicas: 1
      selector:
        matchLabels:
          app: simple-k8s-app
      template:
        metadata:
          labels:
            app: simple-k8s-app
        spec:
          containers:
          - name: simple-k8s-app
            image: rseroter/simple-k8s-app-kpack:latest
            ports:
            - containerPort: 8080
            env:
            - name: FLAG_VALUE
              value: "on"
    ---
    apiVersion: v1
    kind: Service
    metadata:
      name: simple-k8s-app
    spec:
      type: NodePort
      ports:
      - port: 9001
        protocol: TCP
        targetPort: 8080
      selector:
        app: simple-k8s-app
    

    After applying this configuration, I could reach my container using the host IP (retrieved via “minikube ip”) and generated port number.

    Option 3: kind

    A handful of people have been pushing this on me, so I wanted to try it out as well. How’s it different from minikube? A few ways. First, it’s not virtual machine-based. The name stands for Kubernetes in Docker, as the cluster nodes are running in Docker containers. Since it’s all local Docker stuff, it’s easy to use your local registry without any extra hoops to jump through. What’s also nice is that you can create multiple worker nodes, so you can test more realistic scenarios. kind is meant to be used by those testing Kubernetes, but you can use it on your own as well.

    Installing is fairly straightforward. For those on Mac, a simple “brew install kind” gets you going. When creating clusters, you can simply do “kind create cluster”, or do that with a configuration file to customize the build. I created a simple config that created two control plane nodes, and two workers nodes.

    # a cluster with 2 control-plane nodes and 2 workers
    kind: Cluster
    apiVersion: kind.x-k8s.io/v1alpha4
    nodes:
    - role: control-plane
    - role: control-plane
    - role: worker
    - role: worker
    

    After creating the cluster with that YAML configuration, I had a nice little cluster running inside Docker containers.

    It doesn’t look like the UI Dashboard is built in, so again, you can either install it yourself, or point your favorite dashboard at the cluster. Here, Octant shows me the four nodes.

    This time, I deployed my pod without a corresponding service. It’s the same YAML as above, but no service definition. Why? Two reasons: (1) I wanted to try port forward in this environment, and (2) ingress in kind is a little trickier than in the above platforms.

    So, I got the name of my pod, and tunneled to it via this command:

    kubectl port-forward pod/simple-k8s-app-6dd8b59b97-qwsjb 9001:8080

    Once I did that, I pinged http://127.0.0.1:9001 and pulled my the app in the container. Nice!

    Option 4: Tilt

    This is a fairly new option. Tilt is positioned as “local Kubernetes development with no stress.” BOLD CLAIM. Instead of just being a vanilla Kubernetes cluster to deploy to, Tilt offers dev-friendly experiences for packaging code into containers, seeing live updates, troubleshooting, and more. So, you do have to bring your Kubernetes cluster to the table before using Tilt.

    So, I again started up Docker Desktop and got that Kubernetes environment ready to go. Then, I followed the Tilt installation instructions for my machine. After a bit, everything was installed, and typing “tilt” into my Terminal gave me a summary of what Tilt does, and available commands.

    I started by just typing “tilt up” and got a console and web UI. The web UI told me I needed a Tilefile, and I do what I’m told. My file just contained a reference to the YAML file I used for the above Docker Desktop demo.

    k8s_yaml('simple-k8s-app.yaml')

    As soon as I saved the file, things started happening. Tilt immediately applied my YAML file, and started the container up. In a separate window I checked the state of deployment via kubectl, and sure enough everything was up and running.

    But that’s not really the power of this thing. For devs, the fun comes from having the builds automated too. Not just a finished container image. So, I built a new ASP.NET Core app using Visual Studio Code, added a Dockerfile, a put it at the same directory level as the Tiltfile. Then, I updated my Tiltfile to reference the Dockerfile.

    k8s_yaml('simple-k8s-app.yaml')
    docker_build("tilt-demo-app", "./webapp", dockerfile="Dockerfile")

    After saving the files, Tilt got to work and built my image, added it to my local Docker registry, and deployed it to the Kubernetes cluster.

    The fun part, is now I could just change the code, save it, and seconds later Tilt rebuilt the container image and deployed the changes.

    If your future includes Kubernetes, and it looks like for most, it does, you’ll want a good developer workflow. That means using a decent local experience. You may also use clusters in the cloud to complement the one-premises ones. That’s cool. Also consider how you’ll manage all of them. Today, VMware shipped Tanzu Mission Control, which is a cool way to manage Kubernetes clusters created there, or attached from anywhere. For fun, I attached my existing Azure Kubernetes Services (AKS) cluster, and, the kind cluster we created here. Here’s the view of the kind clusters, with all its nodes visible and monitored.

    What else do you use for local Kubernetes development?

  • Looking to continuously test and patch container images? I’ll show you one way.

    Looking to continuously test and patch container images? I’ll show you one way.

    A lot of you are packaging code into container images before shipping it off to production. That’s cool. For many, this isn’t a one-time exercise at the end of a project; it’s an ongoing exercise throughout the lifespan of your product. Last week in Barcelona, I did a presentation at VMworld Europe where I took a custom app, ran tests in a pipeline, containerized it, and pushed to a cloud runtime. I did all of this with fresh open-source technologies like Kubernetes, Concourse, and kpack. For this blog post, I’ll show you my setup, and for fun, take the resulting container image and deploy it, unchanged, to one Microsoft Azure service, and one Pivotal service.

    First off, containers. Let’s talk about them. The image that turns into running container is made up of a series of layers. This union of read-only layers gets mounted to present itself as a single filesystem. Many commands in your Dockerfile, generate a layer. When I pull the latest Redis image, and run a docker history command, I see all the layers:

    Ok, Richard, we get it. Like onions and ogres, images have layers. I bring it up, because responsibly maintaining a container image means continually monitoring and updating those layers. For a custom app, that means updating layers that store app code, the web server, and the root file system. All the time. Ideally, I want a solution that automatically builds and patches all this stuff so that I don’t have to. Whatever pipeline to production you build should have that factored in!

    Let’s get to it. Here’s what I built. After coding a Spring Boot app, I checked the code into a GitHub master branch. That triggered a Concourse pipeline (running in Kubernetes) that ran unit tests, and promoted the code to a “stable” branch if the tests passed. The container build service (using the kpack OSS project) monitored the stable branch, and built a container image which got stored in the Docker Hub. From there, I deployed the Docker image to a container-friendly application runtime. Easy!

    Step #1 – Build the app

    The app is simple, and relatively inconsequential. Build a .NET app, Go app, Node.js app, whatever. I built a Spring Boot app using Spring Initializr. Click here to download the same scaffolding. This app will simply serve up a web endpoint, and also offer a health endpoint.

    In my code, I have a single RESTful endpoint that responds to GET requests at the root. It reads an environment variable (so that I can change it per runtime), and returns that in the response.

    @RestController
    public class GreetingController {
    	
      @Value("${appruntime:Spring Boot}")
      private String appruntime;
    	
      @GetMapping("/")
      public String SayHi() {
        return "Hello VMworld Europe! Greetings from " + appruntime;
      }
    }
    

    I also created a single JUnit test to check the response value from my RESTful service. I write great unit tests; don’t be jealous.

    @RunWith(SpringRunner.class)
    @SpringBootTest(webEnvironment = WebEnvironment.RANDOM_PORT)
    public class BootKpackDemoApplicationTests {
    
      @LocalServerPort
      private int port;
    	
      @Autowired
      private TestRestTemplate restTemplate;
    	
      @Test
      public void testEndpoint() {
        assertThat(this.restTemplate.getForObject("http://localhost:" + port + "/",
        String.class)).contains("Hello");
      }
    }
    

    After crafting this masterpiece, I committed it to a GitHub repo. Ideally, this is all a developer ever has to do in their job. Write code, test it, check it in, repeat. I don’t want to figure out the right Dockerfile format, configure infrastructure, or any other stuff. Just let me write code, and trigger a pipeline that gets my code securely to production, over and over again.

    Step #2 – Set up the CI pipeline

    For this example, I’m using minikube on my laptop to host the continuous integration software and container build service. I got my Kubernetes 1.15 cluster up (since Concourse currently works up to v 1.15) with this command:

    minikube start --memory=4096 --cpus=4 --vm-driver=hyperkit --kubernetes-version v1.15.0
    

    Since I wanted to install Concourse in Kubernetes via Helm, I needed Helm and tiller set up. I used a package manager to install Helm on my laptop. Then I ran three commands to generate a service account, bind a cluster role to that service account, and initialize Helm in the cluster.

    kubectl create serviceaccount -n kube-system tiller 
    kubectl create clusterrolebinding tiller-cluster-rule --clusterrole=cluster-admin --serviceaccount=kube-system:tiller 
    helm init --service-account tiller 
    

    With that business behind me, I could install Concourse. I talk a lot about Concourse, taught a Pluralsight course about it, and use it regularly. It’s such a powerful tool for continuous processing of code. To install into Kubernetes, it’s just a single reference to a Helm chart.

    helm install --name vmworld-concourse stable/concourse
    

    After a few moments, I saw that I had pods created and services configured.

    The chart also printed out commands for how to do port forwarding to access the Concourse web console.

    export POD_NAME=$(kubectl get pods --namespace default -l "app=vmworld-concourse-web" -o jsonpath="{.items[0].metadata.name}")
     echo "Visit http://127.0.0.1:8080 to use Concourse"
     kubectl port-forward --namespace default $POD_NAME 8080:8080
    

    After running those commands, I pinged the localhost URL and saw the dashboard.

    All that was left was the actual pipeline. Concourse pipelines are defined in YAML. My GitHub repo has two branches (master and stable), so I declared “resources” for both. Since I have to write to the stable branch, I also included credentials to GitHub in the “stable” resource definition. My pipeline has two jobs: one that runs the JUnit tests, and another puts the master branch code into the stable branch if the unit tests pass.

    ---
    # declare resources
    resources:
    - name: source-master
      type: git
      icon: github-circle
      source:
        uri: https://github.com/rseroter/boot-kpack-demo
        branch: master
    - name: source-stable
      type: git
      icon: github-circle
      source:
        uri: git@github.com:rseroter/boot-kpack-demo.git
        branch: stable
        private_key: ((github-private-key))
    
    jobs:
    - name: run-tests
      plan:
      - get: source-master
        trigger: true
      - task: first-task
        config: 
          platform: linux
          image_resource:
            type: docker-image
            source: {repository: maven, tag: latest}
          inputs:
          - name: source-master
          run:
              path: sh
              args:
              - -exec
              - |
                cd source-master
                mvn package
    - name: promote-to-stable
      plan:
      - get: source-master
        trigger: true
        passed: [run-tests]
      - get: source-stable
      - put: source-stable
        params:
          repository: source-master
    

    Deploying this pipeline is easy. From the fly CLI tool, it’s one command. Note that my GitHub creds are stored in another file, which is the one I reference in the command.

    fly -t vmworld set-pipeline --pipeline vmworld-pipeline --config vmworld-pipeline.yaml --load-vars-from params.yaml
    

    After unpausing the pipeline, it ran. Once it executed the unit tests, and promoted the master code to the stable branch, the pipeline was green.

    Step #3 – Set up kpack for container builds

    Now to take that tested, high-quality code and containerize it. Cloud Native Buildpacks turn code into Docker images. Buildpacks are something initially created by Heroku, and then used by Cloud Foundry to algorithmically determine how to build a container image based on the language/framework of the code. Instead of developers figuring out how to layer up an image, buildpacks can compile and package up code in a repeatable way by bringing in all the necessary language runtimes and servers. What’s cool is that operators can also extend buildpacks to add org-specific certs, monitoring agents, or whatever else should be standard in your builds.

    kpack is an open-source project from Pivotal that uses Cloud Native Buildpacks, also adds the ability to watch for changes to anything impacting the image, and initiating an update. kpack, which is commercialized as the Pivotal Build Service, watches for changes in source code, buildpacks, or base image and then puts the new or patched image into the registry. Thanks to some smarts, it only updates the impacted layers, thus saving you on data transfer costs and build times.

    The installation instructions are fairly straightforward. You can put this into your Kubernetes cluster in a couple minutes. Once installed, I saw the single kpack controller pod running.

    The only thing left to do was define an image configuration. This declarative config tells kpack where to find the code, and what to do with it. I had already set up a secret to hold my Docker Hub creds, and that corresponding Kubernetes service account is referenced in the image configuration.

    apiVersion: build.pivotal.io/v1alpha1
    kind: Image
    metadata:
      name: vmworld-image
    spec:
      tag: rseroter/vmworld-demo
      serviceAccount: vmworld-service-account
      builder:
        name: default-builder
        kind: ClusterBuilder
      source:
        git:
          url: https://github.com/rseroter/boot-kpack-demo.git
          revision: stable
    

    That’s it. Within moments, kpack detected my code repo, compiled my app, built a container image, cached some layers for later, and updated the Docker Hub image.

    I made a bunch of code changes to generate lots of builds, and all the builds showed up my Kubernetes cluster as well.

    Now when I updated my code, my pipeline automatically kicks off and updates the stable branch. Thus, whenever my tested code changes, or the buildpack gets updated (every week or so) with framework updates and patches, my container automatically gets rebuilt. That’s crazy powerful stuff, especially as we create more and more containers, that deploy to more and more places.

    Step #4 – Deploy the container image

    And that’s the final step. I had to deploy this sucker and see it run.

    First, I pushed it to Pivotal Application Service (PAS) because I make good choices. I can push code or containers here. This single command takes that Docker image, deploys it, and gives me a routable endpoint in 20 seconds.

    cf push vmworld-demo --docker-image rseroter/vmworld-demo -i 2
    

    That worked great, and my endpoint returned the expected values after I added an environment variable to the app.

    Can I deploy the same container to Azure Web Apps? Sure. That takes code or containers too. I walked through the wizard experience in the Azure Portal and chose the Docker Hub image created by kpack.

    After a few minutes, the service was up. Then I set the environment variable that the Spring Boot app was looking for (appruntime to “Azure App Service”) and another to expose the right port (WEBSITES_PORT to 8080), and pinged the RESTful endpoint.

    Whatever tech you land on, just promise me that you’ll invest in a container patching strategy. Automation is non-negotiable, and there are good solutions out there that can improve your security posture, while speeding up software delivery.

  • Messing around with Apache Kafka using the Confluent Cloud free trial

    Messing around with Apache Kafka using the Confluent Cloud free trial

    This week, Confluent announced that there’s now a free trial for their Confluent Cloud. If you’re unfamiliar with either, Confluent is the company founded by the creators of Apache Kafka, and Confluent Cloud is their managed Kafka offering that runs on every major public cloud. There are various ways to kind-of use Kafka in the public cloud (e.g. Amazon Managed Streaming for Apache Kafka, Azure Event Hubs with Kafka interface), but what Confluent offers is the single, best way to use the full suite of Apache Kafka capabilities as a managed service. It’s now free to try out, so I figured I’d take it for a spin.

    First, I went to the Confluent Cloud site and clicked the “try free” button. I was prompted to create an account.

    I was asked for credit card info to account for overages above the free tier (and after the free credits expire in 3 months), which I provided. With that, I was in.

    First, I was prompted to create a cluster. I do what I’m told.

    Here, I was asked to provide a cluster name, and choose a public cloud provider. For each cloud, I was shown a set of available regions. Helpfully, the right side also showed me the prices, limits, billing cycle, and SLA. Transparency, FTW!

    While that was spinning up, I followed the instructions to install the Confluent Cloud CLI so that I could also geek-out at the command line. I like the the example CLI commands in the docs actually reflect the values of my environment (e.g. cluster name). Nice touch.

    Within maybe a minute, my Kafka cluster was running. That’s pretty awesome. I chose to create a new topic with 6 partitions. I’m able to choose up to 60 partitions for a topic, and define other settings like data retention period, max size on disk, and cleanup policy.

    Before building an app to publish data to Confluent Cloud, I needed an API key and secret. I could create this via the CLI, or the dashboard. I generated the key via the dashboard, saved it (since I can’t see it again after generating), and saw the example Java client configuration updated with those values. Handy, especially because I’m going to talk to Kafka via Spring Cloud Stream!

    Now I needed an app that would send messages to Apache Kafka in the Confluent Cloud. I chose Spring Boot because I make good decisions. Thanks to the Spring Cloud Stream project, it’s super-easy to interact with Apache Kafka without having to be an expert in the tech itself. I went to start.spring.io to generate a project. If you click this link, you can download an identical project configuration.

    I opened up this project and added the minimum code and configuration necessary to gab with Apache Kafka in Confluent Cloud. I wanted to be able to submit an HTTP request and see that message published out. That required one annotation to create a REST controller, and one annotation to indicate that this app is a source to the stream. I then have a “Source” variable is autowired, which means it’s inflated by Spring Boot at runtime. Finally, I have a single operation that responds to an HTTP post command and writes the payload to the message stream. That’s it!

    package com.seroter.confluentboot;
    
    import org.springframework.beans.factory.annotation.Autowired;
    import org.springframework.boot.SpringApplication;
    import org.springframework.boot.autoconfigure.SpringBootApplication;
    import org.springframework.cloud.stream.annotation.EnableBinding;
    import org.springframework.cloud.stream.messaging.Source;
    import org.springframework.messaging.support.GenericMessage;
    import org.springframework.web.bind.annotation.PostMapping;
    import org.springframework.web.bind.annotation.RequestBody;
    import org.springframework.web.bind.annotation.RestController;
    
    @EnableBinding(Source.class)
    @RestController
    @SpringBootApplication
    public class ConfluentBootApplication {
    
        public static void main(String[] args) {
          SpringApplication.run(ConfluentBootApplication.class, args);
        }
    	
        @Autowired
        private Source source;
     
        @PostMapping("/messages")
        public String postMsg(@RequestBody String msg) {
         this.source.output().send(new GenericMessage<>(msg));
         return "success";
        }
    }
    

    The final piece? The application configuration. In the application.properties file, I set the handful of parameters, mostly around the target cluster, topic name, and credentials.

    spring.cloud.stream.kafka.binder.brokers=pkc-41973.westus2.azure.confluent.cloud:9092
    spring.cloud.stream.bindings.output.destination=seroter-topic
     
    spring.cloud.stream.kafka.binder.configuration.sasl.jaas.config=org.apache.kafka.common.security.plain.PlainLoginModule required username="[KEY]" password="[SECRET]";
    spring.cloud.stream.kafka.binder.configuration.sasl.mechanism=PLAIN
    spring.cloud.stream.kafka.binder.configuration.security.protocol=SASL_SSL
    

    I started up the app, confirmed that it connected (via application logs), and opened Postman to issue an HTTP POST command.

    After switching back to the Confluent Cloud dashboard, I saw my messages pop up.

    You can probably repeat this whole demo in about 10 minutes. As you can imagine, there’s a LOT more you can do with Apache Kafka than what I showed you. If you want an environment to learn Apache Kafka in depth, it’s now a no-brainer to spin up a free account in Confluent Cloud. And if you want to use a legit managed Apache Kafka for production in any cloud, this seems like a good bet as well.

  • My Pluralsight course—Getting Started with Concourse—is now available!

    Design software that solves someone’s “job to be done“, build it, package it, ship it, collect feedback, learn, and repeat. That’s the dream, right? For many, shipping software is not fun. It’s downright awful. Too many tickets, too many handoffs, and too many hours waiting. Continuous integration and delivery offer some relief, as you keep producing tested, production-ready artifacts. Survey data shows that we’re not all adopting this paradigm as fast as we should. I figured I’d do my part by preparing and delivering a new video training course about Concourse.

    I’ve been playing a lot with Concourse recently, and published a 3-part blog series on using it to push .NET Core apps to Kubernetes. It’s an easy-to-use CI system with declarative pipelines and stateless servers. Concourse runs jobs on Windows or Linux, and works with any programming language you use.

    My new hands-on Pluralsight course is ~90 minutes long, and gives you everything you need to get comfortable with the platform. It’s made up of three modules. The first module looks at key concepts, the Concourse architecture, and user roles, and we set up our local environment for development.

    The second module digs deep into the primitives of Concourse: tasks, jobs and resources. I explain how to configure each, and then we go hands on with each. There are aspects that took me a while to understand, so I worked hard to explain these well!

    The third and final module looks at pipeline lifecycle management and building manageable pipelines. We explore troubleshooting and more.

    Believe it or not, this is my 20th course with Pluralsight. Over these past 8 years, I’ve switched job roles many times, but I’ve always enjoyed learning new things and sharing that information with others. Pluralsight makes that possible for me. I hope you enjoy this new course, and most importantly, start doing CI/CD for more of your workloads!

  • Building an Azure-powered Concourse pipeline for Kubernetes  – Part 3: Deploying containers to Kubernetes

    Building an Azure-powered Concourse pipeline for Kubernetes – Part 3: Deploying containers to Kubernetes

    So far in this blog series, we’ve set up our local machine and cloud environment, and built the initial portion of a continuous delivery pipeline. That pipeline, built using the popular OSS tool Concourse, pulls source code from GitHub, generates a Docker image that’s stored in Azure Container Registry, and produces a tarball that’s stashed in Azure Blob Storage. What’s left? Deploying our container image to Azure Kubernetes Service (AKS). Let’s go.

    Generating AKS credentials

    Back in blog post one, we set up a basic AKS cluster. For Concourse to talk to AKS, we need credentials!

    From within the Azure Portal, I started up an instance of the Cloud Shell. This is a hosted Bash environment with lots of pre-loaded tools. From here, I used the AKS CLI to get the administrator credentials for my cluster.

    az aks get-credentials --name seroter-k8s-cluster --resource-group demos --admin

    This command generated a configuration file with URLs, users, certificates, and tokens.

    I copied this file locally for use later in my pipeline.

    Creating a role-binding for permission to deploy

    The administrative user doesn’t automatically have rights to do much in the default cluster namespace. Without explicitly allowing permissions, you’ll get some gnarly “does not have access” errors when doing most anything. Enter role-based access controls. I created a new rolebinding named “admin” with admin rights in the cluster, and mapped to the existing clusterAdmin user.

    kubectl create rolebinding admin --clusterrole=admin --user=clusterAdmin --namespace=default

    Now I knew that Concourse could effectively interact with my Kubernetes cluster.

    Giving AKS access to Azure Container Registry

    Right now, Azure Container Registry (ACR) doesn’t support an anonymous access strategy. Everything happens via authenticated users. The Kubernetes cluster needs access to its container registry, so I followed these instructions to connect ACR to AKS. Pretty easy!

    Creating Kubernetes deployment and service definitions

    Concourse is going to apply a Kubernetes deployment to create pods of containers in the cluster. Then, Concourse will apply a Kubernetes service to expose my pod with a routable endpoint.

    I created a pair of configurations and added them to the ci folder of my source code.

    The deployment looks like:

    apiVersion: extensions/v1beta1
     kind: Deployment
     metadata:
       name: demo-app
       namespace: default
       labels:
         app: demo-app
     spec:
       replicas: 1
       template:
         metadata:
           labels:
             app: demo-app
         spec:
           containers:
           - name: demo-app
             image: myrepository.azurecr.io/seroter-api-k8s:latest
             imagePullPolicy: Always
             ports:
             - containerPort: 8080
           restartPolicy: Always 
    

    This is a pretty basic deployment definition. It points to the latest image in the ACR and deploys a single instance (replicas: 1).

    My service is also fairly simple, and AKS will provision the necessary Azure Load Balancer and public IP addresses.

     apiVersion: v1
     kind: Service
     metadata:
       name: demo-app
       namespace: default
       labels:
         app: demo-app
     spec:
       selector:
         app: demo-app
       type: LoadBalancer
       ports:
         - name: web
           protocol: TCP
           port: 80
           targetPort: 80 
    

    I now had all the artifacts necessary to finish up the Concourse pipeline.

    Adding Kubernetes resource definitions to the Concourse pipeline

    First, I added a new resource type to the Concourse pipeline. Because Kubernetes isn’t a baked-in resource type, we need to pull in a community definition. No problem. This one’s pretty popular. It’s important than the Kubernetes client and server are expecting the same Kubernetes version, so I set the tag to match my AKS version.

    resource_types:
    - name: kubernetes
      type: docker-image
      source:
        repository: zlabjp/kubernetes-resource
        tag: "1.13"
    

    Next, I had to declare my resource itself. It has references to the credentials we generated earlier.

    resources:
    - name: azure-kubernetes-service
      type: kubernetes
      icon: azure
      source:
        server: ((k8s-server))
        namespace: default
        token: ((k8s-token))
        certificate_authority: |
          -----BEGIN CERTIFICATE-----
          [...]
          -----END CERTIFICATE-----
    

    There are a few key things to note here. First, the “server” refers to the cluster DNS server name in the credentials file. The “token” refers to the token associated with the clusterAdmin user. For me, it’s the last “user” called out in the credentials file. Finally, let’s talk about the certificate authority. This value comes from the “certificate-authority-data” entry associated with the cluster DNS server. HOWEVER, this value is base64 encoded, and I needed a decoded value. So, I decoded it, and embedded it as you see above.

    The last part of the pipeline? The job!

    jobs:
    - name: run-unit-tests
      [...]
    - name: containerize-app
      [...]
    - name: package-app
      [...]
    - name: deploy-app
      plan:
      - get: azure-container-registry
        trigger: true
        passed:
        - containerize-app
      - get: source-code
      - get: version
      - put: azure-kubernetes-service
        params:
          kubectl: apply -f ./source-code/seroter-api-k8s/ci/deployment.yaml -f ./source-code/seroter-api-k8s/ci/service.yaml
      - put: azure-kubernetes-service
        params:
          kubectl: |
            patch deployment demo-app -p '{"spec":{"template":{"spec":{"containers":[{"name":"demo-app","image":"myrepository.azurecr.io/seroter-api-k8s:'$(cat version/version)'"}]}}}}' 
    

    Let’s unpack this. First, I “get” the Azure Container Registry resource. When it changes (because it gets a new version of the container), it triggers this job. It only fires if the “containerize app” job passes first. Then I get the source code (so that I can grab the deployment.yaml and service.yaml files I put in the ci folder), and I get the semantic version.

    Next I “put” to the AKS resource, twice. In essence, this resource executes kubectl commands. The first command does a kubectl apply for both the deployment and service. On the first run, it provisions the pod and exposes it via a service. However, because the container image tag in the deployment file is to “latest”, Kubernetes actually won’t retrieve new images with that tag after I apply a deployment. So, I “patched” the deployment in a second “put” step and set the deployment’s image tag to the semantic version. This triggers a pod refresh!

    Deploy and run the Concourse pipeline

    I deployed the pipeline as a new revision with this command:

    fly -t rs set-pipeline -c azure-k8s-final.yml -p azure-k8s-final

    I unpaused the pipeline and watched it start up. It quickly reached and completed the “deploy to AKS” stage.

    But did it actually work? I jumped back into the Azure Cloud Shell to check it out. First, I ran a kubectl get pods command. Then, a kubectl get services command. The first showed our running pod, and the second showed the external IP assigned to my pod.

    I also issued a request to that URL in the browser, and got back my ASP.NET Core API results.

    Also to prove that my “patch” command worked, I ran the kubectl get deployment demo-app –output=yaml command to see which container image my deployment referenced. As you can see below, it no longer references “latest” but rather, a semantic version number.

    With all of these settings, I now have a pipeline that “just works” whenever I updated my ASP.NET Core source code. It tests the code, packages it up, and deploys it to AKS in seconds. I’ve added all the pipelines we created here to GitHub so that you can easily try this all out.

    Whatever CI/CD tool you use, invest in automating your path to production.