Category: Microsoft Azure

  • How easily can you process events in AWS Lambda, Azure Functions, and Google Cloud Functions? Let’s try it out.

    How easily can you process events in AWS Lambda, Azure Functions, and Google Cloud Functions? Let’s try it out.

    A simple use case came to mind yesterday. How would I quickly find out if someone put a too-big file into a repository? In ancient times (let’s say, 2008), here’s what I would have done to solve that. First I’d have to find a file share or FTP location to work with. Then I’d write some custom code with a file system listener that reacted to new documents hitting that file location. After that, I’d look at the size and somehow trigger an alert if the file exceeded some pre-defined threshold. Of course, I’d have to find a server to host this little app on, and figure out how to deploy it. So, solving this might take a month or more. Today? Serverless, baby! I can address this use case in minutes.

    I’m learning to program in Go, so ideally, I want a lightweight serverless function written in Go that reacts whenever a new file hits an object store. Is that easy to do in each major public cloud entirely with the console UIs? I just went on a journey to find out, without preparing ahead of time, and am sharing my findings in real time.

    Disclaimer: I work at Google Cloud but I am a fairly regular user of other clouds, and was a 12-time Microsoft MVP, mostly focused on Azure. Any mistakes below can be attributed to my well-documented ignorance, and not about me trying to create FUD!

    Google Cloud

    First up, the folks paying my salary. How easily could I add a Cloud Function that responds to things getting uploaded to Cloud Storage?

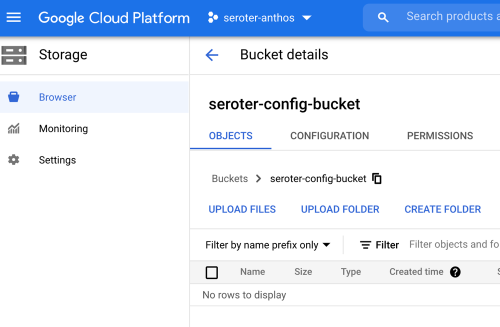
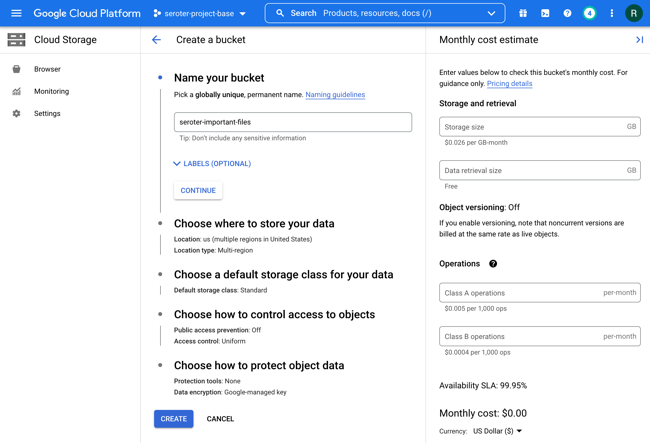
    First, I created a new bucket. This takes a few seconds to do.

    Hey, what’s this? From the bucket browser, I can actually choose to “process with Cloud Functions.” Let’s see what this does.

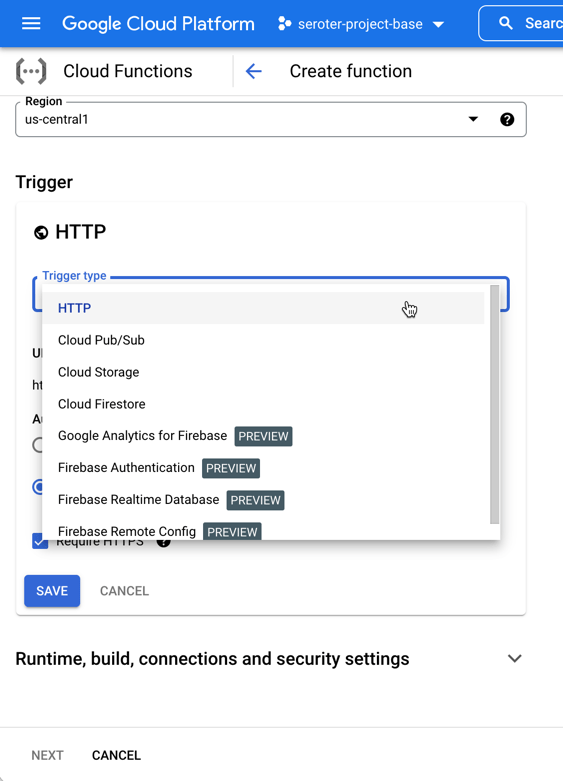
    Whoa. I get an inline “create function” experience with my bucket-name pre-populated, and the ability to actually author the function code RIGHT HERE.

    The Go code template was already populated with a “storage” object as input, and I extended it to include the “size” attribute. Then I added a quick type conversion, and check to see if the detected file was over 1MB.

    // Package p contains a Google Cloud Storage Cloud Function.
    package p
    
    import (
    	"context"
    	"log"
    	"strconv"
    )
    
    // GCSEvent is the payload of a GCS event. Please refer to the docs for
    // additional information regarding GCS events.
    type GCSEvent struct {
    	Bucket string `json:"bucket"`
    	Name   string `json:"name"`
    	Size   string `json:"size"`
    }
    
    // HelloGCS prints a message when a file is changed in a Cloud Storage bucket.
    func HelloGCS(ctx context.Context, e GCSEvent) error {
    	log.Printf("Processing file: %s", e.Name)
    	
    	intSize, _ := strconv.Atoi(e.Size)
    
    	if intSize > 1000000 {
    		log.Printf("Big file detected, do something!")
    	} else {
    		log.Printf("Normal size file detected")
    	}
    
    	return nil
    }
    

    After deploying it, I want to test it. To do so, I just dropped two files—one that was 54 bytes and another that was over 1MB.

    Now I’m heading over to the Cloud Functions dashboard and looking at the inline “Logs” tab. This shows me the system logs, as well as anything my function itself emitted. After just a moment, I see the logs my function wrote out, including the “normal size file” and “big file detected” messages.

    Goodness that was easy. The same sort of in-experience trigger exists for Pub/Sub, making it easy to generate functions that respond to messaging events.

    The other UI-driven way to do this. From the Cloud Functions experience, I chose to add a new function. You see here that I have a choice of “trigger.”

    I chose “Cloud Storage” and then picked from a list of possible event types. Let’s also choose the right bucket to listen in on. Note that from this creation wizard, I can also do things like set the memory allocation and timeout period, define the minimum and maximum instance count, add environment variables, reference secrets, and define ingress and egress permissions.

    Next, I have to add some source code. I can upload a zip file, reference a zip file in Cloud Storage, point to a source code repository, or add code inline. Let’s do that. What I love is that the code template recognizes my trigger type, and takes in the object representing the storage event. For each language. That’s a big time-saver, and helps new folks understand what the input object should look like. See here:

    Here, I picked Go again, used the same code as before, and deployed my function. Once again, it cleanly processes any event related to new files getting added to Cloud Storage. Cloud Functions is underrated, and super easy to work with.

    End to end, this solution should take 2-5 minutes tops to complete and deploy. That’s awesome. Past Richard would be crying for joy right now.

    AWS

    The grandaddy of serverless should be pretty good at this scenario too! From humble beginnings, AWS Lambda has seemingly becomes the preferred app platform in that ecosystem. Let’s use the AWS console experience to build a Lambda function that responds to new files landing in an S3 bucket.

    First, I need an S3 bucket. Easy enough, and accepting all the default settings.

    My bucket is now there, and I’m looking around, but don’t see any option to create a Lambda function from within this S3 interface. Maybe I’m missing it, but doesn’t seem so.

    No problem. Off to the Lambda dashboard. I click the very obvious “create function” button and am presented with a screen that asks for my function name and runtime, and the source of code.

    Let’s see what “from scratch” means, as I’d probably want some help via a template if it’s too bare bones. I click “create function” to move forward.

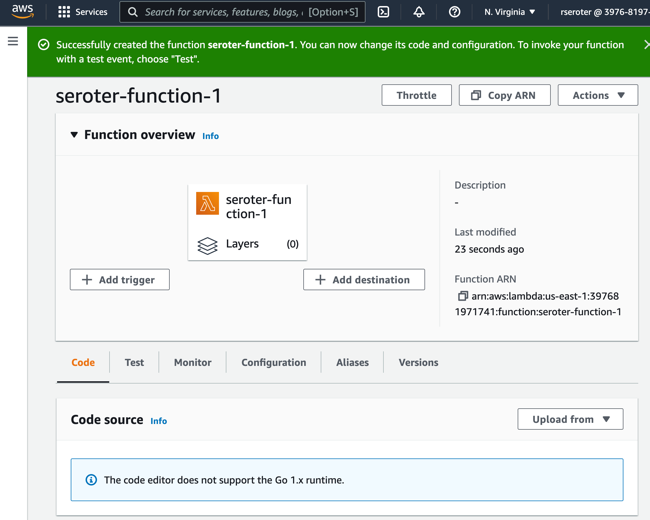
    Ok, rats, I don’t get an inline code editor if I want to write code in Go. Would have been useful to know beforehand. I’ll delete this function and start over, this time, looking for a blueprint that might provide a Go template for reading from S3.

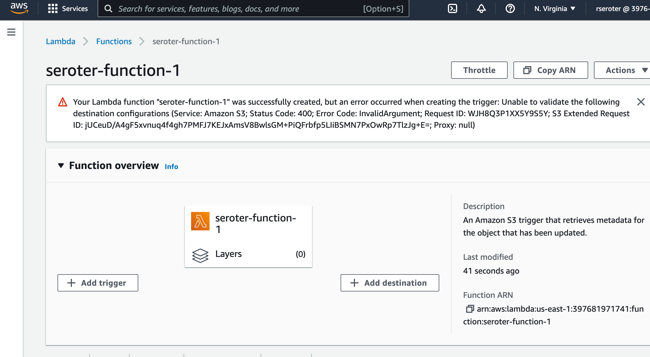
    Doesn’t look like there’s anything for Go. If I want a blueprint, I’m choosing between Python and Node. Ok, I’ll drop by Go requirement, and crank out this Lambda function in JavaScript. I picked that s3-get-object template, and then provide a function name and a role that can access S3. I’m asked for details about my S3 trigger (bucket name, event type) and shown the (uneditable) blueprint code. I’d like to make changes, but I guess I wait until later, so I create the function.

    Shoot, I did something wrong. Got an error that, on the plus side, is completely opaque and unreadable.

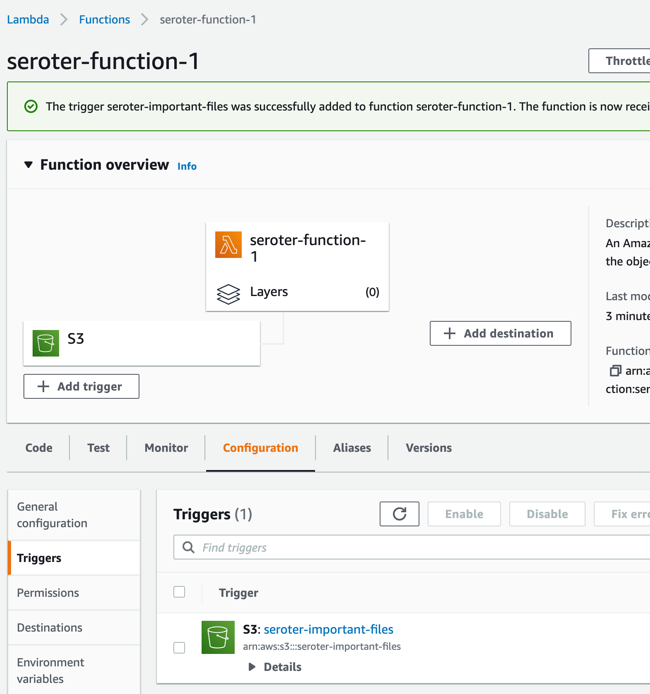
    Not be stopped, I’ll try clicking “add trigger” here, which lets me choose among a variety of sources, including S3, and this configuration seems to work fine.

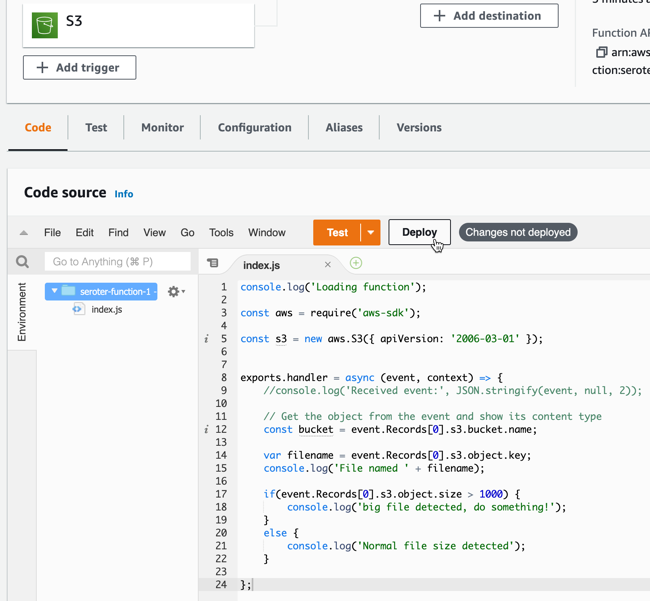
    I want to update the source code of my function, so that it logs alerts for big files. I updated the Lambda code (after looking up the structure of the inbound event object) and clicked “deploy” to apply this new code.

    Not too bad. Ok, let’s test this. In S3, I just dropped a handful of files into the bucket. Back in the Lambda console, I jump to the “Monitor” tab to see what’s up.

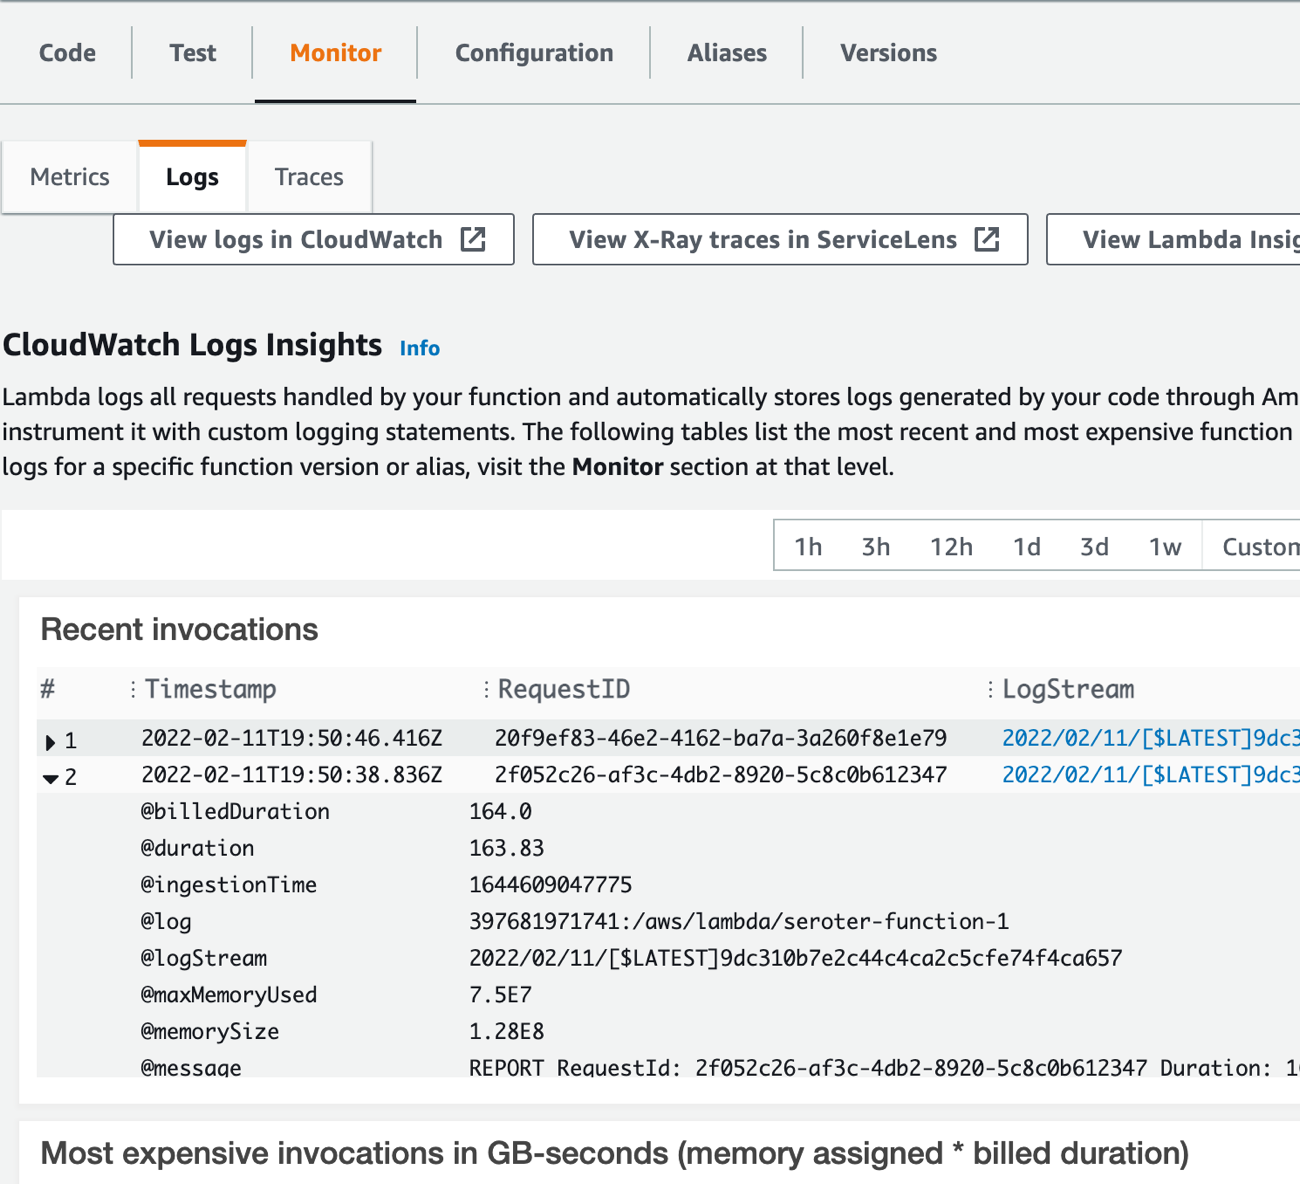
    I’ve got the invocations listed here. I can’t see the logs directly, but looks like I need to click the LogStream links to view the invocation logs. Doing that takes me to a new window where I’m now in CloudWatch. I now see the logs for this particular set of invocations.

    Solid experience. A few hiccups, but we’ll chalk some of that up to my incompetence, and the remainder to the fact that AWS UIs aren’t always the most intuitive.

    Microsoft Azure

    Azure, my old friend. Let’s see how I can use the Azure Portal to trigger an Azure Function whenever I add something to a storage bucket. Here we go.

    Like with the walkthroughs above, I also need to setup some storage. From the home page, I click “create resource” and navigate on the left-hand side to “Storage.” And … don’t see Azure Storage. *Expletive*.

    I can’t find what category it’s in, but just noticed it in the “Get started” section. It’s weird, but whatever. I pick an Azure subscription and resource group, try to set a name (and remember that it doesn’t accept anything but letters and numbers, no dashes), and proceed. It validates something (not sure I’ve ever seen this NOT pass) and then I can click “create.”

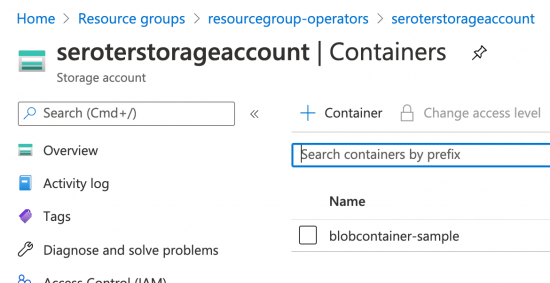
    After thirty seconds, I have my storage account. Azure loves “things contained within things” so this storage account itself doesn’t hold objects. I create a “container” to hold my actual documents.

    Like with Lambda, I don’t see a way from this service to create an event-driven function. [Updated 2-13-22: A reader pointed out that there is an “events” experience in Storage that lets you somewhat create a function (but not the Function App itself). While convenient, the wizard doesn’t recognize where you are, and asks what sort of Function (storage!) you want to build. But it’s definitely something.]

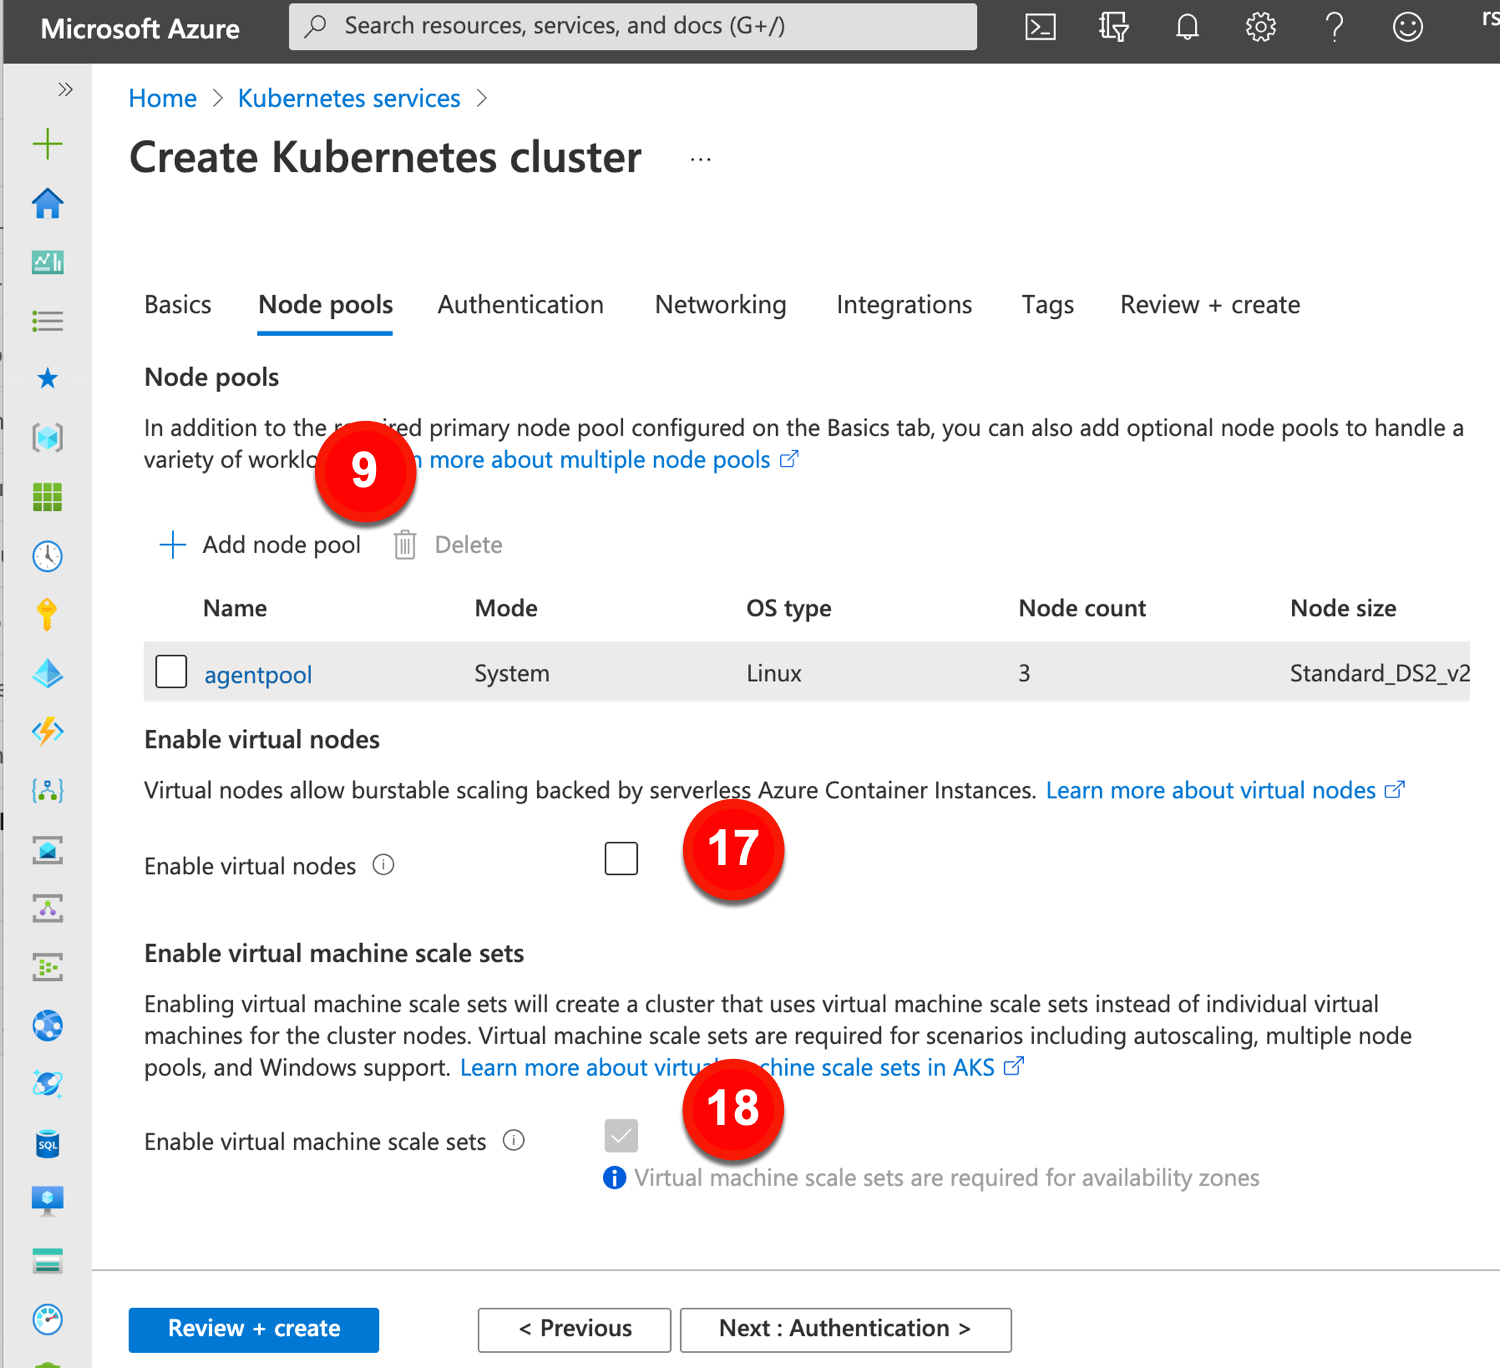
    So, let’s go to the Azure Functions experience. I’m asked to create a “Function App.” There’s no option to choose Go as a managed language, so I’ll once again pick Node. YOU WIN AGAIN JAVASCRIPT.

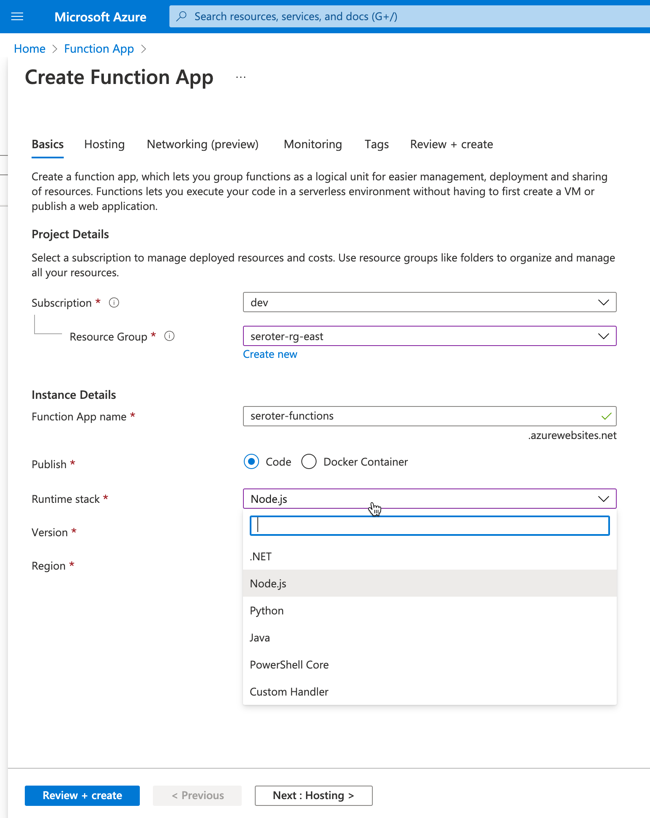
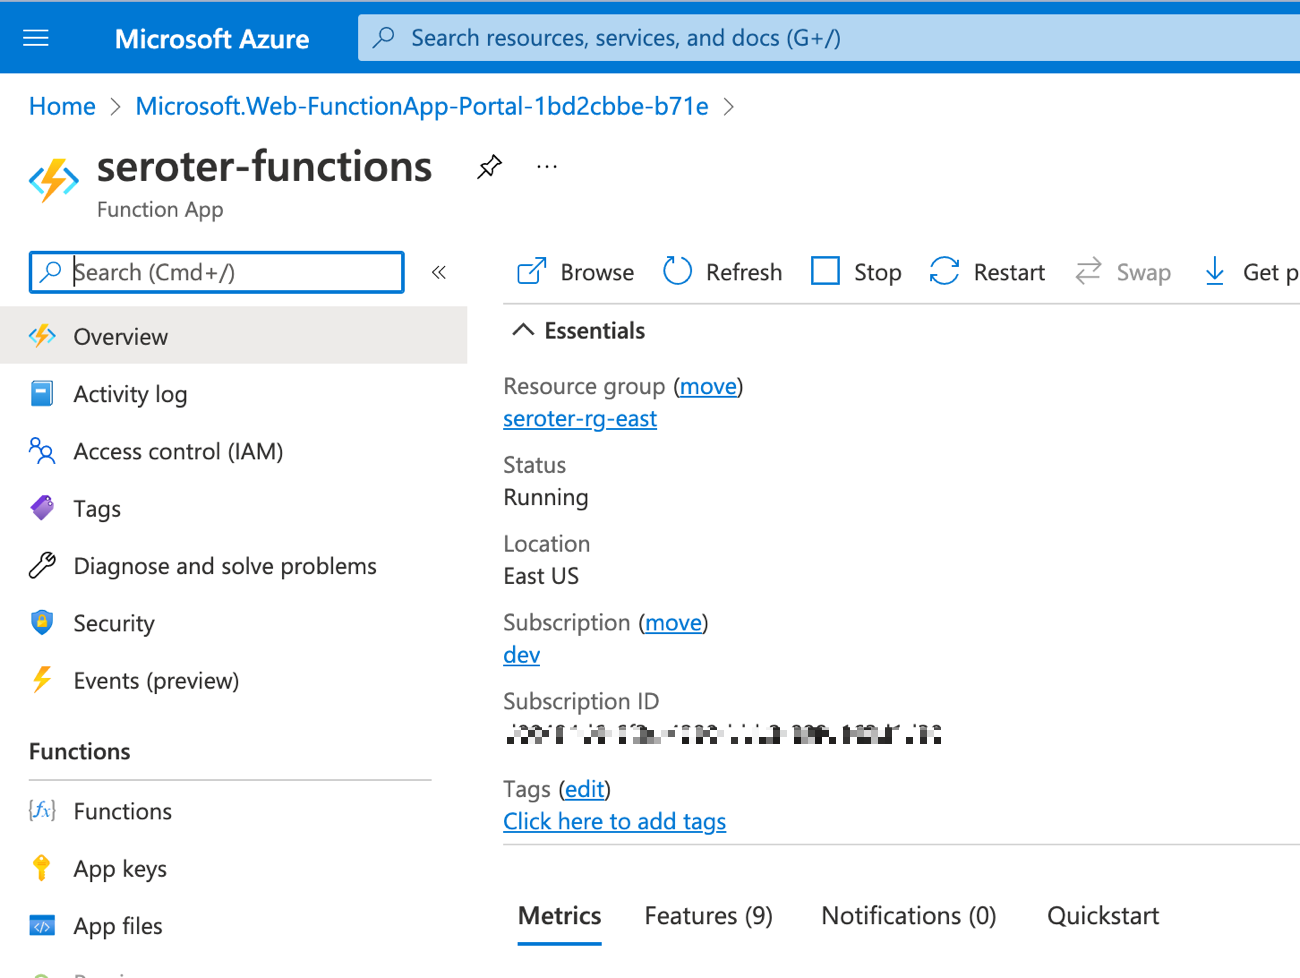
    I move on to the next pane of the wizard where I’m asked about hosting stack. Since this is 2022, I chose Linux, even though Windows is somehow the recommended stack for Node functions. After a few moments, I have my Function app.

    As with the storage scenario, this Function app isn’t actually the function. I need to add a function to the app. Ok, no problem. Wait, apparently you can’t use the inline editor for Linux-based functions because of reasons.

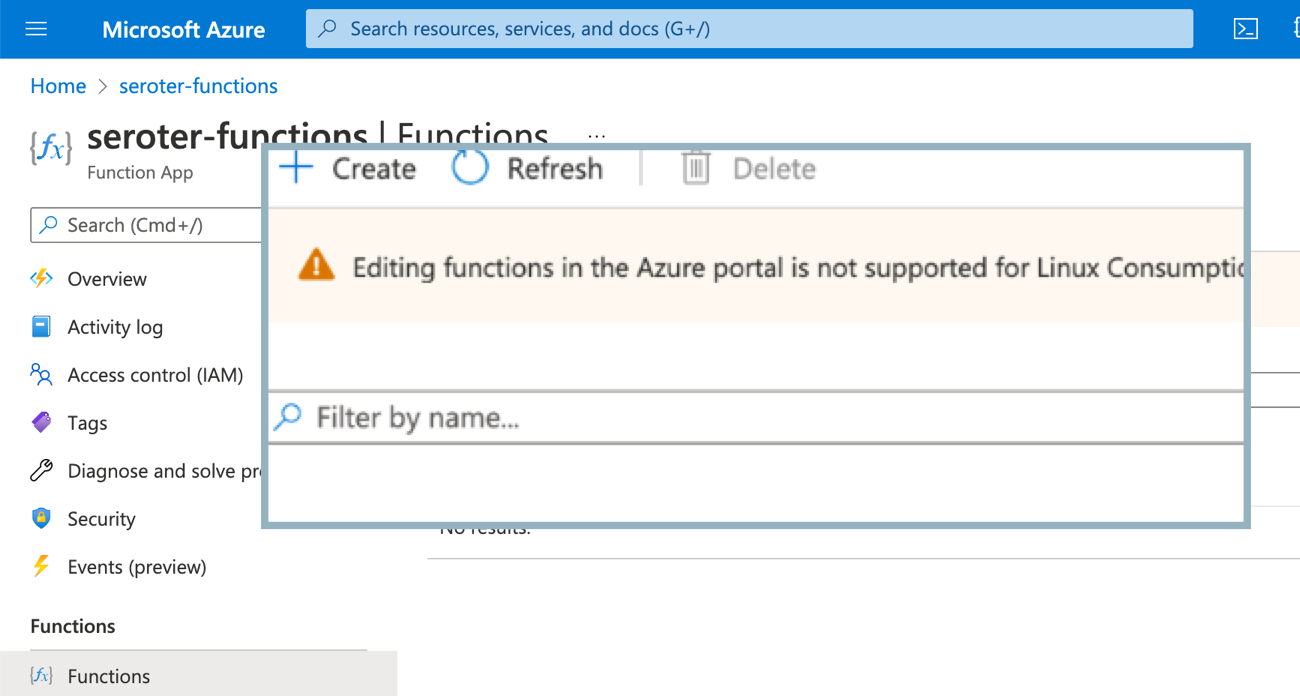
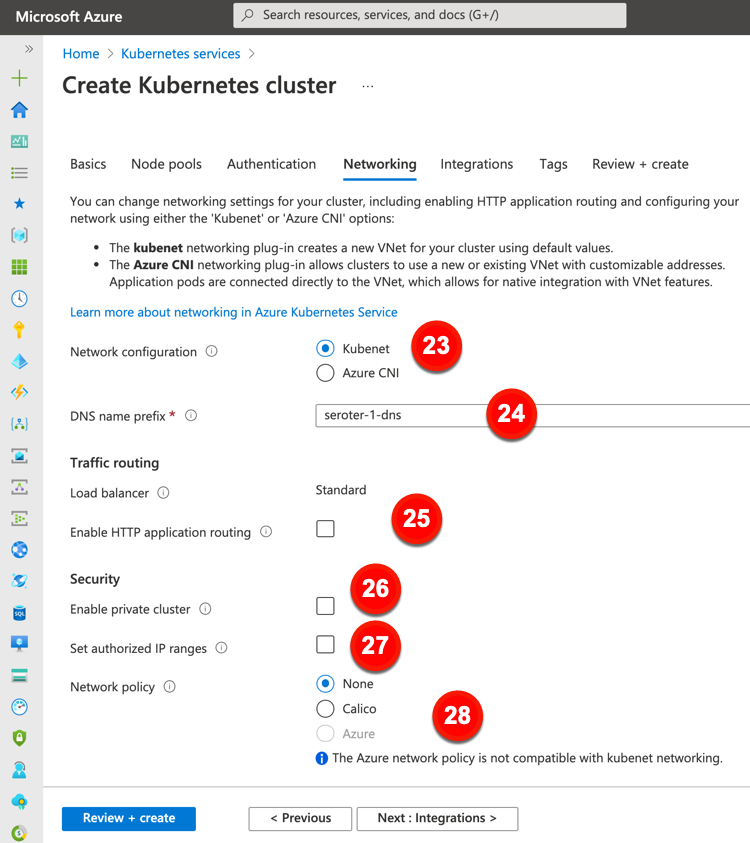
    Sigh. I’ll create a new Function App, this time choosing Windows as the host. Now when I choose to add a function to this Function App, I see the option for “develop in portal”, and can choose a trigger. That’s good. I’ll choose the Storage Blob trigger, but I’m not clear on the parameter values I’m supposed to provide. Hmm, the “learn more” goes to a broken page. Found it by Googling directly. Looks like the “path” is the name of the container in the account, and {name} is a standard token.

    The creation succeeded, and now I have a function. Sweet. Let’s throw some code in here. The “Code + Test” window looks like an inline editor. I updated the code to do a quick check of file size, and hope it works.

    After saving it (I don’t see a concept of versioning), I can test it out. Like I did for Google Cloud and AWS, I dragged a couple of files onto the browser window pointing at the Storage Blob. Looks like the Azure Portal doesn’t support drag-and-drop. I’ll use the “upload files” wizard like an animal. After uploading, I switch back to the Azure Functions view which offers a “Monitor” view.

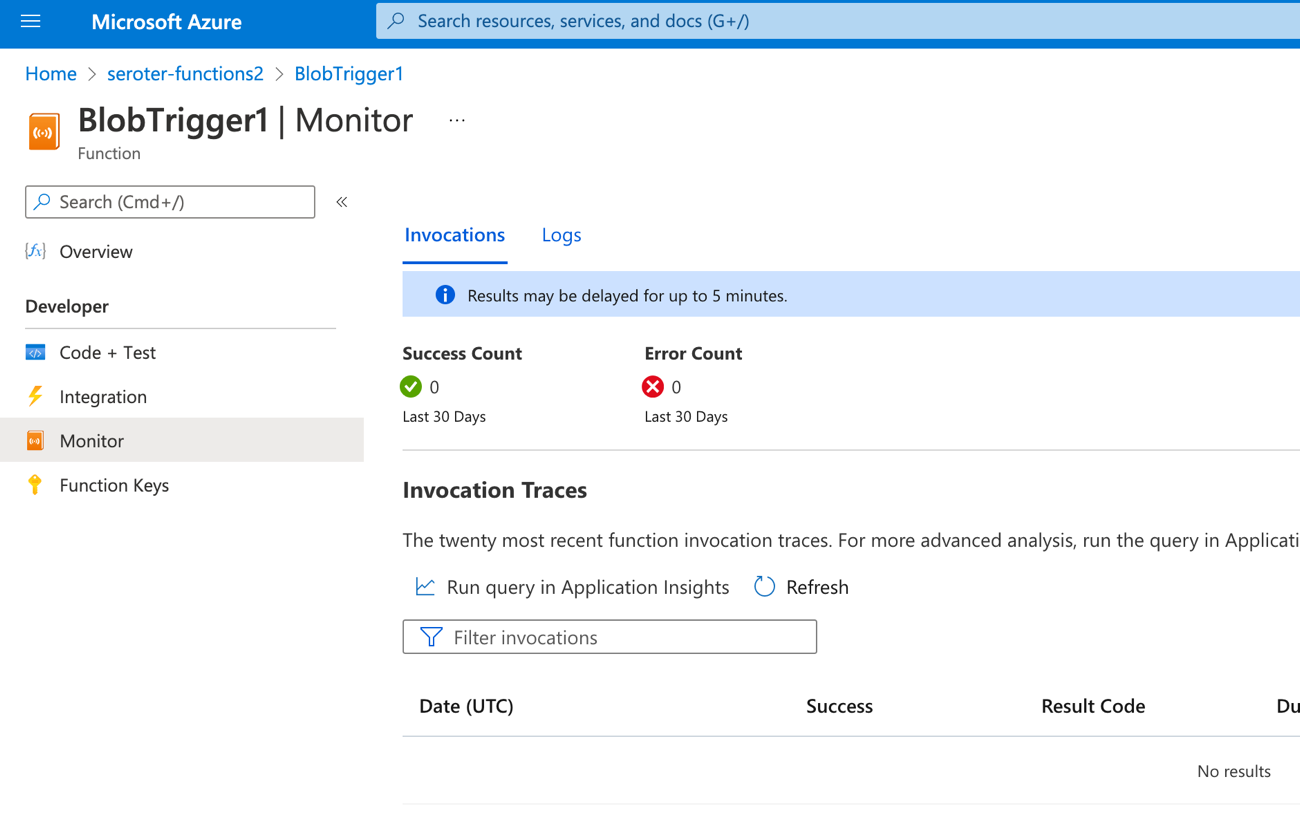
    I don’t love that “results may be delayed for up to 5 minutes” as I’m really into instant gratification. The Function dashboard shows two executions right away, but the logs are still delayed for minutes after that. Eventually I see the invocations show up, and it shows execution history (not app logs).

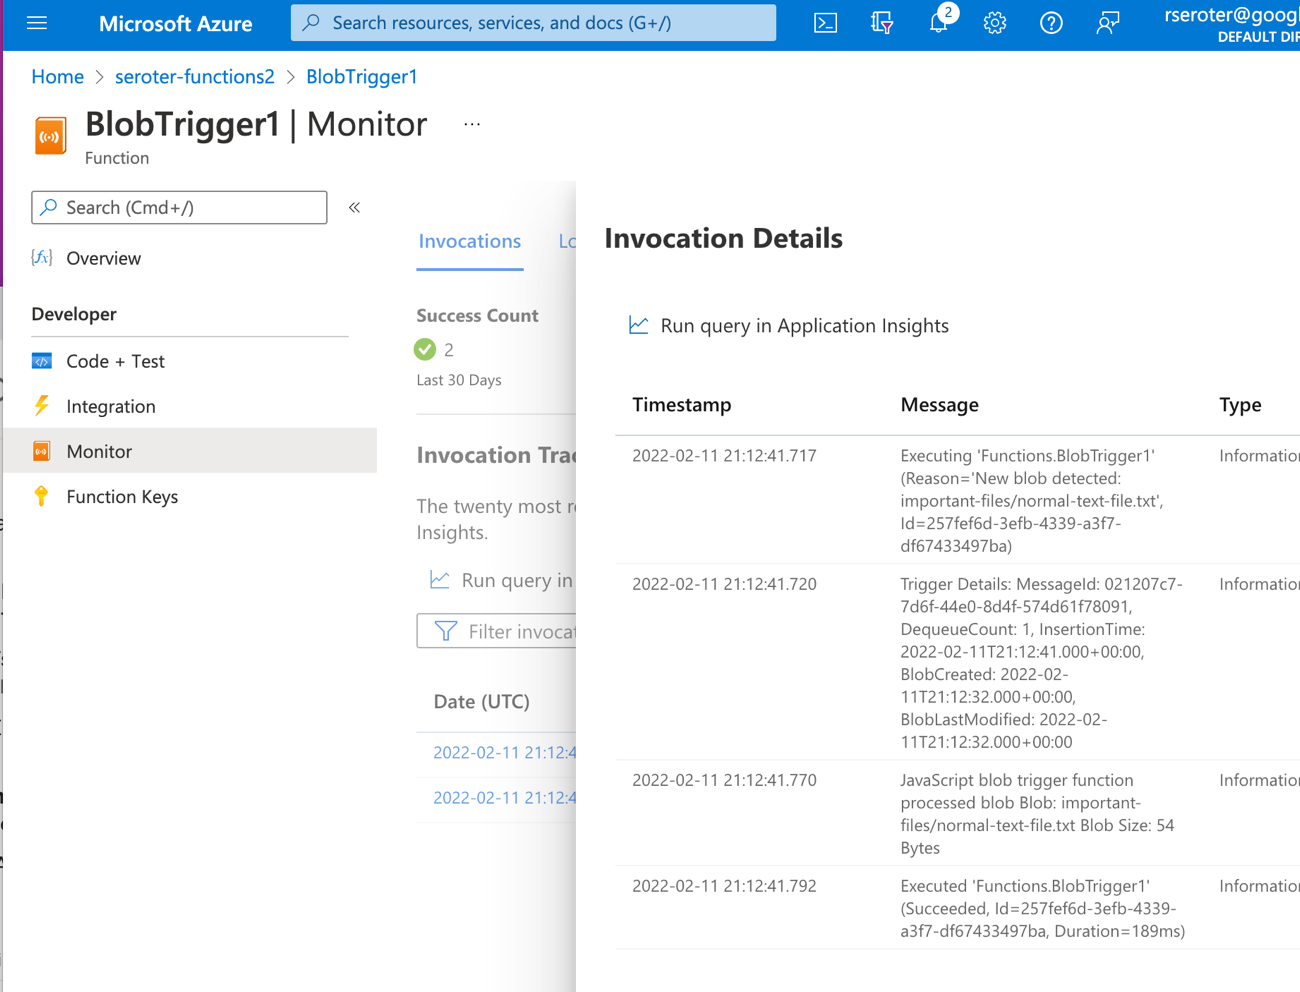
    I can’t seem to find the application logs, as the “logs” tab here seems to show a stream, but nothing appears here for me. Application Insights doesn’t seem to show the logs either. They could be lost to the universe, or more likely, I’m too bad at this to find them.

    Regardless, it works! My Azure Function runs when objects land in my Storage account.

    Wrap Up

    As to the options considered here, it seemed obvious to me that Google Cloud has the best dev experience. The process of creating a function is simple (and even embedded in related services), the inline editor easily works for all languages, and the integrated log monitoring made my build-deploy-test loop faster. The AWS experience was fine overall, although inconsistent depending on your programming language. And the Azure experience, honestly, felt super clunky and the Windows-centricity feels dated. I’m sure they’ll catch up soon.

    Overall, this was pretty fun. Managed services and serverless computing makes these quick solutions so simple to address. It’s such an improvement for how we had to do this before!

  • What’s the most configurable Kubernetes service in the cloud? Does it matter?

    What’s the most configurable Kubernetes service in the cloud? Does it matter?

    Configurability matters. Whether it’s in our code editors, database engine, or compute runtimes, we want the option—even if we don’t regularly use it—to shape software to our needs. When it comes to using that software as a service, we also look for configurations related to quality attributes—think availability, resilience, security, and manageability.

    For something like Kubernetes—a hyper-configurable platform on its own—you want a cloud service that makes this powerful software more resilient and cheaper to operate. This blog post focuses on configurability of each major Kubernetes service in the public cloud. I’ll make that judgement based on the provisioning options offered by each cloud.

    Disclaimer: I work for Google Cloud, so obviously I’ll have some biases. That said, I’ve used AWS for over a decade, was an Azure MVP for years, and can be mostly fair when comparing products and services. Please call out any mistakes I make!

    Google Kubernetes Engine (GKE)

    GKE was the first Kubernetes service available in the public cloud. It’s got a lot of features to explore. Let’s check it out.

    When creating a cluster, we’re immediately presented with two choices: standard cluster, or Autopilot cluster. The difference? A standard cluster gives the user full control of cluster configuration, and ownership of day-2 responsibilities like upgrades. An Autopilot cluster—which is still a GKE cluster—has a default configuration based on Google best practices, and all day-2 activities are managed by Google Cloud. This is ideal for developers who want the Kubernetes API but none of the management. For this evaluation, let’s consider the standard cluster type.

    If the thought of all these configurations feels intimidating, you’ll like that GKE offers a “my first cluster” button which spins up a small instance with a default configuration. Also, this first “create cluster” tab has a “create” button at the bottom that provisions a regular (3-node) cluster without requiring you to enter or change any configuration values. Basically, you can get started with GKE in three clicks.

    With that said, let’s look at the full set of provisioning configurations. On the left side of the “create a Kubernetes cluster” experience, you see the list of configuration categories.

    How about we look at the specific configurations. On the cluster basics tab, we have seven configuration decisions to make (or keep, if you just want to accept default values). These configurations include:

    1. Name. Naming is hard. These are 40 characters long, and permanent.

    2. Location type. Where do you want your control plane and nodes? Zonal clusters only live in a chosen zone, while Regional clusters spread the control plane and workers across zones in a region.

    3. Zone/Region. For zonal clusters, you pick a zone, for regional clusters, you pick a region.

    4. Specify default node locations. Choose which zone(s) to deploy to.

    5. Control plane version. GKE provisions and offers management of control plane AND worker nodes. Here, you choose whether you want to pick a static Kubernetes version and handle upgrades yourself, or a “release channel” where Google Cloud manages the upgrade cadence.

    6. Release channel. If you chose release channel vs static, you get a configuration choice of which channel. Options include “rapid” (get Kubernetes versions right away), “regular” (get Kubernetes versions after a period of qualification), and “stable” (longer validation period).

    7. Version. Whether choosing “static” or “release channel”, you configure which version you want to start with.

    You see in the picture that I can click “Create” here and be done. But I want to explore all the possible configurations at my disposal with GKE.

    My next (optional) set of configurations relates to node pools. A GKE cluster must have at least one node pool, which consists of an identical group of nodes. A cluster can have many node pools. You might want a separate pool for Windows nodes, or a bigger machine type, or faster storage.

    In this batch of configurations, we have:

    8. Add node pool. Here you have a choice on whether to stick with a single default node pool, or add others. You can add and remove node pools after cluster creation.

    9. Name. More naming.

    10. Number of nodes. By default there are three. Any fewer than three and you can have downtime during upgrades. Max of 1000 allowed here. Note that you get this number of nodes deployed PER location. 3 nodes x 3 locations = 9 nodes total.

    11. Enable autoscaling. Cluster autoscaling is cool. It works on a per-node-pool basis.

    12. Specify node locations. Where do you want the nodes? If you have a regional cluster, this is where you choose which AZs you want.

    13. Enable auto-upgrade. It’s grayed-out below because this is automatically selected for any “release channel” clusters. GKE upgrades worker nodes automatically in that case. If you chose a static version, then you have the option of selecting auto-upgrades.

    14. Enable auto-repair. If a worker node isn’t healthy, auto-repair kicks in to fix or replace the node. Like the previous configuration, this one is automatically applied for “release channel’ clusters.

    15. Max surge. Surge updates is about letting you control how many nodes GKE can upgrade at a given time, and how disruptive an upgrade may be. The “max surge” configuration determines how many additional nodes GKE adds to the node pool during upgrades.

    16. Max unavailable. This configuration refers to how many nodes can be simultaneously unavailable during an upgrade.

    Once again, you could stop here, and build your cluster. I WANT MORE CONFIGURATION. Let’s keep going. What if I want to configure the nodes themselves? That’s the next available tab.

    For node configurations, you can configure:

    17. Image type. This refers to the base OS which includes Google’s container-optimized OS, Ubuntu, and Windows Server.

    18. Machine family. GKE runs on virtual machines. Here is where you choose which type of underlying VM you want, including general purpose, compute-optimized, memory-optimized or GPU-based.

    19. Series. Some machine families have sub-options for specific VMs.

    20. Machine type. Here are the specific VM sizes you want, with combinations of CPU and memory.

    21. Boot disk type. This is where you choose a standard or SSD persistent disk.

    22. Boot disk size. Choose how big of a boot disk you want. Max size is 65,536 GB.

    23. Enable customer-managed encryption for boot disk. You can encrypt the boot disk with your own key.

    24. Local SSD disks. How many attached disks do you want? Enter here. Max of 24.

    25. Enable preemptible nodes. Choose to use cheaper compute instances that only live for up to 24 hours.

    26. Maximum pods per node. Limit how many pods you want on a given node, which has networking implications.

    27. Network tags. This represents firewall rules applied to nodes.

    Security. Let’s talk about it. You have a handful of possible configurations to secure your GKE node pools.

    Node pool security configurations include:

    28. Service account. By default, containers running on this VM call Google Cloud APIs using this account. You may want a unique service account, and/or least-privilege one.

    29. Access scopes. Control the type of level of API access to grant the underlying VM.

    30. Enable sandbox with gVisor. This isn’t enabled for the default node pool, but for others, you can choose the extra level of isolation for pods on the node.

    31. Enable integrity monitoring. Part of the “Shielded node” functionality, this configuration lets you monitor and verify boot integrity.

    32. Enable secure boot. Use this configuration setting for additional protection from boot-level and kernel-level malware.

    Our last set of options for each node pool relates to metadata. Specifically:

    33. Kubernetes labels. These get applied to every node in the pool and can be used with selectors to place pods.

    34. Node taints. These also apply to every node in the pool and help control what gets scheduled.

    35. GCE instance metadata. This attaches info to the GCE instances

    That’s the end of the node pool configurations. Now we have the option of cluster-wide configurations. First up are settings based on automation.

    These cluster automation configurations include:

    36. Enable Maintenance Window. If you want maintenance activities to happen during certain times or days, you can set up a schedule.

    37. Maintenance exclusions. Define up to three windows where updates won’t happen.

    38. Enable Notifications. GKE can publish upgrade notifications to a Google Cloud Pub/Sub topic.

    39. Enable Vertical Pod Autoscaling. With this configured, your cluster will rightsize CPU and memory based on usage.

    40. Enable node auto-provisioning. GKE can create/manage entire node pools on your behalf versus just nodes within a pool.

    41. Autoscaling profile. Choose when to remove underutilized nodes.

    The next set of cluster-level options refer to Networking. Those configurations include:

    42. Network. Choose the network the GKE cluster is a member of.

    43. Node subnet. Apply a subnet.

    44. Public cluster / Private cluster. If you want only private IPs for your cluster, choose a private cluster.

    45. Enable VPC-native traffic routing. Applies alias IP for more secure integration with Google Cloud services.

    46. Automatically create secondary ranges. Disabled here because my chosen subnet doesn’t have available user-managed secondary ranges. If it did, I’d have a choice of letting GKE manage those ranges.

    47. Port address range. Pods in the clusters are assigned IPs from this range.

    48. Maximum pods per node. Has network implications.

    49. Service address range. Any cluster services will be assigned an IP address from this range.

    50. Enable intranode visibility. Pod-to-pod traffic because visible to the GCP networking fabric so that you could do flow logging, and more.

    51. Enable NodeLocal DNSCache. Improve perf by running a DNS caching agent on nodes.

    52. Enable HTTP load balancing. This installs a controller that applies configs to the Google Cloud Load Balancer.

    53. Enable subsetting for L4 internal load balancers. Internal LBs use a subset of nodes as backends to improve perf.

    54. Enable control plane authorized networks. Block untrusted, non-GCP sources from accessing the Kubernetes master.

    55. Enable Kubernetes Network Policy. This API lets you define which pods can access each other.

    GKE also offers a lot of (optional) cluster-level security options.

    The cluster security configurations include:

    56. Enable Binary Authorization. If you want a secure software supply chain, you might want to apply this configuration and ensure that only trusted images get deployed to GKE.

    57. Enable Shielded GKE Nodes. This provides cryptographic identity for nodes joining a cluster.

    58. Enable Confidential GKE Nodes. Encrypt the memory of your running nodes.

    59. Enable Application-level Secrets Encryption. Protect secrets in etcd using a key stored in Cloud KMS.

    60. Enable Workload Identity. Map Kubernetes service accounts to IAM accounts so that your workload doesn’t need to store creds. I wrote about it recently.

    61. Enable Google Groups for RBAC. Grant roles to members of a Workspace group.

    62. Enable legacy authorization. Prevents full Kubernetes RBAC from being used in cluster.

    63. Enable basic authentication. This is a deprecated way to authenticate to a cluster. Don’t use it.

    64. Issue a client certificate. Skip this too. This creates a specific cert for cluster access, and doesn’t automatically rotate.

    It’s useful to have cluster metadata so that you can tag clusters by environment, and more.

    The couple of metadata configurations are:

    65. Description. Free text box to describe your cluster.

    66. Labels. Add individual labels that can help you categorize.

    We made it to the end! The last set of GKE configurations relate to features that you want to add to the cluster.

    These feature-based configurations include:

    67. Enable Cloud Run for Anthos. Throw Knative into your GKE cluster.

    68. Enable Cloud Operations for GKE. A no-brainer. Send logs and metrics to the Cloud Ops service in Google Cloud.

    69. Select logging and monitoring type. If you select #68, you can choose the level of logging (e.g. workload logging, system logging).

    70. Enable Cloud TPU. Great for ML use cases within the cluster.

    71. Enable Kubernetes alpha features in this cluster. Enabled if you are NOT using release channels. These are short lived clusters with everything new lit up.

    72. Enable GKE usage metering. See usage broken down by namespace and label. Good for chargebacks.

    73. Enable Istio. Throw Istio into your cluster. Lots of folks do it!

    74. Enable Application Manager. Helps you do some GitOps style deployments.

    75. Enable Compute Engine Persistent Disk CSI Driver. This is now the standard way to get volume claims for persistent storage.

    76. Enable Config Connector. If you have Workload Identity enabled, you can set this configuration. It adds custom resources and controllers to your cluster that let you create and manage 60+ Google Cloud services as if they were Kubernetes resources.

    FINAL TALLY. Getting started: 3 clicks. Total configurations available: 76.

    Azure Kubernetes Service (AKS)

    Let’s turn our attention to Microsoft Azure. They’ve had a Kubernetes service for quite a while.

    When creating an AKS cluster, I’m presented with an initial set of cluster properties. Two of them (resource group, and cluster name) are required before I can “review and create” and then create the cluster. Still, it’s a simple way to get started with just five clicks.

    The first tab of the provisioning experience focuses on “basic” configurations.

    These configurations include:

    1. Subscription. Set which of your Azure subscriptions to use for this cluster.

    2. Resource group. Decide which existing (or create a new) resource group to associate with this cluster.

    3. Kubernetes cluster name. Give your cluster a name.

    4. Region. Choose where in the world you want you cluster.

    5. Availability zones. For regions with availability zones, you can choose how to stripe the cluster across those.

    6. Kubernetes version. Pick a specific version of Kubernetes for the AKS cluster.

    7. Node size. Here you choose the VM family and instance type for your cluster.

    8. Node count. Pick how many nodes make up the primary node pool.

    Now let’s explore the options for a given node pool. AKS offers a handful of settings, including ones that fly out into another tab. These include:

    9. Add node pool. You can stick with the default node pool, or add more.

    10. Node pool name. Give each node pool a unique name.

    11. Mode. A “system” node pool is meant for running system pods. This is what the default node pool will always be set to. User node pools make sense for your workloads.

    12. OS type. Choose Linux or Windows, although system node pools must be Linux.

    13. Availability zones. Select the AZs for this particular node pool. You can change from the default set on the “basic” tab.

    14. Node size. Keep or change the default VM type for the cluster.

    15. Node count. Choose how many nodes to have in this pool.

    16. Max pods per node. Impacts network setup (e.g. how many IP addresses are needed for each pool).

    17. Enable virtual nodes. For bursty scenarios, this AKS features deploys containers to nodes backed by their “serverless” Azure Container Instances platform.

    18. Enable virtual machine scale sets. Chosen by default if you use multiple AZs for a cluster. Plays a part in how AKS autoscales.

    The next set of cluster-wide configurations for AKS relate to security.

    These configurations include:

    19. Authentication method. This determines how an AKS cluster interacts with other Azure sources like load balancers and container registries. The user has two choices here.

    20. Role-based access control. This enables RBAC in the cluster.

    21. AKS-managed Azure Active Directory. This configures Kubernetes RBAC using Azure AD group membership.

    22. Encryption type. Cluster disks are encrypted at rest by default with Microsoft-managed keys. You can keep that setting, or change to a customer-managed key.

    Now, we’ll take a gander at the network-related configurations offered by Azure. These configurations include:

    23. Network configuration. The default option here is a virtual network and subnet created for you. You can also use CNI to get a new or existing virtual network/subnet with user-defined address ranges.

    24. DNS name prefix. This is the prefix used with the hosted API server’s FQDDN.

    25. Enable HTTP application routing. The previous “Load balancer” configuration is fixed for every cluster created in the Azure Portal. This setting is about creating publicly accessible DNS names for app endpoints.

    26. Enable private cluster. This ensures that network traffic between the API server and node pools remains on a private network.

    27. Set authorized IP ranges. Choose the IP ranges that can access the API server.

    28. Network policy. Define rules for ingress and egress traffic between pods in a cluster. You can choose none, Calico, or Azure’s network policies.

    The final major configuration category is “integrations.” This offers a few options to connect AKS clusters to other Azure services.

    These “integration” configurations include:

    29. Container registry. Point to, or create, an Azure Container Registry instance.

    30. Container monitoring. Decide whether you want workload metrics fed to Azure’s analytics suite.

    31. Log Analytics workspace. Create a new one, or point to an existing one, to store monitoring data.

    32. Azure Policy. Choose to apply an admission controller (via Gatekeeper) to enforce policies in the cluster.

    The last tab for AKS configuration relates to tagging. This can be useful for grouping and categorizing resources for chargebacks.

    FINAL TALLY. Getting started: 5 clicks. Total configurations available: 33.

    Amazon Elastic Kubernetes Service (EKS)

    AWS is a go-to for many folks running Kubernetes, and they shipped a managed service for Kubernetes a few years back. EKS looks different from GKE or AKS. The provisioning experience is fairly simplistic, and doesn’t provision the worker nodes. That’s something you do yourself later, and then you see a series of configurations for node pools after you provision them. It also offers post-provisioning options for installing things like autoscalers, versus making that part of the provisioning.

    Getting started with EKS means entering some basic info about your Kubernetes cluster.

    These configurations include:

    1. Name. Provide a unique name for your cluster.

    2. Kubernetes version. Pick a specific version of Kubernetes for your cluster.

    3. Cluster Service Role. This is the AWS IAM role that lets the Kubernetes control plan manage related resources (e.g. load balancers).

    4. Secrets encryption. This gives you a way to encrypt the secrets in the cluster.

    5. Tags. Add up to 50 tags for the cluster.

    After these basic settings, we click through some networking settings for the cluster. Note that EKS doesn’t provision the node pools (workers) themselves, so all these settings are cluster related.

    The networking configurations include:

    6. Select VPC. Choose which VPC to use for the cluster. This is not optional.

    7. Select subnets. Choose the VPC subnet for your cluster. Also, not optional.

    8. Security groups. Choose one or more security groups that apply to worker node subnets.

    9. Configure Kubernetes Service IP address range. Set the range that cluster services use for IPv4 addresses.

    10. Cluster endpoint access. Decide if you want a public cluster endpoint accessible outside the VPC (including worker access), a mix of public and private, or private only.

    11. Advanced settings. Here’s where you set source IPs for the public access endpoint.

    12. Amazon VPC CNI version. Choose which version of the add-on you want for CNI.

    The last major configuration view for provisioning a cluster relates to logging.

    The logging configurations include:

    13. API server. Log info for API requests.

    14. Audit. Grab logs about cluster access.

    15. Authenticator. Get lots for authentication requests.

    16. Controller manager. Store logs for cluster controllers.

    17. Scheduler. Get logs for scheduling decisions.

    We have 17 configurations available in the provisioning experience. I really wanted to stop here (versus being forced to create and pay for a cluster to access the other configuration settings), but to be fair, let’s look at post-provisioning configurations of EKS, too.

    After creating an EKS cluster, we see that new configurations become available. Specifically, configurations for a given node pool.

    The node group configurations include:

    18. Name. This is the name for the node group.

    19. Node IAM role. This is the role used by the nodes to access AWS services. If you don’t have a valid role, you need to create one here.

    20. Use launch template. If you want a specific launch template, you can choose that here.

    21. Kubernetes labels. Apply labels to the node group.

    22. Tags. Add AWS tags to the node group.

    Next we set up compute and scaling configs. These configs include:

    23. AMI type. Pick the machine image you want for your nodes.

    24. Capacity type. Choose on-demand or spot instances.

    25. Instance type. Choose among dozens of VM instance types to host the nodes.

    26. Disk size. Pick the size of attached EBS volumes.

    27. Minimum size. Set the smallest size a cluster can be.

    28. Maximum size. Set the largest size a cluster can be.

    29. Desired size. Set the desired number of nodes to start with.

    Our final set of node group settings relate to networking. The configurations you have access to here include:

    30. Subnets. Choose which subnets for your nodes.

    31. Allow remote access to nodes. This ensures you can access nodes after creation.

    32. SSH keypair. Choose (or create) a key pair for remote access to nodes.

    33. Allow remote access from. This lets you restrict access to source IP ranges.

    FINAL TALLY. Getting started: 7 clicks (just cluster control plane, not nodes). Total configurations available: 33.

    Wrap Up

    GKE does indeed stand out here. GKE has fewest steps required to get a cluster up and running. If I want a full suite of configuration options, GKE has the most. If I want a fully managed cluster without any day-2 activities, GKE is the only one that has that, via GKE Autopilot.

    Does it matter that GKE is the most configurable Kubernetes service in the public cloud? I think it does. Both AKS and EKS have a fine set of configurations. But comparing AKS or EKS to GKE, it’s clear how much more control GKE offers for cluster sizing, scaling, security, and automation. While I might not set most of these configurations on a regular basis, I can shape the platform to a wide variety of workloads and use cases when I need to. That ensures that Kubernetes can run a wide variety of things, and I’m not stuck using specialized platforms for each workload.

    As you look to bring your Kubernetes platform to the cloud, keep an eye on the quality attributes you need, and who can satisfy them the best!

  • Let’s compare the cloud shells offered by AWS, Microsoft Azure, and Google Cloud Platform

    Let’s compare the cloud shells offered by AWS, Microsoft Azure, and Google Cloud Platform

    I keep getting more and more powerful laptops, and then offloading more and more processing to the cloud. SOMETHING’S GOTTA GIVE! My local machine doesn’t just run web browsers and chat apps. No, my laptop is still loaded up with dev tools, while all my virtual machines and container clusters now live in the cloud. That helps. But we’re seeing more and more of the dev tools sneak into the cloud, too.

    One of those dev tools is the shell experience. If you’re like me—actually, you’re probably much more advanced than me—you invest in a loaded terminal on your machine. On my Mac, I directly install a few tools (e.g. git, gcloud CLI) but use Homebrew to keep most of my favorite tools close by.

    It’s no small effort to maintain a local terminal environment that’s up to date, and authenticated to various endpoints. To make all this easier, each of three hyperscalers now has a “cloud shell” experience that offers developers a hosted, pre-loaded terminal for working with that cloud.

    In this blog post, I’m going to look at the cloud shells from AWS, Microsoft Azure, and Google Cloud, and see what they really have to offer. Specifically, I’m going to assess:

    • Shell access. How exactly do you reach and use the shell?
    • Shells offered. Bash? Powershell?
    • Amount of storage provided. How much can you stash in your environment?
    • Durability period. How long does each cloud hold onto your compute environment? Storage?
    • Platform integrations. What ways does the shell integrate with the cloud experience?
    • Embedded tools. What comes pre-loaded in the shell?
    • Code editing options. Is there a way to edit files or build apps?
    • Compute environment configuration/extensibility. Can you change the shell environment temporarily or permanently?
    • UX and usability controls. What can you do to tweak the appearance or behavior?

    Let’s take a look.

    Disclaimer: I work for Google Cloud, so obviously I’ll have some biases. That said, I’ve used AWS for over a decade, was an Azure MVP for years, and can be mostly fair when comparing products and services. Please call out any mistakes I make!

    Google Cloud Platform

    GCP offers a Cloud Shell that runs within a Docker container on a dedicated Google Compute Engine virtual machine. Not that you see any of that. You just see a blinking cursor.

    How do you reach that cursor? From within the GCP Console, there’s an ever-present button in the top navigation. Of note, you can also access it via a dedicated link at shell.cloud.google.com.

    Once you launch the Cloud Shell—and if it’s the first time, you’ll see a brief message about provisioning your infrastructure—you see a new frame on your screen. Note that this is a globally distributed service, and you’re automatically assigned to the closest geographic region.

    Each user gets 5GB of persistent storage that’s mounted into this underlying virtual machine. This VM terminates after 20 minutes of inactivity. If you don’t use Cloud Shell at all for 120 days, the home disk goes away too.

    You have two default shell interpreters (Bash and sh) at your disposal here. Google Cloud Shell lets you create unique sessions via tabs, and see below that I’m using one tab to list all the shells. I was able to switch between shells, including PowerShell too!

    Cloud Shell comes with lots of pre-loaded tools including gcloud, vim, emacs, gradle, helm, maven, npm, pip, git, docker, MySQL client, TensorFlow, and Terraform. It also has built-in language support for Java, Go, Python, Node.js, Ruby, PHP, and .NET Core.

    If you want tools that aren’t pre-loaded by Google Cloud, you’ve got a few options. You can manually install tools during your session, or, create a customer_environment script that runs whenever your instance boots up.

    What about platform integrations? If you call a Google Cloud API that requires credentials, there’s a prompt for authorization. There’s also an “Open in Cloud Shell” feature that makes it simple to create links that trigger opinionated Cloud Shell instances. If you’re writing tutorials or want people to try the code in your git repo, you can generate a link. There’s also a baked-in cloudshell CLI to launch tutorials, download files, and more. You can also use the gcloud CLI on your local workstation to tunnel into the Cloud Shell, thanks to the gcloud beta cloud-shell operation.

    The Google Cloud Shell also has a full-fledged code editor built in. This editor—also available directly via ide.cloud.google.com—gets launched right from the Cloud Shell, either through the button on the Cloud Shell navigation or by invoking the cloudshell edit . command.

    This editor is based on Eclipse Theia and has the Cloud Code extensions built in. This means I can create apps, use source control, link to GCP services, run tests, and more. Because Cloud Shell supports Web Preview, you can also start up web applications and hit a local endpoint.

    Let’s look at the overall user experience. In the Cloud Shell navigation menu, I have options to send key combinations (e.g. Ctrl+V), change the look and feel (e.g. color, font), upload or download files, run in safe mode, restart the Cloud Shell instance, minimize the frame itself, break it out into its own window, or close the terminal entirely.

    With this mix of free storage, a wide set of tools, a fully functional code editor, and easily extendible environments, the Google Cloud Shell feels like a very complete experience.

    Microsoft Azure

    Azure provides a Cloud Shell that runs on a temporary virtual machine. Like with GCP, all the infrastructure details are invisible, and users just get a virtual terminal.

    You have a few ways to reach Azure’s Cloud Shell. There’s an always-there button in the Portal and a direct link available at shell.azure.com.

    Once you trigger the Cloud Shell, you quickly get a new resizable frame holding your terminal instance.

    The compute instance is available at no charge. These instances use a 5GB persistent storage image in your file share, and it appears that you pay for that. Like the Google Cloud Shell, the Azure one uses non-durable compute nodes that time out after 20 minutes of inactivity.

    You have two shell experiences: bash or PowerShell. Storage is shared between each.

    The Azure Cloud Shell comes absolutely loaded with tools. You have all the standard Azure tools (Azure CLI, azcopy, etc) along with things like vim, emacs, git, maven, npm, Docker, kubectl, Helm, MySQL client, PostgreSQL client, Cloud Foundry CLI, Terraform, Ansible, Packer, and more. There’s also built-in language support for Go, Ruby. .NET Core, Java, Node.js, PowerShell, and Python. I didn’t see any obvious way to customize the experience that lasts beyond a given session.

    As far as integrations, it appears there is SSO with Azure Active Directory. There’s also a special PowerShell commandlet for managing Exchange Online. Try to control yourselves. Similar to GCP, the Azure Cloud Shell supports a URL format that lets tutorial creators launch the Cloud Shell from anywhere. Visual Studio Code users can also integrate the Azure Cloud Shell into their local dev experience.

    Azure also provides a handy code editor within their Cloud Shell experience. Based on the open source Monaco editor, has a basic file explorer, command palette, and language highlighting.

    Let’s look at the user experience. In the Cloud Shell navigation bar, you have buttons to restart the shell, configure font style and size, download files, upload files, open the code editor, trigger a local web server, minimize the frame, or shut it down.

    All in all, it’s a solid experience. Not as rich as what GCP has, but entirely functional with nice touches like the code editor, and easy switching between bash and PowerShell.

    AWS

    AWS is the newest entrant to the cloud-based terminal with their AWS CloudShell. AWS seems careful to call the host a “computing environment” versus ever saying “virtual machine.” It’s possible that you get a container in a shared environment.

    It looks like you have one way to reach the CloudShell. There’s a button in the AWS Console navigation bar.

    Clicking that button pops up a new browser instance holding your terminal.

    There’s no cost for AWS CloudShell and you get 1GB of persistent storage (also for free). The service is available in a handful of AWS regions (3 in the US, 1 in Ireland, 1 in Tokyo). Sessions expire after 20-30 minutes, and data is held for 120 days.

    AWS CloudShell has three shell experiences including bash, PowerShell, and z shell.

    The AWS CloudShell comes with a handful of useful pre-loaded tools. You get the AWS tools (e.g. AWS CLI, AWS SAM), as well as git, make, ssh, and vim. You can modify the default environment by creating a .bashrc script that runs whenever the bash shell fires up. There’s native language support for Node.js and Python.

    There’s one platform integration I noticed, which helps you push and pull code from AWS CodeCommit.

    There are some nice touches in the AWS CloudShell user experience. I like that you can stack tabs (session) or put them side by side. You can also download and upload files. AWS also offers settings to change the font size or switch from dark mode to light mode.

    AWS offers a functional experience that’s basic, but useful for those living in an AWS world.

    It’s great to see all the major clouds offering this functionality. GCP objectively has the most feature-rich experience, but each one is useful. Try them out, and see if they can make your dev environment simpler.

  • How GitOps and the KRM make multi-cloud less scary.

    How GitOps and the KRM make multi-cloud less scary.

    I’m seeing the usual blitz of articles that predict what’s going to happen this year in tech. I’m not smart enough to make 2021 predictions, but one thing that seems certain is that most every company is deploying more software to more places more often. Can we agree on that? Companies large and small are creating and buying lots of software. They’re starting to do more continuous integration and continuous delivery to get that software out the door faster. And yes, most companies are running that software in multiple places—including multiple public clouds.

    So we have an emerging management problem, no? How do I create and maintain software systems made up of many types of components—virtual machines, containers, functions, managed services, network configurations—while using different clouds? And arguably the trickiest part isn’t building the system itself, but learning and working within each cloud’s tenancy hierarchy, identity system, administration tools, and API model.

    Most likely, you’ll use a mix of different build orchestration tools and configuration management tools based on each technology and cloud you’re working with. Can we unify all of this without forcing a lowest-common-denominator model that keeps you from using each cloud’s unique stuff? I think so. In this post, I’ll show an example of how to provision and manage infrastructure, apps, and managed services in a consistent way, on any cloud. As a teaser for what we’re building here, see that we’ve got a GitHub repo of configurations, and 1st party cloud managed services deployed and configured in Azure and GCP as a result.

    Before we start, let’s define a few things. GitOps—a term coined by Alexis and championed by the smart folks at Weaveworks—is about declarative definitions of infrastructure, stored in a git repo, and constantly applied to the environment so that you remain in the desired state.

    Next, let’s talk about the Kubernetes Resource Model (KRM). In Kubernetes, you define resources (built in, or custom) and the system uses controllers to create and manage those resources. It treats configurations as data without forcing you to specify *how* to achieve your desired state. Kubernetes does that for you. And this model is extendable to more than just containers!

    The final thing I want you to know about is Google Cloud Anthos. That’s what’s tying all this KRM and GitOps stuff together. Basically, it’s a platform designed to create and manage distributed Kubernetes clusters that are consistent, connected, and application ready. There are four capabilities you need to know to grok this KRM/GitOps scenario we’re building:

    1. Anthos clusters and the cloud control plane. That sounds like the title of a terrible children’s book. For tech folks, it’s a big deal. Anthos deploys GKE clusters to GCP, AWS, Azure (in preview), vSphere, and bare metal environments. These clusters are then visible to (and configured by) a control plane in GCP. And you can attach any existing compliant Kubernetes cluster to this control plane as well.
    2. Config Connector. This is a KRM component that lets you manage Google Cloud services as if they were Kubernetes resources—think BigQuery, Compute Engine, Cloud DNS, and Cloud Spanner. The other hyperscale clouds liked this idea, and followed our lead by shipping their own flavors of this (Azure version, AWS version).
    3. Environs. These are logical groupings of clusters. It doesn’t matter where the clusters physically are, and which provider they run on. An environ treats them all as one virtual unit, and lets you apply the same configurations to them, and join them all to the same service mesh. Environs are a fundamental aspect of how Anthos works.
    4. Config Sync. This Google Cloud components takes git-stored configurations and constantly applies them to a cluster or group of clusters. These configs could define resources, policies, reference data, and more.

    Now we’re ready. What are we building? I’m going to provision two Anthos clusters in GCP, then attach an Azure AKS cluster to that Anthos environ, apply a consistent configuration to these clusters, install the GCP Config Connector and Azure Service Operators into one cluster, and use Config Sync to deploy cloud managed services and apps to both clouds. Why? Once I have this in place, I have a single way to create managed services or deploy apps to multiple clouds, and keep all these clusters identically configured. Developers have less to learn, operators have less to do. GitOps and KRM, FTW!

    Step 1: Create and Attach Clusters

    I started by creating two GKE clusters in GCP. I can do this via the Console, CLI, Terraform, and more. Once I created these clusters (in different regions, but same GCP project), I registered both to the Anthos control plane. In GCP, the “project” (here, seroter-anthos) is also the environ.

    Next, I created a new AKS cluster via the Azure Portal.

    In 2020, our Anthos team added the ability to attach existing clusters an an Anthos environ. Before doing anything else, I created a new minimum-permission GCP service account that the AKS cluster would use, and exported the JSON service account key to my local machine.

    From the GCP Console, I followed the option to “Add clusters to environ” where I provided a name, and got back a single command to execute against my AKS cluster. After logging into my AKS cluster, I ran that command—which installs the Connect agent—and saw that the AKS cluster connected successfully to Anthos.

    I also created a service account in my AKS cluster, bound it to the cluster-admin role, and grabbed the password (token) so that GCP could log into that cluster. At this point, I can see the AKS cluster as part of my environ.

    You know what’s pretty awesome? Once this AKS cluster is connected, I can view all sorts of information about cluster nodes, workloads, services, and configurations. And, I can even deploy workloads to AKS via the GCP Console. Wild.

    But I digress. Let’s keep going.

    Step 2: Instantiate a Git Repo

    GitOps requires … a git repo. I decided to use GitHub, but any reachable git repository works. I created the repo via GitHub, opened it locally, and initialized the proper structure using the nomos CLI. What does a structured repo look like and why does the structure matter? Anthos Config Management uses this repo to figure out the clusters and namespaces for a given configuration. The clusterregistry directory contains ClusterSelectors that let me scope configs to a given cluster or set of clusters. The cluster directory holds any configs that you want applied to entire clusters versus individual namespaces. And the namespaces directory holds configs that apply to a specific namespace.

    Now, I don’t want all my things deployed to all the clusters. I want some namespaces that span all clusters, and others that only sit in one cluster. To do this, I need ClusterSelectors. This lets me define labels that apply to clusters so that I can control what goes where.

    For example, here’s my cluster definition for the AKS cluster (notice the “name” matches the name I gave it in Anthos) that applies an arbitrary label called “cloud” with a value of “azure.”

    kind: Cluster
    apiVersion: clusterregistry.k8s.io/v1alpha1
    metadata:
      name: aks-cluster-1
      labels:
        environment: prod
        cloud: azure
    

    And here’s the corresponding ClusterSelector. If my namespace references this ClusterSelector, it’ll only apply to clusters that match the label “cloud: azure.”

    kind: ClusterSelector
    apiVersion: configmanagement.gke.io/v1
    metadata:
        name: selector-cloud-azure
    spec:
        selector:
            matchLabels:
                cloud: azure
    

    After creating all the cluster definitions and ClusterSelectors, I committed and published the changes. You can see my full repo here.

    Step 3: Install Anthos Config Management

    The Anthos Config Management (ACM) subsystem lets you do a variety of things such as synchronize configurations across clusters, apply declarative policies, and manage a hierarchy of namespaces.

    Enabling and installing ACM on GKE clusters and attached clusters is straightforward. First, we need credentials to talk to our git repo. One option is to use an SSH keypair. I generated a new keypair, and added the public key to my GitHub account. Then, I created a secret in each Kubernetes cluster that references the private key value.

    kubectl create ns config-management-system && \
    kubectl create secret generic git-creds \
      --namespace=config-management-system \
      --from-file=ssh="[/path/to/KEYPAIR-PRIVATE-KEY-FILENAME]"
    

    With that done, I went through the GCP Console (or you can do this via CLI) to add ACM to each cluster. I chose to use SSH as the authentication mechanism, and then pointed to my GitHub repo.

    After walking through the GKE clusters, I could see that ACM was installed and configured. Then I installed ACM on the AKS cluster too, all from the GCP Console.

    With that, the foundation of my multi-cloud platform was all set up.

    Step 4: Install Config Connector and Azure Service Operator

    As mentioned earlier, the Config Connector helps you treat GCP managed services like Kubernetes resources. I only wanted the Config Connector on a single GKE cluster, so I went to gke-cluster-2 in the GCP Console and “enabled” Workload Identity and the Config Connector features. Workload Identity connects Kubernetes service accounts to GCP identities. It’s pretty cool. I created a new service account (“seroter-cc”) that Config Connector would use to create managed services.

    To confirm installation, I ran a “kubectl get crds” command to see all the custom resources added by the Config Connector.

    There’s only one step to configure the Config Connector itself. I created a single configuration that referenced the service account and GCP project used by Config Connector.

    # configconnector.yaml
    apiVersion: core.cnrm.cloud.google.com/v1beta1
    kind: ConfigConnector
    metadata:
      # the name is restricted to ensure that there is only one
      # ConfigConnector instance installed in your cluster
      name: configconnector.core.cnrm.cloud.google.com
    spec:
     mode: cluster
     googleServiceAccount: "seroter-cc@seroter-anthos.iam.gserviceaccount.com"
    

    I ran “kubectl apply -f configconnector.yaml” for the configuration, and was all set.

    Since I also wanted to provision Microsoft Azure services using the same GitOps + KRM mechanism, I installed the Azure Service Operators. This involved installing a cert manager, installing Helm, creating an Azure Service Principal (that has rights to create services), and then installing the operator.

    Step 5: Check-In Configs to Deploy Managed Services and Applications

    The examples for the Config Connector and Azure Service Operator talk about running “kubectl apply” for each service you want to create. But I want GitOps! So, that means setting up git directories that hold the configurations, and relying on ACM (and Config Sync) to “apply” these configurations on the target clusters.

    I created five namespace directories in my git repo. The everywhere-apps namespace applies to every cluster. The gcp-apps namespace should only live on GCP. The azure-apps namespace only runs on Azure clusters. And the gcp-connector and azure-connector namespaces should only live on the cluster where the Config Connector and Azure Service Operator live. I wanted something like this:

    How do I create configurations that make that above image possible? Easy. Each “namespace” directory in the repo has a namespace.yaml file. This file provides the name of the namespace, and optionally, annotations. The annotation for the gcp-connector namespace used the ClusterSelector that only applied to gke-cluster-2. I also added a second annotation that told the Config Connector which GCP project hosted the generated managed services.

    apiVersion: v1
    kind: Namespace
    metadata:
      name: gcp-connector
      annotations:
        configmanagement.gke.io/cluster-selector: selector-specialrole-connectorhost
        cnrm.cloud.google.com/project-id: seroter-anthos
    

    I added namespace.yaml files for each other namespace, with ClusterSelector annotations on all but the everywhere-apps namespace, since that one runs everywhere.

    Now, I needed the actual resource configurations for my cloud managed services. In GCP, I wanted to create a Cloud Storage bucket. With this “configuration as data” approach, we just define the resource, and ask Anthos to instantiate and manage it. The Cloud Storage configuration looks like this:

      apiVersion: storage.cnrm.cloud.google.com/v1beta1
      kind: StorageBucket
      metadata:
        annotations:
          cnrm.cloud.google.com/project-id : seroter-anthos
          #configmanagement.gke.io/namespace-selector: config-supported
        name: seroter-config-bucket
      spec:
        lifecycleRule:
          - action:
              type: Delete
            condition:
              age: 7
        uniformBucketLevelAccess: true
    

    The Azure example really shows the value of this model. Instead of programmatically sequencing the necessary objects—first create a resource group, then a storage account, then a storage blob—I just need to define those three resources, and Kubernetes reconciles each resource until it succeeds. The Storage Blob resource looks like:

    apiVersion: azure.microsoft.com/v1alpha1
    kind: BlobContainer
    metadata:
      name: blobcontainer-sample
    spec:
      location: westus
      resourcegroup: resourcegroup-operators
      accountname: seroterstorageaccount
      # accessLevel - Specifies whether data in the container may be accessed publicly and the level of access.
      # Possible values include: 'Container', 'Blob', 'None'
      accesslevel: Container
    

    The image below shows my managed-service-related configs. I checked all these configurations into GitHub.

    A few seconds later, I saw that Anthos was processing the new configurations.

    Ok, it’s the moment of truth. First, I checked Cloud Storage and saw my brand new bucket, provisioned by Anthos.

    Switching over to the Azure Portal, I navigated to Storage area and saw my new account and blob container.

    How cool is that? Now i just have to drop resource definitions into my GitHub repository, and Anthos spins up the service in GCP or Azure. And if I delete that resource manually, Anthos re-creates it automatically. I don’t have to learn each API or manage code that provisions services.

    Finally, we can also deploy applications this way. Imagine using a CI pipeline to populate a Kubernetes deployment template (using kpt, or something else) and dropping it into a git repo. Then, we use the Kubernetes resource model to deploy the application container. In the gcp-apps directory, I added Kubernetes deployment and service YAML files that reference a basic app I containerized.

    As you might expect, once the repo synced to the correct clusters, Anthos created a deployment and service that resulted in a routable endpoint. While there are tradeoffs for deploying apps this way, there are some compelling benefits.

    Step 6: “Move” App Between Clouds by Moving Configs in GitHub

    This last step is basically my way of trolling the people who complain that multi-cloud apps are hard. What if I want to take the above app from GCP and move it to Azure? Does it require a four week consulting project and sacrificing a chicken? No. I just have to copy the Kubernetes deploy and service YAML files to the azure-apps directory.

    After committing my changes to GitHub, ACM fired up and deleted the app from GCP, and inflated it on Azure, including an Azure Load Balancer instance to get a routable endpoint. I can see all of that from within the GCP Console.

    Now, in real life, apps aren’t so easily portable. There are probably sticky connections to databases, and other services. But if you have this sort of platform in place, it’s definitely easier.

    Thanks to deep support for GitOps and the KRM, Anthos makes it possible to manage infrastructure, apps, and managed services in a consistent way, on any cloud. Whether you use Anthos or not, take a look at GitOps and the KRM and start asking your preferred vendors when they’re going to adopt this paradigm!

  • Let’s compare the CLI experiences offered by AWS, Microsoft Azure, and Google Cloud Platform

    Let’s compare the CLI experiences offered by AWS, Microsoft Azure, and Google Cloud Platform

    Real developers use the CLI, or so I’m told. That probably explains why I mostly use the portal experiences of the major cloud providers. But judging from the portal experiences offered by most clouds, they prefer you use the CLI too. So let’s look at the CLIs.

    Specifically, I evaluated the cloud CLIs with an eye on five different areas:

    1. API surface and patterns. How much of the cloud was exposed via CLI, and is there a consistent way to interact with each service?
    2. Authentication. How do users identify themselves to the CLI, and can you maintain different user profiles?
    3. Creating and viewing services. What does it feel like to provision instances, and then browse those provisioned instances?
    4. CLI sweeteners. Are there things the CLI offers to make using it more delightful?
    5. Utilities. Does the CLI offer additional tooling that helps developers build or test their software?

    Let’s dig in.

    Disclaimer: I work for Google Cloud, so obviously I’ll have some biases. That said, I’ve used AWS for over a decade, was an Azure MVP for years, and can be mostly fair when comparing products and services. Please call out any mistakes I make!

    AWS

    You have a few ways to install the AWS CLI. You can use a Docker image, or install directly on your machine. If you’re installing directly, you can download from AWS, or use your favorite package manager. AWS warns you that third party repos may not be up to date. I went ahead and installed the CLI on my Mac using Homebrew.

    API surface and patterns

    As you’d expect, the AWS CLI has wide coverage. Really wide. I think there’s an API in there to retrieve the name of Andy Jassy’s favorite jungle cat. The EC2 commands alone could fill a book. The documentation is comprehensive, with detailed summaries of parameters, and example invocations.

    The command patterns are relatively consistent, with some disparities between older services and newer ones. Most service commands look like:

    aws [service name] [action] [parameters]

    Most “actions” start with create, delete, describe, get, list, or update.

    For example:

    aws elasticache create-cache-cluster --engine redis
    aws kinesis describe-stream --stream-name seroter-stream
    aws kinesis describe-stream --stream-name seroter-stream
    aws qldb delete-ledger --name seroterledger
    aws sqs list-queues

    S3 is one of the original AWS services, and its API is different. It uses commands like cp, ls, and rm. Some services have modify commands, others use update. For the most part, it’s intuitive, but I’d imagine most people can’t guess the commands.

    Authentication

    There isn’t one way to authenticate to the AWS CLI. You might use SSO, an external file, or inline access key and ID, like I do below.

    The CLI supports “profiles” which seems important when you may have different access to default values based on what you’re working on.

    Creating and viewing service instances

    By default, everything the CLI does occurs in the region of the active profile. You can override the default region by passing in a region flag to each command. See below that I created a new SQS queue without providing a region, and it dropped it into my default one (us-west-2). By explicitly passing in a target region, I created the second queue elsewhere.

    The AWS Console shows you resources for a selected region. I don’t see obvious ways to get an all-up view. A few services, like S3, aren’t bound by region, and you see all resources at once. The CLI behaves the same. I can’t view all my SQS queues, or databases, or whatever, from around the world. I can “list” the items, region by region. Deletion behaves the same. I can’t delete the above SQS queue without providing a region flag, even though the URL is region-specific.

    Overall, it’s fast and straightforward to provision, update, and list AWS services using the CLI. Just keep the region-by-region perspective in mind!

    CLI sweeteners

    The AWS CLI gives you control over the output format. I set the default for my profile to json, but you can also do yaml, text, and table. You can toggle this on a request by request basis.

    You can also take advantage of command completion. This is handy, given how tricky it may be to guess the exact syntax of a command. Similarly, I really like you can be prompted for parameters. Instead of guessing, or creating giant strings, you can go parameter by parameter in a guided manner.

    The AWS CLI also offers select opportunities to interact with the resources themselves. I can send and receive SQS messages. Or put an item directly into a DynamoDB table. There are a handful of services that let you create/update/delete data in the resource, but many are focused solely on the lifecycle of the resource itself.

    Finally, I don’t see a way to self-update from within the CLI itself. It looks like you rely on your package manager or re-download to refresh it. If I’m wrong, tell me!

    Utilities

    It doesn’t look like the CLI ships with other tools that developers might use to build apps for AWS.

    Microsoft Azure

    The Microsoft Azure CLI also has broad coverage and is well documented. There’s no shortage of examples, and it clearly explains how to use each command.

    Like AWS, Microsoft offers their CLI in a Docker image. They also offer direct downloads, or access via a package manager. I grabbed mine from Homebrew.

    API surface and patterns

    The CLI supports almost every major Azure service. Some, like Logic Apps or Blockchain, only show up in their experimental sandbox.

    Commands follow a particular syntax:

    az [service name] [object] create | list | delete | update [parameters]

    Let’s look at a few examples:

    az ad app create --display-name my-ad-app
    az cosmosdb list --resource-group group1
    az postgres db show --name mydb --resource-group group1 --server-name myserver
    az service bus queue delete --name myqueue --namespace-name mynamespace --resource-group group1

    I haven’t observed much inconsistency in the CLI commands. They all seem to follow the same basic patterns.

    Authentication

    Logging into the CLI is easy. You can simply do az login as I did below—this opens a browser window and has you sign into your Azure account to retrieve a token—or you can pass in credentials. Those credentials may be a username/password, service principal with a secret, or service principal with a client certificate.

    Once you log in, you see all your Azure subscriptions. You can parse the JSON to see which one is active, and will be used as the default. If you wish to change the default, you can use az account set --subscription [name] to pick a different one.

    There doesn’t appear to be a way to create different local profiles.

    Creating and viewing service instances

    It seems that most everything you create in Azure goes into a resource group. While a resource group has a “location” property, that’s related to the metadata, not a restriction on what gets deployed into it. You can set a default resource group (az configure --defaults group=[name]) or provide the relevant input parameter on each request.

    Unlike other clouds, Azure has a lot of nesting. You have a root account, then a subscription, and then a resource group. And most resources also have parent-child relationships you must define before you can actually build the thing you want.

    For example, if you want a service bus queue, you first create a namespace. You can’t create both at the same time. It’s two calls. Want a storage blob to upload videos into? Create a storage account first. A web application to run your .NET app? Provision a plan. Serverless function? Create a plan. This doesn’t apply to everything, but just be aware that there are often multiple steps involved.

    The creation activity itself is fairly simple. Here are commands to create Service Bus namespace and then a queue

    az servicebus namespace create --resource-group mydemos --name seroter-demos --location westus
    az servicebus queue create --resource-group mydemos --namespace-name seroter-demos --name myqueue

    Like with AWS, some Azure assets get grouped by region. With Service Bus, namespaces are associated to a geo. I don’t see a way to query all queues, regardless of region. But for the many that aren’t, you get a view of all resources across the globe. After I created a couple Redis caches in my resource group, a simple az redis list --resource-group mydemos showed me caches in two different parts of the US.

    Depending on how you use resource groups—maybe per app or per project, or even by team—just be aware that the CLI doesn’t retrieve results across resource groups. I’m not sure the best strategy for viewing subscription-wide resources other than the Azure Portal.

    CLI sweeteners

    The Azure CLI has some handy things to make it easier to use.

    There’s a find function for figuring out commands. There’s output formatting to json, tables, or yaml. You’ll also find a useful interactive mode to get auto-completion, command examples, and more. Finally, I like that the Azure CLI supports self-upgrade. Why leave the CLI if you don’t have to?

    Utilities

    I noticed a few things in this CLI that help developers. First, there’s an az rest command that lets you call Azure service endpoints with authentication headers taken care of for you. That’s a useful tool for calling secured endpoints.

    Azure offers a wide array of extensions to the CLI. These aren’t shipped as part of the CLI itself, but you can easily bolt them on. And you can create your own. This is a fluid list, but az extension list-available shows you what’s in the pool right now. As of this writing, there are extensions for preview AKS capabilities, managing Azure DevOps, working with DataBricks, using Azure LogicApps, querying the Azure Resource Graph, and more.

    Google Cloud Platform

    I’ve only recently started seriously using the GCP CLI. What’s struck me most about the gcloud tool is that it feels more like a system—dare I say, platform—than just a CLI. We’ll talk more about that in a bit.

    Like with other clouds, you can use the SDK/CLI within a supported Docker image, package manager, or direct download. I did a direct download, since this is also a self-updating CLI, so I didn’t want to create a zombie scenario with my package manager.

    API surface and patterns

    The gcloud CLI has great coverage for the full breadth of GCP. I can’t see any missing services, including things launched two weeks ago. There is a subset of services/commands available in the alpha or beta channels, and are fully integrated into the experience. Each command is well documented, with descriptions of parameters, and example calls.

    CLI commands follow a consistent pattern:

    gcloud [service] create | delete | describe | list | update [parameters]

    Let’s see some examples:

    gcloud bigtable instances create seroterdb --display-name=seroterdb --cluster=serotercluster --cluster-zone=us-east1-a
    gcloud pubsub topics describe serotertopic
    gcloud run services update --memory=1Gi
    gcloud spanner instances delete myspanner

    All the GCP services I’ve come across follow the same patterns. It’s also logical enough that I even guessed a few without looking anything up.

    Authentication

    A gcloud auth login command triggers a web-based authorization flow.

    Once I’m authenticated, I set up a profile. It’s possible to start with this process, and it triggers the authorization flow. Invoking the gcloud init command lets me create a new profile/configuration, or update an existing one. A profile includes things like which account you’re using, the “project” (top level wrapper beneath an account) you’re using, and a default region to work in. It’s a guided processes in the CLI, which is nice.

    And it’s a small thing, but I like that when it asks me for a default region, it actually SHOWS ME ALL THE REGION CODES. For the other clouds, I end up jumping back to their portals or docs to see the available values.

    Creating and viewing service instances

    As mentioned above, everything in GCP goes into Projects. There’s no regional affinity to projects. They’re used for billing purposes and managing permissions. This is also the scope for most CLI commands.

    Provisioning resources is straightforward. There isn’t the nesting you find in Azure, so you can get to the point a little faster. For instance, provisioning a new PubSub topic looks like this:

    gcloud pubsub topics create richard-topic

    It’s quick and painless. PubSub doesn’t have regional homing—it’s a global service, like others in GCP—so let’s see what happens if I create something more geo-aware. I created two Spanner instances, each in different regions.

    gcloud spanner instances create seroter-db1 --config=regional-us-east1 --description=ordersdb --nodes=1
    gcloud spanner instances create seroter-db2 --config=regional-us-west1 --description=productsdb --nodes=1

    It takes seconds to provision, and then querying with gcloud spanner instances list gives me all Spanner database instances, regardless of region. And I can use a handy “filter” parameter on any command to winnow down the results.

    The default CLI commands don’t pull resources from across projects, but there is a new command that does enable searching across projects and organizations (if you have permission). Also note that Cloud Storage (gsutil) and Big Query (bq) use separate CLIs that aren’t part of gcloud directly.

    CLI sweeteners

    I used one of the “sweeteners” before: filter. It uses a simple expression language to return a subset of results. You’ll find other useful flags for sorting and limiting results. Like with other cloud CLIs, gcloud lets you return results as json, table, csv, yaml, and other formats.

    There’s also a full interactive shell with suggestions, auto-completion, and more. That’s useful as you’re learning the CLI.

    gcloud has a lot of commands for interacting with the services themselves. You can publish to a PubSub topic, execute a SQL statement against a Spanner database, or deploy and call a serverless Function. It doesn’t apply everywhere, but I like that it’s there for many services.

    The GCP CLI also self-updates. We’ll talk about it more in the section below.

    Utilities

    A few paragraphs ago, I said that the gcloud CLI felt more like a system. I say that, because it brings a lot of components with it. When I type in gcloud components list, I see all the options:

    We’ve got the core SDK and other GCP CLIs for Big Query, but also a potpourri of other handy tools. You’ve got Kubernetes development tools like minikube, Skaffold, Kind, kpt, and kubectl. And you get a stash of local emulators for cloud services like Bigtable, Firestore, Spanner, PubSub and Spanner.

    I can install any or all of these, and upgrade them all from here. A gcloud components update command update all of them, and, shows me a nice change log.

    There are other smaller utility functions included in gcloud. I like that I have commands to configure Docker to work with Google Container Registry, Or fetch Kubernetes cluster credentials and put them into my active profile. And print my identity token to inject into the auth headers of calls to secure endpoints.

    Wrap

    To some extent, each CLI reflects the ethos of their cloud. The AWS CLI is dense, powerful, and occasionally inconsistent. The Azure CLI is rich, easy to get started with, and 15% more complicated than it should be. And the Google Cloud CLI is clean, integrated, and evolving. All of these are great. You should use them and explore their mystery and wonder.

  • Think all Kubernetes look alike? Look for differences in these six areas.

    Think all Kubernetes look alike? Look for differences in these six areas.

    I feel silly admitting that I barely understand what happens in the climactic scene of the 80s movie Trading Places. It has something to do with short-selling commodities—in this case, concentrated orange juice. Let’s talk about commodities, which Investopedia defines as:

    a basic good used in commerce that is interchangeable with other goods of the same type. Commodities are most often used as inputs in the production of other goods or services. The quality of a given commodity may differ slightly, but it is essentially uniform across producers.

     Our industry has rushed to declare Kubernetes a commodity, but is it? It is now a basic good used as input to other goods and services. But is uniform across producers? It seems to me that the Kubernetes API is commoditized and consistent, but the platform experience isn’t. Your Kubernetes experience isn’t uniform across Google Kubernetes Engine (GKE), AWS Elastic Kubernetes Service (EKS), Azure Kubernetes Service (AKS), VMware PKS, Red Hat OpenShift, Minikube, and 130+ other options. No, there are real distinctions that can impact your team’s chance of success adopting it. As you’re choosing a Kubernetes product to use, pay upfront attention to provisioning, upgrades, scaling/repair, ingress, software deployment, and logging/monitoring. 

    I work for Google Cloud, so obviously I’ll have some biases. That said, I’ve used AWS for over a decade, was an Azure MVP for years, and can be mostly fair when comparing products and services.

    1. Provisioning

    Kubernetes is a complex distributed system with lots of moving parts. Multi-cluster has won out as a deployment strategy (versus one giant mega cluster segmented by namespace), which means you’ll provision Kubernetes clusters with some regularity.

    What do you have to do? How long does it take? What options are available? Those answers matter! 

    Kubernetes offerings don’t have identical answers to these questions:

    • Do you want clusters in a specific geography?
    • Should clusters get deployed in an HA fashion across zones?
    • Can you build a tiny cluster (small machine, single node) and a giant cluster?
    • Can you specify the redundancy of the master nodes? Is there redundancy?
    • Do you need to choose a specific Kubernetes version? 
    • Are worker nodes provisioned during cluster build, or do you build separately and attach to the cluster?
    • Will you want persistent storage for workloads?
    • Are there “special” computing needs, including large CPU/memory nodes, GPUs, or TPUs?
    • Are you running Windows containers in the cluster?

    As you can imagine, since GKE is the original managed Kubernetes, there’s lots of options for you when building clusters. Or, you can do a one-click install of a “starter” cluster, which is pretty great.

    2. Upgrades

    You got a cluster running? Cool! Day 2 is usually where the real action’s at. Let’s talk about upgrades, which are a fact of life for clusters. What gets upgraded? Namely the version of Kubernetes, and the configuration/OS of the nodes themselves. The level of cluster management amongst the various providers is not uniform.

    GKE supports automated upgrades of everything in the cluster, or you can trigger it manually. Either way, you don’t do any of the upgrade work yourself. Release channels are pretty cool, too. DigitalOcean looks somewhat similar to GKE, from an upgrade perspective. AKS offers manually triggered upgrades. AWS offers kinda automated or extremely manual (i.e. creating new node groups or using Cloud Formation), depending on whether you used managed or unmanaged worker nodes.

    3. Scaling / Repairs

    Given how many containers you can run on a good-sized cluster, you may not have to scale your cluster TOO often. But, you may also decide to act in a “cloudy” way, and purposely start small and scale up as needed.

    Like with most any infrastructure platform, you’ll expect to scale Kubernetes environments (minus local dev environments) both vertically and horizontally. Minimally, demand that your Kubernetes provider can scale clusters via manual commands. Increasingly, auto-scaling of the cluster is table-stakes. And don’t forget scaling of the pods (workloads) themselves. You won’t find it everywhere, but GKE does support horizontal pod autoscaling and vertical pod autoscaling too.

    Also, consider how your Kubernetes platform handles the act of scaling. It’s not just about scaling the nodes or pods. It’s how well the entire system swells to absorb the increasing demand. For instance, Bayer Crop Science worked with Google Cloud to run a 15,000 node cluster in GKE. For that to work, the control planes, load balancers, logging infrastructure, storage, and much more had to “just work.” Understand those points in your on-premises or cloud environment that will feel the strain.

    Finally, figure out what you want to happen when something goes wrong with the cluster. Does the system detect a down worker and repair/replace it? Most Kubernetes offerings support this pretty well, but do dig into it!

    4. Ingress

    I’m not a networking person. I get the gist, and can do stuff, but I quickly fall into the pit of despair. Kubernetes networking is powerful, but not simple. How do containers, pods, and clusters interact? What about user traffic in and out of the cluster? We could talk about service meshes and all that fun, but let’s zero in on ingress. Ingress is about exposing “HTTP and HTTPS routes from outside the cluster to services within the cluster.” Basically, it’s a Layer 7 front door for your Kubernetes services.

    If you’re using Kubernetes on-premises, you’ll have some sort of load balancer configuration setup available, maybe even to use with an ingress controller. Hopefully! In the public cloud, major providers offer up their load-balancer-as-a-service whenever you expose a service of type “LoadBalancer.” But, you get a distinct load balancer and IP for each service. When you use an ingress controller, you get a single route into the cluster (still load balanced, most likely) and the traffic is routed to the correct pod from there. Microsoft, Amazon, and Google all document their way to use ingress controllers with their managed Kubernetes.

    Make sure you investigate the network integrations and automation that comes with your Kubernetes product. There are super basic configurations (that you’ll often find in local dev tools) all the way to support for Istio meshes and ingress controllers.

    5. Software Deployment

    How do you get software into your Kubernetes environment? This is where the commoditization of the Kubernetes API comes in handy! Many software products know how to deploy containers to a Kubernetes environment.

    Two areas come to mind here. First, deploying packaged software.  You can use Helm to deploy software to most any Kubernetes environment. But let’s talk about marketplaces. Some self-managed software products deliver some form of a marketplace, and a few public clouds do. AWS has the AWS Marketplace for Containers. DigitalOcean has a nice little marketplace for Kubernetes apps. In the Google Cloud Marketplace, you can filter by Kubernetes apps, and see what you can deploy on GKE, or in Anthos environments. I didn’t notice a way in the Azure marketplace to find or deploy Kubernetes-targeted software.

    The second area of software deployment I think about relates to CI/CD systems for custom apps. Here, you have a choice of 3rd party best-of-breed tools, or whatever your Kubernetes provider bakes in. AWS CodePipeline or CodeDeploy can deploy apps to ECS (not EKS, it seems). Azure Pipelines looks like it deploys apps directly to AKS. Google Cloud Build makes it easy to deploy apps to GKE, App Engine, Functions, and more.

    When thinking about software deployment, you could also consider the app platforms that run atop a Kubernetes foundation, like Knative and in the future, Cloud Foundry. These technologies can shield you from some of the deployment and configuration muck that’s required to build a container, deploy it, and wire it up for routing.

    6. Logging/Monitoring

    Finally, take a look at what you need from a logging and monitoring perspective. Most any Kubernetes system will deliver some basic metrics about resource consumption—think CPU, memory, disk usage—and maybe some Kubernetes-specific metrics. From what I can tell, the big 3 public clouds integrate their Kubernetes services with their managed monitoring solutions. For example, you get visibility into all sorts of GKE metrics when clusters are configured to use Cloud Operations.

    Then there’s the question of logging. Do you need a lot of logs, or is it ok if logs rotate often? DigitalOcean rotates logs when they reach 10MB in size. What kind of logs get stored? Can you analyze logs from many clusters? As always, not every Kubernetes behaves the same!

    Plenty of other factors may come into play—things like pricing model, tenancy structure, 3rd party software integration, troubleshooting tools, and support community come to mind—when choosing a Kubernetes product to use, so don’t get lulled into a false sense of commoditization!

  • Trying out local emulators for the cloud-native databases from AWS, Google Cloud, and Microsoft Azure.

    Trying out local emulators for the cloud-native databases from AWS, Google Cloud, and Microsoft Azure.

    Most apps use databases. This is not a shocking piece of information. If your app is destined to run in a public cloud, how do you work with cloud-only databases when doing local development? It seems you have two choices:

    1. Provision and use an instance of the cloud database. If you’re going to depend on a cloud database, you can certainly use it directly during local development. Sure, there might be a little extra latency, and you’re paying per hour for that instance. But this is the most direct way to do it.
    2. Install and use a local version of that database. Maybe your app uses a cloud DB based on installable software like Microsoft SQL Server, MongoDB, or PostgreSQL. In that case, you can run a local copy (in a container, or natively), code against it, and swap connection strings as you deploy to production. There’s some risk, as it’s not the EXACT same environment. But doable.

    A variation of choice #2 is when you select a cloud database that doesn’t have an installable equivalent. Think of the cloud-native, managed databases like Amazon DynamoDB, Google Cloud Spanner, and Azure Cosmos DB. What do you do then? Must you choose option #1 and work directly in the cloud? Fortunately, each of those cloud databases now has a local emulator. This isn’t a full-blown instance of that database, but a solid mock that’s suitable for development. In this post, I’ll take a quick look at the above mentioned emulators, and what you should know about them.

    #1 Amazon DynamoDB

    Amazon’s DynamoDB is a high-performing NoSQL (key-value and document) database. It’s a full-featured managed service that transparently scales to meet demand, supports ACID transactions, and offers multiple replication options.

    DynamoDB Local is an emulator you can run anywhere. AWS offers a few ways to run it, including a direct download—it requires Java to run—or a Docker image. I chose the downloadable option and unpacked the zip file on my machine.

    Before you can use it, you need credentials set up locally. Note that ANY credentials will do (they don’t have to be valid) for it to work. If you have the AWS CLI, you can simply do an aws configure command to generate a credentials file based on your AWS account.

    The JAR file hosting the emulator has a few flags you can choose at startup:

    You can see that you have a choice of running this entirely in-memory, or use the default behavior which saves your database to disk. The in-memory option is nice for quick testing, or running smoke tests in an automated pipeline. I started up DynamoDB Local with the following command, which gave me a shared database file that every local app will connect to:

    java -Djava.library.path=./DynamoDBLocal_lib -jar DynamoDBLocal.jar -sharedDb

    This gave me a reachable instance on port 8000. Upon first starting it up, there’s no database file on disk. As soon as I issued a database query (in another console, as the emulator blocks after it starts up), I saw the database file.

    Let’s try using it from code. I created a new Node Express app, and added an npm reference to the AWS SDK for JavaScript. In this app, I want to create a table in DynamoDB, add a record, and then query that record. Here’s the complete code:

    const express = require('express')
    const app = express()
    const port = 3000
    
    var AWS = require("aws-sdk");
    
    //region doesn't matter for the emulator
    AWS.config.update({
      region: "us-west-2",
      endpoint: "http://localhost:8000"
    });
    
    //dynamodb variables
    var dynamodb = new AWS.DynamoDB();
    var docClient = new AWS.DynamoDB.DocumentClient();
    
    //table configuration
    var params = {
        TableName : "Animals",
        KeySchema: [       
            { AttributeName: "animal_id", KeyType: "HASH"},  //Partition key
            { AttributeName: "species", KeyType: "RANGE" }  //Sort key
        ],
        AttributeDefinitions: [       
            { AttributeName: "animal_id", AttributeType: "S" },
            { AttributeName: "species", AttributeType: "S" }
        ],
        ProvisionedThroughput: {       
            ReadCapacityUnits: 10, 
            WriteCapacityUnits: 10
        }
    };
    
    
    // default endpoint
    app.get('/', function(req, res, next) {
        res.send('hello world!');
    });
    
    // create a table in DynamoDB
    app.get('/createtable', function(req, res) {
        dynamodb.createTable(params, function(err, data) {
            if (err) {
                console.error("Unable to create table. Error JSON:", JSON.stringify(err, null, 2));
                res.send('failed to create table')
            } else {
                console.log("Created table. Table description JSON:", JSON.stringify(data, null, 2));
                res.send('success creating table')
            }
        });
    });
    
    //create a variable holding a new data item
    var animal = {
        TableName: "Animals",
        Item: {
            animal_id: "B100",
            species: "E. lutris",
            name: "sea otter",
            legs: 4
        }
    }
    
    // add a record to DynamoDB table
    app.get('/addrecord', function(req, res) {
        docClient.put(animal, function(err, data) {
            if (err) {
                console.error("Unable to add animal. Error JSON:", JSON.stringify(err, null, 2));
                res.send('failed to add animal')
            } else {
                console.log("Added animal. Item description JSON:", JSON.stringify(data, null, 2));
                res.send('success added animal')
            }
        });
    });
    
    // define what I'm looking for when querying the table
    var readParams = {
        TableName: "Animals",
        Key: {
            "animal_id": "B100",
            "species": "E. lutris"
        }
    };
    
    // retrieve a record from DynamoDB table
    app.get('/getrecord', function(req, res) {
        docClient.get(readParams, function(err, data) {
            if (err) {
                console.error("Unable to read animal. Error JSON:", JSON.stringify(err, null, 2));
                res.send('failed to read animal')
            } else {
                console.log("Read animal. Item description JSON:", JSON.stringify(data, null, 2));
                res.send(JSON.stringify(data, null, 2))
            }
        });
    });
    
    //start up app
    app.listen(port);
    

    It’s not great, but it works. Yes, I’m using a GET To create a record. This is a free site, so you’ll take this code AND LIKE IT.

    After starting up the app, I can create a table, create a record, and find it.

    Because data is persisted, I can stop the emulator, start it up later, and everything is still there. That’s handy.

    As you can imagine, this emulator isn’t an EXACT clone of a global managed service. It doesn’t do anything with replication or regions. The “provisioned throughput” settings which dictate read/write performance are ignored. Table scans are done sequentially and parallel scans aren’t supported, so that’s another performance-related thing you can’t test locally. Also, read operations are all eventually consistent, but things will be so fast, it’ll seem strongly consistent. There are a few other considerations, but basically, use this to build apps, not to do performance tests or game-day chaos exercises.

    #2 Google Cloud Spanner

    Cloud Spanner is a relational database that Google says is “built for the cloud.” You get the relational database traits including schema-on-write, strong consistency, and ANSI SQL syntax, with some NoSQL database traits like horizontal scale and great resilience.

    Just recently, Google Cloud released a beta emulator. The Cloud Spanner Emulator stores data in memory and works with their Java, Go, and C++ libraries. To run the emulator, you need Docker on your machine. From there, you can either use the gcloud CLI to run it, a pre-built Docker image, Linux binaries, and more. I’m going to use the gcloud CLI that comes with the Google Cloud SDK.

    I ran a quick update of my existing SDK, and it was cool to see it pull in the new functionality. Kicking off emulation from the CLI is a developer-friendly idea.

    Starting up the emulator is simple: gcloud beta emulators spanner start. The first time it runs, the CLI pulls down the Docker image, and then starts it up. Notice that it opens up all the necessary ports.

    I want to make sure my app doesn’t accidentally spin up something in the public cloud, so I create a separate gcloud configuration that points at my emulator and uses the project ID of “seroter-local.”

    gcloud config configurations create emulator
    gcloud config set auth/disable_credentials true
    gcloud config set project seroter-local
    gcloud config set api_endpoint_overrides/spanner http://localhost:9020/

    Next, I create a database instance. Using the CLI, I issue a command creating an instance named “spring-demo” and using the local emulator configuration.

    gcloud spanner instances create spring-demo --config=emulator-config --description="Seroter Instance" --nodes=1

    Instead of building an app from scratch, I’m using one of the Spring examples created by the Google Cloud team. Their go-to demo for Spanner uses their library that already recognizes the emulator, if you provide a particular environment variable. This demo uses Spring Data to work with Spanner, and serves up web endpoints for interacting with the database.

    In the application package, the only file I had to change was the application.properties. Here, I specified project ID, instance ID, and database to create.

    spring.cloud.gcp.spanner.project-id=seroter-local
    spring.cloud.gcp.spanner.instance-id=spring-demo
    spring.cloud.gcp.spanner.database=trades

    In the terminal window where I’m going to run the app, I set two environment variables. First, I set SPANNER_EMULATOR_HOST=localhost:9010. As I mentioned earlier, the Spanner library for Java looks for this value and knows to connect locally. Secondly, I set a pointer to my GCP service account credentials JSON file: GOOGLE_APPLICATION_CREDENTIALS=~/Downloads/gcp-key.json. You’re not supposed to need creds for local testing, but my app wouldn’t start without it.

    Finally, I compile and start up the app. There are a couple ways this app lets you interact with Spanner, and I chose the “repository” one:

    mvn spring-boot:run -Dspring-boot.run.arguments=--spanner_repository

    After a second or two, I see that the app compiled, and data got loaded into the database.

    Pinging the endpoint in the browser gives a RESTful response.

    Like with the AWS emulator, the Google Cloud Spanner emulator doesn’t do everything that its managed counterpart does. It uses unencrypted traffic, identity management APIs aren’t supported, concurrent read/write transactions get aborted, there’s no data persistence, quotas aren’t enforced, and monitoring isn’t enabled. There are also limitations during the beta phase, related to the breadth of supported queries and partition operations. Check the GitHub README for a full list.

    #3 Microsoft Azure Cosmos DB

    Now let’s look at Azure’s Cosmos DB. This is billed as a “planet scale” NoSQL database with easy scaling, multi-master replication, sophisticated transaction support, and support for multiple APIs. It can “talk” Cassandra, MongoDB, SQL, Gremlin, or Etcd thanks to wire-compatible APIs.

    Microsoft offers the Azure Cosmos Emulator for local development. Somewhat inexplicably, it’s available only as a Windows download or Windows container. That surprised me, given the recent friendliness to Mac and Linux. Regardless, I spun up a Windows 10 environment in Azure, and chose the downloadable option.

    Once it’s installed, I see a graphical experience that closely resembles the one in the Azure Portal.

    From here, I use this graphical UI and build out a new database, container—not an OS container, but the name of a collection—and specify a partition key.

    For fun, I added an initial database record to get things going.

    Nice. Now I have a database ready to use from code. I’m going to use the same Node.js app I built for the AWS demo above, but this time, reference the Azure SDK (npm install @azure/cosmos) to talk to the database. I also created a config.json file that stores, well, config values. Note that there is a single fixed account and well-known key for all users. These aren’t secret.

    const config = {
    endpoint: "https://localhost:8081",
    key: "C2y6yDjf5/R+ob0N8A7Cgv30VRDJIWEHLM+4QDU5DE2nQ9nDuVTqobD4b8mGGyPMbIZnqyMsEcaGQy67XIw/Jw==",
    databaseId: "seroterdb",
    containerId: "animals",
    partitionKey: { kind: "Hash", paths: ["/species"] }
    };
    module.exports = config;
    

    Finally, the app code itself. It’s pretty similar to what I wrote earlier for DynamoDB. I have an endpoint to add a record, and another one to retrieve records.

    const express = require('express')
    const app = express()
    const port = 3000
    
    const CosmosClient = require("@azure/cosmos").CosmosClient;
    const config = require("./config");
    
    //disable TLS verification
    process.env.NODE_TLS_REJECT_UNAUTHORIZED = "0";
    
    const { endpoint, key, databaseId, containerId } = config;
    const client = new CosmosClient({ endpoint, key });
    const database = client.database(databaseId);
    const container = database.container(containerId);
    
    app.get('/', function(req, res) {
        res.send('Hello World!')
    })
    
    //create a variable holding a new data item
    var animal = {
        animal_id: "B100",
        species: "E. lutris",
        name: "sea otter",
        legs: 4
    }
    
    // add a record to DynamoDB table
    app.get('/addrecord', async function(req, res) {
        const { resource: createdItem } = await container.items.create(animal);
    
        res.send('successfully added animal - ' + createdItem.id);
    });
    
    app.get('/getrecords', async function(req, res) {
        
        //query criteria
        querySpec = {
            query: "SELECT * from c WHERE c.species='E. lutris'"
          }; 
    
        animals = await container.items.query(querySpec).fetchAll();
    
        res.send(JSON.stringify(animals));
    });
    
    app.listen(port, function() {
        console.log('Example app listening at http://localhost:' + port)
    });
    

    When I start the app, I call the endpoint to create a record, see it show up in Cosmos DB, and issue another request to get the records that match the target “species.” Sure enough, everything works great.

    What’s different about the emulator, compared to the “real” Cosmos DB? The emulator UI only supports the SQL API, not the others. You can’t use the adjustable consistency levels—like strong, session, or eventual—for queries. There are limits on how many containers you can create, and there’s no concept of replication here. Check out the remaining differences on the Azure site.

    All three emulators are easy to set up and straightforward to use. None of them are suitable for performance testing or simulating production resilience scenarios. That’s ok, because the “real” thing is just a few clicks (or CLI calls) away. Use these emulators to iterate on your app locally, and maybe to simulate behaviors in your integration pipelines, and then spin up actual instances for in-depth testing before going live.

  • Creating an event-driven architecture out of existing, non-event-driven systems

    Creating an event-driven architecture out of existing, non-event-driven systems

    Function-as-a-service gets all the glory in the serverless world, but the eventing backplane is the unheralded star of modern architectures, serverless or otherwise. Don’t get me wrong, scale-to-zero compute is cool. But is your company really transforming because you’re using fewer VMs? I’d be surprised. No, it seems that big benefits comes from a reimagined architecture, often powered by (managed) software that emit and consume events. If you have this in place, creative developers can quickly build out systems by tapping into event streams. If you have a large organization, and business systems that many IT projects tap into, this sort of event-driven architecture can truly speed up delivery.

    But I doubt that most existing software at your company is powered by triggers and events. How can you start being more event-driven with all the systems you have in place now? In this post, I’ll look at three techniques I’ve used or seen.

    First up, what do you need at your disposal? What’s the critical tech if you want to event-enable your existing SaaS or on-premises software? How about:

    • Event bus/backbone. You need an intermediary to route events among systems. It might be on-premises or in the public cloud, in-memory or persistent, open source or commercial. The important thing is having a way to fan-out the information instead of only offering point-to-point linkages.
    • Connector library. How are you getting events to and from software systems? You may use HTTP APIs or some other protocol. What you want is a way to uniformly talk to most source/destination systems without having to learn the nuances of each system. A series of pre-built connectors play a big part.
    • Schema registry. Optional, but important. What do the events looks like? Can I discover the available events and how to tap into them?
    • Event-capable targets. Your downstream systems need to be able to absorb events. They might need a translation layer or buffer to do so.

    MOST importantly, you need developers/architects that understand asynchronous programming, stateful stream processing, and distributed systems. Buying the technology doesn’t matter if you don’t know how to best use it.

    Let’s look at how you might use these technologies and skills to event-ify your systems. In the comments, tell me what I’m missing!

    Option #1: Light up natively event-driven capabilities in the software

    Some software is already event-ready and waiting for you to turn it on! Congrats if you use a wide variety of SaaS systems like Salesforce (via outbound messaging), Oracle Cloud products (e.g. Commerce Cloud), GSuite (via push notifications), Office 365 (via graph API) and many more. Heck, even some cloud-based databases like Azure Cosmos DB offer a change feed you can snack on. It’s just a matter of using these things.

    On-premises software can work here as well. A decade ago, I worked at Amgen and we created an architecture where SAP events were broadcasted through a broker, versus countless individual systems trying to query SAP directly. SAP natively supported eventing then, and plenty of systems do now.

    For either case—SaaS systems or on-premises software—you have to decide where the events go. You can absolutely publish events to single-system web endpoints. But realistically, you want these events to go into an event backplane so that everyone (who’s allowed) can party on the event stream.

    AWS has a nice offering that helps here. Amazon EventBridge came out last year with a lot of fanfare. It’s a fully managed (serverless!) service for ingesting and routing events. EventBridge takes in events from dozens of AWS services, and (as of this writing) twenty-five partners. It has a nice schema registry as well, so you can quickly understand the events you have access to. The list of integrated SaaS offerings is a little light, but getting better. 

    Given their long history in the app integration space, Microsoft also has a good cloud story here. Their eventing subsystem, called Azure Event Grid, ingests events from Azure (or custom) sources, and offers sophisticated routing rules. Today, its built-in event sources are all Azure services. If you’re looking to receive events from a SaaS system, you bolt on Azure Logic Apps. This service has a deep array of connectors that talk to virtually every system you can think of. Many of these connectors—including SharePointSalesforceWorkdayMicrosoft Dynamics 365, and Smartsheet—support push-based triggers from the SaaS source. It’s fairly easy to create a Logic App that receives a trigger, and publishes to Azure Event Grid.

    And you can always use “traditional” service brokers like Microsoft’s BizTalk Server which offer connectors, and pub/sub routing on any infrastructure, on-premises or off.

    Option #2: Turn request-driven APIs into event streams

    What if your software doesn’t have triggers or webhooks built in? That doesn’t mean you’re out of luck. 

    Virtually all modern packaged (on-premises or SaaS) software offers APIs. Even many custom-built apps do. These APIs are mostly request-response based (versus push-based async, or request-stream) but we can work with this.

    One pattern? Have a scheduler call those request-response APIs and turn the results into broadcasted events. Is it wasteful? Yes, polling typically is. But, the wasted polling cycles are worth it if you want to create a more dynamic architecture.

    Microsoft Azure users have good options. Specifically, you can quickly set up an Azure Logic App that talks to most everything, and then drops the results to Azure EventGrid for broadcast to all interested parties. Logic Apps also supports debatching, so you can parse the polled results and create an outbound stream of individual events. Below, every minute I’m listing records from ServiceNow that I publish to EventGrid.

    Note that Amazon EventBridge also supports scheduled invocation of targets. Those targets include batch job queues, code pipelines, ECS tasks, Lambda functions, and more.

    Option #3: Hack the subsystems to generate events

    You’ll have cases where you don’t have APIs at all. Just give up? NEVER. 

    A last resort is poking into the underlying subsystems. That means generating events from file shares, FTP locations, queues, and databases. Now, be careful here. You need to REALLY know your software before doing this. If you create a change feed for the database that comes with your packaged software, you could end up with data integrity issues. So, I’d probably never do this unless it was a custom-built (or well-understood) system.

    How do public cloud platforms help? Amazon EventBridge primarily integrates with AWS services today. That means if your custom or packaged app runs in AWS, you can trigger events off the foundational pieces. You might trigger events off EC2 state changes, new objects added to S3 blob storage, deleted users in the identity management system, and more. Most of these are about the service lifecycle, versus about the data going through the service, but still useful.

    In Azure, the EventGrid service ingests events from lots of foundational Azure services. You can listen on many of the same types of things that Amazon EventBridge does. That includes blob storage, although nothing yet on virtual machines.

    Your best bet in Azure may be once again to use Logic Apps and turn subsystem queries into an outbound event stream. In this example, I’m monitoring IBM DB2 database changes, and publishing events. 

    I could do the same with triggers on FTP locations …

    … and file shares.

    In all those cases, it’s fairly straightforward to publish the queried items to Azure EventGrid for fan-out processing to trigger-based recipient systems

    Ideally, you have option #1 at your disposal. If not, you can selectively choose #2 or #3 to get more events flowing in your architecture. Are there other patterns and techniques you use to generate events out of existing systems?

  • These six integrations show that Microsoft is serious about Spring Boot support in Azure

    Microsoft doesn’t play favorites. Oh sure, they heavily promote their first party products. But after that, they typically take a big-tent, welcome-all-comers approach and rarely call out anything as “the best” or “our choice.” They do seem to have a soft spot for Spring, though. Who can blame them? You’ve got millions of Java/Spring developers out there, countless Spring-based workloads in the wild, and 1.6 million new projects created each month at start.spring.io. I’m crazy enough to think that whichever vendor attracts the most Spring apps will likely “win” the first phase of the public cloud wars.

    With over a dozen unique integrations between Spring projects and Azure services, the gang in Redmond has been busy. A handful stand out to me, although all of them make a developer’s life easier.

    #6 Azure Functions

    I like Azure Functions. There’s not a lot extra machinery—such as API gateways—you have to figure out to use it. The triggers and bindings model are powerful. And it supports lots of different programming languages.

    While many (most?) developers are polyglot and comfortable switching between languages, it’d make sense if you want to keep your coding patterns and tooling the same as you adopt a new runtime like Azure Functions. The Azure team worked with the Spring team to ensure that  developers could take advantage of Azure Functions, while still retaining their favorite parts of Spring. Specifically, they partnered on the adapter that wires up Azure’s framework into the user’s code, and testing of the end-to-end experience. The result? A thoughtful integration of Spring Cloud Functions and Azure Functions that gives you the best of both worlds. I’ve seen a handful of folks offer guidance, and tutorials. And Microsoft offers a great guide.

    Always pick the right language based on performance needs, scale demands, etc. Above all else, you may want to focus on developer productivity, and using the language/framework that’s best for your team. Your productivity (or lack thereof) is more costly than any compute infrastructure!

    #5 Azure Service Bus and Event Hubs

    I’m a messaging geek. Connecting systems together is an underrated, but critically valuable skill. I’ve written a lot about Spring Cloud Stream in the past. Specifically, I’ve shown you how to use it with Azure Event Hubs, and even the Kafka interface.

    Basically, you can now use Microsoft’s primary messaging platforms—Service Bus Queues, Service Bus Topics, Event Hubs—as the messaging backbone of a Spring Boot app. And you can do all that, without actually learning the unique programming models of each platform. The Spring Boot developer writes platform-agnostic code to publish messages to subscribe to messages, and the Spring Cloud Stream objects take care of the rest.

    Microsoft has guides for working with Service BusEvent Hubs, and Event Hubs Kafka API. When you’re using Azure messaging services, I’m hard pressed to think of any easier way to interact with them than Spring Boot.

    #4 Azure Cosmos DB

    Frankly, all the database investment’s by Microsoft’s Java/Spring team have been impressive. You can cleanly interact with their whole suite of relational databases with JDBC and JPA via Spring Data.

    I’m more intrigued by their Cosmos DB work. Cosmos DB is Microsoft’s global scale database service that serves up many different APIs. Want a SQL API? You got it. How about a MongoDB or Cassandra facade? Sure. Or maybe a graph API using Gremlin? It’s got that too.

    Spring developers can use Microsoft-created SDKs for any of it. There’s a whole guide for using the SQL API. Likewise, Microsoft created walkthroughs for Spring devs using CassandraMongo, or Gremlin APIs. They all seem to be fairly expressive and expose the core capabilities you want from a Cosmos DB instance. 

    #3 Azure Active Directory B2C

    Look, security stuff doesn’t get me super pumped. Of course it’s important. I just don’t enjoy coding for it. Microsoft’s making it easier, though. They’ve got a Spring Boot Starter just for Azure Key Vault, and clean integration with Azure Active Directory via Spring Security. I’m also looking forward to seeing managed identities in these developer SDKs.

    I like the support for Azure Active Directory B2C. This is a standalone Azure service that offer single sign-on using social or other 3rd party identities. Microsoft claims it can support millions of users, and billions of authentication requests. I like that Spring developers have such a scalable service to seamlessly weave into their apps. The walkthrough that Microsoft created is detailed, but straightforward. 

    My friend Asir also presented this on stage with me at SpringOne last year in Austin. Here’s the part of the video where he’s doing the identity magic:

    #2 Azure App Configuration

    When you’re modernizing an app, you might only be aiming for one or two factors. Can you gracefully restart the thing, and did you yank configuration out of code? Azure App Configuration is a new service that supports the latter.

    This service is resilient, and supports labeling, queryingencryption, and event listeners. And Spring was one of the first things they announced support for. Spring offers a robust configuration subsystem, and it looks like Azure App Configuration slides right in. Check out their guide to see how to tap into cloud-stored config values, whether your app itself is in the cloud, or not.

    #1 Azure Spring Cloud

    Now, I count about a dozen ways to run a Java app on Azure today. You’re not short of choices. Why add another? Microsoft saw demand for a Spring-centric runtime that caters to microservices using Spring Cloud. Azure Spring Cloud will reach General Availability soon, so I’m told, and offers features like config management, service discovery, blue/green deployments, integrated monitoring, and lots more. I’ve been playing with it for a while, and am impressed with what’s possible.

    These integrations help you stitch together some pretty cool Azure cloud services into a broader Spring Boot app. That makes sense, when you consider what Spring Boot lead Phil Webb said at SpringOne a couple years back:

    “A lot of people think that Spring is a dependency injection framework … Spring is more of an integration framework. It’s designed to take lots of different technologies that you might want to use and allow you to combine them in ways that feel nature.”

  • 2019 in Review: Watching, Reading, and Writing Highlights

    Be still and wait. This was the best advice I heard in 2019, and it took until the end of the year for me to realize it. Usually, when I itch for a change, I go all in, right away. I’m prone to thinking that “patience” is really just “indecision.” It’s not. The best things that happened this year were the things that didn’t happen when I wanted! I’m grateful for an eventful, productive, and joyful year where every situation worked out for the best.

    2019 was something else. My family grew, we upgraded homes, my team was amazing, my company was acquired by VMware, I spoke at a few events around the world, chaired a tech conference, kept up a podcast, created a couple new Pluralsight classes, continued writing for InfoQ.com, and was awarded a Microsoft MVP for the 12th straight time.

    For the last decade+, I’ve started each year by recapping the last one. I usually look back at things I wrote, and books I read. This year, I’ll also add “things I watched.”

    Things I Watched

    I don’t want a ton of “regular” TV—although I am addicted to Bob’s Burgers and really like the new FBI—and found myself streaming or downloading more things while traveling this year. These shows/seasons stood out to me:

    Crashing – Season 3 [HBO] Pete Holmes is one of my favorite stand-up comedians, and this show has some legit funny moments, but it’s also complex, dark, and real. This was a good season with a great ending.

    BoJack Horseman – Season 5 [Netflix] Again, a show with absurdist humor, but also a dark, sobering streak. I’m got to catch up on the latest season, but this one was solid.

    Orange is the New Black – Season 7 [Netflix] This show has had some ups and downs, but I’ve stuck with it because I really like the cast, and there are enough surprises to keep me hooked. This final season of the show was intense and satisfying.

    Bosch – Season 4 [Amazon Prime] Probably the best thing I watched this year? I love this show. I’ve read all the books the show is based on, but the actors and writers have given this its own tone. This was a super tense season, and I couldn’t stop watching.

    Schitt’s Creek – Seasons 1-4 [Netflix] Tremendous cast and my favorite overall show from 2019. Great writing, and some of the best characters on TV. Highly recommended.

    Jack Ryan – Season 1 [Amazon Prime] Wow, what a show. Throughly enjoyed the story and cast. Plenty of twists and turns that led me to binge watch this on one of my trips this year.

    Things I Wrote

    I kept up a reasonable writing rhythm on my own blog, as well as publication to the Pivotal blog and InfoQ.com site. Here were a few pieces I enjoyed writing the most:

    [Pivotal blog] Five part series on digital transformation. You know what you should never do? Write a blog post and in it, promise that you’ll write four more. SO MUCH PRESSURE. After the overview post, I looked at the paradox of choice, design thinking, data processing, and automated delivery. I’m proud of how it all ended up.

    [blog] Which of the 295,680 platform combinations will you create on Microsoft Azure? The point of this post wasn’t that Microsoft, or any cloud provider for that matter, has a lot of unique services. They do, but the point was that we are prone to thinking that we’re getting a complete solution from someone, but really getting some really cool components to stitch together.

    [Pivotal blog] Kubernetes is a platform for building platforms. Here’s what that means. This is probably my favorite piece I wrote this year. It required a healthy amount of research and peer review, and dug into something I see very few people talking about.

    [blog] Go “multi-cloud” while *still* using unique cloud services? I did it using Spring Boot and MongoDB APIs. There’s so many strawman arguments on Twitter when it comes to multi-cloud that it’s like a scarecrow convention. Most people I see using multiple clouds aren’t dumb or lazy. They have real reasons, including a well-founded lack of trust in putting all their tech in one vendor’s basket. This blog post looked at how to get the best of all worlds.

    [blog] Looking to continuously test and patch container images? I’ll show you one way. I’m not sure when I give up on being a hands on technology person. Maybe never? This was a demo I put together for my VMworld Barcelona talk, and like the final result.

    [blog] Building an Azure-powered Concourse pipeline for Kubernetes – Part 3: Deploying containers to Kubernetes. I waved the white flag and learned Kubernetes this year. One way I forced myself to do so was sign up to teach an all-day class with my friend Rocky. While leading up to that, I wrote up this 3-part series of posts on continuous delivery of containers.

    [blog] Want to yank configuration values from your .NET Core apps? Here’s how to store and access them in Azure and AWS. It’s fun to play with brand new tech, curse at it, and document your journey for others so they curse less. Here I tried out Microsoft’s new configuration storage service, and compared it to other options.

    [blog] First Look: Building Java microservices with the new Azure Spring Cloud. Sometimes it’s fun to be first. Pivotal worked with Microsoft on this offering, so on the day it was announced, I had a blog post ready to go. Keep an eye on this service in 2020; I think it’ll be big.

    [InfoQ] Swim Open Sources Platform That Challenges Conventional Wisdom in Distributed Computing. One reason I keep writing for InfoQ is that it helps me discover exciting new things. I don’t know if SWIM will be a thing long term, but their integrated story is unconventional in today’s “I’ll build it all myself” world.

    [InfoQ] Weaveworks Releases Ignite, AWS Firecracker-Powered Software for Running Containers as VMs. The other reason I keep writing for InfoQ is that I get to talk to interesting people and learn from them. Here, I engaged in an informative Q&A with Alexis and pulled out some useful tidbits about GitOps.

    [InfoQ] Cloudflare Releases Workers KV, a Serverless Key-Value Store at the Edge. Feels like edge computing has the potential to disrupt our current thinking about what a “cloud” is. I kept an eye on Cloudflare this year, and this edge database warranted a closer look.

    Things I Read

    I like to try and read a few books a month, but my pace was tested this year. Mainly because I chose to read a handful of enormous biographies that took a while to get through. I REGRET NOTHING. Among the 32 books I ended up finishing in 2019, these were my favorites:

    Churchill: Walking with Destiny by Andrew Roberts (@aroberts_andrew). This was the most “highlighted” book on my Kindle this year. I knew the caricature, but not the man himself. This was a remarkably detailed and insightful look into one of the giants of the 20th century, and maybe all of history. He made plenty of mistakes, and plenty of brilliant decisions. His prolific writing and painting were news to me. He’s a lesson in productivity.

    At Home: A Short History of Private Life by Bill Bryson. This could be my favorite read of 2019. Bryson walks around his old home, and tells the story of how each room played a part in the evolution of private life. It’s a fun, fascinating look at the history of kitchens, studies, bedrooms, living rooms, and more. I promise that after you read this book, you’ll be more interesting at parties.

    Messengers: Who We Listen To, Who We Don’t, and Why by Stephen Martin (@scienceofyes) and Joseph Marks (@Joemarks13). Why is it that good ideas get ignored and bad ideas embraced? Sometimes it depends on who the messenger is. I enjoyed this book that looked at eight traits that reliably predict if you’ll listen to the messenger: status, competence, attractiveness, dominance, warm, vulnerability, trustworthiness, and charisma.

    Six Days of War: June 1967 and the Making of the Modern Middle East by Michael Oren (@DrMichaelOren). What a story. I had only a fuzzy understanding of what led us to the Middle East we know today. This was a well-written, engaging book about one of the most consequential events of the 20th century.

    The Unicorn Project: A Novel about Developers, Digital Disruption, and Thriving in the Age of Data by Gene Kim (@RealGeneKim). The Phoenix Project is a must-read for anyone trying to modernize IT. Gene wrote that book from a top-down leadership perspective. In The Unicorn Project, he looks at the same situation, but from the bottom-up perspective. While written in novel form, the book is full of actionable advice on how to chip away at the decades of bureaucratic cruft that demoralizes IT and prevents forward progress.

    Talk Triggers: The Complete Guide to Creating Customers with Word of Mouth by Jay Baer (@jaybaer) and Daniel Lemin (@daniellemin). Does your business have a “talk trigger” that leads customers to voluntarily tell your story to others? I liked the ideas put forth by the authors, and the challenge to break out from the pack with an approach (NOT a marketing gimmick) that really resonates with customers.

    I Heart Logs: Event Data, Stream Processing, and Data Integration by Jay Kreps (@jaykreps). It can seem like Apache Kafka is the answer to everything nowadays. But go back to the beginning and read Jay’s great book on the value of the humble log. And how it facilitates continuous data processing in ways that preceding technologies struggled with.

    Kafka: The Definitive Guide: Real-Time Data and Stream Processing at Scale by Neha Narkhede (@nehanarkhede), Gwen Shapira (@gwenshap), and Todd Palino (@bonkoif). Apache Kafka is probably one of the five most impactful OSS projects of the last ten years, and you’d benefit from reading this book by the people who know it. Check it out for a great deep dive into how it works, how to use it, and how to operate it.

    The Players Ball: A Genius, a Con Man, and the Secret History of the Internet’s Rise by David Kushner (@davidkushner). Terrific story that you’ve probably never heard before, but have felt its impact. It’s a wild tale of the early days of the Web where the owner of sex.com—who also created match.com—had it stolen, and fought to get it back. It’s hard to believe this is a true story.

    Mortal Prey by John Sanford. I’ve read a dozen+ of the books in this series, and keep coming back for more. I’m a sucker for a crime story, and this is a great one. Good characters, well-paced plots.

    Your God is Too Safe: Rediscovering the Wonder of a God You Can’t Control by Mark Buchanan (@markaldham). A powerful challenge that I needed to hear last year. You can extrapolate the main point to many domains—is something you embrace (spirituality, social cause, etc) a hobby, or a belief? Is it something convenient to have when you want it, or something powerful you do without regard for the consequences? We should push ourselves to get off the fence!

    Escaping the Build Trap: How Effective Product Management Creates Real Value by Melissa Perri (@lissijean). I’m not a product manager any longer, but I still care deeply about building the right things. Melissa’s book is a must-read for people in any role, as the “build trap” (success measured by output instead of outcomes) infects an entire organization, not just those directly developing products. It’s not an easy change to make, but this book offers tangible guidance to making the transition.

    Project to Product: How to Survive and Thrive in the Age of Digital Disruption with the Flow Framework by Mik Kersten (@mik_kersten). This is such a valuable book for anyone trying to unleash their “stuck” I.T. organization. Mik does a terrific job explaining what’s not working given today’s realities, and how to unify an organization around the value streams that matter. The “flow framework” that he pioneered, and explains here, is a brilliant way of visualizing and tracking meaningful work.

    Range: Why Generalists Triumph in a Specialized World by David Epstein (@DavidEpstein). I felt “seen” when I read this. Admittedly, I’ve always felt like an oddball who wasn’t exceptional at one thing, but pretty good at a number of things. This book makes the case that breadth is great, and most of today’s challenges demand knowledge transfer between disciplines and big-picture perspective. If you’re a parent, read this to avoid over-specializing your child at the cost of their broader development. And if you’re starting or midway through a career, read this for inspiration on what to do next.

    John Newton: From Disgrace to Amazing Grace by Jonathan Aitken. Sure, everyone knows the song, but do you know the man? He had a remarkable life. He was the captain of a slave ship, later a pastor and prolific writer, and directly influenced the end of the slave trade.

    Blue Ocean Shift: Beyond Competing – Proven Steps to Inspire Confidence and Seize New Growth by W. Chan Kim and Renee Mauborgne. This is a book about surviving disruption, and thriving. It’s about breaking out of the red, bloody ocean of competition and finding a clear, blue ocean to dominate. I liked the guidance and techniques presented here. Great read.

    Leonardo da Vinci by Walter Isaacson (@WalterIsaacson). Huge biography, well worth the time commitment. Leonardo had range. Mostly self-taught, da Vinci studying a variety of topics, and preferred working through ideas to actually executing on them. That’s why he had so many unfinished projects! It’s amazing to think of his lasting impact on art, science, and engineering, and I was inspired by his insatiable curiosity.

    AI Superpowers: China, Silicon Valley, and the New World Order by Kai-Fu Lee (@kaifulee). Get past some of the hype on artificial intelligence, and read this grounded book on what’s happening RIGHT NOW. This book will make you much smarter on the history of AI research, and what AI even means. It also explains how China has a leg up on the rest of the world, and gives you practical scenarios where AI will have a big impact on our lives.

    Never Split the Difference: Negotiating As If Your Life Depended On It by Chris Voss (@VossNegotiation) and Tahl Raz (@tahlraz). I’m fascinated by the psychology of persuasion. Who better to learn negotiation from than an FBI’s international kidnapping negotiator? He promotes empathy over arguments, and while the book is full of tactics, it’s not about insincere manipulation. It’s about getting to a mutually beneficial state.

    Amazing Grace: William Wilberforce and the Heroic Campaign to End Slavery by Eric Metaxas (@ericmetaxas). It’s tragic that this generation doesn’t know or appreciate Wilberforce. The author says that Wilberforce could be the “greatest social reformer in the history of the world.” Why? His decades-long campaign to abolish slavery from Europe took bravery, conviction, and effort you rarely see today. Terrific story, well written.

    Unlearn: : Let Go of Past Success to Achieve Extraordinary Results by Barry O’Reilly (@barryoreilly). Barry says that “unlearning” is a system of letting go and adapting to the present state. He gives good examples, and offers actionable guidance for leaders and team members. This strikes me as a good book for a team to read together.

    The Soul of a New Machine by Tracy Kidder. Our computer industry is younger than we tend to realize. This is such a great book on the early days, featuring Data General’s quest to design and build a new minicomputer. You can feel the pressure and tension this team was under. Many of the topics in the book—disruption, software compatibility, experimentation, software testing, hiring and retention—are still crazy relevant today.

    Billion Dollar Whale: The Man Who Fooled Wall Street, Hollywood, and the World by Tom Wright (@TomWrightAsia) and Bradley Hope (@bradleyhope). Jho Low is a con man, but that sells him short. It’s hard not to admire his brazenness. He set up shell companies, siphoned money from government funds, and had access to more cash than almost any human alive. And he spent it. Low befriended celebrities and fooled auditors, until it all came crashing down just a few years ago.

    Multipliers: How the Best Leaders Make Everyone Smarter by Liz Wiseman (@LizWiseman). It’s taken me very long (too long?) to appreciate that good managers don’t just get out of the way, they make me better. Wiseman challenges us to release the untapped potential of our organizations, and people. She contrasts the behavior of leaders that diminish their teams, and those that multiply their impact. Lots of food for thought here, and it made a direct impact on me this year.

    Darwin’s Doubt: The Explosive Origin of Animal Life and the Case for Intelligent Design by Stephen Meyer (@StephenCMeyer). The vast majority of this fascinating, well-researched book is an exploration of the fossil record and a deep dive into Darwin’s theory, and how it holds up to the scientific research since then. Whether or not you agree with the conclusion that random mutation and natural selection alone can’t explain the diverse life that emerged on Earth over millions of years, it will give you a humbling appreciation for the biological fundamentals of life.

    Napoleon: A Life by Adam Zamoyski. This was another monster biography that took me months to finish. Worth it. I had superficial knowledge of Napoleon. From humble beginnings, his ambition and talent took him to military celebrity, and eventually, the Emperorship. This meticulously researched book was an engaging read, and educational on the time period itself, not just Bonaparte’s rise and fall.

    The Paradox of Choice: Why More Is Less by Barry Schwartz. I know I’ve used this term for year’s since it was part of other book’s I’ve read. But I wanted to go to the source. We hate having no choices, but are often paralyzed by having too many. This book explores the effects of choice on us, and why more is often less. It’s a valuable read, regardless of what job you have.

    I say it every year, but thank you for having me as part of your universe in 2019. You do have a lot of choices of what to read or watch, and I truly appreciate when you take time to turn that attention to something of mine. Here’s to a great 2020!