Real developers use the CLI, or so I’m told. That probably explains why I mostly use the portal experiences of the major cloud providers. But judging from the portal experiences offered by most clouds, they prefer you use the CLI too. So let’s look at the CLIs.
Specifically, I evaluated the cloud CLIs with an eye on five different areas:
- API surface and patterns. How much of the cloud was exposed via CLI, and is there a consistent way to interact with each service?
- Authentication. How do users identify themselves to the CLI, and can you maintain different user profiles?
- Creating and viewing services. What does it feel like to provision instances, and then browse those provisioned instances?
- CLI sweeteners. Are there things the CLI offers to make using it more delightful?
- Utilities. Does the CLI offer additional tooling that helps developers build or test their software?
Let’s dig in.
Disclaimer: I work for Google Cloud, so obviously I’ll have some biases. That said, I’ve used AWS for over a decade, was an Azure MVP for years, and can be mostly fair when comparing products and services. Please call out any mistakes I make!
AWS
You have a few ways to install the AWS CLI. You can use a Docker image, or install directly on your machine. If you’re installing directly, you can download from AWS, or use your favorite package manager. AWS warns you that third party repos may not be up to date. I went ahead and installed the CLI on my Mac using Homebrew.
API surface and patterns
As you’d expect, the AWS CLI has wide coverage. Really wide. I think there’s an API in there to retrieve the name of Andy Jassy’s favorite jungle cat. The EC2 commands alone could fill a book. The documentation is comprehensive, with detailed summaries of parameters, and example invocations.
The command patterns are relatively consistent, with some disparities between older services and newer ones. Most service commands look like:
aws [service name] [action] [parameters]
Most “actions” start with create, delete, describe, get, list, or update.
For example:
aws elasticache create-cache-cluster --engine redis
aws kinesis describe-stream --stream-name seroter-stream
aws kinesis describe-stream --stream-name seroter-stream
aws qldb delete-ledger --name seroterledger
aws sqs list-queues
S3 is one of the original AWS services, and its API is different. It uses commands like cp, ls, and rm. Some services have modify commands, others use update. For the most part, it’s intuitive, but I’d imagine most people can’t guess the commands.
Authentication
There isn’t one way to authenticate to the AWS CLI. You might use SSO, an external file, or inline access key and ID, like I do below.

The CLI supports “profiles” which seems important when you may have different access to default values based on what you’re working on.
Creating and viewing service instances
By default, everything the CLI does occurs in the region of the active profile. You can override the default region by passing in a region flag to each command. See below that I created a new SQS queue without providing a region, and it dropped it into my default one (us-west-2). By explicitly passing in a target region, I created the second queue elsewhere.

The AWS Console shows you resources for a selected region. I don’t see obvious ways to get an all-up view. A few services, like S3, aren’t bound by region, and you see all resources at once. The CLI behaves the same. I can’t view all my SQS queues, or databases, or whatever, from around the world. I can “list” the items, region by region. Deletion behaves the same. I can’t delete the above SQS queue without providing a region flag, even though the URL is region-specific.
Overall, it’s fast and straightforward to provision, update, and list AWS services using the CLI. Just keep the region-by-region perspective in mind!
CLI sweeteners
The AWS CLI gives you control over the output format. I set the default for my profile to json, but you can also do yaml, text, and table. You can toggle this on a request by request basis.
You can also take advantage of command completion. This is handy, given how tricky it may be to guess the exact syntax of a command. Similarly, I really like you can be prompted for parameters. Instead of guessing, or creating giant strings, you can go parameter by parameter in a guided manner.
The AWS CLI also offers select opportunities to interact with the resources themselves. I can send and receive SQS messages. Or put an item directly into a DynamoDB table. There are a handful of services that let you create/update/delete data in the resource, but many are focused solely on the lifecycle of the resource itself.
Finally, I don’t see a way to self-update from within the CLI itself. It looks like you rely on your package manager or re-download to refresh it. If I’m wrong, tell me!
Utilities
It doesn’t look like the CLI ships with other tools that developers might use to build apps for AWS.
Microsoft Azure
The Microsoft Azure CLI also has broad coverage and is well documented. There’s no shortage of examples, and it clearly explains how to use each command.
Like AWS, Microsoft offers their CLI in a Docker image. They also offer direct downloads, or access via a package manager. I grabbed mine from Homebrew.
API surface and patterns
The CLI supports almost every major Azure service. Some, like Logic Apps or Blockchain, only show up in their experimental sandbox.
Commands follow a particular syntax:
az [service name] [object] create | list | delete | update [parameters]
Let’s look at a few examples:
az ad app create --display-name my-ad-app
az cosmosdb list --resource-group group1
az postgres db show --name mydb --resource-group group1 --server-name myserver
az service bus queue delete --name myqueue --namespace-name mynamespace --resource-group group1
I haven’t observed much inconsistency in the CLI commands. They all seem to follow the same basic patterns.
Authentication
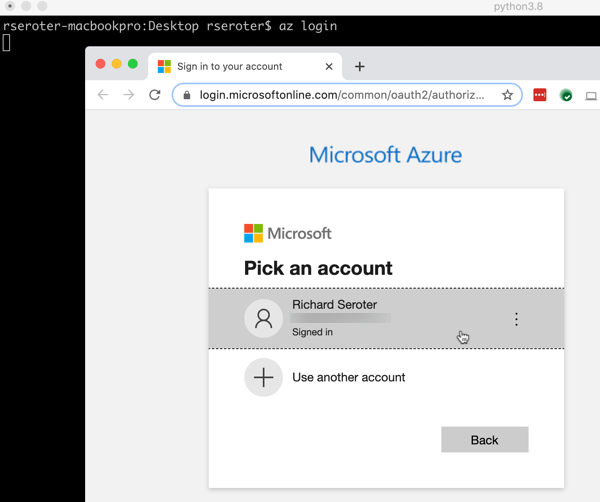
Logging into the CLI is easy. You can simply do az login as I did below—this opens a browser window and has you sign into your Azure account to retrieve a token—or you can pass in credentials. Those credentials may be a username/password, service principal with a secret, or service principal with a client certificate.
Once you log in, you see all your Azure subscriptions. You can parse the JSON to see which one is active, and will be used as the default. If you wish to change the default, you can use az account set --subscription [name] to pick a different one.
There doesn’t appear to be a way to create different local profiles.
Creating and viewing service instances
It seems that most everything you create in Azure goes into a resource group. While a resource group has a “location” property, that’s related to the metadata, not a restriction on what gets deployed into it. You can set a default resource group (az configure --defaults group=[name]) or provide the relevant input parameter on each request.
Unlike other clouds, Azure has a lot of nesting. You have a root account, then a subscription, and then a resource group. And most resources also have parent-child relationships you must define before you can actually build the thing you want.
For example, if you want a service bus queue, you first create a namespace. You can’t create both at the same time. It’s two calls. Want a storage blob to upload videos into? Create a storage account first. A web application to run your .NET app? Provision a plan. Serverless function? Create a plan. This doesn’t apply to everything, but just be aware that there are often multiple steps involved.
The creation activity itself is fairly simple. Here are commands to create Service Bus namespace and then a queue
az servicebus namespace create --resource-group mydemos --name seroter-demos --location westus
az servicebus queue create --resource-group mydemos --namespace-name seroter-demos --name myqueue
Like with AWS, some Azure assets get grouped by region. With Service Bus, namespaces are associated to a geo. I don’t see a way to query all queues, regardless of region. But for the many that aren’t, you get a view of all resources across the globe. After I created a couple Redis caches in my resource group, a simple az redis list --resource-group mydemos showed me caches in two different parts of the US.
Depending on how you use resource groups—maybe per app or per project, or even by team—just be aware that the CLI doesn’t retrieve results across resource groups. I’m not sure the best strategy for viewing subscription-wide resources other than the Azure Portal.
CLI sweeteners
The Azure CLI has some handy things to make it easier to use.
There’s a find function for figuring out commands. There’s output formatting to json, tables, or yaml. You’ll also find a useful interactive mode to get auto-completion, command examples, and more. Finally, I like that the Azure CLI supports self-upgrade. Why leave the CLI if you don’t have to?
Utilities
I noticed a few things in this CLI that help developers. First, there’s an az rest command that lets you call Azure service endpoints with authentication headers taken care of for you. That’s a useful tool for calling secured endpoints.
Azure offers a wide array of extensions to the CLI. These aren’t shipped as part of the CLI itself, but you can easily bolt them on. And you can create your own. This is a fluid list, but az extension list-available shows you what’s in the pool right now. As of this writing, there are extensions for preview AKS capabilities, managing Azure DevOps, working with DataBricks, using Azure LogicApps, querying the Azure Resource Graph, and more.
Google Cloud Platform
I’ve only recently started seriously using the GCP CLI. What’s struck me most about the gcloud tool is that it feels more like a system—dare I say, platform—than just a CLI. We’ll talk more about that in a bit.
Like with other clouds, you can use the SDK/CLI within a supported Docker image, package manager, or direct download. I did a direct download, since this is also a self-updating CLI, so I didn’t want to create a zombie scenario with my package manager.
API surface and patterns
The gcloud CLI has great coverage for the full breadth of GCP. I can’t see any missing services, including things launched two weeks ago. There is a subset of services/commands available in the alpha or beta channels, and are fully integrated into the experience. Each command is well documented, with descriptions of parameters, and example calls.
CLI commands follow a consistent pattern:
gcloud [service] create | delete | describe | list | update [parameters]
Let’s see some examples:
gcloud bigtable instances create seroterdb --display-name=seroterdb --cluster=serotercluster --cluster-zone=us-east1-a
gcloud pubsub topics describe serotertopic
gcloud run services update --memory=1Gi
gcloud spanner instances delete myspanner
All the GCP services I’ve come across follow the same patterns. It’s also logical enough that I even guessed a few without looking anything up.
Authentication
A gcloud auth login command triggers a web-based authorization flow.

Once I’m authenticated, I set up a profile. It’s possible to start with this process, and it triggers the authorization flow. Invoking the gcloud init command lets me create a new profile/configuration, or update an existing one. A profile includes things like which account you’re using, the “project” (top level wrapper beneath an account) you’re using, and a default region to work in. It’s a guided processes in the CLI, which is nice.

And it’s a small thing, but I like that when it asks me for a default region, it actually SHOWS ME ALL THE REGION CODES. For the other clouds, I end up jumping back to their portals or docs to see the available values.
Creating and viewing service instances
As mentioned above, everything in GCP goes into Projects. There’s no regional affinity to projects. They’re used for billing purposes and managing permissions. This is also the scope for most CLI commands.
Provisioning resources is straightforward. There isn’t the nesting you find in Azure, so you can get to the point a little faster. For instance, provisioning a new PubSub topic looks like this:
gcloud pubsub topics create richard-topic
It’s quick and painless. PubSub doesn’t have regional homing—it’s a global service, like others in GCP—so let’s see what happens if I create something more geo-aware. I created two Spanner instances, each in different regions.
gcloud spanner instances create seroter-db1 --config=regional-us-east1 --description=ordersdb --nodes=1
gcloud spanner instances create seroter-db2 --config=regional-us-west1 --description=productsdb --nodes=1
It takes seconds to provision, and then querying with gcloud spanner instances list gives me all Spanner database instances, regardless of region. And I can use a handy “filter” parameter on any command to winnow down the results.

The default CLI commands don’t pull resources from across projects, but there is a new command that does enable searching across projects and organizations (if you have permission). Also note that Cloud Storage (gsutil) and Big Query (bq) use separate CLIs that aren’t part of gcloud directly.
CLI sweeteners
I used one of the “sweeteners” before: filter. It uses a simple expression language to return a subset of results. You’ll find other useful flags for sorting and limiting results. Like with other cloud CLIs, gcloud lets you return results as json, table, csv, yaml, and other formats.
There’s also a full interactive shell with suggestions, auto-completion, and more. That’s useful as you’re learning the CLI.
gcloud has a lot of commands for interacting with the services themselves. You can publish to a PubSub topic, execute a SQL statement against a Spanner database, or deploy and call a serverless Function. It doesn’t apply everywhere, but I like that it’s there for many services.
The GCP CLI also self-updates. We’ll talk about it more in the section below.
Utilities
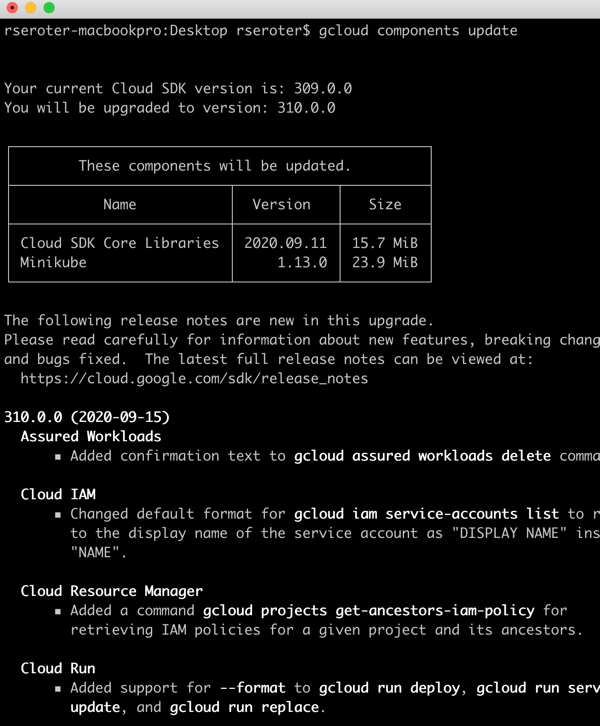
A few paragraphs ago, I said that the gcloud CLI felt more like a system. I say that, because it brings a lot of components with it. When I type in gcloud components list, I see all the options:

We’ve got the core SDK and other GCP CLIs for Big Query, but also a potpourri of other handy tools. You’ve got Kubernetes development tools like minikube, Skaffold, Kind, kpt, and kubectl. And you get a stash of local emulators for cloud services like Bigtable, Firestore, Spanner, PubSub and Spanner.
I can install any or all of these, and upgrade them all from here. A gcloud components update command update all of them, and, shows me a nice change log.
There are other smaller utility functions included in gcloud. I like that I have commands to configure Docker to work with Google Container Registry, Or fetch Kubernetes cluster credentials and put them into my active profile. And print my identity token to inject into the auth headers of calls to secure endpoints.
Wrap
To some extent, each CLI reflects the ethos of their cloud. The AWS CLI is dense, powerful, and occasionally inconsistent. The Azure CLI is rich, easy to get started with, and 15% more complicated than it should be. And the Google Cloud CLI is clean, integrated, and evolving. All of these are great. You should use them and explore their mystery and wonder.