Month: March 2020

  • Creating an event-driven architecture out of existing, non-event-driven systems

    Creating an event-driven architecture out of existing, non-event-driven systems

    Function-as-a-service gets all the glory in the serverless world, but the eventing backplane is the unheralded star of modern architectures, serverless or otherwise. Don’t get me wrong, scale-to-zero compute is cool. But is your company really transforming because you’re using fewer VMs? I’d be surprised. No, it seems that big benefits comes from a reimagined architecture, often powered by (managed) software that emit and consume events. If you have this in place, creative developers can quickly build out systems by tapping into event streams. If you have a large organization, and business systems that many IT projects tap into, this sort of event-driven architecture can truly speed up delivery.

    But I doubt that most existing software at your company is powered by triggers and events. How can you start being more event-driven with all the systems you have in place now? In this post, I’ll look at three techniques I’ve used or seen.

    First up, what do you need at your disposal? What’s the critical tech if you want to event-enable your existing SaaS or on-premises software? How about:

    • Event bus/backbone. You need an intermediary to route events among systems. It might be on-premises or in the public cloud, in-memory or persistent, open source or commercial. The important thing is having a way to fan-out the information instead of only offering point-to-point linkages.
    • Connector library. How are you getting events to and from software systems? You may use HTTP APIs or some other protocol. What you want is a way to uniformly talk to most source/destination systems without having to learn the nuances of each system. A series of pre-built connectors play a big part.
    • Schema registry. Optional, but important. What do the events looks like? Can I discover the available events and how to tap into them?
    • Event-capable targets. Your downstream systems need to be able to absorb events. They might need a translation layer or buffer to do so.

    MOST importantly, you need developers/architects that understand asynchronous programming, stateful stream processing, and distributed systems. Buying the technology doesn’t matter if you don’t know how to best use it.

    Let’s look at how you might use these technologies and skills to event-ify your systems. In the comments, tell me what I’m missing!

    Option #1: Light up natively event-driven capabilities in the software

    Some software is already event-ready and waiting for you to turn it on! Congrats if you use a wide variety of SaaS systems like Salesforce (via outbound messaging), Oracle Cloud products (e.g. Commerce Cloud), GSuite (via push notifications), Office 365 (via graph API) and many more. Heck, even some cloud-based databases like Azure Cosmos DB offer a change feed you can snack on. It’s just a matter of using these things.

    On-premises software can work here as well. A decade ago, I worked at Amgen and we created an architecture where SAP events were broadcasted through a broker, versus countless individual systems trying to query SAP directly. SAP natively supported eventing then, and plenty of systems do now.

    For either case—SaaS systems or on-premises software—you have to decide where the events go. You can absolutely publish events to single-system web endpoints. But realistically, you want these events to go into an event backplane so that everyone (who’s allowed) can party on the event stream.

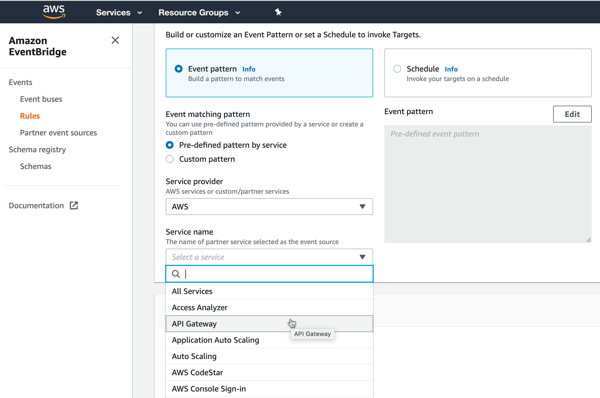
    AWS has a nice offering that helps here. Amazon EventBridge came out last year with a lot of fanfare. It’s a fully managed (serverless!) service for ingesting and routing events. EventBridge takes in events from dozens of AWS services, and (as of this writing) twenty-five partners. It has a nice schema registry as well, so you can quickly understand the events you have access to. The list of integrated SaaS offerings is a little light, but getting better. 

    Given their long history in the app integration space, Microsoft also has a good cloud story here. Their eventing subsystem, called Azure Event Grid, ingests events from Azure (or custom) sources, and offers sophisticated routing rules. Today, its built-in event sources are all Azure services. If you’re looking to receive events from a SaaS system, you bolt on Azure Logic Apps. This service has a deep array of connectors that talk to virtually every system you can think of. Many of these connectors—including SharePointSalesforceWorkdayMicrosoft Dynamics 365, and Smartsheet—support push-based triggers from the SaaS source. It’s fairly easy to create a Logic App that receives a trigger, and publishes to Azure Event Grid.

    And you can always use “traditional” service brokers like Microsoft’s BizTalk Server which offer connectors, and pub/sub routing on any infrastructure, on-premises or off.

    Option #2: Turn request-driven APIs into event streams

    What if your software doesn’t have triggers or webhooks built in? That doesn’t mean you’re out of luck. 

    Virtually all modern packaged (on-premises or SaaS) software offers APIs. Even many custom-built apps do. These APIs are mostly request-response based (versus push-based async, or request-stream) but we can work with this.

    One pattern? Have a scheduler call those request-response APIs and turn the results into broadcasted events. Is it wasteful? Yes, polling typically is. But, the wasted polling cycles are worth it if you want to create a more dynamic architecture.

    Microsoft Azure users have good options. Specifically, you can quickly set up an Azure Logic App that talks to most everything, and then drops the results to Azure EventGrid for broadcast to all interested parties. Logic Apps also supports debatching, so you can parse the polled results and create an outbound stream of individual events. Below, every minute I’m listing records from ServiceNow that I publish to EventGrid.

    Note that Amazon EventBridge also supports scheduled invocation of targets. Those targets include batch job queues, code pipelines, ECS tasks, Lambda functions, and more.

    Option #3: Hack the subsystems to generate events

    You’ll have cases where you don’t have APIs at all. Just give up? NEVER. 

    A last resort is poking into the underlying subsystems. That means generating events from file shares, FTP locations, queues, and databases. Now, be careful here. You need to REALLY know your software before doing this. If you create a change feed for the database that comes with your packaged software, you could end up with data integrity issues. So, I’d probably never do this unless it was a custom-built (or well-understood) system.

    How do public cloud platforms help? Amazon EventBridge primarily integrates with AWS services today. That means if your custom or packaged app runs in AWS, you can trigger events off the foundational pieces. You might trigger events off EC2 state changes, new objects added to S3 blob storage, deleted users in the identity management system, and more. Most of these are about the service lifecycle, versus about the data going through the service, but still useful.

    In Azure, the EventGrid service ingests events from lots of foundational Azure services. You can listen on many of the same types of things that Amazon EventBridge does. That includes blob storage, although nothing yet on virtual machines.

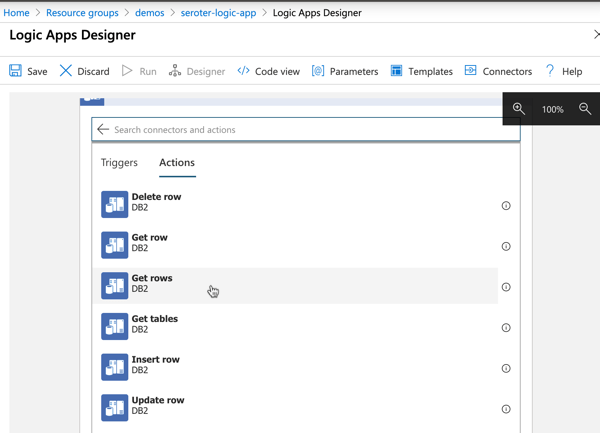
    Your best bet in Azure may be once again to use Logic Apps and turn subsystem queries into an outbound event stream. In this example, I’m monitoring IBM DB2 database changes, and publishing events. 

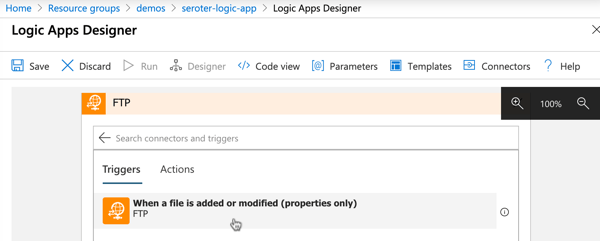
    I could do the same with triggers on FTP locations …

    … and file shares.

    In all those cases, it’s fairly straightforward to publish the queried items to Azure EventGrid for fan-out processing to trigger-based recipient systems

    Ideally, you have option #1 at your disposal. If not, you can selectively choose #2 or #3 to get more events flowing in your architecture. Are there other patterns and techniques you use to generate events out of existing systems?

  • It turns out there might be a better dev abstraction than "serverless." Enter Dark.

    It turns out there might be a better dev abstraction than "serverless." Enter Dark.

    My favorite definition of “serverless computing” still comes from Rachel Stephens at RedMonk: managed services that scale to zero. There’s a lot packed into that statement. It elevates consumption-based pricing, and a bias towards managed services, not raw infrastructure. That said, do today’s mainstream serverless technologies represent a durable stack for the next decade? I’m not sure. It feels like there’s still plenty of tradeoffs and complexity. I especially feel this way after spending time with Dark.

    If you build apps by writing code, you’re doing a lot of setup and wiring. Before writing code, you figure out tech choices, spin up dependent services (databases, etc), get your CI/CD pipeline figured out, and decide out how to stitch it all together. Whether you’re building on-premises or off, it’s generally the same. Look at a typical serverless stack from AWS. it’s made up of AWS Lambda or Fargate, Amazon S3, Amazon DynamoDB, Amazon Cognito, Amazon API Gateway, Amazon SQS or Kinesis, Amazon CloudWatch, AWS X-Ray and more. All managed services, but still a lot to figure out and pre-provision. To be fair, frameworks like AWS Amplify or Google’s Firebase pull things together better than pure DIY. Regardless, it might be serverless, but it’s not setup-less or maintain-less.

    Dark seems different. It’s a complete system—language, editor, runtime, and infrastructure. You spend roughly 100% of your time building the app. It’s a deploy-less model where your code changes are instantly deployed behind the scenes. It’s setup-less as you don’t create databases, message brokers, API gateways, or compute hosts. Everything is interconnected. Some of this sounds reminiscent of low-code platforms like Salesforce, Microsoft PowerApps, or OutSystems. But Dark still targets professional programmers, I think, so it’s a different paradigm.

    In this post, I’ll build a simple app with Dark. As we go along, I’ll explain some of the interesting aspects of the platform. This app serves up a couple REST endpoints, stores data in database, and uses a background worker to “process” incoming orders.

    Step 0: Understand Dark Language and Components

    With Dark, you’re coding in their language. They describe it as “statically-typed functional/imperative hybrid, based loosely on ML. It is a high-level language, with immutable values, garbage collection, and support for generics/polymorphic types.” It offers the standard types (e.g. Strings, Integers, Booleans, Lists, Dictionaries), and doesn’t really support custom objects.

    The Dark team also describes their language as “expression-oriented.” You basically build up expressions. You use (immutable) variables, conditional statements, and pipelining to accomplish your objectives. We’ll see a few examples of this below.

    There are five (kinda, six) components that make up a Dark app. These “handlers” sit on your “canvas” and hold all your code. These components are:

    • HTTP endpoints. These are for creating application entry points via the major HTTP verbs.
    • Cron jobs. These are tasks that run on whatever schedule you set.
    • Background Workers. They receive events, run asynchronously, and support automatic retries.
    • Persistent Datastores. This is a key-value store.
    • REPL. These are developer tools you create to run commands outside of your core components.

    All of these components are first-class in the Dark language itself. I can write Dark code that inherently knows what to do with all the above things.

    The other component that’s available is a “Function” which is just that. It’s an extracted command that you can call from your other components.

    Ok, we know the basics. Let’s get to work.

    Step 1: Create a Datastore

    I need to store state. Almost every system does. Whether your compute nodes store it locally, or you pull it from an attached backing store, you have to factor in provisioning, connecting to, and maintaining it. Not with Dark.

    First, let’s look at the canvas. Here, I add and position the components that make up my app. Each user (or app) gets its own canvas.

    I need a database. To create it, I just click the “plus” next to the Datastores item in the left sidebar, or click on the canvas and choose New DB.

    I named mine “Orders” and proceeded to define a handful of fields and corresponding data types. That’s it. I didn’t pick an instance size, throughput units, partition IDs, or replication factors.

    I can also test out my database by adding a REPL to my canvas, and writing some quick code to inject a record in the database. A button in the REPL lights up and when I click it, it runs whatever code is there. I can then see the record in the database, and add a second REPL to purge the database.

    Step 2: Code the REST endpoints

    Let’s add some data to this database, via a REST API.

    I could click the “plus” button next to the HTTP component in the sidebar, or click the canvas. A better way of doing this is via the Trace-Based Development model in Dark. Specifically, I can issue a request to a non-existent endpoint, Dark will capture that, and I can build up a handler based on it. Reminds me a bit of consumer-driven contract testing where you’re building based on what the client needs.

    So, I go to Postman and submit an HTTP POST request to a URL that references my canvas, but the path doesn’t exist (yet). I’m also sending in the shape of the JSON payload that I want my app to handle.

    Back in Dark, I see a new entry under “404s.”

    When I click the “plus” sign next to it, I get a new HTTP handler on my canvas. Not only that, the handler is pre-configured to handle POST requests to the URL I specified, and, shows me the raw trace of the 404 request.

    What’s kinda crazy is that I can choose this trace (or others) and replay them through the component. This is a powerful way to first create the stub, and then run that request through the component after writing the handler code.

    So let’s write the code. All I want to do is create a record in the database with the data from the HTTP request. If the fields map 1:1, you can just dump it right in there. I chose to more explicitly map it, and set some DB values that didn’t exist in the JSON payload.

    As I start typing my code in, I’m really just filling in the expressions, and choosing from the type-ahead values. Also notice that each expression resolves immediately and shows you the result of that expression on the left side.

    My code itself is fairly simple. I use the built-in operators to set a new database record, and return a simple JSON acknowledgement to the caller.

    That’s it. Dark recognized that this handler is now using the Orders database, and shows a ghostly connection visualization. When I click the “replay” button on my HTTP handler, it runs my code against the selected trace, and sure enough, a record shows up in the database.

    I want a second API endpoint to retrieve a specific order from the system. So, I go back to Postman, and issue another HTTP request to the URL that I want the system to give me.

    As expected, I have another trace to leverage when inflating my HTTP handler.

    For this handler, I changed the handler’s URL to tokenize the request (and get the “orderid” as a variable), and added some simple code to retrieve a record from the database using that order ID.

    That’s all. I now have two REST endpoints that work together to create and retrieve data from a persistent datastore. At no point was I creating containers, deployment pipelines, or switching to logging dashboards. It’s all in one place, as one experience.

    Step 3: Build a Worker

    The final step is to build a worker. This component receives an event and does some work. In my case, I want it to receive new orders, and change the order status to “processing.”

    Once again, I can trigger creation of a worker by “calling” it before it exists. Back in my HTTP post handler, I’m adding the reserved emit command. This is how you send events to a background worker. In this case, I specify the payload, and the name of the yet-to-be-created worker. Then I replay that specific command against the latest trace, and see a new 404 for the worker request.

    In my Dark code, I overwrite the existing record with a new one, and set the OrderStatus value. By replaying the trace, I can see the inbound payload (left) and resulting database update (bottom).

    At this point, my app is done. I can POST new orders, and almost immediately see the changed “status” because the workers run so fast.

    Dark won’t be a fit for many apps and architectures. That said, if my app has me debating between integrating a dozen individual serverless services from a cloud provider, or Dark, I’m choosing Dark.

  • Let’s look at your options for local development with Kubernetes

    Let’s look at your options for local development with Kubernetes

    For a while, I’ve been saying that developers should build great software, and pick their host at the last responsible moment. Apps first, not infrastructure. But now, I don’t think that’s exactly right. It’s naive. As you’re writing code, there are at least three reasons you’ll want to know where you app will eventually run:

    1. It impacts your architecture. You likely need to know if you’re dealing with a function-as-a-service environment, Kubernetes, virtual machines, Cloud Foundry, or whatever. This changes how you lay out components, store state, etc.
    2. There are features your app may use. For each host, there are likely capabilities you want to tap into. Whether it’s input/output bindings in Azure Functions, ConfigMaps in Kubernetes, or something else, you probably can take advantage of what’s there.
    3. It changes your local testing setup. It makes sense that you want to test your code in a production-like environment before you get to production. That means you’ll invest in a local setup that mimics the eventual destination.

    If you’re using Kubernetes, you’ve got lots of options to address #3. I took four popular Kubernetes development options for a spin, and thought I’d share my findings. There are more than four options (e.g. k3dMicrok8sMicronetes), but I had to draw the line somewhere.

    For this post, I’m considering solutions that run on my local machine. Developers using Kubernetes may also spin up cloud clusters (and use features like Dev Spaces in Azure AKS), or sandboxes in something like Katacoda. But I suspect that most will be like me, and enjoy doing things locally. Let’s dig in.

    Option 1: Docker Desktop

    For many, this is the “easy” choice. You’re probably already running Docker Desktop on your PC or Mac.

    By default, you have to explicitly enable it. The screen below is accessible via the “Preferences” menu. 

    After a few minutes, my cluster was running, and I could switch my Kubernetes context to Docker Desktop environment.

    I proved this by running a couple simple kubectl commands that show I’ve got a single node, local cluster.

    This cluster doesn’t have the Kubernetes Dashboard installed by default, so you can follow a short set of steps to add it. You can also, of course, use other dashboards, like Octant

    With my cluster running, I wanted to create a pod, and expose it via a service. 

    My corresponding YAML file is as such:

    ---
    apiVersion: apps/v1
    kind: Deployment
    metadata:
      name: simple-k8s-app
    spec:
      replicas: 1
      selector:
        matchLabels:
          app: simple-k8s-app
      template:
        metadata:
          labels:
            app: simple-k8s-app
        spec:
          containers:
          - name: simple-k8s-app
            image: rseroter/simple-k8s-app-kpack:latest
            ports:
            - containerPort: 8080
            env:
            - name: FLAG_VALUE
              value: "on"
    ---
    apiVersion: v1
    kind: Service
    metadata:
      name: simple-k8s-app
    spec:
      type: LoadBalancer
      ports:
      - port: 9001
        protocol: TCP
        targetPort: 8080
      selector:
        app: simple-k8s-app
    

    I used the “LoadBalancer” type, which I honestly didn’t expect to see work. Everything I’ve seen online says I need to explicitly set up ingress via NodePort. But, once I deployed, my container was running, and service was available on localhost:9001.

    Nice. Now that there was something in my cluster, I started up Octant, and saw my pods, containers, and more.

    Option 2: Minikube

    This has been my go-to for years. Seemingly, for many others as well. It’s featured prominently in the Kubernetes docs and gives you a complete (single node via VM) solution. If you’re on a Mac, it’s super easy to install with a simple “brew install minikube” command.

    To start up Kubernetes, I simply enter “minikube start” in my Terminal. I usually specify a Kubernetes version number, because it defaults to the latest, and some software that I install expects a specific version. 

    After a few minutes, I’m up and running. Minikube has some of its own commands, like one below that returns the status of the environment.

    There are other useful commands for setting Docker environment variables, mounting directories into minikube, tunneling access to containers, and serving up the Kubernetes dashboard.

    My deployment and service YAML definitions are virtually the same as the last time. The only difference? I’m using NodePort here, and it worked fine. 

    ---
    apiVersion: apps/v1
    kind: Deployment
    metadata:
      name: simple-k8s-app
    spec:
      replicas: 1
      selector:
        matchLabels:
          app: simple-k8s-app
      template:
        metadata:
          labels:
            app: simple-k8s-app
        spec:
          containers:
          - name: simple-k8s-app
            image: rseroter/simple-k8s-app-kpack:latest
            ports:
            - containerPort: 8080
            env:
            - name: FLAG_VALUE
              value: "on"
    ---
    apiVersion: v1
    kind: Service
    metadata:
      name: simple-k8s-app
    spec:
      type: NodePort
      ports:
      - port: 9001
        protocol: TCP
        targetPort: 8080
      selector:
        app: simple-k8s-app
    

    After applying this configuration, I could reach my container using the host IP (retrieved via “minikube ip”) and generated port number.

    Option 3: kind

    A handful of people have been pushing this on me, so I wanted to try it out as well. How’s it different from minikube? A few ways. First, it’s not virtual machine-based. The name stands for Kubernetes in Docker, as the cluster nodes are running in Docker containers. Since it’s all local Docker stuff, it’s easy to use your local registry without any extra hoops to jump through. What’s also nice is that you can create multiple worker nodes, so you can test more realistic scenarios. kind is meant to be used by those testing Kubernetes, but you can use it on your own as well.

    Installing is fairly straightforward. For those on Mac, a simple “brew install kind” gets you going. When creating clusters, you can simply do “kind create cluster”, or do that with a configuration file to customize the build. I created a simple config that created two control plane nodes, and two workers nodes.

    # a cluster with 2 control-plane nodes and 2 workers
    kind: Cluster
    apiVersion: kind.x-k8s.io/v1alpha4
    nodes:
    - role: control-plane
    - role: control-plane
    - role: worker
    - role: worker
    

    After creating the cluster with that YAML configuration, I had a nice little cluster running inside Docker containers.

    It doesn’t look like the UI Dashboard is built in, so again, you can either install it yourself, or point your favorite dashboard at the cluster. Here, Octant shows me the four nodes.

    This time, I deployed my pod without a corresponding service. It’s the same YAML as above, but no service definition. Why? Two reasons: (1) I wanted to try port forward in this environment, and (2) ingress in kind is a little trickier than in the above platforms.

    So, I got the name of my pod, and tunneled to it via this command:

    kubectl port-forward pod/simple-k8s-app-6dd8b59b97-qwsjb 9001:8080

    Once I did that, I pinged http://127.0.0.1:9001 and pulled my the app in the container. Nice!

    Option 4: Tilt

    This is a fairly new option. Tilt is positioned as “local Kubernetes development with no stress.” BOLD CLAIM. Instead of just being a vanilla Kubernetes cluster to deploy to, Tilt offers dev-friendly experiences for packaging code into containers, seeing live updates, troubleshooting, and more. So, you do have to bring your Kubernetes cluster to the table before using Tilt.

    So, I again started up Docker Desktop and got that Kubernetes environment ready to go. Then, I followed the Tilt installation instructions for my machine. After a bit, everything was installed, and typing “tilt” into my Terminal gave me a summary of what Tilt does, and available commands.

    I started by just typing “tilt up” and got a console and web UI. The web UI told me I needed a Tilefile, and I do what I’m told. My file just contained a reference to the YAML file I used for the above Docker Desktop demo.

    k8s_yaml('simple-k8s-app.yaml')

    As soon as I saved the file, things started happening. Tilt immediately applied my YAML file, and started the container up. In a separate window I checked the state of deployment via kubectl, and sure enough everything was up and running.

    But that’s not really the power of this thing. For devs, the fun comes from having the builds automated too. Not just a finished container image. So, I built a new ASP.NET Core app using Visual Studio Code, added a Dockerfile, a put it at the same directory level as the Tiltfile. Then, I updated my Tiltfile to reference the Dockerfile.

    k8s_yaml('simple-k8s-app.yaml')
    docker_build("tilt-demo-app", "./webapp", dockerfile="Dockerfile")

    After saving the files, Tilt got to work and built my image, added it to my local Docker registry, and deployed it to the Kubernetes cluster.

    The fun part, is now I could just change the code, save it, and seconds later Tilt rebuilt the container image and deployed the changes.

    If your future includes Kubernetes, and it looks like for most, it does, you’ll want a good developer workflow. That means using a decent local experience. You may also use clusters in the cloud to complement the one-premises ones. That’s cool. Also consider how you’ll manage all of them. Today, VMware shipped Tanzu Mission Control, which is a cool way to manage Kubernetes clusters created there, or attached from anywhere. For fun, I attached my existing Azure Kubernetes Services (AKS) cluster, and, the kind cluster we created here. Here’s the view of the kind clusters, with all its nodes visible and monitored.

    What else do you use for local Kubernetes development?

  • These six integrations show that Microsoft is serious about Spring Boot support in Azure

    Microsoft doesn’t play favorites. Oh sure, they heavily promote their first party products. But after that, they typically take a big-tent, welcome-all-comers approach and rarely call out anything as “the best” or “our choice.” They do seem to have a soft spot for Spring, though. Who can blame them? You’ve got millions of Java/Spring developers out there, countless Spring-based workloads in the wild, and 1.6 million new projects created each month at start.spring.io. I’m crazy enough to think that whichever vendor attracts the most Spring apps will likely “win” the first phase of the public cloud wars.

    With over a dozen unique integrations between Spring projects and Azure services, the gang in Redmond has been busy. A handful stand out to me, although all of them make a developer’s life easier.

    #6 Azure Functions

    I like Azure Functions. There’s not a lot extra machinery—such as API gateways—you have to figure out to use it. The triggers and bindings model are powerful. And it supports lots of different programming languages.

    While many (most?) developers are polyglot and comfortable switching between languages, it’d make sense if you want to keep your coding patterns and tooling the same as you adopt a new runtime like Azure Functions. The Azure team worked with the Spring team to ensure that  developers could take advantage of Azure Functions, while still retaining their favorite parts of Spring. Specifically, they partnered on the adapter that wires up Azure’s framework into the user’s code, and testing of the end-to-end experience. The result? A thoughtful integration of Spring Cloud Functions and Azure Functions that gives you the best of both worlds. I’ve seen a handful of folks offer guidance, and tutorials. And Microsoft offers a great guide.

    Always pick the right language based on performance needs, scale demands, etc. Above all else, you may want to focus on developer productivity, and using the language/framework that’s best for your team. Your productivity (or lack thereof) is more costly than any compute infrastructure!

    #5 Azure Service Bus and Event Hubs

    I’m a messaging geek. Connecting systems together is an underrated, but critically valuable skill. I’ve written a lot about Spring Cloud Stream in the past. Specifically, I’ve shown you how to use it with Azure Event Hubs, and even the Kafka interface.

    Basically, you can now use Microsoft’s primary messaging platforms—Service Bus Queues, Service Bus Topics, Event Hubs—as the messaging backbone of a Spring Boot app. And you can do all that, without actually learning the unique programming models of each platform. The Spring Boot developer writes platform-agnostic code to publish messages to subscribe to messages, and the Spring Cloud Stream objects take care of the rest.

    Microsoft has guides for working with Service BusEvent Hubs, and Event Hubs Kafka API. When you’re using Azure messaging services, I’m hard pressed to think of any easier way to interact with them than Spring Boot.

    #4 Azure Cosmos DB

    Frankly, all the database investment’s by Microsoft’s Java/Spring team have been impressive. You can cleanly interact with their whole suite of relational databases with JDBC and JPA via Spring Data.

    I’m more intrigued by their Cosmos DB work. Cosmos DB is Microsoft’s global scale database service that serves up many different APIs. Want a SQL API? You got it. How about a MongoDB or Cassandra facade? Sure. Or maybe a graph API using Gremlin? It’s got that too.

    Spring developers can use Microsoft-created SDKs for any of it. There’s a whole guide for using the SQL API. Likewise, Microsoft created walkthroughs for Spring devs using CassandraMongo, or Gremlin APIs. They all seem to be fairly expressive and expose the core capabilities you want from a Cosmos DB instance. 

    #3 Azure Active Directory B2C

    Look, security stuff doesn’t get me super pumped. Of course it’s important. I just don’t enjoy coding for it. Microsoft’s making it easier, though. They’ve got a Spring Boot Starter just for Azure Key Vault, and clean integration with Azure Active Directory via Spring Security. I’m also looking forward to seeing managed identities in these developer SDKs.

    I like the support for Azure Active Directory B2C. This is a standalone Azure service that offer single sign-on using social or other 3rd party identities. Microsoft claims it can support millions of users, and billions of authentication requests. I like that Spring developers have such a scalable service to seamlessly weave into their apps. The walkthrough that Microsoft created is detailed, but straightforward. 

    My friend Asir also presented this on stage with me at SpringOne last year in Austin. Here’s the part of the video where he’s doing the identity magic:

    #2 Azure App Configuration

    When you’re modernizing an app, you might only be aiming for one or two factors. Can you gracefully restart the thing, and did you yank configuration out of code? Azure App Configuration is a new service that supports the latter.

    This service is resilient, and supports labeling, queryingencryption, and event listeners. And Spring was one of the first things they announced support for. Spring offers a robust configuration subsystem, and it looks like Azure App Configuration slides right in. Check out their guide to see how to tap into cloud-stored config values, whether your app itself is in the cloud, or not.

    #1 Azure Spring Cloud

    Now, I count about a dozen ways to run a Java app on Azure today. You’re not short of choices. Why add another? Microsoft saw demand for a Spring-centric runtime that caters to microservices using Spring Cloud. Azure Spring Cloud will reach General Availability soon, so I’m told, and offers features like config management, service discovery, blue/green deployments, integrated monitoring, and lots more. I’ve been playing with it for a while, and am impressed with what’s possible.

    These integrations help you stitch together some pretty cool Azure cloud services into a broader Spring Boot app. That makes sense, when you consider what Spring Boot lead Phil Webb said at SpringOne a couple years back:

    “A lot of people think that Spring is a dependency injection framework … Spring is more of an integration framework. It’s designed to take lots of different technologies that you might want to use and allow you to combine them in ways that feel nature.”