Category: SOA

  • Orchestrating the Cloud: Part II – Creating and Consuming a Salesforce.com Service From BizTalk Server

    In my previous post, I explained my cloud orchestration scenario where my on-premises ESB coordinated calls to the Google App Engine, Salesforce.com and a local service, and returned a single data entity to a caller.  That post looked at creating and consuming a Google App Engine service from BizTalk.

    In this post, I’ll show you how to customize a data object in Force.com, expose that object via a web service, and invoke that from BizTalk Server.  As a ridiculously short primer, SalesForce.com is considered the premier SaaS CRM product which provides sales force automation and customer service modules serving both large and small organizations alike.  Underlying SalesForce.com is a scalable robust platform (Force.com) which can be used to build all sorts of data-driven applications. You can leverage the apps built by others through the AppExchange which lists a diverse range of applications built on Force.com.

    Ok, enough of a sales job.  First off, I signed up for a free Force.com account.  I’m going to extend the out-of-the-box “Contact” object by adding a few new fields.  The “Setup” section of my Force.com application provides me access to a host of options to create new things, customize existing things and turn all sorts of knobs that enable rich functionality.  Here I browsed to the “Contact” object and chose “Fields”.

    2009.10.07force01

    Next I created a few custom fields to hold a global identifier (across all my CRM applications), a contact preference and a list of technology interests of the contact.

    2009.10.07force02

    I then navigate to my “Contacts” page and see my custom fields on the screen.  I can move then anywhere on the screen that I like using an easy-to-use drag-and-drop interface.

    2009.10.07force03

    Now that my data object is complete, I want to create a web service that lets my on-premises ESB retrieve customers based on their Global ID.  Back within the Force.com “Setup” screens I chose to Develop a new Apex class.  Note that Apex is the C#/Java-like language used to write code for Force.com.

    2009.10.07force04

    My class, named CRMCustomer has a web service operation identified where I lookup the contact with the ID matching the service’s input parameter, and then deliver a subset of the full Contact object back to the service caller.  If you look closely you can see that some fields have a “__c” after the field name to designate them as custom.

    2009.10.07force05

    If my class is written successfully, I’ll see an entry in my list of classes.  Note that my class now has a “WSDL” link next to it.

    2009.10.07force06

    Ok, now I have the object and service that I need for BizTalk to call this Force.com service.  But, I still need to retrieve my service definition.  First, I clicked this WSDL link next to my Apex class and saved the WSDL to my BizTalk machine.  Every time that I call the Force.com service I need to pass an access token in the header.  The header definition can be found in the Enterprise WSDL, which I also saved to my BizTalk machine.

    2009.10.07force07

    I made a choice to cache the temporary Force.com access token so that each call to my custom service wouldn’t have to do two invocations.  I accomplished this by building a singleton class which expires its token and reacquires a new one every hour.  That class library project has a reference to the Salesforce.com Enterprise WSDL.

    [Serializable]
        public static class ForceToken
        {
            private static DateTime _sessionDate = DateTime.Now;
            private static string _sessionId = string.Empty;
            public static string SessionId
            {
                get { return GetSession(); }
            }
            private static string GetSession()
            {
                DateTime now = DateTime.Now;
                TimeSpan diff = now.Subtract(_sessionDate);
                if (_sessionId == string.Empty || (diff.TotalMinutes > 60))
                {
                    //TODO lock object during update
                    //refresh token
                    System.Diagnostics.EventLog.WriteEntry("Utilities", "Salesforce.com Session Refresh");
                    string uname = "<sf account>";
                    string password = "<sf password>";
                    string securityToken = "<sf token>";
                    SFSvcRef.SforceService proxy = new SFSvcRef.SforceService();
                    proxy.Url = "https://www.salesforce.com/services/Soap/c/16.0";
                    SFSvcRef.LoginResult result = proxy.login(uname, password + securityToken);
                    _sessionId = result.sessionId;
                }
                return _sessionId;
            }
        }

    Within my actual BizTalk project, I added a service reference to the Force.com custom WSDL that was saved to my machine.  Lots of things come in, including the definition of the session header and my modified Contact object.

    2009.10.07force08

    Notice that the response object holds my custom fields such as “Contact Preference.”

    2009.10.07force09

    I’m using an orchestration to first get the access token from my singleton, and then put that token into the WCF header of the outbound message.

    2009.10.07force10

    Inside the Assignment shape is the simple statement that populates the SOAP header of my Force.com service call.

    CRMCustomer_Request(WCF.Headers) = "<headers><SessionHeader><sessionId>"+ Seroter.SwedenUG.Utilities.ForceToken.SessionId +"</sessionId></SessionHeader></headers>";

    My send port was created automatically from the binding file produced when importing the Force.com custom WSDL.  This WCF-Custom send port uses the basicHttp binding to call the endpoint.

    2009.10.07force12

    Once I send a message to my orchestration which contains the “global ID” of the record that I’m looking for, the Force.com service is called and my record is returned.

    2009.10.07force11

    Cool.  That’s a live record in my Force.com application (shown in a screenshot earlier) and can be pulled on-demand via my service.

    So what we know now?

    • Easy to set up a Force.com account
    • There is a straightforward interface to customize objects and build web services
    • BizTalk needs to request a time-limited token for it service calls so a singleton can introduce some efficiency
    • You can add the session header to the outbound message via a WCF context property accessor in an orchestration

    Next up, I’ll show how I tie all this together with an web application hosted in Amazon.com’s EC2 environment and leveraging the Azure .NET Service Bus to communicate between Amazon’s public cloud and my on-premise ESB.

    Share

  • Orchestrating the Cloud : Part I – Creating and Consuming A Google App Engine Service From BizTalk Server

    I recently wrote about my trip to Stockholm where I demonstrated some scenarios showing how I could leverage my onsite ESB in a cloud-focused solution.  The first scenario I demonstrated was using BizTalk Server 2009 to call a series of cloud services and return the result of that orchestrated execution back to a web application hosted in the Amazon.com EC2 cloud.  This series of blog posts will show how I put each piece of this particular demonstration together.

    2009_09_21cloud01

    In this first post, I’ll show how I created a Python web application in the Google App Engine which allows me to both add/delete data via a web UI and provides a POX web service for querying data.  I’ll then call this application from BizTalk Server to extract relevant data.

    As you’d expect, the initial step was to build the Google App Engine web app.  First, you need to sign up for a (free) Google App Engine account.  Then, if you’re like me and building a Python app (vs. Java) you can go here and yank all the necessary SDKs.  You get a local version of the development sandbox so that you can fully test your application before deploying it to the Google cloud.

    Let’s walk through the code I built.  As a disclaimer, I learned Python solely for this exercise, and I’m sure that my code reflects the language maturity of a fetus.  Whatever, it works.  Don’t judge me.  But either way, note that there are probably better ways to do what I’ve done, but I couldn’t find them.

    First off, I have some import statements to libraries I’ll use within my code.

    import cgi
    from google.appengine.ext import webapp
    from google.appengine.ext.webapp.util import run_wsgi_app
    from google.appengine.ext import db
    from xml.dom import minidom
    from xml.sax.saxutils import unescape

    Next I defined a “customer” object which represents the data I wish to stash in the Datastore.

    #customer object definition
    class Customer(db.Model):
        userid = db.StringProperty()
        firstname = db.StringProperty()
        lastname = db.StringProperty()
        currentbeta = db.StringProperty()
        betastatus = db.StringProperty()
        dateregistered = db.StringProperty()

    At this point, I’m ready for the primary class which is responsible for drawing the HTML page where I can add/delete new records to my application. First I define the class and write out the header of the page.

    #main class
    class MainPage(webapp.RequestHandler):
        def get(self):
            #header HTML
            self.response.out.write('<html><head><title>Vandelay Industries Beta Signup Application</title>')
            self.response.out.write('<link type=\"text/css\" rel=\"stylesheet\" href=\"stylesheets/appengine.css\" /></head>')
    
            self.response.out.write('<body>')
            self.response.out.write('<table class=\"masterTable\">')
    
            self.response.out.write('<tr><td rowspan=2><img src=\"images/vandsmall.png\"></td>')
    
            self.response.out.write('<td class=\"appTitle\">Beta Technology Sign Up Application</td></tr>')
    
            self.response.out.write('<tr><td class=\"poweredBy\">Powered by Google App Engine<img src=\"images/appengine_small.gif\"></td></tr>')
    

    Now I want to show any existing customers stored in my system.  Before I do my Data Store query, I write the table header.

    #show existing customer section
            self.response.out.write('<tr><td colspan=2>')
            self.response.out.write('<hr width=\"75%\" align=\"left\">')
    
            self.response.out.write('<span class=\"sectionHeader\">Customer List</span>')
    
            self.response.out.write('<hr width=\"75%\" align=\"left\">')
    
            self.response.out.write('<table class=\"customerListTable\">')
    
            self.response.out.write('<tr>')
            self.response.out.write('<td class=\"customerListHeader\">ID</td>')
    
            self.response.out.write('<td class=\"customerListHeader\">First Name</td>')
    
            self.response.out.write('<td class=\"customerListHeader\">Last Name</td>')
    
            self.response.out.write('<td class=\"customerListHeader\">Current Beta</td>')
    
            self.response.out.write('<td class=\"customerListHeader\">Beta Status</td>')
    
            self.response.out.write('<td class=\"customerListHeader\">Date Registered</td>')
    
            self.response.out.write('</tr>')

    Here’s the good stuff.  Relatively.  I query the Datastore using a SQL-like syntax called GQL and then loop through the results and print each returned record.

    #query customers from database
           customers = db.GqlQuery('SELECT * FROM Customer')
           #add each customer to page
           for customer in customers:
               self.response.out.write('<tr>')
               self.response.out.write('<td class=\"customerListCell\">%s</td>' % customer.userid)
    
               self.response.out.write('<td class=\"customerListCell\">%s</td>' % customer.firstname)
    
               self.response.out.write('<td class=\"customerListCell\">%s</td>' % customer.lastname)
    
               self.response.out.write('<td class=\"customerListCell\">%s</td>' % customer.currentbeta)
    
               self.response.out.write('<td class=\"customerListCell\">%s</td>' % customer.betastatus)
    
               self.response.out.write('<td class=\"customerListCell\">%s</td>' % customer.dateregistered)
    
               self.response.out.write('</tr>')
           self.response.out.write('</table><br/><br />')
           self.response.out.write('</td></tr>')

    I then need a way to add new records to the application, so here’s a block that defines the HTML form and input fields that capture a new customer.  Note that my form’s “action” is is set to “/Add”.

    #add customer entry section
            self.response.out.write('<tr><td colspan=2>')
            self.response.out.write('<hr width=\"75%\" align=\"left\">')
    
            self.response.out.write('<span class=\"sectionHeader\">Add New Customer</span>')
    
            self.response.out.write('<hr width=\"75%\" align=\"left\">')
    
            self.response.out.write('<form action="/Add" method="post">')
            self.response.out.write('<table class=\"customerAddTable\">')
    
            self.response.out.write('<tr><td class=\"customerAddHeader\">ID:</td>')
    
            self.response.out.write('<td class=\"customerListCell\"><input type="text" name="userid"></td></tr>')
    
            self.response.out.write('<tr><td class=\"customerAddHeader\">First Name:</td>')
    
            self.response.out.write('<td class=\"customerListCell\"><input type="text" name="firstname"></td></tr>')
    
            self.response.out.write('<tr><td class=\"customerAddHeader\">Last Name:</td>')
    
            self.response.out.write('<td class=\"customerListCell\"><input type="text" name="lastname"></td></tr>')
    
            self.response.out.write('<tr><td class=\"customerAddHeader\">Current Beta:</td>')
    
            self.response.out.write('<td class=\"customerListCell\"><input type="text" name="currentbeta"></td></tr>')
    
            self.response.out.write('<tr><td class=\"customerAddHeader\">Beta Status:</td>')
    
            self.response.out.write('<td class=\"customerListCell\"><input type="text" name="betastatus"></td></tr>')
    
            self.response.out.write('<tr><td class=\"customerAddHeader\">Date Registered:</td>')
    
            self.response.out.write('<td class=\"customerListCell\"><input type="text" name="dateregistered"></td></tr>')
    
            self.response.out.write('</table>')
            self.response.out.write('<input type="submit" value="Add Customer">')
            self.response.out.write('</form><br/>')
            self.response.out.write('</td></tr>')

    Finally, I have an HTML form for a delete behavior which has an action of “/Delete.”

    #delete all section
            self.response.out.write('<tr><td colspan=2>')
            self.response.out.write('<hr width=\"75%\" align=\"left\">')
    
            self.response.out.write('<span class=\"sectionHeader\">Delete All Customer</span>')
    
            self.response.out.write('<hr width=\"75%\" align=\"left\">')
    
            self.response.out.write('<form action="/Delete" method="post"><div><input type="submit" value="Delete All Customers"></div></form>')
            self.response.out.write('</td></tr>')
            self.response.out.write('</table>')
            #self.response.out.write('')
            #write footer
            self.response.out.write('</body></html>')

    The bottom of my “.py” file has the necessary setup declarations to fire up my default class and register behaviors.

    #setup
    application = webapp.WSGIApplication([('/', MainPage)],debug=True)
    def main():
        run_wsgi_app(application)
    if __name__ == "__main__":
        main()

    If I open a DOS prompt, navigate to the parent folder of my solution (and assuming I have a valid app.yaml file that points at my .py file), I can run the dev_appserver.py serotercustomer/ command and see a local, running instance of my web app.

    2009.10.01gae01

    Cool.  Of course I still need to wire the events up for adding, deleting and getting a customer.  For the “Add” operation, I create a new “customer” object, and populate it with values from the form submitted on the default page.  After calling the “put” operation on the object (which adds it to the Datastore), I jump back to the default HTML page.

    #add customer action class
    class AddCustomer(webapp.RequestHandler):
        def post(self):
            customer = Customer()
            customer.firstname = self.request.get('firstname')
            customer.lastname = self.request.get('lastname')
            customer.userid = self.request.get('userid')
            customer.currentbeta = self.request.get('currentbeta')
            customer.betastatus = self.request.get('betastatus')
            customer.dateregistered = self.request.get('dateregistered')
            #store customer
            customer.put()
            self.redirect('/')

    My “Delete” is pretty coarse as all it does is delete every customer object from the Datastore.

    #delete customer action class
    class DeleteCustomer(webapp.RequestHandler):
        def post(self):
            customers = db.GqlQuery('SELECT * FROM Customer')
            for customer in customers:
                customer.delete()
            self.redirect('/')

    The “Get” operation is where I earn my paycheck.  This “Get” is called via a system (i.e. not the user interface) so it needs to accept XML in, and return XML back.  So what I do is take the XML I received into the HTTP POST command, unescape it, load it into an XML DOM, and pull out the “customer ID” node value.  I then execute some GQL using that customer ID and retrieve the corresponding record from the Datastore.  I inflate an XML string, load it back into a DOM object, and return that to the caller.

    #get customer action class
    class GetCustomer(webapp.RequestHandler):
        def post(self):
            #read inbound xml
            xmlstring = self.request.body
            #unescape to XML
            xmlstring2 = unescape(xmlstring)
            #load into XML DOM
            xmldoc = minidom.parseString(xmlstring)
            #yank out value
            idnode = xmldoc.getElementsByTagName("userid")
            userid = idnode[0].firstChild.nodeValue
            #find customer
            customers = db.GqlQuery('SELECT * FROM Customer WHERE userid=:1', userid)
            customer = customers.get()
            lastname = customer.lastname
            firstname = customer.firstname
            currentbeta = customer.currentbeta
            betastatus = customer.betastatus
            dateregistered = customer.dateregistered
            #build result
            responsestring = """"" % (userid, firstname, lastname, currentbeta, betastatus, dateregistered)
            <CustomerDetails>
                <ID>%s</ID>
                <FirstName>%s</FirstName>
                <LastName>%s</LastName>
                <CurrentBeta>%s</CurrentBeta>
                <BetaStatus>%s</BetaStatus>
                <DateRegistered>%s</DateRegistered>
            </CustomerDetails>
            "
    
            #parse result
            xmlresponse = minidom.parseString(responsestring)
            self.response.headers['Content-type'] = 'text/xml'
            #return result
            self.response.out.write(xmlresponse.toxml())

    Before running the solution again, I need to update my “setup” statement to register the new commands (“/Add”, “/Delete”, “/Get”).

    #setup
    application = webapp.WSGIApplication([('/', MainPage),
                                          ('/Add', AddCustomer),
                                          ('/Delete', DeleteCustomer),
                                          ('/Get', GetCustomer)],
                                         debug=True)

    Coolio.  If I run my web application now, I can add and delete records and any records in the store show up in the page.  Now I can deploy my app to the Google cloud using the the console or the new deployment application.  I then added a few sample records that I could use BizTalk to lookup later.

    2009.10.01gae05

    The final thing to do is have BizTalk call my POX web service.  In my new BizTalk project, I built a schema for the service request.  Remember that all it needs to contain is a customer ID.  Also note that my Google App Engine XML is simplistic and contains no namespaces.  That’s no problem for a BizTalk schema.  Neither of my hand-built Google App Engine XSDs have namespaces defined.  Here is my service request schema:

    2009.10.01gae02

    The POX service response schema reflects the XML structure that my service returns.

    2009.10.01gae03

    Now that I have this, I decided to use a solicit-response BizTalk HTTP adapter to invoke my service.  The URL of my service was: http://<my app name>.appspot.com/Get which leverages the “Get” operation that will accepts the HTTP post request.

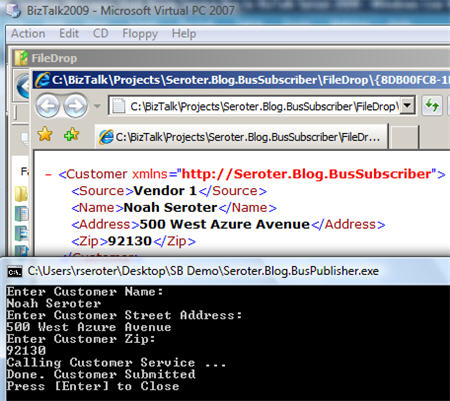
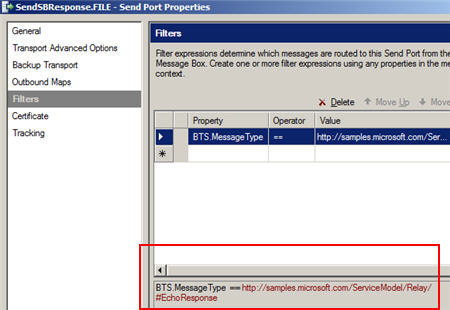
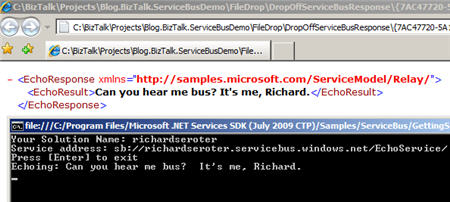
    Since I don’t have an orchestration yet, I can just use a messaging scenario and have a FILE send port that subscribes on the response from the solicit-response HTTP port.  When I send in a file with a valid customer ID, I end up with a full response back from my POX web service.

    2009.10.01gae04

    So there you go.  Creating a POX web service in the Google App Engine and using BizTalk Server to call it.  Next up, using BizTalk to extract data from a SalesForce.com instance.

    Share

  • Sweden UG Visit Wrap Up

    Last week I had the privilege of speaking at the BizTalk User Group Sweden.  Stockholm pretty much matched all my assumptions: clean, beautiful and full of an embarrassingly high percentage of good looking people.  As you can imagine, I hated every minute of it.

    While there, I first did a presentation for Logica on the topic of cloud computing.  My second presentation was for the User Group and was entitled BizTalk, SOA, and Leveraging the Cloud.  In it, I took the first half to cover tips and demonstrations for using BizTalk in a service-oriented way.  We looked at how to do contract-first development, asynchronous callbacks using the WCF wsdualHttpBinding, and using messaging itineraries in the ESB Toolkit.

    During the second half the User Group presentation, I looked at how to take service oriented patterns and apply them to BizTalk integration with the cloud.  I showed how BizTalk can consume cloud services through the Azure .NET Service Bus and how BizTalk could expose its own endpoints through the Azure .NET Service Bus.  I then showed off a demo that I spent a couple months putting together which showed how BizTalk could orchestrate cloud services.  The final solution looked like this:

    What I have here is (a) a POX web service written in Python hosted in the Google App Engine, (b) a Force.com application with a custom web service defined and exposed, (c) a BizTalk Server which orchestrates calls to Google, Force.com and an internal system and aggregates a single “customer” object, (d) an endpoint hosted in the .NET Service Bus which exposes my ESB to the cloud and (e) a custom web application hosted in an Amazon.com EC2 instance which requests a specific “customer” through the .NET Service Bus to BizTalk Server.  Shockingly, this all works pretty well.  It’s neat to see so many independent components woven together to solve a common goal.

    I’m debating whether or not to do a short blog series showing how I built each component of this cloud orchestration solution.  We’ll see.

    The user group presentation should be up on Channel 9 in a couple weeks if you care to take a look.  If you get the chance to visit this user group as an attendee or speaker, don’t hesitate to do so.  Mikael and company are a great bunch of people and there’s probably no higher quality concentration of BizTalk folks in the world.


    Share

  • Sending Messages From Azure Service Bus to BizTalk Server 2009

    In my last post, I looked at how BizTalk Server 2009 could send messages to the Azure .NET Services Service Bus.  It’s only logical that I would also try and demonstrate integration in the other direction: can I send a message to a BizTalk receive location through the cloud service bus?

    Let’s get started.  First, I need to define the XSD schema which reflects the message I want routed through BizTalk Server.  This is a painfully simple “customer” schema.

    Next, I want to build a custom WSDL which outlines the message and operation that BizTalk will receive.  I could walk through the wizards and the like, but all I really want is the WSDL file since I’ll pass this off to my service client later on.  My WSDL references the previously built schema, and uses a single message, single port and single service.

    <?xml version="1.0" encoding="utf-8"?>
    <wsdl:definitions name="CustomerService"
                 targetNamespace="http://Seroter.Blog.BusSubscriber"
                 xmlns:wsdl="http://schemas.xmlsoap.org/wsdl/"
                 xmlns:soap="http://schemas.xmlsoap.org/wsdl/soap/"
                 xmlns:tns="http://Seroter.Blog.BusSubscriber"
                 xmlns:xsd="http://www.w3.org/2001/XMLSchema">
      <!-- declare types-->
      <wsdl:types>
        <xsd:schema targetNamespace="http://Seroter.Blog.BusSubscriber">
          <xsd:import
    	schemaLocation="http://rseroter08:80/Customer_XML.xsd"
    	namespace="http://Seroter.Blog.BusSubscriber" />
        </xsd:schema>
      </wsdl:types>
      <!-- declare messages-->
      <wsdl:message name="CustomerMessage">
        <wsdl:part name="part" element="tns:Customer" />
      </wsdl:message>
      <wsdl:message name="EmptyResponse" />
      <!-- decare port types-->
      <wsdl:portType name="PublishCustomer_PortType">
        <wsdl:operation name="PublishCustomer">
          <wsdl:input message="tns:CustomerMessage" />
          <wsdl:output message="tns:EmptyResponse" />
        </wsdl:operation>
      </wsdl:portType>
      <!-- declare binding-->
      <wsdl:binding
    	name="PublishCustomer_Binding"
    	type="tns:PublishCustomer_PortType">
        <soap:binding transport="http://schemas.xmlsoap.org/soap/http"/>
        <wsdl:operation name="PublishCustomer">
          <soap:operation soapAction="PublishCustomer" style="document"/>
          <wsdl:input>
            <soap:body use ="literal"/>
          </wsdl:input>
          <wsdl:output>
            <soap:body use ="literal"/>
          </wsdl:output>
        </wsdl:operation>
      </wsdl:binding>
      <!-- declare service-->
      <wsdl:service name="PublishCustomerService">
        <wsdl:port
    	binding="PublishCustomer_Binding"
    	name="PublishCustomerPort">
          <soap:address
    	location="http://localhost/Seroter.Blog.BusSubscriber"/>
        </wsdl:port>
      </wsdl:service>
    </wsdl:definitions>

    Note that the URL in the service address above doesn’t matter.  We’ll be replacing this with our service bus address.  Next (after deploying our BizTalk schema), we should configure the service-bus-connected receive location.  We can take advantage of the WCF-Custom adapter here.

    First, we set the Azure cloud address we wish to establish.

    Next we set the binding, which in our case is the NetTcpRelayBinding.  I’ve also explicitly set it up to use Transport security.

    In order to authenticate with our Azure cloud service endpoint, we have to define our security scheme.  I added an TransportClientEndpointBehavior and set it to use UserNamePassword credentials.  Then, don’t forget to click the UserNamePassword node and enter your actual service bus credentials.

    After creating a send port that subscribes on messages to this port and emits them to disk, we’re done with BizTalk.  For good measure, you should start the receive location and monitor the event log to ensure that a successful connection is established.

    Now let’s turn our attention to the service client.  I added a service reference to our hand-crafted WSDL and got the proxy classes and serializable types I was after.  I didn’t get much added to my application configuration, so I went and added a new service bus endpoint whose address matches the cloud address I set in the BizTalk receive location.

    You can see that I’ve also chosen a matching binding and was able to browse the contract by interrogating the client executable.  In order to handle security to the cloud, I added the same TransportClientEndpointBehavior to this configuration file and associated it with my service.

    All that’s left is to test it.  To better simulate the cloud experience, I gone ahead and copied the service client to my desktop computer and left my BizTalk Server running in its own virtual machine.  If all works right, my service client should successfully connect to the cloud, transmit a message, and the .NET Service Bus will redirect (relay) that message, securely, to the BizTalk Server running in my virtual machine.  I can see here that my console app has produced a message in the file folder connected to BizTalk.

    And opening the message shows the same values entered in the service client’s console application.

    Sweet.  I honestly thought connecting BizTalk bi-directionally to Azure services was going to be more difficult.  But the WCF adapters in BizTalk are pretty darn extensible and easily consume these new bindings.  More importantly, we are beginning to see a new set of patterns emerge for integrating on-premises applications through the cloud.  BizTalk may play a key role in receive from, sending to, and orchestrating cloud services in this new paradigm.

    Technorati Tags: , , ,

    Share

  • Securely Calling Azure Service Bus From BizTalk Server 2009

    I just installed the July 2009 .NET Services SDK and after reviewing it for changes, I started wondering how I might call a cloud service from BizTalk using the out-of-the-box BizTalk adapters.  While I showed in a previous blog how to call .NET Services service anonymously, that isn’t practical for most scenarios.  I want to SECURELY call an Azure cloud service from BizTalk.

    If you’re familiar with the “Echo” sample for the .NET Service Bus, then you know that the service host authenticates with the bus via inline code like this:

    // create the credentials object for the endpoint
    TransportClientEndpointBehavior userNamePasswordServiceBusCredential =
       new TransportClientEndpointBehavior();
    userNamePasswordServiceBusCredential.CredentialType =
        TransportClientCredentialType.UserNamePassword;
    userNamePasswordServiceBusCredential.Credentials.UserName.UserName =
        solutionName;
    userNamePasswordServiceBusCredential.Credentials.UserName.Password =
        solutionPassword;

    While that’s ok for the service host, BizTalk would never go for that (without a custom adapter). I need my client to use configuration-based credentials instead.  To test this out, try removing the Echo client’s inline credential code and adding a new endpoint behavior to the configuration file:

    <endpointBehaviors>
      <behavior name="SbEndpointBehavior">
        <transportClientEndpointBehavior credentialType="UserNamePassword">
           <clientCredentials>
              <userNamePassword userName="xxxxx" password="xxxx" />
           </clientCredentials>
         </transportClientEndpointBehavior>
       </behavior>
    </endpointBehaviors>

    Works fine. Nice.  So that proves that we can definitely take care of credentials outside of code, and thus have an offering that BizTalk stands a chance of calling securely.

    With that out of the way, let’s see how to actually get BizTalk to call a cloud service.  First, I need my metadata to call the service (schemas, bindings).  While I could craft these by hand, it’s convenient to auto-generate them.  Now, to make life easier (and not have to wrestle with code generation wizards trying to authenticate with the cloud), I’ve rebuilt my Echo service to run locally (basicHttpBinding).  I did this by switching the binding, adding a base URI, adding a metadata behavior, and commenting out any cloud-specific code from the service.  Now my BizTalk project can use the Consume Adapter Service wizard to generate metadata.

    I end up with a number of artifacts (schemas, bindings, orchestration with ports) including the schema which describes the input and output of the .NET Services Echo sample service.

    After flipping my Echo service back to the Cloud-friendly configuration (including the netTcpRelayBinding), I deployed the BizTalk solution.  Then, I imported the (custom) binding into my BizTalk application.  Sure enough, I get a send port added to my application.

    First thing I do is switch the address of my service to the valid .NET Services Bus URI.

    Next, on the Bindings tab, I switch to the netTcpRelayBinding.

    I made sure my security mode was set to “Transport” and used the RelayAccessToken for its RelayClientAuthenticationType.

    Now, much my like my updated client configuration above, I need to add an endpoint behavior to my BizTalk send port configuration so that I can provide valid credentials to the service bus.  Now the WCF Configuration Editor within Visual Studio didn’t seem to provide me a way to add those username and password values; I had to edit the XML configuration manually.  So, I expected that the BizTalk adapter configuration would be equally deficient and I’d have to create a custom binding and hope that BizTalk accepted it.  However, imagine my surprise when I saw that BizTalk DID expose those credential fields to me!

    I first had to add a new endpoint behavior of type transportClientEndpointBehavior.  Then, set its credentialType attribute to UserNamePassword.

    Then, click the ClientCredential type we’re interested in (UserNamePassword) and key in the data valid to the .NET Services authentication service.

    After that, I added a subscription and saved the send port. Next I created a new send port that would process the Echo response.  I subscribed on the message type of the cloud service result.

    Now we’re ready to test this masterpiece.  First, I fired up the Echo service and ensured that it was bound to the cloud.  The image below shows that my service host is running locally, and the public service bus has my local service in its registry.  Neato.

    Now for magic time.  Here’s the message I’ll send in:

    If this works, I should see a message printed on my service host’s console, AND, I should get a message sent to disk.  What happens?


    I have to admit that I didn’t think this would work.  But, you would have never read my blog again if I had strung you along this far and showed you a broken demo.   Disaster averted.

    So there you have it.  I can use BizTalk Server 2009 to SECURELY call the Service Bus from the Azure .NET Services offering which means that I am seamlessly doing integration between on-premises offerings via the cloud.  Lots and lots of use cases (and more demos from me) on this topic.

    Technorati Tags: , , ,

    Share

  • My ESB Toolkit Webcast is Online

    That Alan Smith is always up to something.  He’s just created a new online community for hosting webcasts about Microsoft technologies (Cloud TV).  It’s mainly an excuse for him to demonstrate his mastery of Azure.  Show off.  Anyway, I recently produced a webcast on the ESB Toolkit 2.0 for Mick Badran Productions, and we’ve uploaded that to Alan’s site.

    It’s about 20 minutes or so, and it covers why the need for the Toolkit arose, what the core services are, and some demonstrations of the core pieces (including the Management Portal).  It was fun to put together, and I did my best to keep it free of gratuitous swearing and vaguely suggestive comments.

    While you’re on Alan’s site, definitely check out a few more of the webcasts.  I’ll personally be watching a number of them including Kent’s session about the SAP adapter, Thiago’s session on the SQL adapter, plus other ones on Oslo, M and Dublin.

    Technorati Tags:

  • Books I’ve Recently Finished Reading

    Other obligations have quieted down over the past two months and I’ve been able to get back to some voracious reading.  I thought I’d point out a few of the books that I’ve recently knocked out, and let you know what I think of them.

    • SOA Governance.  This is a book from Todd Biske and published by my book’s publisher, Packt.  It follows a make-believe company through their efforts to establish SOA best practices at their organization.  Now, that doesn’t mean that the book reads like a novel, but, this isn’t a “reference book” to me as much as an “ideas” book.  When I finished it, I had a better sense of the behavioral changes, roles required and processes that I should consider when evangelizing SOA behavior in my own company.  Todd does a good job identifying the underlying motivations of the people that will enable SOA to succeed or fail within a company.  You’ll find some useful thinking around identifying the “right” services, versioning considerations, SLA definition, and even some useful checklists to verify if you’re asking the right questions at each phase of the service lifecycle.  Whether you’re “doing SOA” or not, this is a easy read that can help you better digest the needs of stakeholders in an enterprise software solution.
    • Mashup Patterns : Designs and Examples for the Modern Enterprise.  I’ve been spending a fair amount of time digging into mashups lately, and it was great to see a book on the topic come out.  The author breaks down the key aspects of designing a mashup (harvesting data, enriching data, assembling results and managing the deliverable).  Each of the 30+ patterns is comprised of: (a) a problem statement that describes the issue at hand, (b) a conceptual solution to the problem, (c) a “fragility score” which indicates how brittle the solution is, (d) and finally 2 or more examples where this solution is applied to a very specific case.  The examples for each pattern are where I found the most value.  This helped drive home the problem being solved and provided a bit more meat on the conceptual solution being offered.  That said, don’t expect this book to tell you WHAT can help you create these solutions.  There is very much the tone of “we just need to get this data from here, combine it with this, and even our business analyst can do it!” However, nowhere does the author dig into how all this MAGIC really happens (e.g. products, tools, etc).  That was the only weakness of the book to me.  Otherwise, this was quite a well put together book that added a few things to my arsenal of options when architecting solutions.
    • Thank You for Arguing: What Aristotle, Lincoln, and Homer Simpson Can Teach Us About the Art of Persuasion.  I really enjoyed reading this.  In essence, it’s a look at the lost art of rhetoric and covers a wide set of tools we can use to better frame an argument and win it.  The author has a great sense of humor and I found myself actually taking notes while reading the book (which I never really do).  There are a mix of common sense techniques for setting up your own case, but I also found the parts outlining how to spot a bad argument quite interesting.  So, if you want to get noticeably better at persuading others and also become more effective at identifying when someone’s trying to bamboozle you, definitely pick this up.
    • Leaving Microsoft to Change the World.  A co-worker suggested this book to me.  It’s the story of John Wood, a former Microsoft executive during the 90s glory days, who chucked his comfortable lifestyle and started a non-profit organization (Room to Read) with the mission of improving education in the poorest countries in the world.  John’s epiphany came during a backpacking trip through Nepal and seeing the shocking lack of reading materials available to kids who desperately wanted to learn and lift themselves out of poverty.  Even if the topic doesn’t move you, this book has a fascinating look at how to start up a global organization with a focused objective and a shoestring budget.  This is one of those “perspective books” that I try and make sure I read from time to time.
    • Microsoft .NET: Architecting Applications for the Enterprise.  I actually had this book sent to me by a friend at Microsoft.  Authored by Dino Esposito and Andrea Saltarello, this is an excellent look at software architecture.  It starts off with a very clear summary of what architecture really is, and raised  a point that struck home for me: architecture should be about the “hard decisions.”  An architect isn’t going to typically get into the weeds on every project, but instead should be seeking out the trickiest or most critical parts of a proposed solution and focus their energies there.  The book contains a good summary of core architecture patterns and spends much of the time digging into how to design a business layer, data access layer, service layer, and presentation layer.  Clearly this book has a Microsoft bent, but, don’t discount it as a valid introduction to architecture for any technologist.  They address a wide set of core principles that are technology agnostic in a well-written fashion.

    I’m trying to queue up some books for my company’s annual “summer shutdown” and always looking for suggestions.   Technology, sports, erotic thrillers, you name it.

  • ESB Toolkit Out and About

    Congrats to the BizTalk team for getting the ESB Toolkit out the door.    This marks a serious milestone in this package.  No longer just a CodePlex set of bits (albeit a rich one), but now a supported toolkit (download here) with real Microsoft ownership.  Check out the MSDN page for lots more on what’s in the Toolkit.

    I’ve dedicated a chapter to the Toolkit in my book, and also recently recorded a webcast on it.  You’ll see that online shortly.  Also, the upcoming Pro BizTalk 2009 book, which I’m the technical reviewer for, has a really great chapter on it by the talented Peter Kelcey.

    The main message with this toolkit is that you do NOT have to install and use the whole thing.  Want dynamic transformation as a standalone service?  Go for it.  Need to resolve endpoints and metadata on the fly?  Try the resolver service.  Looking for a standard mechanism to capture and report on exceptions?  Take a look at the exception framework.  And so on. 

    Technorati Tags: ,

  • Recent Links of Interest

    It’s the Friday before a holiday here in the States so I’m clearing out some of the interesting things that caught my eye this week.

    • BizTalk “Cloud” Adapter is coming.  Check out Danny’s blog where he talks about what he demonstrated at TechEd.  Specifically, we should be on the lookout for a Azure adapter for BizTalk.  This is pretty cool given what I showed in my last blog post.  Think of exposing a specific endpoint of your internal BizTalk Server to a partner via the cloud.
    • Updated BizTalk 24×7 site.  Saravana did a nice refresh of this site and arguably has the site that the BizTalk team itself SHOULD have on MSDN.  Well done.
    • BizTalk Adapter Pack 2.0 is out there.  You can now pull the full version of the Adapter Pack from the MSDN downloads (this link is to the free, evaluation version).  Also note that you can grab the new WCF SQL Server adapter only and put it into your BizTalk 2006 environment.  I think.
    • The ESB Guidance is now ESB Toolkit.  We have a name change and support change.  No longer a step-child to the product, the ESB Toolkit now gets full love and support from the parents.  Of course, it’s fantastic to already have an out-of-date book on BizTalk Server 2009.  Thanks guys.  Jerks 😉
    • The Open Group releases their SOA Source Book.  This compilation of SOA principles and considerations can be freely read online and contains a few useful sections.
    • Returning typed WCF exceptions from BizTalk orchestrations. Great post from Paolo on how to get BizTalk to return typed errors back to WCF callers. Neat use of WCF extensions.

    That’s it.  Quick thanks to all that have picked up the book or posted reviews around.  Appreciate that.

    Technorati Tags: , ,

  • Building a RESTful Cloud Service Using .NET Services

    On of the many actions items I took away from last week’s TechEd was to spend some time with the latest release of the .NET Services portion of the Azure platform from Microsoft.  I saw Aaron Skonnard demonstrate an example of a RESTful, anonymous cloud service, and I thought that I should try and build the same thing myself.  As an aside, if you’re looking for a nice recap of the “connected system” sessions at  TechEd, check out Kent Weare’s great series (Day1, Day2, Day3, Day4, Day5).

    So what I want is a service, hosted on my desktop machine, to be publicly available on the internet via .NET Services.  I’ve taken the SOAP-based “Echo” example from the .NET Services SDK and tried to build something just like that in a RESTful fashion.

    First, I needed to define a standard WCF contract that has the attributes needed for a RESTful service.

    using System.ServiceModel;
    using System.ServiceModel.Web;
    
    namespace RESTfulEcho
    {
        [ServiceContract(
            Name = "IRESTfulEchoContract", 
            Namespace = "http://www.seroter.com/samples")]
        public interface IRESTfulEchoContract
        {
            [OperationContract()]
            [WebGet(UriTemplate = "/Name/{input}")]
            string Echo(string input);
        }
    }
    

    In this case, my UriTemplate attribute means that something like http://<service path>/Name/Richard should result in the value of “Richard” being passed into the service operation.

    Next, I built an implementation of the above service contract where I simply echo back the name passed in via the URI.

    using System.ServiceModel;
    
    namespace RESTfulEcho
    {
        [ServiceBehavior(
            Name = "RESTfulEchoService", 
            Namespace = "http://www.seroter.com/samples")]
        class RESTfulEchoService : IRESTfulEchoContract
        {
            public string Echo(string input)
            {
                //write to service console
                Console.WriteLine("Input name is " + input);
    
                //send back to caller
                return string.Format(
                    "Thanks for calling Richard's computer, {0}", 
                    input);
            }
        }
    }
    

    Now I need a console application to act as my “on premises” service host.  The .NET Services Relay in the cloud will accept the inbound requests, and securely forward them to my machine which is nestled deep within a corporate firewall.   On this first pass, I will use a minimum amount of service code which doesn’t even explicitly include service host credential logic.

    using System.ServiceModel;
    using System.ServiceModel.Web;
    using System.ServiceModel.Description;
    using Microsoft.ServiceBus;
    
    namespace RESTfulEcho
    {
        class Program
        {
            static void Main(string[] args)
            {
                Console.WriteLine("Host starting ...");
    
                Console.Write("Your Solution Name: ");
                string solutionName = Console.ReadLine();
    
                // create the endpoint address in the solution's namespace
                Uri address = ServiceBusEnvironment.CreateServiceUri(
                    "http", 
                    solutionName, 
                    "RESTfulEchoService");
    
                //make sure to use WEBservicehost
                WebServiceHost host = new WebServiceHost(
                    typeof(RESTfulEchoService), 
                    address);
    
                host.Open();
    
                Console.WriteLine("Service address: " + address);
                Console.WriteLine("Press [Enter] to close ...");
    
                Console.ReadLine();
    
                host.Close();
            }
        }
    }
    

    So what did I do there?  First, I asked the user for the solution name.  This is the name of the solution set up when you register for your .NET Services account.

    Once I have that solution name, I use the Service Bus API to create the URI of the cloud service.  Based on the name of my solution and service, the URI should be:

    http://richardseroter.servicebus.windows.net/RESTfulEchoService.

    Note that the URI template I set up in the initial contract means that a fully exercised URI would look like:

    http://richardseroter.servicebus.windows.net/RESTfulEchoService/Name/Richard

    Next, I created an instance of the WebServiceHost.  Do not use the standard “ServiceHost” object for a RESTful service.  Otherwise you’ll be like me and waste way too much time trying to figure out why things didn’t work.  Finally, I open the host and print out the service address to the caller.

    Now, nowhere in there are my .NET Services credentials applied.  Does this mean that I’ve just allowed ANYONE to host a service on my solution?  Nope.  The Service Bus Relay service requires authentication/authorization and if none is provided here, then a Windows CardSpace card is demanded when the host is started up.  In my Access Control Service settings, you can see that I have a Windows CardSpace card associated with my .NET Services account.

    Finally, I need to set up my service configuration file to use the new .NET Services WCF bindings that know how to securely communicate with the cloud (and hide all the messy details from me).  My straightforward  configuration file looks like this:

    <configuration>
      <system.servicemodel>
          <bindings>
              <webhttprelaybinding>
                  <binding opentimeout="00:02:00" name="default">
                      <security relayclientauthenticationtype="None" />
                  </binding>
              </webhttprelaybinding>
          </bindings>
          <services>
              <service name="RESTfulEcho.RESTfulEchoService">
                  <endpoint name="RelayEndpoint" 
    	      address="" contract="RESTfulEcho.IRESTfulEchoContract" 
    	      bindingconfiguration="default" 
    	      binding="webHttpRelayBinding" />
              </service>
          </services>
      </system.servicemodel>
    </configuration>
    

    Few things to point out here.  First, notice that I use the webHttpRelayBinding for the service.  Besides my on-premises host, this is the first mention of anything cloud-related.  Also see that I explicitly created a binding configuration for this service and modified the timeout value from the default of 1 minute up to 2 minutes.  If I didn’t do this, I occasionally got an “Unable to establish Web Stream” error.  Finally, and most importantly to this scenario, see the RelayClientAuthenticationType is set to None which means that this service can be invoked anonymously.

    So what happens when I press “F5” in Visual Studio?  After first typing in my solution name, I am asked to chose a Windows Card that is valid for this .NET Services account.  Once selected, those credentials are sent to the cloud and the private connection between the Relay and my local application is established.


    I can now open a browser and ping this public internet-addressable space and see a value (my dog’s name) returned to the caller, and, the value printed in my local console application.

    Neato.  That really is something pretty amazing when you think about it.  I can securely unlock resources that cannot (or should not) be put into my organization’s DMZ, but are still valuable to parties outside our local network.

    Now, what happens if I don’t want to use Windows CardSpace for authentication?  No problem.  For now (until .NET Services is actually released and full ADFS federation is possible with Geneva), the next easiest thing to do is apply username/password authorization.  I updated my host application so that I explicitly set the transport credentials:

    static void Main(string[] args)
     {
       Console.WriteLine("Host starting ...");
    
       Console.Write("Your Solution Name: ");
       string solutionName = Console.ReadLine();
       Console.Write("Your Solution Password: ");
       string solutionPassword = ReadPassword();
    
       // create the endpoint address in the solution's namespace
       Uri address = ServiceBusEnvironment.CreateServiceUri(
           "http", 
           solutionName, 
           "RESTfulEchoService");
    
       // create the credentials object for the endpoint
      TransportClientEndpointBehavior userNamePasswordServiceBusCredential= 
           new TransportClientEndpointBehavior();
      userNamePasswordServiceBusCredential.CredentialType = 
           TransportClientCredentialType.UserNamePassword;
      userNamePasswordServiceBusCredential.Credentials.UserName.UserName= 
           solutionName;
      userNamePasswordServiceBusCredential.Credentials.UserName.Password= 
           solutionPassword;
    
       //make sure to use WEBservicehost
       WebServiceHost host = new WebServiceHost(
           typeof(RESTfulEchoService), 
           address);
       host.Description.Endpoints[0].Behaviors.Add(
    	userNamePasswordServiceBusCredential);
    
       host.Open();
    
       Console.WriteLine("Service address: " + address);
       Console.WriteLine("Press [Enter] to close ...");
    
       Console.ReadLine();
    
       host.Close();
    }
    

    Now, I have a behavior explicitly added to the service which contains the credentials needed to successfully bind my local service host to the cloud provider.  When I start the local host again, I am prompted to enter credentials into the console.  Nice.

    One last note.  It’s probably stupidity or ignorance on my part, but I was hoping that, like the other .NET Services binding types, that I could attach a ServiceRegistrySettings behavior to my host application.  This is what allows me to add my service to the ATOM feed of available services that .NET Services exposes to the world.  However, every time that I add this behavior to my service endpoint above, my service starts up but fails whenever I call it.  I don’t have the motivation to currently solve that one, but if there are restrictions on which bindings can be added to the ATOM feed, that’d be nice to know.

    So, there we have it.  I have a application sitting on my desktop and if it’s running, anyone in the world could call it.  While that would make our information security team pass out, they should be aware that this is a very secure way to expose this service since the cloud-based relay has hidden all the details of my on-premises application.  All the public consumer knows is a URI in the cloud that the .NET Services Relay then bounces to my local app.

    As I get the chance to play with the latest bits in this release of .NET Services, I’ll make sure to post my findings.

    Technorati Tags: , ,