Category: Pivotal

  • Wait, THAT runs on Pivotal Cloud Foundry? Part 3 – Background, batch, and scheduled jobs

    Wait, THAT runs on Pivotal Cloud Foundry? Part 3 – Background, batch, and scheduled jobs

    So far in this series of posts, we’ve seen that Pivotal Cloud Foundry (PCF) runs a lot more than just web applications. Not every app has a user-facing front-end component. Some of your systems run in the background or on a schedule and perform a variety of important tasks. In this post, I’ll take a look at how to deploy background workers, on-demand batch tasks, and scheduled jobs.

    This is the third in a five part series of posts:

    Deploying and running background workers

    Pivotal Cloud Foundry makes it easy to run workers that don’t have a routable address. These background jobs might listen to a database and respond to data changes, or respond to messages in a work queue. Let’s demonstrate the latter. 

    I built a .NET Core console app that’s responsible for pulling “loan” records from RabbitMQ and processing them. You can built these background jobs is any programming language supported by Cloud Foundry.

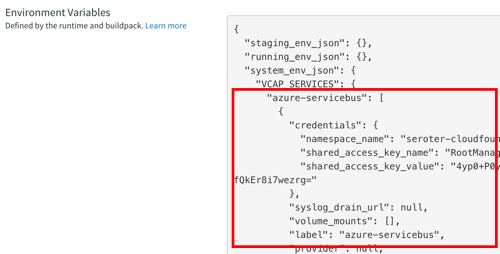
    What’s nice is that background jobs have access to all the useful PCF capabilities that web apps do. One such capability? Service Brokers! Devs love using Service Brokers to provision and access backing services. My background job needs access to RabbitMQ and I don’t want to hard-code any connection details. No big deal. I first spun up an on-demand RabbitMQ instance via the PCF Service Broker.

    My .NET Core app uses the Steeltoe Service Connector (and the RabbitMQ .NET Client) to load service broker connection info and talk to my instance.

    static void Main(string[] args){            
    //pull service broker configuration
    var builder = new ConfigurationBuilder()
    .AddEnvironmentVariables()
    .AddCloudFoundry();

    var configuration = builder.Build();
    //get our fully loaded service
    var services = new ServiceCollection();
    services.AddRabbitMQConnection(configuration);
    var provider = services.BuildServiceProvider();
    ConnectionFactory f = provider.GetService<ConnectionFactory>();

    //connect to RMQ
    using (var connection = f.CreateConnection())
    using (var channel = connection.CreateModel())
    {
    channel.QueueDeclare(queue: "loans", durable: true, exclusive: false, autoDelete: false, arguments: null);
    var consumer = new EventingBasicConsumer(channel);

    //fire up when a new message comes in
    consumer.Received += (model, ea) => {
    var body = ea.Body;
    var message = Encoding.UTF8.GetString(body);
    Console.WriteLine("[x] Received loan data: {0}", message);
    };
    channel.BasicConsume(queue: "loans", autoAck: true, consumer: consumer);
    Console.ReadLine();
    }
    }

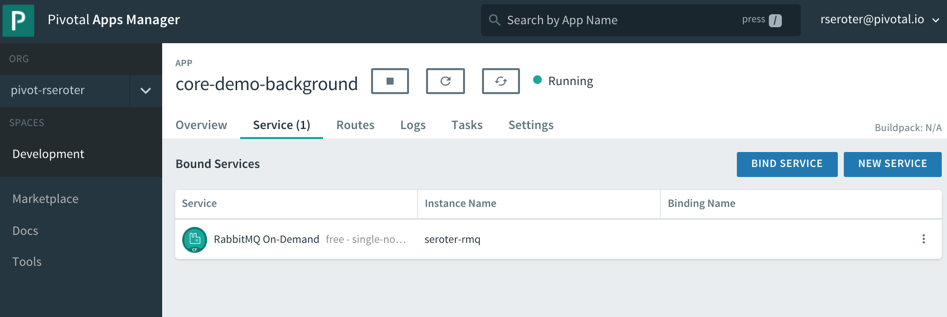
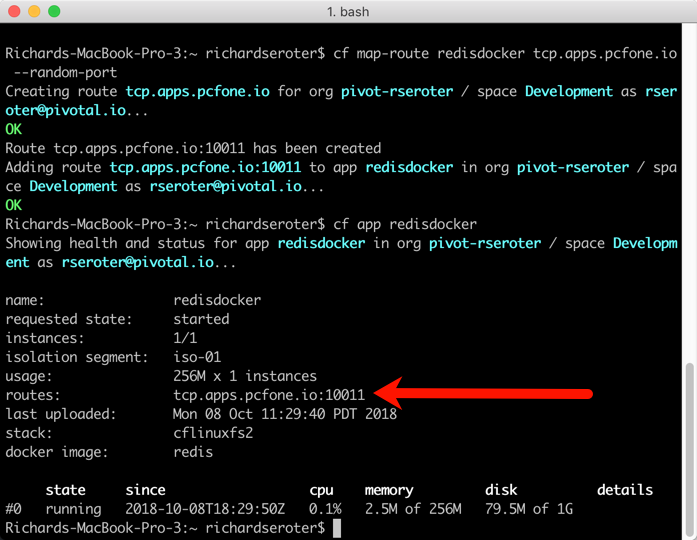
    Apps deployed to Cloud Foundry are typically accompanied by a YAML manifest. You can provide the parameters on the CLI, but versioned, source-controlled manifests are a better way to go. For these background jobs, the manifests are simple. Note two key things: the no-route parameter is “true” so that we don’t get a route assigned, and the health-check-type is set to “process” so that the orchestrator monitors process availability and doesn’t try to ping a non-existent web endpoint. Also notice that I bound my app to the previously-created RabbitMQ service instance.

    ---  
    applications:
    - name: core-demo-background
    memory: 256M
    no-route: true
    health-check-type: process
    services:
    - seroter-rmq

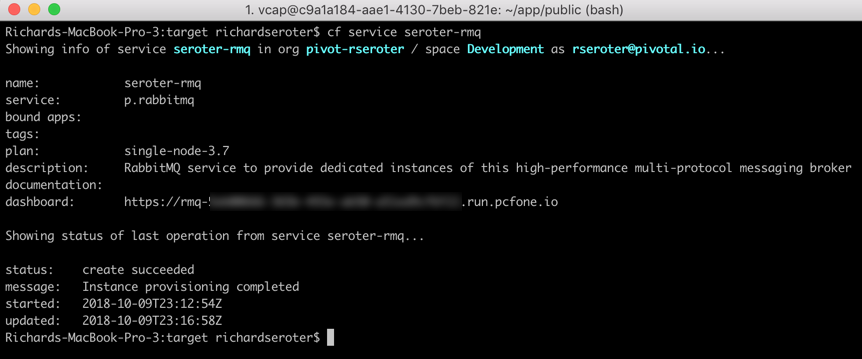
    After a quick cf push, my background app was running, and bound to the RabbitMQ instance.

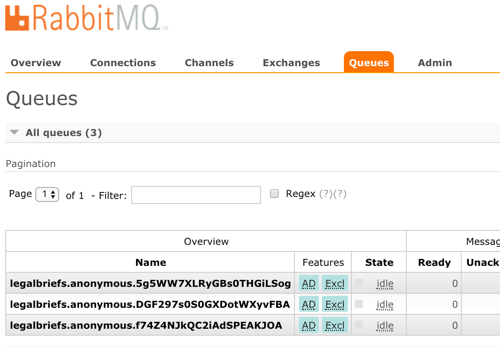
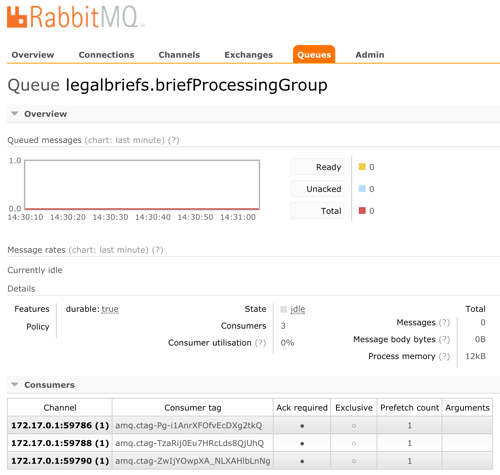
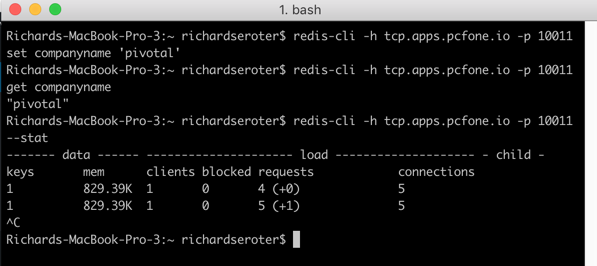
    This job quietly sits and waits for work to do. What’s neat is this can also take advantage of PCF’s autoscale capability, and scale by monitoring RabbitMQ queue depth, for example. For now, one instance is plenty. I logged into RabbitMQ and sent in a couple sample “loan” messages.

    Sure enough, when I viewed the aggregated application logs for my background job, I saw the content of each read message printed out. 

    These sorts of workers are a useful part of most systems, and PCF offers a resilient, manageable place to run them.

    Deploying and running on-demand batch tasks

    How many useful, random scripts do your system administrators have sitting around? You know, the ones that create users, reset demo environments, or purge FTP shares. Instead of having those scripts buried on administrator desktops, you can run these one-off batch jobs in PCF.

    I created another .NET Core console application. This one pretends to sweep expired files from a shared folder. I deployed this application to PCF with a –no-start command since I want to trigger it on demand.

    cf push --no-start

    Now, to trigger the job, I need to know the start command. This depends on how you deployed it. Since I used the .NET Core buildpack, I want to start up the app one time to discover how PCF starts up the app.

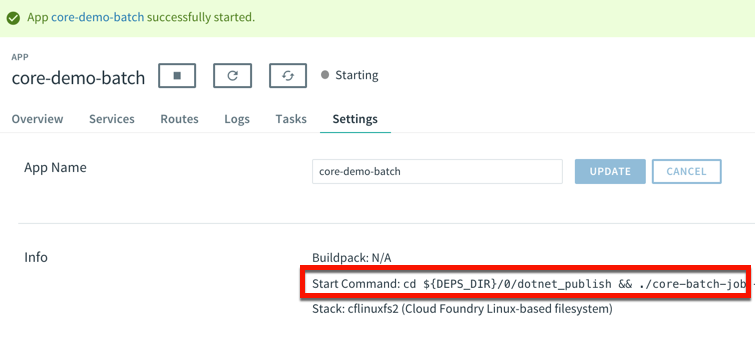
    That command showed me where the .NET Core executable lives in the container. I stopped the app again, and switched over the “Tasks” view in the PCF Apps Manager interface. I can do all these things via the CLI as well, but I’m a sucker for a nice UX. There’s a “run task” button that lets me define a one-off task definition.

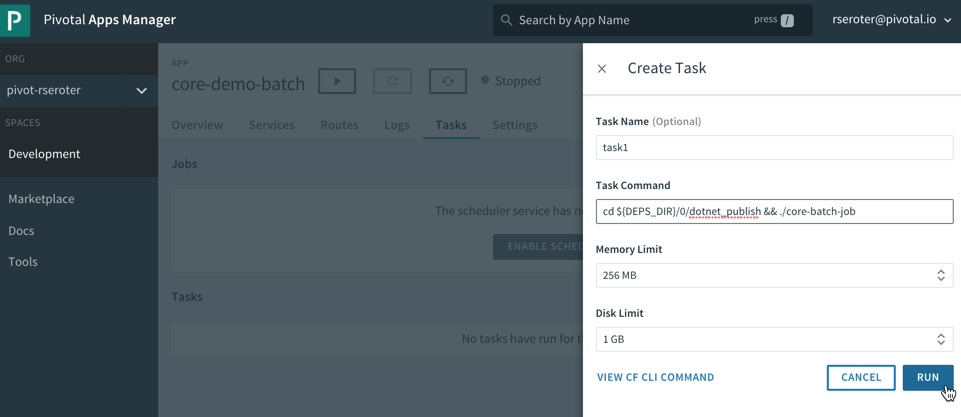
    Here I gave the task a name, pasted the start command I found above, and that was it! When I hit, “run”, PCF instantiated a new container instance and shut down the container when the task was complete. And that’s what I saw. There was a log entry indicating a successful job run, and the application logs showed the output of the task. Nice!

    This is a great option for one-off jobs and scripts. Consolidate them in PCF, and get all the availability and auditing you need.

    Deploying and running scheduled jobs

    Finally, some of those one-off jobs may not be as one-off as you thought! Instead of asking your admin to trigger a task once a day to purge expired files, how about you schedule the job to run on a schedule? 

    PCF also offers a scheduling component to trigger tasks (or API calls!) on a recurring basis. On the same “tasks” tab of the PCF Apps Manager UX, there’s a “jobs” section for scheduled tasks. Besides giving the job a name and a command (the same as the task command above), you enter a Cron expression for the schedule itself. The expression is in a MIN HOUR DAY-OF-MONTH MONTH DAY-OF-WEEK format. For example “15 * ? * * *” means you should run the job every 15 minutes, and “30 10 * * 5” means you should run the job at 10:30am every Friday. My job below is set to run every minute.

    We’re all building lots of web apps nowadays, but you have lots of need for event-driven or scheduled background work. PCF may surprise you as an entirely suitable platform for those workloads.

  • Wait, THAT runs on Pivotal Cloud Foundry? Part 2 – TCP-routable services

    Wait, THAT runs on Pivotal Cloud Foundry? Part 2 – TCP-routable services

    Platform-as-a-Service products typically run web apps. That is, apps that accept HTTP traffic and listen on ports 80, 8080 or 443. As you survey the landscape today, you’ll find that’s still the case in the most popular public cloud application runtimes. That’s not a bad thing, but sometimes you have workloads with different routing needs. In this post, I’m going to demonstrate TCP Routing in Pivotal Cloud Foundry (PCF), and show Redis running directly in the platform.

    As a reminder, this is the 2nd post in a series about “unexpected” workloads running on PCF.

    About TCP Routing in PCF

    TCP Routing has been part of Cloud Foundry for two years now. Basically, TCP Routing lets your app handle traffic over non-HTTP TCP protocols. This is valuable for custom-built apps or packaged software that communicate with binary payloads or specialized transports.

    By default, custom-built apps are set to always listen on port 8080 in Cloud Foundry. The buildpack process (mentioned in part 1 of the series) configures that, although you can change this behavior. Even if your app does listen on port 8080, TCP Routing makes it easy to expose a non-HTTP port to the outside world via network address translation.

    Source: https://docs.cloudfoundry.org/adminguide/enabling-tcp-routing.html

    Assuming your Cloud Foundry admins configured TCP Routing in your environment(s), you can set up this type of per-app routing entirely via self-service.

    Deploying a TCP routable workload

    Instead of demonstrating with an app I wrote myself, I thought it’d be more fun to deploy a well-known software product. Enter Redis! Redis is a wildly-popular key-value store, and there are many ways to install it. One of the easiest options is the Docker image. Note that Redis typically exposes access over port 6379. When deploying Docker images to Cloud Foundry, the port defined in the EXPOSE directive is what’s actually exposed by Cloud Foundry app container. I didn’t know that until this week!

    After logging into my PCF environment, I ran the cf domains command to see what routable domains were available to me.

    I’ve got the “standard” domain for my regular web apps (here, apps.pcfone.io), a domain for TCP routing (tcp.apps.pcfone.io) and one for private traffic (apps.internal) that we’ll mess with shortly.

    I started by pushing a Redis image to PCF. I’m purposely using the –no-route command to ensure it doesn’t get a default web route in the apps.pcfone.io domain.

    cf push redisdocker --docker-image redis -i 1 -m 256M --no-route -u process

    After about ten seconds, the container is up and running. Notice however, that it’s currently not routable.

    Let’s change that. Now, because all apps sit behind the same edge router and TCP routes don’t have a path component, I can’t have two apps listening on the same TCP port. So, there’s a good chance that the default Redis port fo 6379 is already in use somewhere. That’s cool; we can tell PCF to assign a random port at the edge route that forwards traffic to port 6379 on the app container.

    cf map-route redisdocker tcp.apps.pcfone.io --random-port

    The result? I get a TCP route assigned on port 10011.

    Again, note that the app container is still listening on 6379, because that’s what was set by the Docker image at deploy time. But through network address translation, the external facing port is a different value. Let’s prove that Redis is actually running and addressable.

    I spun up the redis-cli and issued a command.

    Ok, clearly it’s reachable via the public Internet over a non-HTTP connection. That’s neat. I did a LITTLE more with Redis than that, by also adding and retrieving a key.

    With this pattern, my apps running in PCF (or anywhere) can send requests to PCF-hosted software that handles all kinds of payloads and protocols. But what if you don’t want these workloads to be Internet accessible?

    Setting up private TCP routing

    The above demo is cool, but you might not like having your cache, MQTT bus, or whatever, exposed to public traffic. This is where the relatively-new container-to-container networking is pretty darn neat.

    By default, app instances in Cloud Foundry talk to each other through the shared router. That’s not awful, but for performance reasons, or to access private services, you may want to communicate directly with another app container. With polyglot service discovery now part of PCF, it’s easy to do this via DNS, versus hard-coded container addresses. Let me show you.

    First, I removed the publicly-accessible TCP route from my Redis instance.

    Now, you can no longer reach it. Next up, I wanted to map my Redis instance to the apps.internal domain that’s ONLY accessible within a Cloud Foundry.

    cf map-route redisdocker apps.internal --hostname redisdocker

    Because we’re not dealing with any extra NAT action, I can directly hit Redis on port 6379. I built a Node.js app that connects to Redis, adds a key, and reads a key. I set the connection details to the internal domain and standard port.

    var options = {  host: "redisdocker.apps.internal",  port: 6379}
    var redis = require("redis"), client = redis.createClient(options);

    Then I pushed this app to PCF with a –no-start command so that I could set up connectivity between my app and Redis. Apps can’t automatically reach other apps on the apps.internal domain unless we give permission. It’s easy to do.  Via the Cloud Foundry CLI, I can create, delete, and list network policies. A network policy determines which apps can directly talk to each other (without going through the router), over which port and protocol.

    cf add-network-policy demo-app --destination-app redisdocker --protocol tcp --port 6379

    Notice that in that command, all I said was that one app (demo-app) could talk to another app (redisdocker). I didn’t have to map IP addresses, or anything like that. As app instances scale in and out, there’s no need to change the policies to reflect that. That’s a considerate UX.

    After executing the above command, my Node.js app (demo-app) could “see” the redisdocker app instance. And notice that I’ve allowed traffic to the default Redis port, 6379.

    With that policy in place, I loaded the Node.js app, and it directly routed requests over port 6379 to my Redis instance.

    Unlike most PaaS-like products, PCF offers TCP routing over non-HTTP channels. While you may still (wisely) choose to run certain workloads—clustered services, apps that need multiple IPs exposed per container, or workloads with complex persistence needs—in an environment outside of PCF, it’s useful to know that you can leverage PCF to host and orchestrate a wide variety of publicly or privately routable workloads. Keep an eye out tomorrow for the next post, where we investigate batch jobs.

  • My new Pluralsight course—Cloud-native Architecture: The Big Picture—is now available!

    I’ll be honest with you, I don’t know much about horses. I mean, I know some things and can answer basic questions from my kids. But I’m mostly winging it and relying on what I remember from watching Seabiscuit. Sometimes you need just enough knowledge to be dangerous. With that in mind, do you really know what “cloud-native” is all about? You should, and if you want the foundational ideas, my new on-demand Pluralsight class is just for you.

    Clocking in at a tight 51 minutes, my course “Cloud-native Architecture: The Big Picture” introduces you to the principles, patterns, and technologies related to cloud-native software. The first module digs into why cloud-native practices matter, how to define cloud-native, what “good” looks like, and more.

    The second module calls out cloud-native patterns around application architecture, application deployment, application infrastructure, and teams. The third and final module explains the technologies that help you realize those cloud-native patterns.

    This was fun to put together, and I’ve purposely made the course brief so that you could quickly get the key points. This was my 18th Pluralsight course, and there’s no reason to stop now. Let me know what topic you’d like to see next!

  • Creating a continuous integration pipeline in Concourse for a test-infused ASP.NET Core app

    Creating a continuous integration pipeline in Concourse for a test-infused ASP.NET Core app

    Trying to significantly improve your company’s ability to build and run good software? Forget Docker, public cloud, Kubernetes, service meshes, Cloud Foundry, serverless, and the rest of it. Over the years, I’ve learned the most important place you should start: continuous integration and delivery pipelines. Arguably, “apps on pipeline” is the most important “transformation” metric to track. Not “deploys per day” or “number of microservices.” It’s about how many apps you’ve lit up for repeatable, automated deployment. That’s a legit measure of how serious you are about being responsive and secure.

    All this means I needed to get smarter with Concourse, one of my favorite tools for CI (and a little CD). I decided to build an ASP.NET Core app, and continuously integrate and deliver it to a Cloud Foundry environment running in AWS. Let’s go!

    First off, I needed an app. I spun up a new ASP.NET Core Web API project with a couple REST endpoints. You can grab the source code here. Most of my code demos don’t include tests because I’m in marketing now, so YOLO, but a trustworthy pipeline needs testable code. If you’re a .NET dev, xUnit is your friend. It’s maintained by my friend Brad, so I basically chose it because of peer pressure. My .csproj file included a few references to bring xUnit into my project:

    • “Microsoft.NET.Test.Sdk” Version=”15.7.0″
    • “xunit” Version=”2.3.1″
    • “xunit.runner.visualstudio” Version=”2.3.1″

    Then, I created a class to hold the tests for my web controller. I included one test with a basic assertion, and another “theory” with an input data set. These are comically simple, but prove the point!

       public class TestClass {
            private ValuesController _vc;
    public TestClass() {
                _vc = new ValuesController();
            }
    
            [Fact]
            public void Test1(){
                Assert.Equal("pivotal", _vc.Get(1));
            }
    
            [Theory]
            [InlineData(1)]
            [InlineData(3)]
            [InlineData(20)]
            public void Test2(int value) {
                Assert.Equal("public", _vc.GetPublicStatus(value));
            }
        }
    

    When I ran dotnet test against the above app, I got an expected error because the third inline data source led to a test failure, since my controller only returns “public” companies when the input value is between 1 and 10. Commenting the offending inline data source led to a successful test run.

    2018.06.06-concourse-02

    Ok, the app was done. Now, to put it on a pipeline. If you’ve ever used shameful swear words when wrangling your CI server, maybe it’s worth joining all the folks who switched to Concourse. It’s a pretty straightforward OSS tool that uses a declarative model and containers for defining and running pipelines, respectively. Getting started is super simple. If you’re running Docker on your desktop, that’s your easiest route. Just grab this Docker Compose file from the Concourse GitHub repo. I renamed mine to docker-compose.yml, jumped into a Terminal session, switched to the folder holding this YAML file, and ran docker-compose up -d. After a second or two, I had a PostgreSQL server (for state) and a Concourse server. PROVE IT, you say. Hit localhost:8080, and you’ll see the Concourse dashboard.

    2018.06.06-concourse-01

    Besides this UX, we interface with Concourse via a CLI tool called fly. I downloaded it from here. I then used fly to add my local environment as a “target” to manage. Instead of plugging in the whole URL every time I interacted with Concourse, I created an alias (“rs”) using fly -t rs login -c http://localhost:8080. If you get a warning to sync your version of fly with your version of Concourse, just enter fly -t rs sync and it gets updated. Neato.

    Next up? The pipeline. Pipelines are defined in YAML and are made up of resources and jobs. One of the great things about a declarative model, is that I can run my CI tests against any Concourse by just passing in this (source-controlled) pipeline definition. No point-and-ciick configurations, no prerequisite components to install. Love it. First up, I defined a couple resources. One was my GitHub repo, the second was my target Cloud Foundry environment. In the real world, you’d externalize the Cloud Foundry credentials, and call out to files to build the app, etc. For your benefit, I compressed to a single YAML file.

    resources:
    - name: seroter-source
      type: git
      source:
        uri: https://github.com/rseroter/xunit-tested-dotnetcore
        branch: master
    - name: pcf-on-aws
      type: cf
      source:
        api: https://api.run.pivotal.io
        skip_cert_check: false
        username: XXXXX
        password: XXXXX
        organization: seroter-dev
        space: development
    

    Those resources tell Concourse where to get the stuff it needs to run the jobs. The first job used the GitHub resource to grab the source code. Then it used the Microsoft-provided Docker image to run the dotnet test command.

    jobs:
    - name: aspnetcore-unit-tests
      plan:
        - get: seroter-source
          trigger: true
        - task: run-tests
          privileged: true
          config:
            platform: linux
            inputs:
            - name: seroter-source
            image_resource:
                type: docker-image
                source:
                  repository: microsoft/aspnetcore-build
            run:
                path: sh
                args:
                - -exc
                - |
                    cd ./seroter-source
                    dotnet restore
                    dotnet test
    

    Concourse isn’t really a CD tool, but it does a nice basic job of getting code to a defined destination. The second job deploys the code to Cloud Foundry. It also uses the source code resource and only fires if the test job succeeds. This ensures that only fully-tested code makes its way to the hosting environment. If I were being more responsible, I’d take the results of the test job, drop it into an artifact repo, and then use that artifact for deployment. But hey, you get the idea!

    jobs:
    - name: aspnetcore-unit-tests
      [...]
    - name: deploy-to-prod
      plan:
        - get: seroter-source
          trigger: true
          passed: [aspnetcore-unit-tests]
        - put: pcf-on-aws
          params:
            manifest: seroter-source/manifest.yml
    

    That was it! I was ready to deploy the pipeline (pipeline.yml) to Concourse. From the Terminal, I executed fly -t rs set-pipeline -p test-pipeline -c pipeline.yml. Immediately, I saw my pipeline show up in the Concourse Dashboard.

    2018.06.06-concourse-03

    After I unpaused my pipeline, it fired up automatically.

    2018.06.06-concourse-05

    Remember, my job specified a Microsoft-provided container for building the app. Concourse started this job by downloading the Docker image.

    2018.06.06-concourse-04

    After downloading the image, the job kicked off the dotnet test command and confirmed that all my tests passed.

    2018.06.06-concourse-06

    Terrific. Since my next job was set to trigger when the first one succeeded, I immediately saw the “deploy” job spin up.

    2018.06.06-concourse-07

    This job knew how to publish content to Cloud Foundry, and used the provided parameters to deploy the app in a few seconds. Note that there are other resource types if you’re not a Cloud Foundry user. Nobody’s perfect!

    2018.06.06-concourse-08

    The pipeline run was finished, and I confirmed that the app was actually deployed.

    2018.06.06-concourse-09

    Finished? Yes, but I wanted to see a failure in my pipeline! So, I changed my xUnit tests and defined inline data that wouldn’t pass. After committing code to GitHub, my pipeline kicked off automatically. Once again it was tested in the pipeline, and this time, failed. Because it failed, the next step (deployment) didn’t happen. Perfect.

    2018.06.06-concourse-10

    If you’re looking for a CI tool that people actually like using, check out Concourse. Regardless of what you use, focus your energy on getting (all?) apps on pipelines. You don’t do it because you have to ship software every hour, as most apps don’t need it. It’s about shipping whenever you need to, with no drama. Whether you’re adding features or patching vulnerabilities, having pipelines for your apps means you’re actually becoming a customer-centric, software-driven company.

  • How to use the Kafka interface of Azure Event Hubs with Spring Cloud Stream

    How to use the Kafka interface of Azure Event Hubs with Spring Cloud Stream

    When I think of the word “imposter” my mind goes to movies where the criminal is revealed after their disguise is removed. But imposters don’t have to be evil geniuses. Sometimes imposters are good. You may buy generic types of pharmaceuticals or swap out beef for a meat-less hamburger. The goal is to get the experience of what you’re after, but through secondary means. In that sense, Azure Event Hubs is a fantastic imposter.

    Now to be sure, Azure Event Hubs is a terrific standalone cloud service. If you need to reliably ingest tons of events in a scalable way, there aren’t many (any?) better options.

    Microsoft’s gotten into the habit of putting facades onto their cloud services to turn them into credible imposters. For instance, Azure Cosmos DB has its own native interface, but also ones that mimic MongoDB and Apache Cassandra. Azure Event Hubs got into the action by recently adding an Apache Kafka interface. If you have apps or tools that use those interfaces, it’s much easier to adopt the Azure “equivalents” now. Azure isn’t actually offering MongoDB, Cassandra, or Kafka, but their first party services resemble them enough that you don’t have to change code to get the benefits of Azure’s global scale. Good strategy.

    Java developers everywhere use Spring Cloud Stream to talk to popular message brokers like RabbitMQ and Apache Kafka. I thought it’d be fun to see if Spring Cloud Stream “just works” with the new Event Hubs interface. LET’S SEE WHAT HAPPENS.

    Creating our Azure Event Hub

    I started in the Microsoft Azure portal. From there, I chose to add a new Event Hubs namespace which holds all my actual Event Hubs. For kicks, I chose the “basic” pricing tier which allows a single consumer group and a hundred connections. I set the “enable Kafka” flag and configured three throughput units (each Event Hubs partition scales to a maximum of one throughput unit).

    2018.05.29-kafka-01

    Once I had an Event Hubs namespace, I added an Event Hub to it. I gave the Event Hub a name, and three partitions to spread the data. If I had chosen a plan besides “basic”, I would have also been able to set the message retention period beyond one day.

    2018.05.29-kafka-02

    That’s it. Might be the simplest possible way to create a Kafka-like service!

    Spring Boot project setup

    The whole point of Spring Boot is to eliminate boilerplate code and make it easier to focus on building robust apps. For example, you don’t want to mess with all that broker-specific logic when you want to pass messages or events around. Spring Boot and Spring Cloud Stream make it straightforward.

    To get going, I went to start.spring.io. Devs create over 800,000 projects per month from here, so I added two more to the mix. My first project (source code here) added Spring Cloud Stream and Web dependencies. This is my message producer. Then I created a second project (source code here) with the Spring Cloud Stream dependency. This one acts as my message consumer.

    2018.05.29-kafka-03

    This is a Maven project, so I added one more dependency directly to the pom.xml file. This one tells my project to activate the Kafka-specific objects upon application startup.

    
      org.springframework.cloud
      spring-cloud-stream-binder-kafka


    Configuring the producer

    With my projects created, it was time to configure them. First up, the producer.

    I made this one simple for demo purposes. First, I added Spring Boot annotations on the primary class. The @RestController one exposes annotated operations as HTTP endpoints. The second annotation was @EnableBinding(Source.class) which set this up as a Spring Cloud Stream object that used channels identified in the default “Source” class.

    Next, I autowired a Source object that gets autoconfigured by the Spring Boot process at startup. Finally, I defined a method that responds to HTTP POST requests and sends a message to the “output” channel. This is where the message is sent to Event Hubs, but notice that my code is completely unaware of that fact.

    @EnableBinding(Source.class)
    @RestController
    @SpringBootApplication
    public class EventHubsKafkaApplication {
    
      public static void main(String[] args) {
    	SpringApplication.run(EventHubsKafkaApplication.class, args);
      }
    
      @Autowired
      Source mySource;
    
      @RequestMapping(method=RequestMethod.POST, path="/")
      public String PublishMessage(@RequestBody String company) {
        mySource.output().send(MessageBuilder.withPayload(company).build());
    
        return "success";
      }
    }
    

    That’s all the code I needed to test this out. All that was left for my producer was to configure the application.properties file. This lets me set some of the properties needed to connect to my message broker. Before setting them, I went back to the Microsoft Azure portal and grabbed the connection string for my Event Hub.

    2018.05.29-kafka-04
    With that connection string in hand, I set up my application.properties file. First, I defined my brokers. In this case, it’s the fully qualified domain name of my Event Hubs namespace. Next I set the channel destination, in this case, the Event Hub named “eh1.” Finally, I configured my security settings, which includes the connection string.

    spring.cloud.stream.kafka.binder.brokers=rseroter-eventhubs-tu1-cg1.servicebus.windows.net:9093
    spring.cloud.stream.bindings.output.destination=eh1
    
    spring.cloud.stream.kafka.binder.configuration.sasl.jaas.config=org.apache.kafka.common.security.plain.PlainLoginModule required username="$ConnectionString" password="Endpoint=sb://rseroter-eventhubs-tu1-cg1.servicebus.windows.net/;SharedAccessKeyName=RootManageSharedAccessKey;SharedAccessKey=";
    spring.cloud.stream.kafka.binder.configuration.sasl.mechanism=PLAIN
    spring.cloud.stream.kafka.binder.configuration.security.protocol=SASL_SSL
    

    With that, the producer app was done.

    Configuring the consumer

    The consumer app is even simpler! Its main class also has an @EnableBinding annotation, and this one binds to the channels in the default Sink class. Then, it makes use of the very handy @StreamListener which grabs data from the sink and handles content negotiation.

    @EnableBinding(Sink.class)
    @SpringBootApplication
    public class EventHubsKafkaConsumerApplication {
    
      public static void main(String[] args) {
        SpringApplication.run(EventHubsKafkaConsumerApplication.class, args);
      }
    
      @StreamListener(target=Sink.INPUT)
      public void logMessages(String msg) {
        System.out.println("message is: " + msg);
    }
    

    This was all the code needed to talk to a message broker or event stream processor and do something when a message arrives. Amazing.

    The application properties for the consumer are virtually identical to the producer. The only difference is the second property that refers to the input channel, versus the producer that refers to the output channel.

    spring.cloud.stream.kafka.binder.brokers=rseroter-eventhubs-tu1-cg1.servicebus.windows.net:9093
    spring.cloud.stream.bindings.input.destination=eh1
    
    spring.cloud.stream.kafka.binder.configuration.sasl.jaas.config=org.apache.kafka.common.security.plain.PlainLoginModule required username="$ConnectionString" password="Endpoint=sb://rseroter-eventhubs-tu1-cg1.servicebus.windows.net/;SharedAccessKeyName=RootManageSharedAccessKey;SharedAccessKey=";
    spring.cloud.stream.kafka.binder.configuration.sasl.mechanism=PLAIN
    spring.cloud.stream.kafka.binder.configuration.security.protocol=SASL_SSL
    

    With that, I had two working apps.

    Testing everything

    I first ran a simple test. This involved starting up both the producer and the consumer apps. The producer noticed that I had three partitions, and handled accordingly. The consumer recognized the three partitions as well, and joined an anonymous consumer group (as we didn’t specify one).

    2018.05.29-kafka-05

    I kicked up Postman and posted a JSON message to the REST endpoint exposed by my app. I sent in messages with company names of company-1, company-2, and company-3. You can see here that they show up in my consumer app!

    2018.05.29-kafka-08

    To make sure this wasn’t some other witchcraft going on, I checked the Microsoft Azure portal, and sure enough, see the connections and messages counted.

    2018.05.29-kafka-07

    Simple, right?

    BONUS: Messing with Kafka Consumer Groups

    I wanted to try something else, too. Kafka offers “consumer groups” where a single consumer instance within the group gets the message. This lets you load balance by having multiple instances of your consumer app, without each one getting a copy of the message. Every consumer group gets the message, so the same message may get read many times by different consumer groups. Azure Event Hubs has the same concept, and it behaves the same way. Spring Cloud Stream also offers this abstraction, even when the underlying broker (e.g. RabbitMQ) doesn’t offer it.

    I could set the consumer group property directly in the application.properties file. Just add “spring.cloud.stream.bindings.input.group=app1” to it. But I wanted to pass this in at application startup so that I could start up multiple instances of the app with different consumer group values.

    I started up an instance of my consumer (java -jar event-hubs-kafka-consumer-0.0.1-SNAPSHOT.jar –spring.cloud.stream.bindings.input.group=app1) and passed in that property. Notice that it read the full log (because this is the first time the consumer group saw it), and the consumer group is indicated in the log.

    2018.05.29-kafka-09

    Interestingly, when I started a second instance, it didn’t grab what was already read by the consumer group (expected), but when I sent in three more events, BOTH instances got a copy (not expected). Saw some other weirdness when I set the “partitioned=true” on the consumer, and provided an “instanceIndex” number for each consumer app instance.

    2018.05.29-kafka-10

    What’s ALSO interesting is that even though I set up an Event Hubs namespace for a single consumer group, I can apparently create as many as I want with the Kafka interface. Here, I started up another instance of my consumer, but with a different consumer group ID (java -jar event-hubs-kafka-consumer-0.0.1-SNAPSHOT.jar –spring.cloud.stream.bindings.input.group=app2), and it also read the full log, as you’d expect from a new consumer group. In fact, I created two new ones (app2, app3) and both worked.

    2018.05.29-kafka-11

    So, it seems like the consumer group limits aren’t applying here. I checked the consumer groups in Azure to see if these were being created behind the scenes, but using the Azure API, I still only saw the $Default one there. I have no idea where the Kafka consumer groups show up but they’re clearly in place. Otherwise, I wouldn’t have seen the correct behavior as each new consumer group came online!

    2018.05.29-kafka-12

    I’ll chalk it up to one of two possible things: (1) I’m a mediocre programmer so I probably screwed something up, or (2) it’s an alpha product and everything might not be wired up just yet. Or both!

    Regardless, it’s VERY simple to try out a Kafka-compatible interface on a cloud-hosted service thanks to Azure Event Hubs and Spring Cloud Stream. Kafka users should keep an eye on Azure Event Hubs as a legit option for a cloud-hosted event stream processor.

  • 2017 in Review: Reading and Writing Highlights

    kid-3What a fun year. Lots of things to be grateful for. Took on some more responsibility at Pivotal, helped put on a couple conferences, recorded a couple dozen podcast episodes, wrote news/articles/eMags for InfoQ.com, delivered a couple Pluralsight courses (DevOps, and Java related), received my 10th straight Microsoft MVP award, wrote some blog posts, spoke at a bunch of conferences, and added a third kid to the mix.

    Each year, I like to recap some of the things I enjoyed writing and reading. Enjoy!

    Things I Wrote

    I swear that I’m writing as much as I ever have, but it definitely doesn’t all show up in one place anymore! Here are a few things I churned out that made me happy.

    Things I Read

    I plowed through thirty four books this year, mostly on my wonderful Kindle. As usual, I choose a mix of biographies, history, sports, religion, leadership, and mystery/thriller. Here’s a handful of the ones I enjoyed the most.

    • Apollo 8: The Thrilling Story of the First Mission to the Moon, by Jeffrey Kluger (@jeffreykluger). Brilliant storytelling about our race to the moon. There was a perfect mix of character backstory, science, and narrative. Really well done.
    • Boyd: The Fighter Pilot Who Changed the Art of War, by Robert Coram (@RobertBCoram). I had mixed feelings after finishing this. Boyd’s lessons on maneuverability are game-changing. His impact on the world is massive. But this well-written story also highlights a man obsessed; one who grossly neglected his family. Important book for multiple reasons.
    • The Game: Inside the Secret World of Major League Baseball’s Power Brokers, by Jon Pessah (@JonPessah). Gosh, I love baseball books. This one highlights the Bud Selig era as commissioner, the rise of steroid usage, complex labor negotiations, and the burst of new stadiums. Some amazing behind-the-scenes insight here.
    • Not Forgotten: The True Story of My Imprisonment in North Korea, by Kenneth Bae. One might think that an American held in captivity by North Koreans longer than anyone since the Korean War would be angry. Rather, Bae demonstrates sympathy and compassion for people who aren’t exposed to a better way. Good story.
    • Shoe Dog: A Memoir by the Creator of Nike, by Phil Knight (@NikeUnleash). I went and bought new Nikes after this. MISSION ACCOMPLISHED PHIL KNIGHT. This was a fantastic book. Knight’s passion and drive to get Blue Ribbon (later, Nike) off the ground was inspiring. People can create impactful businesses even if they don’t feel an intense calling, but there’s something special about those that do.
    • Dynasty: The Rise and Fall of the House of Cesar, by Tom Holland (@holland_tom). This is somewhat of a “part 2” from Holland’s previous work. Long, but engaging, this book tells the tale of the first five emperors. It’s far from a dry history book, as Holland does a admirable job weaving specific details into an overarching story. Books like this always remind me that nothing happens in politics today that didn’t already happen thousands of years ago.
    • Avenue of Spies: A True Story of Terror, Espionage, and One American Family’s Heroic Resistance in Nazi-Occupied Paris, by Alex Kershaw (@kershaw_alex). Would you protect the most vulnerable, even if your life was on the line as a result? Many during WWII faced that choice. This book tells the story of one family’s decision, the impact they had, and the hard price they paid.
    • Stalling for Time: My Life as an FBI Hostage Negotiator, by Gary Noesner. Fascinating book that explains the principles of hostage negotiation, but also lays out the challenge of introducing it to an FBI conditioned to respond with force. Lots of useful nuggets in here for people who manage complex situations and teams.
    • The Things Our Fathers Saw: The Untold Stories of the World War II Generation from Hometown, USA, by Matthew Rozell (@marozell). Intensely personal stories from those who fought in WWII, with a focus on the battles in the Pacific. Harrowing, tragic, inspiring. Very well written.
    • I Don’t Have Enough Faith to Be an Atheist, by Norman Geisler (@NormGeisler) and Frank Turek (@Frank_Turek). Why are we here? Where did we come from? This book outlines the beautiful intersection of objective truth, science, philosophy, history, and faith. It’s a compelling arrangement of info.
    • The Late Show, by Michael Connelly (@Connellybooks). I’d read a book on kangaroo mating rituals if Connelly wrote it. Love his stuff. This new cop-thriller introduced a multi-dimensional lead character. Hopefully Connelly builds a new series of books around her.
    • The Toyota Way: 14 Management Principles from the World’s Greatest Manufacturer, by Jeffrey Liker. Ceremonies and “best practices” don’t matter if you have the wrong foundation. Liker’s must-read book lays out, piece by piece, the fundamental principles that help Toyota achieve operational excellence. Everyone in technology should read this and absorb the lessons. It puts weight behind all the DevOps and continuous delivery concepts we debate.
    • One Mission: How Leaders Build a Team of Teams, by Chris Fussell (@FussellChris). I read, and enjoyed, Team of Teams last year. Great story on the necessity to build adaptable organizations. The goal of this book is to answer *how* you create an adaptable organization. Fussell uses examples from both military and private industry to explain how to establish trust, create common purpose, establish a shared consciousness, and create spaces for “empowered execution.”
    • Win Bigly: Persuasion in a World Where Facts Don’t Matter, by Scott Adams (@ScottAdamsSays). What do Obama, Steve Jobs, Madonna, and Trump have in common? Remarkable persuasion skills, according to Adams. In his latest book, Adams deconstructs the 2016 election, and intermixes a few dozen persuasion tips you can use to develop more convincing arguments.
    • Value Stream Mapping: How to Visualize Work and Align Leadership for Organizational Transformation, by Karen Martin (@KarenMartinOpEx) and Mike Osterling (@leanmike). How does work get done, and are you working on things that matter? I’d suspect that most folks in IT can’t confidently answer either of those questions. That’s not the way IT orgs were set up. But I’ve noticed a change during the past year+, and there’s a renewed focus on outcomes. This book does a terrific job helping you understand how work flows, techniques for mapping it, where to focus your energy, and how to measure the success of your efforts.
    • The Five Dysfunctions of a Team, by Patrick Lencioni (@patricklencioni). I’ll admit that I’m sometimes surprised when teams of “all stars” fail to deliver as expected. Lencioni spins a fictitious tale of a leader and her team, and how they work through the five core dysfunctions of any team. Many of you will sadly nod your head while reading this book, but you’ll also walk away with ideas for improving your situation.
    • Setting the Table: The Transforming Power of Hospitality in Business, by Danny Meyer (@dhmeyer). How does your company make people feel? I loved Meyer’s distinction between providing a service and displaying hospitality in a restaurant setting, and the lesson is applicable to any industry. A focus on hospitality will also impact the type of people you hire. Great book that that leaves you hungry and inspired.
    • Extreme Ownership: How U.S. Navy SEALs Lead and Win, by Jocko Willink (@jockowillink) and Leif Babin (@LeifBabin). As a manager, are you ready to take responsibility for everything your team does? That’s what leaders do. Willink and Babin explain that leaders take extreme ownership of anything impacting their mission. Good story, with examples, of how this plays out in reality. Their advice isn’t easy to follow, but the impact is undeniable.
    • Strategy: A History, by Sir Lawrence Freedman (@LawDavF). This book wasn’t what I expected—I thought it’d be more about specific strategies, not strategy as a whole. But there was a lot to like here. The author looks at how strategy played a part in military, political, and business settings.
    • Radical Candor: Be a Kick-Ass Boss Without Losing Your Humanity, by Kim Scott (@kimballscott). I had a couple hundred highlights in this book, so yes, it spoke to me. Scott credibly looks at how to guide a high performing team by fostering strong relationships. The idea of “radical candor” altered my professional behavior and hopefully makes me a better boss and colleague.
    • The Lean Startup: How’s Today’s Entrepreneurs Use Continuous Innovation to Create Radically Successful Businesses, by Eric Ries (@ericries). A modern classic, this book walks entrepreneurs through a process for validated learning and figuring out the right thing to build. Ries sprinkles his advice with real-life stories as proof points, and offers credible direction for those trying to build things that matter.
    • Hooked: How to Build Habit-Forming Products, by Nir Eyal (@nireyal). It’s not about tricking people into using products, but rather, helping people do things they already want to do. Eyal shares some extremely useful guidance for those building (and marketing) products that become indispensable.
    • The Art of Action: How Leaders Close the Gap between Plans, Actions, and Results, by Stephen Bungay. Wide-ranging book that covers a history of strategy, but also focuses on techniques for creating an action-oriented environment that delivers positive results.

    Thank you all for spending some time with me in 2017, and I look forward to learning alongside you all in 2018.

  • Can’t figure out which SpringOne Platform sessions to attend? I’ll help you out.

    Can’t figure out which SpringOne Platform sessions to attend? I’ll help you out.

    Next week is SpringOne Platform (S1P). This annual conference is where developers from around the world learn about about Spring, Cloud Foundry, and modern architecture. It’s got a great mix of tech talks, product demos, and transformational case studies. Hear from software engineers and leaders that work at companies like Pivotal, Boeing, Mastercard, Microsoft, Google, FedEx, HCSC, The Home Depot, Comcast, Accenture, and more.

    If you’re attending (and you are, RIGHT?!?), how do you pick sessions from the ten tracks over three days? I helped build the program, and thought I’d point out the best talks for each type of audience member.

    The “multi-cloud enthusiast”

    Your future involves multiple clouds. It’s inevitable. Learn all about the tech and strategies to make it more successful.

    The “bleeding-edge developer”

    The vast major of S1P attendees are developers who want to learn about the hottest technologies. Here are some highlights for them.

    The “enterprise change agent”

    I’m blown away by the number of real case studies at this show. If you’re trying to create a lasting change at your company, these are the talks that prep you for success.

    The “ambitious operations pro”

    Automation doesn’t spell the end of Ops. But it does change the nature of it. These are talks that forward-thinking operations folks want to attend to learn how to build and manage future tech.

    The “modern app architect”

    What a fun time to be an architect! We’re expected to deliver software with exceptional availability and scale. That requires a new set of patterns. You’ll learn them in these talks.

    The “curious data pro”

    How we collect, process, store, and retrieve data is changing. It has to. There’s more data, in more formats, with demands for faster access. These talks get you up to speed on modern data approaches.

    The “plugged-in manager”

    Any engineering lead, manager, or executive is going to spend considerable time optimizing the team, not building software. But that doesn’t mean you shouldn’t be up-to-date on what your team is working with. These talks will make you sound hip at the water cooler after the conference.

    Fortunately all these sessions will be recorded and posted online. But nothing beats the in-person experience. If you haven’t bought a ticket, it’s not too late!

  • Adding circuit breakers to your .NET applications

    Adding circuit breakers to your .NET applications

    Apps fail. Hardware fails. Networks fail. None of this should surprise you. As we build more distributed systems, these failures create unpredictability. Remote calls between components might experience latency, faults, unresponsiveness, or worse. How do you keep a failure in one component from creating a cascading failure across your whole environment?

    In his seminal book Release It!, Michael Nygard introduced the “circuit breaker” software pattern. Basically, you wrap calls to downstream services, and watch for failure. If there are too many failures, the circuit “trips” and the downstream services isn’t called any longer. Or at least for a period of time until the service heals itself.

    How do we use this pattern in our apps? Enter Hystrix from Netflix OSS. Released in 2012, this library executes each call on a separate thread, watches for failures in Java calls, invokes a fallback operation upon failure, trips a circuit if needed, and periodically checks to see if the downstream service is healthy. And it has a handy dashboard to visualize your circuits. It’s wicked. The Spring team worked with Netflix and created a easy-to-use version for Spring Boot developers. Spring Cloud Hystrix is the result. You can learn all about it in my most recent Pluralsight course.

    But why do Java developers get to have all the fun? Pivotal released an open-source library called Steeltoe last year. This library brings microservices patterns to .NET developers. It started out with things like a Git-backed configuration store, and service discovery. The brand new update offers management endpoints and … an implementation of Hystrix for .NET apps. Note that this is for .NET Framework OR .NET Core apps. Everybody gets in on the action.

    Let’s see how Steeltoe Hystrix works. I built an ASP.NET Core service, and than called it from a front-end app. I wrapped the calls to the service using Steeltoe Hystrix, which protects my app when failures occur.

    Dependency: the recommendation service

    This service returns recommended products to buy, based on your past purchasing history. In reality, it returns four products that I’ve hard-coded into a controller. LOWER YOUR EXPECTATIONS OF ME.

    This is an ASP.NET Core MVC Web API. The code is in GitHub, but here’s the controller for review:

    namespace core_hystrix_recommendation_service.Controllers
    {
        [Route("api/[controller]")]
        public class RecommendationsController : Controller
        {
            // GET api/recommendations
            [HttpGet]
            public IEnumerable<Recommendations> Get()
            {
                Recommendations r1 = new Recommendations();
                r1.ProductId = "10023";
                r1.ProductDescription = "Women's Triblend T-Shirt";
                r1.ProductImage = "https://cdn.shopify.com/s/files/1/0692/5669/products/charcoal_pivotal_grande_43987370-6045-4abf-b81c-b444e4c481bc_1024x1024.png?v=1503505687";
    
                Recommendations r2 = new Recommendations();
                r2.ProductId = "10040";
                r2.ProductDescription = "Men's Bring Back Your Weekend T-Shirt";
                r2.ProductImage = "https://cdn.shopify.com/s/files/1/0692/5669/products/m2_1024x1024.png?v=1503525900";
    
                Recommendations r3 = new Recommendations();
                r3.ProductId = "10057";
                r3.ProductDescription = "H2Go Force Water Bottle";
                r3.ProductImage = "https://cdn.shopify.com/s/files/1/0692/5669/products/Pivotal-Black-Water-Bottle_1024x1024.png?v=1442486197";
    
                Recommendations r4 = new Recommendations();
                r4.ProductId = "10059";
                r4.ProductDescription = "Migrating to Cloud Native Application Architectures by Matt Stine";
                r4.ProductImage = "https://cdn.shopify.com/s/files/1/0692/5669/products/migrating_1024x1024.png?v=1458083725";
    
                return new Recommendations[] { r1, r2, r3, r4 };
            }
        }
    }
    

    Note that the dependency service has no knowledge of Hystrix or how the caller invokes it.

    Caller: the recommendations UI

    The front-end app calls the recommendation service, but it shouldn’t tip over just because the service is unavailable. Rather, bad calls should fail quickly, and gracefully. We could return cached or static results, as an example. Be aware that a circuit breaker is much more than fancy exception handling. One big piece is that each call executes in its own thread. This implementation of the bulkhead patterns prevents runaway resource consumption, among other things. Besides that, circuit breakers are also machinery to watch failures over time, and allow the failing service to recover before allowing more requests.

    This ASP.NET Core app uses the mvc template. I’ve added the Steeltoe packages to the project. There are a few Nuget packages to choose from. If you’re running this in Pivotal Cloud Foundry, there’s a set of packages that make it easy to integrate with Hystrix dashboard embedded there. Here, let’s assume we’re running this app somewhere else. That means I need the base package “Steeltoe.CircuitBreaker.Hystrix” and “Steeltoe.CircuitBreaker.Hystrix.MetricsEvents” which gives me a stream of real-time data to analyze.

    <Project Sdk="Microsoft.NET.Sdk.Web">
      <PropertyGroup>
        <TargetFramework>netcoreapp2.0</TargetFramework>
      </PropertyGroup>
      <ItemGroup>
        <PackageReference Include="Microsoft.AspNet.WebApi.Client" Version="5.2.3" />
        <PackageReference Include="Microsoft.AspNetCore.All" Version="2.0.0" />
        <PackageReference Include="Microsoft.Extensions.Configuration" Version="2.0.0" />
        <PackageReference Include="Steeltoe.CircuitBreaker.Hystrix" Version="1.1.0" />
        <PackageReference Include="Steeltoe.CircuitBreaker.Hystrix.MetricsEvents" Version="1.1.0" />
      </ItemGroup>
      <ItemGroup>
        <DotNetCliToolReference Include="Microsoft.VisualStudio.Web.CodeGeneration.Tools" Version="2.0.0" />
      </ItemGroup>
    </Project>
    

    I built a class (“RecommendationService”) that calls the dependent service. This class inherits from HystrixCommand. There are a few ways to use these commands in calling code. I’m adding it to the ASP.NET Core service container, so my constructor takes in a IHystrixCommandOptions.

    //HystrixCommand means no result, HystrixCommand<string> means a string comes back
    public class RecommendationService: HystrixCommand<List<Recommendations>>
    {
      public RecommendationService(IHystrixCommandOptions options):base(options) {
         //nada
      }
    

    I’ve got inherited methods to use thanks to the base class. I call my dependent service by overriding Run (or RunAsync). If failure happens, the RunFallback (or RunFallbackAsync) is invoked and I just return some static data. Here’s the code:

    protected override List<Recommendations> Run()
    {
      var client = new HttpClient();
      var response = client.GetAsync("http://localhost:5000/api/recommendations").Result;
    
      var recommendations = response.Content.ReadAsAsync<List<Recommendations>>().Result;
    
      return recommendations;
    }
    
    protected override List<Recommendations> RunFallback()
    {
      Recommendations r1 = new Recommendations();
      r1.ProductId = "10007";
      r1.ProductDescription = "Black Hat";
      r1.ProductImage = "https://cdn.shopify.com/s/files/1/0692/5669/products/hatnew_1024x1024.png?v=1458082282";
    
      List<Recommendations> recommendations = new List<Recommendations>();
      recommendations.Add(r1);
    
      return recommendations;
    }
    

    My ASP.NET Core controller uses the RecommendationService class to call its dependency. Notice that I’ve got an object of that type coming into my constructor. Then I call the Execute method (that’s part of the base class) to trigger the Hystrix-protected call.

    public class HomeController : Controller
    {
      public HomeController(RecommendationService rs) {
      this.rs = rs;
      }
    
      RecommendationService rs;
    
      public IActionResult Index()
      {
        //call Hystrix-protected service
        List<Recommendations> recommendations = rs.Execute();
    
        //add results to property bag for view
        ViewData["Recommendations"] = recommendations;
    
        return View();
      }
    

    Last thing? Tying it all together. In the Startup.cs class, I added two things to the ConfigureServices operation. First, I added a HystrixCommand to the service container. Second, I added the Hystrix metrics stream.

    // This method gets called by the runtime. Use this method to add services to the container.
    public void ConfigureServices(IServiceCollection services)
    {
      services.AddMvc();
    
      //add QueryCommand to service container, and inject into controller so it gets config values
      services.AddHystrixCommand<RecommendationService>("RecommendationGroup", Configuration);
    
      //added to get Metrics stream
      services.AddHystrixMetricsStream(Configuration);
    }
    

    In the Configure method, I added couple pieces to the application pipeline.

    // This method gets called by the runtime. Use this method to configure the HTTP request pipeline.
    public void Configure(IApplicationBuilder app, IHostingEnvironment env)
    {
       if (env.IsDevelopment())
       {
         app.UseDeveloperExceptionPage();
       }
       else
       {
         app.UseExceptionHandler("/Home/Error");
       }
    
       app.UseStaticFiles();
    
       //added
       app.UseHystrixRequestContext();
    
       app.UseMvc(routes =>
       {
         routes.MapRoute(
           name: "default",
           template: "{controller=Home}/{action=Index}/{id?}");
       });
    
       //added
       app.UseHystrixMetricsStream();
    }
    

    That’s it. Notice that I took advantage of ASP.NET Core’s dependency injection, and known extensibility points. Nothing unnatural here.

    You can grab the source code for this from my GitHub repo.

    Testing the circuit

    Let’s test this out. First, I started up the recommendation service. Pinging the endpoint proved that I got back four recommended products.

    2017.09.21-steeltoe-01

    Great. Next I started up the MVC app that acts as the front-end. Loading the page in the browser showed the four recommendations returned by the service.

    2017.09.21-steeltoe-02

    That works. No big deal. Now let’s turn off the downstream service. Maybe it’s down for maintenance, or just misbehaving. What happens?

    2017.09.21-steeltoe-03

    The Hystrix wrapper detected a failure, and invoked the fallback operation. That’s cool. Let’s see what Hystrix is tracking in the metrics stream. Just append /hystrix/hystrix.stream to the URL and you get a data stream that’s fully compatible with Spring Cloud Hystrix.

    2017.09.21-steeltoe-04

    Here, we see a whole bunch of data that Hystrix is tracking. It’s watching request count, error rate, and lots more. What if you want to change the behavior of Hystrix? Amazingly, the .NET version of Hystrix in Steeltoe has the same broad configuration surface that classic Hystrix does. By adding overrides to the appsettings.json file, you can tweak the behavior of commands, the thread pool, and more. In order to see the circuit actually open, I stretched the evaluation window (from 10 to 20 seconds), and reduced the error limit (from 20 to 3). Here’s what that looked like:

    {
    "hystrix": {
      "command": {
          "default": {
            "circuitBreaker": {
              "requestVolumeThreshold": 3
            },
            "metrics" : {
              "rollingStats": {
                "timeInMilliseconds" : 20000
              }
            }
          }
        }
      }
    }
    

    Restarting my service shows new threshold in the Hystrix stream. Super easy, and very powerful.

    2017.09.21-steeltoe-05

    BONUS: Using the Hystrix Dashboard

    Look, I like reading gobs of JSON in the browser as much as the next person with too much free time. However, normal people like dense visualizations that help them make decisions quickly. Fortunately, Hystrix comes with an extremely data-rich dashboard that makes it simple to see what’s going on.

    This is still a Java component, so I spun up a new project from start.spring.io and added a Hystrix Dashboard dependency to my Boot app. After adding a single annotation to my class, I spun up the project. The Hystrix dashboard asks for a metrics endpoint. Hey, I have one of those! After plugging in my stream URL, I can immediately see tons of info.

    2017.09.21-steeltoe-06.png

    As a service owner or operator, this is a goldmine. I see request volumes, circuit status, failure counts, number of hosts, latency, and much more. If you’ve got a couple services, or a couple hundred, visualizations like this are a life saver.

    Summary

    As someone who started out their career as a .NET developer, I’m tickled to see things like this surface. Steeltoe adds serious juice to your .NET apps and the addition of things like circuit breakers makes it a must-have. Circuit breakers are a proven way to deliver more resilient service environments, so download my sample apps and give this a spin right now!

  • Surprisingly simple messaging with Spring Cloud Stream

    Surprisingly simple messaging with Spring Cloud Stream

    You’ve got a lot of options when connecting microservices together. You could use service discovery and make direct calls. Or you might use a shared database to transfer work. But message brokers continue to be a popular choice. These range from single purpose engines like Amazon SQS or RabbitMQ, to event stream processors like Azure Event Hubs or Apache Kafka, all the way to sophisticated service buses like Microsoft BizTalk Server. When developers choose any one of those, they need critical knowledge to be use them effectively. How can you shrink the time to value and help developers be productive, faster? For Java developers, Spring Cloud Stream offers a valuable abstraction.

    Spring Cloud Stream offers an interface for developers that requires no knowledge of the underlying broker. That broker, either Apache Kafka or RabbitMQ, gets configured by Spring Cloud Stream. Communication to and from the broker is also done via the Stream library.

    What’s exciting to me is that all brokers are treated the same. Spring Cloud Stream normalizes behavior, even if it’s not native to the broker. For example, want a competing consumer model for your clients, or partitioned processing? Those concepts behave differently in RabbitMQ and Kafka. No problem. Spring Cloud Stream makes it work the same, transparently. Let’s actually try both of those scenarios.

    Competing consumers through “consumer groups”

    By default, Spring Cloud Stream sets up everything as a publish-subscribe relationship. This makes it easy to share data among many different subscribers. But what if you want multiple instances of one subscriber (for scale out processing)? One solution is consumer groups. These don’t behave the same in both messaging brokers. Spring Cloud Stream don’t care! Let’s build an example app using RabbitMQ.

    Before writing code, we need an instance of RabbitMQ running. The most dead-simple option? A Docker container for it. If you’ve got Docker installed, the only thing you need to do is run the following command:

    -docker run -d –hostname local-rabbit –name demo-rmq -p 15672:15672 -p 5672:5672 rabbitmq:3.6.11-management

    2017.09.05-stream-02

    After running that, I have a local cache of the image, and a running container with port mapping that makes the container accessible from my host.

    How do we get messages into RabbitMQ? Spring Cloud Stream supports a handful of patterns. We could publish on a schedule, or on-demand. Here, let’s build a web app that publishes to the bus when the user issues a POST command to a REST endpoint.

    Publisher app

    First, build a Spring Boot application that leverages spring-cloud-starter-stream-rabbit (and spring-boot-starter-web). This brings in everything I need to use Spring Cloud Stream, and RabbitMQ as a destination.

    2017.09.05-stream-01

    Add a new class that acts as our REST controller. A simple @EnableBinding annotation lights this app up as a Spring Cloud Stream project. Here, I’m using the built-in “Source” interface that defines a single communication channel, but you can also build your own.

    @EnableBinding(Source.class)
    @RestController
    public class BriefController {
    

    In this controller class, add an @Autowired variable that references the bean that Spring Cloud Stream adds for the Source interface. We can then use this variable to directly publish to the bound channel! Same code whether talking to RabbitMQ or Kafka. Simple stuff.

    @EnableBinding(Source.class)
    @RestController
    public class BriefController {
      //refer to instance of bean that Stream adds to container
      @Autowired
      Source mysource;
    
      //take in a message via HTTP, publish to broker
      @RequestMapping(path="/brief", method=RequestMethod.POST)
      public String publishMessage(@RequestBody String payload) {
    
        System.out.println(payload);
    
        //send message to channel
        mysource.output().send(MessageBuilder.withPayload(payload).build());
    
        return "success";
      }
    

    Our publisher app is done, so all that’s left is some basic configuration. This configuration tells Spring Cloud Stream how to connect to the right broker. Note that we don’t have to tell Spring Cloud Stream to use RabbitMQ; it happens automatically by having that dependency in our classpath. No, all we need is connection info to our broker, an explicit reference to a destination (without it, the RabbitMQ exchange would be called “output”), and a command to send JSON.

    server.port=8080
    
    #rabbitmq settings for Spring Cloud Stream to use
    spring.rabbitmq.host=127.0.0.1
    spring.rabbitmq.port=5672
    spring.rabbitmq.username=guest
    spring.rabbitmq.password=guest
    
    spring.cloud.stream.bindings.output.destination=legalbriefs
    spring.cloud.stream.default.contentType=application/json
    

    Consumer app

    This part’s almost too easy. Here, build a new Spring Boot application and only choose the spring-cloud-starter-stream-rabbit dependency.

    In the default class, decorate it with @EnableBinding and use the built-in Sink interface. Then, all that’s left is to create a method to process any messages found in the broker. To do that, we decorate the operation with @StreamListener, and all the content type handling is done for us. Wicked.

    @EnableBinding(Sink.class)
    @SpringBootApplication
    public class BlogStreamSubscriberDemoApplication {
    
      public static void main(String[] args) {
        SpringApplication.run(BlogStreamSubscriberDemoApplication.class, args);
      }
    
      @StreamListener(target=Sink.INPUT)
      public void logfast(String msg) {
        System.out.println(msg);
      }
    }
    

    The configuration for this app is straightforward. Like above, we have connection details for RabbitMQ. Also, note that the binding now references “input”, which was the name of the channel in the default “Sink” interface. Finally, observe that I used the SAME destination as the source, to ensure that Spring Cloud Stream wires up my publisher and subscriber successfully. For kicks, I didn’t yet add the consumer group settings.

    server.port=0
    
    #rabbitmq settings for Spring Cloud Stream to use
    spring.rabbitmq.host=127.0.0.1
    spring.rabbitmq.port=5672
    spring.rabbitmq.username=guest
    spring.rabbitmq.password=guest
    
    spring.cloud.stream.bindings.input.destination=legalbriefs
    

    Test the solution

    Let’s see how this works. First, start up three instances of the subscriber app. I generated a jar file, and started up three instances in the shell.

    2017.09.05-stream-04

    When you start up these apps, Spring Cloud Stream goes to work. Log into the RabbitMQ admin console, and notice that one exchange got generated. This one, named “legalbriefs”, maps to the name we put in our configuration file.

    2017.09.05-stream-12

    We also have three queues that map to each of the three app instances we started up.

    2017.09.05-stream-13

    Nice! Finally, start up the publisher, and post a message to the /briefs endpoint.

    2017.09.05-stream-05

    What happens? As expected, each subscriber gets a copy of the message, because by default, everything happens in a pub/sub fashion.

    2017.09.05-stream-06

    Add consumer group configuration

    We don’t want each instance to get a copy. Rather, we want these instances to share the processing load. Only one should get each message. In the subscriber app, we add a single line to our configuration file. This tells Spring Cloud Stream that all the instances form a single consumer group that share work.

    #adds consumer group processing
    spring.cloud.stream.bindings.input.group=briefProcessingGroup
    

    After regenerating the subscriber jar file, and starting up each file, we see a different setup in RabbitMQ. What you see is a single, named queue, but three “consumers” of the queue.

    2017.09.05-stream-07

    Send in two different messages, and see that each is only processed by a single subscriber instance. This is a simple way to use a message broker to scale out processing.

    2017.09.05-stream-08

    Doing stateful processing using partitioning

    Partitioning feels like a related, but different scenario than consumer groups. Partitions in Kafka introduce a level of parallel processing by writing data to different partitions. Then, each subscriber pulls from a given partition to do work. Here in Spring Cloud Stream, partitioning is useful for parallel processing, but also for stateful processing. When setting it up, you specify a characteristic that steers messages to a given partition. Then, a single app instance processes all the data in that partition. This can be handy for event processing or any scenario where it’s useful for related messages to get processed by the same instance. Think counters, complex event processing, or time-sensitive calculations.

    Unlike with consumer groups. partitioning requires configuration changes to both publishers AND subscribers.  On the publisher side, all that’s needed is (a) the number of partitions, and (b) the expression that describes how data is partitioned. That’s it. No code changes.

    #adding configuration for partition processing
    spring.cloud.stream.bindings.output.producer.partitionKeyExpression=payload.attorney
    spring.cloud.stream.bindings.output.producer.partitionCount=3
    

    On the subscriber side, you set the number of partitions, and set the “partitioned” property equal to “true.” What’s also interesting, but logical, is that as each subscriber starts, you need to give it an “index” so that Spring Cloud Streams knows which partition it should read from.

    #add partition processing
    spring.cloud.stream.bindings.input.consumer.partitioned=true
    #spring.cloud.stream.instanceIndex=0
    spring.cloud.stream.instanceCount=3
    

    Let’s start everything up again. The publisher starts up the same as before. Now though, each subscriber instance starts up with a “”spring.cloud.stream.instanceIndex=X” flag that specifies which index applies.

    2017.09.05-stream-09

    In RabbitMQ, the setup is different than before. Now, we have three queues, each with a different “routing key” that corresponds to its partition.

    2017.09.05-stream-10

    Send in a message, and notice that all messages with the same attorney name go to one instance. Change the case number, and see that all messages still go to the same place. Switch the attorney ID, and observe that a different partition (likely) gets it. If you have more data varieties than you do partitions, you’ll see a partition handle more than one set of data. No problem, just know that happens.

    2017.09.05-stream-11

    Summary

    It shouldn’t have to be hard to deal with message brokers. Of course there are plenty of scenarios where you want to flex the advanced options of a broker, but there are also many cases where you just want a reliable intermediary. In those cases, Spring Cloud Stream makes it super easy to abstract away knowledge of the broker, while still normalizing behavior across the unique engines.

    In my latest Pluralsight course, I spent over an hour digging into Spring Cloud Stream, and another ninety minutes working with Spring Cloud Data Flow. That project helps you quickly string together Stream applications. Check it out for a deeper dive!

  • Introducing cloud-native integration (and why you should care!)

    Introducing cloud-native integration (and why you should care!)

    I’ve got three kids now. Trying to get anywhere on time involves heroics. My son is almost ten years old and he’s rarely the problem. The bottleneck is elsewhere. It doesn’t matter how much faster my son gets himself ready, it won’t improve my family’s overall speed at getting out the door. The Theory of Constraints says that you improve the throughput of your process by finding and managing the bottleneck, or constraint. Optimizing areas outside the constraint (e.g. my son getting ready even faster) don’t make much of a difference. Does this relate to software, and application integration specifically? You betcha.

    Software delivery goes through a pipeline. Getting from “idea” to “production” requires a series of steps. And then you repeat it over and over for each software update. How fast you get through that process dictates how responsive you can be to customers and business changes. Your development team may operate LIKE A MACHINE and crank out epic amounts of code. But if your dedicated ops team takes forever to deploy it, then it just doesn’t matter how fast your devs are. Inventory builds up, value is lost. My assertion is that the app integration stage of the pipeline is becoming a bottleneck. And without making changes to how you do integration, your cloud-native efforts are going to waste.

    What’s “cloud native” all about? At this month’s Integrate conference, I had the pleasure of talking about it. Cloud-native refers to how software is delivered, not where. Cloud-native systems are built for scale, built for continuous change, and built to tolerate failure. Traditional enterprises can become cloud natives, but only if they make serious adjustments to how they deliver software.

    Even if you’ve adjusted how you deliver code, I’d suspect that your data, security, and integration practices haven’t caught up. In my talk, I explained six characteristics of a cloud-native integration environment, and mixed in a few demos (highlighted below) to prove my points.

    #1 – Cloud-native integration is more composable

    By composable, I mean capable of assembling components into something greater. Contrast this to classic integration solutions where all the logic gets embedded into a single artifact. Think ETL workflows where ever step of the process is in one deployable piece. Need to change one component? Redeploy the whole thing. One step require a ton of CPU processing? Find a monster box to host the process in.

    A cloud-native integration gets built by assembling independent components. Upgrade and scale each piece independently. To demonstrate this, I built a series of Microsoft Logic Apps. Two of them take in data. The first takes in a batch file from Microsoft OneDrive, the other takes in real-time HTTP requests. Both drop the results to a queue for later processing.

    2017.07.10-integrate-01

    The “main” Logic App takes in order entries, enriches the order via a REST service I have running in Azure App Service, calls an Azure Function to assign a fraud score, and finally dumps the results to a queue for others to grab.

    2017.07.10-integrate-02

    My REST API sitting in Azure App Service is connected to a GitHub repo. This means that I should be able to upgrade that individual service, without touching the data pipeline sitting Logic Apps. So that’s what I did. I sent in a steady stream of requests, modified my API code, pushed the change to GitHub, and within a few seconds, the Logic App is emitting out a slightly different payload.

    2017.07.10-integrate-03

    #2 – Cloud-native integration is more “always on”

    One of the best things about early cloud platforms being less than 100% reliable was that it forced us to build for failure. Instead of assuming the infrastructure was magically infallible, we built systems that ASSUMED failure, and architected accordingly.

    For integration solutions, have we really done the same? Can we tolerate hardware failure, perform software upgrades, or absorb downstream dependency hiccups without stumbling? A cloud-native integration solution can handle a steady load of traffic while staying online under all circumstances.

    #3 – Cloud-native integration is built for scale

    Elasticity is a key attribute of cloud. Don’t build out infrastructure for peak usage; build for easy scale when demand dictates. I haven’t seen too many ESB or ETL solutions that transparently scale, on-demand with no special considerations. No, in most cases, scaling is a carefully designed part of an integration platform’s lifecycle. It shouldn’t be.

    If you want cloud-native integration, you’ll look to solutions that support rapid scale (in, or out), and let you scale individual pieces. Event ingestions unexpected and overwhelming? Scale that, and that alone. You’ll also want to avoid too much shared capacity, as that creates unexpected coupling and makes scaling the environment more difficult.

    #4 – Cloud-native integration is more self-service

    The future is clear: there will be more “citizen integrators” who don’t need specialized training to connect stuff. IFTTT is popular, as are a whole new set of iPaaS products that make it simple to connect apps. Sure, they aren’t crazy sophisticated integrations; there will always be a need for specialists there. But integration matters more than ever, and we need to democratize the ability to connect our stuff.

    One example I gave here was Pivotal Cloud Cache and Pivotal GemFire. Pivotal GemFire is an industry-leading in-memory data grid. Awesome tech, but not trivial to properly setup and use. So, Pivotal created an opinionated slice of GemFire with a subset of features, but an easier on-ramp. Pivotal Cloud Cache supports specific use cases, and an easy self-service provisioning experience. My challenge to the Integrate conference audience? Why couldn’t we create a simple facade for something powerful, but intimidating, like Microsoft BizTalk Server? What if you wanted a self-service way to let devs create simple integrations? I decided use the brand new Management REST API from BizTalk Server 2016 Feature Pack 1 to build one.

    I used the incomparable Spring Boot to build a Java app that consumed those REST APIs. This app makes it simple to create a “pipe” that uses BizTalk’s durable bus to link endpoints.

    2017.07.10-integrate-05

    I built a bunch of Java classes to represent BizTalk objects, and then created the required API payloads.

    2017.07.10-integrate-04

    The result? Devs can create a new pipe that takes in data via HTTP and drops the result to two file locations.

    2017.07.10-integrate-06

    When I click the button above, I use those REST APIs to create a new in-process HTTP receive location, two send ports, and the appropriate subscriptions.

    2017.07.10-integrate-07

    Fun stuff. This seems like one way you could unlock new value in your ESB, while giving it a more cloud-native UX.

    #5 – Cloud-native integration supports more endpoints

    There’s no turning back. Your hippest integration offered to enterprise devs CANNOT be SharePoint. Nope. Your teams want to creatively connect to Slack, PagerDuty, Salesforce, Workday, Jira, and yes, enterprisey things like SQL Server and IBM DB2.

    These endpoints may be punishing your integration platform with a constant data stream, or, process data irregularly, in bulk. Doing newish patterns like Event Sourcing? Your apps will talk to an integration platform that offers a distributed commit log. Are you ready? Be ready for new endpoints, with new data streams, consumed via new patterns.

    #6 – Cloud-native integration demands complete automation

    Are you lovingly creating hand-crafted production servers? Stop that. And devs should have complete replicas of production environments, on their desktop. That means packaging and automating the integration bus too. Cloud-natives love automation!

    Testing and deploying integration apps must be automated. Without automated tests, you’ll never achieve continuous delivery of your whole system. Additionally, if you have to log into one of your integration servers, you’re doing it wrong. All management (e.g. monitoring, deployments, upgrades) should be done via remote tools and scripts. Think fleets of servers, not long-lived named instances.

    To demonstrate this concept, I discussed automating the lifecycle of your integration dependency. Specifically, through the use of a service broker. Initially part of Cloud Foundry, the service broker API has caught on elsewhere. A broad set of companies are now rallying around a single API for advertising services, provisioning, de-provisioning, and more. Microsoft built a Cloud Foundry service broker, and it handles lots of good things. It handles lifecycle and credential sharing for services like Azure SQL Database, Azure Service Bus, Azure CosmosDB, and more. I installed this broker into my Pivotal Web Services account, and it advertised available services.

    2017.07.10-integrate-08

    Simply by typing in cf create-service azure-servicebus standard integratesb -c service-bus-config.json I kicked off a fast, automated process to generate an Azure Resource Group and create a Service Bus namespace.

    2017.07.10-integrate-09

    Then, my app automatically gets access to environment variables that hold the credentials. No more embedding creds in code or config, no need to go to the Azure Portal. This makes integration easy, developer-friendly, and repeatable.

    2017.07.10-integrate-10

    Summary

    It’s such an exciting time to be a software developer. We’re solving new problems in new ways, and making life better for so many. The last thing we want is to be held back by a bottleneck in our process. Don’t let integration slow down your ambitions. The technology is there to help you build integration platforms that are more scalable, resilient, and friendly-to-change. Go for it!