Category: Microservices

  • Introducing cloud-native integration (and why you should care!)

    Introducing cloud-native integration (and why you should care!)

    I’ve got three kids now. Trying to get anywhere on time involves heroics. My son is almost ten years old and he’s rarely the problem. The bottleneck is elsewhere. It doesn’t matter how much faster my son gets himself ready, it won’t improve my family’s overall speed at getting out the door. The Theory of Constraints says that you improve the throughput of your process by finding and managing the bottleneck, or constraint. Optimizing areas outside the constraint (e.g. my son getting ready even faster) don’t make much of a difference. Does this relate to software, and application integration specifically? You betcha.

    Software delivery goes through a pipeline. Getting from “idea” to “production” requires a series of steps. And then you repeat it over and over for each software update. How fast you get through that process dictates how responsive you can be to customers and business changes. Your development team may operate LIKE A MACHINE and crank out epic amounts of code. But if your dedicated ops team takes forever to deploy it, then it just doesn’t matter how fast your devs are. Inventory builds up, value is lost. My assertion is that the app integration stage of the pipeline is becoming a bottleneck. And without making changes to how you do integration, your cloud-native efforts are going to waste.

    What’s “cloud native” all about? At this month’s Integrate conference, I had the pleasure of talking about it. Cloud-native refers to how software is delivered, not where. Cloud-native systems are built for scale, built for continuous change, and built to tolerate failure. Traditional enterprises can become cloud natives, but only if they make serious adjustments to how they deliver software.

    Even if you’ve adjusted how you deliver code, I’d suspect that your data, security, and integration practices haven’t caught up. In my talk, I explained six characteristics of a cloud-native integration environment, and mixed in a few demos (highlighted below) to prove my points.

    #1 – Cloud-native integration is more composable

    By composable, I mean capable of assembling components into something greater. Contrast this to classic integration solutions where all the logic gets embedded into a single artifact. Think ETL workflows where ever step of the process is in one deployable piece. Need to change one component? Redeploy the whole thing. One step require a ton of CPU processing? Find a monster box to host the process in.

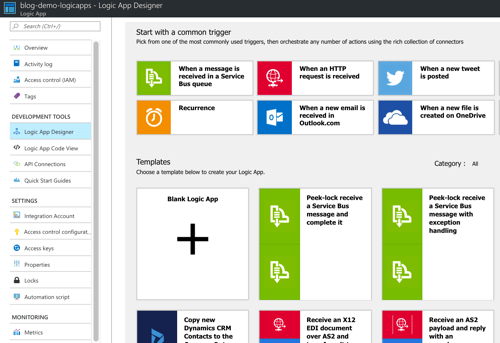
    A cloud-native integration gets built by assembling independent components. Upgrade and scale each piece independently. To demonstrate this, I built a series of Microsoft Logic Apps. Two of them take in data. The first takes in a batch file from Microsoft OneDrive, the other takes in real-time HTTP requests. Both drop the results to a queue for later processing.

    2017.07.10-integrate-01

    The “main” Logic App takes in order entries, enriches the order via a REST service I have running in Azure App Service, calls an Azure Function to assign a fraud score, and finally dumps the results to a queue for others to grab.

    2017.07.10-integrate-02

    My REST API sitting in Azure App Service is connected to a GitHub repo. This means that I should be able to upgrade that individual service, without touching the data pipeline sitting Logic Apps. So that’s what I did. I sent in a steady stream of requests, modified my API code, pushed the change to GitHub, and within a few seconds, the Logic App is emitting out a slightly different payload.

    2017.07.10-integrate-03

    #2 – Cloud-native integration is more “always on”

    One of the best things about early cloud platforms being less than 100% reliable was that it forced us to build for failure. Instead of assuming the infrastructure was magically infallible, we built systems that ASSUMED failure, and architected accordingly.

    For integration solutions, have we really done the same? Can we tolerate hardware failure, perform software upgrades, or absorb downstream dependency hiccups without stumbling? A cloud-native integration solution can handle a steady load of traffic while staying online under all circumstances.

    #3 – Cloud-native integration is built for scale

    Elasticity is a key attribute of cloud. Don’t build out infrastructure for peak usage; build for easy scale when demand dictates. I haven’t seen too many ESB or ETL solutions that transparently scale, on-demand with no special considerations. No, in most cases, scaling is a carefully designed part of an integration platform’s lifecycle. It shouldn’t be.

    If you want cloud-native integration, you’ll look to solutions that support rapid scale (in, or out), and let you scale individual pieces. Event ingestions unexpected and overwhelming? Scale that, and that alone. You’ll also want to avoid too much shared capacity, as that creates unexpected coupling and makes scaling the environment more difficult.

    #4 – Cloud-native integration is more self-service

    The future is clear: there will be more “citizen integrators” who don’t need specialized training to connect stuff. IFTTT is popular, as are a whole new set of iPaaS products that make it simple to connect apps. Sure, they aren’t crazy sophisticated integrations; there will always be a need for specialists there. But integration matters more than ever, and we need to democratize the ability to connect our stuff.

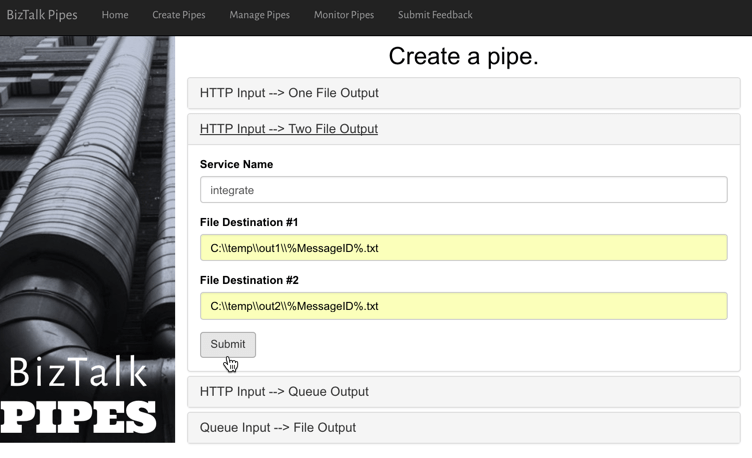
    One example I gave here was Pivotal Cloud Cache and Pivotal GemFire. Pivotal GemFire is an industry-leading in-memory data grid. Awesome tech, but not trivial to properly setup and use. So, Pivotal created an opinionated slice of GemFire with a subset of features, but an easier on-ramp. Pivotal Cloud Cache supports specific use cases, and an easy self-service provisioning experience. My challenge to the Integrate conference audience? Why couldn’t we create a simple facade for something powerful, but intimidating, like Microsoft BizTalk Server? What if you wanted a self-service way to let devs create simple integrations? I decided use the brand new Management REST API from BizTalk Server 2016 Feature Pack 1 to build one.

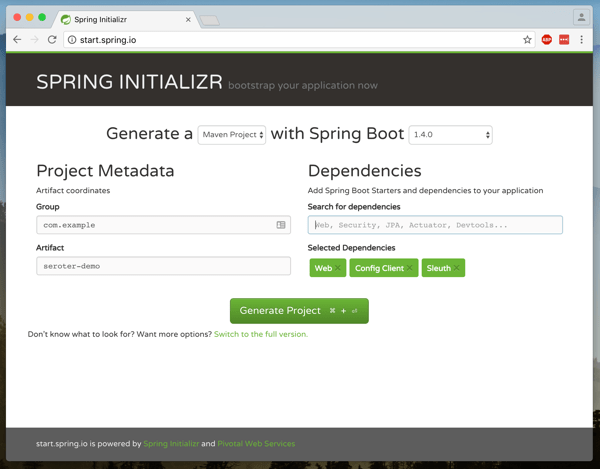
    I used the incomparable Spring Boot to build a Java app that consumed those REST APIs. This app makes it simple to create a “pipe” that uses BizTalk’s durable bus to link endpoints.

    2017.07.10-integrate-05

    I built a bunch of Java classes to represent BizTalk objects, and then created the required API payloads.

    2017.07.10-integrate-04

    The result? Devs can create a new pipe that takes in data via HTTP and drops the result to two file locations.

    2017.07.10-integrate-06

    When I click the button above, I use those REST APIs to create a new in-process HTTP receive location, two send ports, and the appropriate subscriptions.

    2017.07.10-integrate-07

    Fun stuff. This seems like one way you could unlock new value in your ESB, while giving it a more cloud-native UX.

    #5 – Cloud-native integration supports more endpoints

    There’s no turning back. Your hippest integration offered to enterprise devs CANNOT be SharePoint. Nope. Your teams want to creatively connect to Slack, PagerDuty, Salesforce, Workday, Jira, and yes, enterprisey things like SQL Server and IBM DB2.

    These endpoints may be punishing your integration platform with a constant data stream, or, process data irregularly, in bulk. Doing newish patterns like Event Sourcing? Your apps will talk to an integration platform that offers a distributed commit log. Are you ready? Be ready for new endpoints, with new data streams, consumed via new patterns.

    #6 – Cloud-native integration demands complete automation

    Are you lovingly creating hand-crafted production servers? Stop that. And devs should have complete replicas of production environments, on their desktop. That means packaging and automating the integration bus too. Cloud-natives love automation!

    Testing and deploying integration apps must be automated. Without automated tests, you’ll never achieve continuous delivery of your whole system. Additionally, if you have to log into one of your integration servers, you’re doing it wrong. All management (e.g. monitoring, deployments, upgrades) should be done via remote tools and scripts. Think fleets of servers, not long-lived named instances.

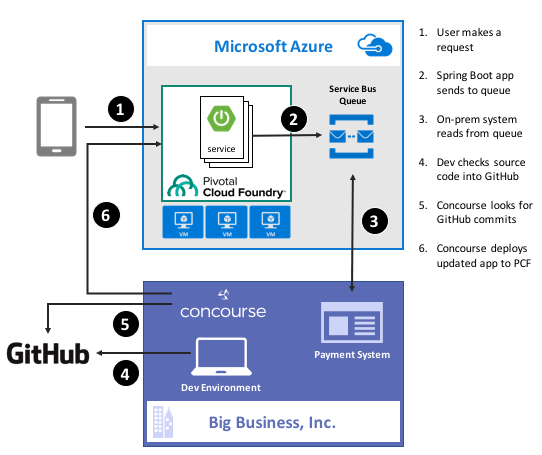
    To demonstrate this concept, I discussed automating the lifecycle of your integration dependency. Specifically, through the use of a service broker. Initially part of Cloud Foundry, the service broker API has caught on elsewhere. A broad set of companies are now rallying around a single API for advertising services, provisioning, de-provisioning, and more. Microsoft built a Cloud Foundry service broker, and it handles lots of good things. It handles lifecycle and credential sharing for services like Azure SQL Database, Azure Service Bus, Azure CosmosDB, and more. I installed this broker into my Pivotal Web Services account, and it advertised available services.

    2017.07.10-integrate-08

    Simply by typing in cf create-service azure-servicebus standard integratesb -c service-bus-config.json I kicked off a fast, automated process to generate an Azure Resource Group and create a Service Bus namespace.

    2017.07.10-integrate-09

    Then, my app automatically gets access to environment variables that hold the credentials. No more embedding creds in code or config, no need to go to the Azure Portal. This makes integration easy, developer-friendly, and repeatable.

    2017.07.10-integrate-10

    Summary

    It’s such an exciting time to be a software developer. We’re solving new problems in new ways, and making life better for so many. The last thing we want is to be held back by a bottleneck in our process. Don’t let integration slow down your ambitions. The technology is there to help you build integration platforms that are more scalable, resilient, and friendly-to-change. Go for it!

  • Using speaking opportunities as learning opportunities

    Over this summer, I’ll be speaking at a handful of events. I sign myself up for these opportunities —in addition to teaching courses for Pluralsight —so that I commit time to learning new things. Nothing like a deadline to provide motivation!

    Do you find yourself complaining that you have a stale skill set, or your “brand” is unknown outside your company? You can fix that. Sign up for a local user group presentation. Create a short “course” on a new technology and deliver it to colleagues at lunch. Start a blog and share your musings and tech exploration. Pitch a talk to a few big conferences. Whatever you do, don’t wait for others to carve out time for you to uplevel your skills! For me, I’m using this summer to refresh a few of my own skill areas.

    In June, I’m once again speaking in London at Integrate. Application integration is arguably the most important/interesting part of Azure right now. Given Microsoft’s resurgence in this topic area, the conference matters more than ever. My particular session focuses on “cloud-native integration.” What is it all about? How do you do it? What are examples of it in action? I’ve spent a fair amount of time preparing for this, so hopefully it’s a fun talk. The conference is nearly sold out, but I know there are handful of tickets left. It’s one of my favorite events every year.

    Coming up in July, I’m signed up to speak at PerfGuild. It’s a first-time, online-only conference 100% focused on performance testing. My talk is all about distributed tracing and using it to uncover (and resolve) latency issues. The talk builds on a topic I covered in my Pluralsight course on Spring Cloud, with some extra coverage for .NET and other languages. As of this moment, you can add yourself to the conference waitlist.

    Finally, this August I’ll be hitting balmy Orlando, FL to speak at the Agile Alliance conference. This year’s “big Agile” conference has a track centered on foundational concepts. It introduces attendees to concepts like agile project delivery, product ownership, continuous delivery, and more. My talk, DevOps Explained, builds on things I’ve covered in recent Pluralsight courses, as well as new research.

    Speaking at conferences isn’t something you do to get wealthy. In fact, it’s somewhat expensive. But in exchange for incurring that cost, I get to allocate time for learning interesting things. I then take those things, and share them with others. The result? I feel like I’m investing in myself, and I get to hang out at conferences with smart people.

    If you’re just starting to get out there, use a blog or user groups to get your voice heard. Get to know people on the speaking circuit, and they can often help you get into the big shows! If we connect at any of the shows above, I’m happy to help you however I can.

  • Yes, You Can Use a Single Service Registry for .NET and Java Microservices

    Years ago, I could recall lots of phone numbers from memory. Now? It’d be tough to come up with more than two. There’s so many ways to contact each person that I know (phone, email(s), Twitter, WhatsApp, etc) and I depend heavily on my address book. As you start using microservices in your architecture, you’ll discover that you also need a good address book to find services at runtime. But unlike classic solutions such as configuration management databases or UDDI registries, a modern “address book” is different. Why? As microservices get deployed, scaled, and updated, their “address” is fluid. To account for that, any modern address book cannot have stale references. Enter Eureka from Netflix. While baked into Spring Cloud for Java users, Eureka isn’t easily available to .NET microservices. That changed with the OSS Steeltoe library, and I thought I’d show that off here.

    Building a Eureka Server

    Thanks to Spring Cloud, it’s easy to set up a Eureka registry for your services to talk to.

    First, I used Spring Tool Suite to build a new Spring Boot app. In the app creation wizard, I chose the “Eureka Server” package dependency (spring-cloud-starter-eureka-server). If you aren’t using Spring Tool Suite, check out the awesome web-based Spring Intializr to generate project scaffolding to import into any Java IDE.

    2017.03.29-eureka-01

    Next up, there was a LOT of code to write to bring up a Eureka server.

    @EnableEurekaServer
    @SpringBootApplication
    public class PsPlaceholderEurekaServerApplication {
    
      public static void main(String[] args) {
        SpringApplication.run(PsPlaceholderEurekaServerApplication.class, args);
      }
    }
    

    Seriously, that’s it. Bonkers. All that remained was adding a few properties. I set a couple of cosmetic properties (“datacenter” and “environment”), and then told Eureka to NOT register itself with the server, and to NOT retrieve a copy of the registry.

    server.port=8761
    
    # value used for AWS, here can be anything
    eureka.datacenter=seattle
    eureka.environment=prod
    
    # no need to register the server with the server
    eureka.client.register-with-eureka=false
    
    # don't need a local copy of the registry
    eureka.client.fetch-registry=false
    

    I started up the app, navigated to the right URL, and saw the Eureka Server dashboard. There was a bunch of system status info, and an (empty) list of registered servers. Note that Eureka stores its registry in memory. The registry is a live look at the environment because services send a heartbeat to state that they’re online. No need to persist anything to disk.

    2017.03.29-eureka-02

    Building a Eureka Server (Alternative, No-Java Way)

    Now you might say “I don’t know Java and don’t want to learn it.” Fair enough. If you’re a Pivotal customer, than you’re in luck. Spring Cloud Services bundles up key Spring Cloud projects and runs them “as a service” in your Cloud Foundry environment. One such service is the Eureka Service Registry. You can try this out for free in Pivotal Web Services.

    2017.03.29-eureka-03

    After clicking a couple buttons, and waiting about 30 seconds, I had a registry! No Java required.

    2017.03.29-eureka-04

    Registering a Java Service

    Great, I had a registry. Now what? I wanted to add a Java and .NET service to my local registry.

    First up, Java. I created a new Spring Boot application, and chose the “Eureka Discovery” package dependency (spring-cloud-starter-eureka).

    I set up a super awesome REST service that says “hello from Spring Boot.” What about registering with Eureka? It took a single @EnableEurekaClient annotation in my code.

    @EnableEurekaClient
    @RestController
    @SpringBootApplication
    public class PsPlaceholderEurekaServiceApplication {
    
       public static void main(String[] args) {
    
          SpringApplication.run(PsPlaceholderEurekaServiceApplication.class, args);
       }
    
       @RequestMapping("/")
       public String SayHello() {
          return "hello from Spring Boot!";
       }
    }
    

    In the bootstrap.properties file, I set the “spring.application.name” property. This told Eureka what to label my service in the registry. In my application.properties file, I specified that I should register with Eureka, and to send health data along with my service’s heartbeat.

    eureka.client.register-with-eureka=true
    eureka.client.fetch-registry=false
    
    #can intentionally set the host name
    eureka.instance.hostname=localhost
    
    eureka.client.healthcheck.enabled=true
    

    With this in place, I started up my Java service, and sure enough, saw it in the Eureka registry. Cool!

    2017.03.29-eureka-05

    Registering a .NET Service

    .NET developers, rejoice! We can enjoy all kinds of microservices goodness by using libraries like Steeltoe. And it works with .NET Framework and .NET Core apps.

    In this example, I chose to use .NET Core. Here’s my sequence of commands in the wicked .NET Core CLI:

    dotnet new webapi
    dotnet add package Steeltoe.Discovery.Client -v 1.0.0-rc2
    dotnet restore
    dotnet build
    dotnet run

    Just running those commands gave me a Web API project with a dependency on Steeltoe’s discovery package. The latter two commands built and ran the app itself.

    The “webapi” project shell sets up a default REST controller, and for this demo, I just kept that. The only necessary code changes occurred in the Startup.cs class.

    Here, I added a using directive for “Steeltoe.Discovery.Client”, and updated the ConfigureServices and Configure operations to each include references to the discovery client.

    // This method gets called by the runtime. Use this method to add services to the container.
     public void ConfigureServices(IServiceCollection services)
            {
                // Add framework services.
                services.AddMvc();
                services.AddDiscoveryClient(Configuration);
            }
    
    // This method gets called by the runtime. Use this method to configure the HTTP request pipeline.
    public void Configure(IApplicationBuilder app, IHostingEnvironment env, ILoggerFactory loggerFactory)
            {
                loggerFactory.AddConsole(Configuration.GetSection("Logging"));
                loggerFactory.AddDebug();
    
                app.UseMvc();
                app.UseDiscoveryClient();
            }
    

    Finally, I added a few entries to the appsettings.json file. First I set a “spring.application.name” value, just like I did with my Spring Boot app. This tells the registry what to label my service. Then I have a block of Eureka settings including the registry URL, whether I should register with Eureka (yes!), pull a local copy of the registry (no!), and how to find my instance.

    {
      "Logging": {
        "IncludeScopes": false,
        "LogLevel": {
          "Default": "Warning",
          "System": "Information",
          "Microsoft": "Information"
        }
      },
      "spring": {
        "application": {
          "name":  "dotnet-demo-service"
        }
      },
      "eureka": {
        "client": {
          "serviceUrl": "http://localhost:8761/eureka/",
          "shouldRegisterWithEureka": true,
          "shouldFetchRegistry": false
        },
        "instance": {
          "hostname": "localhost",
          "port": 5000
        }
      }
    }
    

    When I ran the “dotnet build” and “dotnet run” commands, I saw my .NET service show up in the Eureka registry. BAM!

    2017.03.29-eureka-06

    Performing Discovery From a Java App

    It’s all nice and good to have an up-to-date address book, but it’s kinda worthless if nobody ever calls you!

    How would I yank service information from the registry for a Java app? It’s easy. First, I created a new Spring Boot project, and used the same “Eureka Discovery” package dependency (spring-cloud-starter-eureka) as before.

    In the application properties file, I specified that I *do* want a local copy of the registry, but do *not* need to register the client app as an available service. I’m just a client here, so no need to do register or give heartbeats.

    server.port=8081
    eureka.client.register-with-eureka=false
    eureka.client.fetch-registry=true
    eureka.client.healthcheck.enabled=false
    

    In my application code, I annotated my main class with @EnableDiscoveryClient, created a load balanced RestTemplate bean, autowired a variable to it, and then defined an operation that used it.

    @EnableDiscoveryClient
    @SpringBootApplication
    public class PsPlaceholderEurekaServiceConsumerApplication {
    
      public static void main(String[] args) {
        SpringApplication.run(PsPlaceholderEurekaServiceConsumerApplication.class, args);
      }
    
      @LoadBalanced
      @Bean
      public RestTemplate restTemplate(RestTemplateBuilder builder) {
         return builder.build();
      }
    }
    
    @RestController
    @Component
    class ConsumerController {
    
      //available now with load balanced bean
      @Autowired
      private RestTemplate restTemplate;
    
      @RequestMapping("/service-instancesrt")
      public String GetServiceInstancesRt() {
    
        String response = restTemplate.getForObject("http://dotnet-demo-service/api/values", String.class);
        return response;
      }
    }
    

    What’s pretty cool is that RestTemplate object is injected with enough smarts to replace the service name from the registry (“dotnet-demo-service”) with the actual URL when it makes the API call. When I invoked my local endpoint, it passed through the request to the microservice it looked up in the registry, and returned the result.

    2017.03.29-eureka-07

    Performing Discovery From a .NET App

    Finally, let’s see how a .NET app would pull a reference from the Eureka registry and use it.

    I created a new project based on the ASP.NET Core MVC template. And then I added the Steeltoe package for service discovery.

    dotnet new mvc
    dotnet add package Steeltoe.Discovery.Client -v 1.0.0-rc2
    dotnet restore

    With this MVC template, I got some basic scaffolding for a sample website. I just extended this by adding a new view (called “Demo”) and controller method. No content in the method right away.

    Just like before, I updated the Startup.cs class by first adding a reference to “Steeltoe.Discovery.Client” and updating the “ConfigureServices” and “Configure” methods.

    ASP.NET Core offers some nice dependency injection stuff. So with the code update above, I now had a “DiscoveryClient” object available for any controller or service to use. So, back in the controller, I added a variable for DiscoveryHttpClientHandler. Then I instantiated that object in the controller constructor, and used it in the new controller method to call a Eureka-registered Java service. Note once again that I only needed the registered service name, and the client libraries flipped this to the address/port of my actual service.

    public class HomeController : Controller
    {
      //added for demonstration
      DiscoveryHttpClientHandler _handler;
    
      public HomeController(IDiscoveryClient client) {
          _handler = new DiscoveryHttpClientHandler(client);
      }
    
      public IActionResult Demo()
      {
          HttpClient c = new HttpClient(_handler, false);
          //call service using registered alias
          string s = c.GetStringAsync("http://boot-customer-service").Result;
    
          ViewData["Message"] = "Service result is: " + s;
    
          return View();
       }
    }
    

    Finally, I added a few things to my appsettings.json file so that the Steeltoe client library knew how to behave. I gave the application a name, and told it to *not* register itself with Eureka, but only to fetch the registry and cache it locally.

    {
      "Logging": {
        "IncludeScopes": false,
        "LogLevel": {
          "Default": "Warning"
        }
      },
      "spring": {
        "application": {
          "name":  "dotnet-demo-service-client"
        }
      },
      "eureka": {
        "client": {
          "serviceUrl": "http://localhost:8761/eureka/",
          "shouldRegisterWithEureka": false,
          "shouldFetchRegistry": true
        },
        "instance": {
          "hostname": "localhost",
          "port": 5001
        }
      }
    }
    

    After that, I started up by ASP.NET Core app, hit the webpage, and saw a result from my Spring Boot service.

    2017.03.29-eureka-08

    That was fun! Some sort of service registry is extremely helpful when adopting a microservices architecture. Instead of using hard-coding references or stale data stores, an always-accurate registry gives you the best chance of surviving in a fluid microservices environment. Now, thanks to Steeltoe, you can use the same registry for your Java, .NET (and even Node.js) services.

  • Creating a JSON-Friendly Azure Logic App That Interacts with Functions, DocumentDB and Service Bus

    Creating a JSON-Friendly Azure Logic App That Interacts with Functions, DocumentDB and Service Bus

    I like what Microsoft’s doing in the app integration space. They breathed new life into their classic integration bus (BizTalk Server). The family of Azure Service Bus technologies (Queues, Topics, Relay) is super solid. API Management and Event Hubs solve real needs. And Azure Logic Apps is maturing at an impressive rate. That last one is the one I wanted to dig into more. Logic Apps gets updated every few weeks, and I thought it’d be fun to put a bunch of new functionality to the test. Specifically, I’m going to check out the updated JSON support, and invoke a bunch of Azure services.

    Step 1 – Create Azure DocumentDB collection

    In my fictitious example, I’m processing product orders. The Logic App takes in the order, and persists it in a database. In the Azure Portal, I created a database account.

    2017-02-22-logicapps-01

    DocumentDB stores content in “collections”, so I needed one of those. To define a collection you must provide some names, throughput (read/write) capacity, and a partition key. The partition key is used to shard the data, and document IDs have to be unique within that partition.

    2017-02-22-logicapps-02

    Ok, I was all set to store my orders.

    Step 2 – Create Azure Function

    Right now, you can’t add custom code inside a Logic App. Microsoft recommends that you call out to an Azure Function if you want to do any funny business. In this example, I wanted to generate a unique ID per order. So, I needed a snippet of code that generated a GUID.

    First up, I created a new Azure Functions app.

    2017-02-22-logicapps-03

    Next up, I had to create an actual function. I could start from scratch, or use a template. I chose the “generic webhook” template for C#.

    2017-02-22-logicapps-05

    This function is basic. All I do is generate a GUID, and return it back.

    2017-02-22-logicapps-06

    Step 3 – Create Service Bus Queue

    When a big order came in, I wanted to route a message to a queue for further processing. Up front, I created a new Service Bus queue to hold these messages.

    2017-02-22-logicapps-07

    With my namespace created, I added a new queue named “largeorders.”

    That was the final prerequisite for this demo. Next up, building the Logic App!

    Step 4 – Create the Azure Logic App

    First, I defined a new Logic App in the Azure Portal.

    2017-02-22-logicapps-08

    Here’s the first new thing I saw: an updated “getting started” view. I could choose a “trigger” to start off my Logic App, or, choose from a base scenario template.

    2017-02-22-logicapps-09

    I chose the trigger “when an HTTP request is received” and got an initial shape on my Logic App. Now, here’s where I saw the second cool update: instead of manually building a JSON schema, I could paste in a sample and generate one. Rad.

    2017-02-22-logicapps-10

    Step 5 – Call out to Azure Functions from Logic App

    After I received a message, I wanted to add it to DocumentDB. But first, I need my unique order ID. Recall that our Azure Function generated one. I chose to “add an action” and selected “Azure Functions” from the list. As you can see below, once I chose that action, I could browse the Function I already created. Note that a new feature of Logic Apps allows you to build (Node.js) Functions from within the Logic App designer itself. I wanted a C# Function, so that’s why I did it outside this UI.

    2017-02-22-logicapps-11

    Step 6 – Insert record into DocumentDB from Logic App

    Next up, I picked the “DocumentDB” activity, and chose the “create or update document” action.

    2017-02-22-logicapps-12

    Unfortunately, Logic Apps doesn’t (yet) look up connection strings for me. I opened another browser tab and navigated back to the DocumentDB “blade” to get my account name and authorization key. Once I did that, the Logic Apps Designer interrogated my account and let me pick my database and collection. After that, I built the payload to store the database. Notice that I built up a JSON message using values from the inbound HTTP message, and Azure Function. I also set the partition key to the “category” value from the inbound message.

    2017-02-22-logicapps-13

    What I have above won’t work. Why? In the present format, the “id” value is invalid. It would contain the whole JSON result from the Azure Function. There’s no way (yet) to grab a part of the JSON in the Designer, but there is a way in code. After switching to “code view”, I added [‘orderid’] reference to the right spot …

    2017-02-22-logicapps-14

    When I switched back to the Designer view, I saw “orderid” the mapped value.

    2017-02-22-logicapps-15

    That finished the first part of the flow. In the second part, I wanted to do different things based on the “category” of the purchased product.

    Step 7 – Add conditional flows to Logic App

    Microsoft recently added a “switch” statement condition to the palette, so I chose that. After choosing the data field to “switch” on, I added a pair of paths for different categories of product.

    2017-02-22-logicapps-16

    Inside the “electronics” switch path, I wanted to check and see if this was a big order. If so, I’d drop a message to a Service Bus queue. At the moment, Logic Apps doesn’t let me create variables (coming soon!), so I needed another way to generate the total order amount. Azure Functions to the rescue! From within the Logic Apps Designer, I once again chose the Azure Functions activity, but this time, selected “Create New Function.” Here, I passed in the full body of the initial message.

    2017-02-22-logicapps-18

    Inside the Function, I wrote some code that multiplied the quantity by the unit price.

    2017.02.22-logicapps-19.png

    We’re nearly done! After this Function, I added an if/else conditional that checked the Function’s result, and if it’s over 100, I send a message to the Azure Service Bus.

    2017-02-22-logicapps-20

    Step 8 – Send a response back to the Logic App caller

    Whew. Last step to do? Send an HTTP response back to the caller, containing the auto-generated order ID. Ok, my entire flow was finished. It took in a message, added it to DocumentDB, and based on a set of conditions, also shipped it over the Azure Service Bus.

    2017-02-22-logicapps-22

    Step 9 – Test this thing!

    I grabbed the URL for the Logic App from the topmost shape, and popped it into Postman. After sending in the JSON payload, I got back a GUID representing the generated order ID.

    2017-02-22-logicapps-23

    That’s great and all, but I needed to confirm everything worked! DocumentDB with a Function-generated ID? Check.

    2017-02-22-logicapps-24

    Service Bus message viewable via the Service Bus Explorer? Check.

    2017-02-22-logicapps-25

    The Logic Apps overview page on the Azure Portal also shows a “run history” and lets you inspect the success/failure of each step. This is new, and very useful.

    2017-02-22-logicapps-26

    Summary

    All in all, this was pretty straightfoward. The Azure Portal still has some UI quirks, but a decent Azure dev can crank out the above flow in 20 minutes. That’s pretty powerful. Keep an eye on Logic Apps, and consider taking it for a spin!

  • Using Azure API Management with Cloud Foundry

    Using Azure API Management with Cloud Foundry

    APIs, APIs everywhere. They power our mobile apps, connect our “things”, and improve supply chains. API management suites popped up to help companies secure, tune, version, and share their APIs effectively. I’ve watched these suites expand beyond the initial service virtualization and policy definition capabilities to, in some cases, replace the need for an ESB. One such suite is Azure API Management. I decided to take Azure API Management for a spin, and use it with a web service running in Cloud Foundry.

    Cloud Foundry is an ideal platform for running modern apps, and it recently added a capability (“Route Services“) that lets you inject another service into the request path. Why is this handy? I could use this feature to transparently introduce a caching service, a logging service, an authorization service, or … an API gateway. Thanks to Azure API Management, I can add all sorts of functionality to my API, without touching the code. Specifically, I’m going to try and add response caching, rate limiting, and IP address filtering to my API.

    2017-01-16-cf-azureapi-01

    Step 1 – Deploy the web service

    I put together a basic Node.js app that serves up “startup ideas.” If you send an HTTP GET request to the root URL, you get all the ideas back. If you GET a path (“/startupideas/1”) you get a specific idea. Nothing earth-shattering.

    Next up, deploying my app to Cloud Foundry. If your company cares about shipping software, you’re probably already running Pivotal Cloud Foundry somewhere. If not, no worries. Nobody’s perfect. You can try it out for free on Pivotal Web Services, or by downloading a fully-encapsulated VM.

    Note: For production scenarios, you’d want your API gateway right next to your web services. So if you want to use Cloud Foundry with Azure API Management, you’ll want to run apps in Pivotal Cloud Foundry on Azure!

    The Cloud Foundry CLI is a super-powerful tool, and makes it easy to deploy an app—Java, .NET, Node.js, whatever. So, I typed in “cf push” and watched Cloud Foundry do it’s magic.

    2017-01-16-cf-azureapi-02

    In a few seconds, my app was accessible. I sent in a request, and got back a JSON response along with a few standard HTTP headers.

    2017-01-16-cf-azureapi-03

    At this point, I had a fully working service deployed, but was in dire need of API management.

    Step 2 – Create an instance of Azure API Management

    Next up, I set up an instance of Azure API Management. From within the Azure Portal, I found it under the “Web + Mobile” category.

    2017-01-16-cf-azureapi-04

    After filling in all the required fields and clicking “create”, I waited about 15 minutes for my instance to come alive.

    2017-01-16-cf-azureapi-05

    Step 3 – Configure API in Azure API Management

    The Azure API Management product is meant to help companies create and manage their APIs. There’s a Publisher Portal experience for defining the API and managing user subscriptions, and a Developer Portal targeted at devs who consume APIs. Both portals are basic looking, but the Publisher Portal is fairly full-featured. That’s where I started.

    Within the Publisher Portal, I defined a new “Product.” A product holds one or more APIs and has settings that control who can view and subscribe to those APIs. By default, developers who want to use APIs have to provide a subscription token in their API calls. I don’t feel like requiring that, so I unchecked the “require subscription” box.

    2017-01-16-cf-azureapi-06

    With a product in place, I added an API record. I pointed to the URL of my service in Cloud Foundry, but honestly, it didn’t matter. I’ll be overwriting it later at runtime.

    2017-01-16-cf-azureapi-07

    In Azure API Management, you can call out each API operation (URL + HTTP verb) separately. For a given operation, you have the choice of specifying unique behaviors (e.g. caching). For a RESTful service, the operations could be represented by a mix of HTTP verbs and extension of the URL path. That is, one operation might be to GET “/customers” and another could GET “/customers/100/orders.”

    2017-01-16-cf-azureapi-08

    In the case of Route Services, the request is forwarded by Cloud Foundry to Azure API Management without any path information. It redirects all requests to the root URL in Azure API Management and puts the full destination URL in an HTTP header (“x-cf-forwarded-url”). What does that mean? It means that I need to define a single operation in Azure API Management, and use policies to add different behaviors for each operation represented by unique paths.

    Step 4 – Create API policy

    Now, the fun stuff! Azure API Management has a rich set of management policies that we use to define our API’s behavior. As mentioned earlier, I wanted to add three behaviors: caching, IP address filtering, and rate limited. And for fun, I also wanted to add an output HTTP header to prove that traffic flowed through the API gateway.

    You can create policies for the whole product, the API, or the individual operation. Or all three! The policy that Azure API Management ends up using for your API is a composite of all applicable policies. I started by defining my scope at the operation level.

    2017-01-16-cf-azureapi-09

    Below is my full policy. What should you pay attention to? On line 10, notice that I set the target URL to whatever Cloud Foundry put into the x-cf-forwarded-url header. On lines 15-18, I do IP filtering to keep a particular source IP from calling the service. See on line 23 that I’m rate limiting requests to the root URL (all ideas) only. Lines 25-28 spell out the request caching policy. Finally, on line 59 I define the cache expiration period.

    <policies>
      <!-- inbound steps apply to inbound requests -->
      <inbound>
        <!-- variable is "true" if request into Cloud Foundry includes /startupideas path -->
        <set-variable name="isStartUpIdea" value="@(context.Request.Headers["x-cf-forwarded-url"].Last().Contains("/startupideas"))" />
        <choose>
          <!-- make sure Cloud Foundry header exists -->
          <when condition="@(context.Request.Headers["x-cf-forwarded-url"] != null)">
            <!-- rewrite the target URL to whatever comes in from Cloud Foundry -->
            <set-backend-service base-url="@(context.Request.Headers["x-cf-forwarded-url"][0])" />
            <choose>
              <!-- applies if request is for /startupideas/[number] requests -->
              <when condition="@(context.Variables.GetValueOrDefault<bool>("isStartUpIdea"))">
                <!-- don't al low direct calls from a particular IP -->
                <ip-filter action="forbid">
    <address>63.234.174.122</address>
    
                </ip-filter>
              </when>
              <!-- applies if request is for the root, and returns all startup ideas -->
              <otherwise>
                <!-- limit callers by IP to 10 requests every sixty seconds -->
                <rate-limit-by-key calls="10" renewal-period="60" counter-key="@(context.Request.IpAddress)" />
                <!-- lookup requests from the cache and only call Cloud Foundry if nothing in cache -->
                <cache-lookup vary-by-developer="false" vary-by-developer-groups="false" downstream-caching-type="none" must-revalidate="false">
                  <vary-by-header>Accept</vary-by-header>
                  <vary-by-header>Accept-Charset</vary-by-header>
                </cache-lookup>
              </otherwise>
            </choose>
          </when>
        </choose>
      </inbound>
      <backend>
        <base />
      </backend>
      <!-- output steps apply to after Cloud Foundry reeturns a response -->
      <outbound>
        <!-- variables hold text to put into the custom outbound HTTP header -->
        <set-variable name="isroot" value="returning all results" />
        <set-variable name="isoneresult" value="returning one startup idea" />
        <choose>
          <when condition="@(context.Variables.GetValueOrDefault<bool>("isStartUpIdea"))">
            <set-header name="GatewayHeader" exists-action="override">
              <value>@(
            	   (string)context.Variables["isoneresult"]
            	  )
              </value>
            </set-header>
          </when>
          <otherwise>
            <set-header name="GatewayHeader" exists-action="override">
              <value>@(
                   (string)context.Variables["isroot"]
                  )
              </value>
            </set-header>
            <!-- set cache to expire after 10 minutes -->
            <cache-store duration="600" />
          </otherwise>
        </choose>
      </outbound>
      <on-error>
        <base />
      </on-error>
    </policies>
    

    Step 5 – Add Azure API Management to the Cloud Foundry route

    At this stage, I had my working Node.js service in Cloud Foundry, and a set of policies configured in Azure API Management. Next up, joining the two!

    The Cloud Foundry service marketplace makes it easy for devs to add all sorts of services to an app—databases, caches, queues, and much more. In this case, I wanted to add a user-provided service for Azure API Management to the catalog. It just took one command:

    cf create-user-provided-service azureapimgmt -r https://seroterpivotal.azure-api.net

    All that was left to do was bind my particular app’s route to this user-provided service. That also takes one command:

    cf bind-route-service cfapps.io azureapimgmt –hostname seroter-startupideas

    With this in place, Azure API Management was invisible to the API caller. The caller only sends requests to the Cloud Foundry URL, and the Route Service intercepts the request!

    Step 6 – Test the service

    Did it work?

    When I sent an HTTP GET request to https://seroter-startupideas.cfapps.io/startupideas/1 I saw a new HTTP header in the result.

    2017-01-16-cf-azureapi-10

    Ok, so it definitely went through Azure API Management. Next I tried the root URL that has policies for caching and rate limiting.

    On the first call to the root URL, I saw an log entry recorded in Cloud Foundry, and a JSON response with the latest timestamp.

    2017-01-16-cf-azureapi-11

    With each subsequent request, the timestamp didn’t change, and there was no entry in the Cloud Foundry logs. What did that mean? It meant that Azure API Management cached the initial response and didn’t send future requests back to Cloud Foundry. Rad!

    The last test was for rate limiting. It didn’t matter how many requests I sent to https://seroter-startupideas.cfapps.io/startupideas/1 I always got a result. No surprise, as there was no rate limiting for that operation. However, when I sent a flurry of requests to https://seroter-startupideas.cfapps.io I got back the following response:

    2017-01-16-cf-azureapi-12

    Very cool. With zero code changes, I added caching and rate-limiting to my Node.js service.

    Next Steps

    Azure API Management is pretty solid. There are lots of great tools in the API Gateway market, but if you’re running apps in Microsoft Azure, you should strongly consider this one. I only scratched the service of the capabilities here, and I plan to spend some more time investigating user subscription and authentication capabilities.

    Have you used Azure API Management? Do you like it?

  • 2016 in Review: Reading and Writing Highlights

    2016 was a wild year for plenty of folks. Me too, I guess. The wildest part was joining Pivotal and signing up for a job I’d never done before. I kept busy in other ways in 2016, including teaching a couple of courses for Pluralsight, traveling around to speak at conferences, writing a bunch for InfoQ.com, and blogging here with semi-regularity. 2017 should be more of the same (minus a job change!), plus another kiddo on the way.

    I tend to read a lot, and write a bit, so each year I like to reflect on my favorites.

    Favorite Blog Posts and Articles I Wrote

    I create stuff in a handful of locations—this blog, InfoQ.com, Pivotal blog—and here were the content pieces I liked the most.

    [My Blog] Modern Open Source Messaging: Apache Kafka, RabbitMQ and NATS in Action. This was my most popular blog post this year, by far. Application integration and messaging are experience a renaissance in this age of cloud and microservices, and OSS software is leading the way. If you want to watch my conference presentation that sparked this blog post, head to the BizTalk360 site.

    [My Blog] Trying out the “standard” and “enterprise” templates in Azure Logic Apps. Speaking of app integration, Microsoft turned a corner in 2016 and has its first clear direction in years. Logic Apps is a big part of that future, and I gave the new stuff a spin. FYI, since I wrote the original post, the Enterprise Integration Pack shipped with a slightly changed user experience.

    [My Blog] Characteristics of great managers. I often looked at “management” as a necessary evil, but a good manager actually makes a big difference. Upon reflection, I listed some of the characteristics of my best managers.

    [My Blog] Using Concourse to continuously deliver a Service Bus-powered Java app to Pivotal Cloud Foundry on Azure. 15 years. That’s how long it had been since I touched Java. When I joined Pivotal, the company behind the defacto Java framework called Spring, I committed to re-learning it. Blog posts like this, and my new Pluralsight course, demonstrated that I learned SOMETHING.

    [InfoQ] Outside of my regular InfoQ contributions covering industry news, I ran a series on the topic of “cloud lock-in.” I wrote an article called “Everything is Lock-In: Focus on Switching Costs” and facilitated a rowdy expert roundtable.

    [InfoQ] Wolfram Wants to Deliver “Computation Everywhere” with New Private Cloud. I purposely choose to write about things I’m not familiar with. How else am I supposed to learn? In this case, I dug into the Wolfram offerings a bit, and interviewed a delightful chap.

    [Pivotal] Pivotal Conversations Podcast. You never know what may happen when you say “yes” to something. I agreed to be a guest on a podcast earlier this year, and as a result, my delightfully bearded work colleague Coté asked me to restart the Pivotal podcast with him. Every week we talk about the news, and some tech topic. It’s been one of my favorite things this year.

    [Pivotal] Standing on the Shoulders of Giants: Supercharging Your Microservices with NetflixOSS and Spring Cloud. I volunteered to write a whitepaper about microservices scaffolding and Spring Cloud, and here’s the result. It was cool to see thousands of folks check it out.

    [Pivotal blog] 250k Containers In Production: A Real Test For The Real World. Scale matters, and I enjoyed writing up the results of an impressive benchmark by the Cloud Foundry team. While I believe our industry is giving outsized attention to the topic of containers, the people who *should care* about them (i.e. platform builders) want tech they can trust at scale.

    [Pivotal blog] To Avoid Getting Caught In The Developer Skills Gap, Do This. It’s hard to find good help these days. Apparently companies struggle to fill open developer positions, and I offered some advice for closing the skills gap.

    Favorite Books I Read

    I left my trusty Kindle 3 behind on an airplane this year, and replaced it with a new Kindle Paperwhite. Despite this hiccup, I still finished 31 books this year. Here are the best ones I read.

    The Hike. I don’t read much fantasy-type stuff, but I love Drew’s writing and gave this a shot. Not disappointed. Funny, tense, and absurd tale that was one of my favorite books of the year. You’ll never look at crustaceans the same way again.

    The Prey Series. I’m a sucker for mystery/thriller books and thought I’d dig into this  long-running series. Ended up reading the first six of them this year. Compelling protagonist, downright freaky villains.

    The Last Policeman Trilogy. I’m not sure where I saw the recommendation for these books, but I’m glad I did. Just fantastic. I plowed through Book 1, Book 2, and Book 3 in about 10 days. It starts as a “cop solving a mystery even though the world is about to end” and carries onward with a riveting sense of urgency.

    Rubicon: The Last Years of the Roman Republic. I really enjoyed this. Extremely engaging story about a turning point in human history. It was tough keeping all the characters straight after a while, but I have a new appreciation for the time period and the (literally) cutthroat politics.

    The Great Bridge: The Epic Story of the Building of the Brooklyn Bridge. It’s easy to glamorize significant construction projects, but this story does a masterful job showing you the glory *and* pain. I was inspired reading it, so much so that I wrote up a blog post comparing software engineering to bridge-building.

    The Path Between the Seas: The Creation of the Panama Canal, 1870-1914. You’ve gotta invest some serious time to get through McCullough’s books, but I’ve never regretted it. This one is about the tortured history of building the Panama Canal. Just an unbelievable level of effort and loss of life to make it happen. It’s definitely a lesson on preparedness and perseverance.

    The Summer of 1787: The Men Who Invented the Constitution. Instead of only ingesting hot-takes about American history and the Founder’s intent, it’s good to take time to actually read about it! I seem to read an American history book each year, and this one was solid. Good pacing, great details.

    The Liberator: One World War II Soldier’s 500-Day Odyssey from the Beaches of Sicily to the Gates of Dachau. I also seem to read a WWII book every year, and this one really stayed with me. I don’t believe in luck, but it’s hard to attribute this man’s survival to much else. Story of hope, stress, disaster, and bravery.

    Navigating Genesis: A Scientist’s Journey through Genesis 1–11. Intriguing investigation into the overlap between the biblical account and scientific research into the origins of the universe.  Less conflict than you may think.

    Boys Among Men: How the Prep-to-Pro Generation Redefined the NBA and Sparked a Basketball Revolution. I’m a hoops fan, but it’s easy to look at young basketball players as spoiled millionaires. That may be true, but it’s the result of a system that doesn’t set these athletes up for success. Sobering story that reveals how elusive that success really is.

    Yes, My Accent Is Real: And Some Other Things I Haven’t Told You. This was such a charming set of autobiographical essays from The Big Bang Theory’s Kunal Nayyar. It’s an easy read, and one that provides a fun behind-the-scenes look at “making it” in Hollywood.

    Eleven Rings: The Soul of Success. One of my former colleagues, Jim Newkirk, recommended this book from Phil Jackson. Jim said that Jackson’s philosophy influenced how he thinks about software teams. Part autobiography, part leadership guide, this book includes a lot of advice that’s applicable to managers in any profession.

    Disrupted: My Misadventure in the Start-Up Bubble. I laughed, I cried, and then I panicked when I realized that I had just joined a startup myself. Fortunately, Pivotal bore no resemblance to the living caricature that is/was HubSpot. Read this book from Lyons before you jump ship from a meaningful company to a glossy startup.

    Overcomplicated: Technology at the Limits of ComprehensionThe thesis of this book is that we’re building systems that cannot be totally understood. The author then goes into depth explaining how to approach complex systems, how to explore them when things go wrong, and how to use caution when unleashing this complexity on customers.

    Pre-Suasion: A Revolutionary Way to Influence and Persuade. If you were completely shocked by the result of the US presidential election, then you might want to read this book. This election was about persuasion, not policy. The “godfather of persuasion” talks about psychological framing and using privileged moments to impact a person’s choice. Great read for anyone in sales and marketing.

    Impossible to Ignore: Creating Memorable Content to Influence Decisions: Creating Memorable Content to Influence Decisions. How can you influence people’s memories and have them act on what you think is important? That’s what this book attempts to answer. Lots of practical info grounded in research studies. If you’re trying to land a message in a noisy marketplace, you’ll like this book.

    Win Your Case: How to Present, Persuade, and Prevail–Every Place, Every Time. I apparently read a lot about persuasion this  year. This one is targeted at trial lawyers, but many of the same components of influence (e.g. trust, credibility) apply to other audiences.

    The Challenger Customer: Selling to the Hidden Influencer Who Can Multiply Your Results. Thought-provoking stuff here. The author’s assertion is that the hard part of selling today isn’t about the supplier struggling to sell their product, but about the customer’s struggle to buy them. An average of 5.4 people are involved in purchasing decisions, and it’s about using “commercial insight” to help them create consensus early on.

    The DevOps Handbook: How to Create World-Class Agility, Reliability, and Security in Technology Organizations. This is the new companion book to the DevOps classic, The Phoenix Project. It contains tons of advice for those trying to change culture and instill a delivery mindset within the organization. It’s full of case studies from companies small and large. Highly recommended.

    Start and Scaling DevOps in the Enterprise. Working at Pivotal, this is one of the questions we hear most from Global 2000 companies: how do I scale agile/DevOps practices to my whole organization? This short book tackles that question with some practical guidance and relevant examples.

    A sincere thanks to all of you for reading my blog, watching my Pluralsight courses, and engaging me on Twitter in 2016. I am such a better technologist and human because of these interactions with so many interesting people!

  • Using Concourse to continuously deliver a Service Bus-powered Java app to Pivotal Cloud Foundry on Azure

    Using Concourse to continuously deliver a Service Bus-powered Java app to Pivotal Cloud Foundry on Azure

    Guess what? Deep down, cloud providers know you’re not moving your whole tech portfolio to their public cloud any time soon. Oh, your transition is probably underway, but you’ve got a whole stash of apps, data stores, and services that may not move for a while. That’s cool. There are more and more patterns and services available to squeeze value out of existing apps by extending them with more modern, scalable, cloudy tech. For instance, how might you take an existing payment transfer system that did B2B transactions and open it up to consumers without requiring your team to do a complete rewrite? One option might be to add a load-leveling queue in front of it, and take in requests via a scalable, cloud-based front-end app. In this post, I’ll show you how to implement that pattern by writing a Spring Boot app that uses Azure Service Bus Queues. Then, I’ll build a Concourse deployment pipeline to ship the app to Pivotal Cloud Foundry running atop Microsoft Azure.

    2016-11-28-azure-boot-01

    Ok, but why use a platform on top of Azure?

    That’s a fair question. Why not just use native Azure (or AWS, or Google Cloud Platform) services instead of putting a platform overlay like Pivotal Cloud Foundry atop it? Two reasons: app-centric workflow for developers, and “day 2” operations at scale.

    Most every cloud platform started off by automating infrastructure. That’s their view of the world, and it still seeps into most of their cloud app services. There’s no fundamental problem with that, except that many developers (“full stack” or otherwise) aren’t infrastructure pros. They want to build and ship great apps for customers. Everything else is a distraction. A platform such as Pivotal Cloud Foundry is entirely application-focused. Instead of the developer finding an app host, packaging the app, deploying the app, setting up a load balancer, configuring DNS, hooking up log collection, and configuring monitoring, the Cloud Foundry dev just cranks out an app and does a single action to get everything correctly configured in the cloud. And it’s an identical experience whether Pivotal Cloud Foundry is deployed to Azure, AWS, OpenStack, or whatever. The smartest companies realized that their developers should be exceptional at writing customer-facing software, not configuring firewall rules and container orchestration.

    Secondly, it’s about “day 2” operations. You know, all the stuff that happens to actually maintain apps in production. I have no doubt that any of you can build an app and quickly get it to cloud platforms like Azure Web Sites or Heroku with zero trouble. But what about when there are a dozen apps, or thousands? How about when it’s not just you, but a hundred of your fellow devs? Most existing app-centric platforms just aren’t set up to be org-wide, and you end up with costly inconsistencies between teams. With something like Pivotal Cloud Foundry, you have a resilient, distributed system that supports every major programing language, and provides a set of consistent patterns for app deployment, logging, scaling, monitoring, and more. Some of the biggest companies in the world deploy thousands of apps to their respective environments today, and we just proved that the platform can handle 250,000 containers with no problem. It’s about operations at scale.

    With that out of the way, let’s see what I built.

    Step 1 – Prerequisites

    Before building my app, I had to set up a few things.

    • Azure account. This is kind of important for a demo of things running on Azure. Microsoft provides a free trial, so take it for a spin if you haven’t already. I’ve had my account for quite a while, so all my things for this demo hang out there.
    • GitHub account. The Concourse continuous integration software knows how to talk to a few things, and git is one of them. So, I stored my app code in GitHub and had Concourse monitoring it for changes.
    • Amazon account. I know, I know, an Azure demo shouldn’t use AWS. But, Amazon S3 is a ubiquitous object store, and Concourse made it easy to drop my binaries there after running my continuous integration process.
    • Pivotal Cloud Foundry (PCF). You can find this in the Azure marketplace, and technically, this demo works with PCF running anywhere. I’ve got a full PCF on Azure environment available, and used that here.
    • Azure Service Broker. One fundamental concept in Cloud Foundry is a “service broker.” Service brokers advertise a catalog of services to app developers, and provide a consistent way to provision and de-provision the service. They also “bind” services to an app, which puts things like service credentials into that app’s environment variables for easy access. Microsoft built a service broker for Azure, and it works for DocumentDB, Azure Storage, Redis Cache, SQL Database, and the Service Bus. I installed this into my PCF-on-Azure environment, but you can technically run it on any PCF installation.

    Step 2 – Build Spring Boot App

    In my fictitious example, I wanted a Java front-end app that mobile clients interact with. That microservice drops messages into an Azure Service Bus Queue so that the existing on-premises app can pull messages from at their convenience, and thus avoid getting swamped by all this new internet traffic.

    Why Java? Java continues to be very popular in enterprises, and Spring Boot along with Spring Cloud (both maintained by Pivotal) have completely modernized the Java experience. Microsoft believes that PCF helps companies get a first-class Java experience on Azure.

    I used Spring Tool Suite to build a new Spring Boot MVC app with “web” and “thymeleaf” dependencies. Note that you can find all my code in GitHub if you’d like to reproduce this.

    To start with, I created a model class for the web app. This “web payment” class represents the data I connected from the user and passed on to the Service Bus Queue.

    package seroter.demo;
    
    public class WebPayment {
    	private String fromAccount;
    	private String toAccount;
    	private long transferAmount;
    
    	public String getFromAccount() {
    		return fromAccount;
    	}
    
    	public void setFromAccount(String fromAccount) {
    		this.fromAccount = fromAccount;
    	}
    
    	public String getToAccount() {
    		return toAccount;
    	}
    
    	public void setToAccount(String toAccount) {
    		this.toAccount = toAccount;
    	}
    
    	public long getTransferAmount() {
    		return transferAmount;
    	}
    
    	public void setTransferAmount(long transferAmount) {
    		this.transferAmount = transferAmount;
    	}
    }
    

    Next up, I built a bean that my web controller used to talk to the Azure Service Bus. Microsoft has an official Java SDK in the Maven repository, so I added this to my project.

    2016-11-28-azure-boot-03

    Within this object, I referred to the VCAP_SERVICES environment variable that I would soon get by binding my app to the Azure service. I used that environment variable to yank out the credentials for the Service Bus namespace, and then created the queue if it didn’t exist already.

    @Configuration
    public class SbConfig {
    
     @Bean
     ServiceBusContract serviceBusContract() {
    
       //grab env variable that comes from binding CF app to the Azure service
       String vcap = System.getenv("VCAP_SERVICES");
    
       //parse the JSON in the environment variable
       JsonParser jsonParser = JsonParserFactory.getJsonParser();
       Map<String, Object> jsonMap = jsonParser.parseMap(vcap);
    
       //create map of values for service bus creds
       Map<String,Object> creds = (Map<String,Object>)((List<Map<String, Object>>)jsonMap.get("seroter-azureservicebus")).get(0).get("credentials");
    
       //create service bus config object
       com.microsoft.windowsazure.Configuration config =
    	ServiceBusConfiguration.configureWithSASAuthentication(
    		creds.get("namespace_name").toString(),
    		creds.get("shared_access_key_name").toString(),
    		creds.get("shared_access_key_value").toString(),
    		".servicebus.windows.net");
    
       //create object used for interacting with service bus
       ServiceBusContract svc = ServiceBusService.create(config);
       System.out.println("created service bus contract ...");
    
       //check if queue exists
       try {
    	ListQueuesResult r = svc.listQueues();
    	List<QueueInfo> qi = r.getItems();
    	boolean hasQueue = false;
    
    	for (QueueInfo queueInfo : qi) {
              System.out.println("queue is " + queueInfo.getPath());
    
    	  //queue exist already?
    	  if(queueInfo.getPath().equals("demoqueue"))  {
    		System.out.println("Queue already exists");
    		hasQueue = true;
    		break;
    	   }
    	 }
    
    	if(!hasQueue) {
    	//create queue because we didn't find it
    	  try {
    	    QueueInfo q = new QueueInfo("demoqueue");
                CreateQueueResult result = svc.createQueue(q);
    	    System.out.println("queue created");
    	  }
    	  catch(ServiceException createException) {
    	    System.out.println("Error: " + createException.getMessage());
    	  }
            }
        }
        catch (ServiceException findException) {
           System.out.println("Error: " + findException.getMessage());
         }
        return svc;
       }
    }
    

    Cool. Now I could connect to the Service Bus. All that was left was my actual web controller that returned views, and sent messages to the Service Bus. One of my operations returned the data collection view, and the other handled form submissions and sent messages to the queue via the @autowired ServiceBusContract object.

    @SpringBootApplication
    @Controller
    public class SpringbootAzureConcourseApplication {
    
       public static void main(String[] args) {
         SpringApplication.run(SpringbootAzureConcourseApplication.class, args);
       }
    
       //pull in autowired bean with service bus connection
       @Autowired
       ServiceBusContract serviceBusContract;
    
       @GetMapping("/")
       public String showPaymentForm(Model m) {
    
          //add webpayment object to view
          m.addAttribute("webpayment", new WebPayment());
    
          //return view name
          return "webpayment";
       }
    
       @PostMapping("/")
       public String paymentSubmit(@ModelAttribute WebPayment webpayment) {
    
          try {
             //convert webpayment object to JSON to send to queue
    	 ObjectMapper om = new ObjectMapper();
    	 String jsonPayload = om.writeValueAsString(webpayment);
    
    	 //create brokered message wrapper used by service bus
    	 BrokeredMessage m = new BrokeredMessage(jsonPayload);
    	 //send to queue
    	 serviceBusContract.sendMessage("demoqueue", m);
    	 System.out.println("message sent");
    
          }
          catch (ServiceException e) {
    	 System.out.println("error sending to queue - " + e.getMessage());
          }
          catch (JsonProcessingException e) {
    	 System.out.println("error converting payload - " + e.getMessage());
          }
    
          return "paymentconfirm";
       }
    }
    

    With that, my microservice was done. Spring Boot makes it silly easy to crank out apps, and the Azure SDK was pretty straightforward to use.

    Step 3 – Deploy and Test App

    Developers use the “cf” command line interface to interact with Cloud Foundry environments. Running a “cf marketplace” command shows all the services advertised by registered service brokers. Since I added the Azure Service Broker to my environment, I instantiated an instance of the Service Bus service to my Cloud Foundry org. To tell the Azure Service Broker what to actually create, I built a simple JSON document that outlined the Azure resource group. region, and service.

    {
      "resource_group_name": "pivotaldemorg",
      "namespace_name": "seroter-boot",
      "location": "westus",
      "type": "Messaging",
      "messaging_tier": "Standard"
    }
    

    By using the Azure Service Broker, I didn’t have to go into the Azure Portal for any reason. I could automate the entire lifecycle of a native Azure service. The command below created a new Service Bus namespace, and made the credentials available to any app that binds to it.

    cf create-service seroter-azureservicebus default seroterservicebus -c sb.json
    

    After running this, my PCF environment had a service instance (seroterservicebus) ready to be bound to an app. I also confirmed that the Azure Portal showed a new namespace, and no queues (yet).

    2016-11-28-azure-boot-06

    Awesome. Next, I added a “manifest” that described my Cloud Foundry app. This manifest specified the app name, how many instances (containers) to spin up, where to get the binary (jar) to deploy, and which service instance (seroterservicebus) to bind to.

    ---
    applications:
    - name: seroter-boot-azure
      memory: 256M
      instances: 2
      path: target/springboot-azure-concourse-0.0.1-SNAPSHOT.jar
      buildpack: https://github.com/cloudfoundry/java-buildpack.git
      services:
        - seroterservicebus
    

    By doing a “cf push” to my PCF-on-Azure environment, the platform took care of all the app packaging, container creation, firewall updates, DNS changes, log setup, and more. After a few seconds, I had a highly-available front end app bound to the Service Bus. Below that you can see I had an app started with two instances, and the service was bound to my new app.

    2016-11-28-azure-boot-07

    All that was left was to test it. I fired up the app’s default view, and filled in a few values to initiate a money transfer.

    2016-11-28-azure-boot-08

    After submitting, I saw that there was a new message in my queue. I built another Spring Boot app (to simulate an extension of my legacy “payments” system) that pulled from the queue. This app ran on my desktop and logged the message from the Azure Service Bus.

    2016-11-28-azure-boot-09

    That’s great. I added a mature, highly-available queue in between my cloud-native Java web app, and my existing line-of-business system. With this pattern, I could accept all kinds of new traffic without overloading the backend system.

    Step 4 – Build Concourse Pipeline

    We’re not done yet! I promised continuous delivery, and I deliver on my promises, dammit.

    To build my deployment process, I used Concourse, a pipeline-oriented continuous integration and delivery tool that’s easy to use and amazingly portable. Instead of wizard-based tools that use fixed environments, Concourse uses pipelines defined in configuration files and executed in ephemeral containers. No conflicts with previous builds, no snowflake servers that are hard to recreate. And, it has a great UI that makes it obvious when there are build issues.

    I downloaded a Vagrant virtual machine image with Concourse pre-configured. Then I downloaded the lightweight command line interface (called Fly) for interacting with pipelines.

    My “build and deploy” process consisted of four files: bootpipeline.yml that contained the core pipeline, build.yml which set up the Java build process, build.sh which actually performs the build, and secure.yml which holds my credentials (and isn’t checked into GitHub).

    The build.sh file clones my GitHub repo (defined as a resource in the main pipeline) and does a maven install.

    #!/usr/bin/env bash
    
    set -e -x
    
    git clone resource-seroter-repo resource-app
    
    cd resource-app
    
    mvn clean
    
    mvn install
    

    The build.yml file showed that I’m using the Maven Docker image to build my code, and points to the build.sh file to actually build the app.

    ---
    platform: linux
    
    image_resource:
      type: docker-image
      source:
        repository: maven
        tag: latest
    
    inputs:
      - name: resource-seroter-repo
    
    outputs:
      - name: resource-app
    
    run:
      path: resource-seroter-repo/ci/build.sh
    

    Finally, let’s look at my build pipeline. Here, I defined a handful of “resources” that my pipeline interacts with. I’ve got my GitHub repo, an Amazon S3 bucket to store the JAR file, and my PCF-on-Azure environment. Then, I have two jobs: one that builds my code and puts the result into S3, and another that takes the JAR from S3 (and manifest from GitHub) and pushes to PCF on Azure.

    ---
    resources:
    # resource for my GitHub repo
    - name: resource-seroter-repo
      type: git
      source:
        uri: https://github.com/rseroter/springboot-azure-concourse.git
        branch: master
    #resource for my S3 bucket to store the binary
    - name: resource-s3
      type: s3
      source:
        bucket: spring-demo
        region_name: us-west-2
        regexp: springboot-azure-concourse-(.*).jar
        access_key_id: {{s3-key-id}}
        secret_access_key: {{s3-access-key}}
    # resource for my Cloud Foundry target
    - name: resource-azure
      type: cf
      source:
        api: {{cf-api}}
        username: {{cf-username}}
        password: {{cf-password}}
        organization: {{cf-org}}
        space: {{cf-space}}
    
    jobs:
    - name: build-binary
      plan:
        - get: resource-seroter-repo
          trigger: true
        - task: build-task
          privileged: true
          file: resource-seroter-repo/ci/build.yml
        - put: resource-s3
          params:
            file: resource-app/target/springboot-azure-concourse-0.0.1-SNAPSHOT.jar
    
    - name: deploy-to-prod
      plan:
        - get: resource-s3
          trigger: true
          passed: [build-binary]
        - get: resource-seroter-repo
        - put: resource-azure
          params:
            manifest: resource-seroter-repo/manifest-ci.yml
    

    I was now ready to deploy my pipeline and see the magic.

    After spinning up the Concourse Vagrant box, I hit the default URL and saw that I didn’t have any pipelines. NOT SURPRISING.

    2016-11-28-azure-boot-10

    From my Terminal, I used Fly CLI commands to deploy a pipeline. Note that I referred again to the “secure.yml” file containing credentials that get injected into the pipeline definition at deploy time.

    fly -t lite set-pipeline --pipeline azure-pipeline --config bootpipeline.yml --load-vars-from secure.yml
    

    In a second or two, a new (paused) pipeline popped up in Concourse. As you can see below, this tool is VERY visual. It’s easy to see how Concourse interpreted my pipeline definition and connected resources to jobs.

    2016-11-28-azure-boot-11

    I then un-paused the pipeline with this command:

    fly -t lite unpause-pipeline --pipeline azure-pipeline
    

    Immediately, the pipeline started up, retrieved my code from GitHub, built the app within a Docker container, dropped the result into S3, and deployed to PCF on Azure.

    2016-11-28-azure-boot-12

    After Concourse finished running the pipeline, I checked the PCF Application Manager UI and saw my new app up and running. Think about what just happened: I didn’t have to muck with any infrastructure or open any tickets to get an app from dev to production. Wonderful.

    2016-11-28-azure-boot-14

    The way I built this pipeline, I didn’t version the JAR when I built my app. In reality, you’d want to use the semantic versioning resource to bump the version on each build. Because of the way I designed this, the second job (“deploy to PCF”) won’t fire automatically after the first build, since there technically isn’t a new artifact in the S3 bucket. A cool side effect of this is that I could constantly do continuous integration, and then choose to manually deploy (clicking the “+” button below) when the company was ready for the new version to go to production. Continuous delivery, not deployment.

    2016-11-28-azure-boot-13

    Wrap Up

    Whew. That was a big demo. But in the scheme of things, it was pretty straightforward. I used some best-of-breed services from Azure within my Java app, and then pushed that app to Pivotal Cloud Foundry entirely through automation. Now, every time I check in a code change to GitHub, Concourse will automatically build the app. When I choose to, I take the latest build and tell Concourse to send it to production.

    magic

    A platform like PCF helps companies solve their #1 problem with becoming software-driven: improving their deployment pipeline. Try to keep your focus on apps not infrastructure, and make sure that whatever platform you use, you focus on sustainable operations at scale!


  • My new Pluralsight course—Developing Java microservices with Spring Cloud—is now available

    Java is back. To be sure, it never really left, but it did appear to take a backseat during the past decade. While new, lightweight, mobile-friendly languages rose to prominence, Java—saddled with cumbersome frameworks and an uncertain future—seemed destined to be used only by the most traditional of enterprises.

    But that didn’t happen. It wasn’t just enterprises that depended on Java, but innovative startups. And heavyweight Java frameworks evolved into more approachable, simple-to-use tools. Case in point: the open-source Spring dependency injection framework. Spring’s been a mainstay of Java development for years, but its XML-heavy configuration model made it increasingly unwieldy. Enter Spring Boot in 2014. Spring Boot introduced an opinionated, convention-over-configuration model to Spring and instantly improved developer productivity. And now, companies large and small are using it at an astonishing rate.

    Spring Cloud followed in 2015. This open-source project included a host of capabilities—including a number of projects from Netflix engineering—for teams building modern web apps and distributed systems. It’s now downloaded hundreds of thousands of times per month.

    Behind all this Spring goodness is Pivotal, the company I work for. We’re the primary sponsor of Spring and after joining Pivotal in April, I thought it’d be fun to teach a course on these technologies. There’s just so much going on in Spring Cloud, that I’m doing a two-partner. First up: Java Microservices with Spring Cloud: Developing Services.

    In this five-hour course, we look at some of the Spring Cloud projects that help you build modern microservices. In the second part of the course (which I’m starting on soon), we’ll dig into the Spring Cloud projects that help you coordinate interactions between microservices (think load balancing, circuit breakers, messaging). So what’s in this current course? It’s got five action-packed modules:

    1. Introduction to Microservices, Spring Boot, and Spring Cloud. Here we talk about the core characteristics of microservices, describe Spring Boot, build a quick sample app using Spring Boot, walk through the Spring Cloud projects, and review the apps we’ll build throughout the course.
    2. Simplifying Environment Managed with Centralized Config. Spring Cloud Config makes it super easy to stand up and consume a Git-backed configuration store. In this module we see how to create a Config Server, review all the ways to query configs, see how to setup secure access, work to configure encryption, and more. What’s cool is that the Config Server is HTTP accessible, so while it’s simple to consume in Spring Boot apps with annotated variables, it’s almost just as easy to consume from ANY other type of app.
    3. Offloading Async Activities with Lightweight, Short-Lived Tasks. Modern software teams don’t just build web apps. No, more and more microservices are being built as short-lived, serverless activities. Here, we look at Spring Cloud Task explore how to build event-driven services that get instantiated, do their work, and gracefully shut down. We see how to build Tasks, store their execution history in a MySQL database, and even build a Task that gets instantiated by an HTTP-initiated message to RabbitMQ.
    4. Securing Your Microservices with a Declarative Model. As an industry, we keep SAYING that security is important in our apps, but it still seems to be an area of neglect. Spring Cloud Security is for teams that recognize the challenge of applying traditional security approaches to microservices, and want an authorization scheme that scales. In this module we talk about OAuth 2.0, see how to perform Authorization Code flows, build our own resource server and flow tokens between services, and even build a custom authorization server. Through it all, we see how to add annotations to code that secure our services with minimal fuss.
    5. Chasing Down Performance Issues Using Distributed Tracing. One of the underrated challenges of building microservices is recognizing the impact of latency on a distributed architecture. Where are there problems? Did we create service interactions that are suboptimal? Here, we look at Spring Cloud Sleuth for automatic instrumentation of virtually EVERY communication path. Then we see how Zipkin surfaces latency issues and lets you instantly visualize the bottlenecks.

    This course was a labor of love for the last 6 months. I learned a ton, and I think I’ve documented and explained things that are difficult to find elsewhere in one place. If you’re a Java dev or looking to add some cloud-native patterns to your microservices, I hope you’ll jet over to Pluralsight and check this course out!

  • Using Steeltoe for ASP.NET 4.x apps that need a microservices-friendly config store

    Using Steeltoe for ASP.NET 4.x apps that need a microservices-friendly config store

    Nowadays, all the cool kids are doing microservices. Whether or not you care, there ARE some really nice distributed systems patterns that have emerged from this movement. Netflix and others have shared novel solutions for preventing cascading failures, discovering services at runtime, performing client-side load balancing, and storing configurations off-box. For Java developers, many of these patterns have been baked into turnkey components as part of Spring Cloud. But what about .NET devs who want access to all this goodness? Enter Steeltoe.

    Steeltoe is an open-source .NET project that gives .NET Framework and .NET Core developers easy access to Spring Cloud services like Spring Cloud Config (Git-backed config server) and Spring Cloud Eureka (service discovery from Netflix). In this blog post, I’ll show you how easy it is to create a config server, and then connect to it from an ASP.NET app using Steeltoe.

    Why should .NET devs care about a config server? We’ve historically thrown our (sometimes encrypted) config values into web.config files or a database. Kevin Hoffman says that’s now an anti-pattern because you end up with mutable build artifacts and don’t have an easy way to rotate encryption keys. With fast-changing (micro)services, and more host environments than ever, a strong config strategy is a must. Spring Cloud Config gives you a web-scale config server that supports Git-backed configurations,  symmetric or asymmetric encryption, access security, and no-restart client refreshes.

    Many Steeltoe demos I’ve seen use .NET Core as the runtime, but my non-scientific estimate is that 99.991% of all .NET apps out there are .NET 4.x and earlier, so let’s build a demo with a Windows stack.

    Before starting to build the app, I needed actual config files! Spring Cloud Config works with local files, or preferably, a Git repo. I created a handful of files in a GitHub repository that represent values for an “inventory service” app. I have one file for dev, QA, and production environments. These can be YAML files or property files.

    2016-10-18-steeltoe07

    Let’s code stuff. I went and built a simple Spring Cloud Config server using Spring Tool Suite. To say “built” is to overstate how silly easy it is to do. Whether using Spring Tool Suite or the fantastic Spring Initializr site, if it takes you more than six minutes to build a config server, you must be extremely drunk.

    2016-10-18-steeltoe01

    Next, I chose which dependencies to add to the project. I selected the Config Server, which is part of Spring Cloud.

    2016-10-18-steeltoe02

    With my app scaffolding done, I added a ton of code to serve up config server endpoints, define encryption/decryption logic, and enable auto-refresh of clients. Just kidding. It takes a single annotation on my main Java class:

    import org.springframework.boot.SpringApplication;
    import org.springframework.boot.autoconfigure.SpringBootApplication;
    import org.springframework.cloud.config.server.EnableConfigServer;
    
    @SpringBootApplication
    @EnableConfigServer
    public class BlogConfigserverApplication {
    
    	public static void main(String[] args) {
    		SpringApplication.run(BlogConfigserverApplication.class, args);
    	}
    }
    

    Ok, there’s got to be more than that, right? Yes, I’m not being entirely honest. I also had to throw this line into my application.properties file so that the config server knew where to pull my GitHub-based configuration files.

    spring.cloud.config.server.git.uri=https://github.com/rseroter/blog-configserver
    

    That’s it for a basic config server. Now, there are tons of other things you CAN configure around access security, multiple source repos, search paths, and more. But this is a good starting point. I quickly tested my config server using Postman and saw that by just changing the profile (dev/qa/default) in the URL, I’d pull up a different config file from GitHub. Spring Cloud Config makes it easy to use one or more repos to serve up configurations for different apps representing different environments. Sweet.

    2016-10-18-steeltoe03

    Ok, so I had a config server. Next up? Using Steeltoe so that my ASP.NET 4.6 app could easily retrieve config values from this server.

    I built a new ASP.NET MVC app in Visual Studio 2015.

    2016-10-18-steeltoe04

    Next, I searched NuGet for Steeltoe, and found the configuration server library.

    2016-10-18-steeltoe05

    Fortunately .NET has some extension points for plugging in an outside configuration source. First, I created a new appsettings.json file at the root of the project. This file describes a few settings that help map to the right config values on the server. Specifically, the name of the app and URL of the config server. FYI, the app name corresponds to the config file name in GitHub. What about whether we’re using dev, test, or prod? Hold on, I’m getting there dammit.

    {
        "spring": {
            "application": {
               "name": "inventoryservice"
             },
            "cloud": {
               "config": {
                 "uri": "[my ip address]:8080"
               }
            }
        }
    }
    

    Next up, I created the class in the “App_Start” project folder that holds the details of our configuration, and looks to the appsettings.json file for some pointers. I stole this class from the nice Steeltoe demos, so don’t give me credit for being smart.

    using System;
    using System.Collections.Generic;
    using System.Linq;
    using System.Web;
    
    //added by me
    using Microsoft.AspNetCore.Hosting;
    using System.IO;
    using Microsoft.Extensions.FileProviders;
    using Microsoft.Extensions.Configuration;
    using Steeltoe.Extensions.Configuration;
    
    namespace InventoryService
    {
        public class ConfigServerConfig
        {
            public static IConfigurationRoot Configuration { get; set; }
    
            public static void RegisterConfig(string environment)
            {
                var env = new HostingEnvironment(environment);
    
                // Set up configuration sources.
                var builder = new ConfigurationBuilder()
                    .SetBasePath(AppDomain.CurrentDomain.BaseDirectory)
                    .AddJsonFile("appsettings.json")
                    .AddConfigServer(env);
    
                Configuration = builder.Build();
            }
        }
        public class HostingEnvironment : IHostingEnvironment
        {
            public HostingEnvironment(string env)
            {
                EnvironmentName = env;
            }
    
            public string ApplicationName
            {
                get
                {
                    throw new NotImplementedException();
                }
    
                set
                {
                    throw new NotImplementedException();
                }
            }
    
            public IFileProvider ContentRootFileProvider
            {
                get
                {
                    throw new NotImplementedException();
                }
    
                set
                {
                    throw new NotImplementedException();
                }
            }
    
            public string ContentRootPath
            {
                get
                {
                    throw new NotImplementedException();
                }
    
                set
                {
                    throw new NotImplementedException();
                }
            }
    
            public string EnvironmentName { get; set; }
    
            public IFileProvider WebRootFileProvider { get; set; }
    
            public string WebRootPath { get; set; }
    
            IFileProvider IHostingEnvironment.WebRootFileProvider
            {
                get
                {
                    throw new NotImplementedException();
                }
    
                set
                {
                    throw new NotImplementedException();
                }
            }
        }
    }
    

    Nearly done! In the Global.asax.cs file, I needed to select which “environment” to use for my configurations. Here, I chose the “default” environment for my app. This means that the Config Server will return the default profile (configuration file) for my application.

    protected void Application_Start()
    {
      AreaRegistration.RegisterAllAreas();
      RouteConfig.RegisterRoutes(RouteTable.Routes);
    
      //add for config server, contains "profile" used
      ConfigServerConfig.RegisterConfig("default");
    }
    

    Ok, now to the regular ASP.NET MVC stuff. I added a new HomeController for the app, and looked into the configuration for my config value. If it was there, I added it to the ViewBag.

    public ActionResult Index()
    {
       var config = ConfigServerConfig.Configuration;
       if (null != config)
       {
           ViewBag.dbserver = config["dbserver"] ?? "server missing :(";
       }
    
       return View();
    }
    

    All that was left was to build a View to show the glorious result. I added a new Index.cshtml file and just printed out the value from the ViewBag. After starting up the app, I saw that the value printed out matches the value in the corresponding GitHub file:

    2016-10-18-steeltoe06

    If you’re a .NET dev like me, you’ll love Steeltoe. It’s easy to use and provides a much more robust, secure solution for app configurations. And while I think it’s best to run .NET apps in Pivotal Cloud Foundry, you can run these Steeltoe-powered .NET services anywhere you want.

    Steeltoe is still in a pre-release mode, so try it out, submit GitHub issues, and give the team feedback on what else you’d like to see in the library.

  • Enterprises fighting back, Spring Boot is the best, and other SpringOne Platform takeaways

    Last week I was in Las Vegas for SpringOne Platform. This conference had one of the greatest session lists I’ve ever seen, and brought together nearly 2,000 people interested in microservices, Java Spring, DevOps, agile, Cloud Foundry, and cloud-native development. With sponsors like Google, Microsoft, HortonWorks, Accenture, and AWS, and over 400 different companies represented by attendees, the conference had a unique blend of characters. I spent some time reflecting on the content and vibe of SpringOne Platform, and noticed that I kept coming back to the following themes.

    #1 – Enterprises are fighting back.

    Finally! Large, established companies are tired of operating slow-moving, decrepit I.T. departments where nothing interesting happens. At SpringOne Platform, I saw company after company talking about how they are creating change, and then showing the results. Watch this insightful keynote from Citi where they outline pain points, and how they’ve changed their team structure, culture, and technology:

    You don’t have to work at Uber, Etsy, Netflix or AWS to work on cutting-edge technology. Enterprises have woken up to the fact that outsourcing their strategic technology skills was a dumb decision. What are they doing to recover?

    1. Newfound focus on hiring and expanding technology talent. In just about every enterprise-led session I attended, the presentation closed with a “we’re hiring!” notice. Netflix has been ending their blog posts with this call-to-action for YEARS. Enterprises are starting to sponsor conferences and go where developers hang out. Additionally, because you can’t just hire hundreds of devs that know cloud-native patterns, I’m seeing enterprises make a greater investment in their existing people. That’s one reason Pluralsight continues to explode in popularity as enterprises purchase subscriptions for all their tech teams.
    2. Upgrading and investing in technology. Give the devs what they want! Enterprises have started to realize that classic enterprise technology doesn’t attract talented people to work on it. Gartner predicts that by the year 2020, 75% of the apps supporting digital business will be built, not bought. That means that your dev teams need the tools and tech that let them crank out customer-centric, resilient apps. And they need support for using modern approaches to delivering software. If you invest in technology, you’ll attract the talent to work with it.


    #2 – Spring Boot is the best application bootstrapping experience, period.

    For 17+ years I’ve either coded in .NET or Node.js (with a little experimentation in Go, Ruby, and Java). After joining Pivotal, I decided that I should learn Spring, since that’s our jam.

    I’ve never seen anything better than Spring Boot for getting developers rolling. Instead of spending hours (days?) setting up boilerplate code, and finding the right mix of dependencies for your project, Spring Boot takes care of all that. Give me 4 minutes, and I can build and deploy a git-backed Configuration Server. In a few moments I can flip on OAuth2 security or distributed tracing. And this isn’t hello-world quality stuff; this is the productization of Netflix OSS and other battle tested technology that you can use with simple code annotations. That’s amazing, and you can use the Spring Initializer to get started today.

    2016.08.10.s1p01

    Smart companies realize that devs shouldn’t be building infrastructure, app scaffolding or wrangling dependencies; they should be creating user experiences and business logic. Whereas Node.js has a billion packages and I spend plenty of time selecting ones that don’t have Guy Fieri images embedded, Spring Boot gives devs a curated, integrated set of packages. And it’s saving companies like Comcast, millions of dollars.

    Presenter after presenter at SpringOne Platform were able to quickly demonstrate complex distributed systems concepts by using Spring Boot apps. Java innovation happens in Spring.

    #3 A wave of realism has swept over the industry.

    I’m probably being optimistic, but it seems like some of the hype is settling down, and we’re actually getting to work on transformation. The SpringOne Platform talks (both in sessions, and hallway/lunch conversations) weren’t about visions of the future, but actual in-progress efforts. Transformation is hard and there aren’t shortcuts. Simply containerizing won’t make a difference, for example.

    Talk after talk, conducted by analysts or customers, highlighted the value of assessing your existing app portfolio, and identifying where refactoring or replatforming can add value. Just lifting and shifting to a container orchestration platform doesn’t actually improve things. At best, you’ve optimized the infrastructure, while ignoring the real challenge: improving the delivery pipeline. Same goes for configuration management, and other technologies that don’t establish meaningful change. It takes a mix of cultural overhaul, management buy-in, and yes, technology. I didn’t see anyone at the conference promising silver bullets. But at the same time, there were some concrete next steps for teams looking for accelerate their efforts.

    #4 The cloud wars have officially moved above IaaS.

    IaaS is definitely not a commodity (although pricing has stabilized), but you’re seeing the major three clouds working hard to own the services layer above the raw infrastructure. Gartner’s just-released IaaS Magic Quadrant shows clear leadership by AWS, Microsoft, and Google, and not accidentally, all three sponsored SpringOne Platform. Google brought over 20 people to the conference, and still couldn’t handle the swarms of people at their booth trying out Spring Boot! An integrated platform on top of leading clouds gives the best of all worlds.

    Great infrastructure matters, but native services in the cloud are becoming the key differentiator for one over another. Want services to bridge on-premises and cloud apps? Azure is a strong choice. Need high performing data storage services? AWS is fantastic. Looking at next generation machine learning and data processing? Google is bleeding edge. At SpringOne Platform, I heard established companies—including Home Depot, the GAP, Merrill Corp—explain why the loved Pivotal Cloud Foundry, especially when it integrated with native services in their cloud of choice. The power of platforms, baby.

    #5 Data microservices is the next frontier.

    I love, love that we’re talking about the role of data in a microservices world. It’s one thing to design and deliver stateless web apps, and scale the heck out of them. We’ve got lots of patterns for that. But what about the data? Are there ways to deploy and manage data platforms with extreme automation? How about scaling real-time and batch data processing? There were tons of sessions about data at SpringOne Platform, and Pivotal’s Data team wrote up some awesome summaries throughout the week:

    It’s almost always about data, and I think it’s great that we had PACKED sessions full of people working through these emerging ideas.

    #6 Pivotal is making a difference.

    I’m very proud of what our customers are doing with the help of Pivotal people and technologies. While we tried to make sure we didn’t beat people over the head with “Pivotal is GREAT” stuff, it became clear that the “Pivotal Way” is working and transforming the how the largest companies in the world build software.

    The Gap talked about going from weeks to deploy code changes, to mere minutes. That has a material impact on how they interact with their customers. And for many, this isn’t about net new applications. Almost everyone who presented talked about how to approach existing investments and find new value. It’s fun to be on this journey to simplify the future.

    Want to help make a difference at Pivotal and drive the future of software? We’re always hiring.