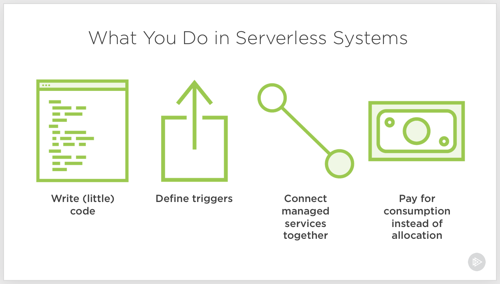
Serverless computing. Let’s talk about it. I don’t think it’s crazy to say that it represents the first cloud-native software model. Done right, it is inherently elastic and pay-per-use, and strongly encourages the use of cloud managed services. And to be sure, it’s about much more than just Function-as-a-Service platforms like AWS Lambda.
So, what exactly is it, why does it matter, and what technologies and architecture patterns should you know? To answer that question, I spent a few months researching the topic, and put together a new Pluralsight course, Serverless Computing: The Big Picture.
The course is only an hour long, but I get into some depth on benefits, challenges, and patterns you should know.
The first module looks at the various serverless definitions offered by industry experts, why serverless is different from what came before it, how serverless compares to serverful systems, challenges you may face adopting it, and example use cases.
The second module digs into the serverless tech that matters. I look at public cloud function-as-a-service platforms, installable platforms, dev tools, and managed services.
The final module of the course looks at architecture patterns. We start by looking at best practices, then review a handful of patterns.
As always, I had fun putting this together. It’s my 19th Pluralsight course, and I don’t see stopping any time soon. If you watch it, I’d love your feedback. I hope it helps you get a handle on this exciting, but sometimes-confusing, topic!
Creating new .NET apps, or modernizing existing ones? If you’re following the 12-factor criteria, you’re probably keeping your configuration out of the code. That means not stashing feature flags in your web.config file, or hard-coding connection strings inside your classes. So where’s this stuff supposed to go? Environment variables are okay, but not a great choice; no version control or access restrictions. What about an off-box configuration service? Now we’re talking. Fortunately AWS, and now Microsoft Azure, offer one that’s friendly to .NET devs. I’ll show you how to create and access configurations in each cloud, and as a bonus, throw out a third option.
.NET Core has a very nice configuration system that makes it easy to read configuration data from a variety of pluggable sources. That means that for the three demos below, I’ve got virtually identical code even though the back-end configuration stores are wildly different.
AWS
Setting it up
AWS offers a parameter store as part of the AWS Systems Manager service. This service is designed to surface information and automate tasks across your cloud infrastructure. While the parameter store is useful to support infrastructure automation, it’s also a handy little place to cram configuration values. And from what I can tell, it’s free to use.
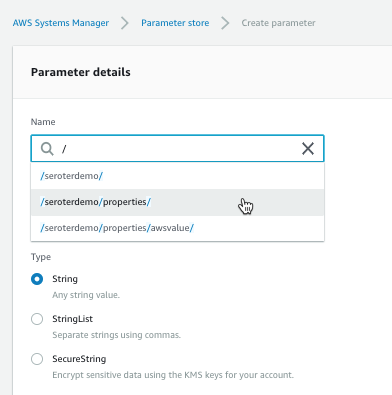
To start, I went to the AWS Console, found the Systems Manager service, and chose Parameter Store from the left menu. From here, I could see, edit or delete existing parameters, and create new ones.
Each parameter gets a name and value. For the name, I used a “/” to define a hierarchy. The parameter type can be a string, list of strings, or encrypted string.
The UI was smart enough that when I went to go add a second parameter (/seroterdemo/properties/awsvalue2), it detected my existing hierarchy.
Ok, that’s it. Now I was ready to use it my .NET Core web app.
Using from code
Before starting, I installed the AWS CLI. I tried to figure out where to pass credentials into the AWS SDK, and stumbled upon some local introspection that the SDK does. Among other options, it looks for files in a local directory, and those files get created for you when you install the AWS CLI. Just a heads up!
I created a new .NET Core MVC project, and added the Amazon.Extensions.Configuration.SystemsManager package. Then I created a simple “Settings” class that holds the configuration values we’ll get back from AWS.
public class Settings
{
   public string awsvalue { get; set; }
   public string awsvalue2 { get; set; }
}
In the appsettings.json file, I told my app which AWS region to use.
Finally, I wanted to make my configuration properties available to my app code. So in the Startup.cs file, I grabbed the configuration properties I wanted, inflated the Settings object, and made it available to the runtime container.
public void ConfigureServices(IServiceCollection services) { services.Configure<Settings>(Configuration.GetSection("properties"));
Last step? Accessing the configuration properties! In my controller, I defined a private variable that would hold a local reference to the configuration values, pulled them in through the constructor, and then grabbed out the values in the Index() operation.
        private readonly Settings _settings;

        public HomeController(IOptions<Settings> settings)
        {
            _settings = settings.Value;
        }

        public IActionResult Index()
        {
            ViewData["configval"] = _settings.awsvalue;
            ViewData["configval2"] = _settings.awsvalue2;

            return View();
        }
After updating my View to show the two properties, I started up my app. As expected, the two configuration values showed up.
What I like
You gotta like that price! AWS Systems Manager is available at no cost, and there appears to be no cost to the parameter store. Wicked.
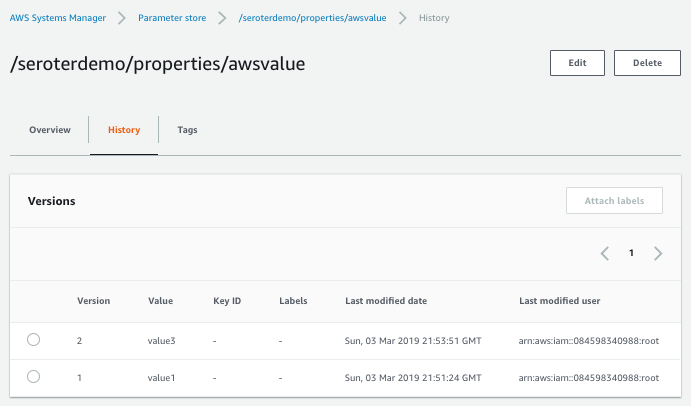
Also, it’s cool that you have an easily-visible change history. You can see below that the audit trail shows what changed for each version, and who changed it.
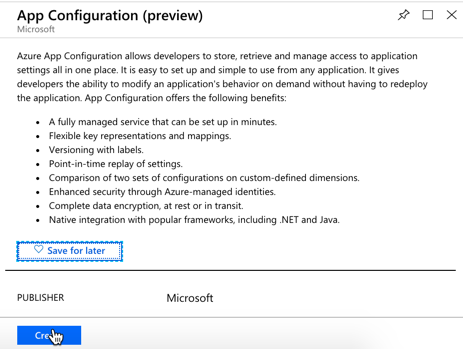
Microsoft just shared the preview release of the Azure App Configuration service. This managed service is specifically created to help you centralize configurations. It’s brand new, but seems to be in pretty good shape already. Let’s take it for a spin.
From the Microsoft Azure Portal, I searched for “configuration” and found the preview service.
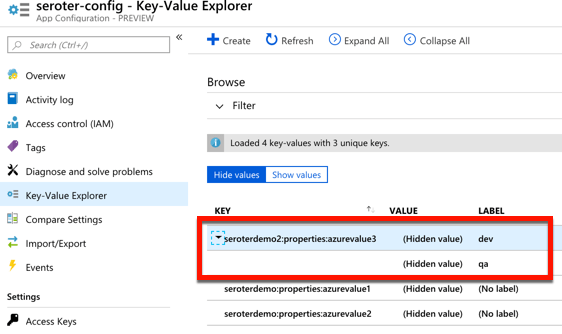
I named my resource seroter-config, picked a region and that was it. After a moment, I had a service instance to mess with. I quickly added two key-value combos.
public class Settings
{
    public string azurevalue1 { get; set; }
    public string azurevalue2 { get; set; }
}
Next up, I updated my Program.cs file to read the Azure App Configuration. I passed the connection string in here, but there are better ways available.
public class Program
{
    public static void Main(string[] args)
    {
        CreateWebHostBuilder(args).Build().Run();
    }

    public static IWebHostBuilder CreateWebHostBuilder(string[] args) =>
        WebHost.CreateDefaultBuilder(args)
            .ConfigureAppConfiguration((hostingContext, config) => {
                var settings = config.Build();
                    config.AddAzureAppConfiguration("[con string]");
                })
            .UseStartup<Startup>();
}
I also updated the ConfigureServices() operation in my Startup.cs file. Here, I chose to only pull configurations that started with seroterdemo:properties.
public void ConfigureServices(IServiceCollection services) { //added services.Configure<Settings>(Configuration.GetSection("seroterdemo:properties"));
To read those values in my controller, I’ve got just about the same code as in the AWS example. The only difference was what I called my class members!
private readonly Settings _settings;

public HomeController(IOptions<Settings> settings)
{
    _settings = settings.Value;
}

public IActionResult Index()
{
   ViewData["configval"] = _settings.azurevalue1;
   ViewData["configval2"] = _settings.azurevalue2;

   return View();
}
I once again updated my View to print out the configuration values, and not shockingly, it worked fine.
What I like
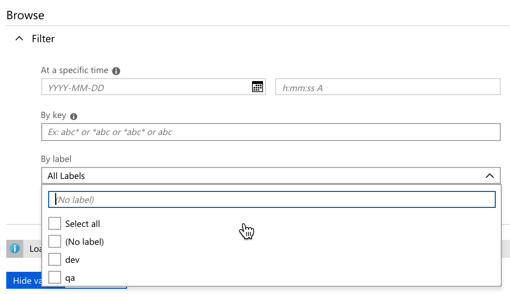
For a new service, there’s a few good things to like here. The concept of labels is handy, as it lets me build keys that serve different environments. See here that I created labels for “qa” and “dev” on the same key.
I saw a “compare” feature which looks handy. There’s also a simple search interface here too, which is valuable.
Pricing isn’t yet available, no I’m not clear as to how I’d have to pay for this.
Spring Cloud Config
Setting it up
Both of the above service are quite nice. And super convenient if you’re running in those clouds. You might also want a portable configuration store that offers its own pluggable backing engines. Spring Cloud Config makes it easy to build a config store backed by a file system, git, GitHub, Hashicorp Vault, and more. It’s accessible via HTTP/S, supports encryption, is fully open source, and much more.
I created a new Spring project from start.spring.io. I chose to include the Spring Cloud Config Server and generate the project.
Literally all the code required is a single annotation (@EnableConfigServer).
My GitHub repo has a configuration file called blogconfig.properties with the following content:
With that, I started up the project, and had a running configuration server.
Using from code
To talk to this configuration store from my .NET app, I used the increasingly-popular Steeltoe library. These packages, created by Pivotal, bring microservices patterns to your .NET (Framework or Core) apps.
For the last time, I created a .NET Core MVC project. This time I added a dependency to Steeltoe.Extensions.Configuration.ConfigServerCore. Again, I added a Settings class to hold these configuration properties.
public class Settings
{
    public string property1 { get; set; }
    public string property2 { get; set; }
    public string property3 { get; set; }
    public string property4 { get; set; }
}
In my appsettings.json, I set my application name (to match the config file’s name I want to access) and URI of the config server.
My Program.cs file has a “using” statement for the Steeltoe.Extensions.Configuration.ConfigServer package, and then used the “AddConfigServer” operation to add the config server as a source.
public class Program
{
    public static void Main(string[] args)
    {
        CreateWebHostBuilder(args).Build().Run();
    }

    public static IWebHostBuilder CreateWebHostBuilder(string[] args) =>
        WebHost.CreateDefaultBuilder(args)
            .AddConfigServer()
            .UseStartup<Startup>();
}
I once again updated the Startup.cs file to load the target configurations into my typed object.
public IActionResult Index() { ViewData["configval"] = _mySettings.property1; return View(); }
Updating the view, and starting the .NET Core app yielded the expected results.
What I like
Spring Cloud Config is a very mature OSS project. You can deliver this sort of microservices machinery along with your apps in your CI/CD pipelines — these components are software that you ship versus services that need to be running — which is powerful. It offers a variety of backends, OAuth2 for security, encryption/decryption of values, and much more. It’s a terrific choice for a consistent configuration store on every infrastructure.
But realistically, I don’t care which of the above you use. Just use something to extract environment-specific configuration settings from your .NET apps. Use these robust external stores to establish some rigor around these values, and make it easier to share configurations, and keep them in sync across all of your application instances.
What do you think of when you hear the phrase “multi-cloud”? Ok, besides stupid marketing people and their dumb words. You might think of companies with on-premises environments who are moving some workloads into a public cloud. Or those who organically use a few different clouds, picking the best one for each workload. While many suggest that you get the best value by putting everything on one provider, that clearly isn’t happening yet. And maybe it shouldn’t. Who knows. But can you get the best of each cloud while retaining some portability? I think you can.
One multi-cloud solution is to do the lowest-common-denominator thing. I really don’t like that. Multi-cloud management tools try to standardize cloud infrastructure but always leave me disappointed. And avoiding each cloud’s novel services in the name of portability is unsatisfying and leaves you at a competitive disadvantage. But why should we choose the cloud (Azure! AWS! GCP!) and runtime (Kubernetes! VMs!) before we’ve even written a line of code? Can’t we make those into boring implementation details, and return our focus to writing great software? I’d propose that with good app frameworks, and increasingly-standard interfaces, you can create great software that runs on any cloud, while still using their novel services.
In this post, I’ll build a RESTful API with Spring Boot and deploy it, without code changes, to four different environments, including:
Local environment running MongoDB software in a Docker container.
Side note: Ok, so multi-cloud sounds good, but it seems like a nightmare of ops headaches and nonstop dev training. That’s true, it sure can be. But if you use a good multi-cloud app platform like Pivotal Cloud Foundry, it honestly makes the dev and ops experience virtually the same everywhere. So, it doesn’t HAVE to suck, although there are still going to be challenges. Ideally, your choice of cloud is a deploy-time decision, not a design-time constraint.
Creating the app
In my career, I’ve coded (poorly) with .NET, Node, and Java, and I can say that Spring Boot is the fastest way I’ve seen to build production-quality apps. So, I chose Spring Boot to build my RESTful API. This API stores and returns information about cloud databases. HOW VERY META. I chose MongoDB as my backend database, and used the amazing Spring Data to simplify interactions with the data source.
From start.spring.io, I created a project with dependencies on spring-boot-starter-data-rest (auto-generated REST endpoints for interacting with databases), spring-boot-starter-data-mongodb (to talk to MongoDB), spring-boot-starter-actuator (for “free” health metrics), and spring-cloud-cloudfoundry-connector (to pull connection details from the Cloud Foundry environment). Then I opened the project and created a new Java class representing a CloudProvider.
package seroter.demo.cloudmongodb;

import org.springframework.data.annotation.Id;

public class CloudProvider {

	@Id private String id;

	private String providerName;
	private Integer numberOfDatabases;
	private Boolean mongoAsService;

	public String getProviderName() {
		return providerName;
	}

	public void setProviderName(String providerName) {
		this.providerName = providerName;
	}

	public Integer getNumberOfDatabases() {
		return numberOfDatabases;
	}

	public void setNumberOfDatabases(Integer numberOfDatabases) {
		this.numberOfDatabases = numberOfDatabases;
	}

	public Boolean getMongoAsService() {
		return mongoAsService;
	}

	public void setMongoAsService(Boolean mongoAsService) {
		this.mongoAsService = mongoAsService;
	}
}
Thanks to Spring Data REST (which is silly powerful), all that was left was to define a repository interface. If all I did was create an annotate the interface, I’d get full CRUD interactions with my MongoDB collection. But for fun, I also added an operation that would return all the clouds that did (or did not) offer a MongoDB service.
package seroter.demo.cloudmongodb;

import java.util.List;

import org.springframework.data.mongodb.repository.MongoRepository;
import org.springframework.data.rest.core.annotation.RepositoryRestResource;

@RepositoryRestResource(collectionResourceRel = "clouds", path = "clouds")
public interface CloudProviderRepository extends MongoRepository<CloudProvider, String> {

	//add an operation to search for a specific condition
	List<CloudProvider> findByMongoAsService(Boolean mongoAsService);
}
That’s literally all my code. Crazy.
Run using Dockerized MongoDB
To start this test, I wanted to use “real” MongoDB software. So I pulled the popular Docker image and started it up on my local machine:
docker run -d -p 27017:27017 --name serotermongo mongo
When starting up my Spring Boot app, I could provide database connection info (1) in an app.properties file, or, as (2) input parameters that require nothing in the compiled code package itself. I chose the file option for readability and demo purposes, which looked like this:
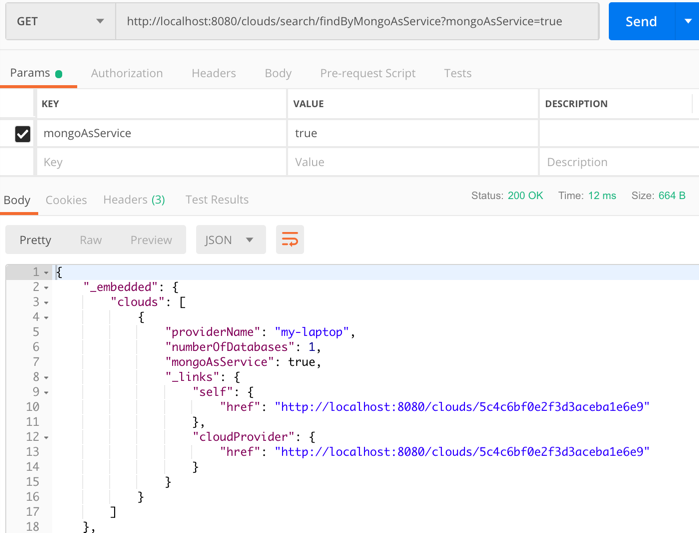
After starting the app, I issued a base request to my API via Postman. Sure enough, I got a response. As expected, no data in my MongoDB database. Note that Spring Data automatically creates a database if it doesn’t find the one specified, so the “demodb” now existed.
I then issued a POST command to add a record to MongoDB, and that worked great too. I got back the URI for the new record in the response.
I also tried calling that custom “search” interface to filter the documents where “mongoAsService” is true. That worked.
So, running my Spring Boot REST API with a local MongoDB worked fine.
Run using Microsoft Azure Cosmos DB
Next up, I pointed this application to Microsoft Azure. One of the many databases in Azure is Cosmos DB. This underrated database offers some pretty amazing performance and scale, and is only available from Microsoft in their cloud. NO PROBLEM. It serves up a handful of standard interfaces, including Cassandra and MongoDB. So I can take advantage of all the crazy-great hosting features, but not lock myself into any of them.
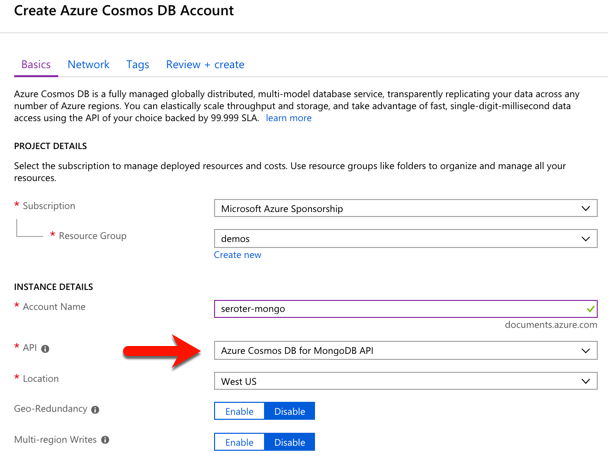
I started by visiting the Microsoft Azure portal. I chose to create a new Cosmos DB instance, and selected which API (SQL, Cassandra, Gremlin, MongoDB) I wanted.
After a few minutes, I had an instance of Cosmos DB. If I had wanted to, I could have created a database and collection from the Azure portal, but I wanted to confirm that Spring Data would do it for me automatically.
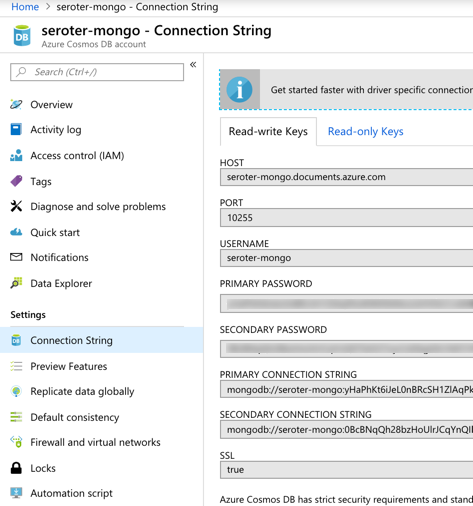
I located the “Connection String” properties for my new instance, and grabbed the primary one.
With that in hand, I went back to my application.properties file, commented out my “local” configuration, and added entries for the Azure instance.
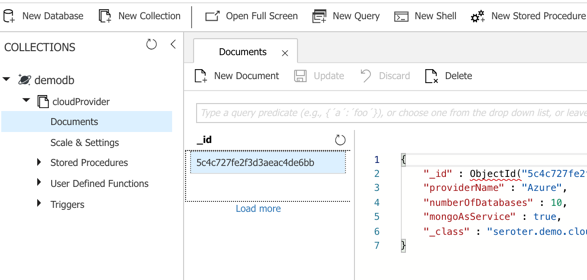
I could publish this app to Azure, but because it’s also easy to test it locally, I just started up my Spring Boot REST API again, and pinged the database. After POSTing a new record to my endpoint, I checked the Azure portal and sure enough, saw a new database and collection with my “document” in it.
Here, I’m using a super-unique cloud database but don’t need to manage my own software to remain “portable”, thanks to Spring Boot and MongoDB interfaces. Wicked.
Run using Amazon DocumentDB
Amazon DocumentDB is the new kid in town. I wrote up an InfoQ story about it, which frankly inspired me to try all this out.
Like Azure Cosmos DB, this database isn’t running MongoDB software, but offers a MongoDB-compatible interface. It also offers some impressive scale and performance capabilities, and could be a good choice if you’re an AWS customer.
For me, trying this out was a bit of a chore. Why? Mainly because the database service is only accessible from within an AWS private network. So, I had to properly set up a Virtual Private Cloud (VPC) network and get my Spring Boot app deployed there to test out the database. Not rocket science, but something I hadn’t done in a while. Let me lay out the steps here.
First, I created a new VPC. It had a single public subnet, and I added two more private ones. This gave me three total subnets, each in a different availability zone.
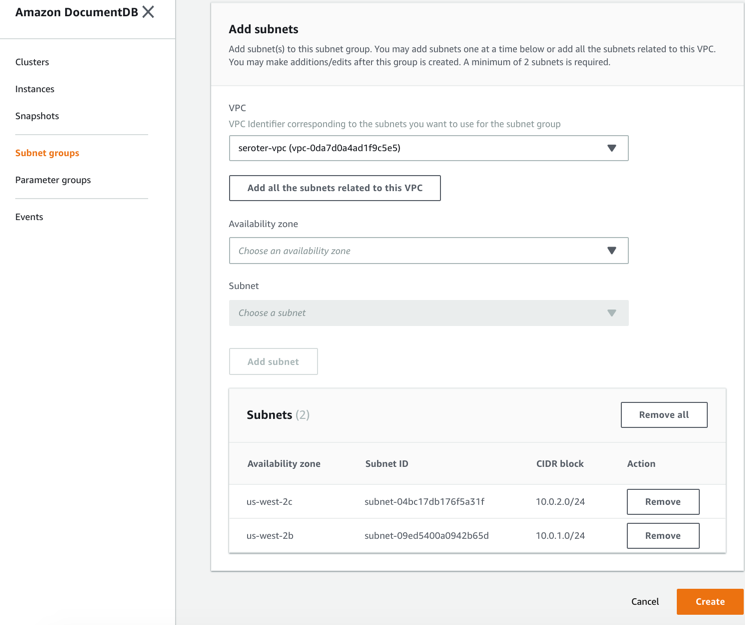
Next, I switched to the DocumentDB console in the AWS portal. First, I created a new subnet group. Each DocumentDB cluster is spread across AZs for high availability. This subnet group contains both the private subnets in my VPC.
I also created a parameter group. This group turned off the requirement for clients to use TLS. I didn’t want my app to deal with certs, and also wanted to mess with this capability in DocumentDB.
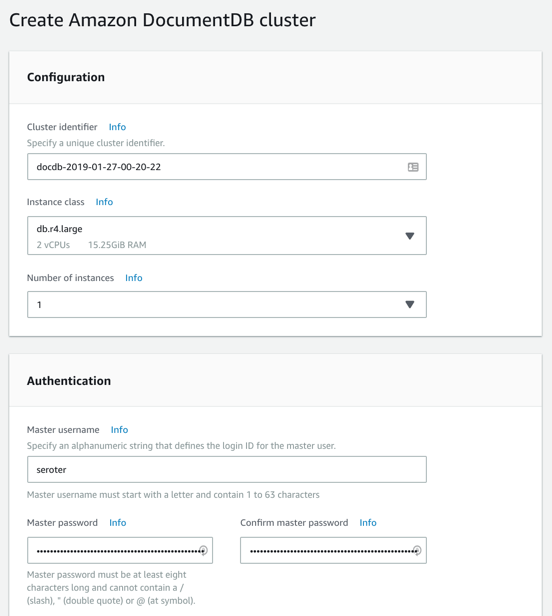
Next, I created my DocumentDB cluster. I chose an instance class to match my compute and memory needs. Then I chose a single instance cluster; I could have chosen up to 16 instances of primaries and replicas.
I also chose my pre-configured VPC and the DocumentDB subnet group I created earlier. Finally, I set my parameter group, and left default values for features like encryption and database backups.
After a few minutes, my cluster and instance were up and running. While this console doesn’t expose the ability to create databases or browse data, it does show me health metrics and cluster configuration details.
Next, I took the connection string for the cluster, and updated my application.properties file.
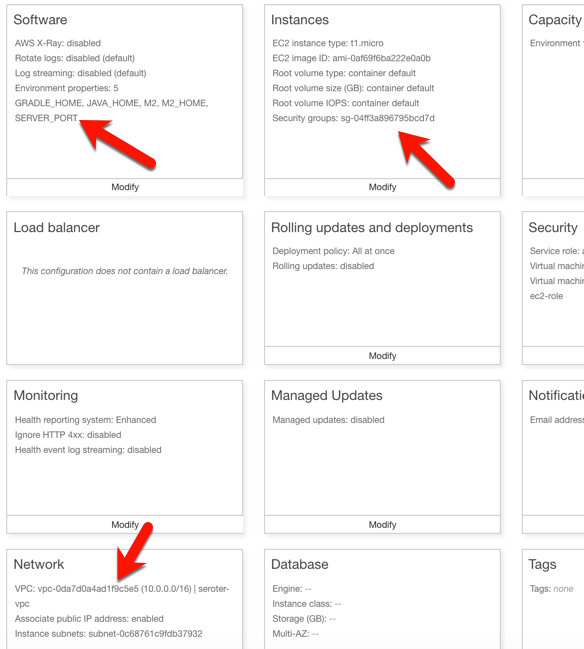
Now to deploy the app to AWS. I chose Elastic Beanstalk as the application host. I selected Java as my platform, and uploaded the JAR file associated with my Spring Boot REST API.
I had to set a few more parameters for this app to work correctly. First, I set a SERVER_PORT environment variable to 5000, because that’s what Beanstalk expects. Next, I ensured that my app was added to my VPC, provisioned a public IP address, and chose to host on the public subnet. Finally, I set the security group to the default one for my VPC. All of this should ensure that my app is on the right network with the right access to DocumentDB.
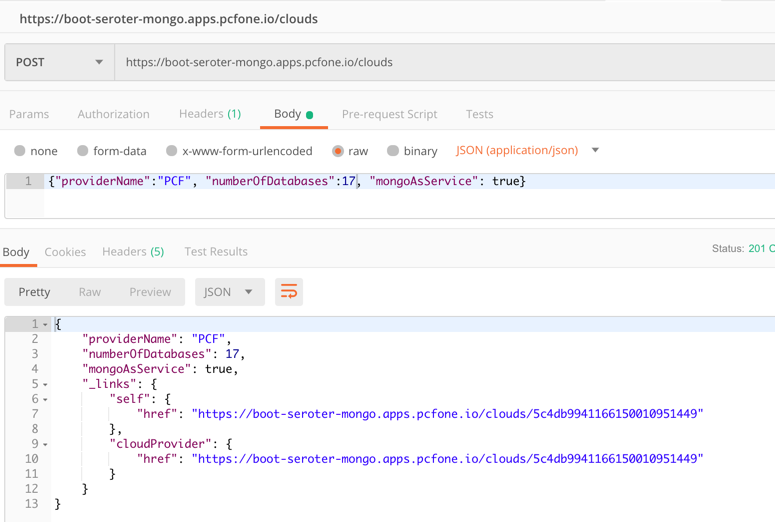
After the app was created in Beanstalk, I queried the endpoint of my REST API. Then I created a new document, and yup, it was added successfully.
So again, I used a novel, interesting cloud-only database, but didn’t have to change a lick of code.
Run using MongoDB in Pivotal Cloud Foundry
The last place to try this app out? A multi-cloud platform like PCF. If you did use something like PCF, the compute layer is consistent regardless of what public/private cloud you use, and connectivity to data services is through a Service Broker. In this case, MongoDB clusters are managed by PCF, and I get my own cluster via a Broker. Then my apps “bind” to that cluster.
First up, provisioning MongoDB. PCF offers MongoDB Enterprise from Mongo themselves. To a developer, this looks like a database-as–a-service because clusters are provisioned, optimized, backed up, and upgraded via automation. Via the command line or portal, I could provision clusters. I used the portal to get myself happy little instance.
After giving the service a name, I was set. As with all the other examples, no code changes were needed. I actually removed any MongoDB-related connection info from my application.properties file because that spring-cloud-cloudfoundry-connector dependency actually grabs the credentials from the environment variables set by the service broker.
One thing I *did* create for this environment — which is entirely optional — is a Cloud Foundry manifest file. I could pass these values into a command line instead of creating a declarative file, but I like writing them out. These properties simply tell Cloud Foundry what to do with my app.
With that, I jumped to a terminal, navigated to a directory holding that manifest file, and typed cf push. About 25 seconds later, I had a containerized, reachable application that connected to my MongoDB instance.
Fortunately, PCF treats Spring Boot apps special, so it used the Spring Boot Actuator to pull health metrics and more. Above, you can see that for each instance, I saw extra health information for my app, and, MongoDB itself.
Once again, I sent some GET requests into my endpoint, saw the expected data, did a POST to create a new document, and saw that succeed.
Wrap Up
Now, obviously there are novel cloud services without “standard” interfaces like the MongoDB API. Some of these services are IoT, mobile, or messaging related —although Azure Event Hubs has a Kafka interface now, and Spring Cloud Stream keeps message broker details out of the code. Other unique cloud services are in emerging areas like AI/ML where standardization doesn’t really exist yet. So some applications will have a hard coupling to a particular cloud, and of course that’s fine. But increasingly, where you run, how you run, and what you connect to, doesn’t have to be something you choose up front. Instead, first you build great software. Then, you choose a cloud. And that’s pretty cool.
When I say “PaaS” what comes to mind? If you’re like most people I talk to, you think of public cloud platforms for modern web apps. So I’ll forgive you if you didn’t realize that things are different now!
The first generation of PaaS products had a few things in common. They were public cloud only. You had to build apps with the runtime constraints in mind. They only ran statelesss web apps. Linux was the only runtime. When Cloud Foundry first came out, it checked most of those boxes. But over the years, Pivotal Cloud Foundry (PCF) evolved to do much more.
Many people still think of those first-generation PaaS constraints when considering PCF, and specifically, the Pivotal Application Service (PAS). So, I thought it’d be fun to look at non-traditional workloads. In this brief five-part series, I’m going to show off the following scenarios:
Most Cloud Foundry users depend on buildpacks. Developers push source code, and the buildpack pulls in dependencies, frameworks, and runtimes, then builds a tarball that’s deployed as an OCI-compatible container in Cloud Foundry. One major benefit of the buildpacks model is that the platform brings the root file system to your app. You’re not responsible for finding secure base images or maintaining that “layer” of the stack. But all that said, some folks like using Docker images as their packaging unit whether manually created (don’t do that) or as the output from a continuous integration pipeline.
It doesn’t matter if Cloud Foundry builds the container or you send in a Docker image, it’s all treated the same by the platform. At runtime, the orchestrator executes all containers using runC, the same spec used by Docker and Kubernetes. Let’s see this in action.
You can try this for free on Pivotal Web Services if you don’t have a Cloud Foundry available. I’m using a different environment, but they all behave the same. That’s the point! After you cf login to Cloud Foundry, it’s time to push a container.
How about we start with a Node.js web app. Here’s an Express app built by the folks at Bitnami. We can actually push this to Cloud Foundry with a single command.
In that command, notice a couple things. First, I’m using the –docker-image flag. Since I’m hitting a public image in the public Docker Hub, no credentials or anything are needed. PCF also works with private images, and private registries. Otherwise, it’s a standard command that asks for a single instance, and 128M of memory for each instance. Within ten seconds, you’ll have two routable instances ready to process traffic.
Seriously. That’s amazing. And PCF doesn’t “mess with” the image. Whatever layers are in your Docker image are what run in Cloud Foundry. One thing PCF *does* do is volume mount a directory that contains a unique certificate for the container. This regularly-rotated credential (up to hourly!) is used for things like mTLS. You can see it by SSH-ing into the container and doing printenv or browsing the file system. Yes, you can actually SSH into containers whether built by the platform or via Docker images. No black boxes here.
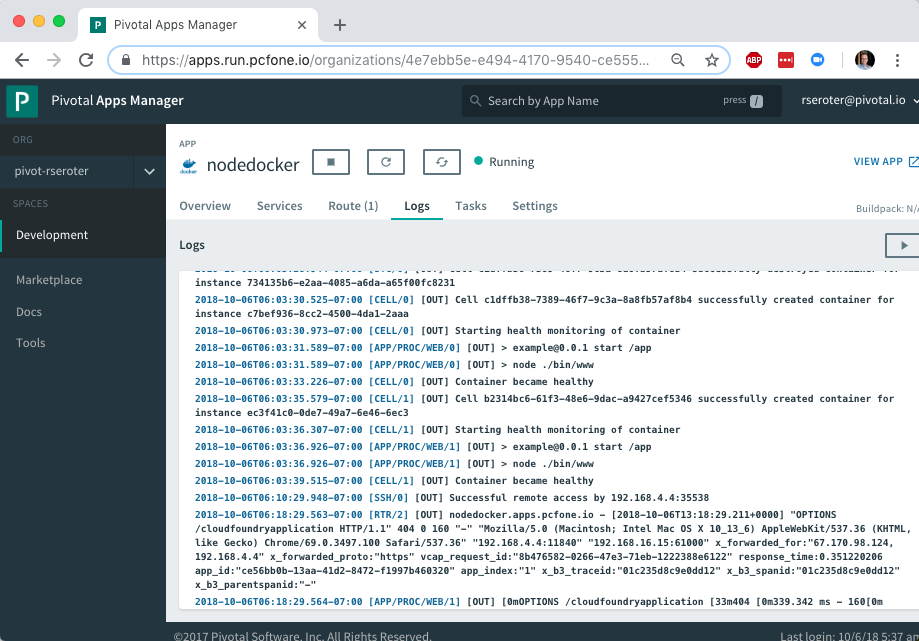
Deploying an app’s only half the story. Does PCF treat the running app the same way if it was packaged as a Docker image? Yup. Jumping to the PCF Apps Manager UX, you see our running app.
If you look closely, you see that we indicate the app type, in this case, that it’s from a Docker image.
More importantly, the platform bestows all the operational goodness on this app as any other. For example, all the logs from each app instance are collected and aggregated.
You can add environment variables. Configure auto-scaling. Monitor app and container health metrics. Bind to marketplace services. All the things that make PCF a great runtime for apps make it a great runtime for apps packaged as Docker images.
So try it out yourself. If you’re building custom apps, PCF is a great destination regardless of how you want to ship code. Stay tuned tomorrow for fun network routing demonstration.
I’ll be honest with you, I don’t know much about horses. I mean, I know some things and can answer basic questions from my kids. But I’m mostly winging it and relying on what I remember from watching Seabiscuit. Sometimes you need just enough knowledge to be dangerous. With that in mind, do you really know what “cloud-native” is all about? You should, and if you want the foundational ideas, my new on-demand Pluralsight class is just for you.
Clocking in at a tight 51 minutes, my course “Cloud-native Architecture: The Big Picture” introduces you to the principles, patterns, and technologies related to cloud-native software. The first module digs into why cloud-native practices matter, how to define cloud-native, what “good” looks like, and more.
The second module calls out cloud-native patterns around application architecture, application deployment, application infrastructure, and teams. The third and final module explains the technologies that help you realize those cloud-native patterns.
This was fun to put together, and I’ve purposely made the course brief so that you could quickly get the key points. This was my 18th Pluralsight course, and there’s no reason to stop now. Let me know what topic you’d like to see next!
Since I’ve moved up to the Seattle-area three years ago, there’s been a hole in my life. No longer. The Habit just opened up around the corner from me. I missed that place! While most of the attention (including my own) is on the Charburger, they actually have a pretty deep menu. I thought about that this week when looking at the latest Spring Cloud portfolio. While it’s used millions of times per month by Java developers —and usage grew 137% over the past year alone—Spring Cloud is best known for its Config Server and packaging of NetflixOSS tech. You know, things for service discovery, load balancing, circuit breakers, etc. THEY DESERVE THE GLORY. But there are four other interesting packages that you shouldn’t overlook.
Spring Cloud Stream
It’s no secret that I’m a big fan of this library. It abstracts away all the complexity of dealing with message brokers like RabbitMQ and Apache Kafka. Spring Cloud Stream has a straightforward programming model that makes it simple to do complex things. Content-based routing? Dead letter queuing? Content-type conversions? Partitioned processing, even on brokers that don’t natively support it? You get all that.
I’ve seen more and more companies move away from the heavy, centralized ESB and towards a federated messaging model. With Stream, you can use your choice of message broker, but make it a late-binding decision for developers. And if you’re doing event processing and want to chain a series of action together, Spring Cloud Stream works great with Spring Cloud Data Flow.
If you want to dig in, check out my Pluralsight course that has a whole module on Spring Cloud Stream. Or just go build something!
Spring Cloud Contract
Consumer-driven contracts are a fresh take on testing APIs. You know the classic way we share API info: create an API and expose operations and payloads for teams to model and test against. With consumer-driven contracts, the API creator builds and tests their service against a set of consumer expectations. But this has traditionally been a bit difficult to pull off. Enter Spring Cloud Contract.
It’s described in the docs as moving “TDD to the level of software architecture.” It does this by “covering a range of options for writing tests, publishing them as assets, and asserting that a contract is kept by producers and consumers.”
You write contracts in Groovy or YAML, and testing stubs get generated and used by both producers and consumers. This enables fast feedback for both side. What’s cool about these generated testing stubs (and the associated “stub runner”) is that you can mock complex distributed systems with a few code annotations. This includes the messaging layer as well. Powerful stuff, and a big deal for today’s software developers.
This one’s pretty new, so I’ll excuse you if you haven’t heard of it. BUT ONLY THIS ONCE! Spring Cloud Gateway gives you a powerful API gateway based on Spring components.
Use (built-in or custom) route predicates to determine how requests are handled. Built-in ones include datetime (before, after, or between), cookies, headers, host, method, path, query, and more. Combine them to get whatever behavior you need. You can also modify incoming or outgoing traffic. Add headers, integrate with Hystrix for circuit breaker behavior, check a rate limiter, do directors, among other things. As you’d expect, this is quite extensible and scalable.
API gateways form an important part of your architecture, and having a bunch of mini-gateways deployed (instead of a single, monolithic one) might give you extra flexibility. Check out the docs and try it out.
Spring Cloud Function
Unless you’ve awoken from a three-year slumber, you’re probably familiar with “serverless” tech. Spring Cloud Function is a pretty wicked (generally available) framework that does a few things you might not expect.
It’s not just about making Spring Boot friendly to function platforms like AWS Lambda or Azure Functions. That’s there (see AWS and Azure adapter guidance). But besides providing a consistent programming model across clouds, it also has stuff you need to run it standalone.
Decorate your code with annotations that result in HTTP or stream-processing endpoints getting attached to your function. Your function can take part in messaging as a source, processor (takes data in, publishes data out), or sink. Or it can get be a standalone web app that gets activated upon HTTP request. Neato. Read the docs and see how easy it is to get started.
Spring Cloud is a pretty unique collection of projects, and the Spring team is constantly upgrading and improving them. The whole point is to make it simple to incorporate proven distributed systems pattern in your apps. From what I can tell, it’s achieving that mission.
Trying to significantly improve your company’s ability to build and run good software? Forget Docker, public cloud, Kubernetes, service meshes, Cloud Foundry, serverless, and the rest of it. Over the years, I’ve learned the most important place you should start: continuous integration and delivery pipelines. Arguably, “apps on pipeline” is the most important “transformation” metric to track. Not “deploys per day” or “number of microservices.” It’s about how many apps you’ve lit up for repeatable, automated deployment. That’s a legit measure of how serious you are about being responsive and secure.
All this means I needed to get smarter with Concourse, one of my favorite tools for CI (and a little CD). I decided to build an ASP.NET Core app, and continuously integrate and deliver it to a Cloud Foundry environment running in AWS. Let’s go!
First off, I needed an app. I spun up a new ASP.NET Core Web API project with a couple REST endpoints. You can grab the source code here. Most of my code demos don’t include tests because I’m in marketing now, so YOLO, but a trustworthy pipeline needs testable code. If you’re a .NET dev, xUnit is your friend. It’s maintained by my friend Brad, so I basically chose it because of peer pressure. My .csproj file included a few references to bring xUnit into my project:
“Microsoft.NET.Test.Sdk” Version=”15.7.0″
“xunit” Version=”2.3.1″
“xunit.runner.visualstudio” Version=”2.3.1″
Then, I created a class to hold the tests for my web controller. I included one test with a basic assertion, and another “theory” with an input data set. These are comically simple, but prove the point!
   public class TestClass {
        private ValuesController _vc;
public TestClass() {
            _vc = new ValuesController();
        }

        [Fact]
        public void Test1(){
            Assert.Equal("pivotal", _vc.Get(1));
        }

        [Theory]
        [InlineData(1)]
        [InlineData(3)]
        [InlineData(20)]
        public void Test2(int value) {
            Assert.Equal("public", _vc.GetPublicStatus(value));
        }
    }
When I ran dotnet test against the above app, I got an expected error because the third inline data source led to a test failure, since my controller only returns “public” companies when the input value is between 1 and 10. Commenting the offending inline data source led to a successful test run.
Ok, the app was done. Now, to put it on a pipeline. If you’ve ever used shameful swear words when wrangling your CI server, maybe it’s worth joining all the folks who switched to Concourse. It’s a pretty straightforward OSS tool that uses a declarative model and containers for defining and running pipelines, respectively. Getting started is super simple. If you’re running Docker on your desktop, that’s your easiest route. Just grab this Docker Compose file from the Concourse GitHub repo. I renamed mine to docker-compose.yml, jumped into a Terminal session, switched to the folder holding this YAML file, and ran docker-compose up -d. After a second or two, I had a PostgreSQL server (for state) and a Concourse server. PROVE IT, you say. Hit localhost:8080, and you’ll see the Concourse dashboard.
Besides this UX, we interface with Concourse via a CLI tool called fly. I downloaded it from here. I then used fly to add my local environment as a “target” to manage. Instead of plugging in the whole URL every time I interacted with Concourse, I created an alias (“rs”) using fly -t rs login -c http://localhost:8080. If you get a warning to sync your version of fly with your version of Concourse, just enter fly -t rs sync and it gets updated. Neato.
Next up? The pipeline. Pipelines are defined in YAML and are made up of resources and jobs. One of the great things about a declarative model, is that I can run my CI tests against any Concourse by just passing in this (source-controlled) pipeline definition. No point-and-ciick configurations, no prerequisite components to install. Love it. First up, I defined a couple resources. One was my GitHub repo, the second was my target Cloud Foundry environment. In the real world, you’d externalize the Cloud Foundry credentials, and call out to files to build the app, etc. For your benefit, I compressed to a single YAML file.
Those resources tell Concourse where to get the stuff it needs to run the jobs. The first job used the GitHub resource to grab the source code. Then it used the Microsoft-provided Docker image to run the dotnet test command.
Concourse isn’t really a CD tool, but it does a nice basic job of getting code to a defined destination. The second job deploys the code to Cloud Foundry. It also uses the source code resource and only fires if the test job succeeds. This ensures that only fully-tested code makes its way to the hosting environment. If I were being more responsible, I’d take the results of the test job, drop it into an artifact repo, and then use that artifact for deployment. But hey, you get the idea!
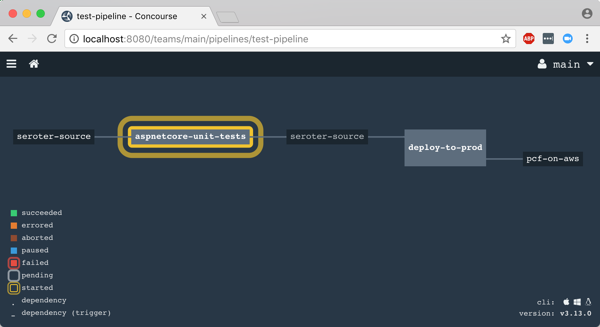
That was it! I was ready to deploy the pipeline (pipeline.yml) to Concourse. From the Terminal, I executed fly -t rs set-pipeline -p test-pipeline -c pipeline.yml. Immediately, I saw my pipeline show up in the Concourse Dashboard.
After I unpaused my pipeline, it fired up automatically.
Remember, my job specified a Microsoft-provided container for building the app. Concourse started this job by downloading the Docker image.
After downloading the image, the job kicked off the dotnet test command and confirmed that all my tests passed.
Terrific. Since my next job was set to trigger when the first one succeeded, I immediately saw the “deploy” job spin up.
This job knew how to publish content to Cloud Foundry, and used the provided parameters to deploy the app in a few seconds. Note that there are other resource types if you’re not a Cloud Foundry user. Nobody’s perfect!
The pipeline run was finished, and I confirmed that the app was actually deployed.
Finished? Yes, but I wanted to see a failure in my pipeline! So, I changed my xUnit tests and defined inline data that wouldn’t pass. After committing code to GitHub, my pipeline kicked off automatically. Once again it was tested in the pipeline, and this time, failed. Because it failed, the next step (deployment) didn’t happen. Perfect.
If you’re looking for a CI tool that people actually like using, check out Concourse. Regardless of what you use, focus your energy on getting (all?) apps on pipelines. You don’t do it because you have to ship software every hour, as most apps don’t need it. It’s about shipping whenever you need to, with no drama. Whether you’re adding features or patching vulnerabilities, having pipelines for your apps means you’re actually becoming a customer-centric, software-driven company.
I mean, you’ll mainly find me in Seattle, where I actually live. But, I’m also speaking on a variety of topics at a few shows over the next few months, and thought I’d point those out.
If the thing that connects your other things together isn’t resilient, you’re in trouble. In this talk, I’ll take a look at some core availability patterns for application/data integration, and then review how to configure Azure’s integration services for high availability. This is always a terrific show with compelling speakers, and the hosts at BizTalk360 always do a bang-up job putting it on.
I know a few things about product ownership, such as how to be a good product owner, and a bad one. Primarily because I’ve been both. In this talk at the “big Agile” show, I’ll look at the role and what a product owner should do. I’m starting to work on this presentation now, and will likely list 10+ things that you should do, and a few things to avoid. This will be my second time speaking at this conference, and I enjoy hearing from so many folks focused on software teams and getting code to production.
I’ve been geeking out on space exploration books and movies lately, and thought it’d be fun to translate the lessons from an iconic NASA mission to the everyday challenges faced by software engineers. Here, I’ll show how some of the key ideas applied by NASA engineers reinforce some of the best practices when designing complex software systems. I didn’t attend the inaugural edition of this conference last year, but I’m jazzed to be part of it this time around.
I hope I’ll see you at some of these! If you’ll be at any one of them (or all three, if you’re my stalker!), do let me know.
Imagine that someone asks you to build a cloud-hosted app. So far so good. And that app should be resilient against any glitches within the data center. Um, ok. And the app should stay online even if a whole region goes offline. Wait, what? While public clouds make it easier to build highly available systems, it’s not automatic. How do you set it up? What’s your responsibility, and what does the cloud provider do for you? I answer this, and more, in my new Pluralsight course: Architecting for High Availability in Microsoft Azure.
This course is a four hour tour through the core Azure services, and how to configure each for high availability. Along the way, we discuss general resilience patterns. To prove how things work, we also build out a reference app that shows how everything works. At the end of the course, you’ll have a good idea of how to use Azure, and configure it effectively.
Patterns for High Availability in the Cloud. Here we discuss some core ideas around highly available distributed systems, and patterns you should know.
Provisioning Durable Azure Storage. In this module, we check out Azure Storage and how Blob, File, and Disk storage works.
Configuring Resilient Azure Databases. Databases can be a vulnerable part of your architecture, so you need to pay special attention here. We’ll look at Azure SQL Database, Cosmos DB, Redis Cache, and more.
Deploying Redundant Azure Compute. This is arguably what cloud was first famous for, and here we’ll play around with Azure Virtual Machines, Azure App Service, and Azure Functions.
Scale Processing via Azure Integration Capabilities. Messaging is so hot right now! A bulletproof integration tier is critical, so we’ll dig into how to set up Azure Service Bus, Azure Event Hubs, and Azure Logic Apps for resilience.
Configuring Uninterrupted Traffic with Azure Networking. If your assets aren’t routable, it doesn’t matter how resilient they are! In this module, we explore Azure networking services like Virtual Networks, Load Balancing, App Gateway, and Traffic Manager.
I hope you watch this course and enjoy it. It took me months to put together, but the final result should be worth it!
My sister-in-law is a personal trainer. Whenever she visits, I instinctively hide any delicious Kit Kats I have lying around. But she inspires me, and I admire how she helps people change their lifestyle for the better. That said, it’s hard work, sometimes she fails, and getting people to sustain that change is the toughest part. If you’re a beleaguered change agent within enterprise IT, this may sound familiar. It does to me. I’ve both succeeded and failed at enacting changes within an IT department. What does it take to succeed when introducing lasting changes? I can think of ten things.
#1 – You tell a story focused on outcomes.
It’s key to understand the impact of what you’re doing. What does this technology make us better at? How does the new process “fix” a troublesome pain point? You need to tell a story that starts with “why.” And the “why” can’t be “it makes us more secure” or “gets us onto a supported version of the software.” That motivates no one. Your audience needs to feel the impact.
#2 – You’re generous with proof points.
This one requires pre-work. You can’t have proof points without data! That means you need before/after stats, ongoing metrics, and anecdotes. How have things improved so far? What’s the awful state we started in? Don’t underestimate the value of chart or visual aid. So when you’re making your case, you have to know up front which measurements matter, and how to collect the data you need to persuade your audience.
#3 – You hit the road to tell your story.
The best change agents I’ve seen don’t wait for people to come ask about their amazing ideas. No, they pitch. You need to find an audience that benefits from the proposed change, and get in front of them. Do free training, schedule meetups, or crash team meetings and ask for a few minutes of their time.
This is also where hitting the conference circuit matters too. If your change is just starting to take hold, you get out there and tell the story. This has a few benefits. First, it motivates the team implementing the change. Our champion’s on stage! Woo hoo! Second, it reinforces the change and makes it harder for internal skeptics to starve it. Third, it acts as free advertising for those internal teams who might not have known about it. And finally, it gives you a chance to get public feedback on your ideas, and improve upon them.
#4 – You invest in documentation and useful assets.
Do you want people to adopt your proposal? Make it easy to learn about it! Invest in materials—think presentations, video recordings, FAQs, intranet sites, sample code—that make your case. Do whatever is needed to empower self-service discovery after your roadshow (#3 above) gets them pumped up.
#5 – You make it easy to onboard and use the new “thing.”
How easy is it to get started with your championed IT system or process? Does it require a ten-week training course and a terrifying maze of executive approvals? Yikes. If you’re a champion of a new platform—like Salesforce.com or a cloud platform like Pivotal Cloud Foundry—then it’s on you to get budget to sponsor the sandbox. Want to kill your platform’s adoption before it starts? Throw “chargebacks” in there immediately. No, you want to give people an easy on-ramp to whatever you’re proposing, and then have a path forward to recoup the investment.
#6 – You cash in on your good will, and capitalize on your reputation.
This one may be hard to hear. If people don’t like you, or you’re a pain to work with, they won’t rally around your (amazing) idea. I just haven’t seen it happen. Successful champions have political capital that they cash in when introducing disruptive changes. Even if you have organizational authority and can ram changes through an approval process, the adoption will be sluggish if there’s no goodwill with your teams. It’s a fact of life that you may have to call in favors when getting something new to stick. Make sure you have some chips to play!
#7 – You demonstrate a path forward and plans for future investments.
No one is going to adopt a major new change if they think it’s a dead end. Why go through all the effort? Besides telling a story based on outcomes (#1 above), you need to show that there’s a plan for ongoing investment. How will the new technology or process evolve over time? What teams are queued up to use it? Momentum matters, but so does a well thought-out plan.
#8 – You recognize paradigm shifts and empathize with those impacted.
When you’re acting as an IT champion, it’s easy to get caught up in why something is awesome. But you may forget or brush aside legitimate fears by those impacted. Not every change is life altering, but when there are real ramifications on existing jobs, you need to have appropriate empathy and message accordingly. It doesn’t mean you back off from radical change, but you focus your message on the positive impacts.
#9 – You establish a wide set of supporters.
Some of the highest-potential changes I’ve seen ended up flaming out because the single champion disappeared. There’s always going to be organizational turnover, and unless you develop a wide base of support, your change is doomed. You want to find like-minded people to embrace your message and carry the banner during the inevitable highs and lows within the company.
#10 – You never stop expanding and “selling” the change.
The downside of being an IT champion is that you’re never really finished. If you’re not expanding and solidifying support, you’re going backwards. In any large enterprise, there are antibodies that swarm to unwelcome changes and try to kill it. If you get too comfortable, you may get surprised by those who look for ways to rollback your changes.
Why go through all the potential heartache to introduce changes to your company? Because you care about making things better. That means fighting battles, doing some thankless work, and sometimes losing out. However, it also means giving your company a chance to be more relevant, and you experience the satisfaction of making life just a little better.
Anything I missed? What have you seen? Where do champions get it right?