Category: Docker

  • Building an Azure-powered Concourse pipeline for Kubernetes  – Part 2: Packaging and containerizing code

    Building an Azure-powered Concourse pipeline for Kubernetes – Part 2: Packaging and containerizing code

    Let’s continuously deliver an ASP.NET Core app to Kubernetes using Concourse. In part one of this blog series, I showed you how to set up your environment to follow along with me. It’s easy; just set up Azure Container Registry, Azure Storage, Azure Kubernetes Service, and Concourse. In this post, we’ll start our pipeline by pulling source code, running unit tests, generating a container image that’s stored in Azure Container Registry, and generating a tarball for Azure Blob Storage.

    We’re building this pipeline with Concourse. Concourse has three core primitives: tasks, jobs, and resources. Tasks form jobs, jobs form pipelines, and state is stored in resources. Concourse is essentially stateless, meaning there are no artifacts on the server after a build. You also don’t register any plugins or extensions. Rather, the pipeline is executed in containers that go away after the pipeline finishes. Any state — be it source code or Docker images — resides in durable resources, not Concourse itself.

    Let’s start building a pipeline.

    Pulling source code

    A Concourse pipeline is defined in YAML. Concourse ships with a handful of “known” resource types including Amazon S3, git, and Cloud Foundry. There are dozens and dozens of community ones, and it’s not hard to build your own. Because my source code is stored in GitHub, I can use the out-of-the-box resource type for git.

    At the top of my pipeline, I declared that resource.

    ---
    resources:
    - name: source-code
      type: git
      icon: github-circle
      source:
        uri: https://github.com/rseroter/seroter-api-k8s
        branch: master
    

    I’ve gave the resource a name (“source-code”) and identified where the code lives. That’s it! Note that when you deploy a pipeline, Concourse produces containers that “check” resources on a schedule for any changes that should trigger a pipeline.

    Running unit tests

    Next up? Build a working version of a pipeline that does something. Specifically, it should execute unit tests. That means we need to define a job.

    A job has a build plan. That build plan contains any of three things: get steps (to retrieve a resource), put steps (to push something to a resource), and task steps (to run a script). Our job below has one get step (to retrieve source code), and one task (to execute the xUnit tests).

    jobs:
    - name: run-unit-tests
      plan:
      - get: source-code
        trigger: true
      - task: first-task
        config: 
          platform: linux
          image_resource:
            type: docker-image
            source: {repository: mcr.microsoft.com/dotnet/core/sdk}
          inputs:
          - name: source-code
          run:
              path: sh
              args:
              - -exec
              - |
                dotnet test ./source-code/seroter-api-k8s/seroter-api-k8s.csproj 
    

    Let’s break it down. First, my “plan” gets the source-code resource. And because I set “trigger: true” Concourse will kick off this job whenever it detects a change in the source code.

    Next, my build plan has a “task” step. Tasks run in containers, so you need to choose a base image that runs the user-defined script. I chose the Microsoft-provided .NET Core image so that I’d be confident it had all the necessary .NET tooling installed. Note that my task has an “input.” Since tasks are like functions, they have inputs and outputs. Anything I input into the task is mounted into the container and is available to any scripts. So, by making the source-code an input, my shell script can party on the source code retrieved by Concourse.

    Finally, I embedded a short script that invokes the “dotnet test” command. If I were being responsible, I’d refactor this embedded script into an external file and reference that file. But hey, this is easier to read.

    This is now a valid pipeline. In the previous post, I had you install the fly CLI to interact with Concourse. From the fly CLI, I deploy pipelines with the following command:

    fly -t rs set-pipeline -c azure-k8s-rev1.yml -p azure-k8s-rev1

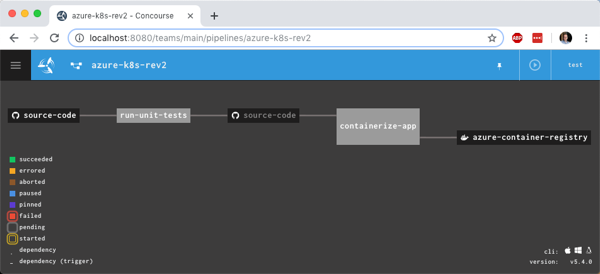
    That command says to use the “rs” target (which points to a given Concourse instance), use the YAML file holding the pipeline, and name this pipeline azure-k8s-rev1. It deployed instantly, and looked like this in the Concourse web dashboard.

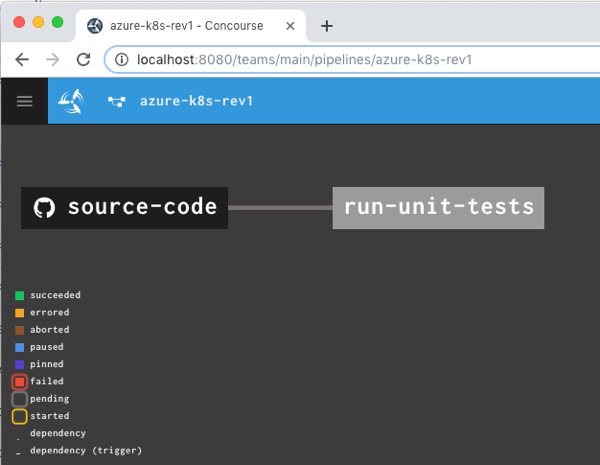
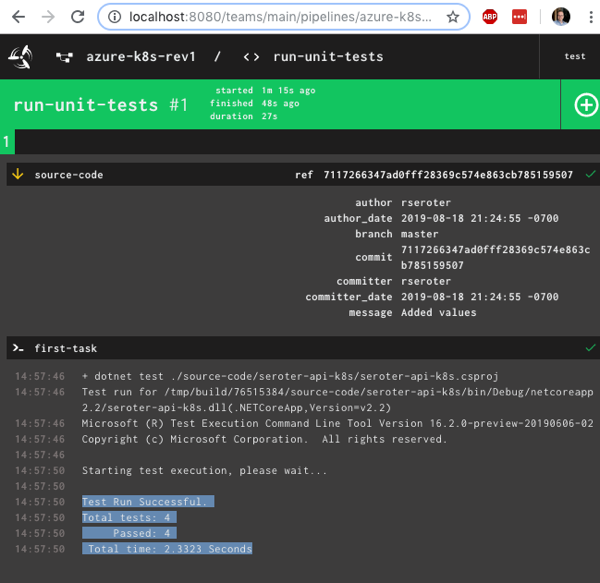
    After unpausing the pipeline so that it came alive, I saw the “run unit tests” job start running. It’s easy to view what a job is doing, and I saw that it loaded the container image from Microsoft, mounted the source code, ran my script and turned “green” because all my tests passed.

    Nice! I had a working pipeline. Now to generate a container image.

    Producing and publishing a container image

    A pipeline that just run tests is kinda weird. I need to do something when tests pass. In my case, I wanted to generate a Docker image. Another of the built-in Concourse resource types is “docker-image” which generates a container image and puts it into a registry. Here’s the resource definition that worked with Azure Container Registry:

    resources:
    - name: source-code
      [...]
    - name: azure-container-registry
      type: docker-image
      icon: docker
      source:
        repository: myrepository.azurecr.io/seroter-api-k8s
        tag: latest
        username: ((azure-registry-username))
        password: ((azure-registry-password))
    

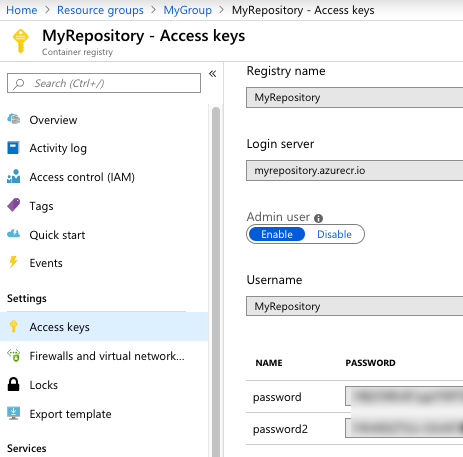
    Where do you get those Azure Container Registry values? From the Azure Portal, they’re visible under “Access keys.” I grabbed the Username and one of the passwords.

    Next, I added a new job to the pipeline.

    jobs:
    - name: run-unit-tests
      [...]
    - name: containerize-app
      plan:
      - get: source-code
        trigger: true
        passed:
        - run-unit-tests
      - put: azure-container-registry
        params:
          build: ./source-code
          tag_as_latest: true
    

    What’s this job doing? Notice that I “get” the source code again. I also set a “passed” attribute meaning this will only run if the unit test step completes successfully. This is how you start chaining jobs together into a pipeline! Then I “put” into the registry. Recall from the first blog post that I generated a Dockerfile from within Visual Studio for Mac, and here, I point to it. The resource does a “docker build” with that Dockerfile, tags the resulting image as the “latest” one, and pushes to the registry.

    I pushed this as a new pipeline to Concourse:

    fly -t rs set-pipeline -c azure-k8s-rev2.yml -p azure-k8s-rev2

    I now had something that looked like a pipeline.

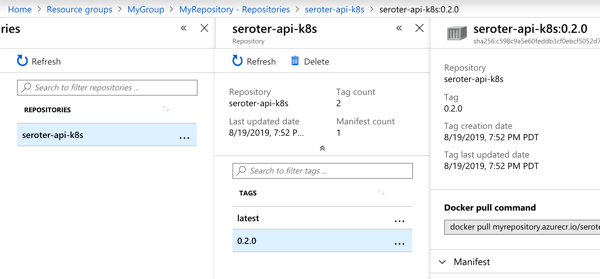
    I manually triggered the “run unit tests” job, and after it completed, the “containerize app” job ran. When that was finished, I checked Azure Container Registry and saw a new repository one with image in it.

    Generating and storing a tarball

    Not every platform wants to run containers. BLASPHEMY! BURN THE HERETIC! Calm down. Some platforms happily take your source code and run it. So our pipeline should also generate a single artifact with all the published ASP.NET Core files.

    I wanted to store this blob in Azure Storage. Since Azure Storage isn’t a built-in Concourse resource type, I needed to reference a community one. No problem finding one. For non-core resources, you have to declare the resource type in the pipeline YAML.

    resource_types:
    - name: azure-blobstore
      type: docker-image
      source:
        repository: pcfabr/azure-blobstore-resource
    

    A resource type declaration is fairly simple; it’s just a type (often docker-image) and then the repo to get it from.

    Next, I needed the standard resource definition. Here’s the one I created for Azure Storage:

    name: azure-blobstore
      type: azure-blobstore
      icon: azure
      source:
        storage_account_name: ((azure-storage-account-name))
        storage_account_key: ((azure-storage-account-key))
        container: coreapp
        versioned_file: app.tar.gz
    

    Here the “type” matches the resource type name I set earlier. Then I set the credentials (retrieved from the “Access keys” section in the Azure Portal), container name (pre-created in the first blog post), and the name of the file to upload. Regex is supported here too.

    Finally, I added a new job that takes source code, runs a “publish” command, and creates a tarball from the result.

    jobs:
    - name: run-unit-tests
      [...]
    - name: containerize-app
      [...]
    - name: package-app
      plan:
      - get: source-code
        trigger: true
        passed:
        - run-unit-tests
      - task: first-task
        config:
          platform: linux
          image_resource:
            type: docker-image
            source: {repository: mcr.microsoft.com/dotnet/core/sdk}
          inputs:
          - name: source-code
          outputs:
          - name: compiled-app
          - name: artifact-repo
          run:
              path: sh
              args:
              - -exec
              - |
                dotnet publish ./source-code/seroter-api-k8s/seroter-api-k8s.csproj -o .././compiled-app
                tar -czvf ./artifact-repo/app.tar.gz ./compiled-app
                ls
      - put: azure-blobstore
        params:
          file: artifact-repo/app.tar.gz
    

    Note that this job is also triggered when unit tests succeed. But it’s not connected to the containerization job, so it runs in parallel. Also note that in addition to an input, I also have outputs defined on the task. This generates folders that are visible to subsequent steps in the job. I dropped the tarball into the “artifact-repo” folder, and then “put” that file into Azure Blob Storage.

    I deployed this pipeline as yet another revision:

    fly -t rs set-pipeline -c azure-k8s-rev3.yml -p azure-k8s-rev3

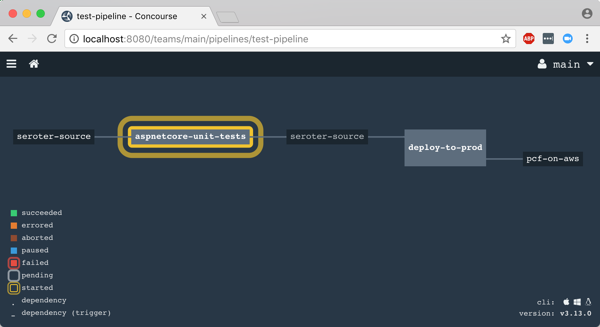
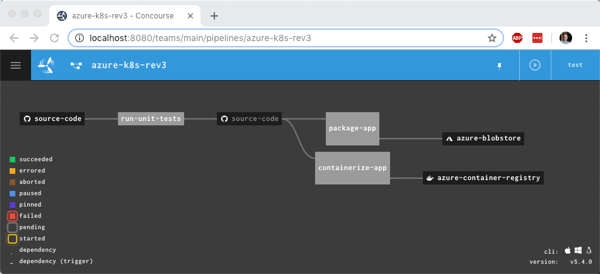
    Now this pipeline’s looking pretty hot. Notice that I have parallel jobs that fire after I run unit tests.

    I once again triggered the unit test job, and watched the subsequent jobs fire. After the pipeline finished, I had another updated container image in Azure Container Registry and a file sitting in Azure Storage.

    Adding semantic version to the container image

    I could stop there and push to Kubernetes (next post!), but I wanted to do one more thing. I don’t like publishing Docker images with the “latest” tag. I want a real version number. It makes sense for many reasons, not the least of which is that Kubernetes won’t pick up changes to a container if the tag doesn’t change! Fortunately, Concourse has a default resource type for semantic versioning.

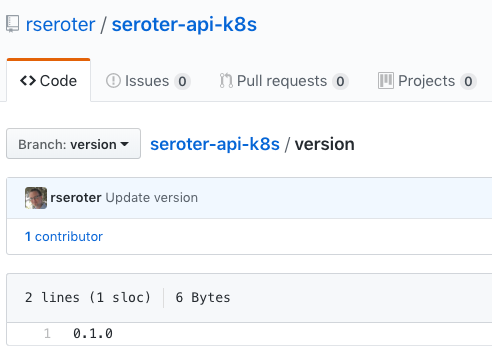
    There are a few backing stores for the version number. Since Concourse is stateless, we need to keep the version value outside of Concourse itself. I chose a git backend. Specifically, I added a branch named “version” to my GitHub repo, and added a single file (no extension) named “version”. I started the version at 0.1.0.

    Then, I ensured that my GitHub account had an SSH key associated with it. I needed this so that Concourse could write changes to this version file sitting in GitHub.

    I added a new resource to my pipeline definition, referencing the built-in semver resource type.

    - name: version  
      type: semver
      source:
        driver: git
        uri: git@github.com:rseroter/seroter-api-k8s.git
        branch: version
        file: version
        private_key: |
            -----BEGIN OPENSSH PRIVATE KEY-----
            [...]
            -----END OPENSSH PRIVATE KEY-----
    

    In that resource definition, I pointed at the repo URI, branch, file name, and embedded the private key for my account.

    Next, I updated the existing “containerization” job to get the version resource, use it, and then update it.

    jobs:
    - name: run-unit-tests
      [...] 
    - name: containerize-app
      plan:
      - get: source-code
        trigger: true
        passed:
        - run-unit-tests
      - get: version
        params: {bump: minor}
      - put: azure-container-registry
        params:
          build: ./source-code
          tag_file: version/version
          tag_as_latest: true
      - put: version
        params: {file: version/version}
    - name: package-app
      [...]
    

    First, I added another ‘get” for version. Notice that its parameter increments the number by one minor version. Then, see that the “put” for the container registry uses “version/version” as the tag file. This ensures our Docker image is tagged with the semantic version number. Finally, notice I “put” the incremented version file back into GitHub after using it successfully.

    I deployed a fourth revision of this pipeline using this command:

    fly -t rs set-pipeline -c azure-k8s-rev4.yml -p azure-k8s-rev4

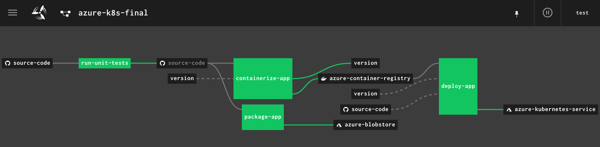
    You see the pipeline, post-execution, below. The “version” resource comes into and out of the “containerize app” job.

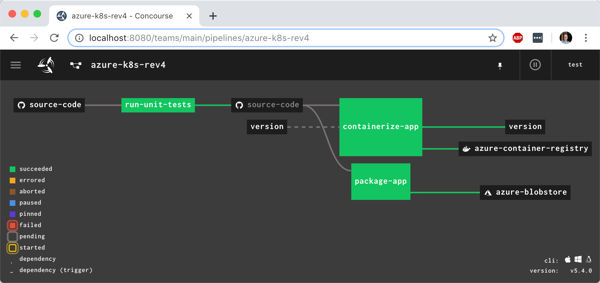
    With the pipeline done, I saw that the “version” value in GitHub was incremented by the pipeline, and most importantly, our Docker image has a version tag.

    In this blog post, we saw how to gradually build up a pipeline that retrieves source and prepares it for downstream deployment. Concourse is fun and easy to use, and its extensibility made it straightforward to deal with managed Azure services. In the final blog post of this series, we’ll take pipeline-generated Docker image and deploy it to Azure Kubernetes Service.

  • Building an Azure-powered Concourse pipeline for Kubernetes  – Part 1: Setup

    Building an Azure-powered Concourse pipeline for Kubernetes – Part 1: Setup

    Isn’t it frustrating to build great software and helplessly watch as it waits to get deployed? We don’t just want to build software in small batches, we want to ship it in small batches. This helps us learn faster, and gives our users a non-stop stream of new value.

    I’m a big fan of Concourse. It’s a continuous integration platform that reflects modern cloud-native values: it’s open source, container-native, stateless, and developer-friendly. And all pipeline definitions are declarative (via YAML) and easily source controlled. I wanted to learn how build a Concourse pipeline that unit tests an ASP.NET Core app, packages it up and stashes a tarball in Azure Storage, creates a Docker container and stores it in Azure Container Registry, and then deploy the app to Azure Kubernetes Service. In this three part blog series, we’ll do just that! Here’s the final pipeline:

    This first posts looks at everything I did to set up the scenario.

    My ASP.NET Core web app

    I used Visual Studio for Mac to build a new ASP.NET Core Web API. I added NuGet package dependencies to xunit and xunit.runner.visualstudio. The API controller is super basic, with three operations.

    [Route("api/[controller]")]
    [ApiController]
    public class ValuesController : ControllerBase
    {
        [HttpGet]
        public ActionResult<IEnumerable<string>> Get()
        {
            return new string[] { "value1", "value2" };
        }
    
        [HttpGet("{id}")]
        public string Get(int id)
        {
            return "value1";
        }
    
        [HttpGet("{id}/status")]
        public string GetOrderStatus(int id)
        {
            if (id > 0 && id <= 20)
            {
                return "shipped";
            }
            else
            {
                return "processing";
            }
        }
    }
    

    I also added a Testing class for unit tests.

        public class TestClass
        {
            private ValuesController _vc;
    
            public TestClass()
            {
                _vc = new ValuesController();
            }
    
            [Fact]
            public void Test1()
            {
                Assert.Equal("value1", _vc.Get(1));
            }
    
            [Theory]
            [InlineData(1)]
            [InlineData(3)]
            [InlineData(9)]
            public void Test2(int value)
            {
                Assert.Equal("shipped", _vc.GetOrderStatus(value));
            }
        }
    

    Next, I right-clicked my project and added “Docker Support.”

    What this does is add a Docker Compose project to the solution, and Dockerfile to the project. Due to relative paths and such, if you try and “docker build” from directly within the project directory containing the Docker file, Docker gets angry. It’s meant to be invoked from the parent directory with a path to the project’s directory, like:

    docker build -f seroter-api-k8s/Dockerfile .

    I wasn’t sure if my pipeline could handle that nuance when containerizing my app, so just went ahead and moved the generated Dockerfile to the parent directory like in the screenshot below. From here, I could just execute the docker build command.

    You can find the complete project up on my GitHub.

    Instantiating an Azure Container Registry

    Where should we store our pipeline-created container images? You’ve got lots of options. You could use the Docker Hub, self-managed OSS projects like VMware’s Harbor, or cloud-specific services like Azure Container Registry. Since I’m trying to use all-things Azure, I chose the latter.

    It’s easy to set up an ACR. Once I provided the couple parameters via the Azure Dashboard, I had a running, managed container registry.

    Provisioning an Azure Storage blob

    Container images are great. We may also want the raw published .NET project package for archival purposes, or to deploy to non-container runtimes. I chose Azure Storage for this purpose.

    I created a blob storage account named seroterbuilds, and then a single blob container named coreapp. This isn’t a Docker container, but just a logical construct to hold blobs.

    Creating an Azure Kubernetes Cluster

    It’s not hard to find a way to run Kubernetes. I think my hair stylist sells a distribution. You can certainly spin up your own vanilla server environment from the OSS bits. Or run it on your desktop with minikube. Or run an enterprise-grade version anywhere with something like VMware PKS. Or run it via managed service with something like Azure Kubernetes Service (AKS).

    AKS is easy to set up, and I provided the version (1.13.9), node pool size, service principal for authentication, and basic HTTP routing for hosted containers. My 3-node cluster was up and running in a few minutes.

    Starting up a Concourse environment

    Finally, Concourse. If you visit the Concourse website, there’s a link to a Docker Compose file you can download and start up via docker-compose up. This starts up the database, worker, and web node components needed to host pipelines.

    Once Concourse is up and running, the web-based Dashboard is available on localhost:8080.

    From there you can find links (bottom left) to downloads for the command line tool (called fly). This is the primary UX for deploying and troubleshooting pipelines.

    With fly installed, we create a “target” that points to our environment. Do this with the following statement. Note that I’m using “rs” (my initials) as the alias, which gets used for each fly command.

    fly -t rs login -c http://localhost:8080

    Once I request a Concourse login (default username is “test” and password is “test”), I’m routed to the dashboard to get a token, which gets loaded automatically into the CLI.

    At this point, we’ve got a functional ASP.NET Core app, a container registry, an object storage destination, a managed Kubernetes environment, and a Concourse. In the next post, we’ll build the first part of our Azure-focused pipeline that reads source code, runs tests, and packages the artifacts.

  • Go “multi-cloud” while *still* using unique cloud services? I did it using Spring Boot and MongoDB APIs.

    Go “multi-cloud” while *still* using unique cloud services? I did it using Spring Boot and MongoDB APIs.

    What do you think of when you hear the phrase “multi-cloud”? Ok, besides stupid marketing people and their dumb words. You might think of companies with on-premises environments who are moving some workloads into a public cloud. Or those who organically use a few different clouds, picking the best one for each workload. While many suggest that you get the best value by putting everything on one provider, that clearly isn’t happening yet. And maybe it shouldn’t. Who knows. But can you get the best of each cloud while retaining some portability? I think you can.

    One multi-cloud solution is to do the lowest-common-denominator thing. I really don’t like that. Multi-cloud management tools try to standardize cloud infrastructure but always leave me disappointed. And avoiding each cloud’s novel services in the name of portability is unsatisfying and leaves you at a competitive disadvantage. But why should we choose the cloud (Azure! AWS! GCP!) and runtime (Kubernetes! VMs!) before we’ve even written a line of code? Can’t we make those into boring implementation details, and return our focus to writing great software? I’d propose that with good app frameworks, and increasingly-standard interfaces, you can create great software that runs on any cloud, while still using their novel services.

    In this post, I’ll build a RESTful API with Spring Boot and deploy it, without code changes, to four different environments, including:

    1. Local environment running MongoDB software in a Docker container.
    2. Microsoft Azure Cosmos DB with MongoDB interface.
    3. Amazon DocumentDB with MongoDB interface.
    4. MongoDB Enterprise running as a service within Pivotal Cloud Foundry

    Side note: Ok, so multi-cloud sounds good, but it seems like a nightmare of ops headaches and nonstop dev training. That’s true, it sure can be. But if you use a good multi-cloud app platform like Pivotal Cloud Foundry, it honestly makes the dev and ops experience virtually the same everywhere. So, it doesn’t HAVE to suck, although there are still going to be challenges. Ideally, your choice of cloud is a deploy-time decision, not a design-time constraint.

    Creating the app

    In my career, I’ve coded (poorly) with .NET, Node, and Java, and I can say that Spring Boot is the fastest way I’ve seen to build production-quality apps. So, I chose Spring Boot to build my RESTful API. This API stores and returns information about cloud databases. HOW VERY META. I chose MongoDB as my backend database, and used the amazing Spring Data to simplify interactions with the data source.

    From start.spring.io, I created a project with dependencies on spring-boot-starter-data-rest (auto-generated REST endpoints for interacting with databases), spring-boot-starter-data-mongodb (to talk to MongoDB), spring-boot-starter-actuator (for “free” health metrics), and spring-cloud-cloudfoundry-connector (to pull connection details from the Cloud Foundry environment). Then I opened the project and created a new Java class representing a CloudProvider.

    package seroter.demo.cloudmongodb;
    
    import org.springframework.data.annotation.Id;
    
    public class CloudProvider {
    	
    	@Id private String id;
    	
    	private String providerName;
    	private Integer numberOfDatabases;
    	private Boolean mongoAsService;
    	
    	public String getProviderName() {
    		return providerName;
    	}
    	
    	public void setProviderName(String providerName) {
    		this.providerName = providerName;
    	}
    	
    	public Integer getNumberOfDatabases() {
    		return numberOfDatabases;
    	}
    	
    	public void setNumberOfDatabases(Integer numberOfDatabases) {
    		this.numberOfDatabases = numberOfDatabases;
    	}
    	
    	public Boolean getMongoAsService() {
    		return mongoAsService;
    	}
    	
    	public void setMongoAsService(Boolean mongoAsService) {
    		this.mongoAsService = mongoAsService;
    	}
    }

    Thanks to Spring Data REST (which is silly powerful), all that was left was to define a repository interface. If all I did was create an annotate the interface, I’d get full CRUD interactions with my MongoDB collection. But for fun, I also added an operation that would return all the clouds that did (or did not) offer a MongoDB service.

    package seroter.demo.cloudmongodb;
    
    import java.util.List;
    
    import org.springframework.data.mongodb.repository.MongoRepository;
    import org.springframework.data.rest.core.annotation.RepositoryRestResource;
    
    @RepositoryRestResource(collectionResourceRel = "clouds", path = "clouds")
    public interface CloudProviderRepository extends MongoRepository<CloudProvider, String> {
    	
    	//add an operation to search for a specific condition
    	List<CloudProvider> findByMongoAsService(Boolean mongoAsService);
    }

    That’s literally all my code. Crazy.

    Run using Dockerized MongoDB

    To start this test, I wanted to use “real” MongoDB software. So I pulled the popular Docker image and started it up on my local machine:

    docker run -d -p 27017:27017 --name serotermongo mongo

    When starting up my Spring Boot app, I could provide database connection info (1) in an app.properties file, or, as (2) input parameters that require nothing in the compiled code package itself. I chose the file option for readability and demo purposes, which looked like this:

    #local configuration
    spring.data.mongodb.uri=mongodb://0.0.0.0:27017
    spring.data.mongodb.database=demodb
    
    #port configuration
    server.port=${PORT:8080}

    After starting the app, I issued a base request to my API via Postman. Sure enough, I got a response. As expected, no data in my MongoDB database. Note that Spring Data automatically creates a database if it doesn’t find the one specified, so the “demodb” now existed.

    I then issued a POST command to add a record to MongoDB, and that worked great too. I got back the URI for the new record in the response.

    I also tried calling that custom “search” interface to filter the documents where “mongoAsService” is true. That worked.

    So, running my Spring Boot REST API with a local MongoDB worked fine.

    Run using Microsoft Azure Cosmos DB

    Next up, I pointed this application to Microsoft Azure. One of the many databases in Azure is Cosmos DB. This underrated database offers some pretty amazing performance and scale, and is only available from Microsoft in their cloud. NO PROBLEM. It serves up a handful of standard interfaces, including Cassandra and MongoDB. So I can take advantage of all the crazy-great hosting features, but not lock myself into any of them.

    I started by visiting the Microsoft Azure portal. I chose to create a new Cosmos DB instance, and selected which API (SQL, Cassandra, Gremlin, MongoDB) I wanted.

    After a few minutes, I had an instance of Cosmos DB. If I had wanted to, I could have created a database and collection from the Azure portal, but I wanted to confirm that Spring Data would do it for me automatically.

    I located the “Connection String” properties for my new instance, and grabbed the primary one.

    With that in hand, I went back to my application.properties file, commented out my “local” configuration, and added entries for the Azure instance.

    #local configuration
    #spring.data.mongodb.uri=mongodb://0.0.0.0:27017
    #spring.data.mongodb.database=demodb
    
    #port configuration
    server.port=${PORT:8080}
    
    #azure cosmos db configuration
    spring.data.mongodb.uri=mongodb://seroter-mongo:<password>@seroter-mongo.documents.azure.com:10255/?ssl=true&replicaSet=globaldb
    spring.data.mongodb.database=demodb

    I could publish this app to Azure, but because it’s also easy to test it locally, I just started up my Spring Boot REST API again, and pinged the database. After POSTing a new record to my endpoint, I checked the Azure portal and sure enough, saw a new database and collection with my “document” in it.

    Here, I’m using a super-unique cloud database but don’t need to manage my own software to remain “portable”, thanks to Spring Boot and MongoDB interfaces. Wicked.

    Run using Amazon DocumentDB

    Amazon DocumentDB is the new kid in town. I wrote up an InfoQ story about it, which frankly inspired me to try all this out.

    Like Azure Cosmos DB, this database isn’t running MongoDB software, but offers a MongoDB-compatible interface. It also offers some impressive scale and performance capabilities, and could be a good choice if you’re an AWS customer.

    For me, trying this out was a bit of a chore. Why? Mainly because the database service is only accessible from within an AWS private network. So, I had to properly set up a Virtual Private Cloud (VPC) network and get my Spring Boot app deployed there to test out the database. Not rocket science, but something I hadn’t done in a while. Let me lay out the steps here.

    First, I created a new VPC. It had a single public subnet, and I added two more private ones. This gave me three total subnets, each in a different availability zone.

    Next, I switched to the DocumentDB console in the AWS portal. First, I created a new subnet group. Each DocumentDB cluster is spread across AZs for high availability. This subnet group contains both the private subnets in my VPC.

    I also created a parameter group. This group turned off the requirement for clients to use TLS. I didn’t want my app to deal with certs, and also wanted to mess with this capability in DocumentDB.

    Next, I created my DocumentDB cluster. I chose an instance class to match my compute and memory needs. Then I chose a single instance cluster; I could have chosen up to 16 instances of primaries and replicas.

    I also chose my pre-configured VPC and the DocumentDB subnet group I created earlier. Finally, I set my parameter group, and left default values for features like encryption and database backups.

    After a few minutes, my cluster and instance were up and running. While this console doesn’t expose the ability to create databases or browse data, it does show me health metrics and cluster configuration details.

    Next, I took the connection string for the cluster, and updated my application.properties file.

    #local configuration
    #spring.data.mongodb.uri=mongodb://0.0.0.0:27017
    #spring.data.mongodb.database=demodb
    
    #port configuration
    server.port=${PORT:8080}
    
    #azure cosmos db configuration
    #spring.data.mongodb.uri=mongodb://seroter-mongo:<password>@seroter-mongo.documents.azure.com:10255/?ssl=true&replicaSet=globaldb
    #spring.data.mongodb.database=demodb
    
    #aws documentdb configuration
    spring.data.mongodb.uri=mongodb://seroter:<password>@docdb-2019-01-27-00-20-22.cluster-cmywqx08yuio.us-west-2.docdb.amazonaws.com:27017
    spring.data.mongodb.database=demodb

    Now to deploy the app to AWS. I chose Elastic Beanstalk as the application host. I selected Java as my platform, and uploaded the JAR file associated with my Spring Boot REST API.

    I had to set a few more parameters for this app to work correctly. First, I set a SERVER_PORT environment variable to 5000, because that’s what Beanstalk expects. Next, I ensured that my app was added to my VPC, provisioned a public IP address, and chose to host on the public subnet. Finally, I set the security group to the default one for my VPC. All of this should ensure that my app is on the right network with the right access to DocumentDB.

    After the app was created in Beanstalk, I queried the endpoint of my REST API. Then I created a new document, and yup, it was added successfully.

    So again, I used a novel, interesting cloud-only database, but didn’t have to change a lick of code.

    Run using MongoDB in Pivotal Cloud Foundry

    The last place to try this app out? A multi-cloud platform like PCF. If you did use something like PCF, the compute layer is consistent regardless of what public/private cloud you use, and connectivity to data services is through a Service Broker. In this case, MongoDB clusters are managed by PCF, and I get my own cluster via a Broker. Then my apps “bind” to that cluster.

    First up, provisioning MongoDB. PCF offers MongoDB Enterprise from Mongo themselves. To a developer, this looks like a database-as–a-service because clusters are provisioned, optimized, backed up, and upgraded via automation. Via the command line or portal, I could provision clusters. I used the portal to get myself happy little instance.

    After giving the service a name, I was set. As with all the other examples, no code changes were needed. I actually removed any MongoDB-related connection info from my application.properties file because that spring-cloud-cloudfoundry-connector dependency actually grabs the credentials from the environment variables set by the service broker.

    One thing I *did* create for this environment — which is entirely optional — is a Cloud Foundry manifest file. I could pass these values into a command line instead of creating a declarative file, but I like writing them out. These properties simply tell Cloud Foundry what to do with my app.

    ---
    applications:
    - name: boot-seroter-mongo
      memory: 1G
      instances: 1
      path: target/cloudmongodb-0.0.1-SNAPSHOT.jar
      services:
      - seroter-mongo

    With that, I jumped to a terminal, navigated to a directory holding that manifest file, and typed cf push. About 25 seconds later, I had a containerized, reachable application that connected to my MongoDB instance.

    Fortunately, PCF treats Spring Boot apps special, so it used the Spring Boot Actuator to pull health metrics and more. Above, you can see that for each instance, I saw extra health information for my app, and, MongoDB itself.

    Once again, I sent some GET requests into my endpoint, saw the expected data, did a POST to create a new document, and saw that succeed.

    Wrap Up

    Now, obviously there are novel cloud services without “standard” interfaces like the MongoDB API. Some of these services are IoT, mobile, or messaging related —although Azure Event Hubs has a Kafka interface now, and Spring Cloud Stream keeps message broker details out of the code. Other unique cloud services are in emerging areas like AI/ML where standardization doesn’t really exist yet. So some applications will have a hard coupling to a particular cloud, and of course that’s fine. But increasingly, where you run, how you run, and what you connect to, doesn’t have to be something you choose up front. Instead, first you build great software. Then, you choose a cloud. And that’s pretty cool.

  • Wait, THAT runs on Pivotal Cloud Foundry? Part 1 – Docker images

    Wait, THAT runs on Pivotal Cloud Foundry? Part 1 – Docker images

    When I say “PaaS” what comes to mind? If you’re like most people I talk to, you think of public cloud platforms for modern web apps. So I’ll forgive you if you didn’t realize that things are different now!

    The first generation of PaaS products had a few things in common. They were public cloud only. You had to build apps with the runtime constraints in mind. They only ran statelesss web apps. Linux was the only runtime. When Cloud Foundry first came out, it checked most of those boxes. But over the years, Pivotal Cloud Foundry (PCF) evolved to do much more.

    Many people still think of those first-generation PaaS constraints when considering PCF, and specifically, the Pivotal Application Service (PAS). So, I thought it’d be fun to look at non-traditional workloads. In this brief five-part series, I’m going to show off the following scenarios:

    Deploying and running Docker images

    Most Cloud Foundry users depend on buildpacks. Developers push source code, and the buildpack pulls in dependencies, frameworks, and runtimes, then builds a tarball that’s deployed as an OCI-compatible container in Cloud Foundry.  One major benefit of the buildpacks model is that the platform brings the root file system to your app. You’re not responsible for finding secure base images or maintaining that “layer” of the stack. But all that said, some folks like using Docker images as their packaging unit whether manually created (don’t do that) or as the output from a continuous integration pipeline.

    It doesn’t matter if Cloud Foundry builds the container or you send in a Docker image, it’s all treated the same by the platform. At runtime, the orchestrator executes all containers using runC, the same spec used by Docker and Kubernetes. Let’s see this in action.

    You can try this for free on Pivotal Web Services if you don’t have a Cloud Foundry available. I’m using a different environment, but they all behave the same. That’s the point! After you cf login to Cloud Foundry, it’s time to push a container.

    How about we start with a Node.js web app. Here’s an Express app built by the folks at Bitnami. We can actually push this to Cloud Foundry with a single command.

    cf push nodedocker --docker-image bitnami/node-example:0.0.1 -i 2 -m 128M

    In that command, notice a couple things. First, I’m using the –docker-image flag. Since I’m hitting a public image in the public Docker Hub, no credentials or anything are needed. PCF also works with private images, and private registries. Otherwise, it’s a standard command that asks for a single instance, and 128M of memory for each instance. Within ten seconds, you’ll have two routable instances ready to process traffic.

    Seriously. That’s amazing. And PCF doesn’t “mess with” the image. Whatever layers are in your Docker image are what run in Cloud Foundry. One thing PCF *does* do is volume mount a directory that contains a unique certificate for the container. This regularly-rotated credential (up to hourly!) is used for things like mTLS. You can see it by SSH-ing into the container and doing printenv or browsing the file system. Yes, you can actually SSH into containers whether built by the platform or via Docker images. No black boxes here.

    Deploying an app’s only half the story. Does PCF treat the running app the same way if it was packaged as a Docker image? Yup. Jumping to the PCF Apps Manager UX, you see our running app.

    If you look closely, you see that we indicate the app type, in this case, that it’s from a Docker image.

    More importantly, the platform bestows all the operational goodness on this app as any other. For example, all the logs from each app instance are collected and aggregated.

    You can add environment variables. Configure auto-scaling. Monitor app and container health metrics. Bind to marketplace services. All the things that make PCF a great runtime for apps make it a great runtime for apps packaged as Docker images.

    So try it out yourself. If you’re building custom apps, PCF is a great destination regardless of how you want to ship code. Stay tuned tomorrow for fun network routing demonstration.

  • Creating a continuous integration pipeline in Concourse for a test-infused ASP.NET Core app

    Creating a continuous integration pipeline in Concourse for a test-infused ASP.NET Core app

    Trying to significantly improve your company’s ability to build and run good software? Forget Docker, public cloud, Kubernetes, service meshes, Cloud Foundry, serverless, and the rest of it. Over the years, I’ve learned the most important place you should start: continuous integration and delivery pipelines. Arguably, “apps on pipeline” is the most important “transformation” metric to track. Not “deploys per day” or “number of microservices.” It’s about how many apps you’ve lit up for repeatable, automated deployment. That’s a legit measure of how serious you are about being responsive and secure.

    All this means I needed to get smarter with Concourse, one of my favorite tools for CI (and a little CD). I decided to build an ASP.NET Core app, and continuously integrate and deliver it to a Cloud Foundry environment running in AWS. Let’s go!

    First off, I needed an app. I spun up a new ASP.NET Core Web API project with a couple REST endpoints. You can grab the source code here. Most of my code demos don’t include tests because I’m in marketing now, so YOLO, but a trustworthy pipeline needs testable code. If you’re a .NET dev, xUnit is your friend. It’s maintained by my friend Brad, so I basically chose it because of peer pressure. My .csproj file included a few references to bring xUnit into my project:

    • “Microsoft.NET.Test.Sdk” Version=”15.7.0″
    • “xunit” Version=”2.3.1″
    • “xunit.runner.visualstudio” Version=”2.3.1″

    Then, I created a class to hold the tests for my web controller. I included one test with a basic assertion, and another “theory” with an input data set. These are comically simple, but prove the point!

       public class TestClass {
            private ValuesController _vc;
    public TestClass() {
                _vc = new ValuesController();
            }
    
            [Fact]
            public void Test1(){
                Assert.Equal("pivotal", _vc.Get(1));
            }
    
            [Theory]
            [InlineData(1)]
            [InlineData(3)]
            [InlineData(20)]
            public void Test2(int value) {
                Assert.Equal("public", _vc.GetPublicStatus(value));
            }
        }
    

    When I ran dotnet test against the above app, I got an expected error because the third inline data source led to a test failure, since my controller only returns “public” companies when the input value is between 1 and 10. Commenting the offending inline data source led to a successful test run.

    2018.06.06-concourse-02

    Ok, the app was done. Now, to put it on a pipeline. If you’ve ever used shameful swear words when wrangling your CI server, maybe it’s worth joining all the folks who switched to Concourse. It’s a pretty straightforward OSS tool that uses a declarative model and containers for defining and running pipelines, respectively. Getting started is super simple. If you’re running Docker on your desktop, that’s your easiest route. Just grab this Docker Compose file from the Concourse GitHub repo. I renamed mine to docker-compose.yml, jumped into a Terminal session, switched to the folder holding this YAML file, and ran docker-compose up -d. After a second or two, I had a PostgreSQL server (for state) and a Concourse server. PROVE IT, you say. Hit localhost:8080, and you’ll see the Concourse dashboard.

    2018.06.06-concourse-01

    Besides this UX, we interface with Concourse via a CLI tool called fly. I downloaded it from here. I then used fly to add my local environment as a “target” to manage. Instead of plugging in the whole URL every time I interacted with Concourse, I created an alias (“rs”) using fly -t rs login -c http://localhost:8080. If you get a warning to sync your version of fly with your version of Concourse, just enter fly -t rs sync and it gets updated. Neato.

    Next up? The pipeline. Pipelines are defined in YAML and are made up of resources and jobs. One of the great things about a declarative model, is that I can run my CI tests against any Concourse by just passing in this (source-controlled) pipeline definition. No point-and-ciick configurations, no prerequisite components to install. Love it. First up, I defined a couple resources. One was my GitHub repo, the second was my target Cloud Foundry environment. In the real world, you’d externalize the Cloud Foundry credentials, and call out to files to build the app, etc. For your benefit, I compressed to a single YAML file.

    resources:
    - name: seroter-source
      type: git
      source:
        uri: https://github.com/rseroter/xunit-tested-dotnetcore
        branch: master
    - name: pcf-on-aws
      type: cf
      source:
        api: https://api.run.pivotal.io
        skip_cert_check: false
        username: XXXXX
        password: XXXXX
        organization: seroter-dev
        space: development
    

    Those resources tell Concourse where to get the stuff it needs to run the jobs. The first job used the GitHub resource to grab the source code. Then it used the Microsoft-provided Docker image to run the dotnet test command.

    jobs:
    - name: aspnetcore-unit-tests
      plan:
        - get: seroter-source
          trigger: true
        - task: run-tests
          privileged: true
          config:
            platform: linux
            inputs:
            - name: seroter-source
            image_resource:
                type: docker-image
                source:
                  repository: microsoft/aspnetcore-build
            run:
                path: sh
                args:
                - -exc
                - |
                    cd ./seroter-source
                    dotnet restore
                    dotnet test
    

    Concourse isn’t really a CD tool, but it does a nice basic job of getting code to a defined destination. The second job deploys the code to Cloud Foundry. It also uses the source code resource and only fires if the test job succeeds. This ensures that only fully-tested code makes its way to the hosting environment. If I were being more responsible, I’d take the results of the test job, drop it into an artifact repo, and then use that artifact for deployment. But hey, you get the idea!

    jobs:
    - name: aspnetcore-unit-tests
      [...]
    - name: deploy-to-prod
      plan:
        - get: seroter-source
          trigger: true
          passed: [aspnetcore-unit-tests]
        - put: pcf-on-aws
          params:
            manifest: seroter-source/manifest.yml
    

    That was it! I was ready to deploy the pipeline (pipeline.yml) to Concourse. From the Terminal, I executed fly -t rs set-pipeline -p test-pipeline -c pipeline.yml. Immediately, I saw my pipeline show up in the Concourse Dashboard.

    2018.06.06-concourse-03

    After I unpaused my pipeline, it fired up automatically.

    2018.06.06-concourse-05

    Remember, my job specified a Microsoft-provided container for building the app. Concourse started this job by downloading the Docker image.

    2018.06.06-concourse-04

    After downloading the image, the job kicked off the dotnet test command and confirmed that all my tests passed.

    2018.06.06-concourse-06

    Terrific. Since my next job was set to trigger when the first one succeeded, I immediately saw the “deploy” job spin up.

    2018.06.06-concourse-07

    This job knew how to publish content to Cloud Foundry, and used the provided parameters to deploy the app in a few seconds. Note that there are other resource types if you’re not a Cloud Foundry user. Nobody’s perfect!

    2018.06.06-concourse-08

    The pipeline run was finished, and I confirmed that the app was actually deployed.

    2018.06.06-concourse-09

    Finished? Yes, but I wanted to see a failure in my pipeline! So, I changed my xUnit tests and defined inline data that wouldn’t pass. After committing code to GitHub, my pipeline kicked off automatically. Once again it was tested in the pipeline, and this time, failed. Because it failed, the next step (deployment) didn’t happen. Perfect.

    2018.06.06-concourse-10

    If you’re looking for a CI tool that people actually like using, check out Concourse. Regardless of what you use, focus your energy on getting (all?) apps on pipelines. You don’t do it because you have to ship software every hour, as most apps don’t need it. It’s about shipping whenever you need to, with no drama. Whether you’re adding features or patching vulnerabilities, having pipelines for your apps means you’re actually becoming a customer-centric, software-driven company.

  • Docker Q&A for Windows Users

    I’m a Windows guy. I’ve spent the better part of the past fifteen years on Windows laptops and servers. That fact probably hurts my geek cred, but hey, gotta be honest. Either way, it really seems that the coolest emerging technologies are happening in an open-source world on Linux. So how does someone from a Windows world make sense of something like Docker, for example? When I first dug into it a year ago, I had a bunch of questions. As I learned more – and started using it a bit – a number of things became clearer. Below is my take on what someone new to Docker might want to know. If for some reason you think one of my answers below is wrong, tell me!

    Q: Is Docker just another means of virtualization?

    A: Somewhat. It’s primarily a way to run lightweight containers that isolate processes. That process may be a web app, database, load balancer, or pretty much anything. Containers don’t do as much as a virtual machine, but that also makes them a lot easier to use (and destroy!). You may hear containers referred to as “operating system virtualization” which is fair since each container gets its own user space in the host OS.


    Q: How do Docker containers differ from a virtual machine?

    A: A virtual machine in Hyper-V or VMware virtualizes an entire guest operating system. Take a physical server, and share its resources among a bunch of virtualized servers running any operating system. With Docker, you’re isolating a process and its dependencies. A container shares the Linux kernel with other containers on the host machine. Instead of running a full copy of an OS like virtual machines do, containers pretty much consist of a directory! The container has everything you need for the application to run.


    Q: Does Docker == container?

    A: No, Docker refers to the daemon which builds, runs, and distributes the containers.


    Q: Can I make something like Docker work natively on Windows?

    A: Not really. While Microsoft is promising some sort of Docker support in the next version of Windows Server (due in 2016), they’ll have to introduce some significant changes to have truly native Docker support. Docker is written in Go and relies on a few core Linux technologies:

    • Namespaces provide process isolation. Windows doesn’t really have something that maps directly to this.
    • Control Groups are used to set up resource limits and constraints to help containers responsibly use host resources. Windows doesn’t have a way to limit resource consumption by a particular service.
    • Union File Systems are file systems created by establishing layers. Docker uses these layers for container changes, and to establish a read/write file system. Not something you see in a Windows environment.
    • Container Format that combines the previous components. Default format is libcontainer, but LXC is also supported.


    Q: What’s in a Docker image?

    A: Images are read-only templates that are used to create Docker containers. You can create your own images, update existing ones, or download from a registry like the Docker Hub. Downloaded images are stored by Docker on the host and can be easily used to create new containers. When you change an image, a new layer is built and added. This makes it simpler to distribute changes without distributing the whole image.


    Q: How big are Docker images?

    A: Base images could be as small as a few hundreds megabytes, to a few gigabytes. Image updates may be much smaller, but also include any (new) dependencies, that can cause the overall container size to grow more than expected.


    Q: What’s the portability story with Docker?

    A: Unlike virtual machines that require a particular hypervisor and are often quite large, containers run anywhere that Linux runs, and can be quickly built from small images.


    Q: Does Docker run on Windows?

    A: Somewhat. Developers who want to run Docker on Windows have to install a simple VM to get the necessary Linux-features. The Boot2Docker app gets this VM installed.


    Q: Can I run more than one process in a Docker container?

    A: While possible, yes (via a supervisor), the Docker team really believes that you should have a single process per container.


    Q: Is a Dockerized app portable to any Linux host?

    A: Ideally, yes. For example, a developer can start up an Ubuntu Docker image on a Red Hat host machine. However, issues can still arise if tools are dependent on kernel features that don’t exist on the host.


    Q: How is data managed in a Dockerized app?

    A: When you exit a container, the read-write file layer goes away. If you save the container as a new image, then the data is retained. Docker encourages developers to use data volumes and data volume containers to persist information. There’s a good StackOverflow question on this topic. Other solutions like Flocker have popped up as well.


    Q: Is there one flavor of Linux that runs Docker better than others?

    A: I don’t believe so. There are Docker-centric Linux distributions like CoreOS, but you can also easily run Docker on distros like SUSE and Ubuntu. Note that you should definitely be running a recent version of whatever distro you choose.


    Q: What type of software can run in a Docker container?

    A: Really, anything that runs on Linux should be able to fit in a container.


    Q: Do I need the cloud to run Docker?

    A: Definitely not. You can run Docker on virtual machines (locally or in the cloud), physical machines (locally or in the cloud), or in Docker-centric services like the Amazon EC2 Container Service. Even Microsoft’s own Azure has declared itself to be “Docker friendly.”


    Q: What related technologies should I care about?

    A: This whole “microservices with containers” revolution means that developers should learn a host of new things. Windows developers may not be as familiar with container deployment tools (e.g. fleet) container orchestration tools (e.g. Kubernetes, or Docker’s own services) or service discovery tools (like Zookeeper or Consul), but now’s a good time to start reading up!


    Q: Where it it still immature?

    A: This is a fast moving technology, and I’d bet that Docker will be “enterprise-ready” long before enterprises are ready to commit to it. Security is a emerging area, and architectural best practices are still forming.


    Q: Ok, you’ve convinced me to try it out. What’s an easy way to get started on Windows?

    A: Download Vagrant, stand up an Ubuntu image, and get Docker installed. Pull an app from the growing Docker Hub and walk through the tutorials provided by Docker. Or, start watching this great new Pluralsight course. Also consider trying out something like Panamax to easily create multi-container apps.


    Hope this helps demystify Docker a bit. I’m far from an expert with it, but it’s really one of these technologies that might be critical to know in the years ahead!