Isn’t it frustrating to build great software and helplessly watch as it waits to get deployed? We don’t just want to build software in small batches, we want to ship it in small batches. This helps us learn faster, and gives our users a non-stop stream of new value.
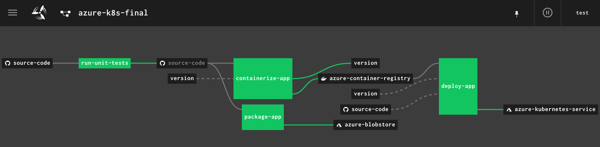
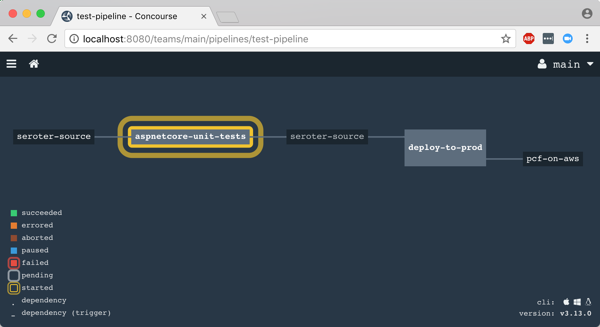
I’m a big fan of Concourse. It’s a continuous integration platform that reflects modern cloud-native values: it’s open source, container-native, stateless, and developer-friendly. And all pipeline definitions are declarative (via YAML) and easily source controlled. I wanted to learn how build a Concourse pipeline that unit tests an ASP.NET Core app, packages it up and stashes a tarball in Azure Storage, creates a Docker container and stores it in Azure Container Registry, and then deploy the app to Azure Kubernetes Service. In this three part blog series, we’ll do just that! Here’s the final pipeline:
This first posts looks at everything I did to set up the scenario.
My ASP.NET Core web app
I used Visual Studio for Mac to build a new ASP.NET Core Web API. I added NuGet package dependencies to xunit and xunit.runner.visualstudio. The API controller is super basic, with three operations.
[Route("api/[controller]")]
[ApiController]
public class ValuesController : ControllerBase
{
    [HttpGet]
    public ActionResult<IEnumerable<string>> Get()
    {
        return new string[] { "value1", "value2" };
    }

    [HttpGet("{id}")]
    public string Get(int id)
    {
        return "value1";
    }

    [HttpGet("{id}/status")]
    public string GetOrderStatus(int id)
    {
        if (id > 0 && id <= 20)
        {
            return "shipped";
        }
        else
        {
            return "processing";
        }
    }
}
I also added a Testing class for unit tests.
    public class TestClass
    {
        private ValuesController _vc;

        public TestClass()
        {
            _vc = new ValuesController();
        }

        [Fact]
        public void Test1()
        {
            Assert.Equal("value1", _vc.Get(1));
        }

        [Theory]
        [InlineData(1)]
        [InlineData(3)]
        [InlineData(9)]
        public void Test2(int value)
        {
            Assert.Equal("shipped", _vc.GetOrderStatus(value));
        }
    }
Next, I right-clicked my project and added “Docker Support.”
What this does is add a Docker Compose project to the solution, and Dockerfile to the project. Due to relative paths and such, if you try and “docker build” from directly within the project directory containing the Docker file, Docker gets angry. It’s meant to be invoked from the parent directory with a path to the project’s directory, like:
docker build -f seroter-api-k8s/Dockerfile .
I wasn’t sure if my pipeline could handle that nuance when containerizing my app, so just went ahead and moved the generated Dockerfile to the parent directory like in the screenshot below. From here, I could just execute the docker build command.
Where should we store our pipeline-created container images? You’ve got lots of options. You could use the Docker Hub, self-managed OSS projects like VMware’s Harbor, or cloud-specific services like Azure Container Registry. Since I’m trying to use all-things Azure, I chose the latter.
It’s easy to set up an ACR. Once I provided the couple parameters via the Azure Dashboard, I had a running, managed container registry.
Provisioning an Azure Storage blob
Container images are great. We may also want the raw published .NET project package for archival purposes, or to deploy to non-container runtimes. I chose Azure Storage for this purpose.
I created a blob storage account named seroterbuilds, and then a single blob container named coreapp. This isn’t a Docker container, but just a logical construct to hold blobs.
Creating an Azure Kubernetes Cluster
It’s not hard to find a way to run Kubernetes. I think my hair stylist sells a distribution. You can certainly spin up your own vanilla server environment from the OSS bits. Or run it on your desktop with minikube. Or run an enterprise-grade version anywhere with something like VMware PKS. Or run it via managed service with something like Azure Kubernetes Service (AKS).
AKS is easy to set up, and I provided the version (1.13.9), node pool size, service principal for authentication, and basic HTTP routing for hosted containers. My 3-node cluster was up and running in a few minutes.
Starting up a Concourse environment
Finally, Concourse. If you visit the Concourse website, there’s a link to a Docker Compose file you can download and start up via docker-compose up. This starts up the database, worker, and web node components needed to host pipelines.
Once Concourse is up and running, the web-based Dashboard is available on localhost:8080.
From there you can find links (bottom left) to downloads for the command line tool (called fly). This is the primary UX for deploying and troubleshooting pipelines.
With fly installed, we create a “target” that points to our environment. Do this with the following statement. Note that I’m using “rs” (my initials) as the alias, which gets used for each fly command.
fly -t rs login -c http://localhost:8080
Once I request a Concourse login (default username is “test” and password is “test”), I’m routed to the dashboard to get a token, which gets loaded automatically into the CLI.
At this point, we’ve got a functional ASP.NET Core app, a container registry, an object storage destination, a managed Kubernetes environment, and a Concourse. In the next post, we’ll build the first part of our Azure-focused pipeline that reads source code, runs tests, and packages the artifacts.
Serverless things don’t always complete their work in milliseconds. With the introduction of AWS Step Functions and Azure Durable Functions, we have compute instances that exist for hours, days, or even months. With serverless workflow tools like Azure Logic Apps, it’s also easy to build long-running processes. So in this world of continuous delivery and almost-too-easy update processes, what happens when you update the underlying definition of things that have running instances? Do they use the version they started with? Do they pick up changes and run with those after waking up? Do they crash and cause the heat death of the universe? I was curious, so I tried it out.
Azure Durable Functions
Azure Durable Functions extends “regular” Azure Functions. They introduce a stateful processing layer by defining an “orchestrator” that calls Azure Functions, checkpoints progress, and manages intermediate state.
Let’s build one, and then update it to see what happens to the running instances.
First, I created a new Function App in the Azure Portal. A Function App holds individual functions. This one uses the “consumption plan” so I only pay for the time a function runs, and contains .NET-based functions. Also note that it provisions a storage account, which we’ll end up using for checkpointing.
Durable Functions are made up of a client function that create an orchestration, orchestration functions that coordinate work, and activity functions that actually do the work. From the Azure Portal, I could see a template for creating an HTTP client (or starter) function.
The function code generated by the template works as-is.
#r "Microsoft.Azure.WebJobs.Extensions.DurableTask"
#r "Newtonsoft.Json"

using System.Net;

public static async Task<HttpResponseMessage> Run(
    HttpRequestMessage req,
    DurableOrchestrationClient starter,
    string functionName,
    ILogger log)
{
    // Function input comes from the request content.
    dynamic eventData = await req.Content.ReadAsAsync<object>();

    // Pass the function name as part of the route
    string instanceId = await starter.StartNewAsync(functionName, eventData);

    log.LogInformation($"Started orchestration with ID = '{instanceId}'.");

    return starter.CreateCheckStatusResponse(req, instanceId);
}
Next I created the activity function. Like with the client function, the Azure Portal generates a working function from the template. It simply takes in a string, and returns a polite greeting.
The final step was to create the orchestrator function. The template-generated code is below. Notice that our orchestrator calls the “hello” function three times with three different inputs, and aggregates the return values into a single output.
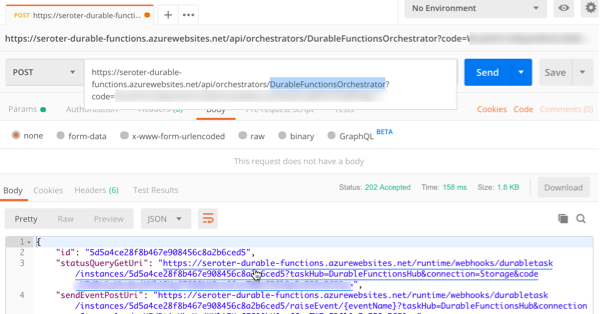
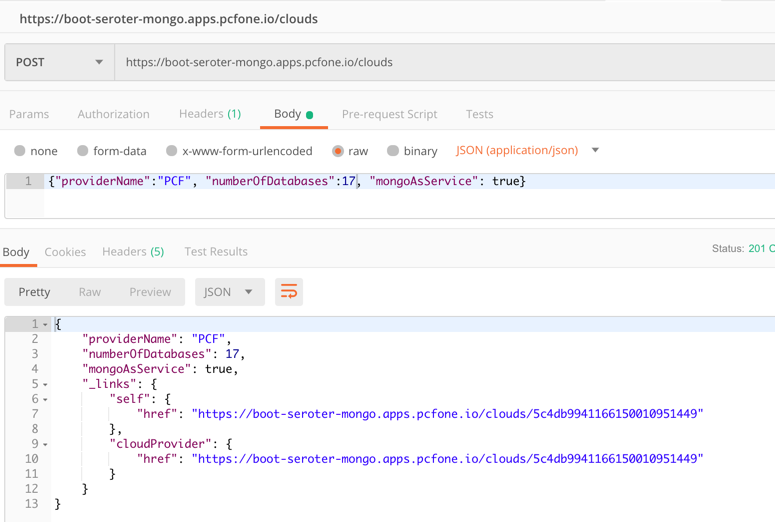
After saving this function, I went back to the starter/client function and clicked the “Get function URL” link to get the URL I need to invoke to instantiate this orchestrator. Then, I plugged that into Postman, and submitted a POST request.
Since the Durable Function is working asynchronously, I get back URIs to check the status, or terminate the orchestrator. I invoked the “get status” endpoint, and saw the aggregated results returned from the orchestrator function.
So it all worked. Terrific. Next I wanted to add a delay in between activity function calls to simulate a long-running process. What’s interesting with Durable Functions is that every time it gets results back from an async call (or timer), it reruns the entire orchestrator from scratch. Now, it checks the execution log to avoid calling the same operation again, but this made me wonder how it would respond if I added *new* activities in the mix, or deleted activities.
First, I added some instrumentation to the orchestrator function (and injected function input) so that I could see more about what was happening. In the code below, if we’re not replaying activities (so, first time it’s being called), it traces out a message.
public static async Task<List<string>> Run(DurableOrchestrationContext context, ILogger log)
{
    var outputs = new List<string>();

    outputs.Add(await context.CallActivityAsync<string>("Hello", "Tokyo"));
    if (!context.IsReplaying) log.LogInformation("Called function once.");

    outputs.Add(await context.CallActivityAsync<string>("Hello", "Seattle"));
    if (!context.IsReplaying) log.LogInformation("Called function twice.");

    outputs.Add(await context.CallActivityAsync<string>("Hello", "London"));
    if (!context.IsReplaying) log.LogInformation("Called function thrice.");

    // returns ["Hello Tokyo!", "Hello Seattle!", "Hello London!"]
    return outputs;
}
After saving this update, I triggered the client function again, and with the streaming “Logs” view open in the Portal. Here, I saw trace statements for each call to an activity function.
A durable function supports Timers that pause processing for up to seven days. I added the following code between the second and third function calls. This pauses the function for 30 seconds.
    if (!context.IsReplaying) log.LogInformation("Starting delay.");
    DateTime deadline = context.CurrentUtcDateTime.Add(TimeSpan.FromSeconds(30));
    await context.CreateTimer(deadline, System.Threading.CancellationToken.None);
    if (!context.IsReplaying) log.LogInformation("Delay finished.");
If you trigger the client function again, it will take 30-ish seconds to get results back, as expected.
Next I tested three scenarios to see how Durable Functions handled them:
Wait until the orchestrator hits the timer, andchange the payload for an activity function call that executed before the timer started. What happens when the framework tries to re-run a step that’s changed? I changed the first function’s payload from “Tokyo” to “Mumbai” after the function instance had already passed the first call, and was paused at the timer. After the function resumed from the timer, the orchestrator failed with a message of: “Non-Deterministic workflow detected: TaskScheduledEvent: 0 TaskScheduled Hello.” Didn’t like that. Changing the call signature, or apparently even the payload is a no-no if you don’t want to break running instances.
Wait until the orchestrator hits the timer, and update the function to introduce a new activity function call in code above the timer. Does the framework execute that new function call when it wakes up and re-runs, or ignore it? Indeed, it runs it. So after the timer wrapped up, the NEW, earlier function call got invoked, AND it ran the timer again before continuing. That part surprised me, and it only kinda worked. Instead of returning the expected value from the activity function, I got a “2” back. And some times when I tested this, I got the above “non-deterministic workflow” error. So, your mileage may vary.
Add an activity call after the timer, and see if it executes it after the delay is over. Does the orchestrator “see” the new activity call I added to the code after it woke back up? The first time I tried this, I again got the “non-deterministic workflow” error, but with a few more tests, I saw it actually executed the new function after waking back up, AND running the timer a second time.
What have we learned? The “version” a Durable Function starts with isn’t serialized and used for the entirety of the execution. It’s picking up things changing along the way. Be very aware of side effects! For a number of these tests, I also had to “try again” and would see different results. I feel like I was breaking Azure Functions!
What’s the right way to version these? Microsoft offers some advice, which ranges from “do nothing and let things fail” to “deploy an entirely new function.” But from these tests, I’d advise against changing function definitions outside of explicitly deploying new versions.
Azure Logic Apps
Let’s take a look at Logic Apps. This managed workflow service is designed for constructing processes that integrate a variety of sources and targets. It supports hundreds of connectors to things likes Salesforce.com, Amazon Redshift, Slack, OneDrive, and more. A Logic App can run for 90 days in the multi-tenant environment, and up to a year in the dedicated environment. So, most users of Logic Apps are going to have instances in-flight when it comes time to deploy updates.
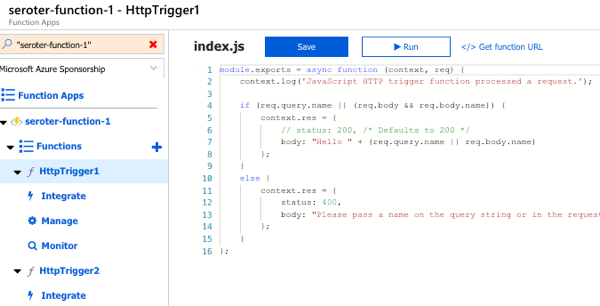
To test this out, I first created a couple of Azure Functions that Logic Apps could call. These JavaScript functions are super lame, and just return a greeting.
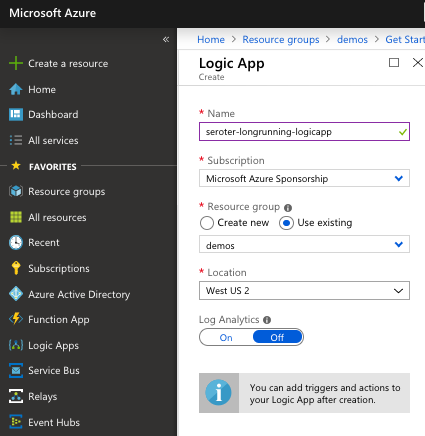
Next up, I created a Logic App. It’s easy.
After a few moments, I could jump in and start designing my workflow. As a “serverless” service, Logic Apps only run when invoked, and start with a trigger. I chose the HTTP trigger.
My Logic App takes in an HTTP request, has a 45 second “delay” (which could represent waiting for new input, or a long-running API call) before invoke our simple Azure Function.
I saved the Logic App, called the HTTP endpoint via Postman, and waited. After about 45 seconds, I saw that everything succeeded.
Next, I kicked off another instance, and quickly went in and added another Function call after the first one. What would Logic Apps do with that after the delay was over? It ignored the new function call. Then I kicked off another Logic Apps instance, and quickly deleted the second function call. Would the instance wake up and now only call one Function? Nope, it called them both.
So it appears that Logic Apps snapshot the workflow when it starts, and it executes that version, regardless of what changes in the underlying definition after the fact. That seems good. It results in a more consistent, predictable process. Logic Apps does have the concept of versioning, and you can promote previous versions to the active one as needed.
AWS Step Functions
AWS doesn’t have something exactly like Logic Apps, but AWS Step Functions is somewhat similar to Azure Durable Functions. With Step Functions, you can chain together a series of AWS services into a workflow. It basically builds a state machine that you craft in their JSON-based Amazon State Language. A given Step Function can be idle for up to a year, so again. you’ll probably have long-running instances going at all times!
I jumped into the AWS console and started with their “hello world” template.
This state machine has a couple basic states that execute immediately. Then I added a 20 second wait.
After deploying the Step Function, it was easy to see that it ran everything quickly and successfully.
Next, I kicked off a new instance, and added a new step to the state machine while the instance was waiting. The Step Function that was running ignored it.
When I kicked off another Step Function and removed the step after the wait step, it also ignored it. It seems pretty clear that AWS Step Functions snapshot the workflow at the start proceed with that snapshot, even if the underlying definition changes. I didn’t find much documentation around formally versioning Step Functions, but it seems to keep you fairly safe from side effects.
With all of these, it’s important to realize that you also have to consider versioning of downstream calls. I could have an unchanged Logic App, but the function or API it invokes had its plumbing entirely updated after the Logic App started running. There’s no way to snapshot the state of all the dependencies! That’s normal in a distributed system. But, something to remember.
Have you observed any different behavior with these stateful serverless products?
What do you think of when you hear the phrase “multi-cloud”? Ok, besides stupid marketing people and their dumb words. You might think of companies with on-premises environments who are moving some workloads into a public cloud. Or those who organically use a few different clouds, picking the best one for each workload. While many suggest that you get the best value by putting everything on one provider, that clearly isn’t happening yet. And maybe it shouldn’t. Who knows. But can you get the best of each cloud while retaining some portability? I think you can.
One multi-cloud solution is to do the lowest-common-denominator thing. I really don’t like that. Multi-cloud management tools try to standardize cloud infrastructure but always leave me disappointed. And avoiding each cloud’s novel services in the name of portability is unsatisfying and leaves you at a competitive disadvantage. But why should we choose the cloud (Azure! AWS! GCP!) and runtime (Kubernetes! VMs!) before we’ve even written a line of code? Can’t we make those into boring implementation details, and return our focus to writing great software? I’d propose that with good app frameworks, and increasingly-standard interfaces, you can create great software that runs on any cloud, while still using their novel services.
In this post, I’ll build a RESTful API with Spring Boot and deploy it, without code changes, to four different environments, including:
Local environment running MongoDB software in a Docker container.
Side note: Ok, so multi-cloud sounds good, but it seems like a nightmare of ops headaches and nonstop dev training. That’s true, it sure can be. But if you use a good multi-cloud app platform like Pivotal Cloud Foundry, it honestly makes the dev and ops experience virtually the same everywhere. So, it doesn’t HAVE to suck, although there are still going to be challenges. Ideally, your choice of cloud is a deploy-time decision, not a design-time constraint.
Creating the app
In my career, I’ve coded (poorly) with .NET, Node, and Java, and I can say that Spring Boot is the fastest way I’ve seen to build production-quality apps. So, I chose Spring Boot to build my RESTful API. This API stores and returns information about cloud databases. HOW VERY META. I chose MongoDB as my backend database, and used the amazing Spring Data to simplify interactions with the data source.
From start.spring.io, I created a project with dependencies on spring-boot-starter-data-rest (auto-generated REST endpoints for interacting with databases), spring-boot-starter-data-mongodb (to talk to MongoDB), spring-boot-starter-actuator (for “free” health metrics), and spring-cloud-cloudfoundry-connector (to pull connection details from the Cloud Foundry environment). Then I opened the project and created a new Java class representing a CloudProvider.
package seroter.demo.cloudmongodb;

import org.springframework.data.annotation.Id;

public class CloudProvider {

	@Id private String id;

	private String providerName;
	private Integer numberOfDatabases;
	private Boolean mongoAsService;

	public String getProviderName() {
		return providerName;
	}

	public void setProviderName(String providerName) {
		this.providerName = providerName;
	}

	public Integer getNumberOfDatabases() {
		return numberOfDatabases;
	}

	public void setNumberOfDatabases(Integer numberOfDatabases) {
		this.numberOfDatabases = numberOfDatabases;
	}

	public Boolean getMongoAsService() {
		return mongoAsService;
	}

	public void setMongoAsService(Boolean mongoAsService) {
		this.mongoAsService = mongoAsService;
	}
}
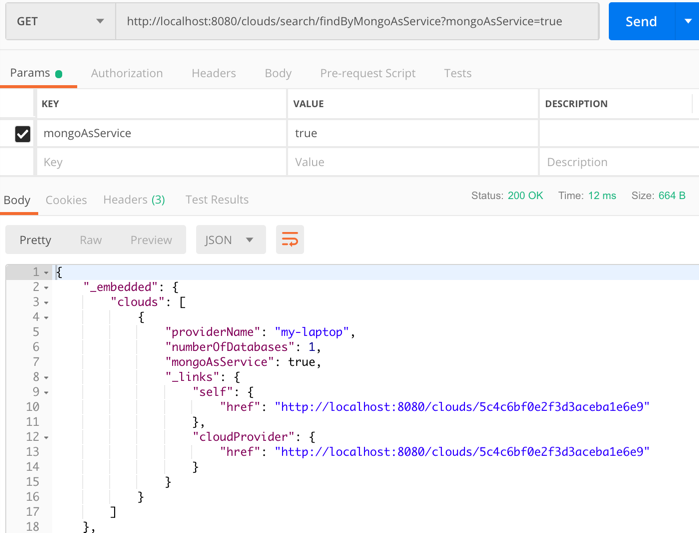
Thanks to Spring Data REST (which is silly powerful), all that was left was to define a repository interface. If all I did was create an annotate the interface, I’d get full CRUD interactions with my MongoDB collection. But for fun, I also added an operation that would return all the clouds that did (or did not) offer a MongoDB service.
package seroter.demo.cloudmongodb;

import java.util.List;

import org.springframework.data.mongodb.repository.MongoRepository;
import org.springframework.data.rest.core.annotation.RepositoryRestResource;

@RepositoryRestResource(collectionResourceRel = "clouds", path = "clouds")
public interface CloudProviderRepository extends MongoRepository<CloudProvider, String> {

	//add an operation to search for a specific condition
	List<CloudProvider> findByMongoAsService(Boolean mongoAsService);
}
That’s literally all my code. Crazy.
Run using Dockerized MongoDB
To start this test, I wanted to use “real” MongoDB software. So I pulled the popular Docker image and started it up on my local machine:
docker run -d -p 27017:27017 --name serotermongo mongo
When starting up my Spring Boot app, I could provide database connection info (1) in an app.properties file, or, as (2) input parameters that require nothing in the compiled code package itself. I chose the file option for readability and demo purposes, which looked like this:
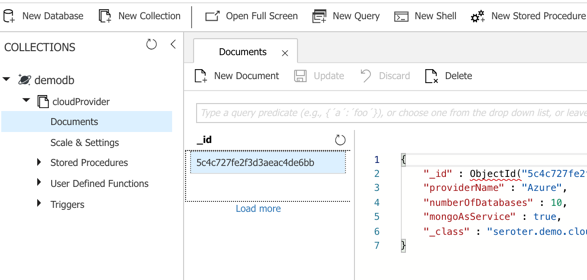
After starting the app, I issued a base request to my API via Postman. Sure enough, I got a response. As expected, no data in my MongoDB database. Note that Spring Data automatically creates a database if it doesn’t find the one specified, so the “demodb” now existed.
I then issued a POST command to add a record to MongoDB, and that worked great too. I got back the URI for the new record in the response.
I also tried calling that custom “search” interface to filter the documents where “mongoAsService” is true. That worked.
So, running my Spring Boot REST API with a local MongoDB worked fine.
Run using Microsoft Azure Cosmos DB
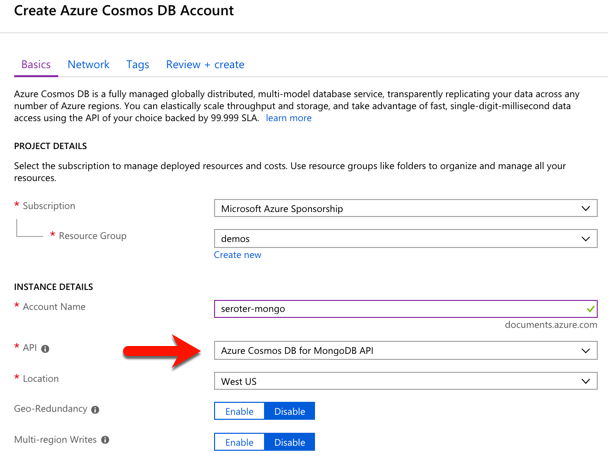
Next up, I pointed this application to Microsoft Azure. One of the many databases in Azure is Cosmos DB. This underrated database offers some pretty amazing performance and scale, and is only available from Microsoft in their cloud. NO PROBLEM. It serves up a handful of standard interfaces, including Cassandra and MongoDB. So I can take advantage of all the crazy-great hosting features, but not lock myself into any of them.
I started by visiting the Microsoft Azure portal. I chose to create a new Cosmos DB instance, and selected which API (SQL, Cassandra, Gremlin, MongoDB) I wanted.
After a few minutes, I had an instance of Cosmos DB. If I had wanted to, I could have created a database and collection from the Azure portal, but I wanted to confirm that Spring Data would do it for me automatically.
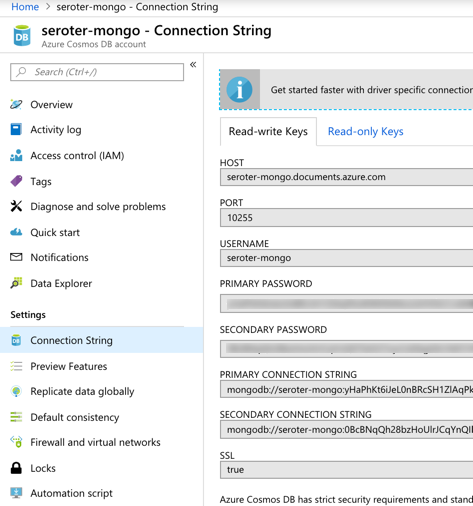
I located the “Connection String” properties for my new instance, and grabbed the primary one.
With that in hand, I went back to my application.properties file, commented out my “local” configuration, and added entries for the Azure instance.
I could publish this app to Azure, but because it’s also easy to test it locally, I just started up my Spring Boot REST API again, and pinged the database. After POSTing a new record to my endpoint, I checked the Azure portal and sure enough, saw a new database and collection with my “document” in it.
Here, I’m using a super-unique cloud database but don’t need to manage my own software to remain “portable”, thanks to Spring Boot and MongoDB interfaces. Wicked.
Run using Amazon DocumentDB
Amazon DocumentDB is the new kid in town. I wrote up an InfoQ story about it, which frankly inspired me to try all this out.
Like Azure Cosmos DB, this database isn’t running MongoDB software, but offers a MongoDB-compatible interface. It also offers some impressive scale and performance capabilities, and could be a good choice if you’re an AWS customer.
For me, trying this out was a bit of a chore. Why? Mainly because the database service is only accessible from within an AWS private network. So, I had to properly set up a Virtual Private Cloud (VPC) network and get my Spring Boot app deployed there to test out the database. Not rocket science, but something I hadn’t done in a while. Let me lay out the steps here.
First, I created a new VPC. It had a single public subnet, and I added two more private ones. This gave me three total subnets, each in a different availability zone.
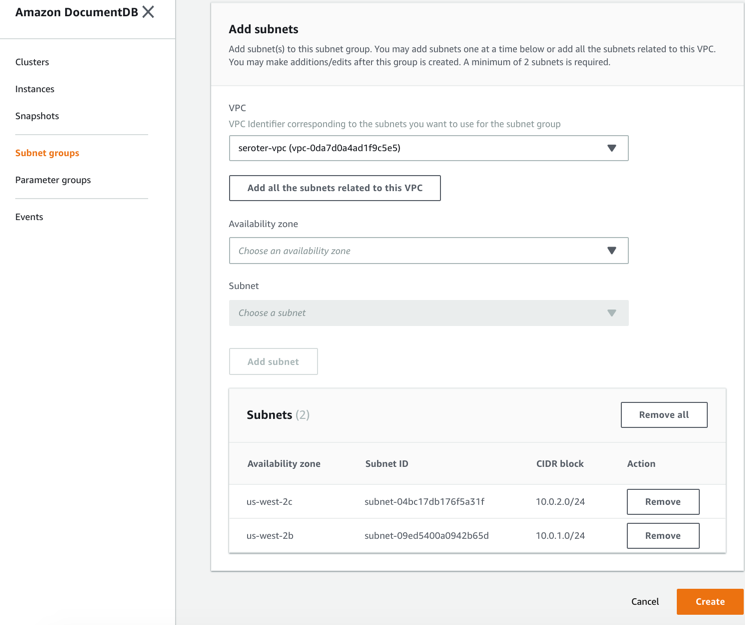
Next, I switched to the DocumentDB console in the AWS portal. First, I created a new subnet group. Each DocumentDB cluster is spread across AZs for high availability. This subnet group contains both the private subnets in my VPC.
I also created a parameter group. This group turned off the requirement for clients to use TLS. I didn’t want my app to deal with certs, and also wanted to mess with this capability in DocumentDB.
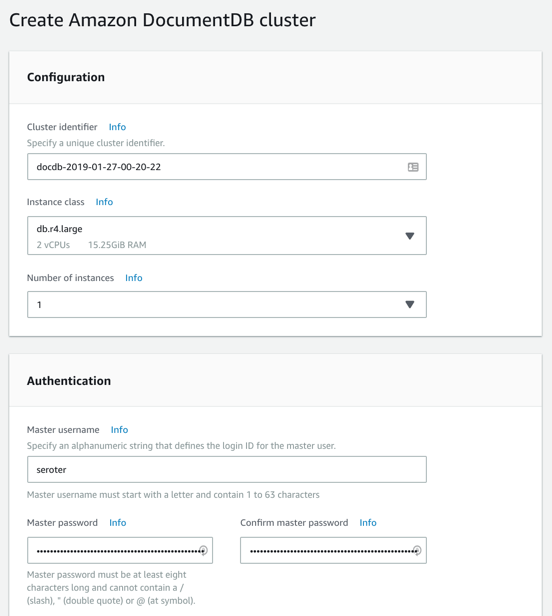
Next, I created my DocumentDB cluster. I chose an instance class to match my compute and memory needs. Then I chose a single instance cluster; I could have chosen up to 16 instances of primaries and replicas.
I also chose my pre-configured VPC and the DocumentDB subnet group I created earlier. Finally, I set my parameter group, and left default values for features like encryption and database backups.
After a few minutes, my cluster and instance were up and running. While this console doesn’t expose the ability to create databases or browse data, it does show me health metrics and cluster configuration details.
Next, I took the connection string for the cluster, and updated my application.properties file.
Now to deploy the app to AWS. I chose Elastic Beanstalk as the application host. I selected Java as my platform, and uploaded the JAR file associated with my Spring Boot REST API.
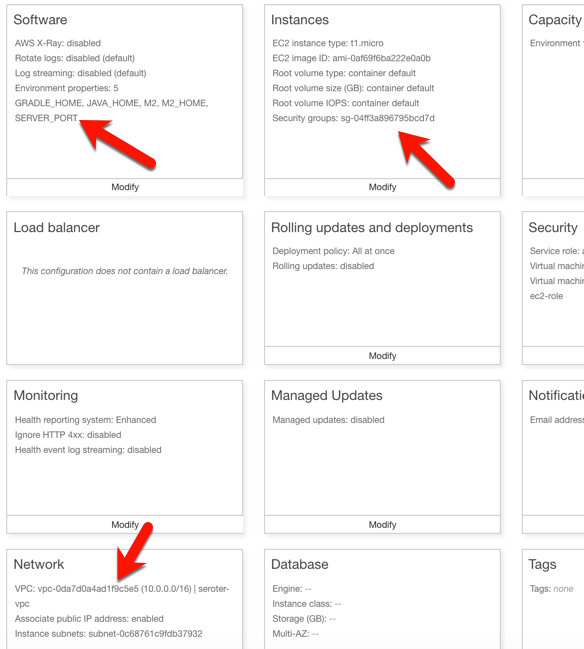
I had to set a few more parameters for this app to work correctly. First, I set a SERVER_PORT environment variable to 5000, because that’s what Beanstalk expects. Next, I ensured that my app was added to my VPC, provisioned a public IP address, and chose to host on the public subnet. Finally, I set the security group to the default one for my VPC. All of this should ensure that my app is on the right network with the right access to DocumentDB.
After the app was created in Beanstalk, I queried the endpoint of my REST API. Then I created a new document, and yup, it was added successfully.
So again, I used a novel, interesting cloud-only database, but didn’t have to change a lick of code.
Run using MongoDB in Pivotal Cloud Foundry
The last place to try this app out? A multi-cloud platform like PCF. If you did use something like PCF, the compute layer is consistent regardless of what public/private cloud you use, and connectivity to data services is through a Service Broker. In this case, MongoDB clusters are managed by PCF, and I get my own cluster via a Broker. Then my apps “bind” to that cluster.
First up, provisioning MongoDB. PCF offers MongoDB Enterprise from Mongo themselves. To a developer, this looks like a database-as–a-service because clusters are provisioned, optimized, backed up, and upgraded via automation. Via the command line or portal, I could provision clusters. I used the portal to get myself happy little instance.
After giving the service a name, I was set. As with all the other examples, no code changes were needed. I actually removed any MongoDB-related connection info from my application.properties file because that spring-cloud-cloudfoundry-connector dependency actually grabs the credentials from the environment variables set by the service broker.
One thing I *did* create for this environment — which is entirely optional — is a Cloud Foundry manifest file. I could pass these values into a command line instead of creating a declarative file, but I like writing them out. These properties simply tell Cloud Foundry what to do with my app.
With that, I jumped to a terminal, navigated to a directory holding that manifest file, and typed cf push. About 25 seconds later, I had a containerized, reachable application that connected to my MongoDB instance.
Fortunately, PCF treats Spring Boot apps special, so it used the Spring Boot Actuator to pull health metrics and more. Above, you can see that for each instance, I saw extra health information for my app, and, MongoDB itself.
Once again, I sent some GET requests into my endpoint, saw the expected data, did a POST to create a new document, and saw that succeed.
Wrap Up
Now, obviously there are novel cloud services without “standard” interfaces like the MongoDB API. Some of these services are IoT, mobile, or messaging related —although Azure Event Hubs has a Kafka interface now, and Spring Cloud Stream keeps message broker details out of the code. Other unique cloud services are in emerging areas like AI/ML where standardization doesn’t really exist yet. So some applications will have a hard coupling to a particular cloud, and of course that’s fine. But increasingly, where you run, how you run, and what you connect to, doesn’t have to be something you choose up front. Instead, first you build great software. Then, you choose a cloud. And that’s pretty cool.
Platforms should run on Kubernetes, apps should run on PaaS. That simple heuristic seems to resonate with the companies I talk to. When you have access to both environments, it makes sense to figure out what runs where. PaaS is ideal when you have custom code and want an app-aware environment that wires everything together. It’s about velocity, and straightforward Day 2 management. Kubernetes is a great choice when you have closely coordinated, distributed components with multiple exposed network ports and a need to access to infrastructure primitives. You know, a platform! Things like databases, message brokers, and hey, integration platforms.In this post, I see what it takes to get a platform up and running on Azure’s new Kubernetes service.
While Kubernetes itself is getting to be a fairly standard component, each public cloud offers it up in a slightly different fashion. Some clouds manage the full control plane, others don’t. Some are on the latest version of Kubernetes, others aren’t. When you want a consistent Kubernetes experience in every infrastructure pool, you typically use an installable product like Pivotal Container Service (PKS). But I’ll be cloud-specific in this demo, since I wanted to take Azure Kubernetes Service (AKS) for a spin. And we’ll use Spring Cloud Data Flow as our “platform” to install on AKS.
To start with, I went to the Azure Portal and chose to add a new instance of AKS. I was first asked to name my cluster, choose a location, pick a Kubernetes version, and set my initial cluster size.
For my networking configuration, I turned on “HTTP application routing” which gives me a basic (non-production grade) ingress controller. Since my Spring Cloud Data Flow is routable and this is a basic demo, it’ll work fine.
After about eleven minutes, I had a fully operational Kubernetes cluster.
Now, this is a “managed” service from Microsoft, but they definitely show you all the guts of what’s stood up to support it. When I checked out the Azure Resource Group that AKS created, it was … full. So, this is apparently the hooves and snouts of the AKS sausage. It’s there, but I don’t want to know about it.
The Azure Cloud Shell is a hidden gem of the Microsoft cloud. It’s a browser-based shell that’s stuffed with powerful components. Instead of prepping my local machine to talk to AKS, I just used this. From the Azure Portal, I spun up the Shell, loaded my credentials to the AKS cluster, and used the kubectl command to check out my nodes.
Groovy. Let’s install stuff. Spring Cloud Data Flow (SCDF) makes it easy to build data pipelines. These pipelines are really just standalone apps that get stitched together to form a sequential data processing pipeline. SCDF is a platform itself; it’s made up of a server, Redis node, MySQL node, and messaging broker (RabbitMQ, Apache Kafka, etc). It runs atop a number of different engines, including Cloud Foundry or Kubernetes. Spring Cloud Data Flow for Kubernetes has simple instructions for installing it via Helm.
I issued a Helm command from the Azure Cloud Shell (as Helm is pre-installed there) and in moments, had SCDF deployed.
When it finished, I saw that I had new Kubernetes pods running, and a load balancer service for routing traffic to the Data Flow server.
SCDF offers up a handful of pre-built “apps” to bake into pipelines, but the real power comes from building your own apps. I showed that off a few weeks ago, so for this demo, I’ll keep it simple. This streaming pipeline simply takes in an HTTP request, and drop the payload into a log file. THRILLING!
The power of a platform like SCDF comes out during deployment of a pipeline. See here that I chose Kubernetes as my underlying engine, created a load balancer service (to make my HTTP component routable) via a property setting, and could have optionally chose different instance counts for each component in the pipeline. Love that.
If you have GUI-fatique, you can always set these deploy-time properties via free text. I won’t judge you.
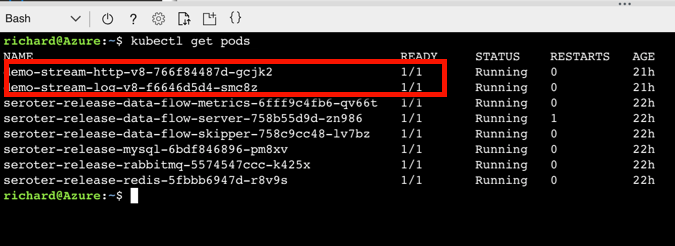
After deploying my streaming pipeline, I saw new pods shows up in AKS: one pod for each component of my pipeline.
I ran the kubectl get services command to confirm that SCDF built out a load balancer service for the HTTP app and assigned a public IP.
SCDF reads runtime information from the underlying engine (AKS, in this case) and showed me that my HTTP app was running, and its URL.
I spun up Postman and sent a bunch of JSON payloads to the first component of the SCDF pipeline running on AKS.
I then ran a kubectl logs [log app’s pod name] command to check the logs of the pipeline component that’s supposed to write logs.
And that’s it. In a very short period of time, I stood up a Kubernetes cluster, deployed a platform on top of it, and tested it out. AKS makes this fairly easy, and the fact that it’s vanilla Kubernetes is nice. When using public cloud container-as-a-service products or installable software that runs everywhere, consider Kubernetes a great choice for running platforms.
I might be the first person to write a technical book because of peer pressure. Let me back up.
I’m fortunate to be surrounded by smart folks at Pivotal. Many of them write books. We usually buy copies of them to give out at conferences. After one of conferences in May, my colleague Nima pointed out that folks wanted a book about .NET. He then pushed all the right buttons to motivate me.
So, I signed a contract with O’Reilly Media in June, started writing in July, and released the book yesterday.
Modernizing .NET Applications is a 100-page book that for now, is free from Pivotal. At some point soon, O’Reilly will put it on Safari (and other channels). So what’s in this book, before you part with your hard-earned email address?
Chapter 1 looks at why app modernization actually matters. I define “modernization” and give you a handful of reasons why you should do it. Chapter 2 offers an audit of what .NET software you’re running today, and why you’re motivated to upgrade it. Chapter 3 takes a quick look at the types of software your stakeholders are asking you to create now. Chapter 4 defines “cloud-native” and explains why you should care. I also define some key characteristics of cloud-native software and what “good” looks like.
Chapter 5 helps you decide between using the .NET Framework or .NET Core for your applications. Then in Chapter 6, I lay out the new anti-patterns for .NET software and what things you have to un-learn. Chapter 7 calls out some of the new components that you’ll want to introduce to your modernized .NET apps. Chapter 8 helps you decide where you should run your .NET apps, with an assessment of all the various public/private software abstractions to choose from. Chapter 9 digs into five specific recipes you should follow to modernize your apps. These include event storming, externalized configuration, remote session stores, token-based security schemes, and apps on pipelines. Finally, Chapter 10 leaves you with some next steps.
I’ve had the pleasure/pain of writing books before, and have held off doing it again since our tech information consumption patterns have changed. But, it seems like there’s still a hunger for long-form content, and I’m passionate about .NET developers. So, I invested in a topic I care about, and hopefully wrote a book in a way that you find enjoyable to read.
Looking for a host suitable for .NET Framework apps? Windows Server virtual machines are almost your only option. The only public cloud PaaS product that offers a higher abstraction than virtual machines is Azure’s App Service. And that’s not really meant to run an entire enterprise portfolio. So … what to do? Don’t say “switch to .NET Core and run on all the Linux-based platforms” because that’s cheating. What can you do today? The best option you don’t know about is Pivotal Cloud Foundry (PCF). In this post, I’ll show you how to easily deploy and operate .NET apps in PCF on any infrastructure.
This is part five of a five part series. Hopefully you’ve enjoyed my exploration of workloads you might not expect to see on a cloud-native platform like PCF.
Part 5 – Deploying .NET Framework apps to Windows Server
About PAS for Windows
Quickly, I want to tell you about Pivotal Application Service (PAS) for Windows. Recall that PCF is really made up of two software abstractions atop a sophisticated infrastructure management platform (BOSH): Pivotal Application Service (for apps) and Pivotal Container Service (for raw containers). PAS for Windows extends PAS with managed Windows Server instances. As an operator, you can deploy, patch, upgrade, and operate Windows Server instances entirely through automation. For developers, you get a on-demand, scalable host that supports remote debugging and much more. I feel pretty safe saying that this is better than whatever you’re doing today for Windows workloads!
PAS for Windows extends PAS and uses all the same machinery
Deploying a WCF application to PCF
Let’s do this. First, I confirmed that I had a Windows “stack” available to me. In my PCF environment, I ran a cf stacks command.
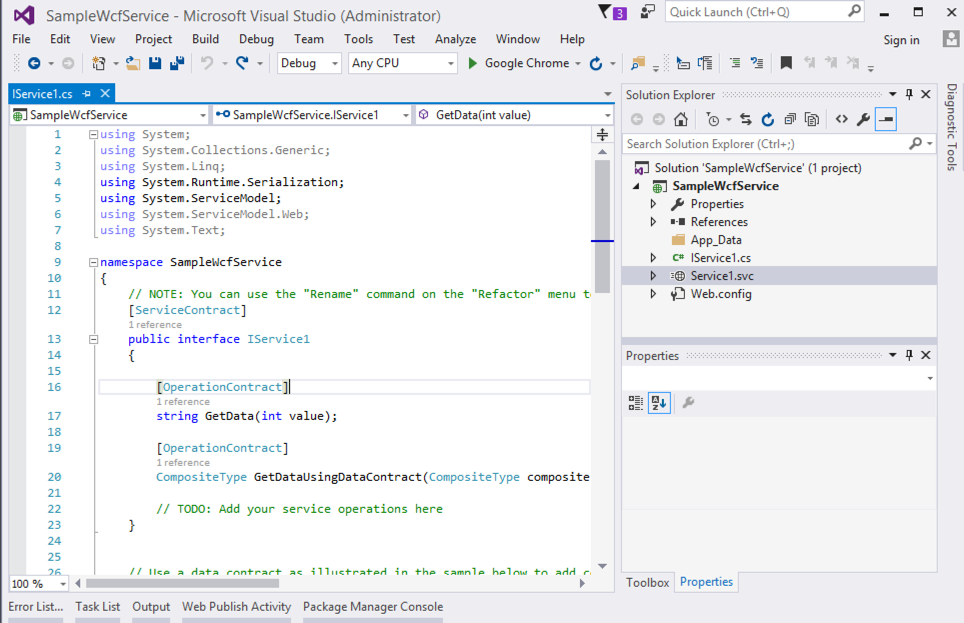
Yup, all good. I created a new Windows Communication Foundation (WCF) application targeting .NET Framework 4.0. All of your apps aren’t using the latest framework, so why should my sample? Note that you can run all types of classic .NET projects in PCF: ASP.NET Web Forms, MVC, Web API, WCF, console, and more.
My WCF service doesn’t need to change at all to run in PCF. To publish to PCF, I just need to provide a set of command line parameters, or, write a manifest with those parameters. My manifest looked like this:
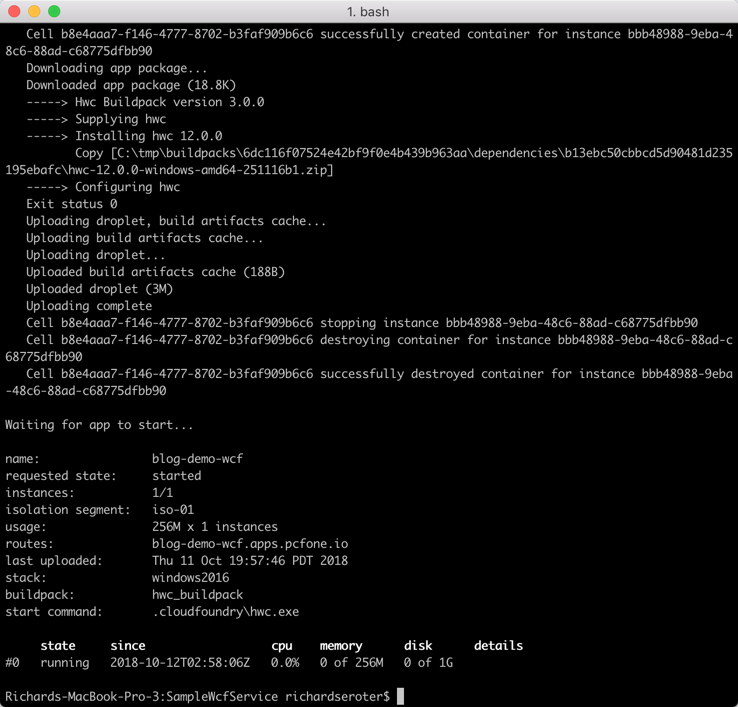
There’s a buildpack just for .NET apps on Windows and all I have to do is push the code itself. About fifteen seconds after typing cf push, my WCF service was packaged up and loaded into a Windows Server container.
Browsing the endpoint returned that familiar page of WCF service metadata.
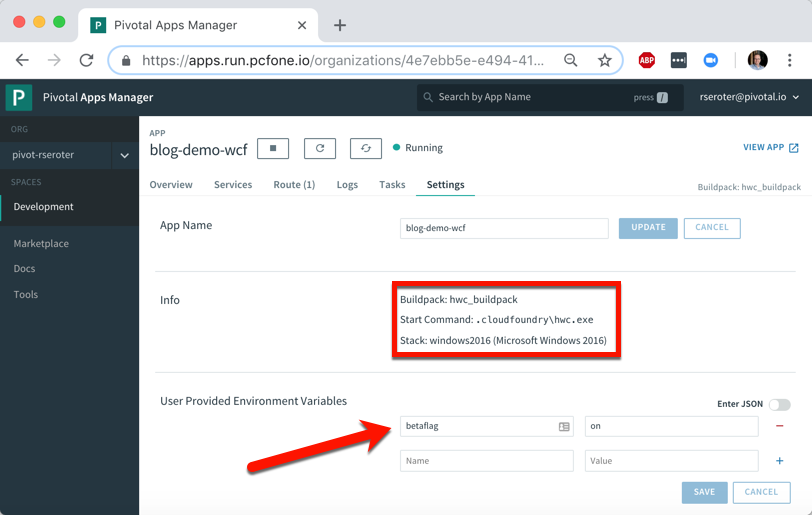
Operating your .NET app on PCF
It’s one thing to deploy an app, it’s another thing to manage it. PCF makes that pretty easy. After deploying a .NET app, I see some helpful metadata. It shows me the stack, buildpack, and any environment variables visible to the app.
How long does it take you to get a new instance of your .NET app into production today? Weeks? Months? I just scaled up from one to three Windows container instances in less than ten seconds. I just love that.
Any app written in any language gets access to the same set of PCF functionality. Your .NET Framework apps get built-in log aggregation, metrics and monitoring, autoscaling, and more. All in a multi-tenant environment. And with straightforward access to anything in the marketplace through the Service Broker interface. Want your .NET Framework app to talk to Azure’s Cosmos DB or Google Cloud Spanner? Just use the broker.
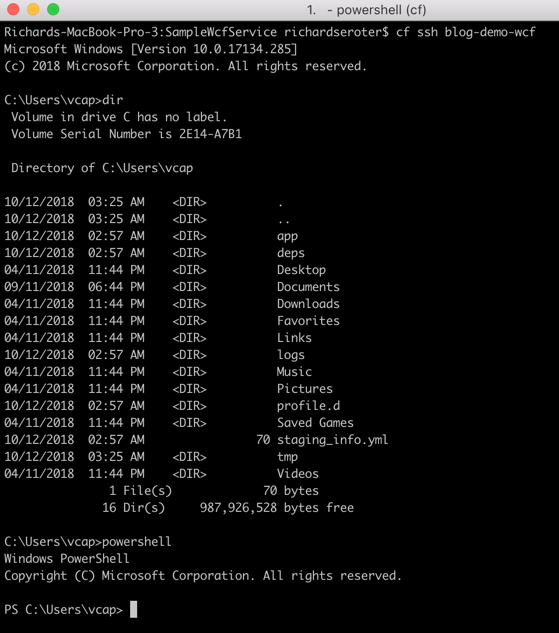
Oh, and don’t forget that because PAS for Windows uses legit Windows Server containers, each app instance gets its own copy of the file system, registry, and GAC. You can see this by SSH-ing into the container. Yes, I said you could SSH in. It’s just a cf ssh command.
That’s a full Windows file system, and I can even spin up Powershell in there. Crazy times.
When I say “PaaS” what comes to mind? If you’re like most people I talk to, you think of public cloud platforms for modern web apps. So I’ll forgive you if you didn’t realize that things are different now!
The first generation of PaaS products had a few things in common. They were public cloud only. You had to build apps with the runtime constraints in mind. They only ran statelesss web apps. Linux was the only runtime. When Cloud Foundry first came out, it checked most of those boxes. But over the years, Pivotal Cloud Foundry (PCF) evolved to do much more.
Many people still think of those first-generation PaaS constraints when considering PCF, and specifically, the Pivotal Application Service (PAS). So, I thought it’d be fun to look at non-traditional workloads. In this brief five-part series, I’m going to show off the following scenarios:
Most Cloud Foundry users depend on buildpacks. Developers push source code, and the buildpack pulls in dependencies, frameworks, and runtimes, then builds a tarball that’s deployed as an OCI-compatible container in Cloud Foundry. One major benefit of the buildpacks model is that the platform brings the root file system to your app. You’re not responsible for finding secure base images or maintaining that “layer” of the stack. But all that said, some folks like using Docker images as their packaging unit whether manually created (don’t do that) or as the output from a continuous integration pipeline.
It doesn’t matter if Cloud Foundry builds the container or you send in a Docker image, it’s all treated the same by the platform. At runtime, the orchestrator executes all containers using runC, the same spec used by Docker and Kubernetes. Let’s see this in action.
You can try this for free on Pivotal Web Services if you don’t have a Cloud Foundry available. I’m using a different environment, but they all behave the same. That’s the point! After you cf login to Cloud Foundry, it’s time to push a container.
How about we start with a Node.js web app. Here’s an Express app built by the folks at Bitnami. We can actually push this to Cloud Foundry with a single command.
In that command, notice a couple things. First, I’m using the –docker-image flag. Since I’m hitting a public image in the public Docker Hub, no credentials or anything are needed. PCF also works with private images, and private registries. Otherwise, it’s a standard command that asks for a single instance, and 128M of memory for each instance. Within ten seconds, you’ll have two routable instances ready to process traffic.
Seriously. That’s amazing. And PCF doesn’t “mess with” the image. Whatever layers are in your Docker image are what run in Cloud Foundry. One thing PCF *does* do is volume mount a directory that contains a unique certificate for the container. This regularly-rotated credential (up to hourly!) is used for things like mTLS. You can see it by SSH-ing into the container and doing printenv or browsing the file system. Yes, you can actually SSH into containers whether built by the platform or via Docker images. No black boxes here.
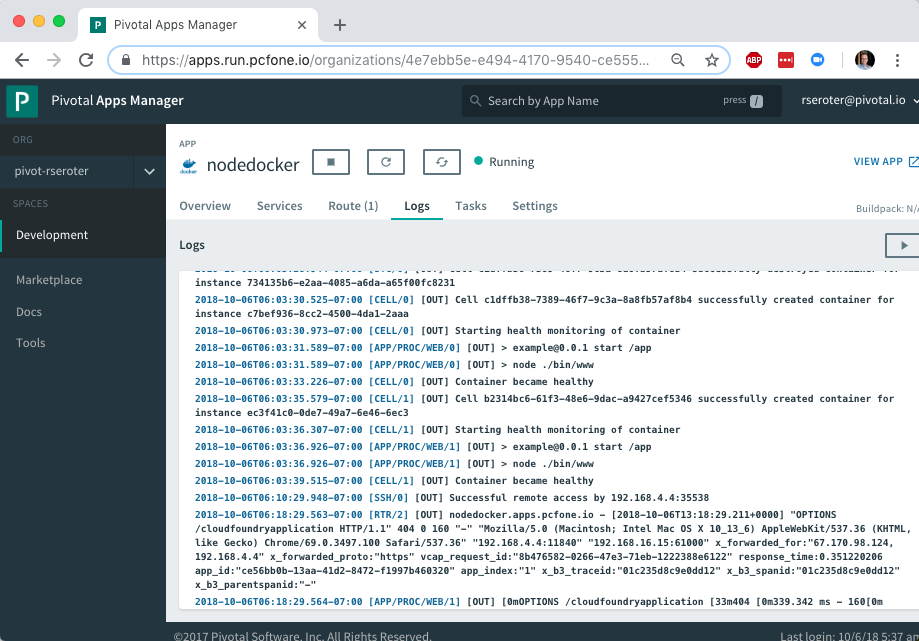
Deploying an app’s only half the story. Does PCF treat the running app the same way if it was packaged as a Docker image? Yup. Jumping to the PCF Apps Manager UX, you see our running app.
If you look closely, you see that we indicate the app type, in this case, that it’s from a Docker image.
More importantly, the platform bestows all the operational goodness on this app as any other. For example, all the logs from each app instance are collected and aggregated.
You can add environment variables. Configure auto-scaling. Monitor app and container health metrics. Bind to marketplace services. All the things that make PCF a great runtime for apps make it a great runtime for apps packaged as Docker images.
So try it out yourself. If you’re building custom apps, PCF is a great destination regardless of how you want to ship code. Stay tuned tomorrow for fun network routing demonstration.
I’ll be honest with you, I don’t know much about horses. I mean, I know some things and can answer basic questions from my kids. But I’m mostly winging it and relying on what I remember from watching Seabiscuit. Sometimes you need just enough knowledge to be dangerous. With that in mind, do you really know what “cloud-native” is all about? You should, and if you want the foundational ideas, my new on-demand Pluralsight class is just for you.
Clocking in at a tight 51 minutes, my course “Cloud-native Architecture: The Big Picture” introduces you to the principles, patterns, and technologies related to cloud-native software. The first module digs into why cloud-native practices matter, how to define cloud-native, what “good” looks like, and more.
The second module calls out cloud-native patterns around application architecture, application deployment, application infrastructure, and teams. The third and final module explains the technologies that help you realize those cloud-native patterns.
This was fun to put together, and I’ve purposely made the course brief so that you could quickly get the key points. This was my 18th Pluralsight course, and there’s no reason to stop now. Let me know what topic you’d like to see next!
Since I’ve moved up to the Seattle-area three years ago, there’s been a hole in my life. No longer. The Habit just opened up around the corner from me. I missed that place! While most of the attention (including my own) is on the Charburger, they actually have a pretty deep menu. I thought about that this week when looking at the latest Spring Cloud portfolio. While it’s used millions of times per month by Java developers —and usage grew 137% over the past year alone—Spring Cloud is best known for its Config Server and packaging of NetflixOSS tech. You know, things for service discovery, load balancing, circuit breakers, etc. THEY DESERVE THE GLORY. But there are four other interesting packages that you shouldn’t overlook.
Spring Cloud Stream
It’s no secret that I’m a big fan of this library. It abstracts away all the complexity of dealing with message brokers like RabbitMQ and Apache Kafka. Spring Cloud Stream has a straightforward programming model that makes it simple to do complex things. Content-based routing? Dead letter queuing? Content-type conversions? Partitioned processing, even on brokers that don’t natively support it? You get all that.
I’ve seen more and more companies move away from the heavy, centralized ESB and towards a federated messaging model. With Stream, you can use your choice of message broker, but make it a late-binding decision for developers. And if you’re doing event processing and want to chain a series of action together, Spring Cloud Stream works great with Spring Cloud Data Flow.
If you want to dig in, check out my Pluralsight course that has a whole module on Spring Cloud Stream. Or just go build something!
Spring Cloud Contract
Consumer-driven contracts are a fresh take on testing APIs. You know the classic way we share API info: create an API and expose operations and payloads for teams to model and test against. With consumer-driven contracts, the API creator builds and tests their service against a set of consumer expectations. But this has traditionally been a bit difficult to pull off. Enter Spring Cloud Contract.
It’s described in the docs as moving “TDD to the level of software architecture.” It does this by “covering a range of options for writing tests, publishing them as assets, and asserting that a contract is kept by producers and consumers.”
You write contracts in Groovy or YAML, and testing stubs get generated and used by both producers and consumers. This enables fast feedback for both side. What’s cool about these generated testing stubs (and the associated “stub runner”) is that you can mock complex distributed systems with a few code annotations. This includes the messaging layer as well. Powerful stuff, and a big deal for today’s software developers.
This one’s pretty new, so I’ll excuse you if you haven’t heard of it. BUT ONLY THIS ONCE! Spring Cloud Gateway gives you a powerful API gateway based on Spring components.
Use (built-in or custom) route predicates to determine how requests are handled. Built-in ones include datetime (before, after, or between), cookies, headers, host, method, path, query, and more. Combine them to get whatever behavior you need. You can also modify incoming or outgoing traffic. Add headers, integrate with Hystrix for circuit breaker behavior, check a rate limiter, do directors, among other things. As you’d expect, this is quite extensible and scalable.
API gateways form an important part of your architecture, and having a bunch of mini-gateways deployed (instead of a single, monolithic one) might give you extra flexibility. Check out the docs and try it out.
Spring Cloud Function
Unless you’ve awoken from a three-year slumber, you’re probably familiar with “serverless” tech. Spring Cloud Function is a pretty wicked (generally available) framework that does a few things you might not expect.
It’s not just about making Spring Boot friendly to function platforms like AWS Lambda or Azure Functions. That’s there (see AWS and Azure adapter guidance). But besides providing a consistent programming model across clouds, it also has stuff you need to run it standalone.
Decorate your code with annotations that result in HTTP or stream-processing endpoints getting attached to your function. Your function can take part in messaging as a source, processor (takes data in, publishes data out), or sink. Or it can get be a standalone web app that gets activated upon HTTP request. Neato. Read the docs and see how easy it is to get started.
Spring Cloud is a pretty unique collection of projects, and the Spring team is constantly upgrading and improving them. The whole point is to make it simple to incorporate proven distributed systems pattern in your apps. From what I can tell, it’s achieving that mission.
Trying to significantly improve your company’s ability to build and run good software? Forget Docker, public cloud, Kubernetes, service meshes, Cloud Foundry, serverless, and the rest of it. Over the years, I’ve learned the most important place you should start: continuous integration and delivery pipelines. Arguably, “apps on pipeline” is the most important “transformation” metric to track. Not “deploys per day” or “number of microservices.” It’s about how many apps you’ve lit up for repeatable, automated deployment. That’s a legit measure of how serious you are about being responsive and secure.
All this means I needed to get smarter with Concourse, one of my favorite tools for CI (and a little CD). I decided to build an ASP.NET Core app, and continuously integrate and deliver it to a Cloud Foundry environment running in AWS. Let’s go!
First off, I needed an app. I spun up a new ASP.NET Core Web API project with a couple REST endpoints. You can grab the source code here. Most of my code demos don’t include tests because I’m in marketing now, so YOLO, but a trustworthy pipeline needs testable code. If you’re a .NET dev, xUnit is your friend. It’s maintained by my friend Brad, so I basically chose it because of peer pressure. My .csproj file included a few references to bring xUnit into my project:
“Microsoft.NET.Test.Sdk” Version=”15.7.0″
“xunit” Version=”2.3.1″
“xunit.runner.visualstudio” Version=”2.3.1″
Then, I created a class to hold the tests for my web controller. I included one test with a basic assertion, and another “theory” with an input data set. These are comically simple, but prove the point!
   public class TestClass {
        private ValuesController _vc;
public TestClass() {
            _vc = new ValuesController();
        }

        [Fact]
        public void Test1(){
            Assert.Equal("pivotal", _vc.Get(1));
        }

        [Theory]
        [InlineData(1)]
        [InlineData(3)]
        [InlineData(20)]
        public void Test2(int value) {
            Assert.Equal("public", _vc.GetPublicStatus(value));
        }
    }
When I ran dotnet test against the above app, I got an expected error because the third inline data source led to a test failure, since my controller only returns “public” companies when the input value is between 1 and 10. Commenting the offending inline data source led to a successful test run.
Ok, the app was done. Now, to put it on a pipeline. If you’ve ever used shameful swear words when wrangling your CI server, maybe it’s worth joining all the folks who switched to Concourse. It’s a pretty straightforward OSS tool that uses a declarative model and containers for defining and running pipelines, respectively. Getting started is super simple. If you’re running Docker on your desktop, that’s your easiest route. Just grab this Docker Compose file from the Concourse GitHub repo. I renamed mine to docker-compose.yml, jumped into a Terminal session, switched to the folder holding this YAML file, and ran docker-compose up -d. After a second or two, I had a PostgreSQL server (for state) and a Concourse server. PROVE IT, you say. Hit localhost:8080, and you’ll see the Concourse dashboard.
Besides this UX, we interface with Concourse via a CLI tool called fly. I downloaded it from here. I then used fly to add my local environment as a “target” to manage. Instead of plugging in the whole URL every time I interacted with Concourse, I created an alias (“rs”) using fly -t rs login -c http://localhost:8080. If you get a warning to sync your version of fly with your version of Concourse, just enter fly -t rs sync and it gets updated. Neato.
Next up? The pipeline. Pipelines are defined in YAML and are made up of resources and jobs. One of the great things about a declarative model, is that I can run my CI tests against any Concourse by just passing in this (source-controlled) pipeline definition. No point-and-ciick configurations, no prerequisite components to install. Love it. First up, I defined a couple resources. One was my GitHub repo, the second was my target Cloud Foundry environment. In the real world, you’d externalize the Cloud Foundry credentials, and call out to files to build the app, etc. For your benefit, I compressed to a single YAML file.
Those resources tell Concourse where to get the stuff it needs to run the jobs. The first job used the GitHub resource to grab the source code. Then it used the Microsoft-provided Docker image to run the dotnet test command.
Concourse isn’t really a CD tool, but it does a nice basic job of getting code to a defined destination. The second job deploys the code to Cloud Foundry. It also uses the source code resource and only fires if the test job succeeds. This ensures that only fully-tested code makes its way to the hosting environment. If I were being more responsible, I’d take the results of the test job, drop it into an artifact repo, and then use that artifact for deployment. But hey, you get the idea!
That was it! I was ready to deploy the pipeline (pipeline.yml) to Concourse. From the Terminal, I executed fly -t rs set-pipeline -p test-pipeline -c pipeline.yml. Immediately, I saw my pipeline show up in the Concourse Dashboard.
After I unpaused my pipeline, it fired up automatically.
Remember, my job specified a Microsoft-provided container for building the app. Concourse started this job by downloading the Docker image.
After downloading the image, the job kicked off the dotnet test command and confirmed that all my tests passed.
Terrific. Since my next job was set to trigger when the first one succeeded, I immediately saw the “deploy” job spin up.
This job knew how to publish content to Cloud Foundry, and used the provided parameters to deploy the app in a few seconds. Note that there are other resource types if you’re not a Cloud Foundry user. Nobody’s perfect!
The pipeline run was finished, and I confirmed that the app was actually deployed.
Finished? Yes, but I wanted to see a failure in my pipeline! So, I changed my xUnit tests and defined inline data that wouldn’t pass. After committing code to GitHub, my pipeline kicked off automatically. Once again it was tested in the pipeline, and this time, failed. Because it failed, the next step (deployment) didn’t happen. Perfect.
If you’re looking for a CI tool that people actually like using, check out Concourse. Regardless of what you use, focus your energy on getting (all?) apps on pipelines. You don’t do it because you have to ship software every hour, as most apps don’t need it. It’s about shipping whenever you need to, with no drama. Whether you’re adding features or patching vulnerabilities, having pipelines for your apps means you’re actually becoming a customer-centric, software-driven company.