Each day I publish a reading list, but maybe you aren’t sifting through ~50 links per week. Understandable.
But what if you could listen to a recap instead? Thanks to a prompt from my boss, I fed in last week’s reading list (all five days) to NotebookLM and generated a 20 minute engaging podcast. It’s so good! Listen below.
If you like this, I’ll start generating these recaps every week too.
Trust. Without trust, AI coding assistants won’t become a default tool in a developer’s toolbox. Trust is the #1 concern of devs today, and it’s something I’ve struggled with in regards to getting the most relevant answers from an LLM. Specifically, am I getting back the latest information? Probably not, given that LLMs have a training cutoff date. Your AI coding assistant probably doesn’t (yet) know about Python 3.13, the most recent features of your favorite cloud service, or the newest architectural idea shared at a conference last week. What can you do about that?
To me, this challenge comes up in at least three circumstances. There are entirely new concepts or tools that the LLM training wouldn’t know about. Think something like pipe syntax as an alternative to SQL syntax. I wouldn’t expect a model trained last year to know about that. How about updated features to existing libraries or frameworks? I want suggestions that reflect the full feature set of the current technology and I don’t want to accidentally do something the hard (old) way. An example? Consider the new “enum type” structured output I can get from LangChain4J. I’d want to use that now! And finally, I think about improved or replicated framework libraries. If I’m upgrading from Java 8 to Java 23, or Deno 1 to Deno 2, I want to ensure I’m not using deprecated features. My AI tools probably don’t know about any of these.
I see four options for trusting the freshness of responses from your AI assistant. The final technique was brand new to me, and I think it’s excellent.
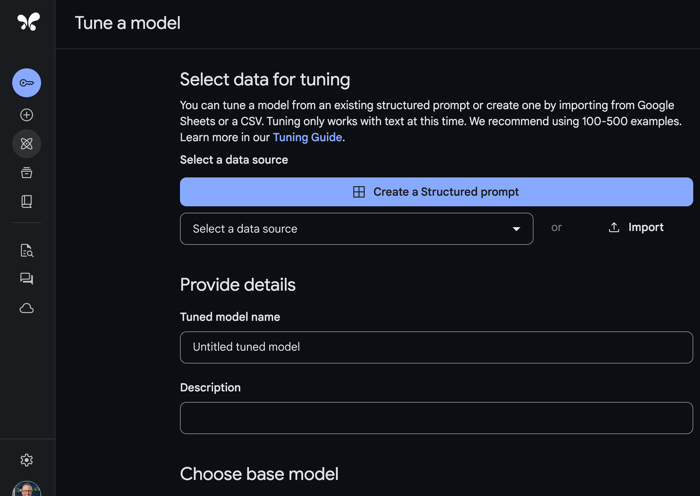
Fine-tune your model
Use retrieval augmented generation (RAG)
Ground the results with trusted sources
“Train” on the fly with input context
Let’s briefly look at the first three, and see some detailed examples of the fourth.
Fine-tune your model
Whether using commercial or open models, they all represent a point-in-time based on their training period. You could choose to repeatedly train your preferred model with fresh info about the programming languages, frameworks, services, and patterns you care about.
The upside? You can get a model with knowledge about whatever you need to trust it. The downside? It’s a lot of work—you’d need to craft a healthy number of examples and must regularly tune the model. That could be expensive, and the result wouldn’t naturally plug into most AI coding assistance tools. You’d have to jump out of your preferred coding tool to ask questions of a model elsewhere.
Use RAG
Instead of tuning a serving a custom model, you could choose to augment the input with pre-processed content. You’ll get back better, more contextual results when taking into account data that reflects the ideal state.
The upside? You’ll find this pattern increasingly supported in commercial AI assistants. This keeps you in your flow without having to jump out to another interface. GitHub Copilot offers this, and now our Gemini Code Assist provides code customization based on repos in GitHub or GitLab. With Code Assist, we handle the creation and management of the code index of your repos, and you don’t have to manually chunk and store your code. The downside? This only works well if you’ve got the most up-to-date data in an indexed source repo. If you’ve got old code or patterns in there, that won’t help your freshness problem. And while these solutions are good for extra code context, they may not support a wider range of possible context sources (e.g. text files).
Ground the results
This approach gives you more confidence that the results are accurate. For example, Google Cloud’s Vertex AI offers “ground with Google Search” so that responses are matched to real, live Google Search results.
If I ask a question about upgrading an old bit of Deno code, you can see that the results are now annotated with reference points. This gives me confidence to some extent, but doesn’t necessarily guarantee that I’m getting the freshest answers. Also, this is outside of my preferred tool, so it again takes me out of a flow state.
Train on the fly
Here’s the approach I just learned about from my boss’s boss, Keith Ballinger. I complained about freshness of results from AI assistance tools, and he said “why don’t you just train it on the fly?” Specifically, pass the latest and greatest reference data into a request within the AI assistance tool. Mind … blown.
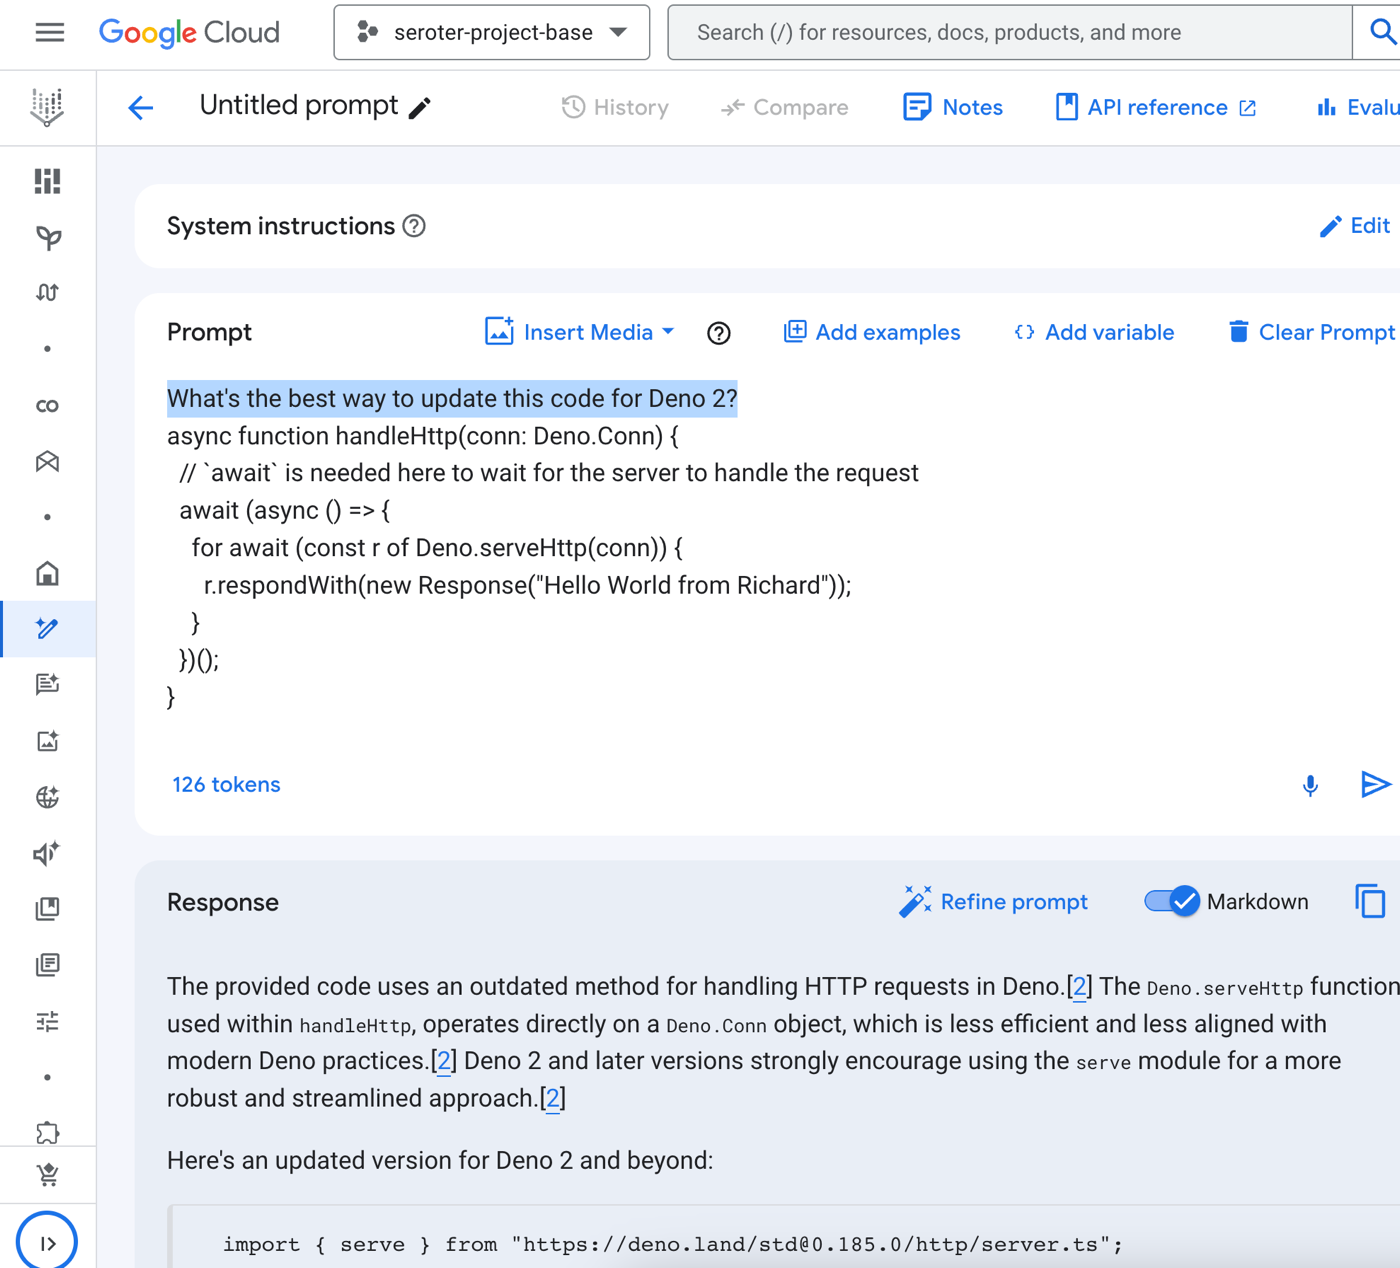
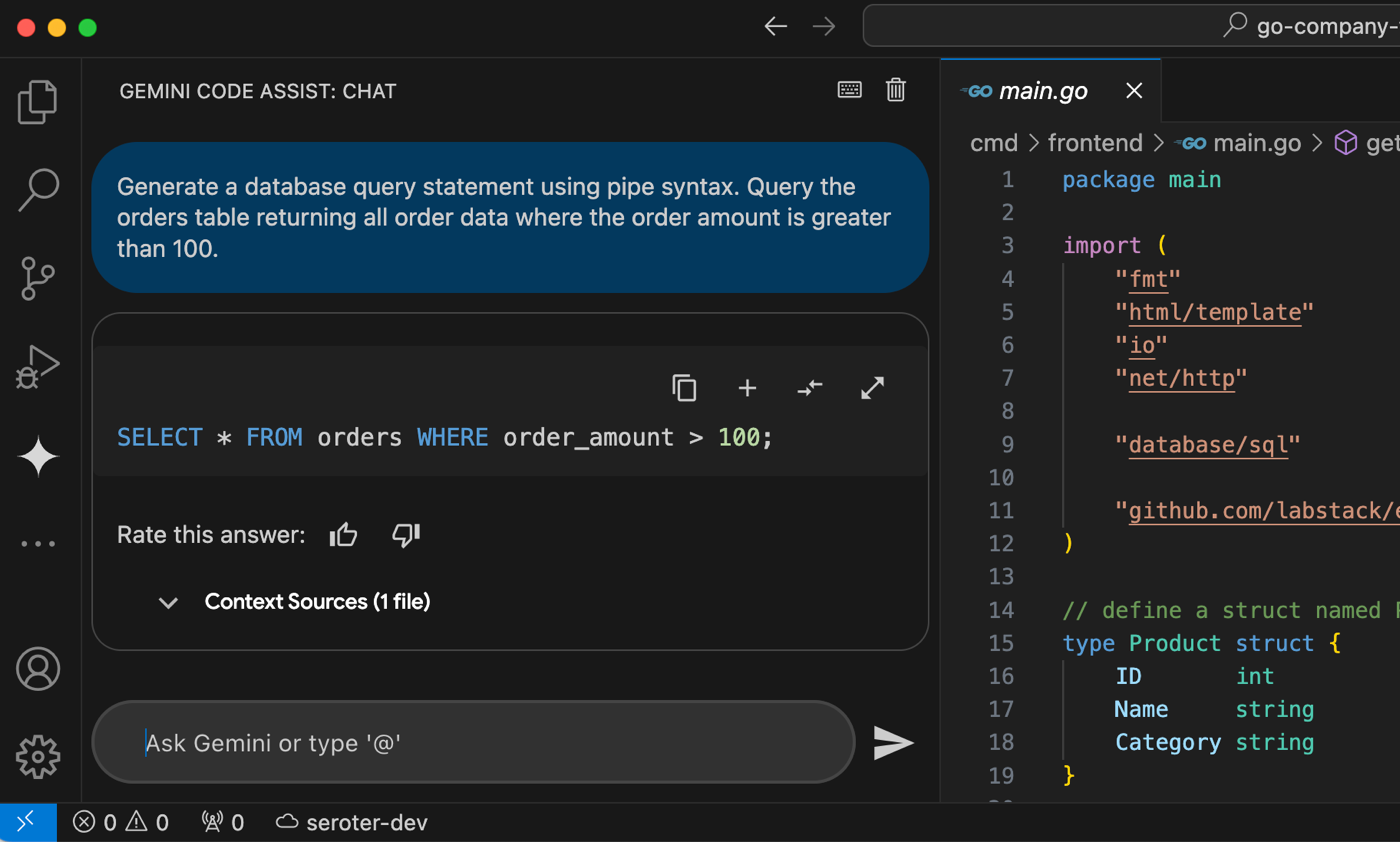
How might it handle entirely new concepts or tools? Let’s use that pipe syntax example. In my code, I want to use this fresh syntax instead of classic SQL. But there’s no way my Gemini Code Assist environment knows about that (yet). Sure enough, I just get back a regular SQL statement.
But now, Gemini Code Assist supports local codebase awareness, up to 128,000 input tokens! I grabbed the docs for pipe query syntax, saved as a PDF, and then asked Google AI Studio to produce a Markdown file of the docs. Note that Gemini Code Assist isn’t (yet) multi-modal, so I need Markdown instead of passing in a PDF or image. I then put a copy of that Markdown file in a “training” folder within my app project. I used the new @ mention feature in our Gemini Code Assist chat to specifically reference the syntax file when asking my question again.
Wow! So by giving Gemini Code Assist a reference file of pipe syntax, it was able to give me an accurate, contextual, and fresh answer.
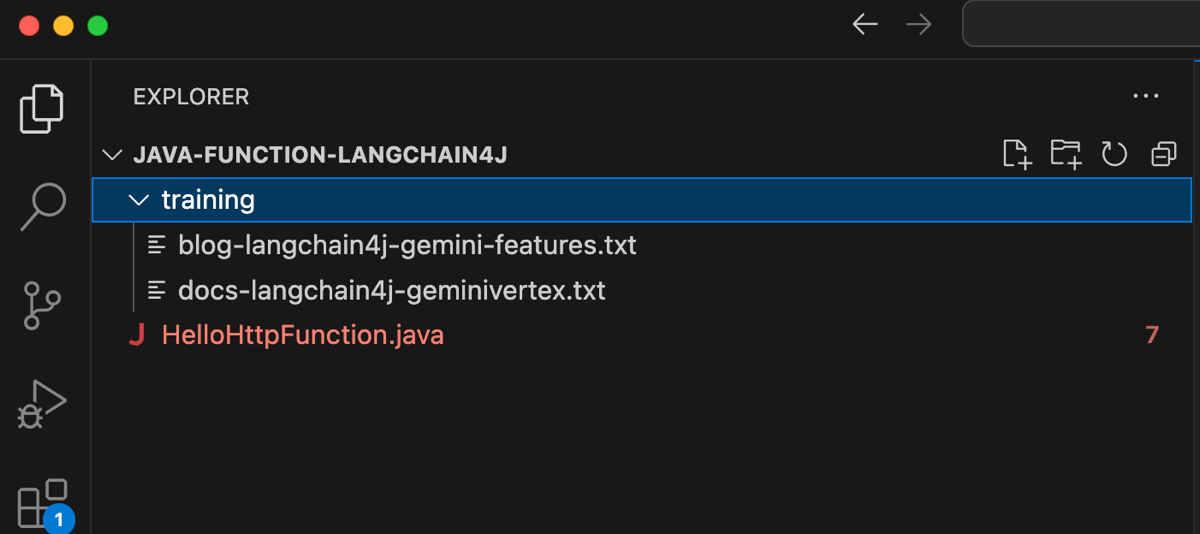
What about updated features to existing libraries or frameworks? I mentioned the new feature of LangChain4J for the Gemini model. There’s no way I’d expect my coding assistant to know about a feature added a few days ago. Once again, I grabbed some resources. This time, I snagged the Markdown doc for Google Vertex AI Gemini from the LangChain4J repo, and converted a blog post from Guillaume to Markdown using Google AI Studio.
My prompt to the Gemini Code Assist model was “Update the service function with a call to Gemini 1.5 Flash using LangChain4J. It takes in a question about a sport, and the response is mapped to an enum with values for baseball, football, cricket, or other.” As expected, the first response was a good attempt, but it wasn’t fully accurate. And it used a manual way to map the response to an enum.
What if I pass in both of those training files with my prompt? I get back exactly the syntax I wanted for my Cloud Run Function!
So great. This approach requires me to know what tech I’m interested in up front, but still, what an improvement!
Final example. How about improved or replicated framework libraries? Let’s say I’ve got a very old Deno app that I created when I first got excited about this excellent JavaScript runtime.
// from https://deno.com/blog/v1.35#denoserve-is-now-stable
async function handleHttp(conn: Deno.Conn) {
  // `await` is needed here to wait for the server to handle the request
  await (async () => {
    for await (const r of Deno.serveHttp(conn)) {
      r.respondWith(new Response("Hello World from Richard"));
    }
  })();
}

for await (const conn of Deno.listen({ port: 8000 })) {
  handleHttp(conn);
}
This code uses some libraries and practices that are now out of date. When I modernize this app, I want to trust that I’m doing it the best way. Nothing to fear! I grabbed the Deno 1.x to 2.x migration guide, a blog post about the new approach to web servers, and the launch blog for Deno 2. The result? Impressive, including a good description of why it generated the code this way.
I could imagine putting the latest reference apps into a repo and using Gemini Code Assist’s code customization feature to pull that automatically into my app. But this demonstrated technique gives me more trust in the output of tool when freshness is paramount. What do you think?
School is back in session, and I just met with a handful of teachers at a recent back-to-school night. They’re all figuring out how to account for generative AI tools that students have access to. I say, let’s give teachers the same tools to use. Specifically, what if a teacher wants a quick preliminary grade on book reports submitted by their students? To solve this, I used Gemini Flash 1.5 in Google Cloud Vertex AI in three different ways—one-off in the prompt editor, through code, and via declarative workflow.
Grade Homework in Vertex AI Studio
Maybe you just have one or two papers to grade. Something like Vertex AI Studio is a good choice. Even if you’re not a Google Cloud customer, you can use it for free through this link.
You don’t have any book reports handy to test this with? Me neither. In Vertex AI Studio, I prompted with something like “Write a 300 word book report for Pride and Prejudice from the perspective of an 8th grade student with a good vocabulary and strong writing skills.”
With that handy, let’s “grade” the paper. Here I’m using system instructions to direct the model. I used Gemini to generate the initial version and then I tweaked it a bit. Here’s the instructions:
Task: Evaluate 8th-grade book reports for an honors English class. You are a tough grader. Input: Book report text. Output: Initial letter grade (A, B, C, D, or F) based on: Structure: Clear introduction, body, and conclusion Grammar: Spelling, punctuation, sentence structure. Content: Understanding of the book, critical thinking. Consider: Age and language proficiency of the student.
This tells the model what to look for, the expected quality (“honors English”), and the desired output.
I added the system instructions to the marked section within Vertex AI Studio.
Then I simply pasted the book report into the “prompt” section and submitted the prompt.
I thought this was a pretty good book report, but Gemini 1.5 Flash had a high bar after obeying my system instructions.
This book report shows good understanding of the book and a strong grasp of the themes. However, there are some issues:

Structure:
The introduction is a little long and could be more concise.
The conclusion is also repetitive.
The report could benefit from more clear paragraph breaks to organize the information more effectively.

Grammar:
No significant grammar issues.

Content:
The student demonstrates good understanding of the novel's major themes and characters.
There's a strong focus on plot summary, which is okay, but the report could benefit from more critical analysis. The student needs to go beyond just describing the events to analyze how they impact the themes, characters, or messages of the book.
Overall: This report shows good effort, but it needs to be refined.

Grade: B-
If I’m a teacher, this is a fascinating way to get a preliminary assessment of a writing assignment!
Grade Homework Through Code
The above solution works fine for one-off experiences, but how might you scale this AI-assisted grader? Another option is code.
To try this scenario out, I used Cloud Firestore as my document database holding the book reports. I created a collection named “Papers” in the default database and added three documents. Each one holds a different book report.
I think used the Firestore API and Vertex AI API to write some simple Go code that iterates through each Firestore document, calls Vertex AI using the provided system instructions, and then logs out the grade for each report. Note that I could have used a meta framework like LangChain, LlamaIndex, or Firebase Genkit, but I didn’t see the need.
package main

import (
	"context"
	"fmt"
	"log"
	"os"

	"cloud.google.com/go/firestore"
	"cloud.google.com/go/vertexai/genai"
	"google.golang.org/api/iterator"
)

func main() {
	// get configuration from environment variables
	projectID := os.Getenv("PROJECT_ID")
	collectionName := os.Getenv("COLLECTION_NAME") // "Papers"
	location := os.Getenv("LOCATION")              //"us-central1"
	modelName := os.Getenv("MODEL_NAME")           // "gemini-1.5-flash-001"

	ctx := context.Background()

	//initialize Vertex AI client
	vclient, err := genai.NewClient(ctx, projectID, location)
	if err != nil {
		log.Fatalf("error creating vertex client: %v\n", err)
	}
	gemini := vclient.GenerativeModel(modelName)

	//add system instructions
	gemini.SystemInstruction = &genai.Content{
		Parts: []genai.Part{genai.Text(`Task: Evaluate 8th-grade book reports for an honors English class. You are a tough grader. Input: Book report text. Output: Initial letter grade (A, B, C, D, or F) based on: Structure: Clear introduction, body, and conclusion Grammar: Spelling, punctuation, sentence structure. Content: Understanding of the book, critical thinking. Consider: Age and language proficiency of the student.
		`)},
	}

	// Initialize Firestore client
	client, err := firestore.NewClient(ctx, projectID)
	if err != nil {
		log.Fatalf("Failed to create client: %v", err)
	}
	defer client.Close()

	// Get documents from the collection
	iter := client.Collection(collectionName).Documents(ctx)
	for {
		doc, err := iter.Next()
		if err != nil {
			if err == iterator.Done {
				break
			}
			log.Fatalf("error iterating through documents: %v\n", err)
		}

		//create the prompt
		prompt := genai.Text(doc.Data()["Contents"].(string))

		//call the model and get back the result
		resp, err := gemini.GenerateContent(ctx, prompt)
		if err != nil {
			log.Fatalf("error generating context: %v\n", err)
		}

		//print out the top candidate part in the response
		log.Println(resp.Candidates[0].Content.Parts[0])
	}

	fmt.Println("Successfully iterated through documents!")
}
The code isn’t great, but the results were. I’m also getting more verbose responses from the model, which is cool. This is a much more scalable way to quickly grade all the homework.
Grade Homework in Cloud Workflows
I like the code solution, but maybe I want to run this preliminary grading on a scheduled basis? Every Tuesday night? I could do that with my above code, but how about using a no-code workflow engine? Our Google Cloud Workflows product recently got a Vertex AI connector. Can I make it work with the same system instructions as the above two examples? Yes, yes I can.
I might be the first person to stitch all this together, but it works great. I first retrieved the documents from Firestore, looped through them, and called Vertex AI with the provided system instructions. Here’s the workflow’s YAML definition:
main:
  params: [args]
  steps:
  - init:
      assign:
        - collection: ${args.collection_name}
        - project_id: ${args.project_id}
        - location: ${args.location}
        - model: ${args.model_name}
  - list_documents:
        call: googleapis.firestore.v1.projects.databases.documents.list
        args:
            collectionId: ${collection}
            parent: ${"projects/" + project_id + "/databases/(default)/documents"}
        result: documents_list
  - process_documents:
        for:
          value: document
          in: ${documents_list.documents}
          steps:
            - ask_llm:
                call: googleapis.aiplatform.v1.projects.locations.endpoints.generateContent
                args:
                    model: ${"projects/" + project_id + "/locations/" + location + "/publishers/google/models/" + model}
                    region: ${location}
                    body:
                        contents:
                            role: "USER"
                            parts:
                                text: ${document.fields.Contents.stringValue}
                        systemInstruction:
                            role: "USER"
                            parts:
                                text: "Task: Evaluate 8th-grade book reports for an honors English class. You are a tough grader. Input: Book report text. Output: Initial letter grade (A, B, C, D, or F) based on: Structure: Clear introduction, body, and conclusion Grammar: Spelling, punctuation, sentence structure. Content: Understanding of the book, critical thinking. Consider: Age and language proficiency of the student."
                        generation_config:
                            temperature: 0.5
                            max_output_tokens: 2048
                            top_p: 0.8
                            top_k: 40
                result: llm_response
            - log_file_name:
                call: sys.log
                args:
                    text: ${llm_response}
No code! I executed the workflow, passing in all the runtime arguments.
In just a moment, I saw my workflow running, and “grades” being logged to the console. In real life, I’d probably update the Firestore document with this information. I’d also use Cloud Scheduler to run this on a regular basis.
While I made this post about rescuing educators from the toil of grading papers, you can apply these patterns to all sorts of scenarios. Use prompt editors like Vertex AI Studio for experimentation and finding the right prompt phrasing. Then jump into code to interact with models in a repeatable, programmatic way. And consider low-code tools when model interactions are scheduled, or part of long running processes.
I’ll admit it, I’m a PaaS guy. Platform-as-a-Service is an ideal abstraction for those that don’t get joy from fiddling with infrastructure. From Google App Engine, to Heroku, to Cloud Foundry, I’ve appreciated attempts to deliver runtimes that makes it easier to ship and run code. Classic PaaS-type services were great at what they did. The problem with all of them—this includes all the first generation serverless products like Amazon Lambda—were that they were limited. Some of the necessary compromises were well-meaning and even healthy: build 12-factor apps, create loose coupling, write less code and orchestrate manage services instead. But in the end, all these platforms, while successful in various ways, were too constrained to take on a majority of apps for a majority of people. Times have changed.
Google Cloud Run started as a serverless product, but it’s more of an application platform at this point. It’s reminiscent of a PaaS, but much better. While not perfect for everything—don’t bring Windows apps, always-on background components, or giant middleware—it’s becoming my starting point for nearly every web app I build. There are ten reasons why Cloud Run isn’t limited by PaaS-t constraints, is suitable for devs at every skill level, and can run almost any web app.
Note that Cloud Run also has “jobs” for run-to-completion batch work. I’m focusing solely on Cloud Run web services here.
I like “functions.” Write short code blocks that respond to events, and perform an isolated piece of work. There are many great uses cases for this.
The new Cloud Run functions experience makes it easy to bang out a function in minutes. It’s baked into CLI and UI. Once I decide to create a function ….
I only need to pick a service name, region, language runtime, and whether access to this function is authenticated or not.
Then, I see a browser-based editor where I can write, test, and deploy my function. Simple, and something most of us equate with “serverless.”
But there’s more. Cloud Run does apps too. That means instead of a few standalone functions to serve a rich REST endpoint, you’re deploying one Spring Boot app with all the requisite listeners. Instead of serving out a static site, you could return a full web app with server-side capabilities. You’ve got nearly endless possibilities when you can serve any container that accepts HTTP, HTTP/2, WebSockets, or gRPC traffic.
Use either abstraction, but stay above the infrastructure and ship quickly.
This is where the power of containers shows up, and why many previous attempts at PaaS didn’t break through. It’s ok if a platform only supports new architectures and new apps. But then you’re accepting that you’ll need an additional stack for EVERYTHING ELSE.
Cloud Run is a great choice because you don’t HAVE to start fresh to use it. Deploy from source in an existing GitHub repo or from cloned code on your machine. Maybe you’ve got an existing Next.js app sitting around that you want to deploy to Cloud Run. Run a headless CMS. Does your old app require local volume mounts for NFS file shares? Easy to do. Heck, I took a silly app I built 4 1/2 years ago, deployed it from the Docker Hub, and it just worked.
Of course, Cloud Run shines when you’re building new apps. Especially when you want fast experimentation with new paradigms. With its new GPU support, Cloud Run lets you do things like serve LLMs via tools like Ollama. Or deploy generative AI apps based on LangChain or Firebase Genkit. Build powerful web apps in Go, Java, Python, .NET, and more. Cloud Run’s clean developer experience and simple workflow makes it ideal for whatever you’re building next.
#3. Use by itself AND as part of a full cloud solution.
There aren’t many tech products that everyone seems to like. But folks seem to really like Cloud Run, and it regularly wins over the Hacker News crowd! Some classic PaaS solutions were lifestyle choices; you had to be all in. Use the platform and its whole way of working. Powerful, but limiting.
You can choose to use Cloud Run all by itself. It’s got a generous free tier, doesn’t require complicated HTTP gateways or routers to configure, and won’t force you to use a bunch of other Google Cloud services. Call out to databases hosted elsewhere, respond to webhooks from SaaS platforms, or just serve up static sites. Use Cloud Run, and Cloud Run alone, and be happy.
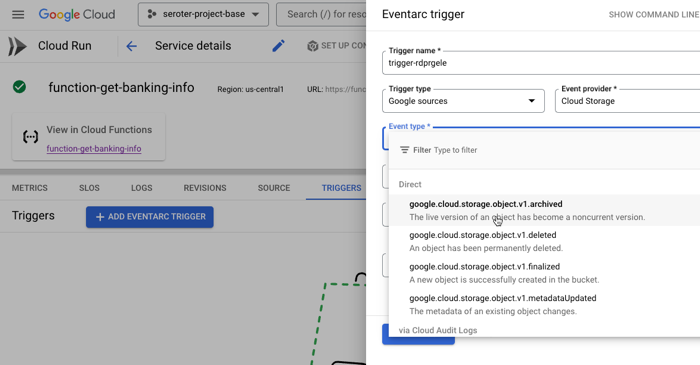
And of course, you can use it along with other great cloud services. Tack on a Firestore database for a flexible storage option. Add a Memorystore caching layer. Take advantage of our global load balancer. Call models hosted in Vertex AI. If you’re using Cloud Run as part of an event-driven architecture, you might also use built-in connections to Eventarc to trigger Cloud Run services when interesting things happen in your account—think file uploaded to object storage, user role deleted, database backup completes.
Use it by itself or “with the cloud”, but either way, there’s value.
#4. Choose simple AND sophisticated configurations.
One reason PaaS-like services are so beloved is because they often provide a simple onramp without requiring tons of configuration. “cf push” to get an app to Cloud Foundry. Easy! Getting an app to Cloud Run is simple too. If you have a container, it’s a single command:
rseroter$ gcloud run deploy go-app --image=gcr.io/seroter-project-base/go-restapi
If all you have is source code, it’s also a single command:
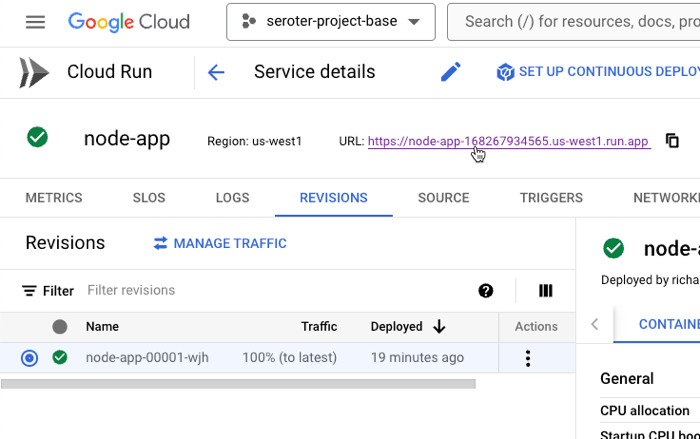
rseroter$ gcloud run deploy node-app --source .
In both cases, the CLI asks me to pick a region and whether I want requests authenticated, and that’s it. Seconds later, my app is running.
This works because Cloud Run sets a series of smart, reasonable default settings.
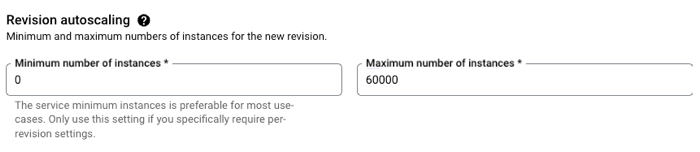
But sometimes you do want more control over service configuration, and Cloud Run opens up dozens of possible settings. What kind of sophisticated settings do you have control over?
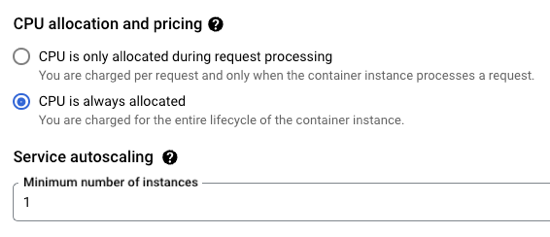
CPU allocation. Do you want CPU to be always on, or quit when idle?
Ingress controls. Do you want VPC-only access or public access?
Multi-container services. Add a sidecar.
Container port. The default is 8080, but set to whatever you want.
Memory. The default value is 512 MiB per instance, but you can go up to 32GB.
CPU. It defaults to 1, but you can go less than 1, or up to 8.
Healthchecks. Define startup or liveliness checks that ping specific endpoints on a schedule.
Variables and secrets. Define environment variables that get injected at runtime. Same with secrets that get mounted at runtime.
Persistent storage volumes. There’s ephemeral scratch storage in every Cloud Run instance, but you can also mount volumes from Cloud Storage buckets or NFS shares.
Request timeout. The default value is 5 minutes, but you can go up to 60 minutes.
Max concurrency. A given service instance can handle more than one request. The default value is 80, but you can go up to 1000!
and much more!
You can do something simple, you can do something sophisticated, or a bit of both.
One of the challenge with early PaaS services was that they were just sitting on the public internet. That’s no good as you get to serious, internal-facing systems.
First off, Cloud Run services are public by default. You control the authentication level (anonymous access, or authenticated user) and need to explicitly set that. But the service itself is publicly reachable. What’s great is that this doesn’t require you to set up any weird gateways or load balancers to make it work. As soon as you deploy a service, you get a reachable address.
Awesome! Very easy. But what if you want to lock things down? This isn’t difficult either.
Cloud Run lets me specify that I’ll only accept traffic from my VPC networks. I can also choose to securely send messages to IPs within a VPC. This comes into play as well if you’re routing requests to a private on-premises network peered with a cloud VPC. We even just added support for adding Cloud Run services to a service mesh for more networking flexibility. All of this gives you a lot of control to create truly private services.
I don’t necessarily believe that cloud is more expensive than on-premises—regardless of some well-publicized stories—but keeping idle cloud services running isn’t helping your cost posture.
Google Cloud Run truly scales to zero. If nothing is happening, nothing is running (or costing you anything). However, when you need to scale, Cloud Run scales quickly. Like, a-thousand-instances-in-seconds quickly. This is great for bursty workloads that don’t have a consistent usage pattern.
But you probably want the option to have an affordable way to keep a consistent pool of compute online to handle a steady stream of requests. No problem. Set the minimum instance to 1 (or 2, or 10) and keep instances warm. And, set concurrency high for apps that can handle it.
If you don’t have CPU always allocated, but keep a minimum instance online, we actually charge you significantly less for that “warm” instance. And you can apply committed use discounts when you know you’ll have a service running for a while.
Run bursty workloads or steadily-used workloads all in a single platform.
#7. Do one-off deploys AND set up continuous delivery pipelines.
I mentioned above that it’s easy to use a single command or single screen to get an app to Cloud Run. Go from source code or container to running app in seconds. And you don’t have to set up any other routing middleware or Cloud networking to get a routable serivce.
Sometimes you just want to do a one-off deploy without all the ceremony. Run the CLI, use the Console UI, and get on with life. Amazing.
But if that was your only option, you’d feel constrained. So you can use something like GitHub Actions to deploy to Cloud Run. Most major CI/CD products support it.
Another great option is Google Cloud Deploy. This managed service takes container artifacts and deploys them to Google Kubernetes Engine or Google Cloud Run. It offers some sophisticated controls for canary deploys, parallel deploys, post-deploy hooks, and more.
Cloud Deploy has built-in support for Cloud Run. A basic pipeline (defined in YAML, but also configured via point-and-click in the UI if you want) might show three stages for dev, test, and prod.
When the pipeline completes, we see three separate Cloud Run instances deployed, representing each stage of the pipeline.
You want something more sophisticated? Ok. Cloud Deploy supports Cloud Run canary deployments. You’d use this if you want a subset of traffic to go to the new instance before deciding to cut over fully.
This is taking advantage of Cloud Run’s built-in traffic management feature. When I check the deployed service, I see that after advancing my pipeline to 75% of production traffic for the new app version, the traffic settings are properly set in Cloud Run.
Serving traffic in multiple regions? Cloud Deploy makes it possible to ship a release to dozens of places simultaneously. Here’s a multi-target pipeline. The production stage deploys to multiple Cloud Run regions in the US.
When I checked Cloud Run, I saw instances in all the target regions. Very cool!
If you want a simple deploy, do that with the CLI or UI. Nothing stops you. However, if you’re aiming for a more robust deployment strategy, Cloud Run readily handles it through services like Cloud Deploy.
#8. Own aspects of security AND offload responsibility.
On reason that you choose managed compute platforms is to outsource operational tasks. It doesn’t mean you’re not capable of patching infrastructure, scaling compute nodes, or securing workloads. It means you don’t want to, and there are better uses of your time.
With Cloud Run, you can drive aspects of your security posture, and also let Cloud Run handle key aspects on your behalf.
What are you responsible for? You choose an authentication approach, including public or private services. This includes control of how you want to authenticate developers who use Cloud Run. You can authenticate end users, internal or external ones, using a handful of supported methods.
It’s also up to you to decide which service account the Cloud Service instance should impersonate. This controls what a given instance has access to. If you want to ensure that only containers with verified provenance get deployed, you can also choose to turn on Binary Authorization.
So what are you offloading to Cloud Run and Google Cloud?
You can outsource protection from DDoS and other threats by turning on Cloud Armor. The underlying infrastructure beneath Cloud Run is completely managed, so you don’t need to worry about upgrading or patching any of that. What’s also awesome is that if you deploy Cloud Run services from source, you can sign up for automatic base image updates. This means we’ll patch the OS and runtime of your containers. Importantly, it’s still up to you to patch your app dependencies. But this is still very valuable!
#9. Treat as post-build target AND as upfront platform choice.
You might just want a compute host for your finished app. You don’t want to have to pick that host up front, and just want a way to run your app. Fair enough! There aren’t “Cloud Run apps”; they’re just containers. That said, there are general tips that make an app more suitable for Cloud Run than not. But the key is, for modern apps, you can often choose to treat Cloud Run as a post-build decision.
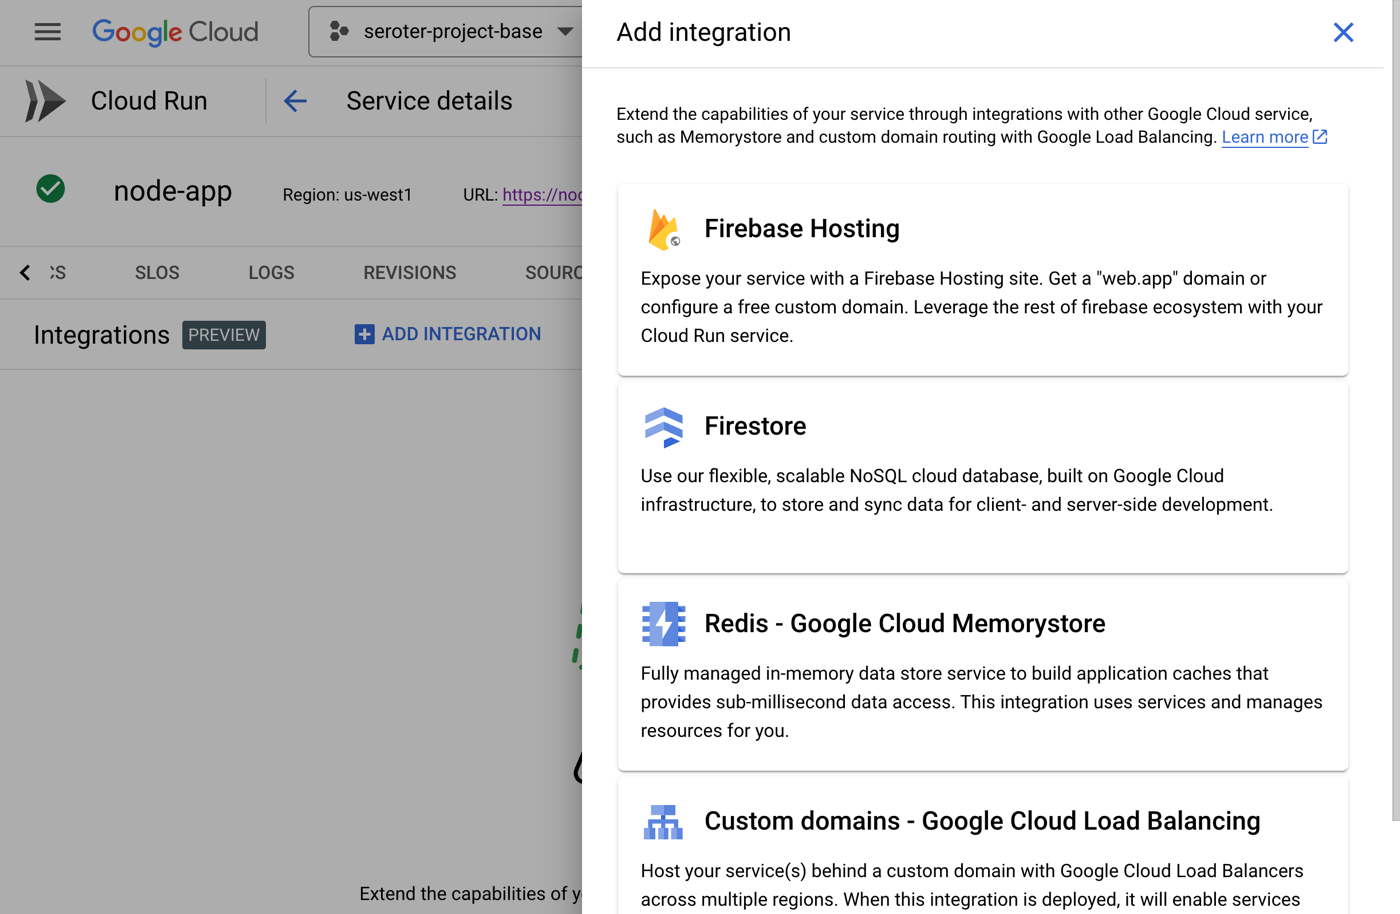
Or, you can design with Cloud Run in mind. Maybe you want to trigger Cloud Run based on a specific Eventarc event. Or you want to capitalize on Cloud Run concurrency so you code accordingly. You could choose to build based on a specific integration provided by Cloud Run (e.g. Memorystore, Firestore, or Firebase Hosting).
There are times that you build with the target platform in mind. In other cases, you want a general purpose host. Cloud Run is suitable for either situation, which makes it feel unique to me.
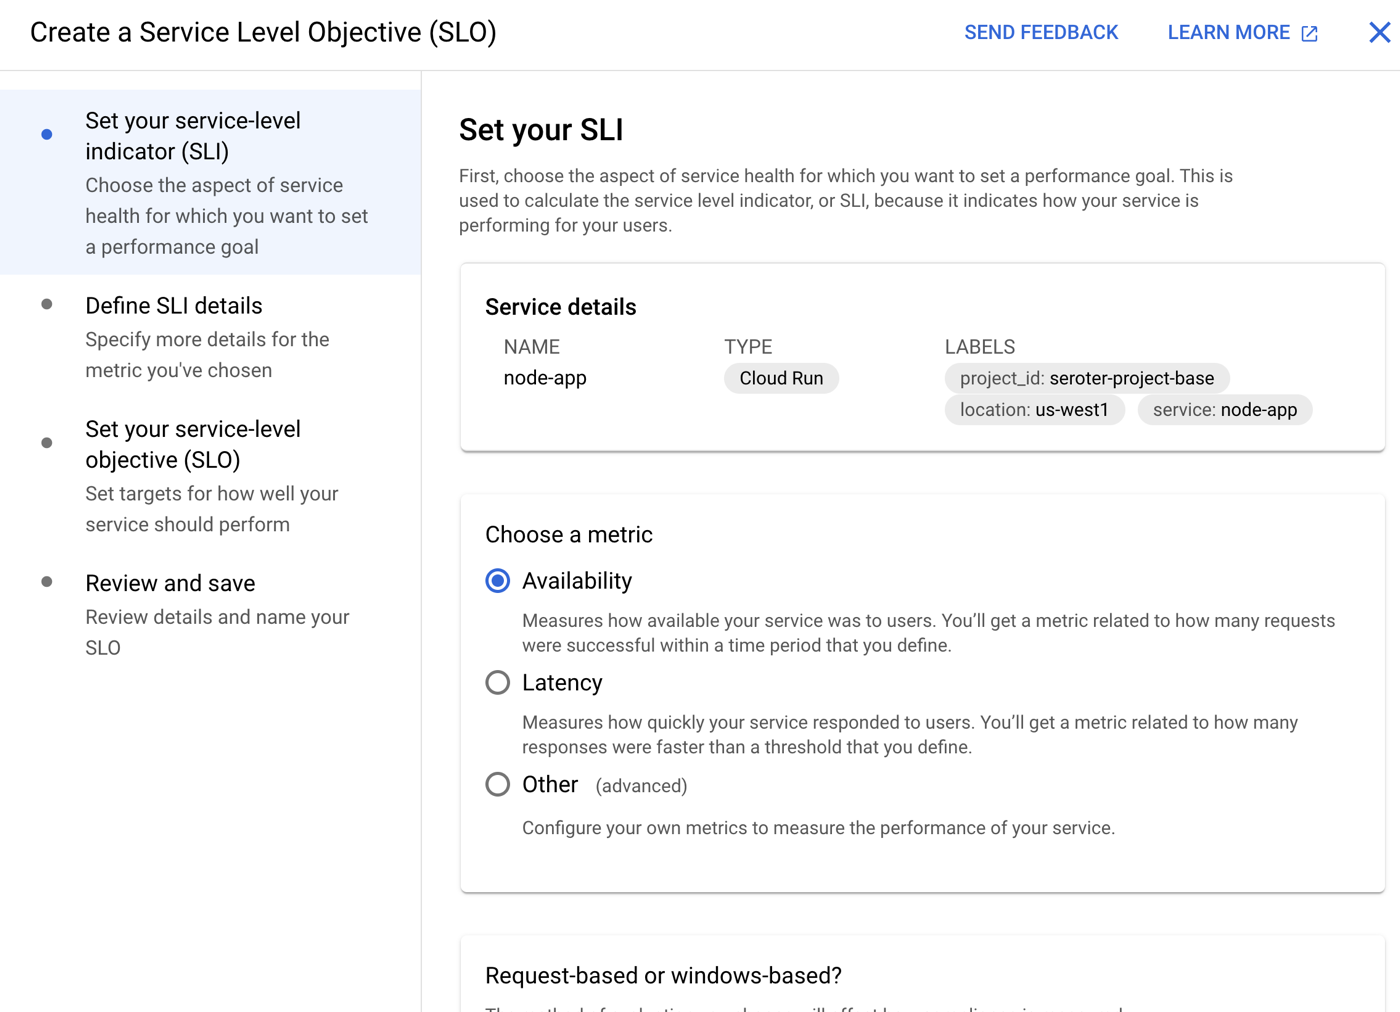
#10. Rely on built-in SLOs, logs, metrics AND use your own observability tools.
If you want it to be, Cloud Run can feel like an all-in-one solution. Do everything from one place. That’s how classic PaaS was, and there was value in having a tightly-integrated experience. From within Cloud Run, you have built-in access to logs, metrics, and even setting up SLOs.
The metrics experience is powered by Cloud Monitoring. I can customize event types, the dashboards, time window, and more. This even includes the ability to set uptime checks which periodically ping your service and let you know if everything is ok.
The embedded logging experience is powered by Cloud Logging and gives you a view into all your system and custom logs.
We’ve even added an SLO capability where you can define SLIs based on availability, latency, or custom metrics. Then you set up service level objectives for service performance.
Kubernetes, virtual machines, and bare metal boxes all play a key role for many workloads. But you also may want to start with the highest abstraction possible so that you can focus on apps, not infrastructure. IMHO, Google Cloud Run is the best around and satisfies the needs of most any modern web app. Give it a try!
What advice do you get if you’re lugging around a lot of financial debt? Many folks will tell you to start purging expenses. Stop eating out at restaurants, go down to one family car, cancel streaming subscriptions, and sell unnecessary luxuries. For some reason, I don’t see the same aggressive advice when it comes to technical debt. I hear soft language around “optimization” or “management” versus assertive stances that take a meat cleaver to your architectural excesses.
What is architectural debt? I’m thinking about bloated software portfolios where you’re carrying eight products in every category. Brittle automation that only partially works and still requires manual workarounds and black magic. Unique customizations to packaged software that’s now keeping you from being able to upgrade to modern versions. Also half-finished “ivory tower” designs where the complex distributed system isn’t fully in place, and may never be. You might have too much coupling, too little coupling, unsupported frameworks, and all sorts of things that make deployments slow, maintenance expensive, and wholesale improvements impossible.
This stuff matters. The latest StackOverflow developer survey shows that the most common frustration is the “amount of technical debt.” It’s wasting up to eight hours a week for each developer! Number two and three are around stack complexity. Your code and architectural tech debt is slowing down your release velocity, creating attrition with your best employees, and limiting how much you can invest in new tech areas. It’s well-past time to simplify by purging architecture components that have built up (and calcified) over time. Let’s write bigger checks to pay down this debt faster.
Explore these four areas, all focused on simplification. There are obviously tradeoffs and cost with each suggestion, but you’re not going to make meaningful progress by being timid. Note there are other dimensions to fixing tech debt besides simplification, but that’s one I see discussed the least often. I’ll use Google Cloud to offer some examples of how you might specifically tackle each, given we’re the best cloud for those making a firm shift away from legacy tech debt.
1. Stop moving so much data around.
If you zoom out on your architecture, how many components do you have that get data from point A to point B? I’d bet that you have lots of ETL pipelines to consolidate data into a warehouse or data lake, messaging and event processing solutions to shunt data around, and even API calls that suck data from one system into another. That’s a lot of machinery you have to create, update, and manage every day.
Can you get rid of some of this? Can you access more of the data where it rests, versus copying it all over the place? Or use software that act on data in different ways without forcing you to migrate it for further processing? I think so.
Let’s see some examples.
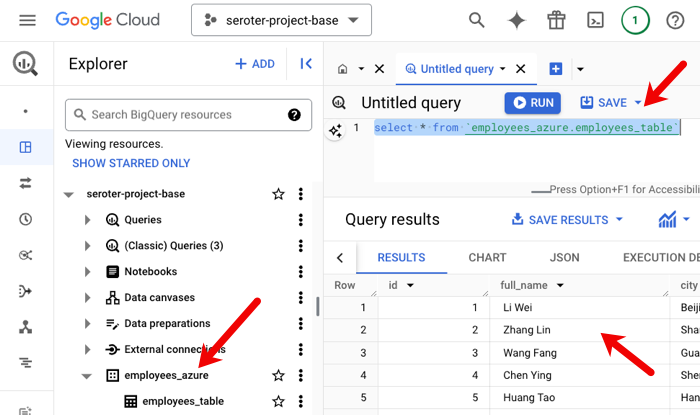
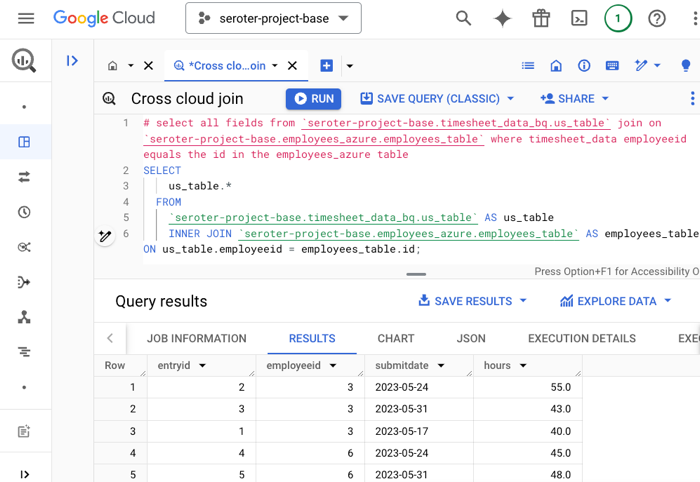
Perform analytical queries against data sitting in different places? Google Cloud supports that with BigQuery Omni. We run BigQuery in AWS and Azure so that you can access data at rest, and not be forced to consolidate it in a single data lake. Here, I have an Excel file sitting in an Azure blob storage account. I could copy that data over to Google Cloud, but that’s more components for me to create and manage.
Rather, I can set up a pointer to Azure from within BigQuery, and treat it like any other table. The data is processed in Azure, and only summary info travels across the wire.
You might say “that’s cool, but I have related data in another cloud, so I’d have to move it anyway to do joins and such.” You’d think so. But we also offer cross-cloud joins with BigQuery Omni. Check this out. I’ve got that employee data in Azure, but timesheet data in Google Cloud.
With a single SQL statement, I’m joining data across clouds. No data movement required. Less debt.
Enrich data in analytical queries from outside databases? You might have ETL jobs in place to bring reference data into your data warehouse to supplement what’s already there. That may be unnecessary.
With BigQuery’s Federated Queries, I can reach live into PostgreSQL, MySQL, Cloud Spanner, and even SAP Datasphere sources. Access data where it rests. Here, I’m using the EXTERNAL_QUERY function to retrieve data from a Cloud SQL database instance.
I could use that syntax to perform joins, and do all sorts of things without ever moving data around.
Perform complex SQL analytics against log data? Does your architecture have data copying jobs for operational data? Maybe to get it into a system where you can perform SQL queries against logs? There’s a better way.
You can’t avoid moving data around. It’s often required. But I’m fairly sure that through smart product selection and some redesign of the architecture, you could eliminate a lot of unnecessary traffic.
2. Compress the stack by removing duplicative components.
Break out the chainsaw. Do you have multiple products for each software category? Or too many fine-grained categories full of best-of-breed technology? It’s time to trim.
My former colleague Josh McKenty used to say something along the lines of “if it’s emerging buy a few, it’s a mature, no more than two.”
You don’t need a dozen project management software products. Or more than two relational database platforms. In many cases, you can use multi-purpose services and embrace “good enough.”
There should be a fifteen day cooling off period before you buy a specialized vector database. Just use PostgreSQL. Or, any number of existing databases that now support vector capabilities. Maybe you can even skip RAG-based solutions (and infrastructure) all together for certain use cases and just use Gemini with its long context.
You could use Spanner Graph instead of a dedicated graph database, or Artifact Registry as a single place for OS and application packages.
I’m keen on the new continuous queries for BigQuery where you can do stream analytics and processing as data comes into the warehouse. Enrich data, call AI models, and more. Instead of a separate service or component, it’s just part of the BigQuery engine. Turn off some stuff?
I suspect that this one is among the hardest for folks to act upon. We often hold onto technology because it’s familiar, or even because of misplaced loyalty. But be bold. Simplify your stack by getting rid of technology that’s no longer differentiated. Make a goal of having 30% fewer software products or platforms in your architecture in 2025.
3. Replace hyper-customized software and automation with managed services and vanilla infrastructure.
Hear me out. You’re not that unique. There are a handful of things that your company does which are the “secret sauce” for your success, and the rest is the same as everyone else.
More often than not, you should be fitting your team to the software, not your software to the team. I’ve personally configured and extended packaged software to a point that it was unrecognizable. For what? Because we thought our customer service intake process was SO MUCH different than anyone else’s? It wasn’t. So much tech debt happens because we want to shape technology to our existing requirements, or we want to avoid “lock-in” by committing to a vendor’s way of doing things. I think both are misguided.
I read a lot of annual reports from public companies. I’ve never seen “we slayed at Kubernetes this year” called out. Nobody cares. A cleverly scripted, hyper-customized setup that looks like the CNCF landscape diagram is more boat anchor than accelerator. Consider switching a fully automated managed cluster in something like GKE Autopilot. Pay per pod, and get automatic upgrades, secure-by-default configurations, and a host of GKE Enterprise features to create sameness across clusters.
Or thank-and-retire that customized or legacy workflow engine (code framework, or software product) that only four people actually understand. Use a nicely API-enabled managed product with useful control-flow actions, or a full-fledged cloud-hosted integration engine.
You probably don’t need a customized database, caching solution, or even CI/CD stack. These are all super mature solution spaces, where whatever is provided out of the box is likely suitable for what you really need.
4. Tone it down on the microservices and distributed systems.
Look, I get excited about technology and want to use all the latest things. But it’s often overkill, especially in the early (or late) stages of a product.
You simply don’t need a couple dozen serverless functions to serve a static web app. Simmer down. Or a big complex JavaScript framework when your site has a pair of pages. So much technical debt comes from over-engineering systems to use the latest patterns and technology, when the classic ones will do.
Smash most of your serverless functions back into an “app” hosted in Cloud Run. Fewer moving parts, and all the agility you want. Use vanilla JavaScript where you can. Use small, geo-located databases until you MUST to do cross-region or global replication. Don’t build “developer platforms” and IDPs until you actually need them.
I’m not going all DHH on you, but most folks would be better off defaulting to more monolithic systems running on a server or two. We’ve all over-distributed too many services and created unnecessarily complex architectures that are now brittle or impossible to understand. If you need the scale and resilience of distributed systems RIGHT NOW then go build one. But most of us have gotten burned from premature optimization because we assumed that our system had to handle 100x user growth overnight.
Wrap Up
Every company has tech debt, whether the business is 100 years old or started last week. Google has it, big banks have it, the governments have it, and YC companies have it. And “managing it” is probably a responsible thing to do. But sometimes, when you need to make a step-function improvement in how you work, incremental changes aren’t good enough. Simplify by removing the cruft, and take big cuts out of your architecture to do it!
Yes, people are doing things besides generative AI. You’ve still got other problems to solve, systems to connect, and data to analyze. Apache Kafka remains a very popular product for event and data processing, and I was thinking about how someone might use it in the cloud right now. I think there are three major options, and one of them (built-in managed service) is now offered by Google Cloud. So we’ll take that for a spin.
Option 1: Run it yourself on (managed) infrastructure
Many companies choose to run Apache Kafka themselves on bare metal, virtual machines, or Kubernetes clusters. It’s easy to find stories about companies like Netflix, Pinterest, and Cloudflare running their own Apache Kafka instances. Same goes for big (and small) enterprises that choose to setup and operate dedicated Apache Kafka environments.
Why do this? It’s the usual reasons why people decide to manage their own infrastructure! Kafka has a lot of configurability, and experienced folks may like the flexibility and cost profile of running Apache Kafka themselves. Pick your infrastructure, tune every setting, and upgrade on your timetable. On the downside, self-managed Apache Kafka can result in a higher total cost of ownership, requires specialized skills in-house, and could distract you from other high-priority work.
If you want to go that route, I see a few choices.
Download the components and install them. Grab the latest release and throw it onto a set of appropriate virtual machine instances or bare metal machines. You might use Terraform or something similar to template out the necessary activities.
Use a pre-packaged virtual machine image. Providers like Bitnami (part of VMware, part of Broadcom) offer a catalog of packaged and supported images that contain popular software packages, including Apache Kafka. These can be deployed directly from your cloud provider as well, as I show here with Google Cloud.
There’s no shame in going this route! It’s actually very useful to know how to run software like Apache Kafka yourself, even if you decide to switch to a managed service later.
Option 2: Use a built-in managed service
You might want Apache Kafka, but not want to run Apache Kafka. I’m with you. Many folks, including those at big web companies and classic enterprises, depend on managed services instead of running the software themselves.
Why do this? You’d sign up for this option when you want the API, but not the ops. It may be more elastic and cost-effective than self-managed hosting. Or, it might cost more from a licensing perspective, but provide more flexibility on total cost of ownership. On the downside, you might not have full access to every raw configuration option, and may pay for features or vendor-dictated architecture choices you wouldn’t have made yourself.
First, I needed to enable the API within Google Cloud. This gave me the ability to use the service. Note that this is NOT FREE while in preview, so recognize that you’ll incur changes.
Next, I wanted a dedicated service account for accessing the Kafka service from client applications. The service supports OAuth and SASL_PLAIN with service account keys. The latter is appropriate for testing, so I chose that.
I created a new service account named seroter-bq-kafka and gave it the roles/managedkafka.client role. I also created a JSON private key and saved it to my local machine.
That’s it. Now I was ready to get going with the cluster.
Provision the cluster and topic
I went into the Apache Kafka for BigQuery dashboard in the Google Cloud console—I could have also used the CLI which has the full set of control plane commands—to spin up a new cluster. I get very few choices, and that’s not a bad thing. You give the CPU and RAM capacity for the cluster, and Google Cloud creates the right shape for the brokers, and creates a highly available architecture. You’ll also see that I choose the VPC for the cluster, but that’s about it. Pretty nice!
In about twenty minutes, my cluster was ready. Using the console or CLI, I could see the details of my cluster.
Topics are a core part of Apache Kafka represent the resource you publish and subscribe to. I could create a topic via the UI or CLI. I created a topic called “topic1”.
Build the producer and consumer apps
I wanted two client apps. One to publish new messages to Apache Kafka, and another to consume messages. I chose Node.js and JavaScript as the language for the app. There are a handful of libraries for interacting with Apache Kafka, and I chose the mature kafkajs.
Let’s start with the consuming app. I need (a) the cluster’s bootstrap server URL and (b) the encoded client credentials. We access the cluster through the bootstrap URL and it’s accessible via the CLI or the cluster details (see above). The client credentials for SASL_PLAIN authentication consists of the base64 encoded service account key JSON file.
My index.js file defines a Kafka object with the client ID (which identifies our consumer), the bootstrap server URL, and SASL credentials. Then I define a consumer with a consumer group ID and subscribe to the “topic1” we created earlier. I process and log each message before appending to an array variable. There’s an HTTP GET endpoint that returns the array. See the whole index.js below, and the GitHub repo here.
const express = require('express');
const { Kafka, logLevel } = require('kafkajs');
const app = express();
const port = 8080;

const kafka = new Kafka({
  clientId: 'seroter-consumer',
  brokers: ['bootstrap.seroter-kafka.us-west1.managedkafka.seroter-project-base.cloud.goog:9092'],
  ssl: {
    rejectUnauthorized: false
  },
  logLevel: logLevel.DEBUG,
  sasl: {
    mechanism: 'plain', // scram-sha-256 or scram-sha-512
    username: 'seroter-bq-kafka@seroter-project-base.iam.gserviceaccount.com',
    password: 'tybgIC ... pp4Fg=='
  },
});

const consumer = kafka.consumer({ groupId: 'message-retrieval-group' });

//create variable that holds an array of "messages" that are strings
let messages = [];

async function run() {
  await consumer.connect();
  //provide topic name when subscribing
  await consumer.subscribe({ topic: 'topic1', fromBeginning: true });

  await consumer.run({
    eachMessage: async ({ topic, partition, message }) => {
      console.log(`################# Received message: ${message.value.toString()} from topic: ${topic}`);
      //add message to local array
      messages.push(message.value.toString());
    },
  });
}

app.get('/consume', (req, res) => {
    //return the array of messages consumed thus far
    res.send(messages);
});

run().catch(console.error);

app.listen(port, () => {
  console.log(`App listening at http://localhost:${port}`);
});
Now we switch gears and go through the producer app that publishes to Apache Kafka.
This app starts off almost identically to the consumer app. There’s a Kafka object with a client ID (different for the producer) and the same pointer to the bootstrap server URL and credentials. I’ve got an HTTP GET endpoint that takes the querystring parameters and publishes the key and value content to the request payload. The code is below, and the GitHub repo is here.
const express = require('express');
const { Kafka, logLevel } = require('kafkajs');
const app = express();
const port = 8080; // Use a different port than the consumer app

const kafka = new Kafka({
    clientId: 'seroter-publisher',
    brokers: ['bootstrap.seroter-kafka.us-west1.managedkafka.seroter-project-base.cloud.goog:9092'],
    ssl: {
      rejectUnauthorized: false
    },
    logLevel: logLevel.DEBUG,
    sasl: {
      mechanism: 'plain', // scram-sha-256 or scram-sha-512
      username: 'seroter-bq-kafka@seroter-project-base.iam.gserviceaccount.com',
      password: 'tybgIC ... pp4Fg=='
    },
  });

const producer = kafka.producer();

app.get('/publish', async (req, res) => {
  try {
    await producer.connect();

    const _key = req.query.key; // Extract key from querystring
    console.log('key is ' + _key);
    const _value = req.query.value // Extract value from querystring
    console.log('value is ' + _value);

    const message = {
      key: _key, // Optional key for partitioning
      value: _value
    };

    await producer.send({
      topic: 'topic1', // Replace with your topic name
      messages: [message]
    });

    res.status(200).json({ message: 'Message sent successfully' });

  } catch (error) {
    console.error('Error sending message:', error);
    res.status(500).json({ error: 'Failed to send message' });
  }
});

app.listen(port, () => {
  console.log(`Producer listening at http://localhost:${port}`);
});
Next up, containerizing both apps so that I could deploy to a runtime.
I used Google Cloud Artifact Registry as my container store, and created a Docker image from source code using Cloud Native buildpacks. It took one command for each app:
Now we had everything needed to deploy and test our client apps.
Deploy apps to Cloud Run and test it out
I chose Google Cloud Run because I like nice things. It’s still one of the best two or three ways to host apps in the cloud. We also make it much easier now to connect to a VPC, which is what I need. Instead of creating some tunnel out of my cluster, I’d rather access it more securely.
Here’s how I configured the consuming app. I first picked my container image and a target location.
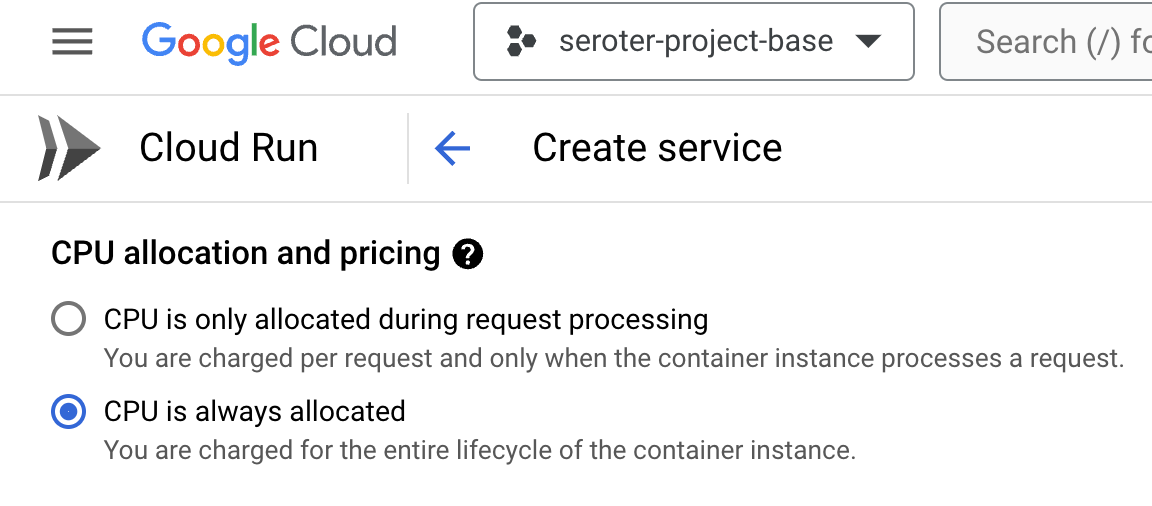
Then I chose to use always-on CPU for the consumer, as I had connection issues when I had a purely ephemeral container.
The last setting was the VPC egress that made it possible for this instance to talk to the Apache Kafka cluster.
About three seconds later, I had a running Cloud Run instance ready to consume.
I ran through a similar deployment process for the publisher app, except I kept the true “scale to zero” setting turned on since it doesn’t matter if the publisher app comes and goes.
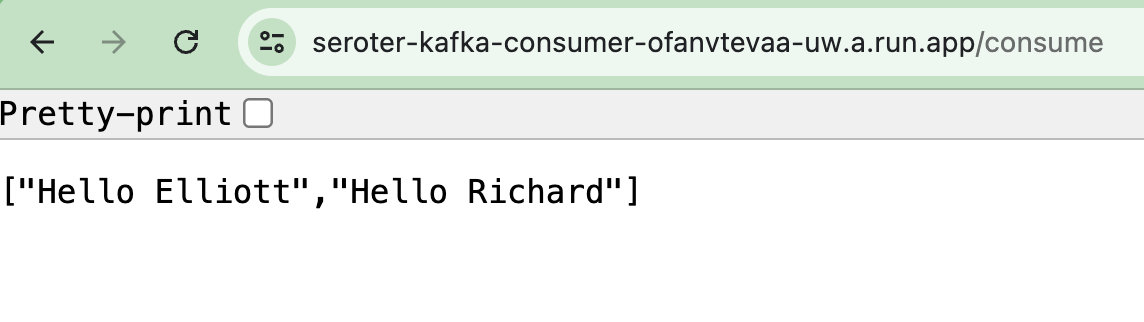
With all apps deployed, I fired up the browser and issued a pair of requests to the “publish” endpoint.
I checked the consumer app’s logs and saw that messages were successfully retrieved.
Sending a request to the GET endpoint on the consumer app returns the pair of messages I sent from the publisher app.
Sweet! We proved that we could send messages to the Apache Kafka cluster, and retrieve them. I get all the benefits of Apache Kafka, integrated into Google Cloud, with none of the operational toil.
Option 3: Use a managed provider on your cloud(s) of choice
The final way you might choose to run Apache Kafka in the cloud is to use a SaaS product designed to work on different infrastructures.
The team at Confluent does much of the work on open source Apache Kafka and offers a managed product via Confluent Cloud. It’s performant, feature-rich, and runs in AWS, Azure, and Google Cloud. Another option is Redpanda, who offer a managed cloud service that they operate on their infrastructure in AWS or Google Cloud.
Why do this? Choosing a “best of breed” type of managed service is going to give you excellent feature coverage and operational benefits. These platforms are typically operated by experts and finely tuned for performance and scale. Are there any downside? These platforms aren’t free, and don’t always have all the native integrations into their target cloud (logging, data services, identity, etc) that a built-in service does. And you won’t have all the configurability or infrastructure choice that you’d have running it yourself.
Wrap up
It’s a great time to run Apache Kafka in the cloud. You can go full DIY or take advantage of managed services. As always, there are tradeoffs with each. You might even use a mix of products and approaches for different stages (dev/test/prod) and departments within your company. Are there any options I missed? Let me know!
I can’t remember who mentioned this idea to me. It might have been a customer, colleague, internet rando, or voice in my head. But the idea was whether you could use source control for the prompts, and leverage an LLM to dynamically generate all the app code each time you run a build. That seems bonkers for all sorts of reasons, but I wanted to see if it was technically feasible.
Should you do this for real apps? No, definitely not yet. The non-deterministic nature of LLMs means you’d likely experience hard-to-find bugs, unexpected changes on each build, and get yelled at by regulators when you couldn’t prove reproducibility in your codebase. When would you use something like this? I’m personally going to use this to generate stub apps to test an API or database, build demo apps for workshops or customer demos, or to create a component for a broader architecture I’m trying out.
tl;dr I built an AI-based generator that takes a JSON file of prompts like this and creates all the code. I call this generator from a CI pipeline which means that I can check in (only) the prompts to GitHub, and end up with a running app in the cloud.
{
  "folder": "generated-web",
  "prompts": [
    {
      "fileName": "employee.json",
      "prompt": "Generate a JSON structure for an object with fields for id, full name, state date, and office location. Populate it with sample data. Only return the JSON content and nothing else."
    },
    {
      "fileName": "index.js",
      "prompt": "Create a node.js program. It instantiates an employee object that looks like the employee.json structure. Start up a web server on port 8080 and expose a route at /employee return the employee object defined earlier."
    },
    {
      "fileName": "package.json",
      "prompt": "Create a valid package.json for this node.js application. Do not include any comments in the JSON."
    },
    {
      "fileName": "Dockerfile",
      "prompt": "Create a Dockerfile for this node.js application that uses a minimal base image and exposes the app on port 8080."
    }
  ]
}
In this post, I’ll walk through the steps of what a software delivery workflow such as this might look like, and how I set up each stage. To be sure, you’d probably make different design choices, write better code, and pick different technologies. That’s cool; this was mostly an excuse for me to build something fun.
Before explaining this workflow, let me first show you the generator itself and how it works.
Building an AI code generator
There are many ways to build this. An AI framework makes it easier, and I chose Spring AI because I wanted to learn how to use it. Even though this is a Java app, it generates code in any programming language.
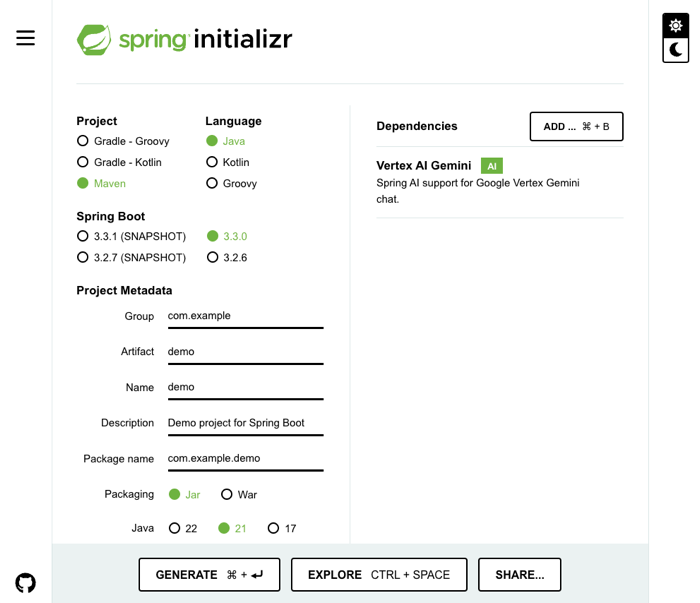
I began at Josh Long’s second favorite place on the Internet, start.spring.io. Here I started my app using Java 21, Maven, and the Vertex AI Gemini starter, which pulls in Spring AI.
My application properties point at my Google Cloud project and I chose to use the impressive new Gemini 1.5 Flash model for my LLM.
My main class implements the CommandLineRunner interface and expects a single parameter, which is a pointer to a JSON file containing the prompts. I also have a couple of classes that define the structure of the prompt data. But the main generator class is where I want to spend some time.
Basically, for each prompt provided to the app, I look for any local files to provide as multimodal context into the request (so that the LLM can factor in any existing code as context when it processes the prompt), call the LLM, extract the resulting code from the Markdown wrapper, and write the file to disk.
Here are those steps in code. First I look for local files:
//load code from any existing files in the folder
private Optional<List<Media>> getLocalCode() {
    String directoryPath = appFolder;
    File directory = new File(directoryPath);

    if (!directory.exists()) {
        System.out.println("Directory does not exist: " + directoryPath);
        return Optional.empty();
    }

    try {
        return Optional.of(Arrays.stream(directory.listFiles())
            .filter(File::isFile)
            .map(file -> {
                try {
                    byte[] codeContent = Files.readAllLines(file.toPath())
                        .stream()
                        .collect(Collectors.joining("\n"))
                        .getBytes();
                    return new Media(MimeTypeUtils.TEXT_PLAIN, codeContent);
                } catch (IOException e) {
                    System.out.println("Error reading file: " + file.getName());
                    return null;
                }
            })
            .filter(Objects::nonNull)
            .collect(Collectors.toList()));
    } catch (Exception e) {
        System.out.println("Error getting local code");
        return Optional.empty();
    }
}
I call the LLM using Spring AI, choosing one of two method depending on whether there’s any local code or not. There won’t be any code when the first prompt is executed!
//call the LLM and pass in existing code
private String callLlmWithLocalCode(String prompt, List<Media> localCode) {
    System.out.println("calling LLM with local code");
    var userMessage = new UserMessage(prompt, localCode);
    var response = chatClient.call(new Prompt(List.of(userMessage)));
    return extractCodeContent(response.toString());
}

//call the LLM when there's no local code
private String callLlmWithoutLocalCode(String prompt) {
    System.out.println("calling LLM withOUT local code");
    var response = chatClient.call(prompt);
    return extractCodeContent(response.toString());
}
You see there that I’m extracting the code itself from the response string with this operation:
//method that extracts code from the LLM response
public static String extractCodeContent(String markdown) {

    System.out.println("Markdown: " + markdown);

    String regex = "`(\\w+)?\\n([\\s\\S]*?)```";
    Pattern pattern = Pattern.compile(regex);
    Matcher matcher = pattern.matcher(markdown);

    if (matcher.find()) {
        String codeContent = matcher.group(2); // Extract group 2 (code content)
        return codeContent;
    } else {
        //System.out.println("No code fence found.");
        return markdown;
    }
}
And finally, I write the resulting code to disk:
//write the final code to the target file path
private void writeCodeToFile(String filePath, String codeContent) {
    try {
        File file = new File(filePath);
        if (!file.exists()) {
            file.createNewFile();
        }

        FileWriter writer = new FileWriter(file);
        writer.write(codeContent);
        writer.close();

        System.out.println("Content written to file: " + filePath);
    } catch (IOException e) {
        e.printStackTrace();
    }
}
There’s some more ancillary stuff that you can check out in the complete GitHub repo with this app in it. I was happy to be using Gemini Code Assist while building this. This AI assistant helped me understand some Java concepts, complete some functions, and fix some of my subpar coding choices.
That’s it. Once I had this component, I built a JAR file and could now use it locally or in a continuous integration pipeline to produce my code. I uploaded the JAR file to Google Cloud Storage so that I could use it later in my CI pipelines. Now, onto the day-to-day workflow that would use this generator!
Workflow step: Set up repo and pipeline
Like with most software projects, I’d start with the supporting machinery. In this case, I needed a source repo to hold the prompt JSON files. Done.
And I’d also consider setting up the path to production (or test environment, or whatever) to build the app as it takes shape. I’m using Google Cloud Build for a fully-managed CI service. It’s a good service with a free tier. Cloud Build uses declarative manifests for pipelines, and this pipeline starts off the same for any type of app.
steps:
  # Print the contents of the current directory
  - name: 'bash'
    id: 'Show source files'
    script: |
      #!/usr/bin/env bash
      ls -l

  # Copy the JAR file from Cloud Storage
  - name: 'gcr.io/cloud-builders/gsutil'
    id: 'Copy AI generator from Cloud Storage'
    args: ['cp', 'gs://seroter-llm-demo-tools/demo-0.0.1-SNAPSHOT.jar', 'demo-0.0.1-SNAPSHOT.jar']

  # Print the contents of the current directory
  - name: 'bash'
    id: 'Show source files and builder tool'
    script: |
      #!/usr/bin/env bash
      ls -l
Not much to it so far. I just print out the source contents seen in the pipeline, download the AI code generator from the above-mentioned Cloud Storage bucket, and prove that it’s on the scratch disk in Cloud Build.
Ok, my dev environment was ready.
Workflow step: Write prompts
In this workflow, I don’t write code, I write prompts that generate code. I might use something like Google AI Studio or even Vertex AI to experiment with prompts and iterate until I like the response I get.
Within AI Studio, I chose Gemini 1.5 Flash because I like nice things. Here, I’d work through the various prompts I would need to generate a working app. This means I still need to understand programming languages, frameworks, Dockerfiles, etc. But I’m asking the LLM to do all the coding.
Once I’m happy with all my prompts, I add them to the JSON file. Note that each prompt entry has a corresponding file name that I want the generator to use when writing to disk.
At this point, I was done “coding” the Node.js app. You could imagine having a dozen or so templates of common app types and just grabbing one and customizing it quickly for what you need!
Workflow step: Test locally
To test this, I put the generator in a local folder with a prompt JSON file and ran this command from the shell:
After just a few seconds, I had four files on disk.
This is just a regular Node.js app. After npm install and npm start commands, I ran the app and successfully pinged the exposed API endpoint.
Can we do things more sophisticated? I haven’t tried a ton of scenarios, but I wanted to see if I could get a database interaction generated successfully.
I went into the Google Cloud console and spun up a (free tier) instance of Cloud Firestore, our NoSQL database. I then created a “collection” called “Employees” and added a single document to start it off.
Then I built a new prompts file with directions to retrieve records from Firestore. I messed around with variations that encouraged the use of certain libraries and versions. Here’s a version that worked for me.
{
  "folder": "generated-web-firestore",
  "prompts": [
    {
      "fileName": "employee.json",
      "prompt": "Generate a JSON structure for an object with fields for id, full name, state date, and office location. Populate it with sample data. Only return the JSON content and nothing else."
    },
    {
      "fileName": "index.js",
      "prompt": "Create a node.js program. Start up a web server on port 8080 and expose a route at /employee. Initializes a firestore database using objects from the @google-cloud/firestore package, referencing Google Cloud project 'seroter-project-base' and leveraging Application Default credentials. Return all the documents from the Employees collection."
    },
    {
      "fileName": "package.json",
      "prompt": "Create a valid package.json for this node.js application using version 7.7.0 for @google-cloud/firestore dependency. Do not include any comments in the JSON."
    },
    {
      "fileName": "Dockerfile",
      "prompt": "Create a Dockerfile for this node.js application that uses a minimal base image and exposes the app on port 8080."
    }
  ]
}
After running the prompts through the generator app again, I got four new files, this time with code to interact with Firestore!
Another npm install and npm start command set started the app and served up the document sitting in Firestore. Very nice.
Finally, how about a Python app? I want a background job that actually populates the Firestore database with some initial records. I experimented with some prompts, and these gave me a Python app that I could use with Cloud Run Jobs.
{
  "folder": "generated-job-firestore",
  "prompts": [
    {
      "fileName": "main.py",
      "prompt": "Create a Python app with a main function that initializes a firestore database object with project seroter-project-base and Application Default credentials. Add two documents to the Employees collection. Generate random id, fullname, startdate, and location data for each document. Have the start script try to call that main function and if there's an exception, prints the error."
    },
    {
      "fileName": "requirements.txt",
      "prompt": "Create a requirements.txt file for the packages used by this app"
    },
    {
      "fileName": "Procfile",
      "prompt": "Create a Procfile for python3 that starts up main.py"
    },
    {
      "fileName": "Dockerfile",
      "prompt": "Create a Dockerfile for this Python batch application that uses a minimal base image and doesn't expose any ports"
    }
  ]
}
Running this prompt set through the AI generator gave me the valid files I wanted. All my prompt files are here.
At this stage, I was happy with the local tests and ready to automate the path from source control to cloud runtime.
Workflow step: Generate app in pipeline
Above, I had started the Cloud Build manifest with the step of yanking down the AI generator JAR file from Cloud Storage.
The next step is different for each app we’re building. I could use substitution variables in Cloud Build and have a single manifest for all of them, but for demonstration purposes, I wanted one manifest per prompt set.
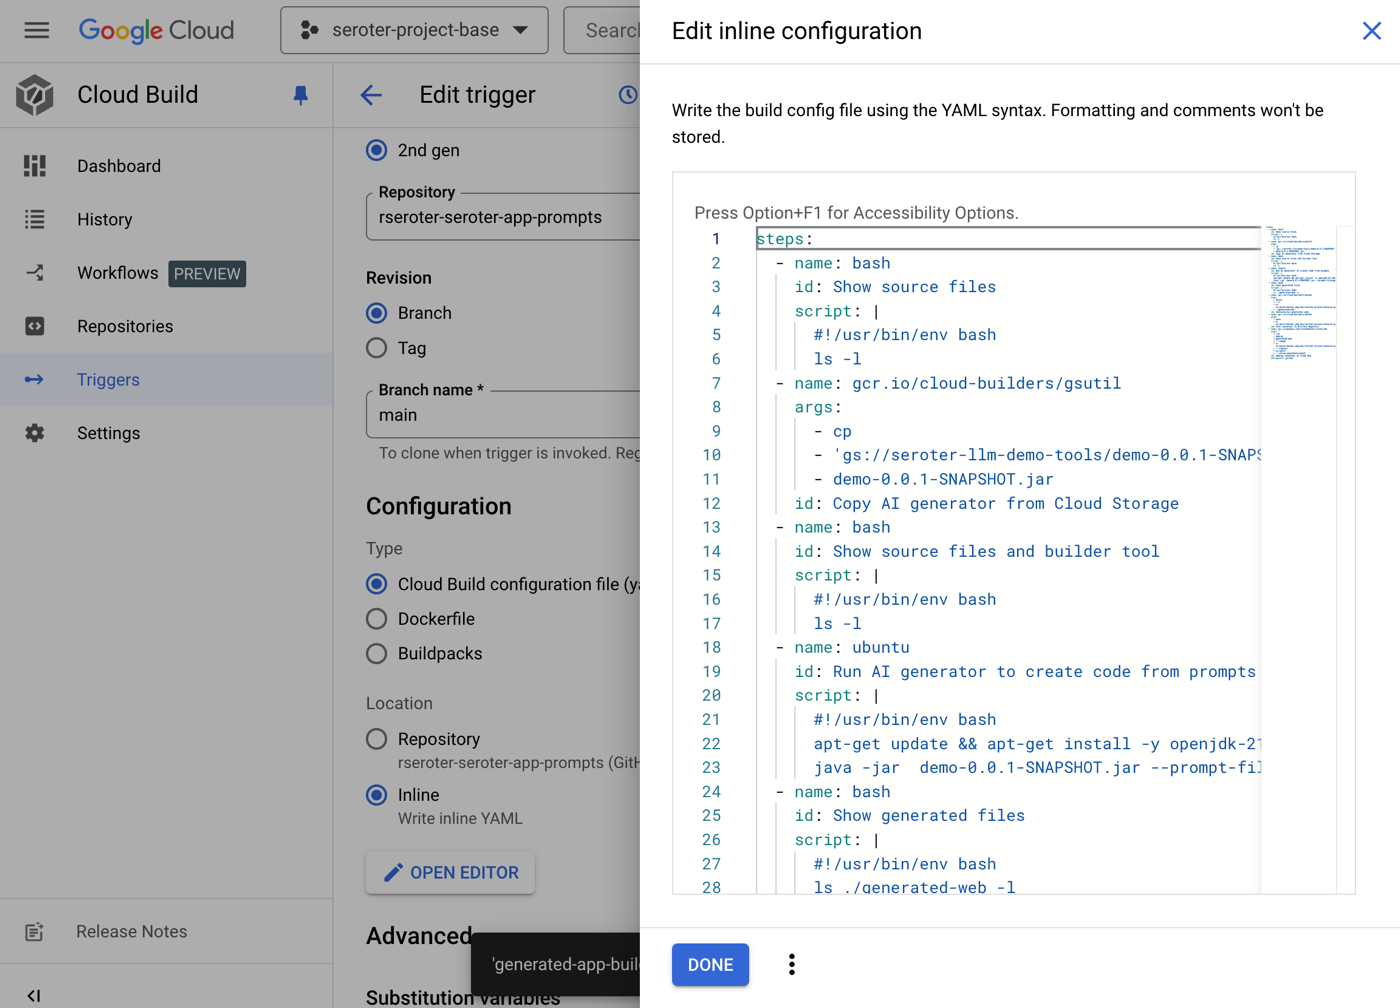
I added this step to what I already had above. It executes the same command in Cloud Build that I had run locally to test the generator. First I do an apt-get on the “ubuntu” base image to get the Java command I need, and then invoke my JAR, passing in the name of the prompt file.
...

# Run the JAR file
  - name: 'ubuntu'
    id: 'Run AI generator to create code from prompts'
    script: |
      #!/usr/bin/env bash
      apt-get update && apt-get install -y openjdk-21-jdk
      java -jar  demo-0.0.1-SNAPSHOT.jar --prompt-file=app-prompts-web.json

  # Print the contents of the generated directory
  - name: 'bash'
    id: 'Show generated files'
    script: |
      #!/usr/bin/env bash
      ls ./generated-web -l
I updated my Cloud Build pipeline that’s connected to my GitHub repo with an updated YAML manifest.
Running the pipeline at this point showed that the generator worked correctly and adds the expected files to the scratch volume in the pipeline. Awesome.
At this point, I had an app generated from prompts found in GitHub.
Workflow step: Upload artifact
Next up? Getting this code into a deployable artifact. There are plenty of options, but I want to use a container-based runtime, and need a container image. Cloud Build makes that easy.
I added another section to my existing Cloud Build manifest to containerize with Docker and upload to Artifact Registry.
 # Containerize the code and upload to Artifact Registry
  - name: 'gcr.io/cloud-builders/docker'
    id: 'Containerize generated code'
    args: ['build', '-t', 'us-west1-docker.pkg.dev/seroter-project-base/ai-generated-images/generated-web:latest', './generated-web']
  - name: 'gcr.io/cloud-builders/docker'
    id: 'Push container to Artifact Registry'
    args: ['push', 'us-west1-docker.pkg.dev/seroter-project-base/ai-generated-images/generated-web']
It used the Dockerfile our AI generator created, and after this step ran, I saw a new container image.
Workflow step: Deploy and run app
The final step, running the workload! I could use our continuous deployment service Cloud Deploy but I took a shortcut and deployed directly from Cloud Build. This step in the Cloud Build manifest does the job.
  # Deploy container image to Cloud Run
  - name: 'gcr.io/google.com/cloudsdktool/cloud-sdk'
    id: 'Deploy container to Cloud Run'
    entrypoint: gcloud
    args: ['run', 'deploy', 'generated-web', '--image', 'us-west1-docker.pkg.dev/seroter-project-base/ai-generated-images/generated-web', '--region', 'us-west1', '--allow-unauthenticated']
After saving this update to Cloud Build and running it again, I saw all the steps complete successfully.
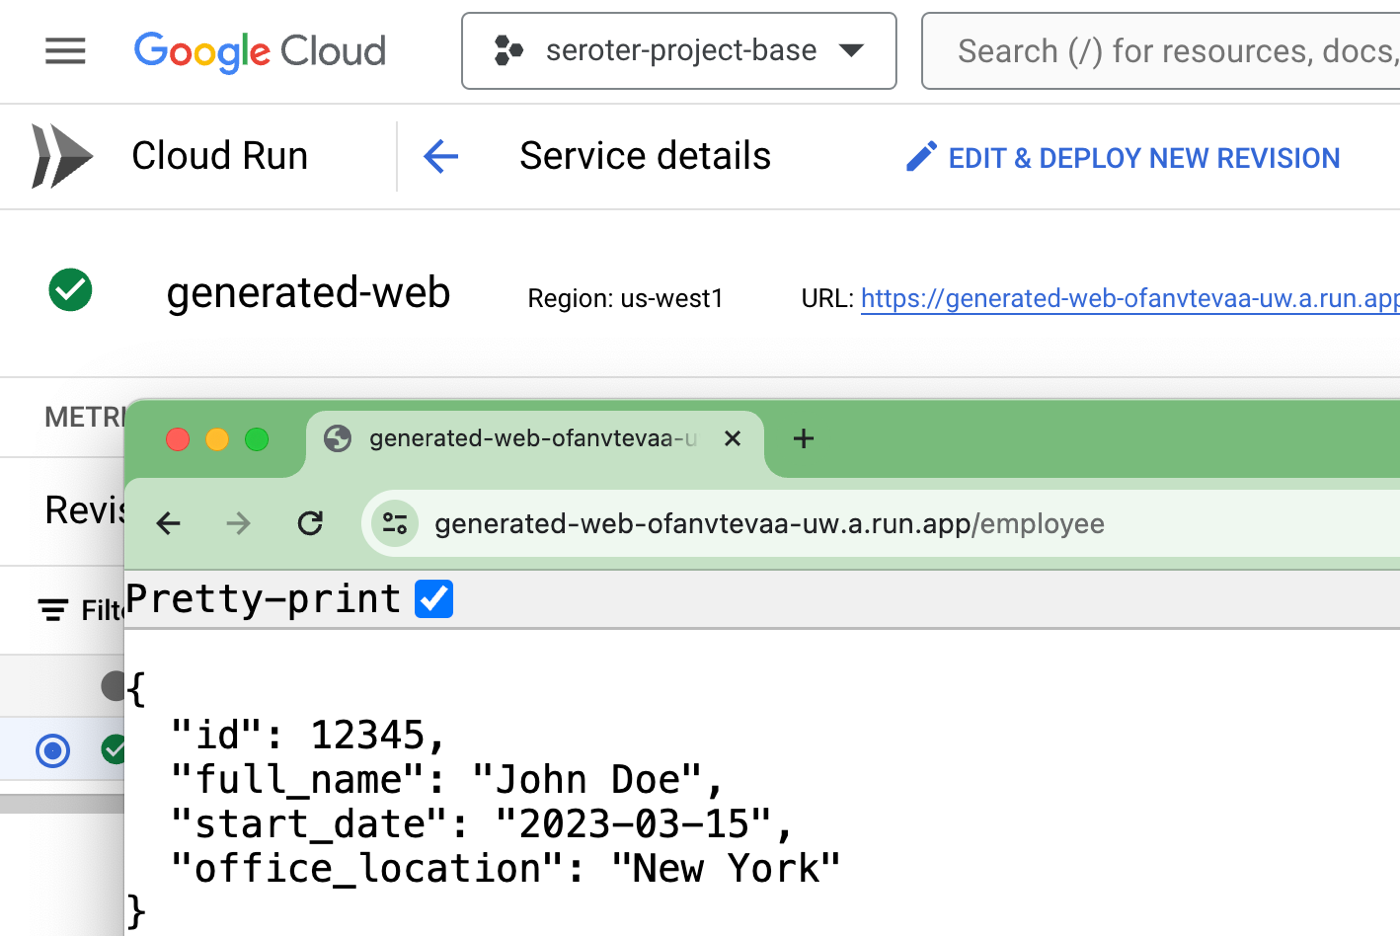
Most importantly, I had an active service in Cloud Run that served up a default record from the API endpoint.
I went ahead and ran a Cloud Build pipeline for the “Firestore” version of the web app, and then the background job that deploys to Cloud Run Jobs. I ended up with two Cloud Run services (web apps), and one Cloud Run Job.
I executed the job, and saw two new Firestore records in the collection!
To prove that, I executed the Firestore version of the web app. Sure enough, the records returned include the two new records.
Wrap up
What we saw here was a fairly straightforward way to generate complete applications from nothing more than a series of prompts fed to the Gemini model. Nothing prevents you from using a different LLM, or using other source control, continuous integration, and hosting services. Just do some find-and-replace!
Again, I would NOT use this for “real” workloads, but this sort of pattern could be a powerful way to quickly create supporting apps and components for testing or learning purposes.
What exactly is a “generative AI app”? Do you think of chatbots, image creation tools, or music makers? What about document analysis services, text summarization capabilities, or widgets that “fix” your writing? These all seem to apply in one way or another! I see a lot written about tools and techniques for training, fine-tuning, and serving models, but what about us app builders? How do we actually build generative AI apps without obsessing over the models? Here’s what I’d consider using in 2024. And note that there’s much more to cover besides just building—think designing, testing, deploying, operating—but I’m just focusing on the builder tools today.
Find a sandbox for experimenting with prompts
A successful generative AI app depends on a useful model, good data, and quality prompts. Before going to deep on the app itself, it’s good to have a sandbox to play in.
You can definitely start with chat tools like Gemini and ChatGPT. That’s not a bad way to get your hands dirty. There’s also a set of developer-centric surfaces such as Google Colab or Google AI Studio. Once you sign in with a Google ID, you get free access to environments to experiment.
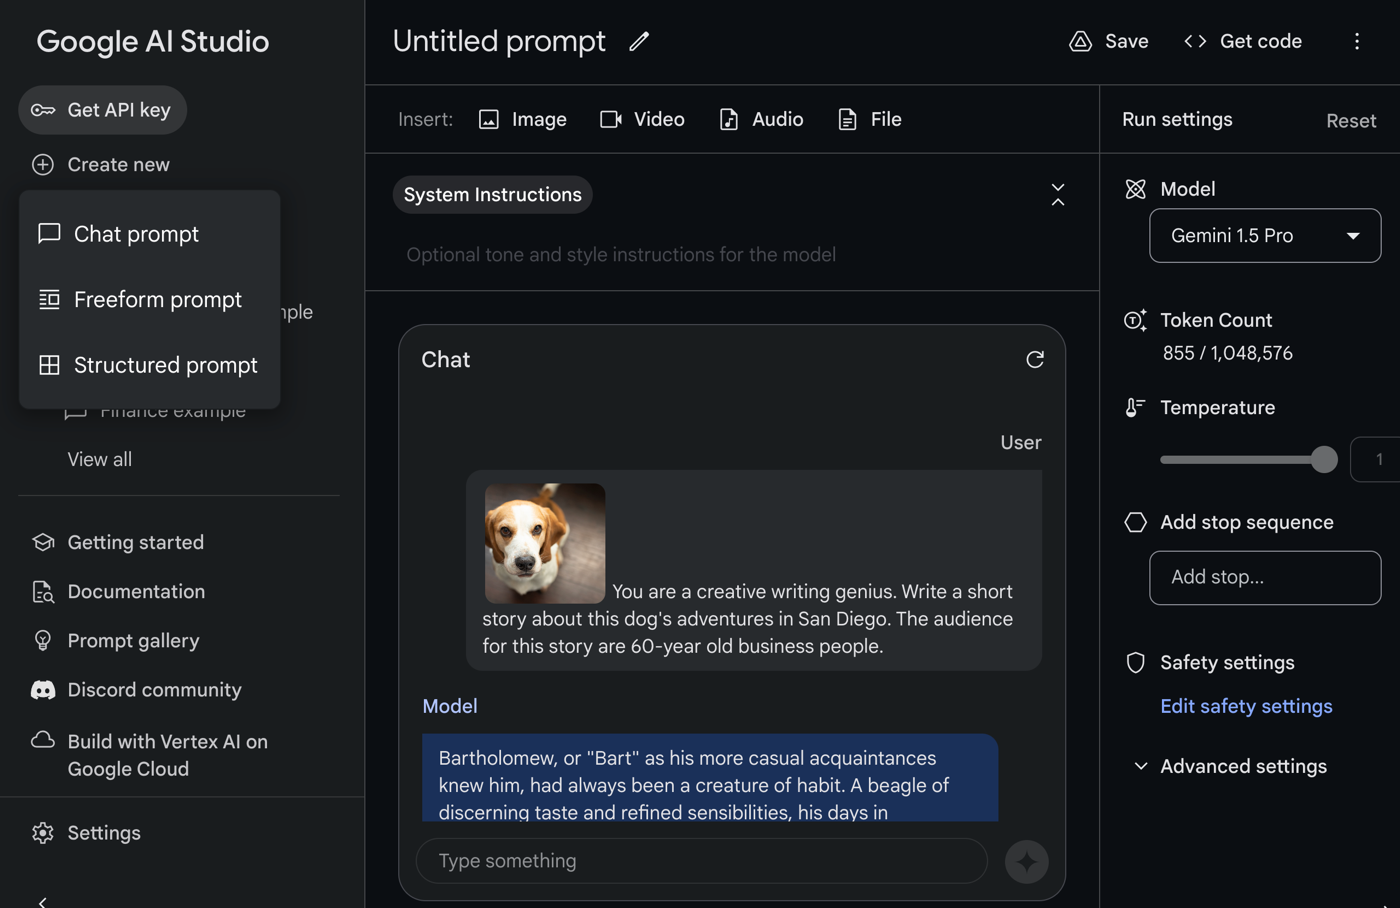
Let’s look at Google AI Studio. Once you’re in this UI, you have the ability to simulate a back-and-forth chat, create freeform prompts that include uploaded media, or even structured prompts for more complex interactions.
If you find yourself staring at an empty console wondering what to try, check out this prompt gallery that shows off a lot of unique scenarios.
Once you’re doing more “serious” work, you might upgrade to a proper cloud service that offers a sandbox along with SLAs and prompt lifecycle capabilities. Google Cloud Vertex AI is one example. Here, I created a named prompt.
With my language prompts, I can also jump into a nice “compare” experience where I can try out variations of my prompt and see if the results are graded as better or worse. I can even set one as “ground truth” used as a baseline for all comparisons.
Whatever sandbox tools you use, make sure they help you iterate quickly, while also matching the enterprise-y needs of the use case or company you work for.
Consume native APIs when working with specific models or platforms
At this point, you might be ready to start building your generative AI app. There seems to be a new, interesting foundation model up on Hugging Face every couple of days. You might have a lot of affection for a specific model family, or not. If you care about the model, you might choose the APIs for that specific model or provider.
For example, let’s say you were making good choices and anchored your app to the Gemini model. I’d go straight to the Vertex AI SDK for Python, Node, Java, or Go. I might even jump to the raw REST API and build my app with that.
If I were baking a chat-like API call into my Node.js app, the quickest way to get the code I need is to go into Vertex AI, create a sample prompt, and click the “get code” button.
I took that code, ran it in a Cloud Shell instance, and it worked perfectly. I could easily tweak it for my specific needs from here. Drop this code into a serverless function, Kubernetes pod, or VM and you’ve got a working generative AI app.
If you have a specific model preference, you might choose to use the API for Gemini, Llama, Mistral, or whatever. And you might choose to directly interact with database or function APIs to augment the input to those models. That’s cool, and is the right choice for many scenarios.
Use meta-frameworks for consistent experiences across models and providers
As expected, the AI builder space is now full of higher-order frameworks that help developers incorporate generative AI into their apps. These frameworks help you call LLMs, work with embeddings and vector databases, and even support actions like function calling.
LangChain is a big one. You don’t need to be bothered with many model details, and you can chain together tasks to get results. It’s for Python devs, so your choice is either to use Python, or, embrace one of the many offshoots. There’s LangChain4J for Java devs, LangChain Go for Go devs, and LangChain.js for JavaScript devs.
You have other choices if LangChain-style frameworks aren’t your jam. There’s Spring AI, which has a fairly straightforward set of objects and methods for interacting with models. I tried it out for interacting with the Gemini model, and almost found it easier to use than our native API! It takes one update to my POM file:
And then an autowired chat object that I call from anywhere, like in this REST endpoint.
@RestController
@SpringBootApplication
public class DemoApplication {

	public static void main(String[] args) {
		SpringApplication.run(DemoApplication.class, args);
	}

	private final VertexAiGeminiChatClient chatClient;

	@Autowired
    public DemoApplication(VertexAiGeminiChatClient chatClient) {
        this.chatClient = chatClient;
    }

	@GetMapping("/")
	public String getGeneratedText() {
		String generatedResponse = chatClient.call("Tell me a joke");
		return generatedResponse;
	}
}
Super easy. There are other frameworks too. Use something like AI.JSX for building JavaScript apps and components. BotSharp is a framework for .NET devs building conversational apps with LLMs. Hugging Face has frameworks that help you abstract the LLM, including Transformers.js and agents.js.
There’s no shortage of these types of frameworks. If you’re iterating through LLMs and want consistent code regardless of which model you use, these are good choices.
Create with low-code tools when available
If I had an idea for a generative AI app, I’d want to figure out how much I actually had to build myself. There are a LOT of tools for building entire apps, components, or widgets, and many require very little coding.
Everyone’s in this game. Zapier has some cool integration flows. Gradio lets you expose models and APIs as web pages. Langflow got snapped up by DataStax, but still offers a way to create AI apps without much required coding. Flowise offers some nice tooling for orchestration or AI agents. Microsoft’s Power Platform is useful for low-code AI app builders. AWS is in the game now with Amazon Bedrock Agents. ServiceNow is baking generative AI into their builder tools, Salesforce is doing their thing, and basically every traditional low-code app vendor is playing along. See OutSystems, Mendix, and everyone else.
As you would imagine, Google does a fair bit here as well. The Vertex AI Agent Builder offers four different app types that you basically build through point-and-click. These include personalized search engines, chat, recommendation engine, and connected agents.
Search apps can tap into a variety of data sources including crawled websites, data warehouses, relational databases, and more.
What’s fairly new is the “agent app” so let’s try building one of those. Specifically, let’s say I run a baseball clinic (sigh, someday) and help people tune their swing in our batting cages. I might want a chat experience for those looking for help with swing mechanics, and then also offer the ability to book time in the batting cage. I need data, but also interactivity.
Before building the AI app, I need a Cloud Function that returns available times for the batting cage.
This Node.js function returns an array of book-able timeslots. I’ve hard-coded the data, but you get the idea.
I also jumped into the Google Cloud IAM interface to ensure that the Dialogflow service account (which the AI agent operates as) has permission to invoke the serverless function.
Let’s build the agent. Back in the Vertex AI Agent Builder interface, I choose “new app” and pick “agent.”
Now I’m dropped into the agent builder interface. On the left, I have navigation for agents, tools, test cases, and more. In the next column, I set the goal of the agent, the instructions, and any tools I want to use with the agent. On the right, I preview my agent.
I set a goal of “Answer questions about baseball and let people book time in the batting cage” and then get to the instructions. There’s a “sample” set of instructions that are useful for getting started. I used those, but removed references to other agents or tools, as we don’t have that yet.
But now I want to add a tool, as I need a way to show available booking times if the user asks. I have a choice of adding a data store—this is useful if you want to source Q&A from a BigQuery table, crawl a website, or get data from an API. I clicked the “manage all tools” button and chose to add a new tool. Here I give the tool a name, and very importantly, a description. This description is used by the AI agent to figure out when to invoke it.
Because I chose OpenAPI as the tool type, I need to provide an OpenAPI spec for my Cloud Function. There’s a sample provided, and I used that to put together my spec. Note that the URL is the function’s base URL, and the path contains the specific function name.
Finally, in this “tool setup” I define the authentication to that API. I chose “service agent token” and because I’m calling a specific instance of a service (versus the platform APIs), I picked “ID token.”
After saving the tool, I go back to the agent definition and want to update the instructions to invoke the tool. I use the syntax, and appreciated the auto-completion help.
Let’s see if it works. I went to the right-hand preview pane and asked it a generic baseball question. Good. Then I asked it for open times in the batting cage. Look at that! It didn’t just return a blob of JSON; it parsed the result and worded it well.
Very cool. There are some quirks with this tool, but it’s early, and I like where it’s going. This was MUCH simpler than me building a RAG-style or function-calling solution by hand.
Summary
The AI assistance and model building products get a lot of attention, but some of the most interesting work is happening in the tools for AI app builders. Whether you’re experimenting with prompts, coding up a solution, or assembling an app out of pre-built components, it’s a fun time to be developer. What products, tools, or frameworks did I miss from my assessment?
Conferences aren’t cheap to attend. Forget the financial commitment—although that’s far from trivial—it’s expensive with regards to your time. You’re likely traveling out of town and spend time commuting. Then there’s the event itself, which takes you away from work and life for at least a few days. All of this in the hope of getting equal or greater value than what you spent. Risky bet? No doubt. I’ve been attending and organizing conferences for many years, and I’ll honestly say that this year’s Google Cloud Next ’24 is one of the surer bets I’ve seen. Even if you’re not a Google Cloud user (yet), I’m confident that you’d get a lot out of attending.
The last edition of the event was terrific, but this one is better; except for one aspect, which I’ll mention at the end. This might be your best 2024 investment to learn about AI, modern app architectures and development, best practices for data access and analysis, and operations at scale. But why do I think it’s better than last year?
There’s much more technical content
We had too much introductory material in our breakout sessions last year. Level 100 content is super valuable, but you can get that anywhere. Many of us attend events to hear stories and go deeper than we can someplace else. This year, well over half of the breakouts are Level 200 or 300 content, and there’s a proper mix of introductory and in-depth material.
Our Innovator’s Hive is where you have 10s of thousands of square feet worth of demo stations featuring creative and educational examples of technology. And our first-time Community Hub offers education on Google-sponsored open tech like Android, Flutter, and more.
See more “now” technology to accompany “next” technology
Last year’s event had lots of exciting previews, but much the tech wasn’t ready yet. We showed off AI developer assistance, previewed some new AI models, and talked about many things that were coming up soon.
That’s all good, but now we have a better mix of “now” and “next.” You’ll continue seeing cutting edge tech that’s coming in the future, but you also will see more products, services, and frameworks that you can use RIGHT NOW.
We thought we’d mix it up this year and invite folks to our main stage that aren’t directly associated with Google. Our developer keynote features Guillermo Rauch, the CEO of Vercel; Josh Long, Spring advocate at Broadcom; and Charity Majors co-founder at Honeycomb. I’m a fan of all three people, which is why I’m amped that they accepted my invitation to join us on stage.
And the breakouts themselves feature an absolute ton of customers and independent experts. A quick scan through our program gave me a list of speakers from companies like AMD, ANZ Bank, ASML, Accenture, Alaska Airlines, American Express, Anthropic, Anyscale, Apple, BMW AG, Bayer, Bayer Corporation, Belk, Bombardier, Boston Consulting Group, Box, CME Group, Carrefour, Charles Schwab, Chicago CTA, Citadel, Commerzbank AG, Core Logic, Covered California, Cox Communication, DZ Bank, Databricks, Deloitte, Deutsche Telekom, Devoteam G Cloud, Dialpad, DoIT International, Docker, Fiserv, Ford Motor Company, GitLab, Glean, Globe Telecom, Goldman Sachs, GrowthLoop, HCA Healthcare, HCL, HSBC, Harness, Hashicorp, Illinois Department of Human Services, Intel, KPMG, Lloyds Banking Group, Logitech, L’Oreal, Macquarie Bank, Major League Baseball, Mayo Clinic, Mercado Libre, Moloco, MongoDB, NJ Cybersecurity and Communications Cell, Nuro, Onix, OpenText, Palo Alto Networks, Paramount, Paypal, Pfizer, PwC, Quantiphi, Red Hat, Reddit, Rent the Runway, Roche, Roku, SADA, Sabre, Salesforce, Scotia Bank, Shopify, Snap, Spotify, Stability AI, Stagwell, Stanford, Symphony, Synk, TD Securities, Telus corporation, TransUnion, Trendyol, Typeface, UC Riverside, UPS, US News and World Report, Uber, Ubie, Inc, Unilever, Unity Technologies, Verizon, Walmart, Wayfair, Weights & Biases, Wells Fargo, Yahoo, and apree health. So many folks to learn from!
Enjoy a bigger overall event
This version of Next is going to be significantly larger than the last one, and that’s a good thing. I don’t want the conference to ever be festival-sized like Dreamforce or re:Invent, but having tens of thousands of folks in one place means a bigger breakout program, more learning opportunities, more serendipitous meetups, and a unique energy for attendees.
We don’t have any musical numbers 😦
The one thing that’s not better than last year? We couldn’t top our last keynote intro, and I didn’t try. There’s no musical tune featuring a sousaphone. That said, I genuinely think our developer keynote itself is even better overall this time, and the whole event should be memorable.
There’s still time to register, and I’d love to bump into you if you attend. Let me know if you’ll be there!
If you have a choice, you should test software against the real thing. The second best option is to use a “fake” that implements the target service’s API. In the cloud, it’s straightforward to spin up a real instance of a service for testing. But there are reasons (e.g. cost or speed) or times (e.g. within a CI pipeline, or rapid testing on your local machine) when an emulator is a better bet.
Let’s say that you wanted to try out Google Cloud Spanner, and it’s useful change streams functionality. Consider creating a real instance and experimenting, but you have an alternative option. The local emulator just added support for change streams, and you can test the whole thing out from the comfort of your own machine. Or, to make life even easier, test it out from a free cloud machine.
With just a Google account (which most everyone has?), you can use a free cloud-based shell and code editor. Just go to shell.cloud.google.com. We’ve loaded this environment up with language CLIs for Java, .NET, Go, and others. It’s got the Docker daemon running. And it’s got our gcloud CLI pre-loaded and ready to go. It’s pretty cool. From here, we can install the Spanner emulator, and run just a few shell commands to see the entire thing in action.
Let’s begin by installing the emulator for Cloud Spanner. It takes just one command.
Then we start up the emulator itself with this command:
gcloud emulators spanner start
After a couple of seconds, I see the emulator running, and listening on two ports.
Great. I want to leave that running while having the freedom to run more commands. It’s easy to spin up new tabs in the Cloud Shell Editor, so I created a new one.
In this new tab, I ran a set of commands that configured the gcloud CLI to work locally with the emulator. The CLI supports the concept of multiple configurations, so we create one that is emulator friendly. Also note that Google Cloud has the idea of “projects.” But if you don’t have a Google Cloud account, you’re ok here. For the emulators, you can use a non-existent value for “project” as I have here.
gcloud config configurations create emulator
gcloud config set auth/disable_credentials true
gcloud config set project local-project
gcloud config set api_endpoint_overrides/spanner http://localhost:9020/
It’s time to create a (local) Spanner instance. I ran this one command to do so. It’s super fast, which makes it great for CI pipeline scenarios. That second command sets the default instance name so that we don’t have to provide an instance value in subsequent commands.
It’s time to turn on change streams, and this takes an extra step. It doesn’t look like I can smuggle utility commands through the “execute-sql” operation, so we need to run a DDL statement instead. Note that you can create change streams that listen to specific tables or columns. This one listens to anything changing in any table.
I’m now going to open a third tab in the Cloud Shell Editor. This is so that we can continuously tail the change stream results. We’ve created this nice little sample project that lets you tail the change stream. Install the app by running this command in the third tab.
go install github.com/cloudspannerecosystem/spanner-change-streams-tail@latest
Then, in this same tab, we want the Go SDK (which this app uses) to look at the local emulator’s gRPC port instead of the public cloud. Set the environment variable that overrides the default behavior.
export SPANNER_EMULATOR_HOST=localhost:9010
Awesome. Now we start up the change stream app with a single command. You should see it start up and hold waiting for data.
Back in the second tab (the first should still be running the emulator, the third is running the change stream tail), let’s add a new record to the Spanner database table. What SHOULD happen is that we see a change record pop up in the third tab.
gcloud spanner databases execute-sql example-db   \
  --sql="INSERT INTO Albums (SingerId, AlbumId, AlbumTitle) VALUES (2, 2, 'Go, Go, Go')"
Sure enough, I see a record pop into the third tab showing the before and after values of the row.
You can mess around with updating records, deleting records, and so on. A change stream is powerful for event sourcing scenarios, or simply feeding data changes to downstream systems.
In this short walkthrough, we tried out the Cloud Shell Editor, spun up the Spanner emulator, and experimented with database change streams. All without needing a Google Cloud account, or installing a lick of software on our own device. Not bad!