Category: Cloud Foundry

  • Take a fresh look at Cloud Foundry? In 20 minutes we’ll get Tanzu Application Service for Kubernetes running on your machine.

    Take a fresh look at Cloud Foundry? In 20 minutes we’ll get Tanzu Application Service for Kubernetes running on your machine.

    It’s been nine years since I first tried out Cloud Foundry, and it remains my favorite app platform. It runs all kinds of apps, has a nice dev UX for deploying and managing software, and doesn’t force me to muck with infrastructure. The VMware team keeps shipping releases (another today) of the most popular packaging of Cloud Foundry, Tanzu Application Service (TAS). One knock against Cloud Foundry has been its weight—in typically runs on dozens of VMs. Others have commented on its use of open-source, but not widely-used, components like BOSH, the Diego scheduler, and more. I think there are good justifications for its size and choice of plumbing components, but I’m not here to debate that. Rather, I want to look at what’s next. The new Tanzu Application Service (TAS) for Kubernetes (now in beta) eliminates those prior concerns with Cloud Foundry, and just maybe, leapfrogs other platforms by delivering the dev UX you like, with the underlying components—things like Kubernetes, Cluster API, Istio, Envoy, fluentd, and kpack—you want. Let me show you.

    TAS runs on any Kubernetes cluster: on-premises or in the cloud, VM-based or a managed service, VMware-provided or delivered by others. It’s based on the OSS Cloud Foundry for Kubernetes project, and available for beta download with a free (no strings attached) Tanzu Network account. You can follow along with me in this post, and in just a few minutes, have a fully working app platform that accepts containers or source code and wires it all up for you.

    Step 1 – Download and Start Stuff (5 minutes)

    Let’s get started. Some of these initial steps will go away post-beta as the install process gets polished up. But we’re brave explorers, and like trying things in their gritty, early stages, right?

    First, we need a Kubernetes. That’s the first big change for Cloud Foundry and TAS. Instead of pointing it at any empty IaaS and using BOSH to create VMs, Cloud Foundry now supports bring-your-own-Kubernetes. I’m going to use Minikube for this example. You can use KinD, or any other number of options.

    Install kubectl (to interact with the Kubernetes cluster), and then install Minikube. Ensure you have a recent version of Minikube, as we’re using the Docker driver for better performance. With Minikube installed, execute the following command to build out our single-node cluster. TAS for Kubernetes is happiest running on a generously-sized cluster.

    minikube start --cpus=4 --memory=8g --kubernetes-version=1.15.7 --driver=docker

    After a minute or two, you’ll have a hungry Kubernetes cluster running, just waiting for workloads.

    We also need a few command line tools to get TAS installed. These tools, all open source, do things like YAML templating, image building, and deploying things like Cloud Foundry as an “app” to Kubernetes. Install the lightweight kapp, klbd, and ytt tools using these simple instructions.

    You also need the Cloud Foundry command line tool. This is for interacting with the environment, deploying apps, etc. This same CLI works against a VM-based Cloud Foundry, or Kubernetes-based one. You can download the latest version via your favorite package manager or directly.

    Finally, you’ll want to install the BOSH CLI. Wait a second, you say, didn’t you say BOSH wasn’t part of this? Am I just a filthy liar? First off, no name calling, you bastards. Secondly, no, you don’t need to use BOSH, but the CLI itself helps generate some configuration values we’ll use in a moment. You can download the BOSH CLI via your favorite package manager, or grab it from the Tanzu Network. Install via the instructions here.

    With that, we’re done the environmental setup.

    Step 2 – Generate Stuff (2 minute)

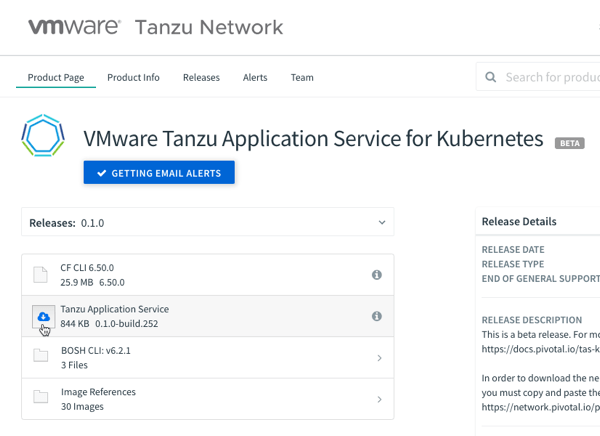
    This is quick and easy. Download the 844KB TAS for Kubernetes bundle from the Tanzu Network.

    I downloaded the archive to my desktop, unpacked it, and renamed the folder “tanzu-application-service.” Create a sibling folder named “configuration-values.”

    Now we’re going to create the configuration file. Run the following command in your console, which should be pointed at the tanzu-application-service directory. The first quoted value is the domain. For my local instance, this value is vcap.me. When running this in a “real” environment, this value is the DNS name associated with your cluster and ingress point. The output of this command is a new file in the configuration-values folder.

    ./bin/generate-values.sh -d "vcap.me" > ../configuration-values/deployment-values.yml

    After a couple of seconds, we have an impressive-looking YAML file with passwords, certificates, and all sorts of delightful things.

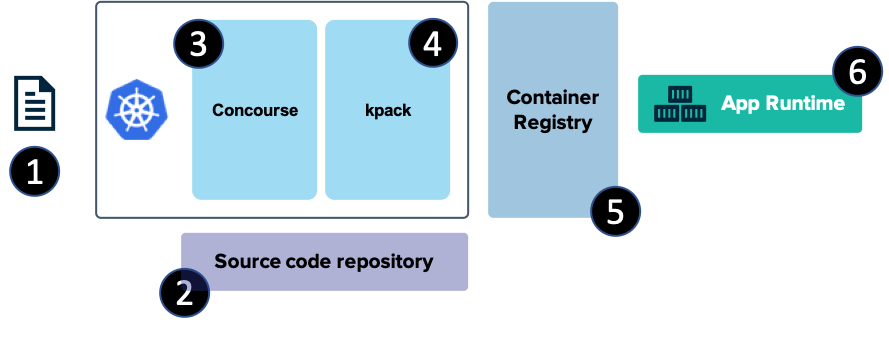
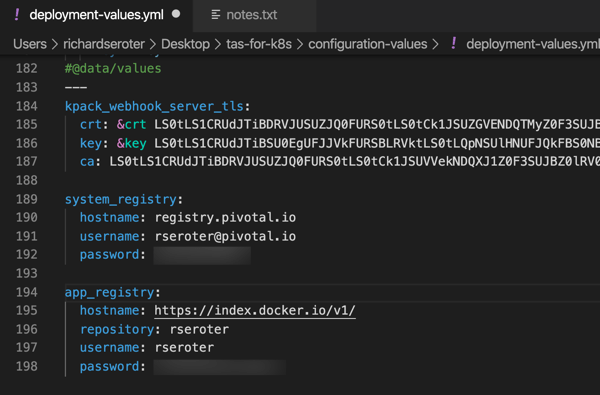
    We’re nearly done. Our TAS environment won’t just run containers; it will also use kpack and Cloud Native Buildpacks to generate secure container images from source code. That means we need a registry for stashing generated images. You can use most any one you want. I’m going to use Docker Hub. Thus, the final configuration values we need are appended to the above file. First, we need the credentials to the Tanzu Network for retrieving platform images, and secondly, credentials for container registry.

    With our credentials in hand, add them to the very bottom of the file. Indentation matters, this is YAML after all, so ensure you’ve got it lined up right.

    The last thing? There’s a file that instructs the installation to create a cluster IP ingress point versus a Kubernetes load balancer resource. For Minikube (and in public cloud Kubernetes-as-a-Service environments) I want the load balancer. So, within the tanzu-application-service folder, move the replace-loadbalancer-with-clusterip.yaml file from the custom-overlays folder to the config-optional folder.

    Finally, to be safe, I created a copy of this remove-resource-requirements.yml file and put it in the custom-overlays folder. It relaxes some of the resource expectations for the cluster. You may not need it, but I saw CPU exhaustion issues pop up when I didn’t use it.

    All finished. Let’s deploy this rascal.

    Step 3 – Deploy Stuff (10 minutes)

    Deploying TAS to Kubernetes takes 5-9 minutes. With your console pointed at the tanzu-application-service directory, run this command:

    ./bin/install-tas.sh ../configuration-values

    There’s a live read-out of progress, and you can also keep checking the Kubernetes environment to see the pods inflate. Tools like k9s make it easy to keep an eye on what’s happening. Notice the Istio components, and some familiar Cloud Foundry pieces. Observe that the entire Cloud Foundry control plane is containerized here—no VMs anywhere to be seen.

    While this is still installing, let’s open up the Minikube tunnel to expose the LoadBalancer service our ingress gateway needs. Do this in a separate console window, as its a blocking call. Note that the installation can’t complete until you do it!

    minikube tunnel

    After a few minutes, we’re ready to deploy workloads.

    Step 4 – Test Stuff (3 minutes)

    We now have a full-featured Tanzu Application Service up and running. Neat. Let’s try a few things. First, we need to point the Cloud Foundry CLI at our environment.

    cf api --skip-ssl-validation https://api.vcap.me

    Great. Next, we log in, using generated cf_admin_password from the deployment-values.yaml file.

    cf auth admin <password>

    After that, we’ll enable containers in the environment.

    cf enable-feature-flag diego_docker

    Finally, we set up a tenant. Cloud Foundry natively supports isolation between tenants. Here, I set up an organization, and within that organization, a “space.” Finally, I tell the Cloud Foundry CLI that we’re working with apps in that particular org and space.

    cf create-org seroter-org
    cf create-space -o seroter-org dev-space
    cf target -o seroter-org -s dev-space

    Let’s do something easy, first. Push a previously-containerized app. Here’s one from my Docker Hub, but it can be anything you want.

    cf push demo-app -o rseroter/simple-k8s-app-kpack

    After you enter that command, 15 seconds later you have a hosted, routable app. The URL is presented in the Cloud Foundry CLI.

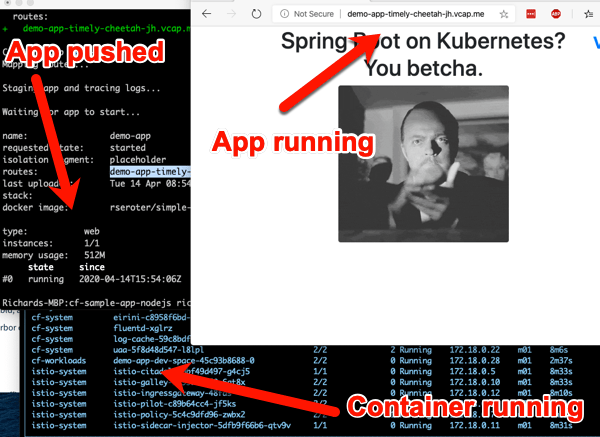
    How about something more interesting? TAS for Kubernetes supports a variety of buildpacks. These buildpacks detect the language of your app, and then assemble a container image for you. Right now, the platform builds Java, .NET Core, Go, and Node.js apps. To make life simple, clone this sample Node app to your machine. Navigate your console to that folder, and simple enter cf push.

    After a minute or so, you end up with a container image in whatever registry you specified (for me, Docker Hub), and a running app.

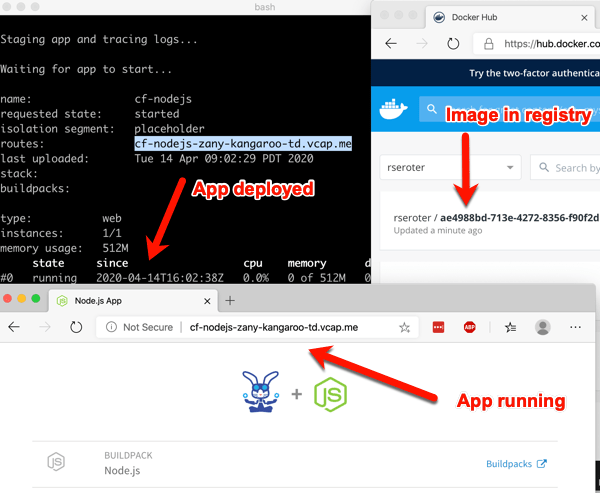
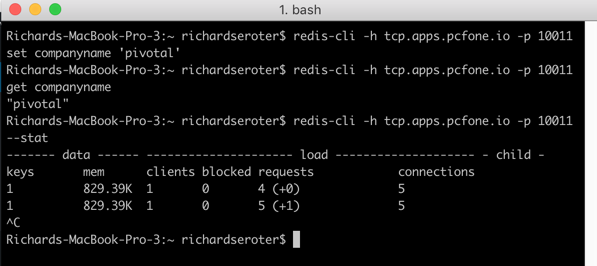
    This beta release of TAS for Kubernetes also supports commands around log streaming (e.g. cf logs cf-nodejs), connecting to backing services like databases, and more. And yes, even the simple, yet powerful, cf scale command works to expand and contract pod instances.

    It’s simple to uninstall the entire TAS environment from your Kubernetes cluster with a single command:

    kapp delete -a cf

    Thanks for trying this out with me! If you only read along, and want to try it yourself later, read the docs, download the bits, and let me know how it goes.

  • Looking to continuously test and patch container images? I’ll show you one way.

    Looking to continuously test and patch container images? I’ll show you one way.

    A lot of you are packaging code into container images before shipping it off to production. That’s cool. For many, this isn’t a one-time exercise at the end of a project; it’s an ongoing exercise throughout the lifespan of your product. Last week in Barcelona, I did a presentation at VMworld Europe where I took a custom app, ran tests in a pipeline, containerized it, and pushed to a cloud runtime. I did all of this with fresh open-source technologies like Kubernetes, Concourse, and kpack. For this blog post, I’ll show you my setup, and for fun, take the resulting container image and deploy it, unchanged, to one Microsoft Azure service, and one Pivotal service.

    First off, containers. Let’s talk about them. The image that turns into running container is made up of a series of layers. This union of read-only layers gets mounted to present itself as a single filesystem. Many commands in your Dockerfile, generate a layer. When I pull the latest Redis image, and run a docker history command, I see all the layers:

    Ok, Richard, we get it. Like onions and ogres, images have layers. I bring it up, because responsibly maintaining a container image means continually monitoring and updating those layers. For a custom app, that means updating layers that store app code, the web server, and the root file system. All the time. Ideally, I want a solution that automatically builds and patches all this stuff so that I don’t have to. Whatever pipeline to production you build should have that factored in!

    Let’s get to it. Here’s what I built. After coding a Spring Boot app, I checked the code into a GitHub master branch. That triggered a Concourse pipeline (running in Kubernetes) that ran unit tests, and promoted the code to a “stable” branch if the tests passed. The container build service (using the kpack OSS project) monitored the stable branch, and built a container image which got stored in the Docker Hub. From there, I deployed the Docker image to a container-friendly application runtime. Easy!

    Step #1 – Build the app

    The app is simple, and relatively inconsequential. Build a .NET app, Go app, Node.js app, whatever. I built a Spring Boot app using Spring Initializr. Click here to download the same scaffolding. This app will simply serve up a web endpoint, and also offer a health endpoint.

    In my code, I have a single RESTful endpoint that responds to GET requests at the root. It reads an environment variable (so that I can change it per runtime), and returns that in the response.

    @RestController
    public class GreetingController {
    	
      @Value("${appruntime:Spring Boot}")
      private String appruntime;
    	
      @GetMapping("/")
      public String SayHi() {
        return "Hello VMworld Europe! Greetings from " + appruntime;
      }
    }
    

    I also created a single JUnit test to check the response value from my RESTful service. I write great unit tests; don’t be jealous.

    @RunWith(SpringRunner.class)
    @SpringBootTest(webEnvironment = WebEnvironment.RANDOM_PORT)
    public class BootKpackDemoApplicationTests {
    
      @LocalServerPort
      private int port;
    	
      @Autowired
      private TestRestTemplate restTemplate;
    	
      @Test
      public void testEndpoint() {
        assertThat(this.restTemplate.getForObject("http://localhost:" + port + "/",
        String.class)).contains("Hello");
      }
    }
    

    After crafting this masterpiece, I committed it to a GitHub repo. Ideally, this is all a developer ever has to do in their job. Write code, test it, check it in, repeat. I don’t want to figure out the right Dockerfile format, configure infrastructure, or any other stuff. Just let me write code, and trigger a pipeline that gets my code securely to production, over and over again.

    Step #2 – Set up the CI pipeline

    For this example, I’m using minikube on my laptop to host the continuous integration software and container build service. I got my Kubernetes 1.15 cluster up (since Concourse currently works up to v 1.15) with this command:

    minikube start --memory=4096 --cpus=4 --vm-driver=hyperkit --kubernetes-version v1.15.0
    

    Since I wanted to install Concourse in Kubernetes via Helm, I needed Helm and tiller set up. I used a package manager to install Helm on my laptop. Then I ran three commands to generate a service account, bind a cluster role to that service account, and initialize Helm in the cluster.

    kubectl create serviceaccount -n kube-system tiller 
    kubectl create clusterrolebinding tiller-cluster-rule --clusterrole=cluster-admin --serviceaccount=kube-system:tiller 
    helm init --service-account tiller 
    

    With that business behind me, I could install Concourse. I talk a lot about Concourse, taught a Pluralsight course about it, and use it regularly. It’s such a powerful tool for continuous processing of code. To install into Kubernetes, it’s just a single reference to a Helm chart.

    helm install --name vmworld-concourse stable/concourse
    

    After a few moments, I saw that I had pods created and services configured.

    The chart also printed out commands for how to do port forwarding to access the Concourse web console.

    export POD_NAME=$(kubectl get pods --namespace default -l "app=vmworld-concourse-web" -o jsonpath="{.items[0].metadata.name}")
     echo "Visit http://127.0.0.1:8080 to use Concourse"
     kubectl port-forward --namespace default $POD_NAME 8080:8080
    

    After running those commands, I pinged the localhost URL and saw the dashboard.

    All that was left was the actual pipeline. Concourse pipelines are defined in YAML. My GitHub repo has two branches (master and stable), so I declared “resources” for both. Since I have to write to the stable branch, I also included credentials to GitHub in the “stable” resource definition. My pipeline has two jobs: one that runs the JUnit tests, and another puts the master branch code into the stable branch if the unit tests pass.

    ---
    # declare resources
    resources:
    - name: source-master
      type: git
      icon: github-circle
      source:
        uri: https://github.com/rseroter/boot-kpack-demo
        branch: master
    - name: source-stable
      type: git
      icon: github-circle
      source:
        uri: git@github.com:rseroter/boot-kpack-demo.git
        branch: stable
        private_key: ((github-private-key))
    
    jobs:
    - name: run-tests
      plan:
      - get: source-master
        trigger: true
      - task: first-task
        config: 
          platform: linux
          image_resource:
            type: docker-image
            source: {repository: maven, tag: latest}
          inputs:
          - name: source-master
          run:
              path: sh
              args:
              - -exec
              - |
                cd source-master
                mvn package
    - name: promote-to-stable
      plan:
      - get: source-master
        trigger: true
        passed: [run-tests]
      - get: source-stable
      - put: source-stable
        params:
          repository: source-master
    

    Deploying this pipeline is easy. From the fly CLI tool, it’s one command. Note that my GitHub creds are stored in another file, which is the one I reference in the command.

    fly -t vmworld set-pipeline --pipeline vmworld-pipeline --config vmworld-pipeline.yaml --load-vars-from params.yaml
    

    After unpausing the pipeline, it ran. Once it executed the unit tests, and promoted the master code to the stable branch, the pipeline was green.

    Step #3 – Set up kpack for container builds

    Now to take that tested, high-quality code and containerize it. Cloud Native Buildpacks turn code into Docker images. Buildpacks are something initially created by Heroku, and then used by Cloud Foundry to algorithmically determine how to build a container image based on the language/framework of the code. Instead of developers figuring out how to layer up an image, buildpacks can compile and package up code in a repeatable way by bringing in all the necessary language runtimes and servers. What’s cool is that operators can also extend buildpacks to add org-specific certs, monitoring agents, or whatever else should be standard in your builds.

    kpack is an open-source project from Pivotal that uses Cloud Native Buildpacks, also adds the ability to watch for changes to anything impacting the image, and initiating an update. kpack, which is commercialized as the Pivotal Build Service, watches for changes in source code, buildpacks, or base image and then puts the new or patched image into the registry. Thanks to some smarts, it only updates the impacted layers, thus saving you on data transfer costs and build times.

    The installation instructions are fairly straightforward. You can put this into your Kubernetes cluster in a couple minutes. Once installed, I saw the single kpack controller pod running.

    The only thing left to do was define an image configuration. This declarative config tells kpack where to find the code, and what to do with it. I had already set up a secret to hold my Docker Hub creds, and that corresponding Kubernetes service account is referenced in the image configuration.

    apiVersion: build.pivotal.io/v1alpha1
    kind: Image
    metadata:
      name: vmworld-image
    spec:
      tag: rseroter/vmworld-demo
      serviceAccount: vmworld-service-account
      builder:
        name: default-builder
        kind: ClusterBuilder
      source:
        git:
          url: https://github.com/rseroter/boot-kpack-demo.git
          revision: stable
    

    That’s it. Within moments, kpack detected my code repo, compiled my app, built a container image, cached some layers for later, and updated the Docker Hub image.

    I made a bunch of code changes to generate lots of builds, and all the builds showed up my Kubernetes cluster as well.

    Now when I updated my code, my pipeline automatically kicks off and updates the stable branch. Thus, whenever my tested code changes, or the buildpack gets updated (every week or so) with framework updates and patches, my container automatically gets rebuilt. That’s crazy powerful stuff, especially as we create more and more containers, that deploy to more and more places.

    Step #4 – Deploy the container image

    And that’s the final step. I had to deploy this sucker and see it run.

    First, I pushed it to Pivotal Application Service (PAS) because I make good choices. I can push code or containers here. This single command takes that Docker image, deploys it, and gives me a routable endpoint in 20 seconds.

    cf push vmworld-demo --docker-image rseroter/vmworld-demo -i 2
    

    That worked great, and my endpoint returned the expected values after I added an environment variable to the app.

    Can I deploy the same container to Azure Web Apps? Sure. That takes code or containers too. I walked through the wizard experience in the Azure Portal and chose the Docker Hub image created by kpack.

    After a few minutes, the service was up. Then I set the environment variable that the Spring Boot app was looking for (appruntime to “Azure App Service”) and another to expose the right port (WEBSITES_PORT to 8080), and pinged the RESTful endpoint.

    Whatever tech you land on, just promise me that you’ll invest in a container patching strategy. Automation is non-negotiable, and there are good solutions out there that can improve your security posture, while speeding up software delivery.

  • Fronting web sites, a classic .NET app, and a serverless function with Spring Cloud Gateway

    Fronting web sites, a classic .NET app, and a serverless function with Spring Cloud Gateway

    Automating deployment of custom code and infrastructure? Not always easy, but feels like a solved problem. It gets trickier when you want to use automation to instantiate and continuously update databases and middleware. Why? This type of software stores state which makes upgrades more sensitive. You also may be purchasing this type of software from vendors who haven’t provided a full set of automation-friendly APIs. Let’s zero in on one type of middleware: API gateways.

    API gateways do lots of things. They selectively expose private services to wider audiences. With routing rules, they make it possible to move clients between versions of a service without them noticing. They protect downstream services by offering capabilities like rate limiting and caching. And they offer a viable way for those with a microservices architecture to secure services without requiring each service to do their own authentication. Historically, your API gateway was a monolith of its own. But a new crop of automation-friendly OSS (and cloud-hosted) options are available, and this gives you new ways to deploy many API gateway instances that get continuously updated.

    I’ve been playing around with Spring Cloud Gateway, which despite its name, can proxy traffic to a lot more than just Spring Boot applications. In fact, I wanted to try and create a configuration-only-no-code API Gateway that could do three things:

    1. Weighted routing between “regular’ web pages on the internet.
    2. Add headers to a JavaScript function running in Microsoft Azure.
    3. Performing rate-limiting on a classic ASP.NET Web Service running on the Pivotal Platform.

    Before starting, let me back up and briefly explain what Spring Cloud Gateway is. Basically, it’s a project that turns a Spring Boot app into an API gateway that routes requests while applying cross-cutting functionality for things like security. Requests come in, and if the request matches a declared route, the request is passed through a series of filters, sent to the target endpoint, and “post” filters get applied on the way back to the client. Spring Cloud Gateway built on a Reactive base, which means it’s non-blocking and efficiently handles many simultaneous requests.

    The biggest takeaway? This is just an app. You can write tests and do continuous integration. You can put it on a pipeline and continuously deliver your API gateway. That’s awesome.

    Note that you can easily follow along with the steps below without ANY Java knowledge! Everything I’m doing using configuration you can also do with the Java DSL, but I wanted to prove how straightforward the configuration-only option is.

    Creating the Spring Cloud Gateway project

    This is the first, and easiest, part of this demonstration. I went to start.spring.io, and generated a new Spring Boot project. This project has dependencies on Gateway (to turn this into an API gateway), Spring Data Reactive Redis (for storing rate limiting info), and Spring Boot Actuator (so we get “free” metrics and insight into the gateway). Click this link to generate an identical project.

    Doing weighed routing between web pages

    For the first demonstration, I wanted to send traffic to either spring.io or pivotal.io/spring-app-framework. You might use weighted routing to do A/B testing with different versions of your site, or even to send a subset of traffic to a new API.

    I added an application.yml file (to replace the default application.properties file) to hold all my configuration settings. Here’s the configuration, and we’ll go through it bit by bit.

    spring:
      cloud:
        gateway:
          routes:
          # doing weighted routing between two sites
          - id: test1
            uri: https://www.pivotal.io
            predicates:
            - Path=/spring
            - Weight=group1, 3
            filters:
            - SetPath=/spring-app-framework
          - id: test2
            uri: https://www.spring.io
            predicates:
            - Path=/spring
            - Weight=group1, 7
            filters:
            - SetPath=/
    

    Each “route” is represented by a section in the YAML configuration. A route has a URI (which represents the downstream host), and a route predicate that indicates the path on the gateway you’re invoking. For example, in this case, my path is “/spring” which means that sending a request to “localhost:8080/spring” would map to this route configuration.

    Now, you’ll see I have two routes with the same path. These are part of the same weighted routing group, which means that traffic to /spring will go to one of the two downstream endpoints. The second endpoint is heavily weighted (7 vs 3), so most traffic goes there. Also see that I applied one filter to clear out the path. If I didn’t do this, then requests to localhost:8080/spring would result in a call to spring.io/spring, as the path (and querystring) is forwarded. Instead, I stripped that off for requests to spring.io, and added the secondary path into the pivotal.io endpoint.

    I’ve got Java and Maven installed locally, so a simple command (mvn spring-boot:run) starts up my Spring Cloud Gateway. Note that so far, I’ve written exactly zero code. Thanks to Spring Boot autoconfiguration and dependency management, all the right packages exist and runtime objects get inflated. Score!

    Once, the Spring Cloud Gateway was up and running, I pinged the Gateway’s endpoint in the browser. Note that some browser’s try to be helpful by caching things, which screws up a weighted routing demo! I opened the Chrome DevTools and disabled request caching before running a test.

    That worked great. Our gateway serves up a single endpoint, but through basic configuration, I can direct a subset of traffic somewhere else.

    Adding headers to serverless function calls

    Next, I wanted to stick my gateway in front of some serverless functions running in Azure Functions. You could imagine having a legacy system that you were slowly strangling and replacing with managed services, and leveraging Spring Cloud Gateway to intercept calls and redirect to the new destination.

    For this example, I built a dead-simple JavaScript function that’s triggered via HTTP call. I added a line of code that prints out all the request headers before sending a response to the caller.

    The Spring Cloud Gateway configuration is fairly simple. Let’s walk through it.

    spring:
      cloud:
        gateway:
          routes:
          # doing weighted routing between two sites
          - id: test1
            ...
          # adding a header to an Azure Function request
          - id: test3
            uri: https://seroter-function-app.azurewebsites.net
            predicates:
            - Path=/function
            filters:
            - SetPath=/api/HttpTrigger1
            - SetRequestHeader=X-Request-Seroter, Pivotal
    

    Like before, I set the URI to the target host, and set a gateway path. On the pre-filters, I reset the path (removing the /function and replacing with the “real” path to the Azure Function) and added a new request header.

    I started up the Spring Cloud Gateway project and sent in a request via Postman. My function expects a “name” value, which I provided as a query parameter.

    I jumped back to the Azure Portal and checked the logs associated with my Azure Function. Sure enough, I see all the HTTP request headers, including the random one that I added via the gateway. You could imagine this type of functionality helping if you have modern endpoints and legacy clients and need to translate between them!

    Applying rate limiting to an ASP.NET Web Service

    You know what types of apps can benefit from an API Gateway? Legacy apps that weren’t designed for high load or modern clients. One example is rate limiting. Your legacy service may not be able to handle internet-scale requests, or have a dependency on a downstream system that isn’t mean to get pummeled with traffic. You can apply request caching and rate limiting to prevent clients from burying the legacy app.

    First off, I built a classic ASP.NET Web Service. I hoped to never use SOAP again, but I’m dedicated to my craft.

    I did a “cf push” to my Pivotal Application Service environment and deployed two instances of the app to a Windows environment. In a few seconds, I had a publicly-accessible endpoint.

    Then it was back to my Gateway configuration. To do rate limiting, you need a way to identify callers. You know, some way to say that client X has exceeded their limit. Out of the box, there’s a rate limiter that uses Redis to store information about clients. That means I need a Redis instance. The simplest answer is “Docker”, so I ran a simple command to get Redis running locally (docker run --name my-redis -d -p 6379:6379 redis).

    I also needed a way to identify the caller. Here, I finally had to write some code. Specifically, this rate limiter filter expects a “key resolver.” I don’t see a way to declare one via configuration, so I opened the .java file in my project and added a Bean declaration that pulls a query parameter named “user.” That’s not enterprise ready (as you’d probably pull source IP, or something from a header), but this’ll do.

    @SpringBootApplication
    public class CloudGatewayDemo1Application {
    
      public static void main(String[] args) {	 
       SpringApplication.run(CloudGatewayDemo1Application.class, args);
      }
    	
      @Bean
      KeyResolver userKeyResolver() {
        return exchange -> 
       Mono.just(exchange.getRequest().getQueryParams().getFirst("user"));
      }
    }
    

    All that was left was my configuration. Besides adding rate limiting, I also wanted to to shield the caller from setting all those gnarly SOAP-related headings, so I added filters for that too.

    spring:
      cloud:
        gateway:
          routes:
          # doing weighted routing between two sites
          - id: test1
            ...
            
          # adding a header to an Azure Function request
          - id: test3
            ...
            
          # introducing rate limiting for ASP.NET Web Service
          - id: test4
            uri: https://aspnet-web-service.apps.pcfone.io
            predicates:
            - Path=/dotnet
            filters:
            - name: RequestRateLimiter
              args:
                key-resolver: "#{@userKeyResolver}"
                redis-rate-limiter.replenishRate: 1
                redis-rate-limiter.burstCapacity: 1
            - SetPath=/MyService.asmx
            - SetRequestHeader=SOAPAction, http://pivotal.io/SayHi
            - SetRequestHeader=Content-Type, text/xml
            - SetRequestHeader=Accept, text/xml
    

    Here, I set the replenish rate, which is how many request per second per user, and burst capacity, which is the max number of requests in a single second. And I set the key resolver to that custom bean that reads the “user” querystring parameter. Finally, notice the three request headers.

    I once again started up the Spring Cloud Gateway, and send a SOAP payload (no extra headers) to the localhost:8080/dotnet endpoint.

    A single call returned the expected response. If I rapidly submitted requests in, I saw an HTTP 429 response.

    So almost zero code to do some fairly sophisticated things with my gateway. None of those things involved a Java microservice, although obviously, Spring Cloud Gateway does some very nice things for Spring Boot apps.

    I like this trend of microservices-machinery-as-code where I can test and deploy middleware the same way I do custom apps. The more things we can reliably deliver via automation, the more bottlenecks we can remove.

  • Eight things your existing ASP.NET apps should get for “free” from a good platform

    Eight things your existing ASP.NET apps should get for “free” from a good platform

    Of all the app modernization strategies, “lift and shift” is my least favorite. To me, picking up an app and dropping it onto a new host is like transferring your debt to a new credit card with a lower interest rate. It’s better, but mostly temporary relief. That said, if your app can inherit legitimate improvements without major changes by running on a new platform, you’d be crazy to not consider it.

    Examples? Here are eight things I think you should expect of a platform that runs your existing .NET apps. And when I say “platform”, I don’t mean an infrastructure host or container runtime. Rather, I’m talking about application-centric platform that supplies what’s needed for a fully configured, routable app. I’ll use Azure Web Apps (part of Azure App Service) and Pivotal Cloud Foundry (PCF) as the demo platforms for this post.

    #1 Secure app packaging

    First, a .NET-friendly app platform should package up my app for me. Containers are cool. I’ll be happy if I never write another Dockerfile, though. Just get me from source-to-runnable-artifact as easily as possible. This can be a BIG value-add for existing .NET apps where getting them to production is a pain in the neck.

    Both Azure Web Apps and PCF do this for me.

    I built a “classic” ASP.NET Web Service to simulate a legacy app that I want to run on one of these new-fangled platforms. The source code is in GitHub, so you can follow along. This SOAP web service returns a value, and also does things like pull values from environment variables, and writes out log statements.

    To deploy it to Azure Web Apps using the Azure CLI, I followed a few steps, none of which required up-front containerization. First, I created a “plan” for my app, which can include things like a resource group, data center location, and more.

    az appservice plan create -g demos -n BlogPlan 

    Next, I created the actual Web App. For the moment, I didn’t point to source code, but just provisioned the environment. In reality, this creates lightweight Windows Server VMs. Microsoft did recently add experimental support for Windows Containers, but I’m not using that here.

    az webapp create -g demos -p BlogPlan -n aspnetservice

    Finally, I pointed my web app to the source code. There are a number of options here, and I chose the option to pull from GitHub.

    az webapp deployment source config -n aspnetservice -g
    demos --repo-url https://github.com/rseroter/classic-aspnet-web-service
    --branch master --repository-type github

    After a few minutes, I saw everything show up in the Azure portal. Microsoft took care of the packaging of my application and properly laying it atop a managed runtime. I manually went into the “Application Settings” properties for my Web App and added environment variables too.

    PCF (and Pivotal Application Service, specifically) is similar, and honestly a bit easier. While I could have published this .NET Framework project completely as-is to PCF, I did add a manifest.yml file to the project. This file simply tells Cloud Foundry what to name the app, how many instances to run, and such. From the local git repo, I used the Cloud Foundry CLI to simply cf push. This resulted in my app artifacts getting uploaded, a buildpack compiling and packaging the app, and a Windows Container spinning up on the platform. Yes, it’s a full-on Windows Server Container, built on your behalf, and managed by the platform.

    When I built this project using Visual Studio for Mac, I could only push the app to PCF. Azure kept gurgling about a missing build profile. Once I built the app using classic Visual Studio on Windows, it all worked. Probably user error.

    Either way, both platforms took care of building up the runnable artifact. No need for me to find the right Windows base image, and securely configure the .NET runtime. That’s all taken care of by a good platform.

    #2 Routable endpoints

    A web app needs to be reachable. SHOCKING, I KNOW. Simply deploying an application to a VM or container environment isn’t the end state. A good platform also ensures that my app has a routable endpoint that humans or machines can access. Again, for existing .NET apps, if you have a way to speed up the path to production by making apps reachable in seconds, that’s super valuable.

    For Azure Web Apps, this is built-in. When I deployed the app above, I immediately got a URL back from the platform. Azure Web Apps automatically takes care of getting me an HTTP/S endpoint.

    Same for PCF. When you push an app to PCF, you immediately get a load balanced network route. And you have complete control over DNS names, etc. And you can easily set up TCP routes in addition to HTTP/S ones.

    It’s one thing to get app binaries onto a host. For many, it’s a whole DIFFERENT task to get routable IPs, firewalls opened up, load balancers configured, and all that gooey networking stuff required to call an app “ready.” A good application platform does that, especially for .NET apps.

    #3 Log aggregation

    As someone who had to spend lots of time scouring Windows Event Logs to troubleshoot, I’m lovin’ the idea of something that automatically collects application logs from all the hosts. If you have existing .NET apps and don’t like spelunking around for logs, a good application platform should help.

    Azure Web Apps offers built-in log collection and log streaming. These are something you turn on (after picking where to store the logs), but it’s there.

    PCF immediately starts streaming application logs when you deploy an app, and also has collectors for things like the Windows Event Log. As you see below, after calling my ASP.NET Web Service a few times, I see the log output, and the reference to the individual hosts each instance is running on (pulled from the environment and written to the log). You can pipe these aggregated logs to off-platform environments like Splunk or even Azure Log Analytics.

    Log aggregation is one of those valuable things you may not consider up front, but it’s super handy if the platform does it for you automatically.

    #4 App metrics collection and app monitoring

    No matter how great, no platform will magically light up your existing apps with unimaginable telemetry. But, a good application platform does automatically capture infrastructure and application metrics and correlate them. And preferably, such a platform does it without requiring you to explicitly add monitoring agents or code to your existing app. If your .NET app can instantly get high quality, integrated monitoring simply by running somewhere else, that’s good, right?

    Does Azure Web Apps do this? You betcha. By default, you get some basic traffic-in/traffic-out sort of metrics on the Web Apps dashboard in the Azure Portal.

    Once you flip on Application Insights (not on by default), you get a much, much deeper look at your running application. This seems pretty great, and it “just works” with my old-and-busted ASP.NET Web Service.

    Speaking of “just works”, the same applies to PCF and your .NET Framework apps. After I pushed the ASP.NET Web Service to PCF, I automatically saw a set of data points, thanks to the included, integrated PCF Metrics service.

    It’s simple to add, remove, or change charts based on included or your own custom metrics. And the application logs get correlated here, so clicking on a time slice in the chart also highlights logs from that time period.

    For either Azure or PCF, you can use best-of-breed application performance monitoring tools like New Relic too. Whatever you do, expect that your .NET applications get native access to at-scale monitoring capabilities.

    #5 Manual or auto-scaling

    An application platform knows how to scale apps. Up or down, in or out. Manually or automatically. If “file a ticket” is your scaling strategy, maybe it’s time for a new one?

    As you’d expect, both Azure and PCF make app scaling easy, even on Windows Server. Azure Web Apps let you scale the amount of allocated resources (up or down) and number of instances (in or out). Because I was a cheapskate with my Azure Web App, I chose a tier that didn’t support autoscaling. So, know ahead of time what you’ve chosen as it can impact how much you can scale.

    For PCF, there aren’t any “plans” that constrain features. So I can either manually scale resource allocation or instance count, or define an auto-scale policy that triggers based on resource consumption, queue depth, or HTTP traffic.

    Move .NET apps to a platform that improve app resilience. One way you get that is through easy, automated scaling.

    #6 Fault detection and recovery

    If you’re lifting-and-shifting .NET apps, you’re probably not going back and fixing a lot of stuff. Maybe your app has a memory leak and crashes every 14 hours. And maybe you wrote a Windows Scheduled Task that bounces the web server’s app pool every 13 hours to prevent the crash. NO ONE IS JUDGING YOU. A good platform knows that things went wrong, and automatically recovers you to a good state.

    Now, most of the code I write crashes on its own, but I wanted to be even more explicit to see how each platform handles unexpected failures. So, I did a VERY bad thing. I created a SOAP endpoint that violently aborts the thread.

    [WebMethod]
    public void CrashMe()
    {
        System.Threading.Thread.CurrentThread.Abort();
    }

    After calling that endpoint on the Azure Web Apps-hosted service, the instance crashed, and Azure resurrected after a minute or two. Nice!

    In PCF, things worked the same way. Since we’re dealing with Windows Server Containers in PCF, the recovery was faster. You can see in the screenshot below that the app instance crashed, and a new instance immediately spawned to replace it.

    Cool. My classic .NET Framework app gets auto-recovery in these platforms. This is an underrated feature, but one you should demand.

    #7 Underlying infrastructure access

    One of the biggest benefits of PaaS is that developers can stop dealing with infrastructure. FINALLY. The platform should do all the things above so that I never mess with servers, networking, agents, or anything that makes me sad. That said, sometimes you do want to dip into the infrastructure. For a legacy .NET app, maybe you want to inspect a temporary log file written to disk, see what got installed into which directories, or even to download extra bits after deploying the app. I’d barely recommend doing any of those things on ephemeral instances, but sometimes the need is there.

    Both Azure and PCF make it straightforward to access the application instances. From the Azure portal, I can dip into a console pointing at the hosting VM.

    I can browse elsewhere on the hosting VM, but only have r/w access to the directory the console drops me into.

    PCF uses Windows Server Containers, so I could SSH right into it. Once I’m in this isolated space, I have r/w access to lots of things. And can trigger PowerShell commands and more.

    If infrastructure access is REQUIRED to deploy and troubleshoot your app, you’re not using an application platform. And that may be fine, but you should expect more. For those cases when you WANT to dip down to the host, a platform should offer a pathway.

    #8 Zero-downtime deployment

    Does your .NET Framework app need to be rebuilt to support continuous updates? Not necessarily. In fact, a friendly .NET app platform makes it possible to keep updating the app in production without taking downtime.

    Azure Web Apps offers deployment slots. This makes it possible to publish a new version, and swap it out for what’s already running. It’s a cool feature that requires a “standard” or “premium” plan to use.

    PCF supports rolling deployments for apps written in any language, to Windows or Linux. Let’s say I have four instances of my app running. I made a small code change to my ASP.NET Web Service and did a cf v3-zdt-push aspnet-web-service. This command did a zero-downtime push, which means that new instances of the app replaced old instances, without disrupting traffic. As you can see below, 3 of the instances were swapped out, and the fourth one was coming online. When the fourth came online, it replaced the last remaining “old” instance of the app.

    Over time, you should probably replatform most .NET Framework apps to .NET Core. It makes sense for many reasons. But that journey may take a decade. Find platforms that treat Windows and Linux, .NET Framework and .NET Core the same way. Expect all these 8 features in your platform of choice so that you get lots of benefits for “free” until you can do further modernization.

  • Go “multi-cloud” while *still* using unique cloud services? I did it using Spring Boot and MongoDB APIs.

    Go “multi-cloud” while *still* using unique cloud services? I did it using Spring Boot and MongoDB APIs.

    What do you think of when you hear the phrase “multi-cloud”? Ok, besides stupid marketing people and their dumb words. You might think of companies with on-premises environments who are moving some workloads into a public cloud. Or those who organically use a few different clouds, picking the best one for each workload. While many suggest that you get the best value by putting everything on one provider, that clearly isn’t happening yet. And maybe it shouldn’t. Who knows. But can you get the best of each cloud while retaining some portability? I think you can.

    One multi-cloud solution is to do the lowest-common-denominator thing. I really don’t like that. Multi-cloud management tools try to standardize cloud infrastructure but always leave me disappointed. And avoiding each cloud’s novel services in the name of portability is unsatisfying and leaves you at a competitive disadvantage. But why should we choose the cloud (Azure! AWS! GCP!) and runtime (Kubernetes! VMs!) before we’ve even written a line of code? Can’t we make those into boring implementation details, and return our focus to writing great software? I’d propose that with good app frameworks, and increasingly-standard interfaces, you can create great software that runs on any cloud, while still using their novel services.

    In this post, I’ll build a RESTful API with Spring Boot and deploy it, without code changes, to four different environments, including:

    1. Local environment running MongoDB software in a Docker container.
    2. Microsoft Azure Cosmos DB with MongoDB interface.
    3. Amazon DocumentDB with MongoDB interface.
    4. MongoDB Enterprise running as a service within Pivotal Cloud Foundry

    Side note: Ok, so multi-cloud sounds good, but it seems like a nightmare of ops headaches and nonstop dev training. That’s true, it sure can be. But if you use a good multi-cloud app platform like Pivotal Cloud Foundry, it honestly makes the dev and ops experience virtually the same everywhere. So, it doesn’t HAVE to suck, although there are still going to be challenges. Ideally, your choice of cloud is a deploy-time decision, not a design-time constraint.

    Creating the app

    In my career, I’ve coded (poorly) with .NET, Node, and Java, and I can say that Spring Boot is the fastest way I’ve seen to build production-quality apps. So, I chose Spring Boot to build my RESTful API. This API stores and returns information about cloud databases. HOW VERY META. I chose MongoDB as my backend database, and used the amazing Spring Data to simplify interactions with the data source.

    From start.spring.io, I created a project with dependencies on spring-boot-starter-data-rest (auto-generated REST endpoints for interacting with databases), spring-boot-starter-data-mongodb (to talk to MongoDB), spring-boot-starter-actuator (for “free” health metrics), and spring-cloud-cloudfoundry-connector (to pull connection details from the Cloud Foundry environment). Then I opened the project and created a new Java class representing a CloudProvider.

    package seroter.demo.cloudmongodb;
    
    import org.springframework.data.annotation.Id;
    
    public class CloudProvider {
    	
    	@Id private String id;
    	
    	private String providerName;
    	private Integer numberOfDatabases;
    	private Boolean mongoAsService;
    	
    	public String getProviderName() {
    		return providerName;
    	}
    	
    	public void setProviderName(String providerName) {
    		this.providerName = providerName;
    	}
    	
    	public Integer getNumberOfDatabases() {
    		return numberOfDatabases;
    	}
    	
    	public void setNumberOfDatabases(Integer numberOfDatabases) {
    		this.numberOfDatabases = numberOfDatabases;
    	}
    	
    	public Boolean getMongoAsService() {
    		return mongoAsService;
    	}
    	
    	public void setMongoAsService(Boolean mongoAsService) {
    		this.mongoAsService = mongoAsService;
    	}
    }

    Thanks to Spring Data REST (which is silly powerful), all that was left was to define a repository interface. If all I did was create an annotate the interface, I’d get full CRUD interactions with my MongoDB collection. But for fun, I also added an operation that would return all the clouds that did (or did not) offer a MongoDB service.

    package seroter.demo.cloudmongodb;
    
    import java.util.List;
    
    import org.springframework.data.mongodb.repository.MongoRepository;
    import org.springframework.data.rest.core.annotation.RepositoryRestResource;
    
    @RepositoryRestResource(collectionResourceRel = "clouds", path = "clouds")
    public interface CloudProviderRepository extends MongoRepository<CloudProvider, String> {
    	
    	//add an operation to search for a specific condition
    	List<CloudProvider> findByMongoAsService(Boolean mongoAsService);
    }

    That’s literally all my code. Crazy.

    Run using Dockerized MongoDB

    To start this test, I wanted to use “real” MongoDB software. So I pulled the popular Docker image and started it up on my local machine:

    docker run -d -p 27017:27017 --name serotermongo mongo

    When starting up my Spring Boot app, I could provide database connection info (1) in an app.properties file, or, as (2) input parameters that require nothing in the compiled code package itself. I chose the file option for readability and demo purposes, which looked like this:

    #local configuration
    spring.data.mongodb.uri=mongodb://0.0.0.0:27017
    spring.data.mongodb.database=demodb
    
    #port configuration
    server.port=${PORT:8080}

    After starting the app, I issued a base request to my API via Postman. Sure enough, I got a response. As expected, no data in my MongoDB database. Note that Spring Data automatically creates a database if it doesn’t find the one specified, so the “demodb” now existed.

    I then issued a POST command to add a record to MongoDB, and that worked great too. I got back the URI for the new record in the response.

    I also tried calling that custom “search” interface to filter the documents where “mongoAsService” is true. That worked.

    So, running my Spring Boot REST API with a local MongoDB worked fine.

    Run using Microsoft Azure Cosmos DB

    Next up, I pointed this application to Microsoft Azure. One of the many databases in Azure is Cosmos DB. This underrated database offers some pretty amazing performance and scale, and is only available from Microsoft in their cloud. NO PROBLEM. It serves up a handful of standard interfaces, including Cassandra and MongoDB. So I can take advantage of all the crazy-great hosting features, but not lock myself into any of them.

    I started by visiting the Microsoft Azure portal. I chose to create a new Cosmos DB instance, and selected which API (SQL, Cassandra, Gremlin, MongoDB) I wanted.

    After a few minutes, I had an instance of Cosmos DB. If I had wanted to, I could have created a database and collection from the Azure portal, but I wanted to confirm that Spring Data would do it for me automatically.

    I located the “Connection String” properties for my new instance, and grabbed the primary one.

    With that in hand, I went back to my application.properties file, commented out my “local” configuration, and added entries for the Azure instance.

    #local configuration
    #spring.data.mongodb.uri=mongodb://0.0.0.0:27017
    #spring.data.mongodb.database=demodb
    
    #port configuration
    server.port=${PORT:8080}
    
    #azure cosmos db configuration
    spring.data.mongodb.uri=mongodb://seroter-mongo:<password>@seroter-mongo.documents.azure.com:10255/?ssl=true&replicaSet=globaldb
    spring.data.mongodb.database=demodb

    I could publish this app to Azure, but because it’s also easy to test it locally, I just started up my Spring Boot REST API again, and pinged the database. After POSTing a new record to my endpoint, I checked the Azure portal and sure enough, saw a new database and collection with my “document” in it.

    Here, I’m using a super-unique cloud database but don’t need to manage my own software to remain “portable”, thanks to Spring Boot and MongoDB interfaces. Wicked.

    Run using Amazon DocumentDB

    Amazon DocumentDB is the new kid in town. I wrote up an InfoQ story about it, which frankly inspired me to try all this out.

    Like Azure Cosmos DB, this database isn’t running MongoDB software, but offers a MongoDB-compatible interface. It also offers some impressive scale and performance capabilities, and could be a good choice if you’re an AWS customer.

    For me, trying this out was a bit of a chore. Why? Mainly because the database service is only accessible from within an AWS private network. So, I had to properly set up a Virtual Private Cloud (VPC) network and get my Spring Boot app deployed there to test out the database. Not rocket science, but something I hadn’t done in a while. Let me lay out the steps here.

    First, I created a new VPC. It had a single public subnet, and I added two more private ones. This gave me three total subnets, each in a different availability zone.

    Next, I switched to the DocumentDB console in the AWS portal. First, I created a new subnet group. Each DocumentDB cluster is spread across AZs for high availability. This subnet group contains both the private subnets in my VPC.

    I also created a parameter group. This group turned off the requirement for clients to use TLS. I didn’t want my app to deal with certs, and also wanted to mess with this capability in DocumentDB.

    Next, I created my DocumentDB cluster. I chose an instance class to match my compute and memory needs. Then I chose a single instance cluster; I could have chosen up to 16 instances of primaries and replicas.

    I also chose my pre-configured VPC and the DocumentDB subnet group I created earlier. Finally, I set my parameter group, and left default values for features like encryption and database backups.

    After a few minutes, my cluster and instance were up and running. While this console doesn’t expose the ability to create databases or browse data, it does show me health metrics and cluster configuration details.

    Next, I took the connection string for the cluster, and updated my application.properties file.

    #local configuration
    #spring.data.mongodb.uri=mongodb://0.0.0.0:27017
    #spring.data.mongodb.database=demodb
    
    #port configuration
    server.port=${PORT:8080}
    
    #azure cosmos db configuration
    #spring.data.mongodb.uri=mongodb://seroter-mongo:<password>@seroter-mongo.documents.azure.com:10255/?ssl=true&replicaSet=globaldb
    #spring.data.mongodb.database=demodb
    
    #aws documentdb configuration
    spring.data.mongodb.uri=mongodb://seroter:<password>@docdb-2019-01-27-00-20-22.cluster-cmywqx08yuio.us-west-2.docdb.amazonaws.com:27017
    spring.data.mongodb.database=demodb

    Now to deploy the app to AWS. I chose Elastic Beanstalk as the application host. I selected Java as my platform, and uploaded the JAR file associated with my Spring Boot REST API.

    I had to set a few more parameters for this app to work correctly. First, I set a SERVER_PORT environment variable to 5000, because that’s what Beanstalk expects. Next, I ensured that my app was added to my VPC, provisioned a public IP address, and chose to host on the public subnet. Finally, I set the security group to the default one for my VPC. All of this should ensure that my app is on the right network with the right access to DocumentDB.

    After the app was created in Beanstalk, I queried the endpoint of my REST API. Then I created a new document, and yup, it was added successfully.

    So again, I used a novel, interesting cloud-only database, but didn’t have to change a lick of code.

    Run using MongoDB in Pivotal Cloud Foundry

    The last place to try this app out? A multi-cloud platform like PCF. If you did use something like PCF, the compute layer is consistent regardless of what public/private cloud you use, and connectivity to data services is through a Service Broker. In this case, MongoDB clusters are managed by PCF, and I get my own cluster via a Broker. Then my apps “bind” to that cluster.

    First up, provisioning MongoDB. PCF offers MongoDB Enterprise from Mongo themselves. To a developer, this looks like a database-as–a-service because clusters are provisioned, optimized, backed up, and upgraded via automation. Via the command line or portal, I could provision clusters. I used the portal to get myself happy little instance.

    After giving the service a name, I was set. As with all the other examples, no code changes were needed. I actually removed any MongoDB-related connection info from my application.properties file because that spring-cloud-cloudfoundry-connector dependency actually grabs the credentials from the environment variables set by the service broker.

    One thing I *did* create for this environment — which is entirely optional — is a Cloud Foundry manifest file. I could pass these values into a command line instead of creating a declarative file, but I like writing them out. These properties simply tell Cloud Foundry what to do with my app.

    ---
    applications:
    - name: boot-seroter-mongo
      memory: 1G
      instances: 1
      path: target/cloudmongodb-0.0.1-SNAPSHOT.jar
      services:
      - seroter-mongo

    With that, I jumped to a terminal, navigated to a directory holding that manifest file, and typed cf push. About 25 seconds later, I had a containerized, reachable application that connected to my MongoDB instance.

    Fortunately, PCF treats Spring Boot apps special, so it used the Spring Boot Actuator to pull health metrics and more. Above, you can see that for each instance, I saw extra health information for my app, and, MongoDB itself.

    Once again, I sent some GET requests into my endpoint, saw the expected data, did a POST to create a new document, and saw that succeed.

    Wrap Up

    Now, obviously there are novel cloud services without “standard” interfaces like the MongoDB API. Some of these services are IoT, mobile, or messaging related —although Azure Event Hubs has a Kafka interface now, and Spring Cloud Stream keeps message broker details out of the code. Other unique cloud services are in emerging areas like AI/ML where standardization doesn’t really exist yet. So some applications will have a hard coupling to a particular cloud, and of course that’s fine. But increasingly, where you run, how you run, and what you connect to, doesn’t have to be something you choose up front. Instead, first you build great software. Then, you choose a cloud. And that’s pretty cool.

  • My new book on modernizing .NET applications is now available!

    My new book on modernizing .NET applications is now available!

    I might be the first person to write a technical book because of peer pressure. Let me back up. 

    I’m fortunate to be surrounded by smart folks at Pivotal. Many of them write books. We usually buy copies of them to give out at conferences. After one of conferences in May, my colleague Nima pointed out that folks wanted a book about .NET. He then pushed all the right buttons to motivate me.

    So, I signed a contract with O’Reilly Media in June, started writing in July, and released the book yesterday.

    Modernizing .NET Applications is a 100-page book that for now, is free from Pivotal. At some point soon, O’Reilly will put it on Safari (and other channels). So what’s in this book, before you part with your hard-earned email address?

    Chapter 1 looks at why app modernization actually matters. I define “modernization” and give you a handful of reasons why you should do it. Chapter 2 offers an audit of what .NET software you’re running today, and why you’re motivated to upgrade it. Chapter 3 takes a quick look at the types of software your stakeholders are asking you to create now. Chapter 4 defines “cloud-native” and explains why you should care. I also define some key characteristics of cloud-native software and what “good” looks like. 

    Chapter 5 helps you decide between using the .NET Framework or .NET Core for your applications. Then in Chapter 6, I lay out the new anti-patterns for .NET software and what things you have to un-learn. Chapter 7 calls out some of the new components that you’ll want to introduce to your modernized .NET apps. Chapter 8 helps you decide where you should run your .NET apps, with an assessment of all the various public/private software abstractions to choose from. Chapter 9 digs into five specific recipes you should follow to modernize your apps. These include event storming, externalized configuration, remote session stores, token-based security schemes, and apps on pipelines. Finally, Chapter 10 leaves you with some next steps.

    I’ve had the pleasure/pain of writing books before, and have held off doing it again since our tech information consumption patterns have changed. But, it seems like there’s still a hunger for long-form content, and I’m passionate about .NET developers. So, I invested in a topic I care about, and hopefully wrote a book in a way that you find enjoyable to read.

    Go check it out, and tell me what you think!

  • Wait, THAT runs on Pivotal Cloud Foundry? Part 5 – .NET Framework apps

    Wait, THAT runs on Pivotal Cloud Foundry? Part 5 – .NET Framework apps

    Looking for a host suitable for .NET Framework apps? Windows Server virtual machines are almost your only option. The only public cloud PaaS product that offers a higher abstraction than virtual machines is Azure’s App Service. And that’s not really meant to run an entire enterprise portfolio. So … what to do? Don’t say “switch to .NET Core and run on all the Linux-based platforms” because that’s cheating. What can you do today? The best option you don’t know about is Pivotal Cloud Foundry (PCF). In this post, I’ll show you how to easily deploy and operate .NET apps in PCF on any infrastructure.

    This is part five of a five part series. Hopefully you’ve enjoyed my exploration of workloads you might not expect to see on a cloud-native platform like PCF.

    About PAS for Windows

    Quickly, I want to tell you about Pivotal Application Service (PAS) for Windows. Recall that PCF is really made up of two software abstractions atop a sophisticated infrastructure management platform (BOSH): Pivotal Application Service (for apps) and Pivotal Container Service (for raw containers). PAS for Windows extends PAS with managed Windows Server instances. As an operator, you can deploy, patch, upgrade, and operate Windows Server instances entirely through automation. For developers, you get a on-demand, scalable host that supports remote debugging and much more. I feel pretty safe saying that this is better than whatever you’re doing today for Windows workloads!

    PAS for Windows extends PAS and uses all the same machinery

    Deploying a WCF application to PCF

    Let’s do this. First, I confirmed that I had a Windows “stack” available to me. In my PCF environment, I ran a cf stacks command.

    Yup, all good. I created a new Windows Communication Foundation (WCF) application targeting .NET Framework 4.0. All of your apps aren’t using the latest framework, so why should my sample? Note that you can run all types of classic .NET projects in PCF: ASP.NET Web Forms, MVC, Web API, WCF, console, and more.

    My WCF service doesn’t need to change at all to run in PCF. To publish to PCF, I just need to provide a set of command line parameters, or, write a manifest with those parameters. My manifest looked like this:

    ---
    applications:
    - name: blog-demo-wcf
    memory: 256M
    instances: 1
    buildpack: hwc_buildpack
    stack: windows2016
    env:
    betaflag: on

    There’s a buildpack just for .NET apps on Windows and all I have to do is push the code itself. About fifteen seconds after typing cf push, my WCF service was packaged up and loaded into a Windows Server container.

    Browsing the endpoint returned that familiar page of WCF service metadata. 

    Operating your .NET app on PCF

    It’s one thing to deploy an app, it’s another thing to manage it. PCF makes that pretty easy. After deploying a .NET app, I see some helpful metadata. It shows me the stack, buildpack, and any environment variables visible to the app.

    How long does it take you to get a new instance of your .NET app into production today? Weeks? Months? I just scaled up from one to three Windows container instances in less than ten seconds. I just love that.

    Any app written in any language gets access to the same set of PCF functionality. Your .NET Framework apps get built-in log aggregation, metrics and monitoring, autoscaling, and more. All in a multi-tenant environment. And with straightforward access to anything in the marketplace through the Service Broker interface. Want your .NET Framework app to talk to Azure’s Cosmos DB or Google Cloud Spanner? Just use the broker.

    Oh, and don’t forget that because PAS for Windows uses legit Windows Server containers, each app instance gets its own copy of the file system, registry, and GAC. You can see this by SSH-ing into the container. Yes, I said you could SSH in. It’s just a cf ssh command.

    That’s a full Windows file system, and I can even spin up Powershell in there. Crazy times.

  • Wait, THAT runs on Pivotal Cloud Foundry? Part 4 – Data pipelines

    Wait, THAT runs on Pivotal Cloud Foundry? Part 4 – Data pipelines

    Streaming is all the rage! No, not binge-watching Arrested Development on Netflix. Rather, I mean data stream processing: ingesting and handling infinite datasets. Instead of chewing through a nightly or weekly batch of records, you’re doing near real-time processing. Done correctly, this helps you improve data quality and make faster decisions. But how do you arrange the sequence of steps to process that data? Data pipelines! In this post, I’ll show you that this is yet another unexpected workload that runs pretty darn well on Pivotal Cloud Foundry (PCF).

    So far in this series, we’ve looked at other workloads ranging from Docker images to batch jobs.

    Let’s build a pipeline that processes a stream of shipment data that flows out of a relational database, gets enriched with additional info, and finally gets written to a log.

    Spinning up Spring Cloud Data Flow on PCF

    You could do streaming a few ways in PCF. You could manually deploy a PCF-managed instance of RabbitMQ, Solace PubSub+, or Apache Kafka. Or connect to a cloud-based broker like Azure Service Bus or Google Pub/Sub through a Service Broker. Any of those options give you a messaging backbone, but a data pipeline often involves a sequence of orchestrated steps. One turnkey solution that combines lightweight messaging with smart orchestration is Spring Cloud Data Flow (SCDF).

    While it’s not that challenging to install SCDF yourself, PCF bundles it all up into a single package. All it takes is deploying the “Data Flow Server” from the PCF marketplace.

    After BOSH built and deployed the Spring Cloud Data Flow server and dependent services (database, Redis cache, RabbitMQ instance), I also provisioned an instance of PostgreSQL from Crunchy Data. This is the source to my data stream.

    That was easy.  From this screen on PCF Apps Manager, I could click through and log into the SCDF dashboard. From here, I loaded all the Spring Cloud Stream App Starters. These are “just” Spring Boot apps, but we can use these to build data streams. We can build our own apps to, but it’s great to pre-load these starters. Note that everything I’m doing with this dashboard you can also do with a CLI.

    With that, I had everything I needed to build out my data pipeline. 

    Building and deploying a data pipeline

    Before building my pipeline, I wanted to prep my PostgreSQL database. To do this, I built a simple ASP.NET Core app that created a data table and added records. I deployed this to PCF, bound it to the Crunchy Data instance, and now had a way to instantiate my relational database and add rows.

    I wanted to enrich data as part of my data pipeline. When a “shipment” record comes out of PostgreSQL, it has an identifier for which warehouse it came from. I wanted to use that ID to look up the US state associated with the warehouse. I could try and use an out-of-the-box App Starter to do it, or just build my own. I chose the latter. What’s wicked is these are just Spring Cloud Stream apps. I created a new app from start.spring.io, created a POJO that represents a “warehouse shipment”, added an annotation and a method, and assembled the jar file. No other configurations needed! 

    @EnableBinding(Processor.class)
    @SpringBootApplication
    public class DemoPipelineEnricherApplication {
    
      public static void main(String[] args) {
         SpringApplication.run(DemoPipelineEnricherApplication.class, 
      args);
      }
    
      @StreamListener(Processor.INPUT)
      @SendTo(Processor.OUTPUT)
      public shipment EnrichShipment(shipment s) {
        switch(s.warehouse_id) {
        case 400:
            s.warehouse_location="CA";
            break;
        case 401:
            s.warehouse_location="WA";
            break;
        case 402:
            s.warehouse_location="TX";
            break;
        case 403:
            s.warehouse_location="FL";
            break;
        }
        return s;
      }
    }

    To make this app available to my new data pipeline, I needed to register it with the SCDF server. That means the jar file needed to be visible to the server. I uploaded the jar file to GitHub (better choices include the Maven repo, or another legit artifact repository) and registered it:

    It’s pipeline time! I designed a pipeline that started with a JDBC source, sent the individual rows to my “enricher” app, and then routed the results to the application log. For fun, I also tapped that result stream to count how many messages came in for each US state.

    The pipeline definition is something you can add to source control and version like any other deployment artifact. My pipeline looks like:

    warehouse-stream=jdbc
    --spring.datasource.username='[username]'
    --spring.datasource.url='jdbc:postgresql://[url]:5432/shipments'
    --jdbc.max-rows-per-poll=5 --jdbc.query='SELECT * FROM WarehouseShipments WHERE
    is_read=FALSE' --jdbc.update='UPDATE WarehouseShipments SET is_read=TRUE WHERE
    is_read=FALSE;' --spring.datasource.password='[password]' |
    demo-enricher | log 

    What’s cool is that after creating the stream, I had all sorts of deployment options for each app in the pipeline. That means that each app could have its own instance count and resource allocation. Much better than coarsely scaling the whole pipeline when just one component needs to scale! 

    After deploying the streams, I saw the underlying Spring Boot apps deployed to my PCF environment. SCDF is pretty sophisticated but still an easy-to-use platform!

    I continually added records to my PostgreSQL database, and saw them immediately stream through SCDF on PCF. Each individual message got enriched with additional details before printing out to the log.

    In this post, we saw that data pipelines have a natural home in PCF. Spring Cloud Data Flow is an ideal replacement for heavyweight ESB products in certain scenarios, and a replacement for ETL in others. Give it a try on PCF, Kubernetes, or other runtimes.

  • Wait, THAT runs on Pivotal Cloud Foundry? Part 3 – Background, batch, and scheduled jobs

    Wait, THAT runs on Pivotal Cloud Foundry? Part 3 – Background, batch, and scheduled jobs

    So far in this series of posts, we’ve seen that Pivotal Cloud Foundry (PCF) runs a lot more than just web applications. Not every app has a user-facing front-end component. Some of your systems run in the background or on a schedule and perform a variety of important tasks. In this post, I’ll take a look at how to deploy background workers, on-demand batch tasks, and scheduled jobs.

    This is the third in a five part series of posts:

    Deploying and running background workers

    Pivotal Cloud Foundry makes it easy to run workers that don’t have a routable address. These background jobs might listen to a database and respond to data changes, or respond to messages in a work queue. Let’s demonstrate the latter. 

    I built a .NET Core console app that’s responsible for pulling “loan” records from RabbitMQ and processing them. You can built these background jobs is any programming language supported by Cloud Foundry.

    What’s nice is that background jobs have access to all the useful PCF capabilities that web apps do. One such capability? Service Brokers! Devs love using Service Brokers to provision and access backing services. My background job needs access to RabbitMQ and I don’t want to hard-code any connection details. No big deal. I first spun up an on-demand RabbitMQ instance via the PCF Service Broker.

    My .NET Core app uses the Steeltoe Service Connector (and the RabbitMQ .NET Client) to load service broker connection info and talk to my instance.

    static void Main(string[] args){            
    //pull service broker configuration
    var builder = new ConfigurationBuilder()
    .AddEnvironmentVariables()
    .AddCloudFoundry();

    var configuration = builder.Build();
    //get our fully loaded service
    var services = new ServiceCollection();
    services.AddRabbitMQConnection(configuration);
    var provider = services.BuildServiceProvider();
    ConnectionFactory f = provider.GetService<ConnectionFactory>();

    //connect to RMQ
    using (var connection = f.CreateConnection())
    using (var channel = connection.CreateModel())
    {
    channel.QueueDeclare(queue: "loans", durable: true, exclusive: false, autoDelete: false, arguments: null);
    var consumer = new EventingBasicConsumer(channel);

    //fire up when a new message comes in
    consumer.Received += (model, ea) => {
    var body = ea.Body;
    var message = Encoding.UTF8.GetString(body);
    Console.WriteLine("[x] Received loan data: {0}", message);
    };
    channel.BasicConsume(queue: "loans", autoAck: true, consumer: consumer);
    Console.ReadLine();
    }
    }

    Apps deployed to Cloud Foundry are typically accompanied by a YAML manifest. You can provide the parameters on the CLI, but versioned, source-controlled manifests are a better way to go. For these background jobs, the manifests are simple. Note two key things: the no-route parameter is “true” so that we don’t get a route assigned, and the health-check-type is set to “process” so that the orchestrator monitors process availability and doesn’t try to ping a non-existent web endpoint. Also notice that I bound my app to the previously-created RabbitMQ service instance.

    ---  
    applications:
    - name: core-demo-background
    memory: 256M
    no-route: true
    health-check-type: process
    services:
    - seroter-rmq

    After a quick cf push, my background app was running, and bound to the RabbitMQ instance.

    This job quietly sits and waits for work to do. What’s neat is this can also take advantage of PCF’s autoscale capability, and scale by monitoring RabbitMQ queue depth, for example. For now, one instance is plenty. I logged into RabbitMQ and sent in a couple sample “loan” messages.

    Sure enough, when I viewed the aggregated application logs for my background job, I saw the content of each read message printed out. 

    These sorts of workers are a useful part of most systems, and PCF offers a resilient, manageable place to run them.

    Deploying and running on-demand batch tasks

    How many useful, random scripts do your system administrators have sitting around? You know, the ones that create users, reset demo environments, or purge FTP shares. Instead of having those scripts buried on administrator desktops, you can run these one-off batch jobs in PCF.

    I created another .NET Core console application. This one pretends to sweep expired files from a shared folder. I deployed this application to PCF with a –no-start command since I want to trigger it on demand.

    cf push --no-start

    Now, to trigger the job, I need to know the start command. This depends on how you deployed it. Since I used the .NET Core buildpack, I want to start up the app one time to discover how PCF starts up the app.

    That command showed me where the .NET Core executable lives in the container. I stopped the app again, and switched over the “Tasks” view in the PCF Apps Manager interface. I can do all these things via the CLI as well, but I’m a sucker for a nice UX. There’s a “run task” button that lets me define a one-off task definition.

    Here I gave the task a name, pasted the start command I found above, and that was it! When I hit, “run”, PCF instantiated a new container instance and shut down the container when the task was complete. And that’s what I saw. There was a log entry indicating a successful job run, and the application logs showed the output of the task. Nice!

    This is a great option for one-off jobs and scripts. Consolidate them in PCF, and get all the availability and auditing you need.

    Deploying and running scheduled jobs

    Finally, some of those one-off jobs may not be as one-off as you thought! Instead of asking your admin to trigger a task once a day to purge expired files, how about you schedule the job to run on a schedule? 

    PCF also offers a scheduling component to trigger tasks (or API calls!) on a recurring basis. On the same “tasks” tab of the PCF Apps Manager UX, there’s a “jobs” section for scheduled tasks. Besides giving the job a name and a command (the same as the task command above), you enter a Cron expression for the schedule itself. The expression is in a MIN HOUR DAY-OF-MONTH MONTH DAY-OF-WEEK format. For example “15 * ? * * *” means you should run the job every 15 minutes, and “30 10 * * 5” means you should run the job at 10:30am every Friday. My job below is set to run every minute.

    We’re all building lots of web apps nowadays, but you have lots of need for event-driven or scheduled background work. PCF may surprise you as an entirely suitable platform for those workloads.

  • Wait, THAT runs on Pivotal Cloud Foundry? Part 2 – TCP-routable services

    Wait, THAT runs on Pivotal Cloud Foundry? Part 2 – TCP-routable services

    Platform-as-a-Service products typically run web apps. That is, apps that accept HTTP traffic and listen on ports 80, 8080 or 443. As you survey the landscape today, you’ll find that’s still the case in the most popular public cloud application runtimes. That’s not a bad thing, but sometimes you have workloads with different routing needs. In this post, I’m going to demonstrate TCP Routing in Pivotal Cloud Foundry (PCF), and show Redis running directly in the platform.

    As a reminder, this is the 2nd post in a series about “unexpected” workloads running on PCF.

    About TCP Routing in PCF

    TCP Routing has been part of Cloud Foundry for two years now. Basically, TCP Routing lets your app handle traffic over non-HTTP TCP protocols. This is valuable for custom-built apps or packaged software that communicate with binary payloads or specialized transports.

    By default, custom-built apps are set to always listen on port 8080 in Cloud Foundry. The buildpack process (mentioned in part 1 of the series) configures that, although you can change this behavior. Even if your app does listen on port 8080, TCP Routing makes it easy to expose a non-HTTP port to the outside world via network address translation.

    Source: https://docs.cloudfoundry.org/adminguide/enabling-tcp-routing.html

    Assuming your Cloud Foundry admins configured TCP Routing in your environment(s), you can set up this type of per-app routing entirely via self-service.

    Deploying a TCP routable workload

    Instead of demonstrating with an app I wrote myself, I thought it’d be more fun to deploy a well-known software product. Enter Redis! Redis is a wildly-popular key-value store, and there are many ways to install it. One of the easiest options is the Docker image. Note that Redis typically exposes access over port 6379. When deploying Docker images to Cloud Foundry, the port defined in the EXPOSE directive is what’s actually exposed by Cloud Foundry app container. I didn’t know that until this week!

    After logging into my PCF environment, I ran the cf domains command to see what routable domains were available to me.

    I’ve got the “standard” domain for my regular web apps (here, apps.pcfone.io), a domain for TCP routing (tcp.apps.pcfone.io) and one for private traffic (apps.internal) that we’ll mess with shortly.

    I started by pushing a Redis image to PCF. I’m purposely using the –no-route command to ensure it doesn’t get a default web route in the apps.pcfone.io domain.

    cf push redisdocker --docker-image redis -i 1 -m 256M --no-route -u process

    After about ten seconds, the container is up and running. Notice however, that it’s currently not routable.

    Let’s change that. Now, because all apps sit behind the same edge router and TCP routes don’t have a path component, I can’t have two apps listening on the same TCP port. So, there’s a good chance that the default Redis port fo 6379 is already in use somewhere. That’s cool; we can tell PCF to assign a random port at the edge route that forwards traffic to port 6379 on the app container.

    cf map-route redisdocker tcp.apps.pcfone.io --random-port

    The result? I get a TCP route assigned on port 10011.

    Again, note that the app container is still listening on 6379, because that’s what was set by the Docker image at deploy time. But through network address translation, the external facing port is a different value. Let’s prove that Redis is actually running and addressable.

    I spun up the redis-cli and issued a command.

    Ok, clearly it’s reachable via the public Internet over a non-HTTP connection. That’s neat. I did a LITTLE more with Redis than that, by also adding and retrieving a key.

    With this pattern, my apps running in PCF (or anywhere) can send requests to PCF-hosted software that handles all kinds of payloads and protocols. But what if you don’t want these workloads to be Internet accessible?

    Setting up private TCP routing

    The above demo is cool, but you might not like having your cache, MQTT bus, or whatever, exposed to public traffic. This is where the relatively-new container-to-container networking is pretty darn neat.

    By default, app instances in Cloud Foundry talk to each other through the shared router. That’s not awful, but for performance reasons, or to access private services, you may want to communicate directly with another app container. With polyglot service discovery now part of PCF, it’s easy to do this via DNS, versus hard-coded container addresses. Let me show you.

    First, I removed the publicly-accessible TCP route from my Redis instance.

    Now, you can no longer reach it. Next up, I wanted to map my Redis instance to the apps.internal domain that’s ONLY accessible within a Cloud Foundry.

    cf map-route redisdocker apps.internal --hostname redisdocker

    Because we’re not dealing with any extra NAT action, I can directly hit Redis on port 6379. I built a Node.js app that connects to Redis, adds a key, and reads a key. I set the connection details to the internal domain and standard port.

    var options = {  host: "redisdocker.apps.internal",  port: 6379}
    var redis = require("redis"), client = redis.createClient(options);

    Then I pushed this app to PCF with a –no-start command so that I could set up connectivity between my app and Redis. Apps can’t automatically reach other apps on the apps.internal domain unless we give permission. It’s easy to do.  Via the Cloud Foundry CLI, I can create, delete, and list network policies. A network policy determines which apps can directly talk to each other (without going through the router), over which port and protocol.

    cf add-network-policy demo-app --destination-app redisdocker --protocol tcp --port 6379

    Notice that in that command, all I said was that one app (demo-app) could talk to another app (redisdocker). I didn’t have to map IP addresses, or anything like that. As app instances scale in and out, there’s no need to change the policies to reflect that. That’s a considerate UX.

    After executing the above command, my Node.js app (demo-app) could “see” the redisdocker app instance. And notice that I’ve allowed traffic to the default Redis port, 6379.

    With that policy in place, I loaded the Node.js app, and it directly routed requests over port 6379 to my Redis instance.

    Unlike most PaaS-like products, PCF offers TCP routing over non-HTTP channels. While you may still (wisely) choose to run certain workloads—clustered services, apps that need multiple IPs exposed per container, or workloads with complex persistence needs—in an environment outside of PCF, it’s useful to know that you can leverage PCF to host and orchestrate a wide variety of publicly or privately routable workloads. Keep an eye out tomorrow for the next post, where we investigate batch jobs.