This 6th article in a series on BizTalk Server 2006 R2 and Windows Communication Foundation (WCF) integration continues a focus on publishing WCF interfaces out of BizTalk Server. Specifically, this article looks at a collection of advanced capabilities around security, attachments, and transactions.
Security
BizTalk Server 2006 R2 supports a robust WCF security model that closely matches what a developer could manually build into a WCF service. The core, built-in security capability of BizTalk Server 2006 R2 is targeted towards authenticating users, not authorizing them. However, this article will demonstrate how to build role-based authorization into a WCF service endpoint.
Message Security
If an HTTP endpoint is being used, then message-based security is one of the simplest routes to take in order to secure your transmission. For this demonstration, a simple orchestration was created which accepts a “customer” and returns a “customer” with a new customer ID and updated status value.
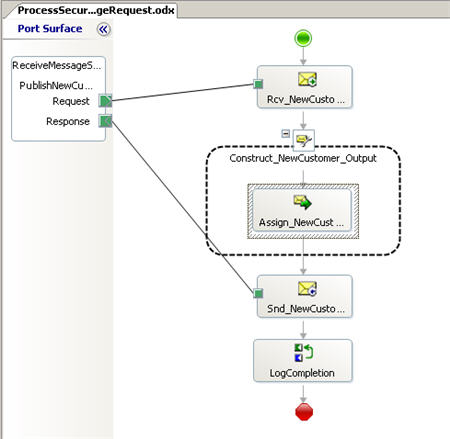
After building and deploying this orchestration, the BizTalk WCF Service Publishing Wizard was used to generate a WS-Http endpoint (with metadata).
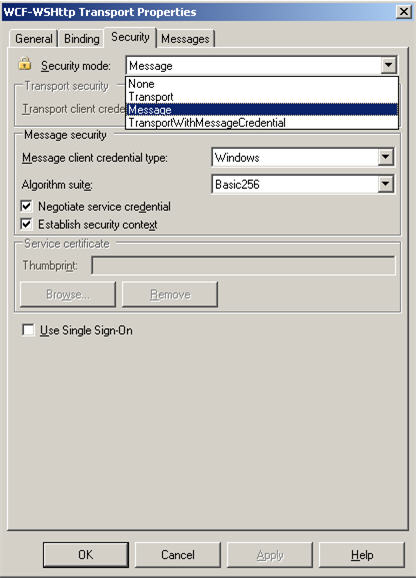
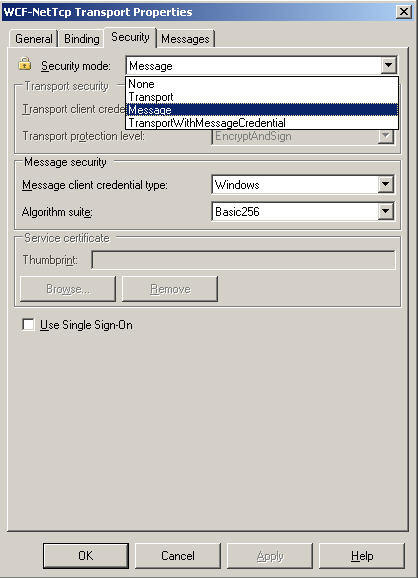
The BizTalk WCF Service Publishing Wizard does NOT prompt the user for their service security preference, so by default, all new services (and receive locations) are set with a “security mode” of “Message.”
The next step was to consume this service from a client application. After generating the useful metadata (proxy class, app.config file) from the svcutil.exe WCF tool, the client application was configured to call the above service. For demonstration purposes, both the receive location, and client binding file (don’t forget to change both!) were set to use a security mode of “None.” In order to observe the raw message traffic traveling between the client and the service, messaging logging was turned on in the client’s app.config file. So, all transmission details and messages will be written to a log file on disk. After the successful service call, the log can be read using the SvcTraceViewer application that comes with WCF.
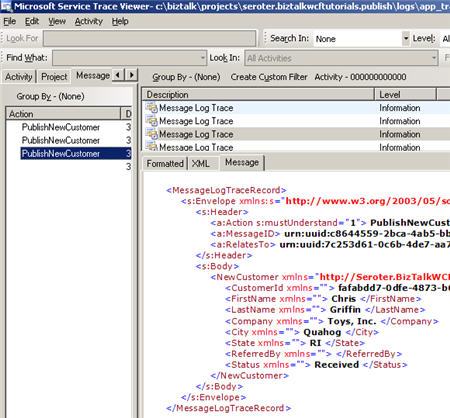
These results show the bare minimum of traffic flowing between client and service, and most importantly, that the message payload is being passed in the clear. What happens when message-based security is turned on both in the receive location and client configuration?
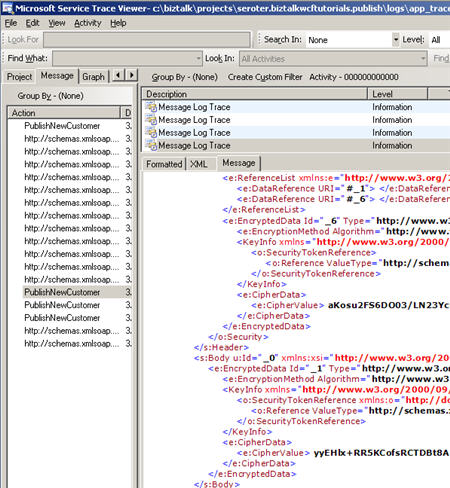
Notice a much chattier communication. There are security negotiations traveling between the client and service, and finally, the encrypted message payload (“CipherValue” above) is sent across the wire. The response value is also encrypted across the wire before the WCF layer decrypts it for the client.
As another test, a WCF-NetTcp receive location was added to the existing receive port, and it too was set up to use a “message” security scheme.
After adding a new endpoint address (and binding setup) to the client configuration, and pointing the client code to the new endpoint, the result was identical to the call to the HTTP-based endpoint. The trace log showed identical traffic between the client and service, and the client was met with a consistent experience regardless of transport binding being used.
Transport Security
In the HTTP world, transport security means applying an SSL certificate to the channel. The first step is to add a security certificate to the web site hosting the WCF service.
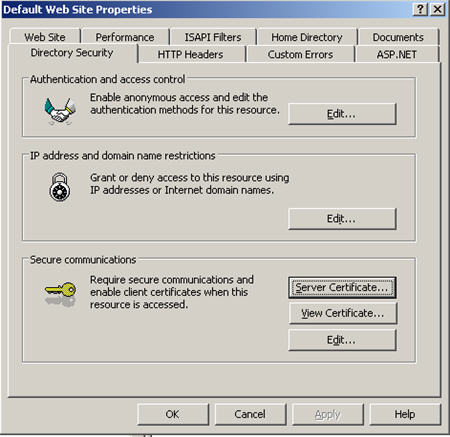
At this point, no other change is required to the actual IIS virtual directory holding the WCF service. A setting could be applied to require SSL communication, but that isn’t always necessary. For this demonstration, another orchestration was built that was virtually identical to the one used above. Once again, the BizTalk WCF Service Publishing Wizard was used to build a WCF-WSHttp endpoint (with metadata). Once the WCF is built, it’s necessary to go into the auto-generated web.config file and enable the HTTPS-specific settings. Specifically, the “httpsGetEnabled” value needs to be to set to “true”, and the “HttpsMexEndpoint” endpoint needs to be uncommented. Once set up correctly, the service can be “browsed” using the HTTPS prefix, and the help page shows an https prefix on the metadata-generation string.
![]()
The results in the SvcTraceViewer WCF tool look similar to the “no security” scenario above. This is because WCF isn’t doing any explicit security processing, but rather, simply sending the message across an already secured channel.
Service Authorization
The security demonstrations so far have highlighted ways to secure and authenticate data and users. However, what are the available options for authorizing the sender of the data itself? It’s great that the data arrived encrypted or over a secure channel, but how to introduce limits on who’s allowed to send data in the first place? Alas, out of the box, it seems there are no clear cut ways to perform any simple authorization (short of IIS directory permissions).
However, all is not lost. WCF has a strong extensibility model, so custom behaviors can be written to perform necessary actions along the transmission channel. For this article, a custom “role based authorization” behavior was written. After first showing how to build the behavior, this article will outline how to apply this behavior to a BizTalk receive location.
The first step is to build a new .NET class library and reference System.ServiceModel and System.Configuration. Next, create a class that inherits the ServiceAuthorizationManager object. Add a public constructor that takes in a string to hold the Windows Group that is allowed to access our service.
public class BizTalkCustomServiceAuthManager : ServiceAuthorizationManager
    {
        private string m_windowsgroup;
        public BizTalkCustomServiceAuthManager(string windowsgroup)
        {
            this.m_windowsgroup = windowsgroup;
        }
     }
Next, override the CheckAccessCore base operation so that a custom security implementation can be applied.
protected override bool CheckAccessCore(OperationContext operationContext)
        {
            //check that basic access is ok before checking our custom conditions
            if (!base.CheckAccessCore(operationContext))
            {
                return false;
            }
     //print out inbound identities recorded by WCF
     System.Diagnostics.Trace.WriteLine("Primary Identity is " +
  operationContext.ServiceSecurityContext.PrimaryIdentity.Name);
            System.Diagnostics.Trace.WriteLine("Windows Identity is " +
  operationContext.ServiceSecurityContext.WindowsIdentity.Name);
     //create Windows principal object from inbound Windows identity
            WindowsPrincipal p = new WindowsPrincipal(operationContext.ServiceSecurityContext.WindowsIdentity);
     //check user in role
            bool isAdmin = p.IsInRole(this.windowsgroup);
             if (!isAdmin)
            {
                return false;
            }
            return true;
        }
The code above creates a new WindowsPrincipal from the Windows Identity recorded by the WCF service. One could also try and access this via the System.Threading.Thread.CurrentPrincipal object, but in this demonstration, that value showed up empty. Also, it would be possible to pull out values from the ClaimSet that came into the service, but this example is meant to showcase a simple implementation scenario.
Next, a WCF behavior object must be created. Create a new class that implements the IServiceBehavior interface. This class also needs a constructor that takes in the Windows Group that will have access to the service using this behavior.
public class BizTalkCustomServiceBehavior : IServiceBehavior
    {
        private string m_windowsgroup;
        ///
        /// Store windows group defined in configuration
        ///
        ///
        public BizTalkCustomServiceBehavior(string windowsgroup)
        {
            this.m_windowsgroup = windowsgroup;
        }
Next, make sure that the “AddBindingParameters” and “Validate” operations of the interface don’t throw exceptions, or have any code contained within them. The “ApplyDispatchBehavior” is where this custom behavior is applied to the service.
public void ApplyDispatchBehavior(ServiceDescription serviceDescription, ServiceHostBase serviceHostBase)
        {
            ServiceAuthorizationBehavior authBehavior =
  serviceDescription.Behaviors.Find();
            //pass in Windows Group set during config setup
            authBehavior.ServiceAuthorizationManager = new BizTalkCustomServiceAuthManager(this.m_windowsgroup);
            ((IServiceBehavior)authBehavior).ApplyDispatchBehavior(serviceDescription, serviceHostBase);
        }
Almost there! If this behavior is to be used within the design time configuration (vs. being set up in code during host instantiation), a final object is needed. Create a class that inherits the BehaviorExtensionElement object.
public class BizTalkCustomBehaviorElement : BehaviorExtensionElement
    {
        ///
        /// Want custom config property to show up in the BizTalk receive location
        ///
        [ConfigurationProperty("windowsgroup", IsRequired = false, DefaultValue = "")]
        public string WindowsGroup
        {
            get { return (string)base["windowsgroup"]; }
            set { base["windowsgroup"] = value; }
        }

        protected override object CreateBehavior()
        {
            return new BizTalkCustomServiceBehavior(WindowsGroup);
        }
        public override Type BehaviorType
        {
            get
            {
                return typeof(BizTalkCustomServiceBehavior);
            }
        }
    }
Note that this class has a public property that uses the “ConfigurationProperty” attribute. This is what allows the Windows Group to be entered at design time. Otherwise, this behavior would have a hard-coded Windows Group, and thus a separate behavior would be needed for each receive location. Instead, the target Windows Group can be entered at design time, thus allowing this behavior to reused over and over.
Once this class is built and compiled, it must be entered into the machine’s Global Assembly Cache (GAC). Next, the machine.config of the host server has to be updated to point to this behavior.
The next step (after bouncing the host instances and restarting the Administration Console), is to create a new WCF-CustomIsolated receive location (or WCF-Custom to test in-process). The BizTalk WCF Service Publishing Wizard is used to build a new service from the orchestration, and the WCF-CustomIsolated adapter is used to build a receive location.
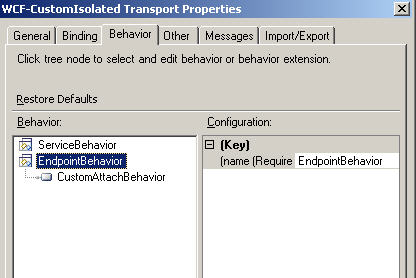
Now that a receive location exists using one of the custom WCF adapters, the custom behavior can be added. The standard WCF adapters (WCF-WSHttp, etc) do not allow users to add new behaviors. The custom adapters have a “behavior” tab, where the new service behavior can be referenced.
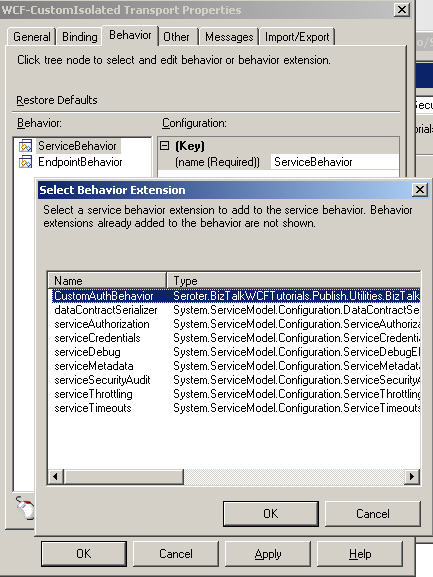
Once the behavior is selected, the custom property (“windows group”) is surfaced in the adapter configuration. A valid Windows Group is entered here.
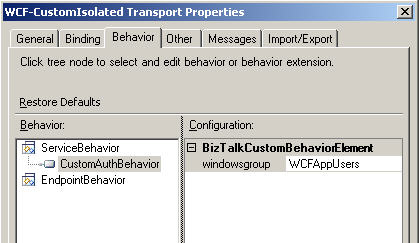
Now, if this service is called by a user in the Windows Group identified here, then the operation proceeds as expected. If however, the service is called by a Windows user that is NOT in the role identified above, their call is aborted and an “Access is Denied” message is returned.
Attachments
A previous article in this series (BizTalk and WCF: Part IV, Attachment Patterns) discussed the SOAP Message Transmission Optimization Mechanism (MTOM) and how it is used to compress the size of large data transferred over a SOAP channel. This demonstration looks at how to apply MTOM to a BizTalk WCF receive location.
First off, an orchestration was used to accept data and return a response. The schema (“EmployeeRecord”) used by the orchestration has a node named “Headshot” which stores an image of the employee being processed and is of type xsd:base64Binary. This orchestration accepts the EmployeeRecord schema, and also returns it. Within the orchestration, the “Headshot” value was loaded from a helper component which read a file and converted the corresponding byte array to a Base64String value. Once the orchestration was completed, the BizTalk WCF Service Publishing Wizard was used to build a new “custom isolated” BizTalk receive location. The WCF-CustomIsolated adapter was used so that there was more control over the behavior and binding of the endpoint.
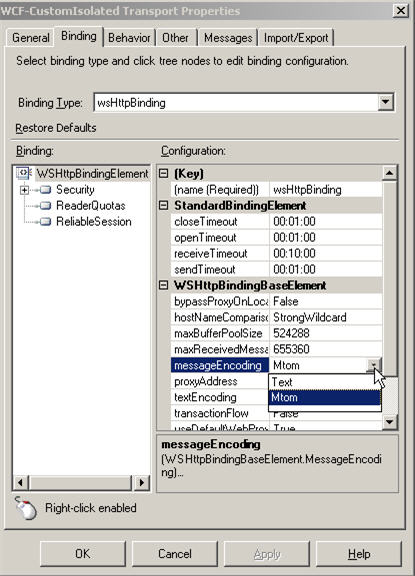
Turning on MTOM encoding within a receive location is quite simple. For the WCF-CustomIsolated receive location, the “Binding” tab has a “messageEncoding” property that can be set to either “Text” (the default value) or “Mtom.”
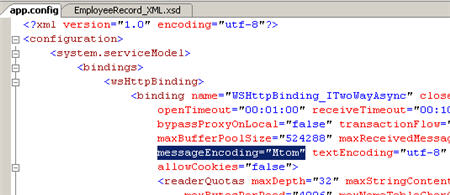
Recall that none of these configuration settings get included in the auto-generated WCF service (for HTTP-based services deployed to IIS). That is, one can change this setting, without having to modify the auto-generated service. When metadata is requested, the IIS-deployed service uses a custom HostFactory which to look up the receive location configurations and build the corresponding configuration file. For this demonstration, the svcutil.exe tool was used to generate a proxy class and configuration file for this service endpoint. The configuration file had the appropriate message encoding value already set.
During the first test scenario, only non-binary data was sent to the service, and the response message had the base64Binary schema node populated. In order to measure message size, the custom “message inspector” behavior created in the previous article (BizTalk and WCF: Part IV, Attachment Patterns) was applied to this WCF-CustomIsolated receive location.
This behavior captures the size of the response package and prints a trace statement. To see how the MTOM encoding was being applied, the TCPTrace tool was set up to monitor the raw traffic between the client application and the WCF service endpoint.
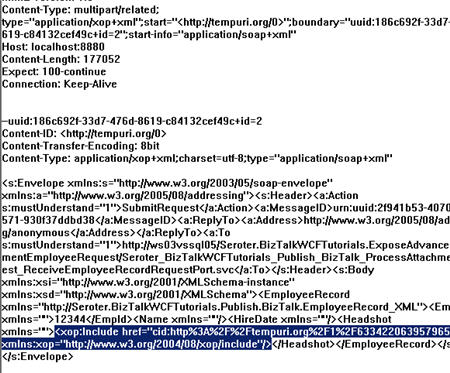
After the test was executed, it was clear that the WCF service did NOT attach the binary portion of the response message as a MIME attachment. The size of the response message was nearly 235KB for a 170KB file which is the expected size without MTOM encoding. Also, viewing TCPTrace, one can see that the “Headshot” node contains the fully inflated binary string instead of a reference to a MIME attachment.
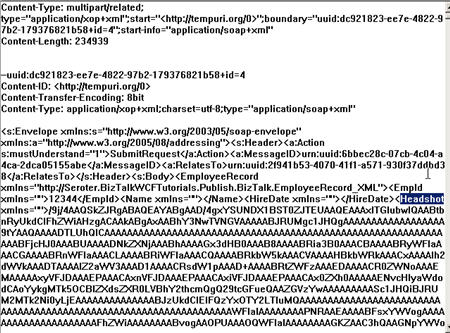
Notice the “Content-Type” which clearly identifies this as MTOM encoding. However, the XML payload contains the actual binary string.
In order to see if the BizTalk WCF adapter supports MTOM at all, the next test included SENDING binary data to the service as well as receiving it. When that test was executed, it was shown that the request message to a WCF service with MTOM turned on does in fact attach the binary portion of the XML message as an attachment.
So the assumption is, the MTOM usage for a BizTalk-exposed WCF endpoint only applies the encoding to the service request message, NOT the service response message. Interesting. This may be ok, given that many BizTalk use cases involve sending a large payload into BizTalk, while there are a limited set of scenarios where a synchronous service call into BizTalk is meant to return a large blob of data. However, this is still an obvious shortcoming, if indeed the behavior observed above is completely accurate. If this demonstration failed to take something into account,which caused this anomaly, please let me know in the comments below.
Transactions
Similar to the way that BizTalk Server 2006 R2 consumes transactional WCF services, BizTalk also has limited support for exposing transactional WCF services. Specifically, only one-way services can be designated as transactional when calling BizTalk. The transaction flows from the receive location to the MessageBox and goes no further. This makes sense given the publish-subscribe architecture of BizTalk that is currently in place. A subscriber (for example, an orchestration) is only engaged once a message is successfully committed to the MessageBox and the subscription can be fulfilled. So it would be impossible to have an orchestration pick up the request message, and send a response all in the same WCF transaction. By the time the orchestration has gotten the message, the transaction must have already been committed.
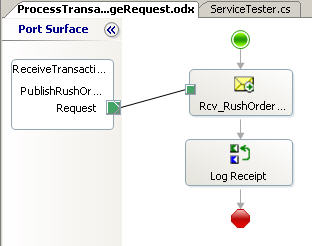
To test the WCF transaction support within BizTalk, an orchestration was built. This very simple process takes in a message, and prints out a trace statement. This basic orchestration will confirm whether or not the transaction was committed because if it fires and a trace statement is written, then this means the orchestration subscribed to the message committed to the MessageBox.
Now what if a transaction is sent and the receive location doesn’t expect it? In the client application, a reference to System.Transactions was added and the code calling the WCF service (exposed by BizTalk Server) was wrapped inside a TransactionScope object. However, neither the client binding nor the WCF endpoint are expecting this call to be wrapped inside a transaction object. The result? The process completes successfully. So sending a transaction when not expected doesn’t result in an exception.
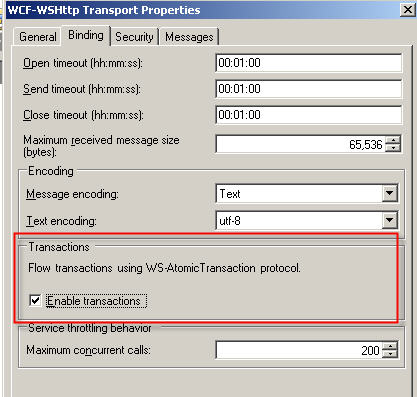
How about turning on transaction support in both the receive location and in the client binding, but not actually flowing a transaction? In the WCF-WSHttp receive location, the transaction flag resides on the “Binding” tab.
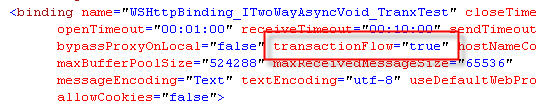
In the client application, the binding file was changed to flow transactions to the service.
If the TransactionScope was removed from the WCF service call by the client, the client throws an exception stating that “The service operation requires a transaction to be flowed”. You cannot call a WCF service expecting a transaction without actually flowing one.
If the TransactionScope is added back to the WCF service call by the client, then the call will STILL fail! What gives? When demonstrating the MTOM configuration settings earlier in the article, it was shown that these settings could be changed in the binding files and receive locations without regenerating any code. However, changing transaction settings is different. If the transaction setting on the receive location is changed, then the auto-generated proxy class must be generated. When the proxy is generated with the transaction setting turned off, the operation looks like this:

The interface operation has no transaction reference. However, if the transaction flag on the receive location is turned on, and this class regenerated, the operation looks like this:

Notice that now, there is a TransactionFlowAttribute that requires a transaction to flow to the service. Once this new proxy class replaces the old (non-transactional) one, the client can successfully submit to the service.
The client transaction is committed only when the TransactionScope object has the “Complete()” operation called. If this was omitted, then the transaction would be considered a failure and be rolled back. This can be tested by adding a MessageBox.Show command to the client application immediately following the WCF service call, and noticing that no trace statement is written by the orchestration while this window remains open. This is because the orchestration can’t see the message yet, because the transaction has committed and thus the message is not yet in the BizTalk MessageBox database. If the TransactionScope is aborted after the client alert is closed, then a trace statement is also not printed by the orchestration.
Obviously in future versions of BizTalk Server it would be valuable to have additional WCF transaction support. This includes flowing transactions to orchestration subscribers, and being able to set up robust processes that span a single transaction.
Summary
In this article, we’ve reviewed how to expose secure WCF services out of BizTalk Server 2006 R2 and highlighted a new way to do role based authorization based on Windows Groups. We’ve also covered BizTalk support for MTOM, and noticed that the response portion of a WCF request/response call does not appear to utilize the MTOM encoding, even for binary results. Finally, we covered BizTalk WCF adapter support for transactions, and considerations for turning that transaction flag on and off inside a receive location.
Once this entire BizTalk+WCF series is complete, I will make the entire source code available.
Questions, comments or corrections? Go ahead and leave a comment on my blog post about this article.
You can read more about BizTalk, SOA and enterprise architecture on my blog at https://seroter.wordpress.com.
